Gardestrike: mudanças entre as edições
(→Tier 2) |
|||
| (58 revisões intermediárias por 8 usuários não estão sendo mostradas) | |||
| Linha 75: | Linha 75: | ||
<center> | <center> | ||
{| class="wikitable" style="text-align:center" width=" | {| class="wikitable" style="text-align:center" width="65%;" | ||
|- | |- | ||
! scope="col" width=" | ! scope="col" width="10%" style="background-color: #F1C232"| <span style="color:black">Nº Dex</span> | ||
! scope="col" style="background-color: # | ! scope="col" style="background-color: #F1C232"| <span style="color:black">Ícone</span> | ||
! scope="col" width=" | ! scope="col" width="15%;" style="background-color: #F1C232"| <span style="color:black">Nome</span> | ||
! scope="col" style="background-color: # | ! scope="col" style="background-color: #F1C232"| <span style="color:black">Elementos</span> | ||
! scope="col" width=" | ! scope="col" width="15%;" style="background-color: #F1C232"| <span style="color:black">Função PvE</span> | ||
! scope="col" width=" | ! scope="col" width="15%;" style="background-color: #F1C232"| <span style="color:black">Função PvP</span> | ||
! scope="col" width="20%;" style="background-color: #F1C232"| <span style="color:black">Held Recomendado (PvP/PvE)</span> | |||
|- | |- | ||
| text-align:center;" | #143 | | text-align:center;" | #143 | ||
| Linha 88: | Linha 89: | ||
| text-align:center;" | [[Shiny Snorlax]] | | text-align:center;" | [[Shiny Snorlax]] | ||
| text-align:center;" | [[Arquivo:Normal1.png|link=]] | | text-align:center;" | [[Arquivo:Normal1.png|link=]] | ||
| width="10%" | [[Arquivo: | | width="10%" | [[Arquivo:Interface_BDD_PVE.png|24px|link=]] [[Arquivo:Interface_OTDD_PVE.png|24px|link=]] | ||
| width="10%" | [[Arquivo:Interface_Tanker_PVP.png|24px|link=]] | | width="10%" | [[Arquivo:Interface_Tanker_PVP.png|24px|link=]] | ||
| text-align:"center;" | [[file:Def7.png|Defense T7|link=]] [[file:Atk7.png|Attack T7|link=]] | |||
|} | |} | ||
</center> | </center> | ||
| Linha 96: | Linha 98: | ||
<center> | <center> | ||
{| class="wikitable" style="text-align:center" width=" | {| class="wikitable" style="text-align:center" width="65%;" | ||
|- | |- | ||
! scope="col" width=" | ! scope="col" width="10%" style="background-color: #F1C232"| <span style="color:black">Nº Dex</span> | ||
! scope="col" style="background-color: # | ! scope="col" style="background-color: #F1C232"| <span style="color:black">Ícone</span> | ||
! scope="col" width=" | ! scope="col" width="15%;" style="background-color: #F1C232"| <span style="color:black">Nome</span> | ||
! scope="col" style="background-color: # | ! scope="col" style="background-color: #F1C232"| <span style="color:black">Elementos</span> | ||
! scope="col" width=" | ! scope="col" width="15%;" style="background-color: #F1C232"| <span style="color:black">Função PvE</span> | ||
! scope="col" width=" | ! scope="col" width="15%;" style="background-color: #F1C232"| <span style="color:black">Função PvP</span> | ||
! scope="col" width="20%;" style="background-color: #F1C232"| <span style="color:black">Held Recomendado (PvP/PvE)</span> | |||
|- | |- | ||
| text-align:center;" | #128 | | text-align:center;" | #128 | ||
| Linha 109: | Linha 112: | ||
| text-align:center;" | [[Shiny Tauros]] | | text-align:center;" | [[Shiny Tauros]] | ||
| text-align:center;" | [[Arquivo:Normal1.png|link=]] | | text-align:center;" | [[Arquivo:Normal1.png|link=]] | ||
| width="10%" | [[Arquivo: | | width="10%" | [[Arquivo:Interface_BDD_PVE.png|24px|link=]] [[Arquivo:Interface_OTDD_PVE.png|24px|link=]] | ||
| width="10%" | [[Arquivo:Interface_Tanker_PVP.png|24px|link=]] | | width="10%" | [[Arquivo:Interface_Tanker_PVP.png|24px|link=]] | ||
| text-align:"center;" | [[file:Def7.png|Defense T7|link=]] [[file:Atk7.png|Attack T7|link=]] | |||
|} | |} | ||
</center> | </center> | ||
| Linha 117: | Linha 121: | ||
<center> | <center> | ||
{| class="wikitable sortable" style="text-align:center" width=" | {| class="wikitable sortable" style="text-align:center" width="65%;" | ||
! scope="col" width="10%" style="background-color: #F1C232"| <span style="color:black">Nº Dex</span> | |||
! scope="col" width=" | ! scope="col" style="background-color: #F1C232"| <span style="color:black">Ícone</span> | ||
! scope="col" style="background-color: # | ! scope="col" width="15%;" style="background-color: #F1C232"| <span style="color:black">Nome</span> | ||
! scope="col" width=" | ! scope="col" style="background-color: #F1C232"| <span style="color:black">Elementos</span> | ||
! scope="col" style="background-color: # | ! scope="col" width="15%;" style="background-color: #F1C232"| <span style="color:black">Função PvE</span> | ||
! scope="col" width=" | ! scope="col" width="15%;" style="background-color: #F1C232"| <span style="color:black">Função PvP</span> | ||
! scope="col" width=" | ! scope="col" width="20%;" style="background-color: #F1C232"| <span style="color:black">Held Recomendado (PvP/PvE)</span> | ||
|- | |- | ||
| text-align:center;" | #018 | | text-align:center;" | #018 | ||
| Linha 130: | Linha 134: | ||
| text-align:center;" | [[Shiny Pidgeot]] | | text-align:center;" | [[Shiny Pidgeot]] | ||
| text-align:center;" | [[Arquivo:Normal1.png|link=]] [[Arquivo:Flying.png|link=Wingeon]] | | text-align:center;" | [[Arquivo:Normal1.png|link=]] [[Arquivo:Flying.png|link=Wingeon]] | ||
| width="10%" | [[Arquivo: | | width="10%" | [[Arquivo:Interface_BDD_PVE.png|24px|link=]] | ||
| width="10%" | [[Arquivo:Interface_OffTank_PVP.png|24px|link=]] | | width="10%" | [[Arquivo:Interface_OffTank_PVP.png|24px|link=]] | ||
| text-align:"center;" | [[file:Def7.png|Defense T7|link=]] [[file:Atk7.png|Attack T7|link=]] | |||
|- | |- | ||
| text-align:center;" | #020 | | text-align:center;" | #020 | ||
| Linha 137: | Linha 142: | ||
| text-align:center;" | [[Alolan Raticate]] | | text-align:center;" | [[Alolan Raticate]] | ||
| text-align:center;" | [[Arquivo:Dark1.png|link=Malefic]] [[Arquivo:Normal1.png|link=]] | | text-align:center;" | [[Arquivo:Dark1.png|link=Malefic]] [[Arquivo:Normal1.png|link=]] | ||
| width="10%" | [[Arquivo: | | width="10%" | [[Arquivo:Interface_OTDD_PVE.png|24px|link=]] | ||
| width="10%" | [[Arquivo:Interface_OTDD_PVP.png|24px|link=]] | | width="10%" | [[Arquivo:Interface_OTDD_PVP.png|24px|link=]] | ||
| text-align:"center;" | [[file:Def7.png|Defense T7|link=]] [[file:Atk7.png|Attack T7|link=]] | |||
|- | |- | ||
| text-align:center;" | #068 | | text-align:center;" | #068 | ||
| Linha 144: | Linha 150: | ||
| text-align:center;" | [[Shiny Machamp]] | | text-align:center;" | [[Shiny Machamp]] | ||
| text-align:center;" | [[Arquivo:Fighting.png|link=]] | | text-align:center;" | [[Arquivo:Fighting.png|link=]] | ||
| width="10%" | [[Arquivo: | | width="10%" | [[Arquivo:Interface_BDD_PVE.png|24px|link=]] | ||
| width="10%" | [[Arquivo:Interface_OTDD_PVP.png|24px|link=]] | | width="10%" | [[Arquivo:Interface_OTDD_PVP.png|24px|link=]] | ||
| text-align:"center;" | [[file:Def7.png|Defense T7|link=]] [[file:Atk7.png|Attack T7|link=]] | |||
|- | |- | ||
| text-align:center;" | #083 | | text-align:center;" | #083 | ||
| Linha 151: | Linha 158: | ||
| text-align:center;" | [[Elite Farfetch'D]] | | text-align:center;" | [[Elite Farfetch'D]] | ||
| text-align:center;" | [[Arquivo:Normal1.png|link=]] [[Arquivo:Flying.png|link=Wingeon]] | | text-align:center;" | [[Arquivo:Normal1.png|link=]] [[Arquivo:Flying.png|link=Wingeon]] | ||
| width="10%" | [[Arquivo: | | width="10%" | [[Arquivo:Interface_OTDD_PVE.png|24px|link=]] | ||
| width="10%" | [[Arquivo:Interface_OTDD_PVP.png|24px|link=]] | | width="10%" | [[Arquivo:Interface_OTDD_PVP.png|24px|link=]] | ||
| text-align:"center;" | [[file:Def7.png|Defense T7|link=]] [[file:Atk7.png|Attack T7|link=]] | |||
|- | |- | ||
| text-align:center;" | #115 | | text-align:center;" | #115 | ||
| Linha 160: | Linha 168: | ||
| width="10%" | [[Arquivo:Not.png|link=]] | | width="10%" | [[Arquivo:Not.png|link=]] | ||
| width="10%" | [[Arquivo:Interface_OTDD_PVP.png|24px|link=]] | | width="10%" | [[Arquivo:Interface_OTDD_PVP.png|24px|link=]] | ||
| text-align:"center;" | [[file:Def7.png|Defense T7|link=]] | |||
|- | |- | ||
| text-align:center;" | #234 | | text-align:center;" | #234 | ||
| Linha 167: | Linha 176: | ||
| width="10%" | [[Arquivo:Not.png|link=]] | | width="10%" | [[Arquivo:Not.png|link=]] | ||
| width="10%" | [[Arquivo:Interface_Disrupter_PVP.png|24px|link=]] | | width="10%" | [[Arquivo:Interface_Disrupter_PVP.png|24px|link=]] | ||
| text-align:"center;" | [[file:Acc7.png|Accuracy T7|link=]] | |||
|- | |- | ||
| text-align:center;" | #130 | | text-align:center;" | #130 | ||
| Linha 172: | Linha 182: | ||
| text-align:center;" | [[Mega Blaziken]] | | text-align:center;" | [[Mega Blaziken]] | ||
| text-align:center;" | [[Arquivo:Fire.png|link=Volcanic]] [[Arquivo:Fighting.png|link=]] | | text-align:center;" | [[Arquivo:Fire.png|link=Volcanic]] [[Arquivo:Fighting.png|link=]] | ||
| width="10%" | [[Arquivo: | | width="10%" | [[Arquivo:Interface_OTDD_PVE.png|24px|link=]] | ||
| width="10%" | [[Arquivo:Interface_OffTank_PVP.png|24px|link=]] | | width="10%" | [[Arquivo:Interface_OffTank_PVP.png|24px|link=]] | ||
| text-align:"center;" | [[file:Def7.png|Defense T7|link=]] [[file:Atk7.png|Attack T7|link=]] | |||
|- | |- | ||
| text-align:center;" | #289 | | text-align:center;" | #289 | ||
| Linha 181: | Linha 192: | ||
| width="10%" | [[Arquivo:Not.png|link=]] | | width="10%" | [[Arquivo:Not.png|link=]] | ||
| width="10%" | [[Arquivo:Interface_OffTank_PVP.png|24px|link=]] | | width="10%" | [[Arquivo:Interface_OffTank_PVP.png|24px|link=]] | ||
| text-align:"center;" | [[file:Atk7.png|Attack T7|link=]] | |||
|- | |- | ||
| text-align:"center;" | #392 | | text-align:"center;" | #392 | ||
| Linha 186: | Linha 198: | ||
| text-align:"center;" | [[Shiny Infernape]] | | text-align:"center;" | [[Shiny Infernape]] | ||
| text-align:"center;" | [[Arquivo:Fire.png|link=Volcanic]] [[Arquivo:Fighting.png|link=Gardestrike]] | | text-align:"center;" | [[Arquivo:Fire.png|link=Volcanic]] [[Arquivo:Fighting.png|link=Gardestrike]] | ||
| text-align:"center;" | [[Arquivo: | | text-align:"center;" | [[Arquivo:Interface_OTDD_PVE.png|24px|link=]] | ||
| text-align:"center;" | [[Arquivo:Interface_OffTank_PVP.png|24px|link=]] | | text-align:"center;" | [[Arquivo:Interface_OffTank_PVP.png|24px|link=]] | ||
| text-align:"center;" | [[file:Atk7.png|Attack T7|link=]] | |||
|- | |- | ||
| text-align:center;" | #448 | | text-align:center;" | #448 | ||
| Linha 193: | Linha 206: | ||
| text-align:center;" | [[Mega Lucario]] | | text-align:center;" | [[Mega Lucario]] | ||
| text-align:center;" | [[Arquivo:Fighting.png|link=]] [[Arquivo:Steel.png|link=Ironhard]] | | text-align:center;" | [[Arquivo:Fighting.png|link=]] [[Arquivo:Steel.png|link=Ironhard]] | ||
| width="10%" | [[Arquivo: | | width="10%" | [[Arquivo:Interface_BDD_PVE.png|24px|link=]] | ||
| width="10%" | [[Arquivo:Interface_OffTank_PVP.png|24px|link=]] | | width="10%" | [[Arquivo:Interface_OffTank_PVP.png|24px|link=]] | ||
| text-align:"center;" | [[file:Atk7.png|Attack T7|link=]] | |||
|- | |- | ||
| text-align:center;" | #474 | | text-align:center;" | #474 | ||
| Linha 200: | Linha 214: | ||
| text-align:center;" | [[Porygon-Z]] | | text-align:center;" | [[Porygon-Z]] | ||
| text-align:center;" | [[Arquivo:Normal1.png|link=]] | | text-align:center;" | [[Arquivo:Normal1.png|link=]] | ||
| width="10%" | [[Arquivo: | | width="10%" | [[Arquivo:Interface_OTDD_PVE.png|24px|link=]] | ||
| width="10%" | [[Arquivo:Interface_Disrupter_PVP.png|24px|link=]] | | width="10%" | [[Arquivo:Interface_Disrupter_PVP.png|24px|link=]] | ||
| text-align:"center;" | [[file:Acc7.png|Accuracy T7|link=]] | |||
|- | |- | ||
| text-align:center;" | #475 | | text-align:center;" | #475 | ||
| text-align:center;" | [[Arquivo:475-Shiny_Gallade.png|link=Shiny Gallade]] | | text-align:center;" | [[Arquivo:475-Shiny_Gallade.png|link=Shiny Gallade]] | ||
| text-align:center;" | [[Shiny Gallade]]* | | text-align:center;" | '''[[Shiny Gallade]]'''* | ||
| text-align:center;" | [[Arquivo:Psychic.png|link=Psycraft]] [[Arquivo:Fighting.png|link=]] | | text-align:center;" | [[Arquivo:Psychic.png|link=Psycraft]] [[Arquivo:Fighting.png|link=]] | ||
| width="10%" | [[Arquivo: | | width="10%" | [[Arquivo:Interface_OTDD_PVE.png|24px|link=]] | ||
| width="10%" | [[Arquivo:Interface_OffTank_PVP.png|24px|link=]] | | width="10%" | [[Arquivo:Interface_OffTank_PVP.png|24px|link=]] | ||
| text-align:"center;" | [[file:Def7.png|Defense T7|link=]] [[file:Atk7.png|Attack T7|link=]] | |||
|- | |- | ||
| text-align:center;" | #531 | | text-align:center;" | #531 | ||
| Linha 214: | Linha 230: | ||
| text-align:center;" | [[Mega Audino]] | | text-align:center;" | [[Mega Audino]] | ||
| text-align:center;" | [[Arquivo:Normal1.png|link=]] [[Arquivo:Fairy.png|link=Psycraft]] | | text-align:center;" | [[Arquivo:Normal1.png|link=]] [[Arquivo:Fairy.png|link=Psycraft]] | ||
| width="10%" | [[Arquivo: | | width="10%" | [[Arquivo:Interface_BDD_PVE.png|24px|link=]] | ||
| width="10%" | [[Arquivo:Interface_Disrupter_PVP.png|24px|link=]] | | width="10%" | [[Arquivo:Interface_Disrupter_PVP.png|24px|link=]] | ||
| text-align:"center;" | [[file:Acc7.png|Accuracy T7|link=]] [[file:Atk7.png|Attack T7|link=]] | |||
|- | |- | ||
| text-align:center;" | #534 | | text-align:center;" | #534 | ||
| Linha 221: | Linha 238: | ||
| text-align:center;" | [[Conkeldurr]] | | text-align:center;" | [[Conkeldurr]] | ||
| text-align:center;" | [[Arquivo:Fighting.png|link=]] | | text-align:center;" | [[Arquivo:Fighting.png|link=]] | ||
| width="10%" | [[Arquivo: | | width="10%" |[[Arquivo:Interface_OTDD_PVE.png|24px|link=]] | ||
| width="10%" | [[Arquivo:Interface_Tanker_PVP.png|24px|link=]] | | width="10%" | [[Arquivo:Interface_Tanker_PVP.png|24px|link=]] | ||
| text-align:"center;" | [[file:Def7.png|Defense T7|link=]] [[file:Atk7.png|Attack T7|link=]] | |||
|- | |- | ||
|} | |} | ||
</center> | </center> | ||
'''*Observação:''' | '''*Observação:''' O Pokémon '''[[Shiny Gallade]]''' é exclusivo de outro clã no PvP. | ||
==Tier 1H== | ==Tier 1H== | ||
<center> | <center> | ||
{| class="wikitable" style="text-align:center" width=" | {| class="wikitable" style="text-align:center" width="65%;" | ||
|- | |- | ||
! scope="col" width=" | ! scope="col" width="10%" style="background-color: #F1C232"| <span style="color:black">Nº Dex</span> | ||
! scope="col" style="background-color: # | ! scope="col" style="background-color: #F1C232"| <span style="color:black">Ícone</span> | ||
! scope="col" width=" | ! scope="col" width="15%;" style="background-color: #F1C232"| <span style="color:black">Nome</span> | ||
! scope="col" style="background-color: # | ! scope="col" style="background-color: #F1C232"| <span style="color:black">Elementos</span> | ||
! scope="col" width=" | ! scope="col" width="15%;" style="background-color: #F1C232"| <span style="color:black">Função PvE</span> | ||
! scope="col" width=" | ! scope="col" width="15%;" style="background-color: #F1C232"| <span style="color:black">Função PvP</span> | ||
! scope="col" width="20%;" style="background-color: #F1C232"| <span style="color:black">Held Recomendado (PvE)</span> | |||
|- | |- | ||
| text-align:center;" | #297 | | text-align:center;" | #297 | ||
| Linha 247: | Linha 266: | ||
| width="10%" | [[Arquivo:Interface_BDD_PVE.png|24px|link=]] | | width="10%" | [[Arquivo:Interface_BDD_PVE.png|24px|link=]] | ||
| width="10%" | [[Arquivo:Not.png|link=]] | | width="10%" | [[Arquivo:Not.png|link=]] | ||
| text-align:"center;" | [[file:Atk7.png|Attack T7|link=]] | |||
|- | |||
| text-align:center;" | #620 | |||
| text-align:center;" | [[Arquivo:620-Shiny_Mienshao.png|link=Shiny Mienshao]] | |||
| text-align:center;" | [[Shiny Mienshao]] | |||
| text-align:center;" | [[Arquivo:Fighting.png|link=]] | |||
| width="10%" | [[Arquivo:Interface_BDD_PVE.png|24px|link=]] | |||
| width="10%" | [[Arquivo:Not.png|link=]] | |||
| text-align:"center;" | [[file:Atk7.png|Attack T7|link=]] | |||
|} | |} | ||
</center> | </center> | ||
| Linha 255: | Linha 283: | ||
<center> | <center> | ||
{| class="wikitable sortable" style="text-align:center" width=" | {| class="wikitable sortable" style="text-align:center" width="65%;" | ||
|- | |- | ||
! scope="col" width=" | ! scope="col" width="10%" style="background-color: #F1C232"| <span style="color:black">Nº Dex</span> | ||
! scope="col" style="background-color: # | ! scope="col" style="background-color: #F1C232"| <span style="color:black">Ícone</span> | ||
! scope="col" width=" | ! scope="col" width="15%;" style="background-color: #F1C232"| <span style="color:black">Nome</span> | ||
! scope="col" style="background-color: # | ! scope="col" style="background-color: #F1C232"| <span style="color:black">Elementos</span> | ||
! scope="col" width=" | ! scope="col" width="15%;" style="background-color: #F1C232"| <span style="color:black">Função PvE</span> | ||
! scope="col" width=" | ! scope="col" width="15%;" style="background-color: #F1C232"| <span style="color:black">Função PvP</span> | ||
! scope="col" width="20%;" style="background-color: #F1C232"| <span style="color:black">Held Recomendado (PvP/PvE)</span> | |||
|- | |- | ||
| | | text-align:center;" | #065 | ||
| | | text-align:center;" | [[Arquivo:62-Champion_Poliwrath.png|link=Champion Poliwrath]] | ||
| | | text-align:center;" | '''[[Champion Poliwrath]]'''* | ||
| | | text-align:center;" | [[Arquivo:Water.png|link=Seavell]] [[Arquivo:Fighting.png|link=]] | ||
| | | width="10%" | [[Arquivo:Not.png|link=]] | ||
| | | width="10%" | [[Arquivo:Interface_Tanker_PVP.png|24px|link=]] | ||
| text-align:"center;" | [[file:Def7.png|Defense T7|link=]] | |||
|- | |- | ||
| text-align:center;" | #106 | | text-align:center;" | #106 | ||
| Linha 277: | Linha 307: | ||
| width="10%" | [[Arquivo:Not.png|link=]] | | width="10%" | [[Arquivo:Not.png|link=]] | ||
| width="10%" | [[Arquivo:Interface_OTDD_PVP.png|24px|link=]] | | width="10%" | [[Arquivo:Interface_OTDD_PVP.png|24px|link=]] | ||
| text-align:"center;" | [[file:Def7.png|Defense T7|link=]] | |||
|- | |- | ||
| text-align:center;" | #107 | | text-align:center;" | #107 | ||
| Linha 284: | Linha 315: | ||
| width="10%" | [[Arquivo:Not.png|link=]] | | width="10%" | [[Arquivo:Not.png|link=]] | ||
| width="10%" | [[Arquivo:Interface_Tanker_PVP.png|24px|link=]] | | width="10%" | [[Arquivo:Interface_Tanker_PVP.png|24px|link=]] | ||
| text-align:"center;" | [[file:Def7.png|Defense T7|link=]] | |||
|- | |- | ||
| text-align:center;" | #143 | | text-align:center;" | #143 | ||
| Linha 291: | Linha 323: | ||
| width="10%" | [[Arquivo:Not.png|link=]] | | width="10%" | [[Arquivo:Not.png|link=]] | ||
| width="10%" | [[Arquivo:Interface_OffTank_PVP.png|24px|link=]] | | width="10%" | [[Arquivo:Interface_OffTank_PVP.png|24px|link=]] | ||
| text-align:"center;" | [[file:Def7.png|Defense T7|link=]] | |||
| text-align: | |||
|- | |- | ||
| text-align:center;" | #214 | | text-align:center;" | #214 | ||
| Linha 305: | Linha 331: | ||
| width="10%" | [[Arquivo:Not.png|link=]] | | width="10%" | [[Arquivo:Not.png|link=]] | ||
| width="10%" | [[Arquivo:Interface_OffTank_PVP.png|24px|link=]] | | width="10%" | [[Arquivo:Interface_OffTank_PVP.png|24px|link=]] | ||
| text-align:"center;" | [[file:Def7.png|Defense T7|link=]] | |||
|- | |- | ||
| text-align:center;" | #217 | | text-align:center;" | #217 | ||
| Linha 312: | Linha 339: | ||
| width="10%" | [[Arquivo:Not.png|link=]] | | width="10%" | [[Arquivo:Not.png|link=]] | ||
| width="10%" | [[Arquivo:Interface_BDD_PVP.png|24px|link=]] | | width="10%" | [[Arquivo:Interface_BDD_PVP.png|24px|link=]] | ||
| text-align:"center;" | [[file:Atk7.png|Attack T7|link=]] | |||
|- | |- | ||
| text-align:center;" | #235 | | text-align:center;" | #235 | ||
| Linha 319: | Linha 347: | ||
| width="10%" | [[Arquivo:Interface_BDD_PVE.png|24px|link=]] | | width="10%" | [[Arquivo:Interface_BDD_PVE.png|24px|link=]] | ||
| width="10%" | [[Arquivo:Not.png|link=]] | | width="10%" | [[Arquivo:Not.png|link=]] | ||
| text-align:"center;" | [[file:Atk7.png|Attack T7|link=]] | |||
|- | |- | ||
| text-align:center;" | #237 | | text-align:center;" | #237 | ||
| Linha 326: | Linha 355: | ||
| width="10%" | [[Arquivo:Interface_OffensiveTanker_pve.png|24px|link=]] | | width="10%" | [[Arquivo:Interface_OffensiveTanker_pve.png|24px|link=]] | ||
| width="10%" | [[Arquivo:Not.png|link=]] | | width="10%" | [[Arquivo:Not.png|link=]] | ||
| text-align:"center;" | [[file:Atk7.png|Attack T7|link=]] | |||
|- | |- | ||
| text-align:center;" | #242 | | text-align:center;" | #242 | ||
| Linha 333: | Linha 363: | ||
| width="10%" | [[Arquivo:Not.png|link=]] | | width="10%" | [[Arquivo:Not.png|link=]] | ||
| width="10%" | [[Arquivo:Interface_Disrupter_PVP.png|24px|link=]] [[Arquivo:Interface_Support_PVP.png|24px|link=]] | | width="10%" | [[Arquivo:Interface_Disrupter_PVP.png|24px|link=]] [[Arquivo:Interface_Support_PVP.png|24px|link=]] | ||
| text-align:"center;" | [[file:Acc7.png|Accuracy T7|link=]] | |||
|- | |- | ||
| text-align:center;" | #297 | | text-align:center;" | #297 | ||
| Linha 340: | Linha 371: | ||
| width="10%" | [[Arquivo:Not.png|link=]] | | width="10%" | [[Arquivo:Not.png|link=]] | ||
| width="10%" | [[Arquivo:Interface_Tanker_PVP.png|24px|link=]] | | width="10%" | [[Arquivo:Interface_Tanker_PVP.png|24px|link=]] | ||
| text-align:"center;" | [[file:Def7.png|Defense T7|link=]] | |||
|- | |||
| text-align:center;" | #308 | |||
| text-align:center;" | [[Arquivo:308-Mega_Medicham.png|link=Mega Medicham]] | |||
| text-align:center;" | [[Mega Medicham]] | |||
| text-align:center;" | [[Arquivo:Fighting.png|link=Gardestrike]] [[Arquivo:Psychic.png|link=]] | |||
| width="10%" | [[Arquivo:Not.png|link=]] | |||
| width="10%" | [[Arquivo:Interface_OTDD_PVP.png|24px|link=]] | |||
| text-align:"center;" | [[file:Def7.png|Defense T7|link=]] | |||
|- | |- | ||
| text-align:center;" | #392 | | text-align:center;" | #392 | ||
| Linha 347: | Linha 387: | ||
| width="10%" | [[Arquivo:Not.png|link=]] | | width="10%" | [[Arquivo:Not.png|link=]] | ||
| width="10%" | [[Arquivo:Interface_OTDD_PVP.png|24px|link=]] | | width="10%" | [[Arquivo:Interface_OTDD_PVP.png|24px|link=]] | ||
| text-align:"center;" | [[file:Def7.png|Defense T7|link=]] | |||
|- | |- | ||
| text-align:center;" | #428 | | text-align:center;" | #428 | ||
| Linha 354: | Linha 395: | ||
| width="10%" | [[Arquivo:Interface_OffensiveTanker_pve.png|24px|link=]] | | width="10%" | [[Arquivo:Interface_OffensiveTanker_pve.png|24px|link=]] | ||
| width="10%" | [[Arquivo:Not.png|link=]] | | width="10%" | [[Arquivo:Not.png|link=]] | ||
| text-align:"center;" | [[file:Atk7.png|Attack T7|link=]] | |||
|- | |- | ||
| text-align:center;" | #446 | | text-align:center;" | #446 | ||
| Linha 361: | Linha 403: | ||
| width="10%" | [[Arquivo:Not.png|link=]] | | width="10%" | [[Arquivo:Not.png|link=]] | ||
| width="10%" | [[Arquivo:Interface_OffTank_PVP.png|24px|link=]] | | width="10%" | [[Arquivo:Interface_OffTank_PVP.png|24px|link=]] | ||
| text-align:"center;" | [[file:Atk7.png|Attack T7|link=]] | |||
|- | |- | ||
| text-align:center;" | #454 | | text-align:center;" | #454 | ||
| Linha 368: | Linha 411: | ||
| width="10%" | [[Arquivo:Not.png|link=]] | | width="10%" | [[Arquivo:Not.png|link=]] | ||
| width="10%" | [[Arquivo:Interface_OffTank_PVP.png|24px|link=]] | | width="10%" | [[Arquivo:Interface_OffTank_PVP.png|24px|link=]] | ||
| text-align:"center;" | [[file:Def7.png|Defense T7|link=]] | |||
|- | |- | ||
| text-align:center;" | #463 | | text-align:center;" | #463 | ||
| Linha 375: | Linha 419: | ||
| width="10%" | [[Arquivo:Not.png|link=]] | | width="10%" | [[Arquivo:Not.png|link=]] | ||
| width="10%" | [[Arquivo:Interface_Tanker_PVP.png|24px|link=]] | | width="10%" | [[Arquivo:Interface_Tanker_PVP.png|24px|link=]] | ||
| text-align:"center;" | [[file:Def7.png|Defense T7|link=]] | |||
|- | |||
| text-align:center;" | #475 | |||
| text-align:center;" | [[Arquivo:475-Gallade.png|link=Gallade]] | |||
| text-align:center;" | '''[[Gallade]]'''* | |||
| text-align:center;" | [[Arquivo:Psychic.png|link=Psycraft]] [[Arquivo:Fighting.png|link=]] | |||
| width="10%" | [[Arquivo:Not.png|link=]] | |||
| width="10%" | [[Arquivo:Interface_OffTank_PVP.png|24px|link=]] | |||
| text-align:"center;" | [[file:Def7.png|Defense T7|link=]] | |||
|- | |- | ||
| text-align:center;" | #538 | | text-align:center;" | #538 | ||
| Linha 382: | Linha 435: | ||
| width="10%" | [[Arquivo:Interface_Tank_PVE.png|24px|link=]] | | width="10%" | [[Arquivo:Interface_Tank_PVE.png|24px|link=]] | ||
| width="10%" | [[Arquivo:Not.png|link=]] | | width="10%" | [[Arquivo:Not.png|link=]] | ||
| text-align:"center;" | [[file:Def7.png|Defense T7|link=]] | |||
|- | |- | ||
| text-align:center;" | #539 | | text-align:center;" | #539 | ||
| Linha 389: | Linha 443: | ||
| width="10%" | [[Arquivo:Interface_BDD_PVE.png|24px|link=]] | | width="10%" | [[Arquivo:Interface_BDD_PVE.png|24px|link=]] | ||
| width="10%" | [[Arquivo:Not.png|link]] | | width="10%" | [[Arquivo:Not.png|link]] | ||
| text-align:"center;" | [[file:Atk7.png|Attack T7|link=]] | |||
|- | |||
| text-align:center;" | #620 | |||
| text-align:center;" | [[Arquivo:620-Mienshao.png|link=Mienshao]] | |||
| text-align:center;" | [[Mienshao]] | |||
| text-align:center;" | [[Arquivo:Fighting.png|link=]] | |||
| width="10%" | [[Arquivo:Interface_OTDD_PVE.png|24px|link=]] | |||
| width="10%" | [[Arquivo:Not.png|link]] | |||
| text-align:"center;" | [[file:Atk7.png|Attack T7|link=]] | |||
|- | |||
| text-align:center;" | #628 | |||
| text-align:center;" | [[Arquivo:628-Braviary.png|link=Braviary]] | |||
| text-align:center;" | [[Braviary]] | |||
| text-align:center;" | [[Arquivo:Normal1.png|link=]] [[Arquivo:Flying.png|link=Wingeon]] | |||
| width="10%" | [[Arquivo:Interface_BDD_PVE.png|24px|link=]] | |||
| width="10%" | [[Arquivo:Not.png|link=]] | |||
| text-align:"center;" | [[file:Atk7.png|Attack T7|link=]] | |||
|- | |- | ||
| text-align:center;" | #668 | | text-align:center;" | #668 | ||
| Linha 396: | Linha 467: | ||
| width="10%" | [[Arquivo:Not.png|link=]] | | width="10%" | [[Arquivo:Not.png|link=]] | ||
| width="10%" | [[Arquivo:Interface_OffTank_PVP.png|24px|link=]] | | width="10%" | [[Arquivo:Interface_OffTank_PVP.png|24px|link=]] | ||
| text-align:"center;" | [[file:Def7.png|Defense T7|link=]] | |||
|- | |- | ||
| text-align:center;" | #668 | | text-align:center;" | #668 | ||
| Linha 402: | Linha 474: | ||
| text-align:center;" | [[Arquivo:Normal1.png|link=]] [[Arquivo:Fire.png|link=Volcanic]] | | text-align:center;" | [[Arquivo:Normal1.png|link=]] [[Arquivo:Fire.png|link=Volcanic]] | ||
| width="10%" | [[Arquivo:Interface_Tank_PVE.png|24px|link=]] | | width="10%" | [[Arquivo:Interface_Tank_PVE.png|24px|link=]] | ||
| width="10%" | [[Arquivo: | | width="10%" | [[Arquivo:Interface_Tanker_PVP.png|24px|link=]] | ||
| text-align:"center;" | [[file:Def7.png|Defense T7|link=]] | |||
|- | |- | ||
| text-align:center;" | #675 | | text-align:center;" | #675 | ||
| Linha 410: | Linha 483: | ||
| width="10%" | [[Arquivo:Not.png|link=]] | | width="10%" | [[Arquivo:Not.png|link=]] | ||
| width="10%" | [[Arquivo:Interface_BDD_PVP.png|24px|link=]] | | width="10%" | [[Arquivo:Interface_BDD_PVP.png|24px|link=]] | ||
| text-align:"center;" | [[file:Atk7.png|Attack T7|link=]] | |||
|- | |- | ||
| text-align:center;" | #335 | | text-align:center;" | #335 | ||
| Linha 417: | Linha 491: | ||
| width="10%" | [[Arquivo:Not.png|link=]] | | width="10%" | [[Arquivo:Not.png|link=]] | ||
| width="10%" | [[Arquivo:Interface_Disrupter_PVP.png|24px|link=]] | | width="10%" | [[Arquivo:Interface_Disrupter_PVP.png|24px|link=]] | ||
| text-align:"center;" | [[file:Acc7.png|Accuracy T7|link=]] | |||
|- | |||
| text-align:center;" | #865 | |||
| text-align:center;" | [[Arquivo:865-Sirfetch'd.png|link=Sirfetch'd]] | |||
| text-align:center;" | [[Sirfetch'd]] | |||
| text-align:center;" | [[Arquivo:Fighting.png|link=]] | |||
| width="10%" | [[Arquivo:Interface_BDD_PVE.png|24px|link=]] | |||
| width="10%" | [[Arquivo:Not.png|link=]] | |||
| text-align:"center;" | [[file:Atk7.png|Attack T7|link=]] | |||
|} | |} | ||
</center> | </center> | ||
'''*Observação:''' | '''*Observação:''' Os Pokémon '''[[Champion Poliwrath]]''' e '''[[Gallade]]''' são exclusivos de outros clãs no PvP. | ||
==Tier 3== | ==Tier 3== | ||
<center> | <center> | ||
{| class="wikitable sortable" style="text-align:center" width=" | {| class="wikitable sortable" style="text-align:center" width="65%;" | ||
|- | |- | ||
! scope="col" width=" | ! scope="col" width="10%" style="background-color: #F1C232"| <span style="color:black">Nº Dex</span> | ||
! scope="col" style="background-color: # | ! scope="col" style="background-color: #F1C232"| <span style="color:black">Ícone</span> | ||
! scope="col" width=" | ! scope="col" width="15%;" style="background-color: #F1C232"| <span style="color:black">Nome</span> | ||
! scope="col" style="background-color: # | ! scope="col" style="background-color: #F1C232"| <span style="color:black">Elementos</span> | ||
! scope="col" width=" | ! scope="col" width="15%;" style="background-color: #F1C232"| <span style="color:black">Função PvE</span> | ||
! scope="col" width=" | ! scope="col" width="15%;" style="background-color: #F1C232"| <span style="color:black">Função PvP</span> | ||
! scope="col" width="20%;" style="background-color: #F1C232"| <span style="color:black">Held Recomendado (PvP/PvE)</span> | |||
|- | |- | ||
| text-align:center;" | #018 | | text-align:center;" | #018 | ||
| Linha 439: | Linha 522: | ||
| text-align:center;" | [[Pidgeot]] | | text-align:center;" | [[Pidgeot]] | ||
| text-align:center;" | [[Arquivo:Normal1.png|link=]] [[Arquivo:Flying.png|link=Wingeon]] | | text-align:center;" | [[Arquivo:Normal1.png|link=]] [[Arquivo:Flying.png|link=Wingeon]] | ||
| width="10%" | [[Arquivo:Interface_BDD_PVE.png|24px|link=]] | |||
| width="10%" | [[Arquivo:Not.png|link=]] | | width="10%" | [[Arquivo:Not.png|link=]] | ||
| | | text-align:"center;" | [[file:Atk7.png|Attack T7|link=]] | ||
|- | |- | ||
| text-align:center;" | #040 | | text-align:center;" | #040 | ||
| Linha 448: | Linha 532: | ||
| width="10%" | [[Arquivo:Not.png|link=]] | | width="10%" | [[Arquivo:Not.png|link=]] | ||
| width="10%" | [[Arquivo:Interface_Disrupter_PVP.png|24px|link=]] | | width="10%" | [[Arquivo:Interface_Disrupter_PVP.png|24px|link=]] | ||
| text-align:"center;" | [[file:Acc7.png|Accuracy T7|link=]] | |||
|- | |- | ||
| text-align:center;" | #057 | | text-align:center;" | #057 | ||
| Linha 455: | Linha 540: | ||
| width="10%" | [[Arquivo:Interface_BDD_PVE.png|24px|link=]] | | width="10%" | [[Arquivo:Interface_BDD_PVE.png|24px|link=]] | ||
| width="10%" | [[Arquivo:Not.png]] | | width="10%" | [[Arquivo:Not.png]] | ||
| text-align:"center;" | [[file:Atk7.png|Attack T7|link=]] | |||
|- | |- | ||
| text-align:center;" | #062 | | text-align:center;" | #062 | ||
| Linha 460: | Linha 546: | ||
| text-align:center;" | [[Poliwrath]] | | text-align:center;" | [[Poliwrath]] | ||
| text-align:center;" | [[Arquivo:Water.png|link=Seavell]] [[Arquivo:Fighting.png|link=]] | | text-align:center;" | [[Arquivo:Water.png|link=Seavell]] [[Arquivo:Fighting.png|link=]] | ||
| width="10%" | [[Arquivo:Not.png|link=]] | | width="10%" | [[Arquivo:Not.png|link=]] | ||
| width="10%" | [[Arquivo:Interface_Disrupter_PVP.png|24px|link=]] | |||
| text-align:"center;" | [[file:Acc7.png|Accuracy T7|link=]] | |||
|- | |- | ||
| text-align:center;" | #068 | | text-align:center;" | #068 | ||
| Linha 467: | Linha 554: | ||
| text-align:center;" | [[Machamp]] | | text-align:center;" | [[Machamp]] | ||
| text-align:center;" | [[Arquivo:Fighting.png|link=]] | | text-align:center;" | [[Arquivo:Fighting.png|link=]] | ||
| width="10%" | [[Arquivo: | | width="10%" | [[Arquivo:Interface_BDD_PVE.png|24px|link=]] | ||
| width="10%" | [[Arquivo:Interface_OTDD_PVP.png|24px|link=]] | | width="10%" | [[Arquivo:Interface_OTDD_PVP.png|24px|link=]] | ||
| text-align:"center;" | [[file:Atk7.png|Attack T7|link=]] | |||
|- | |- | ||
| text-align:center;" | #115 | | text-align:center;" | #115 | ||
| Linha 476: | Linha 564: | ||
| width="10%" | [[Arquivo:Not.png|link=]] | | width="10%" | [[Arquivo:Not.png|link=]] | ||
| width="10%" | [[Arquivo:Interface_BDD_PVP.png|24px|link=]] | | width="10%" | [[Arquivo:Interface_BDD_PVP.png|24px|link=]] | ||
| text-align:"center;" | [[file:Atk7.png|Attack T7|link=]] | |||
|- | |- | ||
| text-align:center;" | #203 | | text-align:center;" | #203 | ||
| Linha 483: | Linha 572: | ||
| width="10%" | [[Arquivo:Not.png|link=]] | | width="10%" | [[Arquivo:Not.png|link=]] | ||
| width="10%" | [[Arquivo:Interface_OTDD_PVP.png|24px|link=]] | | width="10%" | [[Arquivo:Interface_OTDD_PVP.png|24px|link=]] | ||
| text-align:"center;" | [[file:Def7.png|Defense T7|link=]] | |||
|- | |- | ||
| text-align:center;" | #233 | | text-align:center;" | #233 | ||
| Linha 490: | Linha 580: | ||
| width="10%" | [[Arquivo:Not.png|link=]] | | width="10%" | [[Arquivo:Not.png|link=]] | ||
| width="10%" | [[Arquivo:Interface_BDD_PVP.png|24px|link=]] | | width="10%" | [[Arquivo:Interface_BDD_PVP.png|24px|link=]] | ||
| text-align:"center;" | [[file:Atk7.png|Attack T7|link=]] | |||
|- | |- | ||
| text-align:center;" | #235 | | text-align:center;" | #235 | ||
| Linha 497: | Linha 588: | ||
| width="10%" | [[Arquivo:Interface_BDD_PVE.png|24px|link=]] | | width="10%" | [[Arquivo:Interface_BDD_PVE.png|24px|link=]] | ||
| width="10%" | [[Arquivo:Not.png|link=]] | | width="10%" | [[Arquivo:Not.png|link=]] | ||
| text-align:"center;" | [[file:Atk7.png|Attack T7|link=]] | |||
|- | |- | ||
| text-align:center;" | #241 | | text-align:center;" | #241 | ||
| Linha 504: | Linha 596: | ||
| width="10%" | [[Arquivo:Not.png|link=]] | | width="10%" | [[Arquivo:Not.png|link=]] | ||
| width="10%" | [[Arquivo:Interface_Support_PVP.png|24px|link=]] | | width="10%" | [[Arquivo:Interface_Support_PVP.png|24px|link=]] | ||
| text-align:"center;" | [[file:Def7.png|Defense T7|link=]] | |||
|- | |- | ||
| text-align:center;" | #257 | | text-align:center;" | #257 | ||
| Linha 511: | Linha 604: | ||
| width="10%" | [[Arquivo:Not.png|link=]] | | width="10%" | [[Arquivo:Not.png|link=]] | ||
| width="10%" | [[Arquivo:Interface_OffTank_PVP.png|24px|link=]] | | width="10%" | [[Arquivo:Interface_OffTank_PVP.png|24px|link=]] | ||
| text-align:"center;" | [[file:Atk7.png|Attack T7|link=]] | |||
|- | |- | ||
| text-align:center;" | #277 | | text-align:center;" | #277 | ||
| Linha 518: | Linha 612: | ||
| width="10%" | [[Arquivo:Not.png|link=]] | | width="10%" | [[Arquivo:Not.png|link=]] | ||
| width="10%" | [[Arquivo:Interface_BDD_PVP.png|24px|link=]] | | width="10%" | [[Arquivo:Interface_BDD_PVP.png|24px|link=]] | ||
| text-align:"center;" | [[file:Atk7.png|Attack T7|link=]] | |||
|- | |- | ||
| text-align:center;" | #286 | | text-align:center;" | #286 | ||
| Linha 525: | Linha 620: | ||
| width="10%" | [[Arquivo:Not.png|link=]] | | width="10%" | [[Arquivo:Not.png|link=]] | ||
| width="10%" | [[Arquivo:Interface_BDD_PVP.png|24px|link=]] | | width="10%" | [[Arquivo:Interface_BDD_PVP.png|24px|link=]] | ||
| text-align:"center;" | [[file:Def7.png|Defense T7|link=]] | |||
|- | |- | ||
| text-align:center;" | #295 | | text-align:center;" | #295 | ||
| Linha 532: | Linha 628: | ||
| width="10%" | [[Arquivo:Not.png|link=]] | | width="10%" | [[Arquivo:Not.png|link=]] | ||
| width="10%" | [[Arquivo:Interface_Disrupter_PVP.png|24px|link=]] | | width="10%" | [[Arquivo:Interface_Disrupter_PVP.png|24px|link=]] | ||
| text-align:"center;" | [[file:Acc7.png|Accuracy T7|link=]] | |||
|- | |- | ||
| text-align:center;" | #308 | | text-align:center;" | #308 | ||
| Linha 539: | Linha 636: | ||
| width="10%" | [[Arquivo:Not.png|link=]] | | width="10%" | [[Arquivo:Not.png|link=]] | ||
| width="10%" | [[Arquivo:Interface_OTDD_PVP.png|24px|link=]] | | width="10%" | [[Arquivo:Interface_OTDD_PVP.png|24px|link=]] | ||
| text-align:"center;" | [[file:Acc7.png|Accuracy T7|link=]] | |||
|- | |- | ||
| text-align:center;" | #352 | | text-align:center;" | #352 | ||
| Linha 546: | Linha 644: | ||
| width="10%" | [[Arquivo:Not.png|link=]] | | width="10%" | [[Arquivo:Not.png|link=]] | ||
| width="10%" | [[Arquivo:Interface_Disrupter_PVP.png|24px|link=]] | | width="10%" | [[Arquivo:Interface_Disrupter_PVP.png|24px|link=]] | ||
| text-align:"center;" | [[file:Acc7.png|Accuracy T7|link=]] | |||
|- | |- | ||
| text-align:center;" | #424 | | text-align:center;" | #424 | ||
| Linha 553: | Linha 652: | ||
| width="10%" | [[Arquivo:Not.png|link=]] | | width="10%" | [[Arquivo:Not.png|link=]] | ||
| width="10%" | [[Arquivo:Interface_OTDD_PVP.png|24px|link=]] | | width="10%" | [[Arquivo:Interface_OTDD_PVP.png|24px|link=]] | ||
| text-align:"center;" | [[file:Atk7.png|Attack T7|link=]] | |||
|- | |- | ||
| text-align:center;" | #428 | | text-align:center;" | #428 | ||
| Linha 560: | Linha 660: | ||
| width="10%" | [[Arquivo:Not.png|link=]] | | width="10%" | [[Arquivo:Not.png|link=]] | ||
| width="10%" | [[Arquivo:Interface_Disrupter_PVP.png|24px|link=]] | | width="10%" | [[Arquivo:Interface_Disrupter_PVP.png|24px|link=]] | ||
| text-align:"center;" | [[file:Acc7.png|Accuracy T7|link=]] | |||
|- | |- | ||
| text-align:center;" | #432 | | text-align:center;" | #432 | ||
| Linha 567: | Linha 668: | ||
| width="10%" | [[Arquivo:Not.png|link=]] | | width="10%" | [[Arquivo:Not.png|link=]] | ||
| width="10%" | [[Arquivo:Interface_BDD_PVP.png|24px|link=]] | | width="10%" | [[Arquivo:Interface_BDD_PVP.png|24px|link=]] | ||
| text-align:"center;" | [[file:Atk7.png|Attack T7|link=]] | |||
|- | |- | ||
| text-align:center;" | #448 | | text-align:center;" | #448 | ||
| text-align:center;" | [[Arquivo:448-Lucario.png|link=Lucario]] | | text-align:center;" | [[Arquivo:448-Lucario.png|link=Lucario]] | ||
| text-align:center;" | [[Lucario]] | | text-align:center;" | [[Lucario]] | ||
| text-align:center;" | [[Arquivo:Fighting.png|link=]] [[Arquivo:Steel.png|link=Ironhard]] | | text-align:center;" | [[Arquivo:Fighting.png|link=]] [[Arquivo:Steel.png|link=Ironhard]] | ||
| width="10%" | [[Arquivo:Interface_BDD_PVE.png|24px|link=]] | | width="10%" | [[Arquivo:Interface_BDD_PVE.png|24px|link=]] | ||
| width="10%" | [[Arquivo:Not.png|link=]] | | width="10%" | [[Arquivo:Not.png|link=]] | ||
| text-align:"center;" | [[file:Atk7.png|Attack T7|link=]] | |||
|- | |- | ||
| text-align:center;" | #660 | | text-align:center;" | #660 | ||
| Linha 581: | Linha 684: | ||
| width="10%" | [[Arquivo:Not.png|link=]] | | width="10%" | [[Arquivo:Not.png|link=]] | ||
| width="10%" | [[Arquivo:Interface_Disrupter_PVP.png|24px|link=]] | | width="10%" | [[Arquivo:Interface_Disrupter_PVP.png|24px|link=]] | ||
| text-align:"center;" | [[file:Acc7.png|Accuracy T7|link=]] | |||
| text-align: | |||
|- | |- | ||
|} | |} | ||
</center> | </center> | ||
=Rotação Mid-Late Game= | |||
= | |||
<center> | <center> | ||
{| class="wikitable" style="text-align:center" width="50%;" | {| class="wikitable" style="text-align:center" width="50%;" | ||
|- | |- | ||
! colspan="4" scope="col" style="background-color: #8A0808| | ! colspan="4" scope="col" style="background-color: #8A0808| [[Arquivo:Fighting.png|link=]] Fighting | ||
|- | |- | ||
! scope="col" | <span style="color:black">Pokémon</span> | ! scope="col" | <span style="color:black">Pokémon</span> | ||
| Linha 623: | Linha 718: | ||
| text-align:"center;" | [[Arquivo:297-Shiny_Hariyama.png|link=Shiny Hariyama]] | | text-align:"center;" | [[Arquivo:297-Shiny_Hariyama.png|link=Shiny Hariyama]] | ||
| text-align:"center;" | [[Shiny Hariyama]] | | text-align:"center;" | [[Shiny Hariyama]] | ||
| text-align:"center;" | [[Arquivo:Interface_BDD_PVE.png|24px|link=]] | |||
| text-align:"center;" | 1H | |||
|- | |||
| text-align:"center;" | [[Arquivo:620-Shiny_Mienshao.png|link=Shiny Mienshao]] | |||
| text-align:"center;" | [[Shiny Mienshao]] | |||
| text-align:"center;" | [[Arquivo:Interface_BDD_PVE.png|24px|link=]] | | text-align:"center;" | [[Arquivo:Interface_BDD_PVE.png|24px|link=]] | ||
| text-align:"center;" | 1H | | text-align:"center;" | 1H | ||
| Linha 633: | Linha 733: | ||
| text-align:"center;" | [[Arquivo:865-Sirfetch'd.png|link=Sirfetch'd]] | | text-align:"center;" | [[Arquivo:865-Sirfetch'd.png|link=Sirfetch'd]] | ||
| text-align:"center;" | [[Sirfetch'd]] | | text-align:"center;" | [[Sirfetch'd]] | ||
| text-align:"center;" | [[Arquivo:Interface_BDD_PVE.png|25px|link=]] | |||
| text-align:"center;" | 3 | |||
|- | |||
| text-align:"center;" | [[Arquivo:068-Machamp.png|link=Machamp]] | |||
| text-align:"center;" | [[Machamp]] | |||
| text-align:"center;" | [[Arquivo:Interface_BDD_PVE.png|25px|link=]] | | text-align:"center;" | [[Arquivo:Interface_BDD_PVE.png|25px|link=]] | ||
| text-align:"center;" | 3 | | text-align:"center;" | 3 | ||
| Linha 642: | Linha 747: | ||
|} | |} | ||
</center> | </center> | ||
<center> | <center> | ||
{| class="wikitable" style="text-align:center" width="50%;" | {| class="wikitable" style="text-align:center" width="50%;" | ||
|- | |- | ||
! colspan="4" scope="col" style="background-color: #8A0808| | ! colspan="4" scope="col" style="background-color: #8A0808| [[Arquivo:Normal1.png|link=]] Normal | ||
|- | |- | ||
! scope="col" | <span style="color:black">Pokémon</span> | ! scope="col" | <span style="color:black">Pokémon</span> | ||
| Linha 659: | Linha 762: | ||
| text-align:"center;" | [[Arquivo:Interface_Tank_PVE.png|24px|link=]] | | text-align:"center;" | [[Arquivo:Interface_Tank_PVE.png|24px|link=]] | ||
| text-align:"center;" | 2 | | text-align:"center;" | 2 | ||
|} | |} | ||
</center> | </center> | ||
''' | '''Observação:''' Não há uma rotação Normal-type, visto que este não causa dano efetivo a nenhum outro elemento. O Pokémon '''[[Pyroar Female]]''' é o único deste elemento a desempenhar alguma função na rotação PvE. | ||
=Exclusividade do Clã no PvP= | =Exclusividade do Clã no PvP= | ||
| Linha 680: | Linha 773: | ||
{| class="wikitable" style="text-align:center" width="35%;" | {| class="wikitable" style="text-align:center" width="35%;" | ||
|- | |- | ||
! scope="col" width="5%;" style="background-color: #8A0808"| | ! scope="col" width="5%;" style="background-color: #8A0808"| Pokémon | ||
! scope="col" width="15%;" style="background-color: #8A0808"| | ! scope="col" width="15%;" style="background-color: #8A0808"| Nome | ||
! scope="col" width="15%;" style="background-color: #8A0808"| | ! scope="col" width="15%;" style="background-color: #8A0808"| Requer Rank 5 | ||
|- | |- | ||
| text-align:"center;" | [[Arquivo:020-AlolanRaticate.png|link=Alolan Raticate]] | | text-align:"center;" | [[Arquivo:020-AlolanRaticate.png|link=Alolan Raticate]] | ||
| Linha 707: | Linha 800: | ||
| text-align:"center;" | [[Mega Audino]] | | text-align:"center;" | [[Mega Audino]] | ||
| text-align:"center;" | [[Arquivo:Not.png|link=]] | | text-align:"center;" | [[Arquivo:Not.png|link=]] | ||
|- | |||
| text-align:"center;" | [[Arquivo:675-Pangoro.png|link=Pangoro]] | |||
| text-align:"center;" | [[Pangoro]] | |||
| text-align:"center;" | [[Arquivo:Not.png|link=]] | |||
|- | |||
| text-align:"center;" | [[Arquivo:Shiny_Infernape.png|link=Shiny Infernape]] | |||
| text-align:"center;" | [[Shiny Infernape]] | |||
| text-align:"center;" | [[Arquivo:Yep.png|link=]] | |||
|- | |- | ||
|} | |} | ||
| Linha 717: | Linha 818: | ||
*'''Shiny de Clã''' | *'''Shiny de Clã''' | ||
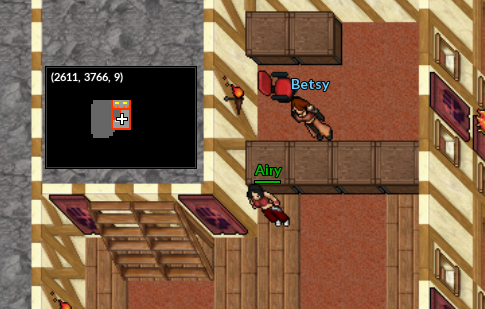
Para obter um [[Arquivo:237-EliteHitmontop.png|link=Elite Hitmontop]] '''[[Elite Hitmontop]]''', [[Arquivo:107-Hitmonchan.png|link=Elite Hitmonchan]] '''[[Elite Hitmonchan]]''' ou [[Arquivo:Elite_Hitmonlee.png|link=Elite Hitmonlee]] '''[[Elite Hitmonlee]]''', fale com a '''[[ | Para obter um [[Arquivo:237-EliteHitmontop.png|link=Elite Hitmontop]] '''[[Elite Hitmontop]]''', [[Arquivo:107-Hitmonchan.png|link=Elite Hitmonchan]] '''[[Elite Hitmonchan]]''' ou [[Arquivo:Elite_Hitmonlee.png|link=Elite Hitmonlee]] '''[[Elite Hitmonlee]]''', fale com a '''[[Pokémon_Obtidos_via_NPC#Shiny_de_Cl.C3.A3|NPC Betsy]]''' na área do clã Gardestrike, no Trade Center. | ||
<center> | <center> | ||
| Linha 728: | Linha 829: | ||
*'''Shiny de Clã da Nightmare World | *'''Shiny de Clã da Nightmare World | ||
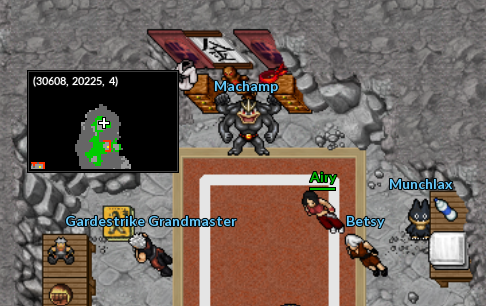
Para obter um [[Arquivo:446-ShinyMunchlax1.png|link=Shiny Munchlax]] '''[[Shiny Munchlax]]''', fale com a '''[[ | Para obter um [[Arquivo:446-ShinyMunchlax1.png|link=Shiny Munchlax]] '''[[Shiny Munchlax]]''', fale com a '''[[Pokémon_Obtidos_via_NPC#Shiny_de_Cl.C3.A3_da_Nightmare_World|NPC Betsy]]''' na área de Gardestrike, na resistência de Cerulean. | ||
<center> | <center> | ||
| Linha 748: | Linha 849: | ||
{| class="wikitable" style="text-align:center" width="30%;" | {| class="wikitable" style="text-align:center" width="30%;" | ||
|- | |- | ||
! colspan="3" scope="col" width="2%" style="background-color: #8A0808"| | ! colspan="3" scope="col" width="2%" style="background-color: #8A0808"| [[Arquivo:Fighting.png|link=]] Ofensivo | ||
|- | |- | ||
! scope="col" width="1%" | <span style="color:black">Dano</span> | ! scope="col" width="1%" | <span style="color:black">Dano</span> | ||
| Linha 795: | Linha 896: | ||
{| class="wikitable" style="text-align:center" width="30%;" | {| class="wikitable" style="text-align:center" width="30%;" | ||
|- | |- | ||
! colspan="3" scope="col" width="2%" style="background-color: #8A0808"| | ! colspan="3" scope="col" width="2%" style="background-color: #8A0808"| [[Arquivo:Fighting.png|link=]] Defensivo | ||
|- | |- | ||
! scope="col" width="1%" | <span style="color:black">Dano</span> | ! scope="col" width="1%" | <span style="color:black">Dano</span> | ||
| Linha 833: | Linha 934: | ||
{| class="wikitable" style="text-align:center" width="30%;" | {| class="wikitable" style="text-align:center" width="30%;" | ||
|- | |- | ||
! colspan="3" scope="col" width="2%" style="background-color: #8A0808"| | ! colspan="3" scope="col" width="2%" style="background-color: #8A0808"| [[Arquivo:Normal1.png|link=]] Ofensivo | ||
|- | |- | ||
! scope="col" width="1%" | <span style="color:black">Dano</span> | ! scope="col" width="1%" | <span style="color:black">Dano</span> | ||
| Linha 857: | Linha 958: | ||
{| class="wikitable" style="text-align:center" width="30%;" | {| class="wikitable" style="text-align:center" width="30%;" | ||
|- | |- | ||
! colspan="3" scope="col" width="2%" style="background-color: #8A0808"| | ! colspan="3" scope="col" width="2%" style="background-color: #8A0808"| [[Arquivo:Normal1.png|link=]] Defensivo | ||
|- | |- | ||
! scope="col" width="1%" | <span style="color:black">Dano</span> | ! scope="col" width="1%" | <span style="color:black">Dano</span> | ||
| Linha 882: | Linha 983: | ||
<center> | <center> | ||
{| class="wikitable" width="42%" | {| class="wikitable" width="42%" | ||
! colspan="2" width="50%" style="background-color: #8A0808" | | ! colspan="2" width="50%" style="background-color: #8A0808" | Rank 1 | ||
! colspan="2" width="50%" style="background-color: #8A0808" | | ! colspan="2" width="50%" style="background-color: #8A0808" | Rank 5 | ||
|- | |- | ||
| width="5%" align="center" | [[Arquivo:Gardestrike1_female.png|link=]] | | width="5%" align="center" | [[Arquivo:Gardestrike1_female.png|link=]] | ||
| Linha 894: | Linha 995: | ||
<center> | <center> | ||
{| class="wikitable" width="42%" | {| class="wikitable" width="42%" | ||
! colspan="2" width="50%" style="background-color: #8A0808" | | ! colspan="2" width="50%" style="background-color: #8A0808" | Master | ||
|- | |- | ||
| width="5%" align="center" | [[Arquivo:Gardestrike_fem.gif|link=]] | | width="5%" align="center" | [[Arquivo:Gardestrike_fem.gif|link=]] | ||
Edição atual tal como às 17h14min de 12 de maio de 2024
Caso encontre algum erro ou queira acrescentar alguma informação, entre em contato com um dos membros da wiki.
Introdução
Os membros deste clã são fortes. Sua força foi conquistada após um longo treinamento com Pokémon do tipo ![]() Normal e
Normal e ![]() Fighting.
Fighting.
Ranking
- Rank 1: Gardestrike Fist.
- Rank 2: Gardestrike Tamer.
- Rank 3: Gardestrike Fighter.
- Rank 4: Gardestrike Deathand.
- Rank 5: Gardestrike Champion.
Acesse a página de Tasks do clã Gardestrike para conferir os requisitos necessários em cada um dos Rankings.
Bônus de Clã
O bônus máximo do clã é aplicado ao completar as tarefas do Rank 5. Abaixo estão as porcentagens de bônus adquiridas:
![]() Normal: Atk 25%, Def 25%
Normal: Atk 25%, Def 25%
![]() Fighting: Atk 25%, Def 25%
Fighting: Atk 25%, Def 25%
Tiers
Tier é uma classificação comum entre os Pokémon, indicando não apenas a raridade deste dentro do jogo, mas também qual executará melhor uma função, contanto que a comparação seja realizada entre dois Pokémon de mesma função. O Tier e a Função de um Pokémon pode ser conferido na ![]() Pokédex (Atalho Shift + D). Caso deseje ler mais sobre, acesse a página Tier e Funções ou Tiers (listagem) para conferir a listagem de Tier de todos os Pokémon.
Pokédex (Atalho Shift + D). Caso deseje ler mais sobre, acesse a página Tier e Funções ou Tiers (listagem) para conferir a listagem de Tier de todos os Pokémon.
Para facilitar a leitura desta página, a tabela a seguir contém a legenda de todas as Funções, PvP e PvE disponíveis no jogo.
| Função PvE | Função PvP | ||
|---|---|---|---|
| Ícone | Função | Ícone | Função |
| Tank | Tank | ||
| Offensive Tank | Offensive Tank | ||
| Burst Damage Dealer | Burst Damage Dealer | ||
| Over Time Damage Dealer | Over Time Damage Dealer | ||
| Support Overtime | Support | ||
| - | Disrupter | ||
Abaixo estão listados todos os Pokémon do clã Gardestrike e suas respectivas funções, separados por Tier.
Tier 1A
| Nº Dex | Ícone | Nome | Elementos | Função PvE | Função PvP | Held Recomendado (PvP/PvE) |
|---|---|---|---|---|---|---|
| #143 | Shiny Snorlax |
Tier 1B
| Nº Dex | Ícone | Nome | Elementos | Função PvE | Função PvP | Held Recomendado (PvP/PvE) |
|---|---|---|---|---|---|---|
| #128 | Shiny Tauros |
Tier 1C
| Nº Dex | Ícone | Nome | Elementos | Função PvE | Função PvP | Held Recomendado (PvP/PvE) |
|---|---|---|---|---|---|---|
| #018 | Shiny Pidgeot | |||||
| #020 | Alolan Raticate | |||||
| #068 | Shiny Machamp | |||||
| #083 | Elite Farfetch'D | |||||
| #115 | Mega Kangaskhan | |||||
| #234 | Shiny Stantler | |||||
| #130 | Mega Blaziken | |||||
| #289 | Slaking | |||||
| #392 | Shiny Infernape | |||||
| #448 | Mega Lucario | |||||
| #474 | Porygon-Z | |||||
| #475 | Shiny Gallade* | |||||
| #531 | Mega Audino | |||||
| #534 | Conkeldurr |
*Observação: O Pokémon Shiny Gallade é exclusivo de outro clã no PvP.
Tier 1H
| Nº Dex | Ícone | Nome | Elementos | Função PvE | Função PvP | Held Recomendado (PvE) |
|---|---|---|---|---|---|---|
| #297 | Shiny Hariyama | |||||
| #620 | Shiny Mienshao |
Observação: Os Pokémon T1H tem força de T1C fora da Nightmare World e são acima dos T1C dentro dela ou pelo menos tem um diferencial perante os demais Pokémon. São balanceados exclusivamente para conteúdos PvE e não podem ser utilizados em duelos PvP.
Tier 2
| Nº Dex | Ícone | Nome | Elementos | Função PvE | Função PvP | Held Recomendado (PvP/PvE) |
|---|---|---|---|---|---|---|
| #065 | Champion Poliwrath* | |||||
| #106 | Elite Hitmonlee | |||||
| #107 | Elite Hitmonchan | |||||
| #143 | Snorlax | |||||
| #214 | Heracross | |||||
| #217 | Ursaring | |||||
| #235 | Smeargle 8 | |||||
| #237 | Elite Hitmontop | |||||
| #242 | Blissey | |||||
| #297 | Hariyama | |||||
| #308 | Mega Medicham | |||||
| #392 | Infernape | |||||
| #428 | Mega Lopunny | |||||
| #446 | Shiny Munchlax | |||||
| #454 | Toxicroak | |||||
| #463 | Lickilicky | |||||
| #475 | Gallade* | |||||
| #538 | Throh | |||||
| #539 | Sawk | |||||
| #620 | Mienshao | |||||
| #628 | Braviary | |||||
| #668 | Pyroar | |||||
| #668 | Pyroar Female | |||||
| #675 | Pangoro | |||||
| #335 | Zangoose | |||||
| #865 | Sirfetch'd |
*Observação: Os Pokémon Champion Poliwrath e Gallade são exclusivos de outros clãs no PvP.
Tier 3
| Nº Dex | Ícone | Nome | Elementos | Função PvE | Função PvP | Held Recomendado (PvP/PvE) |
|---|---|---|---|---|---|---|
| #018 | Pidgeot | |||||
| #040 | Wigglytuff | |||||
| #057 | Champion Primeape | |||||
| #062 | Poliwrath | |||||
| #068 | Machamp | |||||
| #115 | Kangaskhan | |||||
| #203 | Girafarig | |||||
| #233 | Porygon2 | |||||
| #235 | Smeargle 7 | |||||
| #241 | Miltank | |||||
| #257 | Blaziken | |||||
| #277 | Swellow | |||||
| #286 | Breloom | |||||
| #295 | Exploud | |||||
| #308 | Medicham | |||||
| #352 | Kecleon | |||||
| #424 | Ambipom | |||||
| #428 | Lopunny | |||||
| #432 | Purugly | |||||
| #448 | Lucario | |||||
| #660 | Diggersby |
Rotação Mid-Late Game
| Pokémon | Nome | Função | Tier |
|---|---|---|---|
| Throh | 2 | ||
| Mega Lopunny | 2 | ||
| Elite Hitmontop | 2 | ||
| Shiny Hariyama | 1H | ||
| Shiny Mienshao | 1H | ||
| Sawk | 2 | ||
| Sirfetch'd | 3 | ||
| Machamp | 3 | ||
| Champion Primeape | 3 | ||
| Pokémon | Nome | Função | Tier |
|---|---|---|---|
| Pyroar Female | 2 | ||
Observação: Não há uma rotação Normal-type, visto que este não causa dano efetivo a nenhum outro elemento. O Pokémon Pyroar Female é o único deste elemento a desempenhar alguma função na rotação PvE.
Exclusividade do Clã no PvP
| Pokémon | Nome | Requer Rank 5 |
|---|---|---|
| Alolan Raticate | ||
| Elite Hitmontop | ||
| Mega Kangaskhan | ||
| Infernape | ||
| Shiny Munchlax | ||
| Mega Audino | ||
| Pangoro | ||
| Shiny Infernape |
Observação: A exclusividade é aplicada apenas em conteúdos PvP. No PvE, o uso é liberado para todos os clãs.
Pokémon obtido via NPC de Clã
- Shiny de Clã
Para obter um ![]() Elite Hitmontop,
Elite Hitmontop, ![]() Elite Hitmonchan ou
Elite Hitmonchan ou ![]() Elite Hitmonlee, fale com a NPC Betsy na área do clã Gardestrike, no Trade Center.
Elite Hitmonlee, fale com a NPC Betsy na área do clã Gardestrike, no Trade Center.
- Shiny de Clã da Nightmare World
Para obter um ![]() Shiny Munchlax, fale com a NPC Betsy na área de Gardestrike, na resistência de Cerulean.
Shiny Munchlax, fale com a NPC Betsy na área de Gardestrike, na resistência de Cerulean.
Efetividade
Abaixo são apresentadas as efetividades dos Pokémon deste clã, considerando apenas aqueles que possuem um elemento. A efetividade pode mudar caso o Pokémon possua dois elementos ou possua alguma resistência à algum elemento, como é o caso da Mega Lopunny, que possui a passiva Tough Spirit, permitindo que ganhe resistência contra ataques do tipo Normal (0,5x).
A efetividade de um Pokémon pode ser conferida na ![]() Pokédex ou realizando uma busca na página Pokémon (uso do Ctrl+F recomendado).Clique no ícone do elemento desejado para conferir a tabela de efetividade deste clã.
Pokédex ou realizando uma busca na página Pokémon (uso do Ctrl+F recomendado).Clique no ícone do elemento desejado para conferir a tabela de efetividade deste clã.
![]() Fighting
Fighting
| Dano | Elemento | |
|---|---|---|
| 0x | ||
| Dano | Elemento | |
|---|---|---|
| 0x | - | |
![]() Normal
Normal
| Dano | Elemento | |
|---|---|---|
| - | ||
| 0x | ||
| Dano | Elemento | |
|---|---|---|
| - | ||
| 0x | ||
Mais informações poderão ser adquiridas acessando a página Efetividades.
Outfits Exclusivas
| Rank 1 | Rank 5 | ||
|---|---|---|---|

|

|

|

|
| Master | |
|---|---|

|
|