Psycraft: mudanças entre as edições
| (61 revisões intermediárias por 8 usuários não estão sendo mostradas) | |||
| Linha 1: | Linha 1: | ||
<center>[[file:Banner_Clã_Psycraft.png|link=]]<br></center> | |||
<br>'''Caso encontre algum erro ou queira acrescentar alguma informação, <span style="color:#F60303">entre em contato com um dos membros da wiki</span>.''' | |||
=Introdução= | =Introdução= | ||
Os membros deste clã são enigmáticos. Dizem que eles podem controlar a mente de Pokémon do tipo [[Arquivo:Psychic.png|link=]] Psychic e têm um forte vínculo com Pokémon do tipo [[Arquivo:Fairy.png|link=]] Fairy, que são muito afetuosos com seus mestres. | Os membros deste clã são enigmáticos. Dizem que eles podem controlar a mente de Pokémon do tipo [[Arquivo:Psychic.png|link=]] Psychic e têm um forte vínculo com Pokémon do tipo [[Arquivo:Fairy.png|link=]] Fairy, que são muito afetuosos com seus mestres. | ||
| Linha 17: | Linha 18: | ||
O bônus máximo do clã é aplicado ao completar as tarefas do '''Rank 5'''. Abaixo estão as porcentagens de bônus adquiridas: | O bônus máximo do clã é aplicado ao completar as tarefas do '''Rank 5'''. Abaixo estão as porcentagens de bônus adquiridas: | ||
[[Arquivo:Psychic.png|link=Psycraft]] '''Psychic:''' Atk 28%, Def 28% | [[Arquivo:Psychic.png|link=Psycraft]] '''Psychic:''' Atk 28%, Def 28% | ||
[[Arquivo:Fairy.png|link=Psycraft]] '''Fairy:''' Atk 28%, Def 28% | |||
[[Arquivo:Fairy.png|link=Psycraft]] '''Fairy:''' Atk 28%, Def 28% | |||
* É possível observar na [[Diamond Shop]], dentro do jogo, o bônus ofensivo e defensivo que cada clã recebe no ranking 5. | |||
* O bônus de ataque é aplicado aos movimentos do Pokémon. Se o jogador estiver usando um Pokémon de fora do seu clã, mas que execute um movimento do elemento do seu clã, o bônus de ataque ainda será concedido. | |||
=Tiers= | =Tiers= | ||
| Linha 29: | Linha 34: | ||
{| class="wikitable" style="text-align:center" width="50%;" | {| class="wikitable" style="text-align:center" width="50%;" | ||
|- | |- | ||
! colspan="2" scope="col" style="background-color: # | ! colspan="2" scope="col" style="background-color: #8A0808"| Função PvE | ||
! colspan="2" scope="col" style="background-color: # | ! colspan="2" scope="col" style="background-color: #8A0808"| Função PvP | ||
|- | |- | ||
! scope="col | ! scope="col" | <span style="color:black">Ícone</span> | ||
! scope="col | ! scope="col" | <span style="color:black">Função</span> | ||
! scope="col | ! scope="col" | <span style="color:black">Ícone</span> | ||
! scope="col | ! scope="col" | <span style="color:black">Função</span> | ||
|- | |- | ||
| text-align:"center;" | [[Arquivo:Interface_Tank_PVE.png|24px|link=]] | | text-align:"center;" | [[Arquivo:Interface_Tank_PVE.png|24px|link=]] | ||
| Linha 62: | Linha 67: | ||
| text-align:"center;" | Support | | text-align:"center;" | Support | ||
|- | |- | ||
| | | text-align:"center;" | [[Arquivo:Interface_Speedster_PVE.png|24px|link=]] | ||
| text-align:"center;" | Speedster | |||
| text-align:"center;" | [[Arquivo:Interface_Disrupter_PVP.png|24px|link=]] | | text-align:"center;" | [[Arquivo:Interface_Disrupter_PVP.png|24px|link=]] | ||
| text-align:"center;" | Disrupter | | text-align:"center;" | Disrupter | ||
| Linha 68: | Linha 74: | ||
</center> | </center> | ||
Abaixo estão listados todos os Pokémon do clã Psycraft e suas respectivas funções, separados por Tier. | Abaixo estão listados todos os Pokémon do clã '''Psycraft''' e suas respectivas funções, separados por Tier e com algumas recomendações de Held Itens. <br> | ||
<b>Observação:</b> A nossa lista de Helds Recomendados foi composta por colaboradores experientes da Wiki da PokeXGames e serve como sugestões de Held Itens para os Pokémon no âmbito do PvP e PvE, respectivamente. | |||
O jogador ainda tem toda a liberdade de testar e utilizar outros Helds que não esses, podendo personalizar seu Pokémon de um jeito diferente. Ressaltamos que em caso de alterações nos Pokémon, essa lista pode ser alterada e não será garantido que o Pokémon seja adicionado como opção no NPC Jorge.</br> | |||
<b>Observação:</b> Na listagem, o Held PvP sugerido é o primeiro, seguido pelo Held PvE. Caso o Pokémon utilize o mesmo Held Item nos 2 âmbitos, aparecerá listado somente 1 Held Item.</br> | |||
==Tier 1A== | ==Tier 1A== | ||
| Linha 119: | Linha 129: | ||
<center> | <center> | ||
{| class="wikitable sortable" style="text-align:center" width=" | {| class="wikitable sortable" style="text-align:center" width="65%;" | ||
|- | |- | ||
! scope="col" width=" | ! scope="col" width="10%" style="background-color: #F1C232"| <span style="color:black">Nº Dex</span> | ||
! scope="col" style="background-color: # | ! scope="col" style="background-color: #F1C232"| <span style="color:black">Ícone</span> | ||
! scope="col" width=" | ! scope="col" width="15%;" style="background-color: #F1C232"| <span style="color:black">Nome</span> | ||
! scope="col" style="background-color: # | ! scope="col" style="background-color: #F1C232"| <span style="color:black">Elementos</span> | ||
! scope="col" width=" | ! scope="col" width="15%;" style="background-color: #F1C232"| <span style="color:black">Função PvE</span> | ||
! scope="col" width=" | ! scope="col" width="15%;" style="background-color: #F1C232"| <span style="color:black">Função PvP</span> | ||
! scope="col" width="20%;" style="background-color: #F1C232"| <span style="color:black">Held Recomendado (PvP/PvE)</span> | |||
|- | |- | ||
| text-align:center;" | #038 | | text-align:center;" | #038 | ||
| Linha 134: | Linha 145: | ||
| width="10%" | [[Arquivo:Interface_BDD_PVE.png|24px|link=]] | | width="10%" | [[Arquivo:Interface_BDD_PVE.png|24px|link=]] | ||
| width="10%" | [[Arquivo:Interface_OffTank_PVP.png|24px|link=]] | | width="10%" | [[Arquivo:Interface_OffTank_PVP.png|24px|link=]] | ||
| text-align:"center;" | [[file:Atk7.png|Attack T7|link=]] | |||
|- | |- | ||
| text-align:center;" | #065 | | text-align:center;" | #065 | ||
| Linha 141: | Linha 153: | ||
| width="10%" | [[Arquivo:Not.png|link=]] | | width="10%" | [[Arquivo:Not.png|link=]] | ||
| width="10%" | [[Arquivo:Interface_Disrupter_PVP.png|24px|link=]] | | width="10%" | [[Arquivo:Interface_Disrupter_PVP.png|24px|link=]] | ||
| text-align:"center;" | [[file:Acc7.png|Accuracy T7|link=]] | |||
|- | |- | ||
| text-align:center;" | #122 | | text-align:center;" | #122 | ||
| Linha 148: | Linha 161: | ||
| width="10%" | [[Arquivo:Interface_OTDD_PVE.png|24px|link=]] | | width="10%" | [[Arquivo:Interface_OTDD_PVE.png|24px|link=]] | ||
| width="10%" | [[Arquivo:Interface_Disrupter_PVP.png|24px|link=]] | | width="10%" | [[Arquivo:Interface_Disrupter_PVP.png|24px|link=]] | ||
| text-align:"center;" | [[file:Acc7.png|Accuracy T7|link=]] [[file:Atk7.png|Attack T7|link=]] | |||
|- | |- | ||
| text-align:center;" | #124 | | text-align:center;" | #124 | ||
| Linha 155: | Linha 169: | ||
| width="10%" | [[Arquivo:Interface_BDD_PVE.png|24px|link=]] | | width="10%" | [[Arquivo:Interface_BDD_PVE.png|24px|link=]] | ||
| width="10%" | [[Arquivo:Interface_Disrupter_PVP.png|24px|link=]] | | width="10%" | [[Arquivo:Interface_Disrupter_PVP.png|24px|link=]] | ||
| text-align:"center;" | [[file:Acc7.png|Accuracy T7|link=]] [[file:Atk7.png|Attack T7|link=]] | |||
|- | |- | ||
| text-align:center;" | #178 | | text-align:center;" | #178 | ||
| Linha 162: | Linha 177: | ||
| width="10%" | [[Arquivo:Interface_OTDD_PVE.png|24px|link=]] | | width="10%" | [[Arquivo:Interface_OTDD_PVE.png|24px|link=]] | ||
| width="10%" | [[Arquivo:Interface_Disrupter_PVP.png|24px|link=]] | | width="10%" | [[Arquivo:Interface_Disrupter_PVP.png|24px|link=]] | ||
| text-align:"center;" | [[file:Acc7.png|Accuracy T7|link=]] [[file:Atk7.png|Attack T7|link=]] | |||
|- | |- | ||
| text-align:center;" | #196 | | text-align:center;" | #196 | ||
| Linha 169: | Linha 185: | ||
| width="10%" | [[Arquivo:Interface_BDD_PVE.png|24px|link=]] | | width="10%" | [[Arquivo:Interface_BDD_PVE.png|24px|link=]] | ||
| width="10%" | [[Arquivo:Interface_Disrupter_PVP.png|24px|link=]] | | width="10%" | [[Arquivo:Interface_Disrupter_PVP.png|24px|link=]] | ||
| text-align:"center;" | [[file:Acc7.png|Accuracy T7|link=]] [[file:Atk7.png|Attack T7|link=]] | |||
|- | |- | ||
| text-align:center;" | #210 | | text-align:center;" | #210 | ||
| Linha 176: | Linha 193: | ||
| width="10%" | [[Arquivo:Interface_OTDD_PVE.png|24px|link=]] | | width="10%" | [[Arquivo:Interface_OTDD_PVE.png|24px|link=]] | ||
| width="10%" | [[Arquivo:Interface_Tanker_PVP.png|24px|link=]] | | width="10%" | [[Arquivo:Interface_Tanker_PVP.png|24px|link=]] | ||
| text-align:"center;" | [[file:Def7.png|Defense T7|link=]] [[file:Atk7.png|Attack T7|link=]] | |||
|- | |- | ||
| text-align:center;" | #282 | | text-align:center;" | #282 | ||
| Linha 183: | Linha 201: | ||
| width="10%" | [[Arquivo:Not.png|link=]] | | width="10%" | [[Arquivo:Not.png|link=]] | ||
| width="10%" | [[Arquivo:Interface_Disrupter_PVP.png|24px|link=]] [[Arquivo:Interface_Support_PVP.png|24px|link=]] | | width="10%" | [[Arquivo:Interface_Disrupter_PVP.png|24px|link=]] [[Arquivo:Interface_Support_PVP.png|24px|link=]] | ||
| text-align:"center;" | [[file:Acc7.png|Accuracy T7|link=]] | |||
|- | |||
| text-align:"center;" | #303 | |||
| text-align:"center;" | [[Arquivo:303-MegaMawile.png|link=Mega Mawile]] | |||
| text-align:"center;" | '''[[Mega Mawile]]'''* | |||
| text-align:"center;" | [[Arquivo:Steel.png|link=]] [[Arquivo:Fairy.png|link=Psycraft]] | |||
| text-align:"center;" | [[Arquivo:Not.png|link=]] | |||
| text-align:"center;" | [[Arquivo:Interface_OffTank_PVP.png|24px|link=]] [[Arquivo:Interface_Support_PVP.png|24px|link=]] | |||
| text-align:"center;" | [[file:Def7.png|Defense T7|link=]] | |||
|- | |- | ||
| text-align:center;" | #334 | | text-align:center;" | #334 | ||
| Linha 188: | Linha 215: | ||
| text-align:center;" | [[Mega Altaria]] | | text-align:center;" | [[Mega Altaria]] | ||
| text-align:center;" | [[Arquivo:Dragon.png|link=Wingeon]] [[Arquivo:Fairy.png|link=]] | | text-align:center;" | [[Arquivo:Dragon.png|link=Wingeon]] [[Arquivo:Fairy.png|link=]] | ||
| width="10%" | [[Arquivo: | | width="10%" | [[Arquivo:Interface_BDD_PVE.png|24px|link=]] | ||
| width="10%" | [[Arquivo:Interface_Disrupter_PVP.png|24px|link=]] | | width="10%" | [[Arquivo:Interface_Disrupter_PVP.png|24px|link=]] | ||
| text-align:"center;" | [[file:Acc7.png|Accuracy T7|link=]] [[file:Atk7.png|Attack T7|link=]] | |||
|- | |||
| text-align:"center;" | #358 | |||
| text-align:"center;" | [[Arquivo:358-Mega_Chimecho.png|link=Mega Chimecho]] | |||
| text-align:"center;" | '''[[Mega Chimecho]]*''' | |||
| text-align:"center;" | [[Arquivo:Psychic.png|link=]] [[Arquivo:Steel.png|link=Ironhard]] | |||
| text-align:"center;" | [[Arquivo:Not.png|link=]] | |||
| text-align:"center;" | [[Arquivo:Interface_Disrupter_PVP.png|24px|link=]] | |||
| text-align:"center;" | [[file:Acc7.png|Accuracy T7|link=]] | |||
|- | |- | ||
| text-align:center;" | #376 | | text-align:center;" | #376 | ||
| Linha 197: | Linha 233: | ||
| width="10%" | [[Arquivo:Not.png|link=]] | | width="10%" | [[Arquivo:Not.png|link=]] | ||
| width="10%" | [[Arquivo:Interface_Tanker_PVP.png|24px|link=]] | | width="10%" | [[Arquivo:Interface_Tanker_PVP.png|24px|link=]] | ||
| text-align:"center;" | [[file:Def7.png|Defense T7|link=]] | |||
|- | |- | ||
| text-align:center;" | #437 | | text-align:center;" | #437 | ||
| Linha 204: | Linha 241: | ||
| width="10%" | [[Arquivo:Interface_BDD_PVE.png|24px|link=]] | | width="10%" | [[Arquivo:Interface_BDD_PVE.png|24px|link=]] | ||
| width="10%" | [[Arquivo:Interface_Disrupter_PVP.png|24px|link=]] | | width="10%" | [[Arquivo:Interface_Disrupter_PVP.png|24px|link=]] | ||
| text-align:"center;" | [[file:Acc7.png|Accuracy T7|link=]] [[file:Atk7.png|Attack T7|link=]] | |||
|- | |- | ||
| text-align:center;" | #475 | | text-align:center;" | #475 | ||
| Linha 211: | Linha 249: | ||
| width="10%" | [[Arquivo:Interface_OTDD_PVE.png|24px|link=]] | | width="10%" | [[Arquivo:Interface_OTDD_PVE.png|24px|link=]] | ||
| width="10%" | [[Arquivo:Interface_Tanker_PVP.png|24px|link=]] | | width="10%" | [[Arquivo:Interface_Tanker_PVP.png|24px|link=]] | ||
| text-align:"center;" | [[file:Def7.png|Defense T7|link=]] [[file:Atk7.png|Attack T7|link=]] | |||
|- | |||
| text-align:center;" | #475 | |||
| text-align:center;" | [[Arquivo:475-Mega_Gallade.png|link=Mega Gallade]] | |||
| text-align:center;" | [[Mega Gallade]] | |||
| text-align:center;" | [[Arquivo:Psychic.png|link=]] [[Arquivo:Fighting.png|link=Gardestrike]] | |||
| width="10%" | [[Arquivo:not.png|link=]] | |||
| width="10%" | [[Arquivo:Interface_OffTank_PVP.png|24px|link=]] | |||
| text-align:"center;" | [[file:Def7.png|Defense T7|link=]] [[file:Atk7.png|Attack T7|link=]] | |||
|- | |- | ||
| text-align:center;" | #475 | | text-align:center;" | #475 | ||
| Linha 218: | Linha 265: | ||
| width="10%" | [[Arquivo:Interface_BDD_PVE.png|24px|link=]] | | width="10%" | [[Arquivo:Interface_BDD_PVE.png|24px|link=]] | ||
| width="10%" | [[Arquivo:Interface_Disrupter_PVP.png|24px|link=]] | | width="10%" | [[Arquivo:Interface_Disrupter_PVP.png|24px|link=]] | ||
| text-align:"center;" | [[file:Acc7.png|Accuracy T7|link=]] [[file:Atk7.png|Attack T7|link=]] | |||
|- | |- | ||
| text-align:center;" | #655 | | text-align:center;" | #655 | ||
| Linha 225: | Linha 273: | ||
| width="10%" | [[Arquivo:Interface_OTDD_PVE.png|24px|link=]] | | width="10%" | [[Arquivo:Interface_OTDD_PVE.png|24px|link=]] | ||
| width="10%" | [[Arquivo:Interface_OTDD_PVP.png|24px|link=]] | | width="10%" | [[Arquivo:Interface_OTDD_PVP.png|24px|link=]] | ||
| text-align:"center;" | [[file:Atk7.png|Attack T7|link=]] | |||
|- | |||
| text-align:center;" | #899 | |||
| text-align:center;" | [[file:899 - Wyrdeer.png|link=Wyrdeer]] | |||
| text-align:center;" | [[Wyrdeer]] | |||
| text-align:center;" | [[Arquivo:Normal1.png|link=]] [[arquivo:Psychic.png|link=Psycraft]] | |||
| width="10%" | [[Arquivo:Interface_BDD_PVE.png|24px|link=]] | |||
| width="10%" | [[Arquivo:Interface_Tanker_PVP.png|24px|link=]] | |||
| text-align:"center;" | [[file:Atk7.png|Attack T7|link=]] [[file:Def7.png|Defense T7|link=]] | |||
|} | |||
</center> | |||
'''*Observação:''' Os Pokémon [[Arquivo:303-MegaMawile.png|link=Mega Mawile]] '''[[Mega Mawile]]''' , [[Arquivo:531-MegaAudino.png|link=Mega Audino]] '''[[Mega Audino]]''' e [[Arquivo:358-Mega_Chimecho.png|link=Mega Chimecho]] '''[[Mega Chimecho]]''' são exclusivos de outro clãs no PvP. | |||
==Technical Machine (TM)== | |||
<center> | |||
{| class="wikitable sortable" style="text-align:center" width="65%;" | |||
|- | |||
! scope="col" width="10%" style="background-color: #F1C232"| <span style="color:black">Nº Dex</span> | |||
! scope="col" style="background-color: #F1C232"| <span style="color:black">Ícone</span> | |||
! scope="col" width="15%;" style="background-color: #F1C232"| <span style="color:black">Nome</span> | |||
! scope="col" style="background-color: #F1C232"| <span style="color:black">Elementos</span> | |||
! scope="col" width="15%;" style="background-color: #F1C232"| <span style="color:black">Função PvE</span> | |||
! scope="col" width="15%;" style="background-color: #F1C232"| <span style="color:black">Função PvP</span> | |||
! scope="col" width="20%;" style="background-color: #F1C232"| <span style="color:black">Held Recomendado (PvE)</span> | |||
|- | |||
| text-align:"center;" | #065 | |||
| text-align:"center;" | [[Arquivo:065-MegaAlakazam.png|link=Mega Alakazam (TM)]] | |||
| text-align:"center;" | [[Mega Alakazam (TM)]] | |||
| text-align:"center;" | [[Arquivo: Psychic.png|link=]] | |||
| text-align:"center;" | [[Arquivo:Interface OTDD PVE.png|24px|link=]] | |||
| text-align:"center;" | [[Arquivo:not.png|link=]] | |||
| text-align:"center;" | [[file:Atk7.png|Attack T7|link=]] | |||
|- | |||
| text-align:"center;" | #210 | |||
| text-align:"center;" | [[Arquivo:Shiny granbull.png|link=Shiny Granbull (TM)]] | |||
| text-align:"center;" | [[Shiny Granbull (TM)]] | |||
| text-align:"center;" | [[Arquivo: Fairy.png|link=Psycraft]] | |||
| text-align:"center;" | [[Arquivo:Interface Tank PVE.png|24px|link=]] | |||
| text-align:"center;" | [[Arquivo:not.png|link=]] | |||
| text-align:"center;" | [[file:Def7.png|Defense T7|link=]] | |||
|- | |||
| text-align:"center;" | #282 | |||
| text-align:"center;" | [[Arquivo:282-MegaGardevoir.png|link=Mega Gardevoir (TM)]] | |||
| text-align:"center;" | [[Mega Gardevoir (TM)]] | |||
| text-align:"center;" | [[Arquivo: Fairy.png|link=Psycraft]] | |||
| text-align:"center;" | [[Arquivo:Interface OTDD PVE.png|24px|link=]] | |||
| text-align:"center;" | [[Arquivo:not.png|link=]] | |||
| text-align:"center;" | [[file:Atk7.png|Attack T7|link=]] | |||
|- | |||
| text-align:center;" | #334 | |||
| text-align:center;" | [[Arquivo:334-MegaAltaria.png|link=Mega Altaria Fairy (TM)]] | |||
| text-align:center;" | [[Mega Altaria Fairy (TM)]] | |||
| text-align:center;" | [[Arquivo:Fairy.png|link=]] | |||
| width="10%" | [[Arquivo:Interface_OffensiveTanker_pve.png|25px|link=]] | |||
| text-align:"center;" | [[Arquivo:not.png|link=]] | |||
| text-align:"center;"| [[file:Atk7.png|Attack T7|link=]] | |||
|- | |||
| text-align:center;" | #334 | |||
| text-align:center;" | [[Arquivo:334-MegaAltaria.png|link=Mega Altaria Dragon (TM)]] | |||
| text-align:center;" | [[Mega Altaria Dragon (TM)]] | |||
| text-align:center;" | [[arquivo:Dragon.png|link=Wingeon]] [[Arquivo:Fairy.png|link=]] | |||
| width="10%" | [[Arquivo:Interface OTDD PVE.png|24px|link=]] | |||
| text-align:"center;" | [[Arquivo:not.png|link=]] | |||
| text-align:"center;"| [[file:Atk7.png|Attack T7|link=]] | |||
|- | |||
| text-align:"center;" | #376 | |||
| text-align:"center;" | [[Arquivo:376-Metagross.png|link=Metragross (TM)]] | |||
| text-align:"center;" | [[Metagross (TM)]] | |||
| text-align:"center;" | [[Arquivo: Psychic.png|link=Psycraft]] [[arquivo:Steel.png|link=Ironhard]] | |||
| text-align:"center;" | [[Arquivo:Interface_BDD_PVE.png|24px|link=]] | |||
| text-align:"center;" | [[Arquivo:not.png|link=]] | |||
| text-align:"center;" | [[file:Atk7.png|Attack T7|link=]] | |||
|- | |||
| text-align:"center;" | #475 | |||
| text-align:"center;" | [[Arquivo:475-Shiny Gallade.png|link=Shiny Gallade (TM)]] | |||
| text-align:"center;" | [[Shiny Gallade (TM)]] | |||
| text-align:"center;" | [[Arquivo: Psychic.png|link=]] | |||
| text-align:"center;" | [[Arquivo:Interface OTDD PVE.png|24px|link=]] | |||
| text-align:"center;" | [[Arquivo:not.png|link=]] | |||
| text-align:"center;" | [[file:Atk7.png|Attack T7|link=]] | |||
|} | |||
</center> <br> | |||
{{#widget:container}} | |||
<table class="seeMore"> | |||
<tr> | |||
<td class="seeMore__image">[[Arquivo:Telekinetic-compass.gif|link=]]</td> | |||
<td> '''Saiba Mais: [[Technical Machine (TM)]]'''</td> | |||
</tr> | |||
</table> | |||
{{#widget:closecontainer}} | |||
==Technical Records (TR)== | |||
<center> | |||
{| class="wikitable sortable" style="text-align:center" width="65%;" | |||
|- | |||
! scope="col" width="10%" style="background-color: #F1C232"| <span style="color:black">Nº Dex</span> | |||
! scope="col" style="background-color: #F1C232"| <span style="color:black">Ícone</span> | |||
! scope="col" width="15%;" style="background-color: #F1C232"| <span style="color:black">Nome</span> | |||
! scope="col" style="background-color: #F1C232"| <span style="color:black">Elementos</span> | |||
! scope="col" width="15%;" style="background-color: #F1C232"| <span style="color:black">Função PvE</span> | |||
! scope="col" width="15%;" style="background-color: #F1C232"| <span style="color:black">Função PvP</span> | |||
! scope="col" width="20%;" style="background-color: #F1C232"| <span style="color:black">Held Recomendado (PvE)</span> | |||
|- | |||
| text-align:"center;" | #040 | |||
| text-align:"center;" | [[Arquivo:040-Wigglytuff.png|link=Wigglytuff (TR)]] | |||
| text-align:"center;" | [[Wigglytuff (TR)]] | |||
| text-align:"center;" | [[Arquivo:Normal1.png|link=]] [[Arquivo:Fairy.png|link=]] | |||
| text-align:"center;" | [[Arquivo:Interface BDD PVE.png|24px|link=]] | |||
| text-align:"center;" | [[Arquivo:not.png|link=]] | |||
| text-align:"center;" | [[file:Atk7.png|Attack T7|link=]] | |||
|- | |||
| text-align:"center;" | #199 | |||
| text-align:"center;" | [[Arquivo:199-Slowking.png|link=Slowking (TR)]] | |||
| text-align:"center;" | [[Slowking (TR)]] | |||
| text-align:"center;" | [[Arquivo:Water.png|link=]] [[Arquivo:Psychic.png|link=]] | |||
| text-align:"center;" | [[Arquivo:Interface BDD PVE.png|24px|link=]] | |||
| text-align:"center;" | [[Arquivo:not.png|link=]] | |||
| text-align:"center;" | [[file:Atk7.png|Attack T7|link=]] | |||
|- | |- | ||
|} | |} | ||
</center> | </center> | ||
''' | |||
{{#widget:container}} | |||
<table class="seeMore"> | |||
<tr> | |||
<td class="seeMore__image">[[Arquivo:Telekinetic-compass.gif|link=]]</td> | |||
<td> '''Saiba Mais: [[Technical Records (TR)]]'''</td> | |||
</tr> | |||
</table> | |||
{{#widget:closecontainer}} | |||
==Tier 1H== | ==Tier 1H== | ||
| Linha 242: | Linha 420: | ||
! scope="col" width="15%;" style="background-color: #F1C232"| <span style="color:black">Função PvP</span> | ! scope="col" width="15%;" style="background-color: #F1C232"| <span style="color:black">Função PvP</span> | ||
! scope="col" width="20%;" style="background-color: #F1C232"| <span style="color:black">Held Recomendado (PvE)</span> | ! scope="col" width="20%;" style="background-color: #F1C232"| <span style="color:black">Held Recomendado (PvE)</span> | ||
|- | |||
| text-align:center;" | #036 | |||
| text-align:center;" | [[Arquivo:036_-_Mega_Clefable.png|link=Mega Clefable]] | |||
| text-align:center;" | [[Mega Clefable]] | |||
| text-align:center;" | [[Arquivo:Fairy.png|link=]] [[Arquivo:Flying.png|link=Wingeon]] | |||
| width="10%" | [[Arquivo:Interface_BDD_PVE.png|24px|link=]] | |||
| width="10%" | [[Arquivo:Not.png|link=]] | |||
| text-align:"center;" | [[file:Atk7.png|Attack T7|link=]] | |||
|- | |||
| text-align:center;" | #121 | |||
| text-align:center;" | [[arquivo:121_-_Mega_Starmie.png|link=Mega Starmie]] | |||
| text-align:center;" | [[Mega Starmie]] | |||
| text-align:center;" | [[Arquivo:water.png|link=Seavell]] [[Arquivo:Psychic.png|link=]] | |||
| width="10%" | [[Arquivo:Interface_BDD_PVE.png|24px|link=]] | |||
| width="10%" | [[Arquivo:Not.png|link=]] | |||
| text-align:"center;" | [[file:Atk7.png|Attack T7|link=]] | |||
|- | |||
| text-align:center;" | #154 | |||
| text-align:center;" | [[arquivo:154_-_Mega_Meganium.png|link=Mega Meganium]] | |||
| text-align:center;" | [[Mega Meganium]] | |||
| text-align:center;" | [[Arquivo:Grass.png|link=Naturia]] [[Arquivo:Fairy.png|link=]] | |||
| width="10%" | [[Arquivo:Interface_BDD_PVE.png|24px|link=]] | |||
| width="10%" | [[Arquivo:Not.png|link=]] | |||
| text-align:"center;" | [[file:Atk7.png|Attack T7|link=]] | |||
|- | |- | ||
| text-align:center;" | #282 | | text-align:center;" | #282 | ||
| Linha 248: | Linha 450: | ||
| text-align:center;" | [[Arquivo:Fairy.png|link=]] | | text-align:center;" | [[Arquivo:Fairy.png|link=]] | ||
| width="10%" | [[Arquivo:Interface_BDD_PVE.png|24px|link=]] | | width="10%" | [[Arquivo:Interface_BDD_PVE.png|24px|link=]] | ||
| width="10%" | [[Arquivo:Not.png|link=]] | |||
| text-align:"center;" | [[file:Atk7.png|Attack T7|link=]] | |||
|- | |||
| text-align:center;" | #468 | |||
| text-align:center;" | [[Arquivo:468 - Shiny Togekiss.png|link=Shiny Togekiss]] | |||
| text-align:center;" | [[Shiny Togekiss]] | |||
| text-align:center;" | [[Arquivo:Fairy.png|link=]] | |||
| width="10%" | [[Arquivo:Interface_OTDD_PVE.png|24px|link=]] | |||
| width="10%" | [[Arquivo:Not.png|link=]] | | width="10%" | [[Arquivo:Not.png|link=]] | ||
| text-align:"center;" | [[file:Atk7.png|Attack T7|link=]] | | text-align:"center;" | [[file:Atk7.png|Attack T7|link=]] | ||
| Linha 261: | Linha 471: | ||
</center> | </center> | ||
''' | '''Observações:''' <br> | ||
* Os Pokémon T1H têm a força de T1C fora da [[Nightmare World]] e são acima dos T1C dentro dela ou pelo menos possuem um diferencial perante os demais Pokémon. São balanceados exclusivamente para conteúdos PvE e não podem ser utilizados em duelos PvP. <br> | |||
* [[arquivo:154_-_Mega_Meganium.png|link=Mega Meganium]] '''[[Mega Meganium]]''' possui seu moveset focado no tipo [[Arquivo:Grass.png|link=]] Grass.<br> | |||
==Tier 2== | ==Tier 2== | ||
<center> | <center> | ||
{| class="wikitable sortable" style="text-align:center" width=" | {| class="wikitable sortable" style="text-align:center" width="65%;" | ||
|- | |- | ||
! scope="col" width=" | ! scope="col" width="10%" style="background-color: #F1C232"| <span style="color:black">Nº Dex</span> | ||
! scope="col" style="background-color: # | ! scope="col" style="background-color: #F1C232"| <span style="color:black">Ícone</span> | ||
! scope="col" width=" | ! scope="col" width="15%;" style="background-color: #F1C232"| <span style="color:black">Nome</span> | ||
! scope="col" style="background-color: # | ! scope="col" style="background-color: #F1C232"| <span style="color:black">Elementos</span> | ||
! scope="col" width=" | ! scope="col" width="15%;" style="background-color: #F1C232"| <span style="color:black">Função PvE</span> | ||
! scope="col" width=" | ! scope="col" width="15%;" style="background-color: #F1C232"| <span style="color:black">Função PvP</span> | ||
! scope="col" width="20%;" style="background-color: #F1C232"| <span style="color:black">Held Recomendado (PvP/PvE)</span> | |||
|- | |- | ||
| text-align:center;" | #026 | | text-align:center;" | #026 | ||
| Linha 281: | Linha 494: | ||
| width="10%" | [[Arquivo:not.png|link=]] | | width="10%" | [[Arquivo:not.png|link=]] | ||
| width="10%" | [[Arquivo:Interface_BDD_PVP.png|24px|link=]] | | width="10%" | [[Arquivo:Interface_BDD_PVP.png|24px|link=]] | ||
| text-align:"center;" | [[file:Atk7.png|Attack T7|link=]] | |||
|- | |||
| text-align:center;" | #036 | |||
| text-align:center;" | [[Arquivo:036 - Shiny Clefable.png|link=Shiny Clefable]] | |||
| text-align:center;" | [[Shiny Clefable]] | |||
| text-align:center;" | [[Arquivo:Fairy.png|link=]] | |||
| width="10%" | [[Arquivo:not.png|link=]] | |||
| width="10%" | [[Arquivo:Interface Tanker PVP.png|24px|link=]] | |||
| text-align:"center;" | [[file:Def7.png|Defense T7|link=]] | |||
|- | |||
| text-align:center;" | #040 | |||
| text-align:center;" | [[Arquivo:040 - Shiny Wigglytuff.png|link=Shiny Wigglytuff]] | |||
| text-align:center;" | [[Shiny Wigglytuff]] | |||
| text-align:center;" | [[Arquivo:Fairy.png|link=]] | |||
| width="10%" | [[Arquivo:Interface_OTDD_PVE.png|24px|link=]] | |||
| width="10%" | [[Arquivo:Interface_BDD_PVP.png|24px|link=]] | |||
| text-align:"center;" | [[file:Atk7.png|Attack T7|link=]] | |||
|- | |- | ||
| text-align:center;" | #063 | | text-align:center;" | #063 | ||
| Linha 288: | Linha 518: | ||
| width="10%" | [[Arquivo:Not.png|link=]] | | width="10%" | [[Arquivo:Not.png|link=]] | ||
| width="10%" | [[Arquivo:Interface_Disrupter_PVP.png|24px|link=]] | | width="10%" | [[Arquivo:Interface_Disrupter_PVP.png|24px|link=]] | ||
| text-align:"center;" | [[file:Acc7.png|Accuracy T7|link=]] | |||
|- | |- | ||
| text-align:center;" | #065 | | text-align:center;" | #065 | ||
| Linha 295: | Linha 526: | ||
| width="10%" | [[Arquivo:Interface_BDD_PVE.png|24px|link=]] | | width="10%" | [[Arquivo:Interface_BDD_PVE.png|24px|link=]] | ||
| width="10%" | [[Arquivo:Not.png|link=]] | | width="10%" | [[Arquivo:Not.png|link=]] | ||
| text-align:"center;" | [[file:Atk7.png|Attack T7|link=]] | |||
|- | |- | ||
| text-align:center;" | #078 | | text-align:center;" | #078 | ||
| Linha 302: | Linha 534: | ||
| width="10%" | [[Arquivo:Interface_OffensiveTanker_pve.png|24px|link=]] | | width="10%" | [[Arquivo:Interface_OffensiveTanker_pve.png|24px|link=]] | ||
| width="10%" | [[Arquivo:Not.png|link=]] | | width="10%" | [[Arquivo:Not.png|link=]] | ||
| text-align:"center;" | [[file:Atk7.png|Attack T7|link=]] [[file:Def7.png|Defense T7|link=]] | |||
|- | |- | ||
| text-align:center;" | #080 | | text-align:center;" | #080 | ||
| Linha 309: | Linha 542: | ||
| width="10%" | [[Arquivo:Not.png|link=]] | | width="10%" | [[Arquivo:Not.png|link=]] | ||
| width="10%" | [[Arquivo:Interface_Disrupter_PVP.png|24px|link=]] | | width="10%" | [[Arquivo:Interface_Disrupter_PVP.png|24px|link=]] | ||
| text-align:"center;" | [[file:Acc7.png|Accuracy T7|link=]] | |||
|- | |- | ||
| text-align:center;" | #100 | | text-align:center;" | #100 | ||
| Linha 316: | Linha 550: | ||
| width="10%" | [[Arquivo:Not.png|link=]] | | width="10%" | [[Arquivo:Not.png|link=]] | ||
| width="10%" | [[Arquivo:Interface_Disrupter_PVP.png|24px|link=]] | | width="10%" | [[Arquivo:Interface_Disrupter_PVP.png|24px|link=]] | ||
| text-align:"center;" | [[file:Acc7.png|Accuracy T7|link=]] | |||
|- | |- | ||
| text-align:center;" | #103 | | text-align:center;" | #103 | ||
| Linha 323: | Linha 558: | ||
| width="10%" | [[Arquivo:Not.png|link=]] | | width="10%" | [[Arquivo:Not.png|link=]] | ||
| width="10%" | [[Arquivo:Interface_OffTank_PVP.png|24px|link=]] | | width="10%" | [[Arquivo:Interface_OffTank_PVP.png|24px|link=]] | ||
| text-align:"center;" | [[file:Acc7.png|Accuracy T7|link=]] | |||
|- | |- | ||
| text-align:center;" | #121 | | text-align:center;" | #121 | ||
| Linha 330: | Linha 566: | ||
| width="10%" | [[Arquivo:Not.png|link=]] | | width="10%" | [[Arquivo:Not.png|link=]] | ||
| width="10%" | [[Arquivo:Interface_OTDD_PVP.png|24px|link=]] | | width="10%" | [[Arquivo:Interface_OTDD_PVP.png|24px|link=]] | ||
| text-align:"center;" | [[file:Atk7.png|Attack T7|link=]] | |||
|- | |- | ||
| text-align:center;" | #124 | | text-align:center;" | #124 | ||
| Linha 337: | Linha 574: | ||
| width="10%" | [[Arquivo:Not.png|link=]] | | width="10%" | [[Arquivo:Not.png|link=]] | ||
| width="10%" | [[Arquivo:Interface_Disrupter_PVP.png|24px|link=]] | | width="10%" | [[Arquivo:Interface_Disrupter_PVP.png|24px|link=]] | ||
| text-align:"center;" | [[file:Acc7.png|Accuracy T7|link=]] | |||
|- | |- | ||
| text-align:center;" | #176 | | text-align:center;" | #176 | ||
| Linha 344: | Linha 582: | ||
| width="10%" | [[Arquivo:Not.png|link=]] | | width="10%" | [[Arquivo:Not.png|link=]] | ||
| width="10%" | [[Arquivo:Interface_Disrupter_PVP.png|24px|link=]] [[Arquivo:Interface_Support_PVP.png|24px|link=]] | | width="10%" | [[Arquivo:Interface_Disrupter_PVP.png|24px|link=]] [[Arquivo:Interface_Support_PVP.png|24px|link=]] | ||
| text-align:"center;" | [[file:Acc7.png|Accuracy T7|link=]] | |||
|- | |- | ||
| text-align:center;" | #184 | | text-align:center;" | #184 | ||
| Linha 351: | Linha 590: | ||
| width="10%" | [[Arquivo:Not.png|link=]] | | width="10%" | [[Arquivo:Not.png|link=]] | ||
| width="10%" | [[Arquivo:Interface_Tanker_PVP.png|link=]] | | width="10%" | [[Arquivo:Interface_Tanker_PVP.png|link=]] | ||
| text-align:"center;" | [[file:Def7.png|Defense T7|link=]] | |||
|- | |- | ||
| text-align:center;" | #199 | | text-align:center;" | #199 | ||
| Linha 358: | Linha 598: | ||
| width="10%" | [[Arquivo:Not.png|link=]] | | width="10%" | [[Arquivo:Not.png|link=]] | ||
| width="10%" | [[Arquivo:Interface_Disrupter_PVP.png|24px|link=]] | | width="10%" | [[Arquivo:Interface_Disrupter_PVP.png|24px|link=]] | ||
| text-align:"center;" | [[file:Acc7.png|Accuracy T7|link=]] | |||
|- | |- | ||
| text-align:center;" | #202 | | text-align:center;" | #202 | ||
| Linha 365: | Linha 606: | ||
| width="10%" | [[Arquivo:Interface_OffensiveTanker_pve.png|24px|link=]] | | width="10%" | [[Arquivo:Interface_OffensiveTanker_pve.png|24px|link=]] | ||
| width="10%" | [[Arquivo:Not.png|link=]] | | width="10%" | [[Arquivo:Not.png|link=]] | ||
| text-align:"center;" | [[file:Atk7.png|Attack T7|link=]] | |||
|- | |||
| text-align:center;" | #203 | |||
| text-align:center;" | [[Arquivo:203 - Shiny Girafarig.png|link=Shiny Girafarig]] | |||
| text-align:center;" | [[Shiny Girafarig]] | |||
| text-align:center;" | [[Arquivo:Normal1.png|link=Gardestrike]] [[Arquivo:Psychic.png|link=]] | |||
| width="10%" | [[Arquivo:Interface_Speedster_PVE.png|24px|link=]] | |||
| width="10%" | [[Arquivo:Interface_BDD_PVP.png|24px|link=]] | |||
| text-align:"center;" | [[file:Atk7.png|Attack T7|link=]] | |||
|- | |- | ||
| text-align:center;" | #282 | | text-align:center;" | #282 | ||
| Linha 372: | Linha 622: | ||
| width="10%" | [[Arquivo:Not.png|link=]] | | width="10%" | [[Arquivo:Not.png|link=]] | ||
| width="10%" | [[Arquivo:Interface_Disrupter_PVP.png|24px|link=]] [[Arquivo:Interface_Support_PVP.png|24px|link=]] | | width="10%" | [[Arquivo:Interface_Disrupter_PVP.png|24px|link=]] [[Arquivo:Interface_Support_PVP.png|24px|link=]] | ||
| text-align:"center;" | [[file:Acc7.png|Accuracy T7|link=]] [[file:Atk7.png|Attack T7|link=]] | |||
|- | |- | ||
| text-align:center;" | #308 | | text-align:center;" | #308 | ||
| Linha 379: | Linha 630: | ||
| width="10%" | [[Arquivo:Not.png|link=]] | | width="10%" | [[Arquivo:Not.png|link=]] | ||
| width="10%" | [[Arquivo:Interface_OTDD_PVP.png|24px|link=]] | | width="10%" | [[Arquivo:Interface_OTDD_PVP.png|24px|link=]] | ||
| text-align:"center;" | [[file:Def7.png|Defense T7|link=]] | |||
|- | |- | ||
| text-align:center;" | #326 | | text-align:center;" | #326 | ||
| Linha 386: | Linha 638: | ||
| width="10%" | [[Arquivo:Interface_Tank_PVE.png|24px|link=]] | | width="10%" | [[Arquivo:Interface_Tank_PVE.png|24px|link=]] | ||
| width="10%" | [[Arquivo:Not.png|link=]] | | width="10%" | [[Arquivo:Not.png|link=]] | ||
| text-align:"center;" | [[file:Def7.png|Defense T7|link=]] | |||
|- | |- | ||
| text-align:center;" | #375 | | text-align:center;" | #375 | ||
| Linha 393: | Linha 646: | ||
| width="10%" | [[Arquivo:Not.png|link=]] | | width="10%" | [[Arquivo:Not.png|link=]] | ||
| width="10%" | [[Arquivo:Interface_OffTank_PVP.png|24px|link=]] | | width="10%" | [[Arquivo:Interface_OffTank_PVP.png|24px|link=]] | ||
| text-align:"center;" | [[file:Def7.png|Defense T7|link=]] | |||
|- | |- | ||
| text-align:center;" | #437 | | text-align:center;" | #437 | ||
| Linha 400: | Linha 654: | ||
| width="10%" | [[Arquivo:Interface_BDD_PVE.png|24px|link=]] | | width="10%" | [[Arquivo:Interface_BDD_PVE.png|24px|link=]] | ||
| width="10%" | [[Arquivo:Not.png|link=]] | | width="10%" | [[Arquivo:Not.png|link=]] | ||
| text-align:"center;" | [[file:Atk7.png|Attack T7|link=]] | |||
|- | |- | ||
| text-align:center;" | #468 | | text-align:center;" | #468 | ||
| Linha 407: | Linha 662: | ||
| width="10%" | [[Arquivo:Interface_OTDD_PVE.png|24px|link=]] | | width="10%" | [[Arquivo:Interface_OTDD_PVE.png|24px|link=]] | ||
| width="10%" | [[Arquivo:Interface_BDD_PVP.png|24px|link=]] | | width="10%" | [[Arquivo:Interface_BDD_PVP.png|24px|link=]] | ||
| text-align:"center;" | [[file:Atk7.png|Attack T7|link=]] | |||
|- | |- | ||
| text-align:center;" | #475 | | text-align:center;" | #475 | ||
| Linha 414: | Linha 670: | ||
| width="10%" | [[Arquivo:Not.png|link=]] | | width="10%" | [[Arquivo:Not.png|link=]] | ||
| width="10%" | [[Arquivo:Interface_OffTank_PVP.png|24px|link=]] | | width="10%" | [[Arquivo:Interface_OffTank_PVP.png|24px|link=]] | ||
| text-align:"center;" | [[file:Def7.png|Defense T7|link=]] | |||
|- | |- | ||
| text-align:center;" | #547 | | text-align:center;" | #547 | ||
| Linha 421: | Linha 678: | ||
| width="10%" | [[Arquivo:Not.png|link=]] | | width="10%" | [[Arquivo:Not.png|link=]] | ||
| width="10%" | [[Arquivo:Interface_OffTank_PVP.png|24px|link=]] | | width="10%" | [[Arquivo:Interface_OffTank_PVP.png|24px|link=]] | ||
| text-align:"center;" | [[file:Def7.png|Defense T7|link=]] | |||
|- | |- | ||
| text-align:center;" | #555 | | text-align:center;" | #555 | ||
| Linha 428: | Linha 686: | ||
| width="10%" | [[Arquivo:Not.png|link=]] | | width="10%" | [[Arquivo:Not.png|link=]] | ||
| width="10%" | [[Arquivo:Interface_OffTank_PVP.png|24px|link=]] | | width="10%" | [[Arquivo:Interface_OffTank_PVP.png|24px|link=]] | ||
| text-align:"center;" | [[file:Def7.png|Defense T7|link=]] | |||
|- | |- | ||
| text-align:center;" | #576 | | text-align:center;" | #576 | ||
| Linha 435: | Linha 694: | ||
| width="10%" | [[Arquivo:Interface_OTDD_PVE.png|24px|link=]] | | width="10%" | [[Arquivo:Interface_OTDD_PVE.png|24px|link=]] | ||
| width="10%" | [[Arquivo:Not.png|link=]] | | width="10%" | [[Arquivo:Not.png|link=]] | ||
| text-align:"center;" | [[file:Atk7.png|Attack T7|link=]] | |||
|- | |- | ||
| text-align:center;" | #671 | | text-align:center;" | #671 | ||
| Linha 442: | Linha 702: | ||
| width="10%" | [[Arquivo:Interface_OffensiveTanker_pve.png|24px|link=]] | | width="10%" | [[Arquivo:Interface_OffensiveTanker_pve.png|24px|link=]] | ||
| width="10%" | [[Arquivo:Not.png|link=]] | | width="10%" | [[Arquivo:Not.png|link=]] | ||
| text-align:"center;" | [[file:Atk7.png|Attack T7|link=]] [[file:Def7.png|Defense T7|link=]] | |||
|- | |- | ||
| text-align:center;" | #678 | | text-align:center;" | #678 | ||
| Linha 449: | Linha 710: | ||
| width="10%" | [[Arquivo:Interface_BDD_PVE.png|24px|link=]] | | width="10%" | [[Arquivo:Interface_BDD_PVE.png|24px|link=]] | ||
| width="10%" | [[Arquivo:not.png|link=]] | | width="10%" | [[Arquivo:not.png|link=]] | ||
| text-align:"center;" | [[file:Atk7.png|Attack T7|link=]] | |||
|- | |- | ||
| text-align:center;" | #683 | | text-align:center;" | #683 | ||
| Linha 456: | Linha 718: | ||
| width="10%" | [[Arquivo:Interface_SupportOT_PVE.png|24px|link=]] | | width="10%" | [[Arquivo:Interface_SupportOT_PVE.png|24px|link=]] | ||
| width="10%" | [[Arquivo:Not.png|link=]] | | width="10%" | [[Arquivo:Not.png|link=]] | ||
| text-align:"center;" | [[file:Atk7.png|Attack T7|link=]] | |||
|- | |||
| text-align:"center;" | #702 | |||
| text-align:"center;" | [[Arquivo:702-Shiny_Dedenne.png|link=Shiny Dedenne]] | |||
| text-align:"center;" | [[Shiny Dedenne]]* | |||
| text-align:"center;" | [[Arquivo:Electric.png|link=Raibolt]] [[Arquivo:Fairy.png|link=Psycraft]] | |||
| text-align:"center;" | [[Arquivo:Not.png|link=]] | |||
| text-align:"center;" | [[Arquivo:Interface_BDD_PVP.png|24px|link=]] | |||
| text-align:"center;" | [[file:Atk7.png|Attack T7|link=]] | |||
|- | |- | ||
| text-align:"center;" | #703 | | text-align:"center;" | #703 | ||
| Linha 463: | Linha 734: | ||
| text-align:"center;" | [[Arquivo:Not.png|link=]] | | text-align:"center;" | [[Arquivo:Not.png|link=]] | ||
| text-align:"center;" | [[Arquivo:Interface_Tanker_PVP.png|24px|link=]] | | text-align:"center;" | [[Arquivo:Interface_Tanker_PVP.png|24px|link=]] | ||
| text-align:"center;" | [[file:Def7.png|Defense T7|link=]] | |||
|- | |- | ||
| text-align:center;" | #707 | | text-align:center;" | #707 | ||
| Linha 470: | Linha 742: | ||
| width="10%" | [[Arquivo:Not.png|link=]] | | width="10%" | [[Arquivo:Not.png|link=]] | ||
| width="10%" | [[Arquivo:Interface_Disrupter_PVP.png|24px|link=]] | | width="10%" | [[Arquivo:Interface_Disrupter_PVP.png|24px|link=]] | ||
| text-align:"center;" | [[file:Acc7.png|Accuracy T7|link=]] | |||
|- | |- | ||
| text-align:center;" | #778 | | text-align:center;" | #778 | ||
| Linha 477: | Linha 750: | ||
| width="10%" | [[Arquivo:Interface_BDD_PVE.png|24px|link=]] | | width="10%" | [[Arquivo:Interface_BDD_PVE.png|24px|link=]] | ||
| width="10%" | [[Arquivo:Interface_OffTank_PVP.png|24px|link=]] | | width="10%" | [[Arquivo:Interface_OffTank_PVP.png|24px|link=]] | ||
| text-align:"center;" | [[file:Atk7.png|Attack T7|link=]] | |||
|- | |- | ||
| text-align:center;" | #858 | | text-align:center;" | #858 | ||
| Linha 484: | Linha 758: | ||
| width="10%" | [[Arquivo:Interface_BDD_PVE.png|24px|link=]] | | width="10%" | [[Arquivo:Interface_BDD_PVE.png|24px|link=]] | ||
| width="10%" | [[Arquivo:not.png|link=]] | | width="10%" | [[Arquivo:not.png|link=]] | ||
| text-align:"center;" | [[file:Atk7.png|Attack T7|link=]] | |||
|- | |- | ||
| text-align:center;" | #869 | | text-align:center;" | #869 | ||
| Linha 491: | Linha 766: | ||
| width="10%" | [[Arquivo:Interface_BDD_PVE.png|24px|link=]] | | width="10%" | [[Arquivo:Interface_BDD_PVE.png|24px|link=]] | ||
| width="10%" | [[Arquivo:Not.png|link=]] | | width="10%" | [[Arquivo:Not.png|link=]] | ||
| text-align:"center;" | [[file:Atk7.png|Attack T7|link=]] | |||
|} | |} | ||
</center> | </center> | ||
'''*Observação:''' Os Pokémon '''[[Shiny Togetic]]''', '''[[Shiny Carbink]]''' e '''[[Klefki]]''' são exclusivos de outros clãs no PvP. <br> | '''*Observação:''' Os Pokémon '''[[Shiny Togetic]]''', '''[[Shiny Carbink]]''', '''[[Shiny Dedenne]]''' e '''[[Klefki]]''' são exclusivos de outros clãs no PvP. <br> | ||
'''**Observação:''' O Pokémon '''[[Darmanitan]]''' é do clã Psycraft mesmo constando como tipo Fogo puro na Pokédex. Não se trata de um bug. Por favor, '''não''' abra reports sobre o assunto. | '''**Observação:''' O Pokémon '''[[Darmanitan]]''' é do clã Psycraft mesmo constando como tipo Fogo puro na Pokédex. Não se trata de um bug. Por favor, '''não''' abra reports sobre o assunto. | ||
| Linha 500: | Linha 776: | ||
<center> | <center> | ||
{| class="wikitable sortable" style="text-align:center" width=" | {| class="wikitable sortable" style="text-align:center" width="65%;" | ||
|- | |- | ||
! scope="col" width=" | ! scope="col" width="10%" style="background-color: #F1C232"| <span style="color:black">Nº Dex</span> | ||
! scope="col" style="background-color: # | ! scope="col" style="background-color: #F1C232"| <span style="color:black">Ícone</span> | ||
! scope="col" width=" | ! scope="col" width="15%;" style="background-color: #F1C232"| <span style="color:black">Nome</span> | ||
! scope="col" style="background-color: # | ! scope="col" style="background-color: #F1C232"| <span style="color:black">Elementos</span> | ||
! scope="col" width=" | ! scope="col" width="15%;" style="background-color: #F1C232"| <span style="color:black">Função PvE</span> | ||
! scope="col" width=" | ! scope="col" width="15%;" style="background-color: #F1C232"| <span style="color:black">Função PvP</span> | ||
! scope="col" width="20%;" style="background-color: #F1C232"| <span style="color:black">Held Recomendado (PvP/PvE)</span> | |||
|- | |- | ||
| text-align:center;" | #036 | | text-align:center;" | #036 | ||
| Linha 515: | Linha 792: | ||
| width="10%" | [[Arquivo:Interface_Tank_PVE.png|24px|link=]] | | width="10%" | [[Arquivo:Interface_Tank_PVE.png|24px|link=]] | ||
| width="10%" | [[Arquivo:Not.png|link=]] | | width="10%" | [[Arquivo:Not.png|link=]] | ||
| text-align:"center;" | [[file:Def7.png|Defense T7|link=]] | |||
|- | |- | ||
| text-align:center;" | #040 | | text-align:center;" | #040 | ||
| Linha 522: | Linha 800: | ||
| width="10%" | [[Arquivo:Not.png]] | | width="10%" | [[Arquivo:Not.png]] | ||
| width="10%" | [[Arquivo:Interface_Disrupter_PVP.png|24px|link=]] | | width="10%" | [[Arquivo:Interface_Disrupter_PVP.png|24px|link=]] | ||
| text-align:"center;" | [[file:Acc7.png|Accuracy T7|link=]] | |||
|- | |||
| text-align:center;" | #064 | |||
| text-align:center;" | [[Arquivo:064 - Shiny Kadabra.png|link=Shiny Kadabra]] | |||
| text-align:center;" | [[Shiny Kadabra]] | |||
| text-align:center;" | [[Arquivo:Psychic.png|link]] | |||
| width="10%" | [[Arquivo:Interface_BDD_PVE.png|24px|link=]] | |||
| width="10%" | [[Arquivo:Not.png|link=]] | |||
| text-align:"center;" | [[file:Atk7.png|Attack T7|link=]] | |||
|- | |||
| text-align:center;" | #080 | |||
| text-align:center;" | [[Arquivo:080 - Shiny Slowbro.png|link=Shiny Slowbro]] | |||
| text-align:center;" | [[Shiny Slowbro]] | |||
| text-align:center;" | [[Arquivo:Water.png|link=Seavell]] [[Arquivo:Psychic.png|link=Psycraft]] | |||
| width="10%" | [[Arquivo:Interface_BDD_PVE.png|24px|link=]] | |||
| width="10%" | [[Arquivo:Not.png|link=]] | |||
| text-align:"center;" | [[file:Atk7.png|Attack T7|link=]] | |||
|- | |- | ||
| text-align:center;" | #121 | | text-align:center;" | #121 | ||
| Linha 529: | Linha 824: | ||
| width="10%" | [[Arquivo:Not.png|link=]] | | width="10%" | [[Arquivo:Not.png|link=]] | ||
| width="10%" | [[Arquivo:Interface_OTDD_PVP.png|24px|link=]] | | width="10%" | [[Arquivo:Interface_OTDD_PVP.png|24px|link=]] | ||
| text-align:"center;" | [[file:Atk7.png|Attack T7|link=]] | |||
|- | |- | ||
| text-align:center;" | #122 | | text-align:center;" | #122 | ||
| Linha 536: | Linha 832: | ||
| width="10%" | [[Arquivo:Interface_BDD_PVE.png|24px|link=]] | | width="10%" | [[Arquivo:Interface_BDD_PVE.png|24px|link=]] | ||
| width="10%" | [[Arquivo:Not.png|link]] | | width="10%" | [[Arquivo:Not.png|link]] | ||
| text-align:"center;" | [[file:Atk7.png|Attack T7|link=]] | |||
|- | |- | ||
| text-align:center;" | #176 | | text-align:center;" | #176 | ||
| Linha 543: | Linha 840: | ||
| width="10%" | [[Arquivo:Interface_BDD_PVE.png|24px|link=]] | | width="10%" | [[Arquivo:Interface_BDD_PVE.png|24px|link=]] | ||
| width="10%" | [[Arquivo:Not.png|link]] | | width="10%" | [[Arquivo:Not.png|link]] | ||
| text-align:"center;" | [[file:Atk7.png|Attack T7|link=]] | |||
|- | |- | ||
| text-align:center;" | #178 | | text-align:center;" | #178 | ||
| text-align:center;" | [[Arquivo:178-Xatu.png|link=Xatu]] | | text-align:center;" | [[Arquivo:178-Xatu.png|link=Xatu]] | ||
| text-align:center;" | [[Xatu]] | | text-align:center;" | [[Xatu]] | ||
| text-align:center;" | [[Arquivo:Psychic.png|link=]] [[Arquivo:Flying.png|link= | | text-align:center;" | [[Arquivo:Psychic.png|link=Psycraft]] [[Arquivo:Flying.png|link=]] | ||
| width="10%" | [[Arquivo: | | width="10%" | [[Arquivo:Interface_Speedster_PVE.png|24px|link=]] | ||
| width="10%" | [[Arquivo:Not.png|link]] | | width="10%" | [[Arquivo:Not.png|link=]] | ||
| text-align:"center;" | [[file:Atk7.png|Attack T7|link=]] | |||
|- | |- | ||
| text-align:center;" | #184 | | text-align:center;" | #184 | ||
| Linha 557: | Linha 856: | ||
| width="10%" | [[Arquivo:Interface_BDD_PVE.png|24px|link=]] | | width="10%" | [[Arquivo:Interface_BDD_PVE.png|24px|link=]] | ||
| width="10%" | [[Arquivo:Not.png|link]] | | width="10%" | [[Arquivo:Not.png|link]] | ||
| text-align:"center;" | [[file:Atk7.png|Attack T7|link=]] | |||
|- | |- | ||
| text-align:center;" | #196 | | text-align:center;" | #196 | ||
| Linha 564: | Linha 864: | ||
| width="10%" | [[Arquivo:Interface_BDD_PVE.png|24px|link=]] | | width="10%" | [[Arquivo:Interface_BDD_PVE.png|24px|link=]] | ||
| width="10%" | [[Arquivo:Not.png|link]] | | width="10%" | [[Arquivo:Not.png|link]] | ||
| text-align:"center;" | [[file:Atk7.png|Attack T7|link=]] | |||
|- | |- | ||
| text-align:center;" | #203 | | text-align:center;" | #203 | ||
| Linha 571: | Linha 872: | ||
| width="10%" | [[Arquivo:Not.png|link=]] | | width="10%" | [[Arquivo:Not.png|link=]] | ||
| width="10%" | [[Arquivo:Interface_OTDD_PVP.png|24px|link=]] | | width="10%" | [[Arquivo:Interface_OTDD_PVP.png|24px|link=]] | ||
| text-align:"center;" | [[file:Def7.png|Defense T7|link=]] | |||
|- | |- | ||
| Linha 579: | Linha 881: | ||
| width="10%" | [[Arquivo:Interface_BDD_PVE.png|24px|link=]] | | width="10%" | [[Arquivo:Interface_BDD_PVE.png|24px|link=]] | ||
| width="10%" | [[Arquivo:Not.png|link]] | | width="10%" | [[Arquivo:Not.png|link]] | ||
| text-align:"center;" | [[file:Atk7.png|Attack T7|link=]] | |||
|- | |- | ||
| text-align:center;" | #303 | | text-align:center;" | #303 | ||
| Linha 586: | Linha 889: | ||
| width="10%" | [[Arquivo:Not.png|link=]] | | width="10%" | [[Arquivo:Not.png|link=]] | ||
| width="10%" | [[Arquivo:Interface_Support_PVP.png|24px|link=]] | | width="10%" | [[Arquivo:Interface_Support_PVP.png|24px|link=]] | ||
| text-align:"center;" | [[file:Def7.png|Defense T7|link=]] | |||
|- | |- | ||
| text-align:center;" | #308 | | text-align:center;" | #308 | ||
| Linha 593: | Linha 897: | ||
| width="10%" | [[Arquivo:Not.png|link=]] | | width="10%" | [[Arquivo:Not.png|link=]] | ||
| width="10%" | [[Arquivo:Interface_OTDD_PVP.png|24px|link=]] | | width="10%" | [[Arquivo:Interface_OTDD_PVP.png|24px|link=]] | ||
| text-align:"center;" | [[file:Acc7.png|Accuracy T7|link=]] | |||
|- | |- | ||
| text-align:center;" | #326 | | text-align:center;" | #326 | ||
| Linha 600: | Linha 905: | ||
| width="10%" | [[Arquivo:Not.png|link=]] | | width="10%" | [[Arquivo:Not.png|link=]] | ||
| width="10%" | [[Arquivo:Interface_OffTank_PVP.png|24px|link=]] | | width="10%" | [[Arquivo:Interface_OffTank_PVP.png|24px|link=]] | ||
| text-align:"center;" | [[file:Def7.png|Defense T7|link=]] | |||
|- | |- | ||
| text-align:center;" | #337 | | text-align:center;" | #337 | ||
| text-align:center;" | [[Arquivo:337-Lunatone.png|link=Lunatone]] | | text-align:center;" | [[Arquivo:337-Lunatone.png|link=Lunatone]] | ||
| text-align:center;" | [[Lunatone]] | | text-align:center;" | '''[[Lunatone]]''' | ||
| text-align:center;" | [[Arquivo:Rock.png|link=Orebound]] [[Arquivo:Psychic.png|link=]] | | text-align:center;" | [[Arquivo:Rock.png|link=Orebound]] [[Arquivo:Psychic.png|link=]] | ||
| width="10%" | [[Arquivo:Not.png|link=]] | | width="10%" | [[Arquivo:Not.png|link=]] | ||
| width="10%" | [[Arquivo:Interface_Support_PVP.png|24px|link=]] [[Arquivo:Interface_Disrupter_PVP.png|24px|link=]] | | width="10%" | [[Arquivo:Interface_Support_PVP.png|24px|link=]] [[Arquivo:Interface_Disrupter_PVP.png|24px|link=]] | ||
| text-align:"center;" | [[file:Acc7.png|Accuracy T7|link=]] | |||
|- | |- | ||
| text-align:center;" | #338 | | text-align:center;" | #338 | ||
| Linha 614: | Linha 921: | ||
| width="10%" | [[Arquivo:Interface_BDD_PVE.png|24px|link=]] | | width="10%" | [[Arquivo:Interface_BDD_PVE.png|24px|link=]] | ||
| width="10%" | [[Arquivo:Not.png|link]] | | width="10%" | [[Arquivo:Not.png|link]] | ||
| text-align:"center;" | [[file:Atk7.png|Attack T7|link=]] | |||
|- | |- | ||
| text-align:center;" | #344 | | text-align:center;" | #344 | ||
| Linha 621: | Linha 929: | ||
| width="10%" | [[Arquivo:Not.png|link=]] | | width="10%" | [[Arquivo:Not.png|link=]] | ||
| width="10%" | [[Arquivo:Interface_Disrupter_PVP.png|24px|link=]] | | width="10%" | [[Arquivo:Interface_Disrupter_PVP.png|24px|link=]] | ||
| text-align:"center;" | [[file:X-Haste Tier7.png|Haste T7|link=]] | |||
|- | |- | ||
| text-align:center;" | #375 | | text-align:center;" | #375 | ||
| Linha 628: | Linha 937: | ||
| width="10%" | [[Arquivo:Interface_BDD_PVE.png|24px|link=]] | | width="10%" | [[Arquivo:Interface_BDD_PVE.png|24px|link=]] | ||
| width="10%" | [[Arquivo:Not.png|link=]] | | width="10%" | [[Arquivo:Not.png|link=]] | ||
| text-align:"center;" | [[file:Atk7.png|Attack T7|link=]] | |||
|- | |- | ||
| text-align:center;" | #700 | | text-align:center;" | #700 | ||
| Linha 635: | Linha 945: | ||
| width="10%" | [[Arquivo:Interface_OffensiveTanker_pve.png|24px|link=]] | | width="10%" | [[Arquivo:Interface_OffensiveTanker_pve.png|24px|link=]] | ||
| width="10%" | [[Arquivo:Not.png|link=]] | | width="10%" | [[Arquivo:Not.png|link=]] | ||
| text-align:"center;" | [[file:Atk7.png|Attack T7|link=]] | |||
|- | |- | ||
| text-align:center;" | #702 | |||
| text-align:center;" | [[Arquivo:702-Dedenne.png|link=Dedenne]] | |||
| text-align:center;" | [[Dedenne]]* | |||
| text-align:center;" | [[Arquivo:Electric.png|link=Raibolt]] [[Arquivo:Fairy.png|link=Psycraft]] | |||
| width="10%" | [[Arquivo:Not.png|link=]] | |||
| width="10%" | [[Arquivo:Interface_Support_PVP.png|24px|link=]] | |||
| text-align:"center;" | [[file:Def7.png|Defense T7|link=]] | |||
|} | |} | ||
</center> | </center> | ||
'''*Observação:''' O Pokémon '''[[Dedenne]]''' é exclusivo de outro clã no PvP. <br> | |||
=Rotação Mid-Late Game= | =Rotação Mid-Late Game= | ||
| Linha 655: | Linha 975: | ||
| text-align:"center;" | [[Arquivo:Interface_Tank_PVE.png|25px|link=]] | | text-align:"center;" | [[Arquivo:Interface_Tank_PVE.png|25px|link=]] | ||
| text-align:"center;" | 3 | | text-align:"center;" | 3 | ||
|- | |||
| text-align:"center;" | [[Arquivo:334-MegaAltaria.png|link=Mega Altaria Fairy (TM)]] | |||
| text-align:"center;" | [[Mega Altaria Fairy (TM)]] | |||
| text-align:"center;" | [[Arquivo:Interface_OffensiveTanker_pve.png|25px|link=]] | |||
| text-align:"center;" | TM OFF-Tank | |||
|- | |- | ||
| text-align:"center;" | [[Arquivo:671.Florges.png|link=Florges]] | | text-align:"center;" | [[Arquivo:671.Florges.png|link=Florges]] | ||
| Linha 668: | Linha 993: | ||
| text-align:"center;" | [[Arquivo:282-Shiny_Gardevoir.png|link=Shiny Gardevoir]] | | text-align:"center;" | [[Arquivo:282-Shiny_Gardevoir.png|link=Shiny Gardevoir]] | ||
| text-align:"center;" | [[Shiny Gardevoir]] | | text-align:"center;" | [[Shiny Gardevoir]] | ||
| text-align:"center;" | [[Arquivo:Interface_BDD_PVE.png|25px|link=]] | |||
| text-align:"center;" | 1H | |||
|- | |||
| text-align:"center;" | [[Arquivo:036_-_Mega_Clefable.png|link=Mega Clefable]] | |||
| text-align:"center;" | [[Mega Clefable]] | |||
| text-align:"center;" | [[Arquivo:Interface_BDD_PVE.png|25px|link=]] | | text-align:"center;" | [[Arquivo:Interface_BDD_PVE.png|25px|link=]] | ||
| text-align:"center;" | 1H | | text-align:"center;" | 1H | ||
| Linha 690: | Linha 1 020: | ||
| text-align:"center;" | [[Arquivo:Interface_BDD_PVE.png|25px|link=]] | | text-align:"center;" | [[Arquivo:Interface_BDD_PVE.png|25px|link=]] | ||
| text-align:"center;" | 3 | | text-align:"center;" | 3 | ||
|- | |||
| text-align:"center;" | [[Arquivo:040-Wigglytuff.png|link=Wigglytuff (TR)]] | |||
| text-align:"center;" | [[Wigglytuff (TR)]] | |||
| text-align:"center;" | [[Arquivo:Interface BDD PVE.png|24px|link=]] | |||
| text-align:"center;" | TR | |||
|} | |} | ||
</center> | </center> | ||
| Linha 720: | Linha 1 055: | ||
| text-align:"center;" | [[Arquivo:575-Shiny Gothitelle.png|link=Shiny Gothitelle]] | | text-align:"center;" | [[Arquivo:575-Shiny Gothitelle.png|link=Shiny Gothitelle]] | ||
| text-align:"center;" | [[Shiny Gothitelle]] | | text-align:"center;" | [[Shiny Gothitelle]] | ||
| text-align:"center;" | [[Arquivo:Interface_BDD_PVE.png|25px|link=]] | |||
| text-align:"center;" | 1H | |||
|- | |||
| text-align:"center;" | [[Arquivo:121_-_Mega_Starmie.png|link=Mega Starmie]] | |||
| text-align:"center;" | [[Mega Starmie]] | |||
| text-align:"center;" | [[Arquivo:Interface_BDD_PVE.png|25px|link=]] | | text-align:"center;" | [[Arquivo:Interface_BDD_PVE.png|25px|link=]] | ||
| text-align:"center;" | 1H | | text-align:"center;" | 1H | ||
| Linha 738: | Linha 1 078: | ||
| text-align:"center;" | 3 | | text-align:"center;" | 3 | ||
|- | |- | ||
| text-align:"center;" | [[Arquivo: | | text-align:"center;" | [[Arquivo:196-Espeon.png|link=Espeon]] | ||
| text-align:"center;" | [[ | | text-align:"center;" | [[Espeon]] | ||
| text-align:"center;" | [[Arquivo:Interface_BDD_PVE.png|25px|link=]] | | text-align:"center;" | [[Arquivo:Interface_BDD_PVE.png|25px|link=]] | ||
| text-align:"center;" | 3 | | text-align:"center;" | 3 | ||
|- | |- | ||
| text-align:"center;" | [[Arquivo: | | text-align:"center;" | [[Arquivo:064 - Shiny Kadabra.png|link=Shiny Kadabra]] | ||
| text-align:"center;" | [[ | | text-align:"center;" | [[Shiny Kadabra]] | ||
| text-align:"center;" | [[Arquivo:Interface_BDD_PVE.png|25px|link=]] | | text-align:"center;" | [[Arquivo:Interface_BDD_PVE.png|25px|link=]] | ||
| text-align:"center;" | 3 | | text-align:"center;" | 3 | ||
|- | |||
| text-align:"center;" | [[Arquivo:376-Metagross.png|link=Metagross (TM)]] | |||
| text-align:"center;" | [[Metagross (TM)]] | |||
| text-align:"center;" | [[Arquivo:Interface_BDD_PVE.png|25px|link=]] | |||
| text-align:"center;" | TM Burst | |||
|- | |||
| text-align:"center;" | [[Arquivo:199-Slowking.png|link=Slowking (TR)]] | |||
| text-align:"center;" | [[Slowking (TR)]] | |||
| text-align:"center;" | [[Arquivo:Interface BDD PVE.png|24px|link=]] | |||
| text-align:"center;" | TR | |||
|} | |} | ||
</center> | </center> <br> | ||
=Exclusividade do Clã no PvP= | =Exclusividade do Clã no PvP= | ||
<center> | <center> | ||
{| class="wikitable" style="text-align:center" width=" | {| class="wikitable" style="text-align:center" width="25%;" | ||
|- | |- | ||
! scope="col" width="5%;" style="background-color: #D358F7"| <span style="color:black">Pokémon</span> | ! scope="col" width="5%;" style="background-color: #D358F7"| <span style="color:black">Pokémon</span> | ||
! scope="col" width="15%;" style="background-color: #D358F7"| <span style="color:black">Nome</span> | ! scope="col" width="15%;" style="background-color: #D358F7"| <span style="color:black">Nome</span> | ||
|- | |- | ||
| text-align:"center;" | [[Arquivo:038-AlolanNinetales.png|link=Alolan Ninetales]] | | text-align:"center;" | [[Arquivo:038-AlolanNinetales.png|link=Alolan Ninetales]] | ||
| text-align:"center;" | [[Alolan Ninetales]] | | text-align:"center;" | [[Alolan Ninetales]] | ||
|- | |- | ||
| text-align:"center;" | [[Arquivo:065-MegaAlakazam.png|link=Mega Alakazam]] | | text-align:"center;" | [[Arquivo:065-MegaAlakazam.png|link=Mega Alakazam]] | ||
| text-align:"center;" | [[Mega Alakazam]] | | text-align:"center;" | [[Mega Alakazam]] | ||
|- | |- | ||
| text-align:"center;" | [[Arquivo:Shinyhyp.png|link=Shiny Hypno]] | | text-align:"center;" | [[Arquivo:Shinyhyp.png|link=Shiny Hypno]] | ||
| text-align:"center;" | [[Shiny Hypno]] | | text-align:"center;" | [[Shiny Hypno]] | ||
|- | |- | ||
| text-align:"center;" | [[Arquivo:326-ShinyGrumpig.png|link=Shiny Grumpig]] | | text-align:"center;" | [[Arquivo:326-ShinyGrumpig.png|link=Shiny Grumpig]] | ||
| text-align:"center;" | [[Shiny Grumpig]] | | text-align:"center;" | [[Shiny Grumpig]] | ||
|- | |- | ||
| text-align:"center;" | [[Arquivo:475-Gallade.png|link=Gallade]] | | text-align:"center;" | [[Arquivo:475-Gallade.png|link=Gallade]] | ||
| text-align:"center;" | [[Gallade]] | | text-align:"center;" | [[Gallade]] | ||
|- | |- | ||
| text-align:"center;" | [[Arquivo:475-Shiny_Gallade.png|link=Shiny Gallade]] | | text-align:"center;" | [[Arquivo:475-Shiny_Gallade.png|link=Shiny Gallade]] | ||
| text-align:"center;" | [[Shiny Gallade]] | | text-align:"center;" | [[Shiny Gallade]] | ||
| text-align:"center;" | [[Arquivo: | |||
|- | |||
| text-align:"center;" | [[Arquivo:475-Mega_Gallade.png|link=Mega Gallade]] | |||
| text-align:"center;" | [[Mega Gallade]] | |||
|- | |- | ||
| text-align:"center;" | [[Arquivo:547-Whimsicott.png|link=Whimsicott]] | | text-align:"center;" | [[Arquivo:547-Whimsicott.png|link=Whimsicott]] | ||
| text-align:"center;" | [[Whimsicott]] | | text-align:"center;" | [[Whimsicott]] | ||
|- | |- | ||
| text-align:"center;" | [[Arquivo:555-Darmanitan.png|link=Darmanitan]] | | text-align:"center;" | [[Arquivo:555-Darmanitan.png|link=Darmanitan]] | ||
| text-align:"center;" | [[Darmanitan]] | | text-align:"center;" | [[Darmanitan]] | ||
|- | |- | ||
| text-align:"center;" | [[Arquivo:655-ShinyDelphox.png|link=Shiny Delphox]] | | text-align:"center;" | [[Arquivo:655-ShinyDelphox.png|link=Shiny Delphox]] | ||
| text-align:"center;" | [[Shiny Delphox]] | | text-align:"center;" | [[Shiny Delphox]] | ||
| text-align:"center;" | [[ | |||
|- | |||
| text-align:"center;" | [[file:899 - Wyrdeer.png|link=Wyrdeer]] | |||
| text-align:"center;" | [[Wyrdeer]] | |||
|} | |} | ||
</center> | </center> | ||
| Linha 803: | Linha 1 161: | ||
*'''Shiny de Clã''' | *'''Shiny de Clã''' | ||
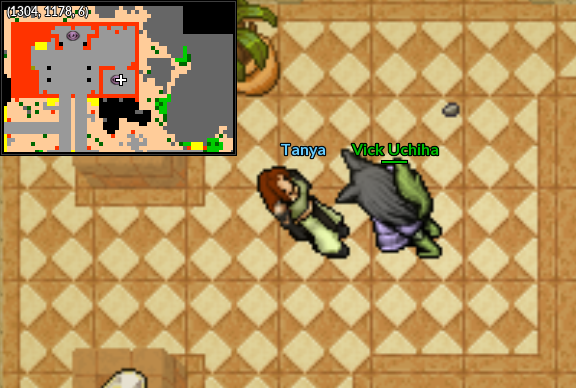
Para obter um [[Arquivo:Shinyhyp.png|link=Shiny Hypno]] '''[[Shiny Hypno]]''', fale com a '''[[Pokémon_Obtidos_via_NPC#Shiny_de_Cl.C3.A3|NPC Tanya]]''', localizada na área do Clã Psycraft , no Trade Center. | Para obter um [[Arquivo:Shinyhyp.png|link=Shiny Hypno]] '''[[Shiny Hypno]]''', fale com a '''[[Pokémon_Obtidos_via_NPC#Shiny_de_Cl.C3.A3|NPC Tanya]]''', localizada na área do Clã Psycraft , no Trade Center. | ||
<center> | <center> | ||
<br>[[Arquivo:NPC Tanya Psycraft.png|link=]] | |||
[[Arquivo: | |||
</center> | </center> | ||
| Linha 813: | Linha 1 168: | ||
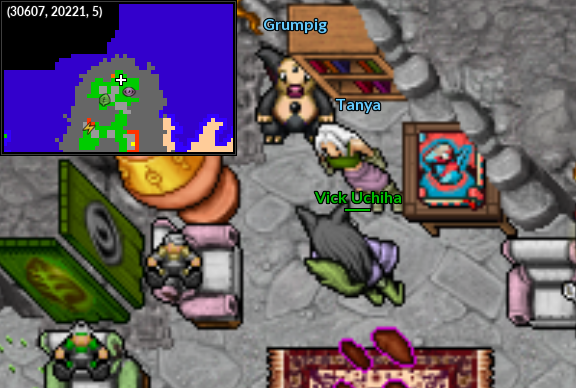
Para obter um [[Arquivo:326-ShinyGrumpig.png|link=Shiny Grumping]] '''[[Shiny Grumpig]]''', fale com a '''[[Pokémon_Obtidos_via_NPC#Shiny_de_Cl.C3.A3_da_Nightmare_World|NPC Tanya]]''', localizada na área de Psycraft, na resistência de Cerulean. | Para obter um [[Arquivo:326-ShinyGrumpig.png|link=Shiny Grumping]] '''[[Shiny Grumpig]]''', fale com a '''[[Pokémon_Obtidos_via_NPC#Shiny_de_Cl.C3.A3_da_Nightmare_World|NPC Tanya]]''', localizada na área de Psycraft, na resistência de Cerulean. | ||
<center> | <center> | ||
<br>[[Arquivo:NPC NW Tanya Psycraft.png|link=]] | |||
[[Arquivo: | |||
</center> | </center> | ||
Edição atual tal como às 16h03min de 2 de junho de 2026
Caso encontre algum erro ou queira acrescentar alguma informação, entre em contato com um dos membros da wiki.
Introdução
Os membros deste clã são enigmáticos. Dizem que eles podem controlar a mente de Pokémon do tipo ![]() Psychic e têm um forte vínculo com Pokémon do tipo
Psychic e têm um forte vínculo com Pokémon do tipo ![]() Fairy, que são muito afetuosos com seus mestres.
Fairy, que são muito afetuosos com seus mestres.
Ranking
- Rank 1: Psycraft Mind.
- Rank 2: Psycraft Brain.
- Rank 3: Psycraft Scholar.
- Rank 4: Psycraft Telepath.
- Rank 5: Psycraft Medium.
Acesse a página de Tasks do clã Psycraft para conferir os requisitos necessários em cada um dos Rankings.
Bônus de Clã
O bônus máximo do clã é aplicado ao completar as tarefas do Rank 5. Abaixo estão as porcentagens de bônus adquiridas:
![]() Psychic: Atk 28%, Def 28%
Psychic: Atk 28%, Def 28%
![]() Fairy: Atk 28%, Def 28%
Fairy: Atk 28%, Def 28%
- É possível observar na Diamond Shop, dentro do jogo, o bônus ofensivo e defensivo que cada clã recebe no ranking 5.
- O bônus de ataque é aplicado aos movimentos do Pokémon. Se o jogador estiver usando um Pokémon de fora do seu clã, mas que execute um movimento do elemento do seu clã, o bônus de ataque ainda será concedido.
Tiers
Tier é uma classificação comum entre os Pokémon, indicando não apenas a raridade deste dentro do jogo, mas também qual executará melhor uma função, contanto que a comparação seja realizada entre dois Pokémon de mesma função. O Tier e a Função de um Pokémon pode ser conferido na ![]() Pokédex (Atalho Shift + D). Caso deseje ler mais sobre, acesse a página Tier e Funções ou Tiers (listagem) para conferir a listagem de Tier de todos os Pokémon.
Pokédex (Atalho Shift + D). Caso deseje ler mais sobre, acesse a página Tier e Funções ou Tiers (listagem) para conferir a listagem de Tier de todos os Pokémon.
Para facilitar a leitura desta página, a tabela a seguir contém a legenda de todas as Funções, PvP e PvE disponíveis no jogo.
| Função PvE | Função PvP | ||
|---|---|---|---|
| Ícone | Função | Ícone | Função |
| Tank | Tank | ||
| Offensive Tank | Offensive Tank | ||
| Burst Damage Dealer | Burst Damage Dealer | ||
| Over Time Damage Dealer | Over Time Damage Dealer | ||
| Support Overtime | Support | ||
| Speedster | Disrupter | ||
Abaixo estão listados todos os Pokémon do clã Psycraft e suas respectivas funções, separados por Tier e com algumas recomendações de Held Itens.
Observação: A nossa lista de Helds Recomendados foi composta por colaboradores experientes da Wiki da PokeXGames e serve como sugestões de Held Itens para os Pokémon no âmbito do PvP e PvE, respectivamente.
O jogador ainda tem toda a liberdade de testar e utilizar outros Helds que não esses, podendo personalizar seu Pokémon de um jeito diferente. Ressaltamos que em caso de alterações nos Pokémon, essa lista pode ser alterada e não será garantido que o Pokémon seja adicionado como opção no NPC Jorge.
Observação: Na listagem, o Held PvP sugerido é o primeiro, seguido pelo Held PvE. Caso o Pokémon utilize o mesmo Held Item nos 2 âmbitos, aparecerá listado somente 1 Held Item.
Tier 1A
| Nº Dex | Ícone | Nome | Elementos | Função PvE | Função PvP | Held Recomendado (PvP/PvE) |
|---|---|---|---|---|---|---|
| #065 | Shiny Alakazam |
Tier 1B
| Nº Dex | Ícone | Nome | Elementos | Função PvE | Função PvP | Held Recomendado (PvP/PvE) |
|---|---|---|---|---|---|---|
| #700 | Shiny Sylveon |
Tier 1C
| Nº Dex | Ícone | Nome | Elementos | Função PvE | Função PvP | Held Recomendado (PvP/PvE) |
|---|---|---|---|---|---|---|
| #038 | Alolan Ninetales | |||||
| #065 | Mega Alakazam | |||||
| #122 | Shiny Mr.Mime | |||||
| #124 | Shiny Jynx | |||||
| #178 | Shiny Xatu | |||||
| #196 | Shiny Espeon | |||||
| #210 | Shiny Granbull | |||||
| #282 | Mega Gardevoir | |||||
| #303 | Mega Mawile* | |||||
| #334 | Mega Altaria | |||||
| #358 | Mega Chimecho* | |||||
| #376 | Metagross | |||||
| #437 | Shiny Bronzong | |||||
| #475 | Shiny Gallade | |||||
| #475 | Mega Gallade | |||||
| #475 | Mega Audino* | |||||
| #655 | Shiny Delphox | |||||
| #899 | Wyrdeer |
*Observação: Os Pokémon ![]() Mega Mawile ,
Mega Mawile , ![]() Mega Audino e
Mega Audino e ![]() Mega Chimecho são exclusivos de outro clãs no PvP.
Mega Chimecho são exclusivos de outro clãs no PvP.
Technical Machine (TM)
| Nº Dex | Ícone | Nome | Elementos | Função PvE | Função PvP | Held Recomendado (PvE) |
|---|---|---|---|---|---|---|
| #065 | Mega Alakazam (TM) | |||||
| #210 | Shiny Granbull (TM) | |||||
| #282 | Mega Gardevoir (TM) | |||||
| #334 | Mega Altaria Fairy (TM) | |||||
| #334 | Mega Altaria Dragon (TM) | |||||
| #376 | Metagross (TM) | |||||
| #475 | Shiny Gallade (TM) |
| Saiba Mais: Technical Machine (TM) |
Technical Records (TR)
| Nº Dex | Ícone | Nome | Elementos | Função PvE | Função PvP | Held Recomendado (PvE) |
|---|---|---|---|---|---|---|
| #040 | Wigglytuff (TR) | |||||
| #199 | Slowking (TR) |
| Saiba Mais: Technical Records (TR) |
Tier 1H
| Nº Dex | Ícone | Nome | Elementos | Função PvE | Função PvP | Held Recomendado (PvE) |
|---|---|---|---|---|---|---|
| #036 | Mega Clefable | |||||
| #121 | Mega Starmie | |||||
| #154 | Mega Meganium | |||||
| #282 | Shiny Gardevoir | |||||
| #468 | Shiny Togekiss | |||||
| #576 | Shiny Gothitelle |
Observações:
- Os Pokémon T1H têm a força de T1C fora da Nightmare World e são acima dos T1C dentro dela ou pelo menos possuem um diferencial perante os demais Pokémon. São balanceados exclusivamente para conteúdos PvE e não podem ser utilizados em duelos PvP.
 Mega Meganium possui seu moveset focado no tipo
  Grass.
Tier 2
| Nº Dex | Ícone | Nome | Elementos | Função PvE | Função PvP | Held Recomendado (PvP/PvE) |
|---|---|---|---|---|---|---|
| #026 | Alolan Raichu | |||||
| #036 | Shiny Clefable | |||||
| #040 | Shiny Wigglytuff | |||||
| #063 | Light Abra | |||||
| #065 | Alakazam | |||||
| #078 | Galarian Rapidash | |||||
| #080 | Mega Slowbro | |||||
| #100 | Shiny Hypno | |||||
| #103 | Exeggutor | |||||
| #121 | Shiny Starmie | |||||
| #124 | Jynx | |||||
| #176 | Shiny Togetic* | |||||
| #184 | Shiny Azumarill | |||||
| #199 | Slowking | |||||
| #202 | Wobbuffet | |||||
| #203 | Shiny Girafarig | |||||
| #282 | Gardevoir | |||||
| #308 | Mega Medicham | |||||
| #326 | Shiny Grumpig | |||||
| #375 | Shiny Metang | |||||
| #437 | Bronzong | |||||
| #468 | Togekiss | |||||
| #475 | Gallade | |||||
| #547 | Whimsicott | |||||
| #555 | Darmanitan** | |||||
| #576 | Gothitelle | |||||
| #671 | Florges | |||||
| #678 | Meowstic | |||||
| #683 | Aromatisse | |||||
| #702 | Shiny Dedenne* | |||||
| #703 | Shiny Carbink* | |||||
| #707 | Klefki* | |||||
| #778 | Mimikyu | |||||
| #858 | Hatterene | |||||
| #869 | Alcremie |
*Observação: Os Pokémon Shiny Togetic, Shiny Carbink, Shiny Dedenne e Klefki são exclusivos de outros clãs no PvP.
**Observação: O Pokémon Darmanitan é do clã Psycraft mesmo constando como tipo Fogo puro na Pokédex. Não se trata de um bug. Por favor, não abra reports sobre o assunto.
Tier 3
| Nº Dex | Ícone | Nome | Elementos | Função PvE | Função PvP | Held Recomendado (PvP/PvE) |
|---|---|---|---|---|---|---|
| #036 | Clefable | |||||
| #040 | Wigglytuff | |||||
| #064 | Shiny Kadabra | |||||
| #080 | Shiny Slowbro | |||||
| #121 | Starmie | |||||
| #122 | Mr.Mime | |||||
| #176 | Togetic | |||||
| #178 | Xatu | |||||
| #184 | Azumarill | |||||
| #196 | Espeon | |||||
| #203 | Girafarig | |||||
| #210 | Granbull | |||||
| #303 | Mawile | |||||
| #308 | Medicham | |||||
| #326 | Grumpig | |||||
| #337 | Lunatone | |||||
| #338 | Solrock | |||||
| #344 | Claydol | |||||
| #375 | Metang | |||||
| #700 | Sylveon | |||||
| #702 | Dedenne* |
*Observação: O Pokémon Dedenne é exclusivo de outro clã no PvP.
Rotação Mid-Late Game
| Pokémon | Nome | Função | Tier |
|---|---|---|---|
| Clefable | 3 | ||
| Mega Altaria Fairy (TM) | TM OFF-Tank | ||
| Florges | 2 | ||
| Sylveon | 3 | ||
| Shiny Gardevoir | 1H | ||
| Mega Clefable | 1H | ||
| Hatterene | 2 | ||
| Alcremie | 2 | ||
| Togetic | 3 | ||
| Granbull | 3 | ||
| Wigglytuff (TR) | TR | ||
| Pokémon | Nome | Função | Tier |
|---|---|---|---|
| Shiny Grumpig | 2 | ||
| Wobbuffet | 2 | ||
| Galarian Rapidash | 2 | ||
| Shiny Gothitelle | 1H | ||
| Mega Starmie | 1H | ||
| Alakazam | 2 | ||
| Meowstic | 2 | ||
| Mr.Mime | 3 | ||
| Espeon | 3 | ||
| Shiny Kadabra | 3 | ||
| Metagross (TM) | TM Burst | ||
| Slowking (TR) | TR | ||
Exclusividade do Clã no PvP
| Pokémon | Nome |
|---|---|
| Alolan Ninetales | |
| Mega Alakazam | |
| Shiny Hypno | |
| Shiny Grumpig | |
| Gallade | |
| Shiny Gallade | |
| Mega Gallade | |
| Whimsicott | |
| Darmanitan | |
| Shiny Delphox | |
| Wyrdeer |
Observação: A exclusividade é aplicada apenas em conteúdos PvP. No PvE, o uso é liberado para todos os clãs.
Pokémon obtido via NPC de Clã
- Shiny de Clã
Para obter um ![]() Shiny Hypno, fale com a NPC Tanya, localizada na área do Clã Psycraft , no Trade Center.
Shiny Hypno, fale com a NPC Tanya, localizada na área do Clã Psycraft , no Trade Center.
- Shiny de Clã da Nightmare World
Para obter um ![]() Shiny Grumpig, fale com a NPC Tanya, localizada na área de Psycraft, na resistência de Cerulean.
Shiny Grumpig, fale com a NPC Tanya, localizada na área de Psycraft, na resistência de Cerulean.
Efetividade
Abaixo são apresentadas as efetividades dos Pokémon deste clã, considerando apenas aqueles que possuem um elemento. A efetividade pode mudar caso o Pokémon possua dois elementos ou possua alguma resistência à algum elemento, como é o caso do Shiny Xatu, que possui a passiva Fearless, permitindo que receba menos dano de ataques do tipo Ghost (0,5x).
A efetividade de um Pokémon pode ser conferida na ![]() Pokédex ou realizando uma busca na página Pokémon (uso do Ctrl+F recomendado).Clique no ícone do elemento desejado para conferir a tabela de efetividade deste clã.
Pokédex ou realizando uma busca na página Pokémon (uso do Ctrl+F recomendado).Clique no ícone do elemento desejado para conferir a tabela de efetividade deste clã.
![]() Fairy
Fairy
| | ||
|---|---|---|
| Dano | Elemento | |
| 0x | - | |
| | ||
|---|---|---|
| Dano | Elemento | |
| 0x | ||
![]() Psychic
Psychic
| Dano | Elemento | |
|---|---|---|
| 0x | ||
| Dano | Elemento | |
|---|---|---|
| 0x | - | |
Mais informações poderão ser adquiridas acessando a página Efetividades.
Outfits Exclusivas
| Rank 1 | Rank 5 | ||
|---|---|---|---|

|

|

|

|
| Master | |
|---|---|

|

|