|
|
| (54 revisões intermediárias por 2 usuários não estão sendo mostradas) |
| Linha 1: |
Linha 1: |
| ===== WIP =====
| | = WIP = |
|
| |
|
| = King Charizard = | | = Halloween Dungeon Captain Dusknoir = |
|
| |
|
| == Introdução == | | <center> [[Arquivo:Banner_Chapeu_Seletor.png|link=]] </center> <br> |
|
| |
|
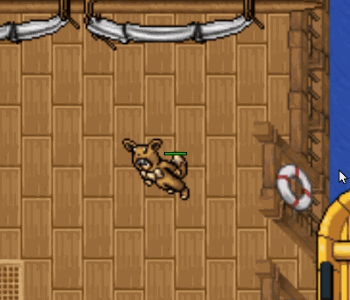
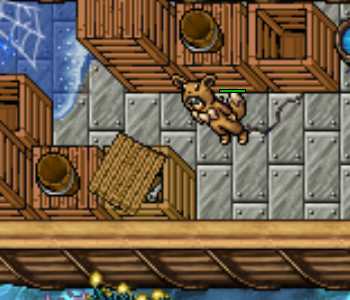
| A King Charizard Dungeon faz parte do Evento de Dia dos Namorados da PokeXGames. Os jogadores devem enfrentar o [[Arquivo:006-shCharizard.png|link=]] King Charizard no modo '''PokéView'''. <br>
| | =='''Informações Básicas'''== |
| É a oportunidade que os jogadores têm de tentar adquirir o [[Arquivo:King Costume.png|link=]] '''King Costume''', um addon muito raro para o [[Arquivo:006-shCharizard.png|link=]] Shiny Charizard.
| |
|
| |
|
| == Informações importantes == | | *'''Modalidade:''' Solo <br /> |
| | *'''Nivel necessário:''' 80 (Fácil), 200 (Normal) e 350 (Difícil). <br /> |
| | *'''Elemento:''' [[Arquivo:NeutralICON.png|Neutro|20px|link=Clãs]] Neutro |
| | *'''Tempo limite:''' 10 minutos. <br /> |
| | *'''PokéView: [[Arquivo:semvip.png|link=]] ''' <br> |
| | *'''Quantidade de Inimigos: 0.''' |
| | <center> |
| | {| class="wikitable" width="30%" |
| | |+ align="center" | Limitações e Bloqueios |
| | |- |
| | ! width="1%" style="background-color: #4682B4" | Poções |
| | ! width="1%" style="background-color: #4682B4" | Elixir |
| | ! width="1%" style="background-color: #4682B4" | Penalidade por morte |
| | ! width="1%" style="background-color: #4682B4" | Revive |
| | ! width="1%" style="background-color: #4682B4" | Medicine |
| | ! width="1%" style="background-color: #4682B4" | Berries |
| | |- |
| | | align="center" | [[Arquivo:semvip.png|link=]] |
| | | align="center" | [[Arquivo:semvip.png|link=]] |
| | | align="center" | [[Arquivo:semvip.png|link=]] |
| | | align="center" | [[Arquivo:semvip.png|link=]] |
| | | align="center" | [[Arquivo:semvip.png|link=]] |
| | | align="center" | [[Arquivo:semvip.png|link=]] |
| | |- |
| | |} |
| | </center> |
|
| |
|
| * A batalha é em dupla. <br>
| | == Localização == |
| * Tempo limite de 20 minutos.
| | |
| * O King Charizard é neutro. <br>
| | Essa dungeon fica localizada no Trade Center, dentro do portal abaixo, após entrar as dungeons estarão na parte superior. <br><br> |
| * O bônus de clã funciona normalmente. <br>
| |
| * Não há limite de tentativas. Entretanto, é possível receber a recompensa apenas uma vez no dia. <br>
| |
| * Não será possível utilizar poções, revives, medicine ou qualquer tipo de item consumível nesses combates. <br>
| |
| * O jogador precisa estar com seu Pokémon escolhido para fora da Pokébola para poder iniciar a batalha. <br>
| |
| * Não haverá punição de EXP ou Bless ao ser derrotado. <br>
| |
| * É possível utilizar o Attachment Device normalmente. <br>
| |
|
| |
|
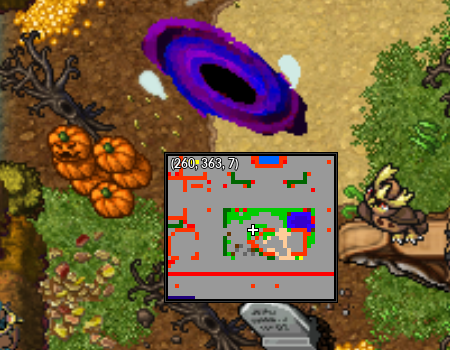
| == Localização == | | <center> |
| | [[Arquivo:Loc DG Assombradas 2024.png|link=]] |
| | </center><br><br> |
|
| |
|
| Para encontrar a [[Arquivo:006-shCharizard.png|link=]] King Charizard Dungeon o jogador deverá se dirigir ao Trade Center, entrar no portal e depois conversar com o NPC King Charizard's Tamer para iniciar a batalha. <br>
| | * As dungeons ativas variam de dia e servidor. <br> |
|
| |
|
| | == Funcionamento== |
|
| |
|
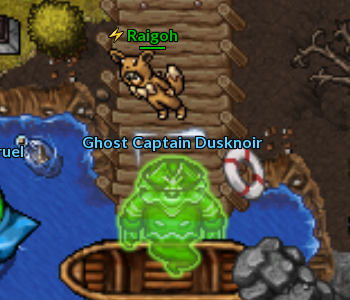
| | Para começar a Dungeon basta ir até o Ghost Captain Dusknoir e escolher a dificuldade. <br> |
| <center> | | <center> |
| {| border="1" style="text-align: center; border-collapse: collapse" | | {| border="1" style="text-align: center; border-collapse: collapse" |
| | width="50%" | [[Arquivo:Localização_Bowstoise_1.png|link=]] | | | width="100%" | [[Arquivo:Halloween captain dusknoir dungeon entrada.png|link=]] |
| | width="50%" | [[Arquivo:Localização_Bowstoise_2.png|link=]]
| |
| |- | | |- |
| |} | | |} |
| </center> <br /> | | </center> |
|
| |
|
| == Dificuldades == | | == Dificuldades == |
| | |
| [[Arquivo:Pokeball.png|15px|link=]] '''Fácil:''' requer no mínimo level 90 e possui um level cap no level 150 (jogadores acima do level 150 terão força semelhante a de um level 150). <br>
| |
| [[Arquivo:Pokeball.png|15px|link=]] '''Normal:''' requer no mínimo level 200 e possui um level cap no level 300 (jogadores acima do level 300 terão força semelhante a de um level 300). <br>
| |
| [[Arquivo:Pokeball.png|15px|link=]] '''Difícil:''' requer no mínimo level 350 e possui um level cap no level 450 (jogadores acima do level 450 terão força semelhante a de um level 450). <br>
| |
| | |
| '''Observação:''' Não há sistema de Held Enhancement em nenhuma dificuldade desta batalha.
| |
| | |
| == Habilidades ==
| |
|
| |
|
| <center class="center-tab"><tabber> | | <center class="center-tab"><tabber> |
| |-|Ember = | | |-|Fácil= |
| | | <center> |
| O King Charizard ataca o jogador com uma habilidade de alvo unico que causa dano e aplica o status BURN.
| |
| | |
| {{#widget:Video|url={{filepath:King Charizard Ember.mp4}}|}}
| |
| | |
| |-|Fire Ball =
| |
| | |
| O King Charizard marca o chão e atira uma bola de fogo que causa dano e aplica o status BURN.
| |
| | |
| {{#widget:Video|url={{filepath:King Charizard Fire Ball.mp4}}|}}
| |
| | |
| |-|Flame Burst =
| |
| | |
| O King Charizard causa dano em uma area frontal e queima alguns SQMs. Caso o jogador passe em cima, irá receber o status BURN.
| |
| | |
| {{#widget:Video|url={{filepath:King Charizard Flame Burst.mp4}}|}}
| |
| | |
| |-|Flamethrower =
| |
| | |
| O King Charizard canaliza um ataque em area frontal que causa dano e aplica o status BURN caso o jogador receba dano.
| |
| | |
| {{#widget:Video|url={{filepath:King Charizard Flamethrower.mp4}}|}}
| |
| | |
| |-|Fly =
| |
| | |
| O King Charizard levanta voo e puxa todos os jogadores que estão fora da arena.
| |
|
| |
|
| {{#widget:Video|url={{filepath:King Charizard Fly.mp4}}|}}
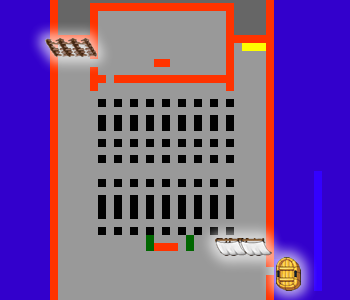
| | [[file:halloween captain dusknoir dungeon minimap andar 3.png|link=]] [[file:halloween captain dusknoir dungeon minimap andar 4.png|link=]] |
|
| |
|
| |-|Flame Charge =
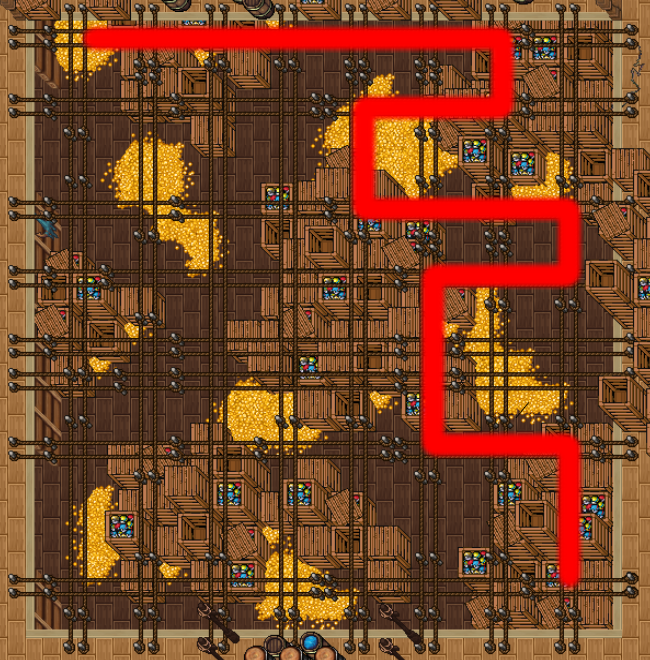
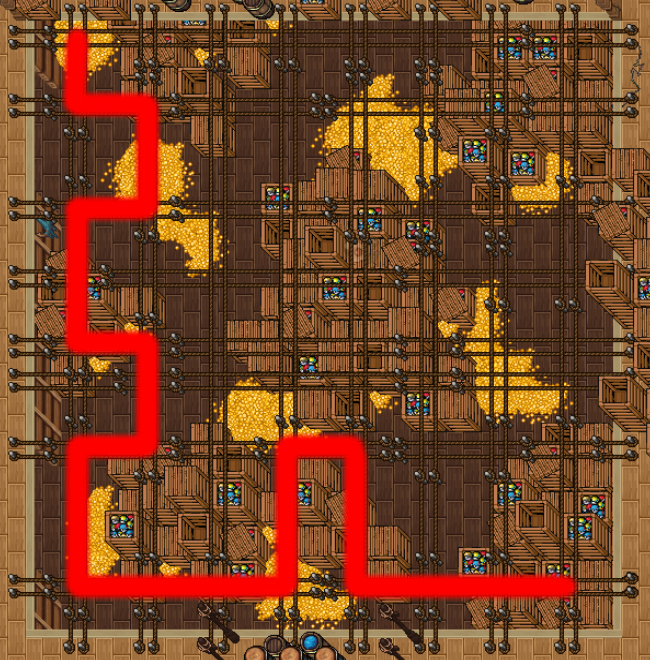
| | Ao entrar na Dungeon, o jogador deve recuperar a toolbox que fica no andar de cima, pra isso, o jogador deve passar pelas cordas e subir a escada do lado direito da Dungeon. |
|
| |
|
| O King Charizard levanta voo e queima metade da arena causando dano aos jogadores que ficaram em cima.
| | === Caminho das Cordas === |
|
| |
|
| {{#widget:Video|url={{filepath:King Charizard Flame Charge.mp4}}|}}
| | O minigame das cordas existem dois caminhos possiveis: |
|
| |
|
| |-|Outrage =
| |
|
| |
| O King Charizard começa a canalizar e ataca a arena causando dano e aplicando o status BURN. Há 4 SQMs quais os jogadores devem se posicionar para desviar do ataque.
| |
|
| |
| {{#widget:Video|url={{filepath:King Charizard Outrage.mp4}}|}}
| |
|
| |
|
| |
| </tabber></center>
| |
|
| |
| === Black Pawn Charmander ===
| |
|
| |
| Quando o King Charizard chega a '''79%''' e '''39%''' de HP ele invocará dois Black Pawn Charmander.
| |
|
| |
| <center>[[file:Localização_Bowstoise_2.png|link=]]</center>
| |
|
| |
| === Cura ===
| |
|
| |
| <center>Os jogadores podem curar a HP e remover o status BURN, pisando na água ao norte da arena como no video abaixo.<br>
| |
|
| |
| {{#widget:Video|url={{filepath:King Charizard Cura.mp4}}|}}</center>
| |
|
| |
| == Recompensas ==
| |
| <center class="center-tab"><tabber>
| |
| |-|Fácil=
| |
| <center> | | <center> |
| <b>
| | {|class="wikitable" style="text-align: center;" |
| {| class="wikitable" width="25%" | | ! A !! B |
| |-
| |
| ! colspan="2" | Item
| |
| ! Raridade
| |
| |-
| |
| | align="center" | [[Arquivo:Lovely_Token.png|link=]]
| |
| |align="left" style="border-left-style: hidden; | 40 Lovely Tokens
| |
| | align="center" | Comum
| |
| |- | | |- |
| | align="center" | [[Arquivo:Mystery_Block.png|link=]]
| | |[[file:halloween captain dusknoir dungeon minigame a.png|350px|link=]] <br> [[Media:halloween captain dusknoir dungeon minigame a.png|'''Clique para ampliar''']] |
| |align="left" style="border-left-style: hidden; | 2 Lovely Dimensional Keys | | |[[file:halloween captain dusknoir dungeon minigame b.png|350px|link=]] <br> [[Media:halloween captain dusknoir dungeon minigame b.png|'''Clique para ampliar''']] |
| | align="center" | Comum | |
| |- | | |- |
| | align="center" | [[Arquivo:Rough_Gemstone.png|link=]]
| |
| |align="left" style="border-left-style: hidden; | 1 Rough Gemstone
| |
| | align="center" | Comum
| |
| |-
| |
| | align="center" | [[Arquivo:Bowser_Blastoise_Picture.png|link=]]
| |
| |align="left" style="border-left-style: hidden; | Random Chess Piece
| |
| | align="center" | Raro
| |
| |-
| |
| | align="center" | [[Arquivo:Royal_Backpack.png|link=]]
| |
| |align="left" style="border-left-style: hidden; | Royal Backpack
| |
| | align="center" | Épico
| |
| |-
| |
| | align="center" | [[Arquivo:King_Charizard_Locker.gif|32px|link=]]
| |
| |align="left" style="border-left-style: hidden; | Packaged King Charizard Locker
| |
| | align="center" | Lendário
| |
| |-
| |
| | align="center" | [[Arquivo:King Costume.png|link=]]
| |
| |align="left" style="border-left-style: hidden; | King Costume
| |
| |align="center" | Lendário
| |
| |-
| |
| ! colspan="3" | [[Arquivo:Exp_icon.png|30px|link=]] Experiencia: ???.???
| |
| |} | | |} |
| <br>
| |
| </b>
| |
| </center> | | </center> |
| |-|Normal=
| |
| <b>
| |
| {| class="wikitable" width="25%"
| |
| |-
| |
| ! colspan="2" | Item
| |
| ! Raridade
| |
| |-
| |
| | align="center" | [[Arquivo:Lovely_Token.png|link=]]
| |
| |align="left" style="border-left-style: hidden; | 60 Lovely Tokens
| |
| | align="center" | Comum
| |
| |-
| |
| | align="center" | [[Arquivo:Mystery_Block.png|link=]]
| |
| |align="left" style="border-left-style: hidden; | 2 Lovely Dimensional Keys
| |
| | align="center" | Comum
| |
| |-
| |
| | align="center" | [[Arquivo:Rough_Gemstone.png|link=]]
| |
| |align="left" style="border-left-style: hidden; | 2 Rough Gemstone
| |
| | align="center" | Comum
| |
| |-
| |
| | align="center" | [[Arquivo:Bowser_Blastoise_Picture.png|link=]]
| |
| |align="left" style="border-left-style: hidden; | Random Chess Piece
| |
| | align="center" | Raro
| |
| |-
| |
| | align="center" | [[Arquivo:Royal_Backpack.png|link=]]
| |
| |align="left" style="border-left-style: hidden; | Royal Backpack
| |
| | align="center" | Épico
| |
| |-
| |
| | align="center" | [[Arquivo:Royal_Backpack.png|link=]]
| |
| |align="left" style="border-left-style: hidden; | Packaged King Charizard Locker
| |
| | align="center" | Lendário
| |
| |-
| |
| | align="center" | [[Arquivo:King Costume.png|link=]]
| |
| |align="left" style="border-left-style: hidden; | King Costume
| |
| |align="center" | Lendário
| |
| |-
| |
| ! colspan="3" | [[Arquivo:Exp_icon.png|30px|link=]] Experiencia: 300.000
| |
| |} <br>
| |
| </b>
| |
|
| |
|
| |-|Difícil=
| | Ao concluir, os jogadores devem seguir ao norte e subir as escadas, tomando cuidado com as armadilhas [[file:355-Duskull.png|link=]] '''Duskull''' que, enquanto estão ativas, detectam o movimento do jogador e invocam Duskulls que atacam o jogador diretamente. |
| <b>
| |
| {| class="wikitable" width="25%"
| |
| |-
| |
| ! colspan="2" | Item
| |
| ! Raridade
| |
| |-
| |
| | align="center" | [[Arquivo:Lovely_Token.png|link=]]
| |
| |align="left" style="border-left-style: hidden; | 80 Lovely Tokens
| |
| | align="center" | Comum
| |
| |-
| |
| | align="center" | [[Arquivo:Mystery_Block.png|link=]]
| |
| |align="left" style="border-left-style: hidden; | 2 Lovely Dimensional Keys
| |
| | align="center" | Comum
| |
| |-
| |
| | align="center" | [[Arquivo:Rough_Gemstone.png|link=]]
| |
| |align="left" style="border-left-style: hidden; | 3 Rough Gemstone
| |
| | align="center" | Comum
| |
| |-
| |
| | align="center" | [[Arquivo:Bowser_Blastoise_Picture.png|link=]]
| |
| |align="left" style="border-left-style: hidden; | Random Chess Piece
| |
| | align="center" | Raro
| |
| |-
| |
| | align="center" | [[Arquivo:Royal_Backpack.png|link=]]
| |
| |align="left" style="border-left-style: hidden; | Royal Backpack
| |
| | align="center" | Épico
| |
| |-
| |
| | align="center" | [[Arquivo:Royal_Backpack.png|link=]]
| |
| |align="left" style="border-left-style: hidden; | Packaged King Charizard Locker
| |
| | align="center" | Lendário
| |
| |-
| |
| | align="center" | [[Arquivo:King Costume.png|link=]]
| |
| |align="left" style="border-left-style: hidden; | King Costume
| |
| |align="center" | Lendário
| |
| |-
| |
| ! colspan="3" | [[Arquivo:Exp_icon.png|30px|link=]] Experiencia: 300.000
| |
| |}
| |
| </b>
| |
| </tabber></center>
| |
|
| |
|
| = Dragon Sky Mythical Rift = | | [[file:halloween captain dusknoir dungeon trap duskull.gif|link=]] [[file:halloween captain dusknoir dungeon trap duskull ativa.gif|link=]] |
|
| |
|
| <center> [[Arquivo:Banner Dragon Sky.png|link=]] </center> <br>
| | Ao subir as escadas, suba novamente para recuperar a Toolbox como na imagem abaixo: |
|
| |
|
| '''Nível mínimo:''' 525. <br>
| | [[file:halloween captain dusknoir dungeon toolbox a.png|link=]] |
| '''Custo de Entrada:''' Dragon Sky Rift Crystal. <br>
| |
| '''Quantidade de jogadores:''' 2. <br>
| |
| '''Boss:''' Shiny Giant Dragonite. <br>
| |
| '''Tempo Limite:''' 1 hora.
| |
|
| |
|
| == Localização da Rift ==
| | Volte até a sala inicial e repare as escadas que estão quebradas à esquerda como na imagem abaixo: |
|
| |
|
| A entrada da Dragon Sky Rift está localizada no topo da Dragon Tunnel de Lavender. Para acessá-la, o jogador deve possuir um Mecha e ter concluído a Mecha Fly Quest. <br>
| | [[file:halloween captain dusknoir dungeon toolbox b.gif|link=]] |
|
| |
|
| <center> [[Arquivo:entrada dragon sky.png|link=]]</center> <br>
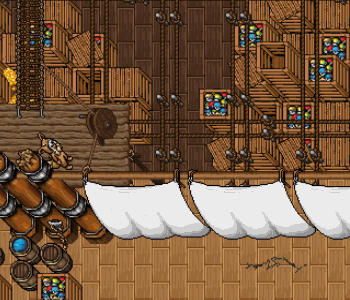
| | Após reparar as escadas, suba e, tomando cuidado com as armadilhas mais uma vez, passe pela ponte de cordas e clique na adriça ao final da ponte para levantar as velas que estão bloqueando a saida do navio. |
|
| |
|
| <table class="seeMore">
| | [[Arquivo:Halloween captain dusknoir dungeon adriça.gif|link=]] |
| <tr>
| |
| <td class="seeMore__image">[[Arquivo:Telekinetic-compass.gif|link=]]</td>
| |
| <td> '''Veja mais: [[Mecha]] - [[Mecha Fly Quest]]'''</td>
| |
| </tr>
| |
| </table>
| |
|
| |
|
| == Minimap da Rift ==
| | Agora basta escapar do navio utilizando o bote que fica logo depois do caminho das cordas como na imagem abaixo: |
|
| |
|
| <center> [[Arquivo:Minimap rift dragon sky.png|link=]] [[Arquivo:Minimap rift dragon sky 2 andar.png|link=]]</center> <br>
| | [[Arquivo:Halloween captain dusknoir dungeon bote.gif|link=]] |
| | |
|
| |
|
| == Liberando os portões == | | </center> |
| | |-|Normal= |
| | <center> |
|
| |
|
| Ao entrar na Rift, cada jogador deve clicar na dragon statue no centro da sala para receber uma [[file:Flint (Dragon Sky).png|link=]] '''Flint'''. Para abrir os portões basta utilizar sua '''Flint''' em uma das tochas nas laterais da sala.
| | == Primeira Etapa == |
|
| |
|
| <center> [[Arquivo:tocha 1 dragon sky.gif|link=]] [[Arquivo:tocha 2 dragon sky.gif|link=]]</center>
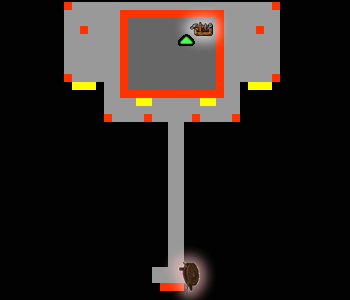
| | [[Arquivo:Halloween captain dusknoir dungeon minimap andar 2.png|link=]] |
|
| |
|
| == Primeira etapa ==
| | Ao entrar na Dungeon, o jogador se encontrará no segundo andar do barco, onde ele deve encontrar a porta que leva pro terceiro andar, para isso, ele deve tomar cuidado com as armadilhas do andar. |
|
| |
|
| Os jogadores devem derrotar os '''20 Pokémon''' espalhados pela Rift.
| | ===Duskull=== |
|
| |
|
| <center>[[file:dragon sky passo 1.png|link=]]</center>
| | Quando as armadilhas Duskull ativam, o jogadore deve parar de andar até que ele desapareça, caso contrário, um Duskull que ataca o jogador será invocado pra cada passo que o jogador deu enquanto a armadilha estava ativa. |
|
| |
|
| Após derrotar os Pokémon, os jogadores devem se encontrar nas marcas que estão no mapa acima e pisar ao mesmo tempo nos lados opostos para liberar o caminho do meio e o Boss Salamence.
| | [[file:halloween captain dusknoir dungeon trap duskull.gif|link=]] [[file:halloween captain dusknoir dungeon trap duskull ativa.gif|link=]] |
|
| |
|
| <center>[[file:marca 1 dragon sky.png|link=]] [[file:marca 2 dragon sky.png|link=]]</center>
| | ===Buracos=== |
|
| |
|
| == Boss Mega Salamence ==
| | O jogador deve tomar cuidado para não cair no primeiro andar, caso caia, terá que subir utilizando a corda ao norte. |
|
| |
|
| Para invocar o Boss Salamence os jogadores devem se encontrar no caminho do meio que foi liberado ao concluir as etapas anteriores. Ao clicar na tocha, outras três serão invocadas junto do [[file:Mega_Salamencee.png|link=]] '''Boss Mega Salamence'''.
| | [[Arquivo:Halloween captain dusknoir dungeon buraco.gif|link=]] |
|
| |
|
| <center>[[file:tocha salamence dragon sky.gif|link=]]</center>
| | Ao encontrar a porta correta, o jogador estará no terceiro andar. |
|
| |
|
| *Quebrar a tocha reduz a defesa do Boss Salamence por um minuto.
| | == Segunda Etapa== |
| *O Boss Salamence tem efetividade
| |
| <br>
| |
| Localização das tochas a serem quebradas:
| |
|
| |
|
| <center>[[file:tochas salamence dragon sky.png|link=]]</center>
| | [[Arquivo:Halloween captain dusknoir dungeon minimap andar 3.png|link=]] [[Arquivo:Halloween captain dusknoir dungeon minimap andar 4.png|link=]] |
|
| |
|
| == Segredo ==
| | No terceiro andar, o jogador deve recuperar a toolbox que fica no andar de cima, pra isso, o jogador deve passar pelas cordas e subir a escada do lado direito da Dungeon. |
|
| |
|
| Após derrotar o Boss Salamence, os jogadores devem fazer o segredo da Rift que fica ao sul da sala central indicado por um baú do tesouro no mapa abaixo:
| | === Caminho das Cordas === |
|
| |
|
| <center>[[Arquivo:Segredo dragon sky rift.png|link=]]</center>
| | O minigame das cordas existem dois caminhos possiveis: |
|
| |
|
| Ao clicar no bau, os jogadores irão receber a mensagem:
| | <center> |
| | {|class="wikitable" style="text-align: center;" |
| | ! A !! B |
| | |- |
| | |[[file:halloween captain dusknoir dungeon minigame a.png|350px|link=]] <br> [[Media:halloween captain dusknoir dungeon minigame a.png|'''Clique para ampliar''']] |
| | |[[file:halloween captain dusknoir dungeon minigame b.png|350px|link=]] <br> [[Media:halloween captain dusknoir dungeon minigame b.png|'''Clique para ampliar''']] |
| | |- |
| | |} |
| | </center> |
|
| |
|
| '''Você encontrou o tesouro de um dragão, mas deve superar os desafios para sair daqui com ele.'''
| | Ao concluir, os jogadores devem seguir ao norte e subir as escadas, tomando cuidado com as armadilhas [[file:355-Duskull.png|link=]] '''Duskull''' |
|
| |
|
| == Segunda etapa ==
| | Ao subir as escadas, suba novamente para recuperar a Toolbox como na imagem abaixo: |
|
| |
|
| Após fazer o segredo, os jogadores devem, novamente, se encontrar na parte central do mapa e clicar na '''dragon statue''' para prosseguir.
| | [[file:halloween captain dusknoir dungeon toolbox a.png|link=]] |
|
| |
|
| <center>[[Arquivo:Dragon sky estatua.png|link=]]</center>
| | Volte até a sala inicial e repare as escadas que estão quebradas à esquerda como na imagem abaixo: |
|
| |
|
| Ao clicar na estátua, os jogadores serão teletransportados para a segunda parte, onde devem coletar as estátuas das versões Shiny de Dratini, Dragonair e Dragonite.
| | [[file:halloween captain dusknoir dungeon toolbox b.gif|link=]] |
|
| |
|
| <center>[[Arquivo:Shiny dratini dragon sky.png|link=]] [[Arquivo:Shiny dragonair dragon sky.png|link=]] [[Arquivo:Shiny dragonite dragon sky.png|link=]]</center>
| | Após reparar as escadas, suba e, tomando cuidado com as armadilhas mais uma vez, passe pela ponte de cordas e clique na adriça ao final da ponte para levantar as velas que estão bloqueando a saida do navio. |
| <br>
| |
| Os jogadores devem colocá-los em '''três altares''' espalhados pela rift como nas imagens abaixo:
| |
|
| |
|
| <center>[[Arquivo:Shiny dratini dragon sky 2.png|link=]] [[Arquivo:Shiny dragonair dragon sky 2.png|link=]] [[Arquivo:Shiny dragonite dragon sky 2.png|link=]]</center>
| | [[Arquivo:Halloween captain dusknoir dungeon adriça.gif|link=]] |
|
| |
|
| <br>
| | Agora basta escapar do navio utilizando o bote que fica logo depois do caminho das cordas como na imagem abaixo: |
| Após colocá-los, os jogadores terão acesso aos dois shiny dragonite guardiões do boss '''Shiny Giant Dragonite'''.
| |
|
| |
|
| *Cuidado com os guardiões, quando eles estão com a vida baixa conseguem facilmente matar o tanque apenas com ataques básicos.
| | [[Arquivo:Halloween captain dusknoir dungeon bote.gif|link=]] |
| *Utilize elixires de defesa e guarde o protect para o final.
| | |
|
| |
|
| Após derrotar os guardiões, os jogadores terão acesso ao boss Shiny Giant Dragonite.
| | </center> |
| | |-|Dificil= |
| | <center> |
|
| |
|
| == Shiny Giant Dragonite == | | == Primeira Etapa == |
|
| |
|
| A luta com o boss [[file:Shiny_Dragonite.png|link=]] '''Shiny Giant Dragonite''' é no modo PokéView e os jogadores poderão trocar de Pokémon normalmente.
| | [[Arquivo:Halloween captain dusknoir dungeon minimap andar 1.png|link=]] |
|
| |
|
| Para iniciar o combate, basta os dois jogadores se posicionarem em cima da marca em cada canto da sala.
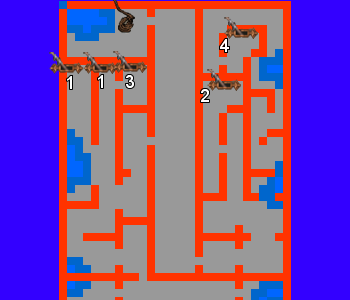
| | Ao entrar na Dungeon, o jogador deve achar a caixa contendo a chave da porta do segundo andar enquanto ativa as '''4''' alavancas em ordem para chegar ao segundo andar. |
|
| |
|
| <center>[[file:marca 3 dragon sky.png|link=]] [[file:marca 4 dragon sky.png|link=]]</center>
| | ▶Obs: A primeira alavanca pode estar em dois lugares diferentes. |
|
| |
|
| Auto Ataque
| | A caixa pode estar em qualquer lugar do primeiro andar. |
|
| |
|
| Habilidades
| | [[Arquivo:Halloween captain dusknoir dungeon caixa.png|link=]] |
|
| |
|
| Chuva
| | ===Barril explosivo=== |
|
| |
|
| == Recompensa ==
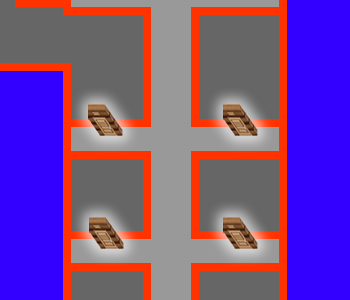
| | O jogador deve tomar cuidado com os barris espalhados pelo primeiro andar, para liberar o caminho basta faze-los explodir clicando neles como na imagem: |
|
| |
|
| = The Game Mythical Rift =
| | [[Arquivo:Halloween captain dusknoir dungeon barril a.gif]] [[Arquivo:Halloween captain dusknoir dungeon barril b.gif]] |
|
| |
|
| <center> [[Arquivo:banner the game.png|link=]] </center> <br>
| | Ao encontrar a chave e puxar as 4 alavancas, basta seguir pelo caminho central e subir a corda marcada no mapa. |
|
| |
|
| '''Nível mínimo:''' 525. <br>
| | No segundo andar o jogador deve utilizar a chave que acabou de pegar na caixa amarela e utilizar na porta como na imagem abaixo: |
| '''Custo de Entrada:''' The Game Rift Crystal. <br>
| |
| '''Quantidade de jogadores:''' 2. <br>
| |
| '''Boss:''' Zoroark, Shiny Gengar e Dragalge. <br>
| |
| '''Tempo Limite:''' 1 hora.
| |
|
| |
|
| == Localização da Rift == | | [[Arquivo:Halloween captain dusknoir dungeon chave.gif|link=]] |
|
| |
|
| A entrada da The Game Rift está localizada no subsolo da Dark Manor, na hunt de Alolan Persian.
| | == Segunda Etapa == |
|
| |
|
| <center>[[Arquivo:entrada the game.png|link=]]</center>
| | [[Arquivo:Halloween captain dusknoir dungeon minimap andar 2.png|link=]] |
|
| |
|
| == Minimap da Rift ==
| | Agora, o jogador deve procurar a porta correta que leva para o terceiro andar. A localização das portas está marcada no mapa acima: |
|
| |
|
| <center>[[Arquivo:The Game - Mapa Zoro.png|link=]]</center> <br>
| | ===Duskull=== |
|
| |
|
| == Informações importantes ==
| | Quando as armadilhas Duskull ativam, o jogadore deve parar de andar até que ele desapareça, caso contrário, um Duskull que ataca o jogador será invocado pra cada passo que o jogador deu enquanto a armadilha estava ativa. |
|
| |
|
| Os jogadores devem tomar cuidado com as armadilhas na primeira parte pois não existe cura para o personagem dentro da Rift.
| | [[file:halloween captain dusknoir dungeon trap duskull.gif|link=]] [[file:halloween captain dusknoir dungeon trap duskull ativa.gif|link=]] |
|
| |
|
| <center>[[Arquivo:trap 1 the game.gif|link=]] [[Arquivo:trap 2 the game.gif|link=]]</center>
| | ===Buracos=== |
|
| |
|
| *Após derrotar o Boss Zoroark e avançar para a segunda parte, os jogadores serão envenenados e precisarão receber o antídoto para concluir a Rift.
| | O jogador deve tomar cuidado para não cair no primeiro andar, caso caia, terá que subir utilizando a corda ao norte. |
| *Elixir of Life não funciona dentro da Rift.
| |
|
| |
|
| == Primeira etapa == | | [[Arquivo:Halloween captain dusknoir dungeon buraco.gif|link=]] |
|
| |
|
| Para prosseguir com a Rift, os jogadores devem derrotar os Pokémon e atravessar o campo tomando cuidado com as armadilhas seguindo o caminho marcado como na imagem abaixo:
| | Ao encontrar a porta correta, o jogador estará no terceiro andar. |
|
| |
|
| <center>[[Arquivo:caminho zoroark.png|link=]]</center>
| | == Terceira Etapa == |
|
| |
|
| == Boss Zoroark == | | [[Arquivo:Halloween captain dusknoir dungeon minimap andar 3.png|link=]] [[Arquivo:Halloween captain dusknoir dungeon minimap andar 4.png|link=]] |
|
| |
|
| Um dos jogadores deve segurar o aggro enquanto o outro ataca e inverter quando necessário. Quando o [[file:571-Zoroark%281%29.png|link=]] '''Boss Zoroark''' atinge HP% de HP, ele irá causar dano aumentado.
| | No terceiro andar, o jogador deve recuperar a toolbox que fica no andar de cima, pra isso, o jogador deve passar pelas cordas e subir a escada do lado direito da Dungeon. |
|
| |
|
| <center>[[Arquivo:boss zoroark.png|link=]]</center>
| | === Caminho das Cordas === |
|
| |
|
| Ao subir as escadas os jogadores serão envenenados e estarão na segunda etapa.
| | O minigame das cordas existem dois caminhos possiveis: |
|
| |
|
| <center>[[file:escadaria zoroark.png|link=]]</center> | | <center> |
| | | {|class="wikitable" style="text-align: center;" |
| == Segunda etapa == | | ! A !! B |
| | | |- |
| <center>[[file:minimap segunda etapa the game.png|link=]]</center>
| | |[[file:halloween captain dusknoir dungeon minigame a.png|350px|link=]] <br> [[Media:halloween captain dusknoir dungeon minigame a.png|'''Clique para ampliar''']] |
| | | |[[file:halloween captain dusknoir dungeon minigame b.png|350px|link=]] <br> [[Media:halloween captain dusknoir dungeon minigame b.png|'''Clique para ampliar''']] |
| Após derrotar todos os Pokémon do andar, deve-se fazer o desafio para liberar a terceira etapa.<br>
| | |- |
| | | |} |
| Os jogadores devem trabalhar em equipe e clicar nas 6 estátuas do andar e descobrir a ordem exata.<br>
| | </center> |
| | |
| <center>[[file:minimap segunda etapa the game minigame1.png|link=]]</center>
| |
| | |
| Após completar o primeiro desafio, os jogadores devem se coordenar mais uma vez e achar a ordem correta dos 7 livros para abrir o portão.
| |
| | |
| <center>[[file:sala dos livros segunda etapa.png|link=]]</center>
| |
| | |
| == Segredo ==
| |
| | |
| Para descobrir o segredo da Rift, jogadores devem fazer como na imagem abaixo:
| |
| | |
| <center>[[file:segredo the game.gif|link=]]</center>
| |
| | |
| Ao clicar no esqueleto, os jogadores irão receber a mensagem:
| |
| | |
| '''Um arrepio percorre todo o seu corpo. Foi uma boa ideia tocar nisso?''' | |
| | |
| == Terceira etapa ==
| |
| | |
| <center>[[file:The Game - Mapa Shiny Gengar.png|link=]]</center>
| |
| | |
| Após descer as escadas e derrotar os Pokémon do andar, os jogadores devem derrotar o [[file:Sgengar.png|link=]] '''Boss Shiny Gengar'''.<br>
| |
| | |
| == Boss Shiny Gengar ==
| |
| | |
| Um dos jogadores deve segurar o aggro enquanto o outro ataca e inverter quando necessário. Quando o Boss atinge HP% de HP, ele irá causar dano aumentado.
| |
| | |
| <center>[[file:boss shiny gengar.png|link=]]</center>
| |
| | |
| Após a batalha, os jogadores devem obter os [[file:antidoto verde.png|link=]][[file:antidoto amarelo.png|link=]] '''antidotos''' que ficam na parte inferior esquerda.
| |
| | |
| <center>[[file:antidoto the game minimap.png|link=]]</center>
| |
| <br>
| |
| Agora deve-se seguir para o norte onde encontrarão duas plantas bloqueando o caminho. Para liberar o caminho, os jogadores devem utilizar o item X como nas imagens abaixo:
| |
| | |
| <center>[[file:the game plant1.gif|link=]] [[file:the game plant2.gif|link=]]</center>
| |
|
| |
|
| == Quarta etapa == | | Ao concluir, os jogadores devem seguir ao norte e subir as escadas, tomando cuidado com as armadilhas [[file:355-Duskull.png|link=]] '''Duskull''' |
|
| |
|
| <center>[[file:The_Game_-_Mapa_Dragalge.png|link=]]</center>
| | Ao subir as escadas, suba novamente para recuperar a Toolbox como na imagem abaixo: |
|
| |
|
| Após descer as escadas, os jogadores devem enfrentar os Pokémon do andar e derrotar o [[file:691-Dragalge.png|link=]] '''Boss Dragalge'''.
| | [[file:halloween captain dusknoir dungeon toolbox a.png|link=]] |
|
| |
|
| == Boss Dragalge ==
| | Volte até a sala inicial e repare as escadas que estão quebradas à esquerda como na imagem abaixo: |
|
| |
|
| Um dos jogadores deve segurar o aggro enquanto o outro ataca e inverter quando necessário. Quando o Boss atinge HP% de HP, ele irá causar dano aumentado.
| | [[file:halloween captain dusknoir dungeon toolbox b.gif|link=]] |
|
| |
|
| <center>[[file:boss dragalge.png|link=]]</center>
| | Após reparar as escadas, suba e, tomando cuidado com as armadilhas mais uma vez, passe pela ponte de cordas e clique na adriça ao final da ponte para levantar as velas que estão bloqueando a saida do navio. |
|
| |
|
| Após derrotar o [[file:691-Dragalge.png|link=]] '''Boss Dragalge''', um dos jogadores deve pegar a [[file:seringa the game.png|link=]] '''Seringa''' que se encontra no canto inferior direito da sala:
| | [[Arquivo:Halloween captain dusknoir dungeon adriça.gif|link=]] |
|
| |
|
| <center>[[file:seringa the game minimap.png|link=]]</center>
| | Agora basta escapar do navio utilizando o bote que fica logo depois do caminho das cordas como na imagem abaixo: |
|
| |
|
| Para concluir a rift, o jogador com a seringa deve utilizar o [[file:antidoto verde.png|link=]] '''antidoto verde''' nela como na imagem:
| | [[Arquivo:Halloween captain dusknoir dungeon bote.gif|link=]] |
| | |
|
| |
|
| <center>[[file:antidoto seringa the game.gif|link=]]</center>
| |
|
| |
|
| *Usar o [[file:antidoto amarelo.png|link=]] '''antidoto amarelo''' fará com que o jogador '''morra'''.
| |
|
| |
| == Recompensa ==
| |
|
| |
| = Sour Behive Mythical Rift =
| |
|
| |
| = Magma Maze Mythical Rift =
| |
|
| |
| = Ancient Temple Mythical Rift =
| |
|
| |
| <center> [[Arquivo:Banner Dragon Sky.png|link=]] </center> <br>
| |
|
| |
| '''Nível mínimo:''' 525. <br>
| |
| '''Custo de Entrada:''' Ancient Temple Rift Crystal. <br>
| |
| '''Quantidade de jogadores:''' 3. <br>
| |
| '''Boss:''' Shiny Ariados, Claydol e Shiny Golurk. <br>
| |
| '''Tempo Limite:''' 1 hora.
| |
|
| |
| == Localização da Rift ==
| |
|
| |
| A entrada da Ancient Temple Rift está localizada no subsolo da Lost Island em Fuchsia. Para acessá-la pela primeira vez, o jogador deve pagar 20 Dragon Wings para o NPC X. Caso o jogador não tenha as Dragon Wings, basta utilizar o Mecha e voar até a ilha. <br>
| |
|
| |
| <center> [[Arquivo:localizacao ancient temple rift.png|link=]]</center> <br>
| |
|
| |
| <table class="seeMore">
| |
| <tr>
| |
| <td class="seeMore__image">[[Arquivo:Telekinetic-compass.gif|link=]]</td>
| |
| <td> '''Veja mais: [[Mecha]] - [[Mecha Fly Quest]]'''</td>
| |
| </tr>
| |
| </table>
| |
|
| |
| == Minimap da Rift ==
| |
|
| |
| <center> [[Arquivo:Minimap rift dragon sky.png|link=]] [[Arquivo:Minimap rift dragon sky 2 andar.png|link=]]</center> <br>
| |
|
| |
| == Liberando os portões ==
| |
|
| |
| == Primeira etapa ==
| |
|
| |
| Os jogadores devem derrotar os '''20 Pokémon''' espalhados pela Rift.
| |
|
| |
| <center>[[file:dragon sky passo 1.png|link=]]</center>
| |
|
| |
| Após derrotar os Pokémon, os jogadores devem se encontrar nas marcas que estão no mapa acima e pisar ao mesmo tempo nos lados opostos para liberar o caminho do meio e o Boss Salamence.
| |
|
| |
| <center>[[file:marca 1 dragon sky.png|link=]] [[file:marca 2 dragon sky.png|link=]]</center>
| |
|
| |
| == Boss Shiny Ariados ==
| |
|
| |
| == Segredo ==
| |
|
| |
| Após derrotar o Boss Salamence, os jogadores devem fazer o segredo da Rift que fica ao sul da sala central indicado por um baú do tesouro no mapa abaixo:
| |
|
| |
| <center>[[Arquivo:Segredo dragon sky rift.png|link=]]</center>
| |
|
| |
| Ao clicar no bau, os jogadores irão receber a mensagem:
| |
|
| |
| '''Você encontrou o tesouro de um dragão, mas deve superar os desafios para sair daqui com ele.'''
| |
|
| |
| == Segunda etapa ==
| |
|
| |
| == Boss Claydol ==
| |
|
| |
| == Boss Shiny Golurk ==
| |
|
| |
| == Recompensa ==
| |
|
| |
|
| |
| ==== PAGINA DE MONUMENTOS ====
| |
|
| |
| Os tipos de monumentos podem ser encontrados na página abaixo:
| |
|
| |
| <center>'''Monumentos de decorador'''</center>
| |
|
| |
| {|class="wikitable" style= "text-align:center" width= "71%"
| |
| !colspan="2"| Nome
| |
| |-
| |
| | '''Darkrai''' <br> <tabber>
| |
| |-|Tipo 1= [[file:Monumento_darkrai1.png|link=]]
| |
| </tabber> | | </tabber> |
| | '''Fossil''' <br> <tabber>
| | </center> |
| |-|Tipo 1= [[file:Monumento_osso1.png|link=]]
| |
| |-|Tipo 2= [[file:Monumento_fossil2.png|link=]]
| |
| |-|Tipo 3= [[file:Monumento_fossil3.png|link=]]
| |
| </tabber>
| |
| |-
| |
| | '''Coffin''' <br> <tabber>
| |
| |-|Tipo 1= [[file:Monumento_coffin1.png|link=]]
| |
| |-|Tipo 2= [[file:Monumento_coffin2.png|link=]]
| |
| </tabber>
| |
| | '''Earth''' <br> <tabber>
| |
| |-|Tipo 1= [[file:Monumento_earth1.png|link=]]
| |
| |-|Tipo 2= [[file:Monumento_earth2.png|link=]]
| |
| </tabber>
| |
| |-
| |
| | '''Ice''' <br> <tabber>
| |
| |-|Tipo 1= [[file:Monumento_iceblock1.png|link=]]
| |
| |-|Tipo 2= [[file:Monumento_iceblock2.png|link=]]
| |
| |-|Tipo 3= [[file:Monumento_iceblock3.png|link=]]
| |
| </tabber>
| |
| | '''Totem''' <br> <tabber>
| |
| |-|Tipo 1= [[file:Monumento_totem1.png|link=]]
| |
| </tabber>
| |
| |-
| |
| | '''Gear''' <br> <tabber>
| |
| |-|Tipo 1= [[file:Monumento_gear1.png|link=]]
| |
| </tabber>
| |
| | '''Hypno''' <br> <tabber>
| |
| |-|Tipo 1= [[file:Monumento_hypno1.png|link=]]
| |
| </tabber>
| |
| |-
| |
| | '''Charizard''' <br> <tabber>
| |
| |-|Tipo 1= [[file:Monumento_charizard1.png|link=]]
| |
| </tabber>
| |
| | '''Gong''' <br> <tabber>
| |
| |-|Tipo 1= [[file:Monumento_gong1.png|link=]]
| |
| </tabber>
| |
| |-
| |
| | '''Fountain''' <br> <tabber>
| |
| |-|Tipo 1= [[file:Monumento_fountain1.png|link=]]
| |
| |-|Tipo 2= [[file:Monumento_fountain2.png|link=]]
| |
| |-|Tipo 3= [[file:Monumento_fountain3.png|link=]]
| |
| </tabber>
| |
| | '''Sphinx''' <br> <tabber>
| |
| |-|Tipo 1= [[file:Monumento_sphinx1.png|link=]]
| |
| </tabber>
| |
| |-
| |
| | '''Machoke''' <br> <tabber>
| |
| |-|Tipo 1= [[file:Monumento_machoke1.png|link=]]
| |
| </tabber>
| |
| | '''Elekid''' <br> <tabber>
| |
| |-|Tipo 1= [[file:Monumento_elekid1.png|link=]]
| |
| </tabber>
| |
| |-
| |
| | '''Pinsir''' <br> <tabber>
| |
| |-|Tipo 1= [[file:Monumento_pinsir1.png|link=]]
| |
| </tabber>
| |
| | '''Glalie''' <br> <tabber>
| |
| |-|Tipo 1= [[file:Monumento_glalie1.png|link=]]
| |
| </tabber>
| |
| |-
| |
| | '''Strange Eyes''' <br> <tabber>
| |
| |-|Tipo 1= [[file:Monumento_strangeeyes2.png|link=]]
| |
| </tabber> | |
| |-
| |
| |}
| |
|
| |
|
| ==== monumentos coord estilo do rene ==== | | ==Recompensas== |
| | | <center class="center-tab"><tabber> |
| <center>[[Arquivo:Banner Computadores.png|link=]]</center> | | |-|Fácil= |
| | |
| | |
| Os computadores são os recursos de especialização dos '''Hackers'''. Disponibilizaremos as '''coordenadas''' já encontradas, basta adicionar manualmente ao seu mapa. <br>
| |
| Não existe uma rota a ser seguida, o jogador deve decidir o melhor caminho.
| |
| | |
| <table class="seeMore">
| |
| <tr>
| |
| <td class="seeMore__image"><!-- Insira a imagem aqui -->[[Arquivo:Telekinetic-compass.gif|link=]]<!-- Insira a imagem aqui --></td>
| |
| <td> '''Veja mais:''' <!-- Insira o texto aqui -->''' [[Coordenadas]]'''.<!-- Insira o texto aqui --> </td>
| |
| </tr>
| |
| </table>
| |
| | |
| [[file:Computador de coleta Hacker.gif|center|150px|link=]]
| |
| | |
| <tabber> | |
| |-|Cinnabar= | |
| <center> | | <center> |
| {|class="wikitable" width="15%" style="text-align:center" | | {| class="wikitable" width="25%" |
| |- | | |- |
| |+ Cinnabar | | ! colspan="2" | Item |
| | ! Raridade |
| |- | | |- |
| ! Nº !! Coordenada
| | | align="center" | [[Arquivo:Halloween Token 2020.png|link=]] |
| | |align="left" style="border-left-style: hidden; | 20 Halloween Token |
| | | align="center" |Comum |
| |- | | |- |
| | '''1''' ||30343, 20888, 6 | | | align="center" | [[Arquivo:Halloween dimensional key.png|link=]] |
| | |align="left" style="border-left-style: hidden; | Halloween Dimensional Key |
| | | align="center" |Comum |
| |- | | |- |
| | '''2''' ||30350, 20786, 4 | | | align="center" | [[Arquivo:Ghost_Skull.png|link=]] |
| | |align="left" style="border-left-style: hidden; | Ghost Skull |
| | |align="center" | Comum |
| |- | | |- |
| | '''3''' ||30366, 20808, 5 | | | align="center" | [[Arquivo:x.png|link=]] |
| | |align="left" style="border-left-style: hidden; | Hangable Tricorn Hat |
| | |align="center" | Épico |
| |- | | |- |
| | '''4''' ||30336, 20817, 2 | | | align="center" | [[Arquivo:Zoroark_bag.png|link=]] |
| | |align="left" style="border-left-style: hidden; | Zoroark Bag |
| | |align="center" | Épico |
| |- | | |- |
| | '''5''' ||30225, 20876, 5 | | | align="center" | [[Arquivo:x.png|link=]] |
| | |align="left" style="border-left-style: hidden; | Hangable Ship's Helm |
| | |align="center" | Épico |
| |- | | |- |
| | '''6''' ||30253, 20800, 5 | | | align="center" | [[Arquivo:Shiny_Gengar_Emote_Toy.png|link=]] |
| | |align="left" style="border-left-style: hidden; | Shiny Gengar Emote Toy |
| | |align="center" | Épico |
| |- | | |- |
| | '''7''' ||30313, 20783, 3 | | | align="center" | [[Arquivo:Gengar_Emote_Toy.png|link=]] |
| | |align="left" style="border-left-style: hidden; | Gengar Emote Toy |
| | |align="center" | Épico |
| |- | | |- |
| </center>
| | | align="center" | [[Arquivo:Sableye_Emote_Toy.png|link=]] |
| |-|Pallet= | | |align="left" style="border-left-style: hidden; | Sableye Emote Toy |
| <center>
| | |align="center" | Épico |
| {|class="wikitable" width="15%" style="text-align:center"
| |
| |- | | |- |
| |+ Pallet | | | align="center" | [[Arquivo:Mismagius_Emote_Toy.png|link=]] |
| | |align="left" style="border-left-style: hidden; | Mismagius Emote Toy |
| | |align="center" | Épico |
| |- | | |- |
| ! Nº !! Coordenada
| | | align="center" | [[Arquivo:Gengar-locker.png|70px|link=]] |
| | |align="left" style="border-left-style: hidden; | Gengar Locker |
| | |align="center" | Epic |
| |- | | |- |
| | '''1''' ||30209, 20557, 5 | | | align="center" | [[Arquivo:Shiny-ariados-locker.png|70px|link=]] |
| | |align="left" style="border-left-style: hidden; | Shiny Ariados Locker |
| | |align="center" | Epic |
| |- | | |- |
| | '''2''' ||30247, 20520, 6 | | | align="center" | [[Arquivo:Shiny-gengar-locker.png|70px|link=]] |
| |- | | |align="left" style="border-left-style: hidden; | Shiny Gengar Locker |
| | '''3''' ||30117, 20558, 6 | | |align="center" | Lendário |
| |- | |
| | '''4''' ||30227, 20377, 7 | |
| |- | | |- |
| | '''5''' ||30223, 20366, 5 | | ! colspan="3" | [[Arquivo:Exp_icon.png|30px|link=]] Experiência: 100.000 |
| |-
| | |} |
| | '''6''' ||30389, 20283, 5
| |
| |-
| |
| |} | |
| </center> | | </center> |
| |-|Cerulean= | | |-|Normal= |
| <center> | | <center> |
| {|class="wikitable" width="15%" style="text-align:center" | | {| class="wikitable" width="25%" |
| |- | | |- |
| |+ Cerulean | | ! colspan="2" | Item |
| | ! Raridade |
| |- | | |- |
| ! Nº !! Coordenada
| | | align="center" | [[Arquivo:Halloween Token 2020.png|link=]] |
| | |align="left" style="border-left-style: hidden; | 30 Halloween Token |
| | | align="center" |Comum |
| |- | | |- |
| | '''1''' ||30748, 20297, 5 | | | align="center" | [[Arquivo:Halloween dimensional key.png|link=]] |
| | |align="left" style="border-left-style: hidden; | Halloween Dimensional Key |
| | | align="center" |Comum |
| |- | | |- |
| | '''2''' ||30812, 20343, 5 | | | align="center" | [[Arquivo:Ghost_Skull.png|link=]] |
| | |align="left" style="border-left-style: hidden; | Ghost Skull |
| | |align="center" | Comum |
| |- | | |- |
| | '''3''' ||30763, 20369, 6 | | | align="center" | [[Arquivo:x.png|link=]] |
| | |align="left" style="border-left-style: hidden; | Hangable Tricorn Hat |
| | |align="center" | Épico |
| |- | | |- |
| | '''4''' ||30778, 20352, 7 | | | align="center" | [[Arquivo:Zoroark_bag.png|link=]] |
| | |align="left" style="border-left-style: hidden; | Zoroark Bag |
| | |align="center" | Épico |
| |- | | |- |
| | '''5''' ||30847, 20241, 7 | | | align="center" | [[Arquivo:x.png|link=]] |
| | |align="left" style="border-left-style: hidden; | Hangable Ship's Helm |
| | |align="center" | Épico |
| |- | | |- |
| | '''6''' ||30704, 20201, 4 | | | align="center" | [[Arquivo:Shiny_Gengar_Emote_Toy.png|link=]] |
| | |align="left" style="border-left-style: hidden; | Shiny Gengar Emote Toy |
| | |align="center" | Épico |
| |- | | |- |
| | '''7''' ||30738, 20232, 4 | | | align="center" | [[Arquivo:Gengar_Emote_Toy.png|link=]] |
| | |align="left" style="border-left-style: hidden; | Gengar Emote Toy |
| | |align="center" | Épico |
| |- | | |- |
| | '''8''' ||30731, 20234, 6 | | | align="center" | [[Arquivo:Sableye_Emote_Toy.png|link=]] |
| | |align="left" style="border-left-style: hidden; | Sableye Emote Toy |
| | |align="center" | Épico |
| |- | | |- |
| | '''9''' ||30688, 20270, 7 | | | align="center" | [[Arquivo:Mismagius_Emote_Toy.png|link=]] |
| | |align="left" style="border-left-style: hidden; | Mismagius Emote Toy |
| | |align="center" | Épico |
| |- | | |- |
| | '''10''' ||30449, 20272, 2 | | | align="center" | [[Arquivo:gengar-locker.png|70px|link=]] |
| | |align="left" style="border-left-style: hidden; | Gengar Locker |
| | |align="center" | Epic |
| |- | | |- |
| | '''11''' ||30538, 20227, 5 | | | align="center" | [[Arquivo:Shiny-ariados-locker.png|70px|link=]] |
| | |align="left" style="border-left-style: hidden; | Shiny Ariados Locker |
| | |align="center" | Epic |
| |- | | |- |
| | '''12''' ||30432, 20280, 6 | | | align="center" | [[Arquivo:Shiny-gengar-locker.png|70px|link=]] |
| | |align="left" style="border-left-style: hidden; | Shiny Gengar Locker |
| | |align="center" | Lendário |
| |- | | |- |
| | '''13''' ||30573, 20236, 6 | | ! colspan="3" | [[Arquivo:Exp_icon.png|30px|link=]] Experiência: 150.000 |
| | |} |
| | </center> |
| | |-|Dificil= |
| | <center> |
| | {| class="wikitable" width="25%" |
| |- | | |- |
| | '''14''' ||30566, 20267, 7 | | ! colspan="2" | Item |
| | ! Raridade |
| |- | | |- |
| | '''15''' ||30466, 20303, 8 | | | align="center" | [[Arquivo:Halloween Token 2020.png|link=]] |
| | |align="left" style="border-left-style: hidden; | 40 Halloween Token |
| | | align="center" |Comum |
| |- | | |- |
| | '''16''' ||30502, 20316, 5 | | | align="center" | [[Arquivo:Halloween dimensional key.png|link=]] |
| | |align="left" style="border-left-style: hidden; | Halloween Dimensional Key |
| | | align="center" |Comum |
| |- | | |- |
| | '''17''' ||30582, 20344, 5 | | | align="center" | [[Arquivo:Ghost_Skull.png|link=]] |
| | |align="left" style="border-left-style: hidden; | Ghost Skull |
| | |align="center" | Comum |
| |- | | |- |
| | '''18''' ||30627, 20326, 7 | | | align="center" | [[Arquivo:x.png|link=]] |
| | |align="left" style="border-left-style: hidden; | Hangable Tricorn Hat |
| | |align="center" | Épico |
| |- | | |- |
| | '''19''' ||30749, 20446, 7 | | | align="center" | [[Arquivo:Zoroark_bag.png|link=]] |
| | |align="left" style="border-left-style: hidden; | Zoroark Bag |
| | |align="center" | Épico |
| |- | | |- |
| | '''20''' ||30685, 20391, 6 | | | align="center" | [[Arquivo:x.png|link=]] |
| | |align="left" style="border-left-style: hidden; | Hangable Ship's Helm |
| | |align="center" | Épico |
| |- | | |- |
| | '''21''' ||30659, 20399, 5 | | | align="center" | [[Arquivo:Shiny_Gengar_Emote_Toy.png|link=]] |
| | |align="left" style="border-left-style: hidden; | Shiny Gengar Emote Toy |
| | |align="center" | Épico |
| |- | | |- |
| {|class="wikitable" width="15%" style="text-align:center"
| | | align="center" | [[Arquivo:Gengar_Emote_Toy.png|link=]] |
| | |align="left" style="border-left-style: hidden; | Gengar Emote Toy |
| | |align="center" | Épico |
| |- | | |- |
| |+ Cosmic Island | | | align="center" | [[Arquivo:Sableye_Emote_Toy.png|link=]] |
| | |align="left" style="border-left-style: hidden; | Sableye Emote Toy |
| | |align="center" | Épico |
| |- | | |- |
| | '''1''' ||31128, 20061, 14 | | | align="center" | [[Arquivo:Mismagius_Emote_Toy.png|link=]] |
| | |align="left" style="border-left-style: hidden; | Mismagius Emote Toy |
| | |align="center" | Épico |
| |- | | |- |
| | '''2''' ||31166, 20216, 14 | | | align="center" | [[Arquivo:gengar-locker.png|70px|link=]] |
| | |align="left" style="border-left-style: hidden; | Gengar Locker |
| | |align="center" | Epic |
| |- | | |- |
| | '''3''' ||31057, 20326, 14 | | | align="center" | [[Arquivo:Shiny-ariados-locker.png|70px|link=]] |
| | |align="left" style="border-left-style: hidden; | Shiny Ariados Locker |
| | |align="center" | Epic |
| |- | | |- |
| | '''4''' ||31300, 20288, 14 | | | align="center" | [[Arquivo:Shiny-gengar-locker.png|70px|link=]] |
| | |align="left" style="border-left-style: hidden; | Shiny Gengar Locker |
| | |align="center" | Lendário |
| |- | | |- |
| | '''5''' ||31244, 20227, 14 | | ! colspan="3" | [[Arquivo:Exp_icon.png|30px|link=]] Experiência: 200.000 |
| |- | | |} |
| | '''6''' ||31247, 20128, 14 | | </tabber> |
| |- | | </center> |
| | '''7''' ||31277, 19960, 14
| | |
| |-
| | = Halloween Dungeon Kraken = |
| | '''8''' ||31506, 20293, 14
| | |
| |-
| | <center class="center-tab"><tabber> |
| | '''9''' ||31563, 20216, 14
| | |-|Habilidade A= |
| |- | | <center> |
| | '''10''' ||31512, 20063, 14
| | |
| |-
| | a |
| | '''11''' ||30913, 20105, 2
| | |
| |-
| | </center> |
| | '''12''' ||30870, 20082, 1
| | |-|Habilidade B= |
| |- | | <center> |
| {|class="wikitable" width="15%" style="text-align:center"
| | |
| |- | | b |
| |+ Cosmic Island
| | |
| |-
| | </center> |
| | '''1''' ||30250, 20235, 9
| | |-|Habilidade C= |
| |-
| | <center> |
| | '''2''' ||30165, 20262, 8
| | |
| |- | | c |
| | '''3''' ||30201, 20286, 10
| | |
| |-
| | </center> |
| | '''4''' ||30213, 20215, 10
| | |-|Habilidade D= |
| |-
| | <center> |
| |}
| | |
| | D |
| | |
| | </center> |
| | |-|Habilidade E= |
| | <center> |
| | |
| | E |
| | |
| | </center> |
| | |-|Habilidade F= |
| | <center> |
| | |
| | F |
| | |
| | </tabber> |
| </center> | | </center> |
| |-|Lavender=
| | |
| | |
| | |
| | |
| | |
| | == NPC TC NW == |
| | |
| <center> | | <center> |
| {|class="wikitable" width="15%" style="text-align:center" | | {| class="wikitable" width="50%" style="text-align:center;" |
| | ! width="1%" | NPC |
| | ! width="9%" | Localização |
| | ! width="15%" | Pokémon |
| |- | | |- |
| |+ Lavender | | | Corrupted Cameron [[Arquivo:poke_bag.png|link=]] |
| | | |
| | | [[Arquivo:407-Roserade.png|link=Roserade]] [[Arquivo:869-Alcremie.png|link=Alcremie]] [[Arquivo:584-Vanilluxe.png|link=Vanilluxe]] [[Arquivo:416-Vespiquen.png|link=Vespiquen]] [[Arquivo:026-AlolanRaichu.png|link=Alolan Raichu]] [[Arquivo:778-Mimikyu.png|link=Mimikyu]] |
| |- | | |- |
| ! Nº !! Coordenada
| | | Corrupted Dr. Bara [[Arquivo:Great bag.png|link=]] |
| | | x |
| | | [[Arquivo:038-Sh_Ninetales.png.png|link=Shiny Ninetales]] [[Arquivo:Shinyrh.png|link=Shiny Rhydon]] [[Arquivo:233-Porygon2.png|link=Porygon2]] [[Arquivo:082-Sh_Magneton.png|link=Shiny Magneton]] [[Arquivo:196-shEspeon.png|link=Shiny Espeon]] [[Arquivo:085-shDodrio.png|link=Shiny Dodrio]] [[Arquivo:108-Lickitung.png|link=Lickitung]] [[Arquivo:036-Clefable.png|link=Clefable]] |
| |- | | |- |
| | '''1''' ||30818, 20356, 2 | | | Corrupted Waitress [[Arquivo:Great bag.png|link=]] |
| | | x |
| | | [[Arquivo:869-Alcremie.png|link=Alcremie]] [[Arquivo:217-Ursaring.png|link=Ursaring]] [[Arquivo:317-Swalot.png|link=Swalot]] [[Arquivo:365-Walrein.png|link=Walrein]] [[Arquivo:675-Pangoro.png|link=Pangoro]] [[Arquivo:143-Snorlax.png|link=Snorlax]] |
| |- | | |- |
| | '''2''' ||30725, 20479, 7 | | | Corrupted Nazar [[Arquivo:ultra_bag.png|link=]] |
| | | x |
| | | [[Arquivo:229-Houndoom.png|link=Houndoom]] [[Arquivo:310-Manectric.png|link=Manectric]] [[Arquivo:210-Granbull.png|link=Granbull]] [[Arquivo:059-Arcanine.png|link=Arcanine]] [[Arquivo:262-Mightyena.png|link=Mightyena]] [[Arquivo:405-Luxray.png|link=Luxray]] |
| |- | | |- |
| | '''3''' ||30790, 20425, 5 | | | Corrupted Gabriel [[Arquivo:ultra_bag.png|link=]] |
| | | x |
| | | [[Arquivo:126-Magmar.png|link=Magmar]] [[Arquivo:127-Pinsir.png|link=Pinsir]] [[Arquivo:115-Kangaskhan.png|link=Kangaskhan]] [[Arquivo:124-Jynx.png|link=Jynx]] [[Arquivo:125-Electabuzz.png|link=Electabuzz]] [[Arquivo:123-Scyther.png|link=Scyther]] |
| |- | | |- |
| | '''4''' ||30947, 20313, 5 | | | Corrupted Gates [[Arquivo:ultra_bag.png|link=]] |
| | | x |
| | | [[Arquivo:Shiny_Torkoall.png|link=Shiny Torkoal]] [[Arquivo:226-Mantine.png|link=Mantine]] [[Arquivo:196-shEspeon.png|link=Shiny Espeon]] [[Arquivo:197-Sh_Umbreon.png|link=Shiny Umbreon]] [[Arquivo:446-ShinyMunchlax1.png|link=Shiny Munchlax]] [[Arquivo:477-Dusknoir.png|link=Dusknoir]] |
| |- | | |- |
| | '''5''' ||30980, 20382, 6 | | | Corrupted Creator [[Arquivo:ultra_bag.png|link=]] |
| | | x |
| | | [[Arquivo:130-RedGyarados.png|link=Shiny Gyarados]] [[Arquivo:237-EliteHitmontop.png|link=Elite Hitmontop]] [[Arquivo:Sgengar.png|link=Shiny Gengar]] [[Arquivo:125-Sh_Electabuzz.png|link=Shiny Electabuzz]] [[Arquivo:142-Aerodactyl.png|link=Aerodactyl]] [[Arquivo:326-ShinyGrumpig.png|link=Shiny Grumpig]] [[Arquivo:Shmagby.png|link=Shiny Magby]] [[Arquivo:239-ShinyElekid1.png|link=Shiny Elekid]] [[Arquivo:232-ShinyDonphan.png|link=Shiny Donphan]] |
| |- | | |- |
| | '''6''' ||30925, 20469, 6 | | | Corrupted Jorge [[Arquivo:ultra_bag.png|link=]] |
| | | x |
| | | [[Arquivo:068-Sh_Machamp.png|link=Shiny Machamp]] [[Arquivo:196-shEspeon.png|link=Shiny Espeon]] [[Arquivo:430-Shiny_Honchkrow.png|link=Shiny Honchkrow]] [[Arquivo:197-Sh_Umbreon.png|link=Shiny Umbreon]] [[Arquivo:248-MegaTyranitar.png|link=Mega Tyranitar]] [[Arquivo:475-Shiny_Gallade.png|link=Shiny Gallade]] |
| |- | | |- |
| | '''7''' ||30999, 20480, 3 | | | Corrupted Victoria [[Arquivo:ultra_bag.png|link=]] |
| | | x |
| | | [[Arquivo:006-MegaCharizardY.png|link=Mega Charizard Y]] [[Arquivo:181-MegaAmpharos.png|link=Mega Ampharos]] [[Arquivo:248-MegaTyranitar.png|link=Mega Tyranitar]] [[Arquivo:065-MegaAlakazam.png|link=Mega Alakazam]] [[Arquivo:303-MegaMawile.png|link=Mega Mawile]] [[Arquivo:094-MegaGengar.png|link=Mega Gengar]] |
| |- | | |- |
| | '''8''' ||30868, 20472, 5 | | | Corrupted Apolo [[Arquivo:ultra_bag.png|link=]] |
| | | x |
| | | [[Arquivo:095-CrystalOnix.png|link=Crystal Onix]] [[Arquivo:485-Heatran.png|link=Heatran]] [[Arquivo:124-shJynx.png|link=Shiny Jynx]] [[Arquivo:Sh_venu.png|link=Shiny Venusaur]] [[Arquivo:448-MegaLucario.png|link=Mega Lucario]] [[Arquivo:038-Sh_Ninetales.png.png|link=Shiny Ninetales]] |
| |- | | |- |
| | '''9''' ||30867, 20549, 6 | | | Corrupted Atena [[Arquivo:ultra_bag.png|link=]] |
| | | x |
| | | [[Arquivo:130-RedGyarados.png|link=Shiny Gyarados]] [[Arquivo:596-G_Galvantula.png|link=Giant Galvantula]] [[Arquivo:Megahoundoom.png|link=Mega Houndoom]] [[Arquivo:Shiny_granbull.png|link=Shiny Granbull]] [[Arquivo:105-AlolaMarowak.png|link=Alolan Marowak]] [[Arquivo:359-MegaAbsol.png|link=Mega Absol]] |
| |- | | |- |
| | '''10''' ||30916, 20579, 2 | | | Corrupted Rachel [[Arquivo:ultra_bag.png|link=]] |
| | | x |
| | | [[Arquivo:617-Accelgor.png|link=Accelgor]] [[Arquivo:279-Pelipper.png|link=Pelipper]] [[Arquivo:S.klinklang.png|link=Shiny Klinklang]] [[Arquivo:164-Sh_Noctowl.png|link=Shiny Noctowl]] [[Arquivo:262-Mightyena.png|link=Mightyena]] [[Arquivo:614-Beartic.png|link=Beartic]] |
| |- | | |- |
| | '''11''' ||30748, 20529, 3 | | | Corrupted Joey [[Arquivo:ultra_bag.png|link=]] |
| | | x |
| | | [[Arquivo:470-Sh_Leafeon.png|link=Shiny Leafeon]] [[Arquivo:700-Sh_Sylveon.png|link=Shiny Sylveon]] [[Arquivo:310-Sh_Manectric.png|link=Shiny Manectric]] [[Arquivo:534-Conkeldurr.png|link=Conkeldurr]] [[Arquivo:437-Sh_Bronzong.png|link=Shiny Bronzong]] [[Arquivo:485-Heatran.png|link=Heatran]] |
| |- | | |- |
| | '''12''' ||30731, 20589, 4 | | | Corrupted Carlos [[Arquivo:ultra_bag.png|link=]] |
| | | x |
| | | [[Arquivo:405-Luxray.png|link=Luxray]] [[Arquivo:392-Infernape.png|link=Infernape]] [[Arquivo:475-Gallade.png|link=Gallade]] [[Arquivo:389-Torterra.png|link=Torterra]] [[Arquivo:395-Empoleon.png|link=Empoleon]] [[Arquivo:430-Honchkrow.png|link=Honchkrow]] |
| |- | | |- |
| | '''13''' ||30762, 20558, 5 | | | Corrupted Archeologist [[Arquivo:ultra_bag.png|link=]] |
| | | x |
| | | [[Arquivo:018-shPidgeot.png|link=Shiny Pidgeot]] [[Arquivo:142-Aerodactyl.png|link=Aerodactyl]] [[Arquivo:178-shXatu.png|link=Shiny Xatu]] [[Arquivo:Shiny_Torkoall.png|link=Shiny Torkoal]] [[Arquivo:376-Metagross.png|link=Metagross]] [[Arquivo:473-Mamoswine.png|link=Mamoswine]] |
| |- | | |- |
| | '''14''' ||30627, 20532, 5 | | | Corrupted Cook [[Arquivo:ultra_bag.png|link=]] |
| | | x |
| | | [[Arquivo:083-shFarfetch-D.png|link=Elite_Farfetch%27D]] [[Arquivo:114-Sh_Tangela.png|link=Shiny Tangela]] [[Arquivo:171-shLanturn.png|link=Shiny Lanturn]] [[Arquivo:073-Sh_Tentacruel.png|link=Shiny Tentacruel]] [[Arquivo:Shiny_snorlax.png|link=Shiny Snorlax]] [[Arquivo:157-Sh_Typhlosion.png|link=Shiny Typhlosion]] |
| |- | | |- |
| {|class="wikitable" width="15%" style="text-align:center"
| | | Corrupted Mechanic [[Arquivo:ultra_bag.png|link=]] |
| | | x |
| | | [[Arquivo:082-Sh_Magneton.png|link=Shiny Magneton]] [[Arquivo:448-MegaLucario.png|link=Mega Lucario]] [[Arquivo:462-Shiny_Magnezone.png|link=Shiny Magnezone]] [[Arquivo:306-MegaAggron.png|link=Mega Aggron]] [[Arquivo:437-Sh_Bronzong.png|link=Shiny Bronzong]] [[Arquivo:376-Metagross.png|link=Metagross]] |
| |- | | |- |
| |+ Power Plant | | | Corrupted Hacker [[Arquivo:ultra_bag.png|link=]] |
| | | x |
| | | [[Arquivo:186-shPolitoed.png|link=Shiny Politoed]] [[Arquivo:Sh_ariados.png|link=Shiny Ariados]] [[Arquivo:197-Sh_Umbreon.png|link=Shiny Umbreon]] [[Arquivo:234-shStantler.png|link=Shiny Stantler]] [[Arquivo:474-PorygonZ.png|link=Porygon-Z]] [[Arquivo:095-CrystalOnix.png|link=Crystal Onix]] |
| |- | | |- |
| | '''1''' ||30613, 20634, 5 | | | Corrupted Decorator [[Arquivo:ultra_bag.png|link=]] |
| | | x |
| | | [[Arquivo:SshBlastoise.png|link=Shiny Blastoise]] [[Arquivo:038-AlolanNinetales.png|link=Alolan Ninetales]] [[Arquivo:006-shCharizard.png|link=Shiny Charizard]] [[Arquivo:700-Sh_Sylveon.png|link=Shiny Sylveon]] [[Arquivo:254-MegaSceptile.png|link=Mega Sceptile]] [[Arquivo:197-Sh_Umbreon.png|link=Shiny Umbreon]] |
| |- | | |- |
| | '''2''' ||30607, 20643, 6 | | | Corrupted Designer [[Arquivo:ultra_bag.png|link=]] |
| | | x |
| | | [[Arquivo:038-Sh_Ninetales.png.png|link=Shiny Ninetales]] [[Arquivo:234-shStantler.png|link=Shiny Stantler]] [[Arquivo:282-MegaGardevoir.png|link=Mega Gardevoir]] [[Arquivo:196-shEspeon.png|link=Shiny Espeon]] [[Arquivo:405-Shiny_Luxray.png|link=Shiny Luxray]] [[Arquivo:350-Milotic.png|link=Milotic]] |
| |- | | |- |
| | '''3''' ||30670, 20624, 4 | | | Corrupted Academic [[Arquivo:ultra_bag.png|link=]] |
| | | x |
| | | [[Arquivo:026-Sh_Raichu.png|link=Shiny Raichu]] [[Arquivo:Shiny_Infernape.png|link=Shiny Infernape]] [[Arquivo:085-shDodrio.png|link=Shiny Dodrio]] [[Arquivo:208-MegaSteelix.png|link=Mega Steelix]] [[Arquivo:MegaBlastoise.png|link=Mega Blastoise]] [[Arquivo:006-MegaCharizardX.png|link=Mega Charizard X]] |
| |- | | |- |
| | '''4''' ||30676, 20616, 3 | | | Corrupted Alchemist [[Arquivo:ultra_bag.png|link=]] |
| |- | | | x |
| | '''5''' ||30574, 20600, 8 | | | [[Arquivo:128-shTauros.png|link=Shiny Tauros]] [[Arquivo:257-MegaBlaziken.png|link=Mega Blaziken]] [[Arquivo:049-Sh_Venomoth.png|link=Shiny Venomoth]] [[Arquivo:471-Sh_Glaceon.png|link=Shiny Glaceon]] [[Arquivo:197-Sh_Umbreon.png|link=Shiny Umbreon]] [[Arquivo:306-MegaAggron.png|link=Mega Aggron]] |
| |- | | |- |
| |} | | |} |
| </center> | | </center> |
| |-|Fuchsia=
| |
| <center>
| |
| {|class="wikitable" width="15%" style="text-align:center"
| |
| |-
| |
| |+ Arredores de Fuchsia
| |
| |-
| |
| | '''1''' ||30766, 20600, 5
| |
| |-
| |
| | '''2''' ||30829, 20735, 5
| |
| |-
| |
| | '''3''' ||30848, 20677, 6
| |
| |-
| |
| | '''4''' ||30711, 20693, 5
| |
| |-
| |
| | '''5''' ||30652, 20731, 4
| |
| |-
| |
| | '''6''' ||30630, 20785, 6
| |
| |-
| |
| | '''7''' ||30582, 20718, 7
| |
| |-
| |
| | '''8''' ||30555, 20824, 5
| |
| |-
| |
| | '''9''' ||30585, 20897, 7
| |
| |-
| |
| | '''10''' ||30602, 20930, 4
| |
| |-
| |
| | '''11''' ||30586, 20935, 2
| |
| |-
| |
| | '''12''' ||30643, 20879, 6
| |
| |-
| |
| | '''13''' ||30595, 21005, 7
| |
| |-
| |
| | '''14''' ||30571, 20980, 5
| |
| |-
| |
| | '''15''' ||30427, 20940, 5
| |
| |-
| |
| |}
| |
| </center>
| |
| </tabber>
| |
|
| |
| <table class="seeMore">
| |
| <tr>
| |
| <td class="seeMore__image"><!-- Insira a imagem aqui -->[[Arquivo:Telekinetic-compass.gif|link=]]<!-- Insira a imagem aqui --></td>
| |
| <td> '''Veja mais:''' <!-- Insira o texto aqui -->''' [[Nightmare_Chests#Novos_Baús|Baús Secretos]]'''.<!-- Insira o texto aqui --> </td>
| |
| </tr>
| |
| </table>
| |
|
| |
| { x = 30588, y = 20928, z = 1 } totem
| |
| { x = 30582, y = 20344, z = 5 } diglet
| |
| { x = 30384, y = 20404, z = 2 } diglet
| |
| { x = 30685, y = 20391, z = 6 } diglet
| |
| { x = 30627, y = 20326, z = 7 } diglet
| |
| { x = 30725, y = 20479, z = 7 } machoke
| |
| { x = 30607, y = 20643, z = 6 } klinklang
| |
| { x = 30669, y = 20623, z = 4 } elekid
| |
| { x = 30790, y = 20425, z = 5 } darkrai
| |
| { x = 30925, y = 20469, z = 6 } congelado
| |
| { x = 30658, y = 20399, z = 5 } dugtrio
| |
| { x = 29967, y = 20153, z = 4 } engrenagem
| |
| { x = 30165, y = 20262, z = 8 } engrenagem
| |
| { x = 30213, y = 20215, z = 10 } engrenagem
| |
| { x = 30201, y = 20286, z = 10 } engrenagem
| |
| { x = 30389, y = 20283, z = 5 } engrenagem
| |
| { x = 30749, y = 20446, z = 7 } engrenagem
| |
| { x = 30130, y = 20087, z = 4 } engrenagem
| |
| { x = 30250, y = 20235, z = 9 } engrenagem
| |
| { x = 30368, y = 20271, z = 4 } engrenagem
| |
| { x = 31277, y = 19960, z = 14 } engrenagem
| |
| { x = 30247, y = 20520, z = 6 } caixao
| |
| { x = 30209, y = 20556, z = 5 } sphinx
| |
| { x = 30130, y = 20320, z = 6 } sphinx
| |
| { x = 30227, y = 20377, z = 7 } caixao
| |
| { x = 30223, y = 20366, z = 5 } caixao
| |
| { x = 30058, y = 20439, z = 6 } caixao
| |
| { x = 30117, y = 20558, z = 6 } caixao
| |
| { x = 30522, y = 20049, z = 5 } fossil
| |
| { x = 30523, y = 20057, z = 4 } fossil
| |
| { x = 30818, y = 20356, z = 2 } glalie
| |
| { x = 30738, y = 20232, z = 4 } sphinx
| |
| { x = 30847, y = 20241, z = 7 } sphinx
| |
| { x = 30730, y = 20234, z = 6 } hypno
| |
| { x = 30748, y = 20297, z = 5 } sphinx
| |
| { x = 30778, y = 20352, z = 7 } sphinx
| |
| { x = 31505, y = 20293, z = 14 } fossil
| |
| { x = 30849, y = 20676, z = 6 } fossil
| |
| { x = 30711, y = 20693, z = 5 } darkrai
| |
| { x = 30916, y = 20579, z = 2 } fossil
| |
| { x = 31300, y = 20288, z = 14 } totem
| |
| { x = 30555, y = 20825, z = 5 } totem
| |
| { x = 30571, y = 20980, z = 5 } totem
| |
| { x = 30478, y = 20579, z = 4 } charizard
| |
| { x = 30582, y = 20717, z = 7 } charizard
| |
| { x = 30419, y = 20674, z = 5 } charizard
| |
| { x = 31247, y = 20128, z = 14 } charizard
| |
| { x = 30350, y = 20786, z = 4 } poço roxo
| |
| { x = 30343, y = 20888, z = 6 } poço roxo
| |
| { x = 30313, y = 20783, z = 3 } poço alolan
| |
| { x = 30336, y = 20823, z = 8 } poço alolan
| |
| { x = 30466, y = 20303, z = 8 } hypno
| |
| { x = 30426, y = 20940, z = 5 } hypno
| |
| { x = 31563, y = 20217, z = 14 } hypno
| |
| { x = 30763, y = 20370, z = 6 } hypno
| |
| { x = 30748, y = 20529, z = 3 } machoke
| |
| { x = 31057, y = 20326, z = 14 } gong
| |
| { x = 30762, y = 20558, z = 5 } gong
| |
| { x = 30731, y = 20589, z = 4 } machoke
| |
| { x = 30765, y = 20601, z = 5 } darkrai
| |
| { x = 30231, y = 20414, z = 4 } strange eyes
| |
| { x = 30225, y = 20422, z = 2 } darkrai
| |
| { x = 30630, y = 20784, z = 6 } fossil
| |
| { x = 30586, y = 20896, z = 7 } darkrai
| |
| { x = 30146, y = 20311, z = 7 } darkrai
| |
| { x = 30221, y = 20393, z = 3 } darkrai
| |
| { x = 30503, y = 20316, z = 5 } darkrai
| |
| { x = 30628, y = 20532, z = 5 } darkrai
| |
| { x = 31245, y = 20227, z = 14 } darkrai
| |
| { x = 30653, y = 20731, z = 4 } darkrai
| |
| { x = 30643, y = 20879, z = 6 } pinsir
| |
| { x = 30573, y = 20236, z = 6 } pinsir
| |
| { x = 30432, y = 20280, z = 6 } poço alolan
| |
| { x = 30566, y = 20267, z = 7 } pinsir
| |
| { x = 30612, y = 20634, z = 5 } elekid
| |
| { x = 31165, y = 20216, z = 14 } elekid
| |
| { x = 30676, y = 20615, z = 3 } elekid
| |
| { x = 30980, y = 20382, z = 6 } congelado
| |
| { x = 30813, y = 20343, z = 5 } congelado
| |
| { x = 31512, y = 20064, z = 14 } congelado
| |
| { x = 30999, y = 20480, z = 3 } congelado
| |
| { x = 30867, y = 20549, z = 6 } fossil
| |
| { x = 31128, y = 20061, z = 14 } caixao
| |
| { x = 30829, y = 20735, z = 5 } darkrai
| |
| { x = 31041, y = 20746, z = 4 } darkrai
| |
| { x = 31130, y = 20092, z = 6 } glalie
| |
| { x = 31161, y = 19998, z = 4 } glalie
| |
| { x = 30868, y = 20081, z = 1 } fossil
| |
| { x = 30447, y = 20271, z = 2 } fossil
| |
| { x = 30682, y = 20098, z = 1 } darkrai
| |
| { x = 30694, y = 20073, z = 1 } darkrai
| |
| { x = 30470, y = 20086, z = 3 } gong
| |
| { x = 30225, y = 20876, z = 5 } poço alolan
| |
| { x = 30252, y = 20799, z = 5 } poço alolan
| |
| { x = 30336, y = 20817, z = 2 } poço shiny muk
| |
| { x = 30704, y = 20201, z = 4 } hypno
| |
| { x = 30869, y = 20472, z = 5 } congelado
| |
| { x = 30348, y = 20431, z = 4 } darkrai
| |
| { x = 30399, y = 20404, z = 4 } darkrai
| |
| { x = 30357, y = 20381, z = 6 } strange eyes
| |
| { x = 30385, y = 20462, z = 6 } strange eyes
| |


