|
|
| (865 revisões intermediárias por 3 usuários não estão sendo mostradas) |
| Linha 1: |
Linha 1: |
| <center> [[Arquivo:Banner_Goh_E_Koharu.png|link=]] </center> <<<<<<<--- editar
| | = WIP = |
|
| |
|
| | = Halloween Dungeon Captain Dusknoir = |
|
| |
|
| | <center> [[Arquivo:Banner_Chapeu_Seletor.png|link=]] </center> <br> |
|
| |
|
| | =='''Informações Básicas'''== |
|
| |
|
| <span style="color:red">'''Nível necessário:</span> 40 | | *'''Modalidade:''' Solo <br /> |
| | *'''Nivel necessário:''' 80 (Fácil), 200 (Normal) e 350 (Difícil). <br /> |
| | *'''Elemento:''' [[Arquivo:NeutralICON.png|Neutro|20px|link=Clãs]] Neutro |
| | *'''Tempo limite:''' 10 minutos. <br /> |
| | *'''PokéView: [[Arquivo:semvip.png|link=]] ''' <br> |
| | *'''Quantidade de Inimigos: 0.''' |
| | <center> |
| | {| class="wikitable" width="30%" |
| | |+ align="center" | Limitações e Bloqueios |
| | |- |
| | ! width="1%" style="background-color: #4682B4" | Poções |
| | ! width="1%" style="background-color: #4682B4" | Elixir |
| | ! width="1%" style="background-color: #4682B4" | Penalidade por morte |
| | ! width="1%" style="background-color: #4682B4" | Revive |
| | ! width="1%" style="background-color: #4682B4" | Medicine |
| | ! width="1%" style="background-color: #4682B4" | Berries |
| | |- |
| | | align="center" | [[Arquivo:semvip.png|link=]] |
| | | align="center" | [[Arquivo:semvip.png|link=]] |
| | | align="center" | [[Arquivo:semvip.png|link=]] |
| | | align="center" | [[Arquivo:semvip.png|link=]] |
| | | align="center" | [[Arquivo:semvip.png|link=]] |
| | | align="center" | [[Arquivo:semvip.png|link=]] |
| | |- |
| | |} |
| | </center> |
| | |
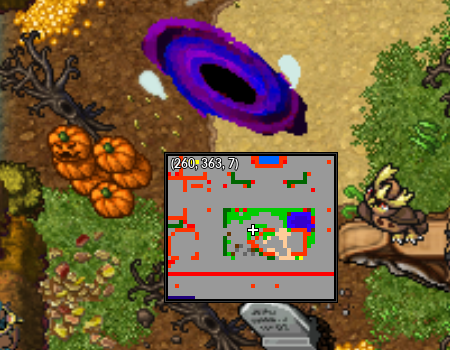
| | == Localização == |
| | |
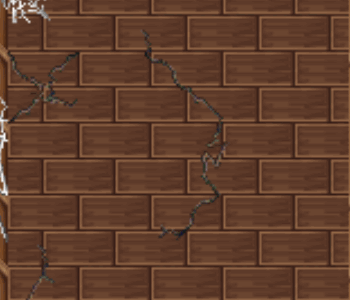
| | Essa dungeon fica localizada no Trade Center, dentro do portal abaixo, após entrar as dungeons estarão na parte superior. <br><br> |
| | |
| | <center> |
| | [[Arquivo:Loc DG Assombradas 2024.png|link=]] |
| | </center><br><br> |
| | |
| | * As dungeons ativas variam de dia e servidor. <br> |
| | |
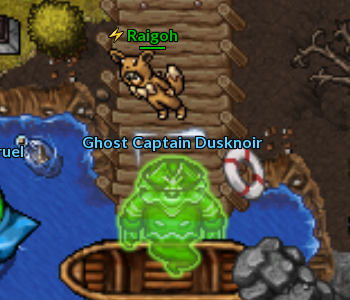
| | == Funcionamento== |
| | |
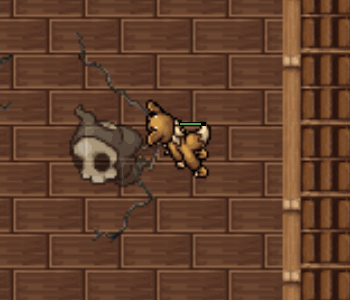
| | Para começar a Dungeon basta ir até o Ghost Captain Dusknoir e escolher a dificuldade. <br> |
| | <center> |
| | {| border="1" style="text-align: center; border-collapse: collapse" |
| | | width="100%" | [[Arquivo:Halloween captain dusknoir dungeon entrada.png|link=]] |
| | |- |
| | |} |
| | </center> |
| | |
| | == Dificuldades == |
| | |
| | <center class="center-tab"><tabber> |
| | |-|Fácil= |
| | <center> |
| | |
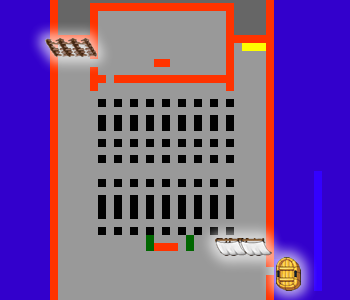
| | [[file:halloween captain dusknoir dungeon minimap andar 3.png|link=]] [[file:halloween captain dusknoir dungeon minimap andar 4.png|link=]] |
| | |
| | Ao entrar na Dungeon, o jogador deve recuperar a toolbox que fica no andar de cima, pra isso, o jogador deve passar pelas cordas e subir a escada do lado direito da Dungeon. |
| | |
| | === Caminho das Cordas === |
| | |
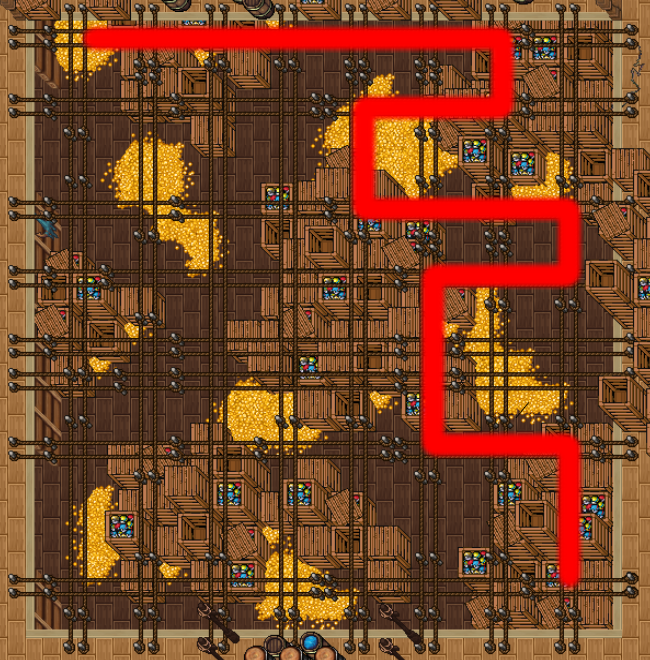
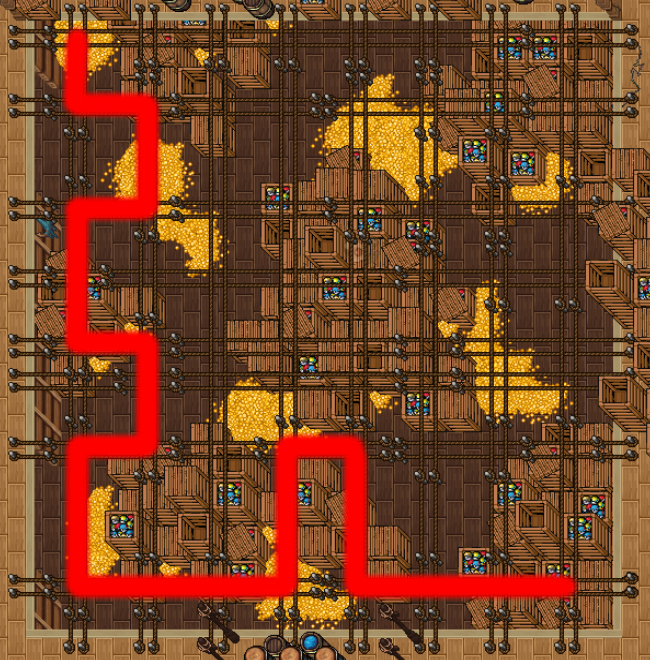
| | O minigame das cordas existem dois caminhos possiveis: |
| | |
| | <center> |
| | {|class="wikitable" style="text-align: center;" |
| | ! A !! B |
| | |- |
| | |[[file:halloween captain dusknoir dungeon minigame a.png|350px|link=]] <br> [[Media:halloween captain dusknoir dungeon minigame a.png|'''Clique para ampliar''']] |
| | |[[file:halloween captain dusknoir dungeon minigame b.png|350px|link=]] <br> [[Media:halloween captain dusknoir dungeon minigame b.png|'''Clique para ampliar''']] |
| | |- |
| | |} |
| | </center> |
| | |
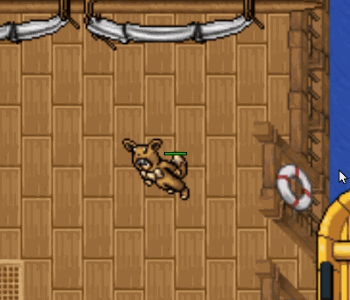
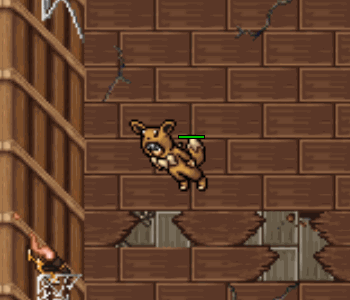
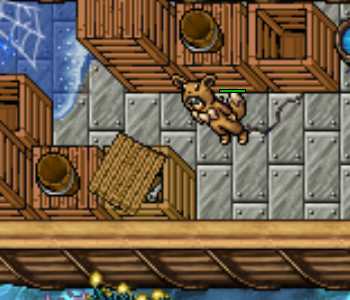
| | Ao concluir, os jogadores devem seguir ao norte e subir as escadas, tomando cuidado com as armadilhas [[file:355-Duskull.png|link=]] '''Duskull''' que, enquanto estão ativas, detectam o movimento do jogador e invocam Duskulls que atacam o jogador diretamente. |
| | |
| | [[file:halloween captain dusknoir dungeon trap duskull.gif|link=]] [[file:halloween captain dusknoir dungeon trap duskull ativa.gif|link=]] |
| | |
| | Ao subir as escadas, suba novamente para recuperar a Toolbox como na imagem abaixo: |
| | |
| | [[file:halloween captain dusknoir dungeon toolbox a.png|link=]] |
| | |
| | Volte até a sala inicial e repare as escadas que estão quebradas à esquerda como na imagem abaixo: |
| | |
| | [[file:halloween captain dusknoir dungeon toolbox b.gif|link=]] |
| | |
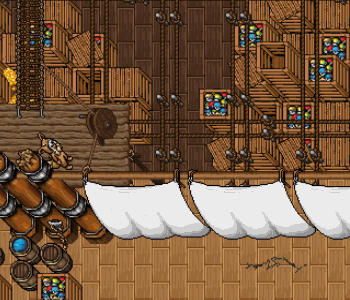
| | Após reparar as escadas, suba e, tomando cuidado com as armadilhas mais uma vez, passe pela ponte de cordas e clique na adriça ao final da ponte para levantar as velas que estão bloqueando a saida do navio. |
| | |
| | [[Arquivo:Halloween captain dusknoir dungeon adriça.gif|link=]] |
| | |
| | Agora basta escapar do navio utilizando o bote que fica logo depois do caminho das cordas como na imagem abaixo: |
| | |
| | [[Arquivo:Halloween captain dusknoir dungeon bote.gif|link=]] |
| | |
| | |
| | </center> |
| | |-|Normal= |
| | <center> |
| | |
| | == Primeira Etapa == |
| | |
| | [[Arquivo:Halloween captain dusknoir dungeon minimap andar 2.png|link=]] |
| | |
| | Ao entrar na Dungeon, o jogador se encontrará no segundo andar do barco, onde ele deve encontrar a porta que leva pro terceiro andar, para isso, ele deve tomar cuidado com as armadilhas do andar. |
| | |
| | ===Duskull=== |
| | |
| | Quando as armadilhas Duskull ativam, o jogadore deve parar de andar até que ele desapareça, caso contrário, um Duskull que ataca o jogador será invocado pra cada passo que o jogador deu enquanto a armadilha estava ativa. |
| | |
| | [[file:halloween captain dusknoir dungeon trap duskull.gif|link=]] [[file:halloween captain dusknoir dungeon trap duskull ativa.gif|link=]] |
| | |
| | ===Buracos=== |
| | |
| | O jogador deve tomar cuidado para não cair no primeiro andar, caso caia, terá que subir utilizando a corda ao norte. |
| | |
| | [[Arquivo:Halloween captain dusknoir dungeon buraco.gif|link=]] |
| | |
| | Ao encontrar a porta correta, o jogador estará no terceiro andar. |
| | |
| | == Segunda Etapa== |
| | |
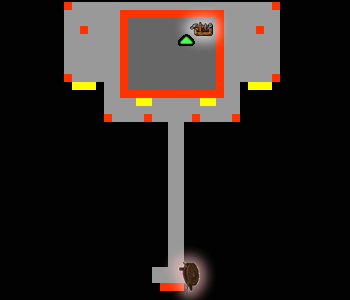
| | [[Arquivo:Halloween captain dusknoir dungeon minimap andar 3.png|link=]] [[Arquivo:Halloween captain dusknoir dungeon minimap andar 4.png|link=]] |
| | |
| | No terceiro andar, o jogador deve recuperar a toolbox que fica no andar de cima, pra isso, o jogador deve passar pelas cordas e subir a escada do lado direito da Dungeon. |
| | |
| | === Caminho das Cordas === |
| | |
| | O minigame das cordas existem dois caminhos possiveis: |
| | |
| | <center> |
| | {|class="wikitable" style="text-align: center;" |
| | ! A !! B |
| | |- |
| | |[[file:halloween captain dusknoir dungeon minigame a.png|350px|link=]] <br> [[Media:halloween captain dusknoir dungeon minigame a.png|'''Clique para ampliar''']] |
| | |[[file:halloween captain dusknoir dungeon minigame b.png|350px|link=]] <br> [[Media:halloween captain dusknoir dungeon minigame b.png|'''Clique para ampliar''']] |
| | |- |
| | |} |
| | </center> |
| | |
| | Ao concluir, os jogadores devem seguir ao norte e subir as escadas, tomando cuidado com as armadilhas [[file:355-Duskull.png|link=]] '''Duskull''' |
| | |
| | Ao subir as escadas, suba novamente para recuperar a Toolbox como na imagem abaixo: |
| | |
| | [[file:halloween captain dusknoir dungeon toolbox a.png|link=]] |
| | |
| | Volte até a sala inicial e repare as escadas que estão quebradas à esquerda como na imagem abaixo: |
| | |
| | [[file:halloween captain dusknoir dungeon toolbox b.gif|link=]] |
| | |
| | Após reparar as escadas, suba e, tomando cuidado com as armadilhas mais uma vez, passe pela ponte de cordas e clique na adriça ao final da ponte para levantar as velas que estão bloqueando a saida do navio. |
| | |
| | [[Arquivo:Halloween captain dusknoir dungeon adriça.gif|link=]] |
| | |
| | Agora basta escapar do navio utilizando o bote que fica logo depois do caminho das cordas como na imagem abaixo: |
| | |
| | [[Arquivo:Halloween captain dusknoir dungeon bote.gif|link=]] |
| | |
| | |
| | </center> |
| | |-|Dificil= |
| | <center> |
| | |
| | == Primeira Etapa == |
| | |
| | [[Arquivo:Halloween captain dusknoir dungeon minimap andar 1.png|link=]] |
| | |
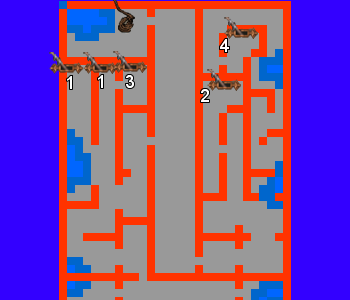
| | Ao entrar na Dungeon, o jogador deve achar a caixa contendo a chave da porta do segundo andar enquanto ativa as '''4''' alavancas em ordem para chegar ao segundo andar. |
| | |
| | ▶Obs: A primeira alavanca pode estar em dois lugares diferentes. |
| | |
| | A caixa pode estar em qualquer lugar do primeiro andar. |
| | |
| | [[Arquivo:Halloween captain dusknoir dungeon caixa.png|link=]] |
| | |
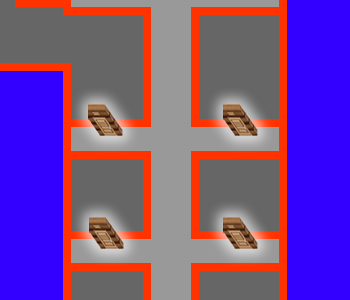
| | ===Barril explosivo=== |
| | |
| | O jogador deve tomar cuidado com os barris espalhados pelo primeiro andar, para liberar o caminho basta faze-los explodir clicando neles como na imagem: |
| | |
| | [[Arquivo:Halloween captain dusknoir dungeon barril a.gif]] [[Arquivo:Halloween captain dusknoir dungeon barril b.gif]] |
| | |
| | Ao encontrar a chave e puxar as 4 alavancas, basta seguir pelo caminho central e subir a corda marcada no mapa. |
| | |
| | No segundo andar o jogador deve utilizar a chave que acabou de pegar na caixa amarela e utilizar na porta como na imagem abaixo: |
| | |
| | [[Arquivo:Halloween captain dusknoir dungeon chave.gif|link=]] |
| | |
| | == Segunda Etapa == |
| | |
| | [[Arquivo:Halloween captain dusknoir dungeon minimap andar 2.png|link=]] |
| | |
| | Agora, o jogador deve procurar a porta correta que leva para o terceiro andar. A localização das portas está marcada no mapa acima: |
| | |
| | ===Duskull=== |
| | |
| | Quando as armadilhas Duskull ativam, o jogadore deve parar de andar até que ele desapareça, caso contrário, um Duskull que ataca o jogador será invocado pra cada passo que o jogador deu enquanto a armadilha estava ativa. |
|
| |
|
| <span style="color:red">'''Recompensa:</span> 5.000 de experiência, Average Pokémon Egg, 25 Great Potions, 10 Revives, 5 Ultra Balls, 25 Empty Super Balls, 50 Empty Great Balls, 10 Ultra Potions e uma Rough Gemstone.
| | [[file:halloween captain dusknoir dungeon trap duskull.gif|link=]] [[file:halloween captain dusknoir dungeon trap duskull ativa.gif|link=]] |
|
| |
|
| <br><b>Caso encontre algum erro ou queira acrescentar alguma informação, entre em contato com [[Nossa Equipe|um dos membros da wiki.]]</b></br>
| | ===Buracos=== |
|
| |
|
| ----
| | O jogador deve tomar cuidado para não cair no primeiro andar, caso caia, terá que subir utilizando a corda ao norte. |
|
| |
|
| === Iniciando === | | [[Arquivo:Halloween captain dusknoir dungeon buraco.gif|link=]] |
|
| |
|
| A Quest se inicia no NPC Yves no '''Laboratório Pokémon de Viridian''', ao sul do Coliseu.
| | Ao encontrar a porta correta, o jogador estará no terceiro andar. |
|
| |
|
| | == Terceira Etapa == |
|
| |
|
| [[Arquivo:NPC Yves.png|centro]] | | [[Arquivo:Halloween captain dusknoir dungeon minimap andar 3.png|link=]] [[Arquivo:Halloween captain dusknoir dungeon minimap andar 4.png|link=]] |
|
| |
|
| ----
| | No terceiro andar, o jogador deve recuperar a toolbox que fica no andar de cima, pra isso, o jogador deve passar pelas cordas e subir a escada do lado direito da Dungeon. |
| === Primeira parte ===
| |
|
| |
|
| Yves irá explicar que é um fã de Pokémon e paleontólogo que estuda Pokémon extintos, e que agora, com avanços tecnológicos, é possível resgatar um Pokémon de seu fóssil se houver material genético suficiente.
| | === Caminho das Cordas === |
|
| |
|
| Em seguida dirá ao jogador que um morador de Pewter City, conhecido como Flint montou uma pequena estação de lapidação de gemas com a ajuda de sua filha. Mensalmente, eles dividem um pacote de [[Arquivo:Rough_Gemstone.png|link=]] '''Rough Gemstones''' e pedras de evolução para a pesquisa do laboratório. Normalmente, um dos estagiários, Gary Oak, seria responsável por pegar a encomenda. No entanto, Gary está trabalhando com o Professor Oak na unidade de Pallet City, deixando-o sem ninguém para realizar a tarefa. Em seguida pedirá ao jogador para coletar a encomenda na estação de lapidação de gemas.
| | O minigame das cordas existem dois caminhos possiveis: |
|
| |
|
| | <center> |
| | {|class="wikitable" style="text-align: center;" |
| | ! A !! B |
| | |- |
| | |[[file:halloween captain dusknoir dungeon minigame a.png|350px|link=]] <br> [[Media:halloween captain dusknoir dungeon minigame a.png|'''Clique para ampliar''']] |
| | |[[file:halloween captain dusknoir dungeon minigame b.png|350px|link=]] <br> [[Media:halloween captain dusknoir dungeon minigame b.png|'''Clique para ampliar''']] |
| | |- |
| | |} |
| | </center> |
|
| |
|
| [[Arquivo:Flintyolandayvesquest.png|centro|link=]] | | Ao concluir, os jogadores devem seguir ao norte e subir as escadas, tomando cuidado com as armadilhas [[file:355-Duskull.png|link=]] '''Duskull''' |
|
| |
|
| A [[Arquivo:Encomendayvesquest.png]] encomenda se encontra no canto superior esquerdo da sala.
| | Ao subir as escadas, suba novamente para recuperar a Toolbox como na imagem abaixo: |
|
| |
|
| Após coletar a encomenda, o jogador deve retornar para o '''NPC Yves''', ele irá agradecer pela ajuda e o recompensará com um dos [[Arquivo:Average_pokemon.gif|link=]] ovos Pokémon do laboratório.
| | [[file:halloween captain dusknoir dungeon toolbox a.png|link=]] |
|
| |
|
| <table class="seeMore">
| | Volte até a sala inicial e repare as escadas que estão quebradas à esquerda como na imagem abaixo: |
| <tr>
| |
| <td class="seeMore__image">[[Arquivo:Telekinetic-compass.gif|link=]]</td>
| |
| <td> '''Veja mais: [[Pokémon Egg]]'''</td>
| |
| </tr>
| |
| </table>
| |
|
| |
|
| ----
| | [[file:halloween captain dusknoir dungeon toolbox b.gif|link=]] |
| === Segunda parte ===
| |
|
| |
|
| Ao falar com o '''NPC Yves''' mais uma vez, ele irá pedir o registro de '''25 Pokémon da região de Kanto''' para continuar com suas pesquisas.
| | Após reparar as escadas, suba e, tomando cuidado com as armadilhas mais uma vez, passe pela ponte de cordas e clique na adriça ao final da ponte para levantar as velas que estão bloqueando a saida do navio. |
|
| |
|
| Para registrar um Pokémon na Pokédex basta utilizar o atalho [[Arquivo:PokedexIcon.png|link=]] '''(SHIFT+D)''' em algum Pokémon selvagem ou clicando no icone da Pokédex como demonstrado abaixo.
| | [[Arquivo:Halloween captain dusknoir dungeon adriça.gif|link=]] |
|
| |
|
| | Agora basta escapar do navio utilizando o bote que fica logo depois do caminho das cordas como na imagem abaixo: |
|
| |
|
| <center>[[Arquivo:usingpokedex.gif|link=]]</center> <br>
| | [[Arquivo:Halloween captain dusknoir dungeon bote.gif|link=]] |
| | |
|
| |
|
|
| |
|
| Após concluir os registros solicitados, volte ao Yves e ele irá lhe entregar as seguintes recompensas.
| | </tabber> |
| | </center> |
|
| |
|
| | ==Recompensas== |
| | <center class="center-tab"><tabber> |
| | |-|Fácil= |
| <center> | | <center> |
| {| class="wikitable" style="text-align:center" | | {| class="wikitable" width="25%" |
| !colspan="2" |Item | | |- |
| !Quantidade | | ! colspan="2" | Item |
| | ! Raridade |
| | |- |
| | | align="center" | [[Arquivo:Halloween Token 2020.png|link=]] |
| | |align="left" style="border-left-style: hidden; | 20 Halloween Token |
| | | align="center" |Comum |
| | |- |
| | | align="center" | [[Arquivo:Halloween dimensional key.png|link=]] |
| | |align="left" style="border-left-style: hidden; | Halloween Dimensional Key |
| | | align="center" |Comum |
| | |- |
| | | align="center" | [[Arquivo:Ghost_Skull.png|link=]] |
| | |align="left" style="border-left-style: hidden; | Ghost Skull |
| | |align="center" | Comum |
| | |- |
| | | align="center" | [[Arquivo:x.png|link=]] |
| | |align="left" style="border-left-style: hidden; | Hangable Tricorn Hat |
| | |align="center" | Épico |
| | |- |
| | | align="center" | [[Arquivo:Zoroark_bag.png|link=]] |
| | |align="left" style="border-left-style: hidden; | Zoroark Bag |
| | |align="center" | Épico |
| | |- |
| | | align="center" | [[Arquivo:x.png|link=]] |
| | |align="left" style="border-left-style: hidden; | Hangable Ship's Helm |
| | |align="center" | Épico |
| | |- |
| | | align="center" | [[Arquivo:Shiny_Gengar_Emote_Toy.png|link=]] |
| | |align="left" style="border-left-style: hidden; | Shiny Gengar Emote Toy |
| | |align="center" | Épico |
| | |- |
| | | align="center" | [[Arquivo:Gengar_Emote_Toy.png|link=]] |
| | |align="left" style="border-left-style: hidden; | Gengar Emote Toy |
| | |align="center" | Épico |
| | |- |
| | | align="center" | [[Arquivo:Sableye_Emote_Toy.png|link=]] |
| | |align="left" style="border-left-style: hidden; | Sableye Emote Toy |
| | |align="center" | Épico |
| | |- |
| | | align="center" | [[Arquivo:Mismagius_Emote_Toy.png|link=]] |
| | |align="left" style="border-left-style: hidden; | Mismagius Emote Toy |
| | |align="center" | Épico |
| | |- |
| | | align="center" | [[Arquivo:Gengar-locker.png|70px|link=]] |
| | |align="left" style="border-left-style: hidden; | Gengar Locker |
| | |align="center" | Epic |
| | |- |
| | | align="center" | [[Arquivo:Shiny-ariados-locker.png|70px|link=]] |
| | |align="left" style="border-left-style: hidden; | Shiny Ariados Locker |
| | |align="center" | Epic |
| | |- |
| | | align="center" | [[Arquivo:Shiny-gengar-locker.png|70px|link=]] |
| | |align="left" style="border-left-style: hidden; | Shiny Gengar Locker |
| | |align="center" | Lendário |
| | |- |
| | ! colspan="3" | [[Arquivo:Exp_icon.png|30px|link=]] Experiência: 100.000 |
| | |} |
| | </center> |
| | |-|Normal= |
| | <center> |
| | {| class="wikitable" width="25%" |
| | |- |
| | ! colspan="2" | Item |
| | ! Raridade |
| | |- |
| | | align="center" | [[Arquivo:Halloween Token 2020.png|link=]] |
| | |align="left" style="border-left-style: hidden; | 30 Halloween Token |
| | | align="center" |Comum |
| | |- |
| | | align="center" | [[Arquivo:Halloween dimensional key.png|link=]] |
| | |align="left" style="border-left-style: hidden; | Halloween Dimensional Key |
| | | align="center" |Comum |
| | |- |
| | | align="center" | [[Arquivo:Ghost_Skull.png|link=]] |
| | |align="left" style="border-left-style: hidden; | Ghost Skull |
| | |align="center" | Comum |
| | |- |
| | | align="center" | [[Arquivo:x.png|link=]] |
| | |align="left" style="border-left-style: hidden; | Hangable Tricorn Hat |
| | |align="center" | Épico |
| | |- |
| | | align="center" | [[Arquivo:Zoroark_bag.png|link=]] |
| | |align="left" style="border-left-style: hidden; | Zoroark Bag |
| | |align="center" | Épico |
| | |- |
| | | align="center" | [[Arquivo:x.png|link=]] |
| | |align="left" style="border-left-style: hidden; | Hangable Ship's Helm |
| | |align="center" | Épico |
| | |- |
| | | align="center" | [[Arquivo:Shiny_Gengar_Emote_Toy.png|link=]] |
| | |align="left" style="border-left-style: hidden; | Shiny Gengar Emote Toy |
| | |align="center" | Épico |
| | |- |
| | | align="center" | [[Arquivo:Gengar_Emote_Toy.png|link=]] |
| | |align="left" style="border-left-style: hidden; | Gengar Emote Toy |
| | |align="center" | Épico |
| | |- |
| | | align="center" | [[Arquivo:Sableye_Emote_Toy.png|link=]] |
| | |align="left" style="border-left-style: hidden; | Sableye Emote Toy |
| | |align="center" | Épico |
| | |- |
| | | align="center" | [[Arquivo:Mismagius_Emote_Toy.png|link=]] |
| | |align="left" style="border-left-style: hidden; | Mismagius Emote Toy |
| | |align="center" | Épico |
| | |- |
| | | align="center" | [[Arquivo:gengar-locker.png|70px|link=]] |
| | |align="left" style="border-left-style: hidden; | Gengar Locker |
| | |align="center" | Epic |
| | |- |
| | | align="center" | [[Arquivo:Shiny-ariados-locker.png|70px|link=]] |
| | |align="left" style="border-left-style: hidden; | Shiny Ariados Locker |
| | |align="center" | Epic |
| | |- |
| | | align="center" | [[Arquivo:Shiny-gengar-locker.png|70px|link=]] |
| | |align="left" style="border-left-style: hidden; | Shiny Gengar Locker |
| | |align="center" | Lendário |
| | |- |
| | ! colspan="3" | [[Arquivo:Exp_icon.png|30px|link=]] Experiência: 150.000 |
| | |} |
| | </center> |
| | |-|Dificil= |
| | <center> |
| | {| class="wikitable" width="25%" |
| | |- |
| | ! colspan="2" | Item |
| | ! Raridade |
| | |- |
| | | align="center" | [[Arquivo:Halloween Token 2020.png|link=]] |
| | |align="left" style="border-left-style: hidden; | 40 Halloween Token |
| | | align="center" |Comum |
| | |- |
| | | align="center" | [[Arquivo:Halloween dimensional key.png|link=]] |
| | |align="left" style="border-left-style: hidden; | Halloween Dimensional Key |
| | | align="center" |Comum |
| | |- |
| | | align="center" | [[Arquivo:Ghost_Skull.png|link=]] |
| | |align="left" style="border-left-style: hidden; | Ghost Skull |
| | |align="center" | Comum |
| | |- |
| | | align="center" | [[Arquivo:x.png|link=]] |
| | |align="left" style="border-left-style: hidden; | Hangable Tricorn Hat |
| | |align="center" | Épico |
| | |- |
| | | align="center" | [[Arquivo:Zoroark_bag.png|link=]] |
| | |align="left" style="border-left-style: hidden; | Zoroark Bag |
| | |align="center" | Épico |
| | |- |
| | | align="center" | [[Arquivo:x.png|link=]] |
| | |align="left" style="border-left-style: hidden; | Hangable Ship's Helm |
| | |align="center" | Épico |
| | |- |
| | | align="center" | [[Arquivo:Shiny_Gengar_Emote_Toy.png|link=]] |
| | |align="left" style="border-left-style: hidden; | Shiny Gengar Emote Toy |
| | |align="center" | Épico |
| | |- |
| | | align="center" | [[Arquivo:Gengar_Emote_Toy.png|link=]] |
| | |align="left" style="border-left-style: hidden; | Gengar Emote Toy |
| | |align="center" | Épico |
| | |- |
| | | align="center" | [[Arquivo:Sableye_Emote_Toy.png|link=]] |
| | |align="left" style="border-left-style: hidden; | Sableye Emote Toy |
| | |align="center" | Épico |
| |- | | |- |
| |[[Arquivo:Great_Poiton.png|link=]] | | | align="center" | [[Arquivo:Mismagius_Emote_Toy.png|link=]] |
| | Great Potion | | |align="left" style="border-left-style: hidden; | Mismagius Emote Toy |
| |25 | | |align="center" | Épico |
| |- | | |- |
| |[[Arquivo:Revive.png|link=]] | | | align="center" | [[Arquivo:gengar-locker.png|70px|link=]] |
| |Revive | | |align="left" style="border-left-style: hidden; | Gengar Locker |
| |10 | | |align="center" | Epic |
| |- | | |- |
| |[[Arquivo:Ultra-ball(1).png|link=]] | | | align="center" | [[Arquivo:Shiny-ariados-locker.png|70px|link=]] |
| |Ultra Ball
| | |align="left" style="border-left-style: hidden; | Shiny Ariados Locker |
| |5
| | |align="center" | Epic |
| |-
| |
| |[[Arquivo:Super-ball(1).png|link=]] | |
| |Super Ball | |
| |25
| |
| |-
| |
| |[[Arquivo:Great-ball(1).png|link=]]
| |
| |Great Ball | |
| |50 | |
| |- | | |- |
| |[[Arquivo:Ultra_potion.png|link=]] | | | align="center" | [[Arquivo:Shiny-gengar-locker.png|70px|link=]] |
| |Ultra Potion | | |align="left" style="border-left-style: hidden; | Shiny Gengar Locker |
| |10 | | |align="center" | Lendário |
| |- | | |- |
| |} </center> <br> | | ! colspan="3" | [[Arquivo:Exp_icon.png|30px|link=]] Experiência: 200.000 |
| | |} |
| | </tabber> |
| | </center> |
|
| |
|
| ----
| | = Halloween Dungeon Kraken = |
|
| |
|
| === Terceira parte === | | <center class="center-tab"><tabber> |
| | |-|Habilidade A= |
| | <center> |
|
| |
|
| Como última missão, volte a conversar com '''Yves''' no '''Laboratório Pokémon de Viridian'''. Ele dirá que precisa de alguém para testar uma das máquinas de Boost, a fim de garantir que estão funcionando corretamente. Para tanto, solicitará que o jogador busque uma [[Arquivo:Cocoon stone.gif|link=]] '''Cocoon Stone''' no '''terceiro andar do laboratório'''. Basta subir as escadas e clicar com o botão direito na caixa ao sul como na imagem abaixo:<br>
| | a |
|
| |
|
| <br /> | | </center> |
| | |-|Habilidade B= |
| | <center> |
|
| |
|
| [[Arquivo:Baucocoonyvesquest.png|centro]]
| | b |
|
| |
|
| Ao retornar com a pedra de evolução, '''Yves''' irá lhe entregar uma [[Arquivo:010-Caterpie.png|link=Caterpie]] '''Caterpie''' para que seja realizado o teste na máquina de boost. Suba até o '''segundo andar do laboratório''' para realizar o procedimento, conforme demonstrado pela imagem abaixo: <br>
| | </center> |
| | |-|Habilidade C= |
| | <center> |
|
| |
|
| <br />
| | c |
|
| |
|
| <center>[[Arquivo:boostmachineyves.gif|link=]]</center> | | </center> |
| | |-|Habilidade D= |
| | <center> |
|
| |
|
| | D |
|
| |
|
| Ao concluir o boost do Caterpie, retorne até '''Yves''' para reportar o resultado. Ele lhe agradecerá novamente e entregará sua ultima recompensa:
| | </center> |
| | |-|Habilidade E= |
| | <center> |
|
| |
|
| | E |
| | |
| | </center> |
| | |-|Habilidade F= |
| <center> | | <center> |
| {| class="wikitable" width="18%"; background-color:#9d1a64";
| |
| ! width="10%" align="center" width="20%" style="background-color: #9d1a64"|5.000 Experiência
| |
| ! width="10%" align="center" width="20%" style="background-color: #9d1a64"|Rough Gemstone
| |
| |- align="center"
| |
| |[[Arquivo:Exp_icon.png|30px|link=]]
| |
| |[[Arquivo:Rough_Gemstone.png|link=]]
| |
| |} </center> <br>
| |
|
| |
|
| *'''Observação:''' A Rough Gemstone poderá ser trocada por pedras de evolução com a NPC Yolanda, na estação de lapidação de gemas em Pewter. Trata-se da mesma localização onde o jogador coleta a encomenda na primeira parte da quest.
| | F |
|
| |
|
| ---- | | </tabber> |
| | </center> |
| | |
| | |
| | |
| | |
| | |
| | == NPC TC NW == |
| | |
| | <center> |
| | {| class="wikitable" width="50%" style="text-align:center;" |
| | ! width="1%" | NPC |
| | ! width="9%" | Localização |
| | ! width="15%" | Pokémon |
| | |- |
| | | Corrupted Cameron [[Arquivo:poke_bag.png|link=]] |
| | | |
| | | [[Arquivo:407-Roserade.png|link=Roserade]] [[Arquivo:869-Alcremie.png|link=Alcremie]] [[Arquivo:584-Vanilluxe.png|link=Vanilluxe]] [[Arquivo:416-Vespiquen.png|link=Vespiquen]] [[Arquivo:026-AlolanRaichu.png|link=Alolan Raichu]] [[Arquivo:778-Mimikyu.png|link=Mimikyu]] |
| | |- |
| | | Corrupted Dr. Bara [[Arquivo:Great bag.png|link=]] |
| | | x |
| | | [[Arquivo:038-Sh_Ninetales.png.png|link=Shiny Ninetales]] [[Arquivo:Shinyrh.png|link=Shiny Rhydon]] [[Arquivo:233-Porygon2.png|link=Porygon2]] [[Arquivo:082-Sh_Magneton.png|link=Shiny Magneton]] [[Arquivo:196-shEspeon.png|link=Shiny Espeon]] [[Arquivo:085-shDodrio.png|link=Shiny Dodrio]] [[Arquivo:108-Lickitung.png|link=Lickitung]] [[Arquivo:036-Clefable.png|link=Clefable]] |
| | |- |
| | | Corrupted Waitress [[Arquivo:Great bag.png|link=]] |
| | | x |
| | | [[Arquivo:869-Alcremie.png|link=Alcremie]] [[Arquivo:217-Ursaring.png|link=Ursaring]] [[Arquivo:317-Swalot.png|link=Swalot]] [[Arquivo:365-Walrein.png|link=Walrein]] [[Arquivo:675-Pangoro.png|link=Pangoro]] [[Arquivo:143-Snorlax.png|link=Snorlax]] |
| | |- |
| | | Corrupted Nazar [[Arquivo:ultra_bag.png|link=]] |
| | | x |
| | | [[Arquivo:229-Houndoom.png|link=Houndoom]] [[Arquivo:310-Manectric.png|link=Manectric]] [[Arquivo:210-Granbull.png|link=Granbull]] [[Arquivo:059-Arcanine.png|link=Arcanine]] [[Arquivo:262-Mightyena.png|link=Mightyena]] [[Arquivo:405-Luxray.png|link=Luxray]] |
| | |- |
| | | Corrupted Gabriel [[Arquivo:ultra_bag.png|link=]] |
| | | x |
| | | [[Arquivo:126-Magmar.png|link=Magmar]] [[Arquivo:127-Pinsir.png|link=Pinsir]] [[Arquivo:115-Kangaskhan.png|link=Kangaskhan]] [[Arquivo:124-Jynx.png|link=Jynx]] [[Arquivo:125-Electabuzz.png|link=Electabuzz]] [[Arquivo:123-Scyther.png|link=Scyther]] |
| | |- |
| | | Corrupted Gates [[Arquivo:ultra_bag.png|link=]] |
| | | x |
| | | [[Arquivo:Shiny_Torkoall.png|link=Shiny Torkoal]] [[Arquivo:226-Mantine.png|link=Mantine]] [[Arquivo:196-shEspeon.png|link=Shiny Espeon]] [[Arquivo:197-Sh_Umbreon.png|link=Shiny Umbreon]] [[Arquivo:446-ShinyMunchlax1.png|link=Shiny Munchlax]] [[Arquivo:477-Dusknoir.png|link=Dusknoir]] |
| | |- |
| | | Corrupted Creator [[Arquivo:ultra_bag.png|link=]] |
| | | x |
| | | [[Arquivo:130-RedGyarados.png|link=Shiny Gyarados]] [[Arquivo:237-EliteHitmontop.png|link=Elite Hitmontop]] [[Arquivo:Sgengar.png|link=Shiny Gengar]] [[Arquivo:125-Sh_Electabuzz.png|link=Shiny Electabuzz]] [[Arquivo:142-Aerodactyl.png|link=Aerodactyl]] [[Arquivo:326-ShinyGrumpig.png|link=Shiny Grumpig]] [[Arquivo:Shmagby.png|link=Shiny Magby]] [[Arquivo:239-ShinyElekid1.png|link=Shiny Elekid]] [[Arquivo:232-ShinyDonphan.png|link=Shiny Donphan]] |
| | |- |
| | | Corrupted Jorge [[Arquivo:ultra_bag.png|link=]] |
| | | x |
| | | [[Arquivo:068-Sh_Machamp.png|link=Shiny Machamp]] [[Arquivo:196-shEspeon.png|link=Shiny Espeon]] [[Arquivo:430-Shiny_Honchkrow.png|link=Shiny Honchkrow]] [[Arquivo:197-Sh_Umbreon.png|link=Shiny Umbreon]] [[Arquivo:248-MegaTyranitar.png|link=Mega Tyranitar]] [[Arquivo:475-Shiny_Gallade.png|link=Shiny Gallade]] |
| | |- |
| | | Corrupted Victoria [[Arquivo:ultra_bag.png|link=]] |
| | | x |
| | | [[Arquivo:006-MegaCharizardY.png|link=Mega Charizard Y]] [[Arquivo:181-MegaAmpharos.png|link=Mega Ampharos]] [[Arquivo:248-MegaTyranitar.png|link=Mega Tyranitar]] [[Arquivo:065-MegaAlakazam.png|link=Mega Alakazam]] [[Arquivo:303-MegaMawile.png|link=Mega Mawile]] [[Arquivo:094-MegaGengar.png|link=Mega Gengar]] |
| | |- |
| | | Corrupted Apolo [[Arquivo:ultra_bag.png|link=]] |
| | | x |
| | | [[Arquivo:095-CrystalOnix.png|link=Crystal Onix]] [[Arquivo:485-Heatran.png|link=Heatran]] [[Arquivo:124-shJynx.png|link=Shiny Jynx]] [[Arquivo:Sh_venu.png|link=Shiny Venusaur]] [[Arquivo:448-MegaLucario.png|link=Mega Lucario]] [[Arquivo:038-Sh_Ninetales.png.png|link=Shiny Ninetales]] |
| | |- |
| | | Corrupted Atena [[Arquivo:ultra_bag.png|link=]] |
| | | x |
| | | [[Arquivo:130-RedGyarados.png|link=Shiny Gyarados]] [[Arquivo:596-G_Galvantula.png|link=Giant Galvantula]] [[Arquivo:Megahoundoom.png|link=Mega Houndoom]] [[Arquivo:Shiny_granbull.png|link=Shiny Granbull]] [[Arquivo:105-AlolaMarowak.png|link=Alolan Marowak]] [[Arquivo:359-MegaAbsol.png|link=Mega Absol]] |
| | |- |
| | | Corrupted Rachel [[Arquivo:ultra_bag.png|link=]] |
| | | x |
| | | [[Arquivo:617-Accelgor.png|link=Accelgor]] [[Arquivo:279-Pelipper.png|link=Pelipper]] [[Arquivo:S.klinklang.png|link=Shiny Klinklang]] [[Arquivo:164-Sh_Noctowl.png|link=Shiny Noctowl]] [[Arquivo:262-Mightyena.png|link=Mightyena]] [[Arquivo:614-Beartic.png|link=Beartic]] |
| | |- |
| | | Corrupted Joey [[Arquivo:ultra_bag.png|link=]] |
| | | x |
| | | [[Arquivo:470-Sh_Leafeon.png|link=Shiny Leafeon]] [[Arquivo:700-Sh_Sylveon.png|link=Shiny Sylveon]] [[Arquivo:310-Sh_Manectric.png|link=Shiny Manectric]] [[Arquivo:534-Conkeldurr.png|link=Conkeldurr]] [[Arquivo:437-Sh_Bronzong.png|link=Shiny Bronzong]] [[Arquivo:485-Heatran.png|link=Heatran]] |
| | |- |
| | | Corrupted Carlos [[Arquivo:ultra_bag.png|link=]] |
| | | x |
| | | [[Arquivo:405-Luxray.png|link=Luxray]] [[Arquivo:392-Infernape.png|link=Infernape]] [[Arquivo:475-Gallade.png|link=Gallade]] [[Arquivo:389-Torterra.png|link=Torterra]] [[Arquivo:395-Empoleon.png|link=Empoleon]] [[Arquivo:430-Honchkrow.png|link=Honchkrow]] |
| | |- |
| | | Corrupted Archeologist [[Arquivo:ultra_bag.png|link=]] |
| | | x |
| | | [[Arquivo:018-shPidgeot.png|link=Shiny Pidgeot]] [[Arquivo:142-Aerodactyl.png|link=Aerodactyl]] [[Arquivo:178-shXatu.png|link=Shiny Xatu]] [[Arquivo:Shiny_Torkoall.png|link=Shiny Torkoal]] [[Arquivo:376-Metagross.png|link=Metagross]] [[Arquivo:473-Mamoswine.png|link=Mamoswine]] |
| | |- |
| | | Corrupted Cook [[Arquivo:ultra_bag.png|link=]] |
| | | x |
| | | [[Arquivo:083-shFarfetch-D.png|link=Elite_Farfetch%27D]] [[Arquivo:114-Sh_Tangela.png|link=Shiny Tangela]] [[Arquivo:171-shLanturn.png|link=Shiny Lanturn]] [[Arquivo:073-Sh_Tentacruel.png|link=Shiny Tentacruel]] [[Arquivo:Shiny_snorlax.png|link=Shiny Snorlax]] [[Arquivo:157-Sh_Typhlosion.png|link=Shiny Typhlosion]] |
| | |- |
| | | Corrupted Mechanic [[Arquivo:ultra_bag.png|link=]] |
| | | x |
| | | [[Arquivo:082-Sh_Magneton.png|link=Shiny Magneton]] [[Arquivo:448-MegaLucario.png|link=Mega Lucario]] [[Arquivo:462-Shiny_Magnezone.png|link=Shiny Magnezone]] [[Arquivo:306-MegaAggron.png|link=Mega Aggron]] [[Arquivo:437-Sh_Bronzong.png|link=Shiny Bronzong]] [[Arquivo:376-Metagross.png|link=Metagross]] |
| | |- |
| | | Corrupted Hacker [[Arquivo:ultra_bag.png|link=]] |
| | | x |
| | | [[Arquivo:186-shPolitoed.png|link=Shiny Politoed]] [[Arquivo:Sh_ariados.png|link=Shiny Ariados]] [[Arquivo:197-Sh_Umbreon.png|link=Shiny Umbreon]] [[Arquivo:234-shStantler.png|link=Shiny Stantler]] [[Arquivo:474-PorygonZ.png|link=Porygon-Z]] [[Arquivo:095-CrystalOnix.png|link=Crystal Onix]] |
| | |- |
| | | Corrupted Decorator [[Arquivo:ultra_bag.png|link=]] |
| | | x |
| | | [[Arquivo:SshBlastoise.png|link=Shiny Blastoise]] [[Arquivo:038-AlolanNinetales.png|link=Alolan Ninetales]] [[Arquivo:006-shCharizard.png|link=Shiny Charizard]] [[Arquivo:700-Sh_Sylveon.png|link=Shiny Sylveon]] [[Arquivo:254-MegaSceptile.png|link=Mega Sceptile]] [[Arquivo:197-Sh_Umbreon.png|link=Shiny Umbreon]] |
| | |- |
| | | Corrupted Designer [[Arquivo:ultra_bag.png|link=]] |
| | | x |
| | | [[Arquivo:038-Sh_Ninetales.png.png|link=Shiny Ninetales]] [[Arquivo:234-shStantler.png|link=Shiny Stantler]] [[Arquivo:282-MegaGardevoir.png|link=Mega Gardevoir]] [[Arquivo:196-shEspeon.png|link=Shiny Espeon]] [[Arquivo:405-Shiny_Luxray.png|link=Shiny Luxray]] [[Arquivo:350-Milotic.png|link=Milotic]] |
| | |- |
| | | Corrupted Academic [[Arquivo:ultra_bag.png|link=]] |
| | | x |
| | | [[Arquivo:026-Sh_Raichu.png|link=Shiny Raichu]] [[Arquivo:Shiny_Infernape.png|link=Shiny Infernape]] [[Arquivo:085-shDodrio.png|link=Shiny Dodrio]] [[Arquivo:208-MegaSteelix.png|link=Mega Steelix]] [[Arquivo:MegaBlastoise.png|link=Mega Blastoise]] [[Arquivo:006-MegaCharizardX.png|link=Mega Charizard X]] |
| | |- |
| | | Corrupted Alchemist [[Arquivo:ultra_bag.png|link=]] |
| | | x |
| | | [[Arquivo:128-shTauros.png|link=Shiny Tauros]] [[Arquivo:257-MegaBlaziken.png|link=Mega Blaziken]] [[Arquivo:049-Sh_Venomoth.png|link=Shiny Venomoth]] [[Arquivo:471-Sh_Glaceon.png|link=Shiny Glaceon]] [[Arquivo:197-Sh_Umbreon.png|link=Shiny Umbreon]] [[Arquivo:306-MegaAggron.png|link=Mega Aggron]] |
| | |- |
| | |} |
| | </center> |


