Orebound: mudanças entre as edições
(→Tier 2) |
|||
| (94 revisões intermediárias por 7 usuários não estão sendo mostradas) | |||
| Linha 1: | Linha 1: | ||
<center>[[file:Banner Clã Orebound.png|link=]]<br></center> | |||
<br>'''Caso encontre algum erro ou queira acrescentar alguma informação, <span style="color:#F60303">entre em contato com um dos membros da wiki</span>.''' | |||
=Introdução= | =Introdução= | ||
| Linha 17: | Linha 20: | ||
O bônus máximo do clã é aplicado ao completar as tarefas do '''Rank 5'''. Abaixo estão as porcentagens de bônus adquiridas: | O bônus máximo do clã é aplicado ao completar as tarefas do '''Rank 5'''. Abaixo estão as porcentagens de bônus adquiridas: | ||
[[Arquivo:Rock.png|link=]] '''Rock:''' Atk 25%, Def 25% | [[Arquivo:Rock.png|link=]] '''Rock:''' Atk 25%, Def 25% | ||
[[Arquivo:Ground.png|link=]] '''Ground:''' Atk 25%, Def 25% | |||
[[Arquivo:Ground.png|link=]] '''Ground:''' Atk 25%, Def 25% | |||
* É possível observar na [[Diamond Shop]], dentro do jogo, o bônus ofensivo e defensivo que cada clã recebe no ranking 5. | |||
* O bônus de ataque é aplicado aos movimentos do Pokémon. Se o jogador estiver usando um Pokémon de fora do seu clã, mas que execute um movimento do elemento do seu clã, o bônus de ataque ainda será concedido. | |||
=Tiers= | =Tiers= | ||
| Linha 29: | Linha 36: | ||
{| class="wikitable" style="text-align:center" width="50%;" | {| class="wikitable" style="text-align:center" width="50%;" | ||
|- | |- | ||
! colspan="2" scope="col" style="background-color: # | ! colspan="2" scope="col" style="background-color: #8A0808"| Função PvE | ||
! colspan="2" scope="col" style="background-color: # | ! colspan="2" scope="col" style="background-color: #8A0808"| Função PvP | ||
|- | |- | ||
! scope="col | ! scope="col" | <span style="color:black">Ícone</span> | ||
! scope="col | ! scope="col" | <span style="color:black">Função</span> | ||
! scope="col | ! scope="col" | <span style="color:black">Ícone</span> | ||
! scope="col | ! scope="col" | <span style="color:black">Função</span> | ||
|- | |- | ||
| text-align:"center;" | [[Arquivo:Interface_Tank_PVE.png|24px|link=]] | | text-align:"center;" | [[Arquivo:Interface_Tank_PVE.png|24px|link=]] | ||
| Linha 62: | Linha 69: | ||
| text-align:"center;" | Support | | text-align:"center;" | Support | ||
|- | |- | ||
| | | text-align:"center;" | [[Arquivo:Interface_Speedster_PVE.png|24px|link=]] | ||
| text-align:"center;" | Speedster | |||
| text-align:"center;" | [[Arquivo:Interface_Disrupter_PVP.png|24px|link=]] | | text-align:"center;" | [[Arquivo:Interface_Disrupter_PVP.png|24px|link=]] | ||
| text-align:"center;" | Disrupter | | text-align:"center;" | Disrupter | ||
| Linha 68: | Linha 76: | ||
</center> | </center> | ||
Abaixo estão listados todos os Pokémon do clã Orebound e suas respectivas funções, separados por Tier. | Abaixo estão listados todos os Pokémon do clã '''Orebound''' e suas respectivas funções, separados por Tier e com algumas recomendações de Held Itens. <br> | ||
<b>Observação:</b> A nossa lista de Helds Recomendados foi composta por colaboradores experientes da Wiki da PokeXGames e serve como sugestões de Held Itens para os Pokémon no âmbito do PvP e PvE, respectivamente. | |||
O jogador ainda tem toda a liberdade de testar e utilizar outros Helds que não esses, podendo personalizar seu Pokémon de um jeito diferente. Ressaltamos que em caso de alterações nos Pokémon, essa lista pode ser alterada e não será garantido que o Pokémon seja adicionado como opção no NPC Jorge.</br> | |||
<b>Observação:</b> Na listagem, o Held PvP sugerido é o primeiro, seguido pelo Held PvE. Caso o Pokémon utilize o mesmo Held Item nos 2 âmbitos, aparecerá listado somente 1 Held Item.</br> | |||
==Tier 1A== | ==Tier 1A== | ||
<center> | <center> | ||
{| class="wikitable" style="text-align:center" width=" | {| class="wikitable" style="text-align:center" width="65%;" | ||
|- | |- | ||
! scope="col" width=" | ! scope="col" width="10%" style="background-color: #F1C232"| <span style="color:black">Nº Dex</span> | ||
! scope="col" style="background-color: # | ! scope="col" style="background-color: #F1C232"| <span style="color:black">Ícone</span> | ||
! scope="col" width=" | ! scope="col" width="15%;" style="background-color: #F1C232"| <span style="color:black">Nome</span> | ||
! scope="col" style="background-color: # | ! scope="col" style="background-color: #F1C232"| <span style="color:black">Elementos</span> | ||
! scope="col" width=" | ! scope="col" width="15%;" style="background-color: #F1C232"| <span style="color:black">Função PvE</span> | ||
! scope="col" width=" | ! scope="col" width="15%;" style="background-color: #F1C232"| <span style="color:black">Função PvP</span> | ||
! scope="col" width="20%;" style="background-color: #F1C232"| <span style="color:black">Held Recomendado (PvP/PvE)</span> | |||
|- | |- | ||
| text-align:center;" | #185 | | text-align:center;" | #185 | ||
| Linha 87: | Linha 101: | ||
| width="10%" | [[Arquivo:Interface_BDD_PVE.png|24px|link=]] [[Arquivo:Interface_OTDD_PVE.png|24px|link=]] | | width="10%" | [[Arquivo:Interface_BDD_PVE.png|24px|link=]] [[Arquivo:Interface_OTDD_PVE.png|24px|link=]] | ||
| width="10%" | [[Arquivo:Interface_Tanker_PVP.png|24px|link=]] | | width="10%" | [[Arquivo:Interface_Tanker_PVP.png|24px|link=]] | ||
| text-align:"center;" | [[file:Def7.png|Defense T7|link=]] [[file:Atk7.png|Attack T7|link=]] | |||
|} | |} | ||
</center> | </center> | ||
| Linha 93: | Linha 108: | ||
<center> | <center> | ||
{| class="wikitable" style="text-align:center" width=" | {| class="wikitable" style="text-align:center" width="65%;" | ||
|- | |- | ||
! scope="col" width=" | ! scope="col" width="10%" style="background-color: #F1C232"| <span style="color:black">Nº Dex</span> | ||
! scope="col" style="background-color: # | ! scope="col" style="background-color: #F1C232"| <span style="color:black">Ícone</span> | ||
! scope="col" width=" | ! scope="col" width="15%;" style="background-color: #F1C232"| <span style="color:black">Nome</span> | ||
! scope="col" style="background-color: # | ! scope="col" style="background-color: #F1C232"| <span style="color:black">Elementos</span> | ||
! scope="col" width=" | ! scope="col" width="15%;" style="background-color: #F1C232"| <span style="color:black">Função PvE</span> | ||
! scope="col" width=" | ! scope="col" width="15%;" style="background-color: #F1C232"| <span style="color:black">Função PvP</span> | ||
! scope="col" width="20%;" style="background-color: #F1C232"| <span style="color:black">Held Recomendado (PvP/PvE)</span> | |||
|- | |- | ||
| text-align:center;" | #247 | | text-align:center;" | #247 | ||
| Linha 108: | Linha 124: | ||
| text-align:center;" | [[Arquivo:Interface_BDD_PVE.png|24px|link=]] [[Arquivo:Interface_OTDD_PVE.png|24px|link=]] | | text-align:center;" | [[Arquivo:Interface_BDD_PVE.png|24px|link=]] [[Arquivo:Interface_OTDD_PVE.png|24px|link=]] | ||
| text-align:center;" | [[Arquivo:Interface_Tanker_PVP.png|24px|link=]] | | text-align:center;" | [[Arquivo:Interface_Tanker_PVP.png|24px|link=]] | ||
| text-align:"center;" | [[file:Def7.png|Defense T7|link=]] [[file:Atk7.png|Attack T7|link=]] | |||
|} | |} | ||
</center> | </center> | ||
| Linha 114: | Linha 131: | ||
<center> | <center> | ||
{| class="wikitable sortable" style="text-align:center" width=" | {| class="wikitable sortable" style="text-align:center" width="65%;" | ||
|- | |- | ||
! scope="col" width=" | ! scope="col" width="10%" style="background-color: #F1C232"| <span style="color:black">Nº Dex</span> | ||
! scope="col" style="background-color: # | ! scope="col" style="background-color: #F1C232"| <span style="color:black">Ícone</span> | ||
! scope="col" width=" | ! scope="col" width="15%;" style="background-color: #F1C232"| <span style="color:black">Nome</span> | ||
! scope="col" style="background-color: # | ! scope="col" style="background-color: #F1C232"| <span style="color:black">Elementos</span> | ||
! scope="col" width=" | ! scope="col" width="15%;" style="background-color: #F1C232"| <span style="color:black">Função PvE</span> | ||
! scope="col" width=" | ! scope="col" width="15%;" style="background-color: #F1C232"| <span style="color:black">Função PvP</span> | ||
! scope="col" width="20%;" style="background-color: #F1C232"| <span style="color:black">Held Recomendado (PvP/PvE)</span> | |||
|- | |||
| text-align:"center;" | #059 | |||
| text-align:"center;" | [[Arquivo:059 - Hisuian Arcanine.png|link=Hisuian Arcanine]] | |||
| text-align:"center;" | '''[[Hisuian Arcanine]]*''' | |||
| text-align:"center;" | [[Arquivo:Fire.png|link=Volcanic]] [[Arquivo:Rock.png|link=Orebound]] | |||
| text-align:"center;" | [[Arquivo:Not.png|link=]] | |||
| text-align:"center;" | [[Arquivo:Interface_BDD_PVP.png|24px|link=]] | |||
| text-align:"center;" | [[file:Atk7.png|Attack T7|link=]] | |||
|- | |- | ||
| text-align:"center;" | #076 | | text-align:"center;" | #076 | ||
| Linha 129: | Linha 155: | ||
| text-align:"center;" | [[Arquivo:Interface_OTDD_PVE.png|24px|link=]] | | text-align:"center;" | [[Arquivo:Interface_OTDD_PVE.png|24px|link=]] | ||
| text-align:"center;" | [[Arquivo:Interface_Tanker_PVP.png|24px|link=]] | | text-align:"center;" | [[Arquivo:Interface_Tanker_PVP.png|24px|link=]] | ||
| text-align:"center;" | [[file:Atk7.png|Attack T7|link=]] | |||
|- | |- | ||
| text-align:"center;" | #095 | | text-align:"center;" | #095 | ||
| Linha 136: | Linha 163: | ||
| text-align:"center;" | [[Arquivo:Interface_BDD_PVE.png|24px|link=]] | | text-align:"center;" | [[Arquivo:Interface_BDD_PVE.png|24px|link=]] | ||
| text-align:"center;" | [[Arquivo:Interface_BDD_PVP.png|24px|link=]] | | text-align:"center;" | [[Arquivo:Interface_BDD_PVP.png|24px|link=]] | ||
| text-align:"center;" | [[file:Atk7.png|Attack T7|link=]] | |||
|- | |- | ||
| text-align:"center;" | #105 | | text-align:"center;" | #105 | ||
| Linha 143: | Linha 171: | ||
| text-align:"center;" | [[Arquivo:Interface_OTDD_PVE.png|24px|link=]] | | text-align:"center;" | [[Arquivo:Interface_OTDD_PVE.png|24px|link=]] | ||
| text-align:"center;" | [[Arquivo:Interface_OTDD_PVP.png|24px|link=]] | | text-align:"center;" | [[Arquivo:Interface_OTDD_PVP.png|24px|link=]] | ||
| text-align:"center;" | [[file:Def7.png|Defense T7|link=]] [[file:Atk7.png|Attack T7|link=]] | |||
|- | |- | ||
| text-align:"center;" | #112 | | text-align:"center;" | #112 | ||
| Linha 150: | Linha 179: | ||
| text-align:"center;" | [[Arquivo:Interface_BDD_PVE.png|24px|link=]] | | text-align:"center;" | [[Arquivo:Interface_BDD_PVE.png|24px|link=]] | ||
| text-align:"center;" | [[Arquivo:Interface_OffTank_PVP.png|24px|link=]] | | text-align:"center;" | [[Arquivo:Interface_OffTank_PVP.png|24px|link=]] | ||
| text-align:"center;" | [[file:Def7.png|Defense T7|link=]] [[file:Atk7.png|Attack T7|link=]] | |||
|- | |- | ||
| text-align:"center;" | #142 | | text-align:"center;" | #142 | ||
| Linha 157: | Linha 187: | ||
| text-align:"center;" | [[Arquivo:Interface_OTDD_PVE.png|24px|link=]] | | text-align:"center;" | [[Arquivo:Interface_OTDD_PVE.png|24px|link=]] | ||
| text-align:"center;" | [[Arquivo:Interface_Tanker_PVP.png|24px|link=]] | | text-align:"center;" | [[Arquivo:Interface_Tanker_PVP.png|24px|link=]] | ||
| text-align:"center;" | [[file:Def7.png|Defense T7|link=]] [[file:Atk7.png|Attack T7|link=]] | |||
|- | |- | ||
| text-align:"center;" | #208 | | text-align:"center;" | #208 | ||
| Linha 162: | Linha 193: | ||
| text-align:"center;" | '''[[Golden Steelix]]'''* | | text-align:"center;" | '''[[Golden Steelix]]'''* | ||
| text-align:"center;" | [[Arquivo:Steel.png|link=]] [[Arquivo:Ground.png|link=Orebound]] | | text-align:"center;" | [[Arquivo:Steel.png|link=]] [[Arquivo:Ground.png|link=Orebound]] | ||
| text-align:"center;" | [[Arquivo:Interface_BDD_PVE.png|24px|link=]] | | text-align:"center;" | [[arquivo:Interface Speedster PVE.png|24px|link=]] [[Arquivo:Interface_BDD_PVE.png|24px|link=]] | ||
| text-align:"center;" | [[Arquivo:Interface_BDD_PVP.png|24px|link=]] | | text-align:"center;" | [[Arquivo:Interface_BDD_PVP.png|24px|link=]] | ||
| text-align:"center;" | [[file:Atk7.png|Attack T7|link=]] | |||
|- | |- | ||
| text-align:"center;" | #208 | | text-align:"center;" | #208 | ||
| Linha 171: | Linha 203: | ||
| text-align:"center;" | [[Arquivo:Interface_BDD_PVE.png|24px|link=]] | | text-align:"center;" | [[Arquivo:Interface_BDD_PVE.png|24px|link=]] | ||
| text-align:"center;" | [[Arquivo:Interface_OffTank_PVP.png|24px|link=]] | | text-align:"center;" | [[Arquivo:Interface_OffTank_PVP.png|24px|link=]] | ||
| text-align:"center;" | [[file:Def7.png|Defense T7|link=]] [[file:Atk7.png|Attack T7|link=]] | |||
|- | |- | ||
| text-align:"center;" | #219 | | text-align:"center;" | #219 | ||
| Linha 178: | Linha 211: | ||
| text-align:"center;" | [[Arquivo:Interface_OTDD_PVE.png|24px|link=]] | | text-align:"center;" | [[Arquivo:Interface_OTDD_PVE.png|24px|link=]] | ||
| text-align:"center;" | [[Arquivo:Interface_Tanker_PVP.png|24px|link=]] | | text-align:"center;" | [[Arquivo:Interface_Tanker_PVP.png|24px|link=]] | ||
| text-align:"center;" | [[file:Def7.png|Defense T7|link=]] [[file:Atk7.png|Attack T7|link=]] | |||
|- | |- | ||
| text-align:"center;" | #248 | | text-align:"center;" | #248 | ||
| Linha 185: | Linha 219: | ||
| text-align:"center;" | [[Arquivo:Interface_OTDD_PVE.png|24px|link=]] | | text-align:"center;" | [[Arquivo:Interface_OTDD_PVE.png|24px|link=]] | ||
| text-align:"center;" | [[Arquivo:Interface_OffTank_PVP.png|24px|link=]] | | text-align:"center;" | [[Arquivo:Interface_OffTank_PVP.png|24px|link=]] | ||
| text-align:"center;" | [[file:Atk7.png|Attack T7|link=]] | |||
|- | |- | ||
| text-align:"center;" | #260 | | text-align:"center;" | #260 | ||
| Linha 192: | Linha 227: | ||
| text-align:"center;" | [[Arquivo:Interface_BDD_PVE.png|24px|link=]] | | text-align:"center;" | [[Arquivo:Interface_BDD_PVE.png|24px|link=]] | ||
| text-align:"center;" | [[Arquivo:Interface_OffTank_PVP.png|24px|link=]] | | text-align:"center;" | [[Arquivo:Interface_OffTank_PVP.png|24px|link=]] | ||
| text-align:"center;" | [[file:Atk7.png|Attack T7|link=]] | |||
|- | |- | ||
| text-align:"center;" | #389 | | text-align:"center;" | #389 | ||
| Linha 199: | Linha 235: | ||
| text-align:"center;" | [[Arquivo:Interface_OTDD_PVE.png|24px|link=]] | | text-align:"center;" | [[Arquivo:Interface_OTDD_PVE.png|24px|link=]] | ||
| text-align:"center;" | [[Arquivo:Interface_Tanker_PVP.png|24px|link=]] | | text-align:"center;" | [[Arquivo:Interface_Tanker_PVP.png|24px|link=]] | ||
| text-align:"center;" | [[file:Def7.png|Defense T7|link=]] [[file:Atk7.png|Attack T7|link=]] | |||
|- | |- | ||
| text-align:"center;" | #445 | | text-align:"center;" | #445 | ||
| Linha 206: | Linha 243: | ||
| text-align:"center;" | [[Arquivo:Interface_BDD_PVE.png|24px|link=]] | | text-align:"center;" | [[Arquivo:Interface_BDD_PVE.png|24px|link=]] | ||
| text-align:"center;" | [[Arquivo:Interface_Tanker_PVP.png|24px|link=]] | | text-align:"center;" | [[Arquivo:Interface_Tanker_PVP.png|24px|link=]] | ||
| text-align:"center;" | [[file:Def7.png|Defense T7|link=]] [[file:Atk7.png|Attack T7|link=]] | |||
|- | |- | ||
| text-align:"center;" | #464 | | text-align:"center;" | #464 | ||
| Linha 213: | Linha 251: | ||
| text-align:"center;" | [[Arquivo:Interface_BDD_PVE.png|24px|link=]] | | text-align:"center;" | [[Arquivo:Interface_BDD_PVE.png|24px|link=]] | ||
| text-align:"center;" | [[Arquivo:Interface_Tanker_PVP.png|24px|link=]] | | text-align:"center;" | [[Arquivo:Interface_Tanker_PVP.png|24px|link=]] | ||
| text-align:"center;" | [[file:Def7.png|Defense T7|link=]] [[file:Atk7.png|Attack T7|link=]] | |||
|- | |||
| text-align:"center;" | #472 | |||
| text-align:"center;" | [[File:472 - Shiny Gliscor.png|link=Shiny Gliscor]] | |||
| text-align:"center;" | [[Shiny Gliscor]] | |||
| text-align:"center;" | [[Arquivo:Ground.png|link=Orebound]] [[Arquivo:Flying.png|link=Wingeon]] | |||
| text-align:"center;" | [[Arquivo:Not.png|link=]] | |||
| text-align:"center;" | [[Arquivo:Interface_Tanker_PVP.png|24px|link=]] | |||
| text-align:"center;" | [[file:Def7.png|Defense T7|link=]] | |||
|- | |- | ||
| text-align:"center;" | #473 | | text-align:"center;" | #473 | ||
| Linha 219: | Linha 266: | ||
| text-align:"center;" | [[Arquivo:Ice.png|link=Seavell]] [[Arquivo:Ground.png|link=Orebound]] | | text-align:"center;" | [[Arquivo:Ice.png|link=Seavell]] [[Arquivo:Ground.png|link=Orebound]] | ||
| text-align:"center;" | [[Arquivo:Interface_OTDD_PVE.png|24px|link=]] | | text-align:"center;" | [[Arquivo:Interface_OTDD_PVE.png|24px|link=]] | ||
| text-align:"center;" | [[Arquivo: | | text-align:"center;" | [[Arquivo:Interface Tanker PVP.png|24px|link=]] | ||
| text-align:"center;" | [[file:Def7.png|Defense T7|link=]] [[file:Atk7.png|Attack T7|link=]] | |||
|- | |- | ||
| text-align:"center;" | #655 | | text-align:"center;" | #655 | ||
| Linha 227: | Linha 275: | ||
| text-align:"center;" | [[Arquivo:Not.png|link=]] | | text-align:"center;" | [[Arquivo:Not.png|link=]] | ||
| text-align:"center;" | [[Arquivo:Interface_Tanker_PVP.png|24px|link=]] | | text-align:"center;" | [[Arquivo:Interface_Tanker_PVP.png|24px|link=]] | ||
| text-align:"center;" | [[file:Def7.png|Defense T7|link=]] | |||
|- | |||
| text-align:center;" | #901 | |||
| text-align:center;" | [[file:901 - Bloodmoon Ursaluna.png|link=Bloodmoon Ursaluna]] | |||
| text-align:center;" | '''[[Bloodmoon Ursaluna]]*''' | |||
| text-align:center;" | [[Arquivo:Normal1.png|link=]] [[arquivo:Ground.png|link=Orebound]] | |||
| width="10%" | [[Arquivo:Not.png|link=]] | |||
| width="10%" | [[Arquivo:Interface_OffTank_PVP.png|24px|link=]] | |||
| text-align:"center;" | [[file:Atk7.png|Attack T7|link=]] | |||
|- | |- | ||
| text-align:"center;" | #970 | |||
| text-align:"center;" | [[file:970-Mega_Glimmora.png|link=Mega Glimmora]] | |||
| text-align:"center;" | [[Mega Glimmora]] | |||
| text-align:"center;" | [[Arquivo:Rock.png|link=]] [[Arquivo:Poison1.png|link=Malefic]] | |||
| text-align:"center;" | [[Arquivo:Interface_BDD_PVE.png|24px|link=]] | |||
| text-align:"center;" | [[Arquivo:Interface_OffTank_PVP.png|24px|link=]] | |||
| text-align:"center;" | [[file:Def7.png|Defense T7|link=]] [[file:Atk7.png|Attack T7|link=]] | |||
|} | |} | ||
</center> | </center> | ||
'''*Observação:''' Os Pokémon [[Arquivo:445-MegaGarchomp.png|link=Mega Garchomp]] '''[[Mega Garchomp]]''' | '''*Observação:''' Os Pokémon [[Arquivo:445-MegaGarchomp.png|link=Mega Garchomp]] '''[[Mega Garchomp]]''' , [[Arquivo:Shiny steelix.png|link=Golden Steelix]] '''[[Golden Steelix]]''' , [[Arquivo:059 - Hisuian Arcanine.png|link=Hisuian Arcanine]] '''[[Hisuian Arcanine]]''' e [[file:901 - Bloodmoon Ursaluna.png|link=Bloodmoon Ursaluna]] '''[[Bloodmoon Ursaluna]]''' são exclusivos de outros clãs no PvP.<br> | ||
==Technical Machine (TM)== | |||
<center> | |||
{| class="wikitable sortable" style="text-align:center" width="65%;" | |||
|- | |||
! scope="col" width="10%" style="background-color: #F1C232"| <span style="color:black">Nº Dex</span> | |||
! scope="col" style="background-color: #F1C232"| <span style="color:black">Ícone</span> | |||
! scope="col" width="15%;" style="background-color: #F1C232"| <span style="color:black">Nome</span> | |||
! scope="col" style="background-color: #F1C232"| <span style="color:black">Elementos</span> | |||
! scope="col" width="15%;" style="background-color: #F1C232"| <span style="color:black">Função PvE</span> | |||
! scope="col" width="15%;" style="background-color: #F1C232"| <span style="color:black">Função PvP</span> | |||
! scope="col" width="20%;" style="background-color: #F1C232"| <span style="color:black">Held Recomendado (PvE)</span> | |||
|- | |||
| text-align:"center;" | #105 | |||
| text-align:"center;" | [[Arquivo:105-Sh Marowak.png|link=Shiny Marowak (TM)]] | |||
| text-align:"center;" | [[Shiny Marowak (TM)]] | |||
| text-align:"center;" | [[Arquivo: Ground.png|link=Orebound]] | |||
| text-align:"center;" | [[Arquivo:Interface OTDD PVE.png|24px|link=]] | |||
| text-align:"center;" | [[Arquivo:not.png|link=]] | |||
| text-align:"center;" | [[file:Atk7.png|Attack T7|link=]] | |||
|- | |||
| text-align:"center;" | #112 | |||
| text-align:"center;" | [[Arquivo:Shinyrh.png|link=Shiny Rhydon (TM)]] | |||
| text-align:"center;" | [[Shiny Rhydon (TM)]] | |||
| text-align:"center;" | [[Arquivo: Ground.png|link=Orebound]] | |||
| text-align:"center;" | [[Arquivo:Interface_BDD_PVE.png|24px|link=]] | |||
| text-align:"center;" | [[Arquivo:not.png|link=]] | |||
| text-align:"center;" | [[file:Atk7.png|Attack T7|link=]] | |||
|- | |||
| text-align:"center;" | #219 | |||
| text-align:"center;" | [[Arquivo:219-Sh Magcargo.png|link=Shiny Magcargo (TM)]] | |||
| text-align:"center;" | [[Shiny Magcargo (TM)]] | |||
| text-align:"center;" | [[Arquivo: Rock.png|link=]] | |||
| text-align:"center;" | [[Arquivo:Interface OTDD PVE.png|24px|link=]] | |||
| text-align:"center;" | [[Arquivo:not.png|link=]] | |||
| text-align:"center;" | [[file:Atk7.png|Attack T7|link=]] | |||
|- | |||
| text-align:"center;" | #389 | |||
| text-align:"center;" | [[Arquivo:389-Shiny Torterra.png|link=Shiny Torterra (TM)]] | |||
| text-align:"center;" | [[Shiny Torterra (TM)]] | |||
| text-align:"center;" | [[Arquivo: Ground.png|link=Orebound]] | |||
| text-align:"center;" | [[Arquivo:Interface OTDD PVE.png|24px|link=]] | |||
| text-align:"center;" | [[Arquivo:not.png|link=]] | |||
| text-align:"center;" | [[file:Atk7.png|Attack T7|link=]] | |||
|- | |||
| text-align:"center;" | #467 | |||
| text-align:"center;" | [[Arquivo:464-Rhyperior.png|link=Rhyperior (TM)]] | |||
| text-align:"center;" | [[Rhyperior (TM)]] | |||
| text-align:"center;" | [[Arquivo: Rock.png|link=Orebound]] | |||
| text-align:"center;" | [[Arquivo:Interface Tank PVE.png|24px|link=]] | |||
| text-align:"center;" | [[Arquivo:not.png|link=]] | |||
| text-align:"center;" | [[file:Def7.png|Defense T7|link=]] | |||
|} | |||
</center> <br> | |||
{{#widget:container}} | |||
<table class="seeMore"> | |||
<tr> | |||
<td class="seeMore__image">[[Arquivo:Telekinetic-compass.gif|link=]]</td> | |||
<td> '''Saiba Mais: [[Technical Machine (TM)]]'''</td> | |||
</tr> | |||
</table> | |||
{{#widget:closecontainer}} | |||
==Technical Records (TR)== | |||
<center> | |||
{| class="wikitable sortable" style="text-align:center" width="65%;" | |||
|- | |||
! scope="col" width="10%" style="background-color: #F1C232"| <span style="color:black">Nº Dex</span> | |||
! scope="col" style="background-color: #F1C232"| <span style="color:black">Ícone</span> | |||
! scope="col" width="15%;" style="background-color: #F1C232"| <span style="color:black">Nome</span> | |||
! scope="col" style="background-color: #F1C232"| <span style="color:black">Elementos</span> | |||
! scope="col" width="15%;" style="background-color: #F1C232"| <span style="color:black">Função PvE</span> | |||
! scope="col" width="15%;" style="background-color: #F1C232"| <span style="color:black">Função PvP</span> | |||
! scope="col" width="20%;" style="background-color: #F1C232"| <span style="color:black">Held Recomendado (PvE)</span> | |||
|- | |||
| text-align:"center;" | #221 | |||
| text-align:"center;" | [[Arquivo:221-Piloswine.png|link=Piloswine (TR)]] | |||
| text-align:"center;" | [[Piloswine (TR)]] | |||
| text-align:"center;" | [[Arquivo:Ice.png|link=]] [[Arquivo:Ground.png|link=]] | |||
| text-align:"center;" | [[Arquivo:Interface BDD PVE.png|24px|link=]] | |||
| text-align:"center;" | [[Arquivo:not.png|link=]] | |||
| text-align:"center;" | [[file:Atk7.png|Attack T7|link=]] | |||
|- | |||
| text-align:"center;" | #248 | |||
| text-align:"center;" | [[Arquivo:248-Tyranitar.png|link=Tyranitar (TR)]] | |||
| text-align:"center;" | [[Tyranitar (TR)]] | |||
| text-align:"center;" | [[Arquivo:Rock.png|link=]] [[Arquivo:Dark1.png|link=]] | |||
| text-align:"center;" | [[Arquivo:Interface BDD PVE.png|24px|link=]] | |||
| text-align:"center;" | [[Arquivo:not.png|link=]] | |||
| text-align:"center;" | [[file:Atk7.png|Attack T7|link=]] | |||
|- | |||
|} | |||
</center> | |||
{{#widget:container}} | |||
<table class="seeMore"> | |||
<tr> | |||
<td class="seeMore__image">[[Arquivo:Telekinetic-compass.gif|link=]]</td> | |||
<td> '''Saiba Mais: [[Technical Records (TR)]]'''</td> | |||
</tr> | |||
</table> | |||
{{#widget:closecontainer}} | |||
==Tier 1H== | ==Tier 1H== | ||
<center> | <center> | ||
{| class="wikitable" style="text-align:center" width=" | {| class="wikitable" style="text-align:center" width="65%;" | ||
|- | |- | ||
! scope="col" width=" | ! scope="col" width="10%" style="background-color: #F1C232"| <span style="color:black">Nº Dex</span> | ||
! scope="col" style="background-color: # | ! scope="col" style="background-color: #F1C232"| <span style="color:black">Ícone</span> | ||
! scope="col" width=" | ! scope="col" width="15%;" style="background-color: #F1C232"| <span style="color:black">Nome</span> | ||
! scope="col" style="background-color: # | ! scope="col" style="background-color: #F1C232"| <span style="color:black">Elementos</span> | ||
! scope="col" width=" | ! scope="col" width="15%;" style="background-color: #F1C232"| <span style="color:black">Função PvE</span> | ||
! scope="col" width=" | ! scope="col" width="15%;" style="background-color: #F1C232"| <span style="color:black">Função PvP</span> | ||
! scope="col" width="20%;" style="background-color: #F1C232"| <span style="color:black">Held Recomendado (PvE)</span> | |||
|- | |||
| text-align:"center;" | #142 | |||
| text-align:"center;" | [[Arquivo:142M.png|link=Mega Aerodactyl]] | |||
| text-align:"center;" | [[Mega Aerodactyl]] | |||
| text-align:"center;" | [[Arquivo: Rock.png|link=Orebound]] | |||
| text-align:"center;" | [[Arquivo:Interface_OffensiveTanker_pve.png|24px|link=]] | |||
| text-align:"center;" | [[Arquivo:not.png|link=]] | |||
| text-align:"center;" | [[file:Atk7.png|Attack T7|link=]] | |||
|- | |- | ||
| text-align:"center;" | #409 | | text-align:"center;" | #409 | ||
| Linha 250: | Linha 429: | ||
| text-align:"center;" | [[Arquivo:Interface_BDD_PVE.png|24px|link=]] | | text-align:"center;" | [[Arquivo:Interface_BDD_PVE.png|24px|link=]] | ||
| text-align:"center;" | [[Arquivo:Not.png|link=]] | | text-align:"center;" | [[Arquivo:Not.png|link=]] | ||
| text-align:"center;" | [[file:Atk7.png|Attack T7|link=]] | |||
|- | |||
| text-align:"center;" | #530 | |||
| text-align:"center;" | [[Arquivo:530-Mega Excadrill.png|link=Mega Excadrill]] | |||
| text-align:"center;" | [[Mega Excadrill]] | |||
| text-align:"center;" | [[Arquivo:Ground.png|link=]] [[arquivo:Steel.png|link=Ironhard]] | |||
| text-align:"center;" | [[Arquivo:Interface_BDD_PVE.png|24px|link=]] | |||
| text-align:"center;" | [[Arquivo:Not.png|link=]] | |||
| text-align:"center;" | [[file:Atk7.png|Attack T7|link=]] | |||
|- | |||
| text-align:"center;" | #553 | |||
| text-align:"center;" | [[Arquivo:553-Shiny_Krookodile.png|link=Shiny Krookodile]] | |||
| text-align:"center;" | [[Shiny Krookodile]] | |||
| text-align:"center;" | [[Arquivo:Ground.png|link=]] | |||
| text-align:"center;" | [[Arquivo:Interface_BDD_PVE.png|24px|link=]] | |||
| text-align:"center;" | [[Arquivo:Not.png|link=]] | |||
| text-align:"center;" | [[file:Atk7.png|Attack T7|link=]] | |||
|- | |||
| text-align:"center;" | #901 | |||
| text-align:"center;" | [[Arquivo:901 - Ursaluna.png|link=Ursaluna]] | |||
| text-align:"center;" | [[Ursaluna]] | |||
| text-align:"center;" | [[Arquivo:Ground.png|link=]] [[Arquivo:Normal1.png|link=Gardestrike]] | |||
| text-align:"center;" | [[Arquivo:Interface_OTDD_PVE.png|24px|link=]] | |||
| text-align:"center;" | [[Arquivo:Not.png|link=]] | |||
| text-align:"center;" | [[file:Atk7.png|Attack T7|link=]] | |||
|- | |||
| text-align:"center;" | #553 | |||
| text-align:"center;" | [[Arquivo:689-Mega Barbaracle.png|link=Mega Barbaracle]] | |||
| text-align:"center;" | [[Mega Barbaracle]] | |||
| text-align:"center;" | [[Arquivo:Rock.png|link=]] [[Arquivo:Fighting.png|link=Gardestrike]] | |||
| text-align:"center;" | [[Arquivo:Interface_BDD_PVE.png|24px|link=]] | |||
| text-align:"center;" | [[Arquivo:Not.png|link=]] | |||
| text-align:"center;" | [[file:Atk7.png|Attack T7|link=]] | |||
|} | |} | ||
</center> | </center> | ||
'''Observação:''' Os Pokémon T1H tem força de T1C fora da '''[[Nightmare World]]''' e são acima dos T1C dentro dela ou pelo menos tem um diferencial perante os demais Pokémon. São balanceados exclusivamente para conteúdos PvE e não podem ser utilizados em duelos PvP. | '''Observação:''' Os Pokémon T1H tem força de T1C fora da '''[[Nightmare World]]''' e são acima dos T1C dentro dela ou pelo menos tem um diferencial perante os demais Pokémon. São balanceados exclusivamente para conteúdos PvE e não podem ser utilizados em duelos PvP. | ||
| Linha 259: | Linha 470: | ||
<center> | <center> | ||
{| class="wikitable sortable" style="text-align:center" width=" | {| class="wikitable sortable" style="text-align:center" width="65%;" | ||
|- | |- | ||
! scope="col" width=" | ! scope="col" width="10%" style="background-color: #F1C232"| <span style="color:black">Nº Dex</span> | ||
! scope="col" style="background-color: # | ! scope="col" style="background-color: #F1C232"| <span style="color:black">Ícone</span> | ||
! scope="col" width=" | ! scope="col" width="15%;" style="background-color: #F1C232"| <span style="color:black">Nome</span> | ||
! scope="col" style="background-color: # | ! scope="col" style="background-color: #F1C232"| <span style="color:black">Elementos</span> | ||
! scope="col" width=" | ! scope="col" width="15%;" style="background-color: #F1C232"| <span style="color:black">Função PvE</span> | ||
! scope="col" width=" | ! scope="col" width="15%;" style="background-color: #F1C232"| <span style="color:black">Função PvP</span> | ||
! scope="col" width="20%;" style="background-color: #F1C232"| <span style="color:black">Held Recomendado (PvP/PvE)</span> | |||
|- | |- | ||
| text-align:"center;" | #028 | | text-align:"center;" | #028 | ||
| Linha 280: | Linha 485: | ||
| text-align:"center;" | [[Arquivo:Ground.png|link=Orebound]] | | text-align:"center;" | [[Arquivo:Ground.png|link=Orebound]] | ||
| text-align:"center;" | [[Arquivo:Interface_OTDD_PVE.png|24px|link=]] | | text-align:"center;" | [[Arquivo:Interface_OTDD_PVE.png|24px|link=]] | ||
| text-align:"center;" | [[Arquivo:Not.png|link=]] | | text-align:"center;" | [[Arquivo:Not.png|link=]] | ||
| text-align:"center;" | [[file:Atk7.png|Attack T7|link=]] | |||
|- | |||
| text-align:center;" | #075 | |||
| text-align:center;" | [[Arquivo:075-Alolan_Graveler.png|link=Alolan Graveler]] | |||
| text-align:center;" | '''[[Alolan Graveler]]'''* | |||
| text-align:center;" | [[Arquivo:Rock.png|link=Orebound]] [[Arquivo:Electric.png|link=Raibolt]] | |||
| text-align:"center;" | [[Arquivo:Not.png|link=]] | |||
| text-align:"center;" | [[Arquivo:Interface_BDD_PVP.png|24px|link=]] | |||
| text-align:"center;" | [[file:Atk7.png|Attack T7|link=]] | |||
|- | |- | ||
| text-align:"center;" | #076 | | text-align:"center;" | #076 | ||
| Linha 288: | Linha 502: | ||
| text-align:"center;" | [[Arquivo:Interface_OffensiveTanker_pve.png|24px|link=]] | | text-align:"center;" | [[Arquivo:Interface_OffensiveTanker_pve.png|24px|link=]] | ||
| text-align:"center;" | [[Arquivo:Not.png|link=]] | | text-align:"center;" | [[Arquivo:Not.png|link=]] | ||
| text-align:"center;" | [[file:Atk7.png|Attack T7|link=]] [[file:Def7.png|Defense T7|link=]] | |||
|- | |- | ||
| text-align:"center;" | #095 | | text-align:"center;" | #095 | ||
| Linha 294: | Linha 509: | ||
| text-align:"center;" | [[Arquivo:Rock.png|link=Orebound]] | | text-align:"center;" | [[Arquivo:Rock.png|link=Orebound]] | ||
| text-align:"center;" | [[Arquivo:Interface_Tank_PVE.png|24px|link=]] | | text-align:"center;" | [[Arquivo:Interface_Tank_PVE.png|24px|link=]] | ||
| text-align:"center;" | [[Arquivo:Not.png|link=]] | | text-align:"center;" | [[Arquivo:Not.png|link=]] | ||
| text-align:"center;" | [[file:Def7.png|Defense T7|link=]] | |||
|- | |- | ||
| text-align:"center;" | #185 | | text-align:"center;" | #185 | ||
| Linha 300: | Linha 516: | ||
| text-align:"center;" | [[Sudowoodo]] | | text-align:"center;" | [[Sudowoodo]] | ||
| text-align:"center;" | [[Arquivo:Rock.png|link=Orebound]] | | text-align:"center;" | [[Arquivo:Rock.png|link=Orebound]] | ||
| text-align:"center;" | [[Arquivo:Interface_Speedster_PVE.png|24px|link=]] | |||
| text-align:"center;" | [[Arquivo:Not.png|link=]] | | text-align:"center;" | [[Arquivo:Not.png|link=]] | ||
| text-align:"center;" | [[ | | text-align:"center;" | [[file:Atk7.png|Attack T7|link=]] | ||
|- | |- | ||
| text-align:"center;" | #208 | | text-align:"center;" | #208 | ||
| Linha 309: | Linha 526: | ||
| text-align:"center;" | [[Arquivo:Interface_OffensiveTanker_pve.png|24px|link=]] | | text-align:"center;" | [[Arquivo:Interface_OffensiveTanker_pve.png|24px|link=]] | ||
| text-align:"center;" | [[Arquivo:Not.png|link=]] | | text-align:"center;" | [[Arquivo:Not.png|link=]] | ||
| text-align:"center;" | [[file:Atk7.png|Attack T7|link=]] [[file:Def7.png|Defense T7|link=]] | |||
|- | |||
| text-align:"center;" | #221 | |||
| text-align:"center;" | [[Arquivo:221 - Shiny Piloswine.png|link=Shiny Piloswine]] | |||
| text-align:"center;" | [[Shiny Piloswine]] | |||
| text-align:"center;" | [[Arquivo:Ground.png|link=Orebound]] [[Arquivo:Ice.png|link=Seavell]] | |||
| text-align:"center;" | [[Arquivo:Interface_OTDD_PVE.png|24px|link=]] | |||
| text-align:"center;" | [[Arquivo:Interface_OTDD_PVP.png|24px|link=]] | |||
| text-align:"center;" | [[file:Atk7.png|Attack T7|link=]] | |||
|- | |- | ||
| text-align:"center;" | #232 | | text-align:"center;" | #232 | ||
| Linha 316: | Linha 542: | ||
| text-align:"center;" | [[Arquivo:Interface_BDD_PVE.png|24px|link=]] | | text-align:"center;" | [[Arquivo:Interface_BDD_PVE.png|24px|link=]] | ||
| text-align:"center;" | [[Arquivo:Not.png|link=]] | | text-align:"center;" | [[Arquivo:Not.png|link=]] | ||
| text-align:"center;" | [[file:Atk7.png|Attack T7|link=]] | |||
|- | |- | ||
| text-align:"center;" | #248 | | text-align:"center;" | #248 | ||
| Linha 323: | Linha 550: | ||
| text-align:"center;" | [[Arquivo:Interface_OTDD_PVE.png|24px|link=]] | | text-align:"center;" | [[Arquivo:Interface_OTDD_PVE.png|24px|link=]] | ||
| text-align:"center;" | [[Arquivo:Interface_BDD_PVP.png|24px|link=]] | | text-align:"center;" | [[Arquivo:Interface_BDD_PVP.png|24px|link=]] | ||
| text-align:"center;" | [[file:Atk7.png|Attack T7|link=]] | |||
|- | |- | ||
| text-align:"center;" | #306 | | text-align:"center;" | #306 | ||
| Linha 330: | Linha 558: | ||
| text-align:"center;" | [[Arquivo:Not.png|link=]] | | text-align:"center;" | [[Arquivo:Not.png|link=]] | ||
| text-align:"center;" | [[Arquivo:Interface_Tanker_PVP.png|24px|link=]] | | text-align:"center;" | [[Arquivo:Interface_Tanker_PVP.png|24px|link=]] | ||
| text-align:"center;" | [[file:Def7.png|Defense T7|link=]] | |||
|- | |- | ||
| text-align:"center;" | #323 | | text-align:"center;" | #323 | ||
| Linha 337: | Linha 566: | ||
| text-align:"center;" | [[Arquivo:Not.png|link=]] | | text-align:"center;" | [[Arquivo:Not.png|link=]] | ||
| text-align:"center;" | [[Arquivo:Interface_BDD_PVP.png|24px|link=]] | | text-align:"center;" | [[Arquivo:Interface_BDD_PVP.png|24px|link=]] | ||
| text-align:"center;" | [[file:Atk7.png|Attack T7|link=]] | |||
|- | |- | ||
| text-align:"center;" | #324 | | text-align:"center;" | #324 | ||
| Linha 344: | Linha 574: | ||
| text-align:"center;" | [[Arquivo:Not.png|link=]] | | text-align:"center;" | [[Arquivo:Not.png|link=]] | ||
| text-align:"center;" | [[Arquivo:Interface_Disrupter_PVP.png|24px|link=]] | | text-align:"center;" | [[Arquivo:Interface_Disrupter_PVP.png|24px|link=]] | ||
| text-align:"center;" | [[file:Acc7.png|Accuracy T7|link=]] | |||
|- | |||
| text-align:"center;" | #330 | |||
| text-align:"center;" | [[Arquivo:330-Flygon.png|link=Flygon]] | |||
| text-align:"center;" | [[Flygon]] | |||
| text-align:"center;" | [[Arquivo:Ground.png|link=Orebound]] [[Arquivo:Dragon.png|link=Wingeon]] | |||
| text-align:"center;" | [[Arquivo:Not.png|link=]] | |||
| text-align:"center;" | [[Arquivo:Interface_Disrupter_PVP.png|24px|link=]] | |||
| text-align:"center;" | [[file:Acc7.png|Accuracy T7|link=]] | |||
|- | |- | ||
| text-align:"center;" | #348 | | text-align:"center;" | #348 | ||
| Linha 351: | Linha 590: | ||
| text-align:"center;" | [[Arquivo:Not.png|link=]] | | text-align:"center;" | [[Arquivo:Not.png|link=]] | ||
| text-align:"center;" | [[Arquivo:Interface_OffTank_PVP.png|24px|link=]] | | text-align:"center;" | [[Arquivo:Interface_OffTank_PVP.png|24px|link=]] | ||
| text-align:"center;" | [[file:Def7.png|Defense T7|link=]] | |||
|- | |- | ||
| text-align:"center;" | #389 | | text-align:"center;" | #389 | ||
| Linha 358: | Linha 598: | ||
| text-align:"center;" | [[Arquivo:Not.png|link=]] | | text-align:"center;" | [[Arquivo:Not.png|link=]] | ||
| text-align:"center;" | [[Arquivo:Interface_OffTank_PVP.png|24px|link=]] | | text-align:"center;" | [[Arquivo:Interface_OffTank_PVP.png|24px|link=]] | ||
| text-align:"center;" | [[file:Def7.png|Defense T7|link=]] | |||
|- | |- | ||
| text-align:"center;" | #409 | | text-align:"center;" | #409 | ||
| Linha 365: | Linha 606: | ||
| text-align:"center;" | [[Arquivo:Interface_BDD_PVE.png|24px|link=]] | | text-align:"center;" | [[Arquivo:Interface_BDD_PVE.png|24px|link=]] | ||
| text-align:"center;" | [[Arquivo:Not.png|link=]] | | text-align:"center;" | [[Arquivo:Not.png|link=]] | ||
| text-align:"center;" | [[file:Atk7.png|Attack T7|link=]] | |||
|- | |- | ||
| text-align:"center;" | #411 | | text-align:"center;" | #411 | ||
| Linha 372: | Linha 614: | ||
| text-align:"center;" | [[Arquivo:Not.png|link=]] | | text-align:"center;" | [[Arquivo:Not.png|link=]] | ||
| text-align:"center;" | [[Arquivo:Interface_BDD_PVP.png|24px|link=]] | | text-align:"center;" | [[Arquivo:Interface_BDD_PVP.png|24px|link=]] | ||
| text-align:"center;" | [[file:Atk7.png|Attack T7|link=]] | |||
|- | |- | ||
| text-align:"center;" | #413 | | text-align:"center;" | #413 | ||
| Linha 379: | Linha 622: | ||
| text-align:"center;" | [[Arquivo:Not.png|link=]] | | text-align:"center;" | [[Arquivo:Not.png|link=]] | ||
| text-align:"center;" | [[Arquivo:Interface_BDD_PVP.png|24px|link=]] | | text-align:"center;" | [[Arquivo:Interface_BDD_PVP.png|24px|link=]] | ||
| text-align:"center;" | [[file:Atk7.png|Attack T7|link=]] | |||
|- | |- | ||
| text-align:"center;" | #445 | | text-align:"center;" | #445 | ||
| Linha 384: | Linha 628: | ||
| text-align:"center;" | [[Garchomp]] | | text-align:"center;" | [[Garchomp]] | ||
| text-align:"center;" | [[Arquivo:Dragon.png|link=Wingeon]] [[Arquivo:Ground.png|link=Orebound]] | | text-align:"center;" | [[Arquivo:Dragon.png|link=Wingeon]] [[Arquivo:Ground.png|link=Orebound]] | ||
| text-align:"center;" | [[Arquivo:Interface_BDD_PVE.png|24px|link=]] | | text-align:"center;" | [[Arquivo:Interface_BDD_PVE.png|24px|link=]] | ||
| text-align:"center;" | [[Arquivo: | | text-align:"center;" | [[Arquivo:Interface_BDD_PVP.png|24px|link=]] | ||
| text-align:"center;" | [[file:Atk7.png|Attack T7|link=]] | |||
|- | |- | ||
| text-align:"center;" | #450 | | text-align:"center;" | #450 | ||
| Linha 393: | Linha 638: | ||
| text-align:"center;" | [[Arquivo:Not.png|link=]] | | text-align:"center;" | [[Arquivo:Not.png|link=]] | ||
| text-align:"center;" | [[Arquivo:Interface_Disrupter_PVP.png|24px|link=]] | | text-align:"center;" | [[Arquivo:Interface_Disrupter_PVP.png|24px|link=]] | ||
| text-align:"center;" | [[file:Acc7.png|Accuracy T7|link=]] | |||
|- | |- | ||
| text-align:"center;" | #450 | | text-align:"center;" | #450 | ||
| Linha 400: | Linha 646: | ||
| text-align:"center;" | [[Arquivo:Interface_BDD_PVE.png|24px|link=]] | | text-align:"center;" | [[Arquivo:Interface_BDD_PVE.png|24px|link=]] | ||
| text-align:"center;" | [[Arquivo:Not.png|link=]] | | text-align:"center;" | [[Arquivo:Not.png|link=]] | ||
| text-align:"center;" | [[file:Atk7.png|Attack T7|link=]] | |||
|- | |- | ||
| text-align:"center;" | #472 | | text-align:"center;" | #472 | ||
| Linha 407: | Linha 654: | ||
| text-align:"center;" | [[Arquivo:Not.png|link=]] | | text-align:"center;" | [[Arquivo:Not.png|link=]] | ||
| text-align:"center;" | [[Arquivo:Interface_BDD_PVP.png|24px|link=]] | | text-align:"center;" | [[Arquivo:Interface_BDD_PVP.png|24px|link=]] | ||
| text-align:"center;" | [[file:Atk7.png|Attack T7|link=]] | |||
|- | |- | ||
| text-align:center;" | #476 | | text-align:center;" | #476 | ||
| Linha 414: | Linha 662: | ||
| width="10%" | [[Arquivo:Not.png|link=]] | | width="10%" | [[Arquivo:Not.png|link=]] | ||
| width="10%" | [[Arquivo:Interface_OffTank_PVP.png|24px|link=]] | | width="10%" | [[Arquivo:Interface_OffTank_PVP.png|24px|link=]] | ||
| text-align:"center;" | [[file:Atk7.png|Attack T7|link=]] | |||
|- | |- | ||
| text-align:"center;" | #530 | | text-align:"center;" | #530 | ||
| text-align:"center;" | [[Arquivo:530-Excadrill.png|link=Excadrill]] | | text-align:"center;" | [[Arquivo:530-Excadrill.png|link=Excadrill]] | ||
| text-align:"center;" | [[Excadrill]] | | text-align:"center;" | [[Excadrill]]* | ||
| text-align:"center;" | [[Arquivo:Ground.png|link=Orebound]] [[Arquivo:Steel.png|link=Ironhard]] | | text-align:"center;" | [[Arquivo:Ground.png|link=Orebound]] [[Arquivo:Steel.png|link=Ironhard]] | ||
| text-align:"center;" | [[Arquivo:Not.png|link=]] | | text-align:"center;" | [[Arquivo:Not.png|link=]] | ||
| text-align:"center;" | [[Arquivo:Interface_BDD_PVP.png|24px|link=]] | | text-align:"center;" | [[Arquivo:Interface_BDD_PVP.png|24px|link=]] | ||
| text-align:"center;" | [[file:Atk7.png|Attack T7|link=]] | |||
|- | |||
| text-align:"center;" | #553 | |||
| text-align:"center;" | [[Arquivo:553-Krookodile.png|link=Krookodile]] | |||
| text-align:"center;" | [[Krookodile]] | |||
| text-align:"center;" | [[Arquivo:Ground.png|link=Orebound]] [[Arquivo:Dark1.png|link=Malefic]] | |||
| text-align:"center;" | [[Arquivo:Not.png|link=]] | |||
| text-align:"center;" | [[Arquivo:Interface_OffTank_PVP.png|24px|link=]] | |||
| text-align:"center;" | [[file:Atk7.png|Attack T7|link=]] | |||
|- | |- | ||
| text-align:"center;" | #565 | | text-align:"center;" | #565 | ||
| Linha 428: | Linha 686: | ||
| text-align:"center;" | [[Arquivo:Not.png|link=]] | | text-align:"center;" | [[Arquivo:Not.png|link=]] | ||
| text-align:"center;" | [[Arquivo:Interface_BDD_PVP.png|24px|link=]] | | text-align:"center;" | [[Arquivo:Interface_BDD_PVP.png|24px|link=]] | ||
| text-align:"center;" | [[file:Atk7.png|Attack T7|link=]] | |||
|- | |- | ||
| text-align:"center;" | #567 | | text-align:"center;" | #567 | ||
| Linha 435: | Linha 694: | ||
| text-align:"center;" | [[Arquivo:Not.png|link=]] | | text-align:"center;" | [[Arquivo:Not.png|link=]] | ||
| text-align:"center;" | [[Arquivo:Interface_BDD_PVP.png|24px|link=]] | | text-align:"center;" | [[Arquivo:Interface_BDD_PVP.png|24px|link=]] | ||
| text-align:"center;" | [[file:Atk7.png|Attack T7|link=]] | |||
|- | |- | ||
| text-align:"center;" | #655 | | text-align:"center;" | #655 | ||
| Linha 442: | Linha 702: | ||
| text-align:"center;" | [[Arquivo:Not.png|link=]] | | text-align:"center;" | [[Arquivo:Not.png|link=]] | ||
| text-align:"center;" | [[Arquivo:Interface_BDD_PVP.png|24px|link=]] | | text-align:"center;" | [[Arquivo:Interface_BDD_PVP.png|24px|link=]] | ||
| text-align:"center;" | [[file:Atk7.png|Attack T7|link=]] | |||
|- | |||
| text-align:"center;" | #697 | |||
| text-align:"center;" | [[file:697 - Tyrantrum.png|link=Tyrantrum]] | |||
| text-align:"center;" | [[Tyrantrum]] | |||
| text-align:"center;" | [[Arquivo:Rock.png|link=Orebound]] [[Arquivo:Dragon.png|link=Wingeon]] | |||
| text-align:"center;" | [[Arquivo:Not.png|link=]] | |||
| text-align:"center;" | [[Arquivo:Interface_OffTank_PVP.png|24px|link=]] | |||
| text-align:"center;" | [[file:Atk7.png|Attack T7|link=]] [[file:Def7.png|Defense T7|link=]] | |||
|- | |||
| text-align:"center;" | #699 | |||
| text-align:"center;" | [[file:699 - Aurorus.png|link=Aurorus]] | |||
| text-align:"center;" | [[Aurorus]] | |||
| text-align:"center;" | [[Arquivo:Rock.png|link=Orebound]] [[Arquivo:Ice.png|link=Seavell]] | |||
| text-align:"center;" | [[Arquivo:Not.png|link=]] | |||
| text-align:"center;" | [[Arquivo:Interface_Disrupter_PVP.png|24px|link=]] | |||
| text-align:"center;" | [[file:Acc7.png|Accuracy T7|link=]] | |||
|- | |- | ||
| text-align:"center;" | #703 | | text-align:"center;" | #703 | ||
| Linha 449: | Linha 726: | ||
| text-align:"center;" | [[Arquivo:Not.png|link=]] | | text-align:"center;" | [[Arquivo:Not.png|link=]] | ||
| text-align:"center;" | [[Arquivo:Interface_Tanker_PVP.png|24px|link=]] | | text-align:"center;" | [[Arquivo:Interface_Tanker_PVP.png|24px|link=]] | ||
| text-align:"center;" | [[file:Def7.png|Defense T7|link=]] | |||
|- | |||
| text-align:"center;" | #745 | |||
| text-align:"center;" | [[Arquivo:745-Lycanroc.png|link=Lycanroc]] | |||
| text-align:"center;" | [[Lycanroc]] | |||
| text-align:"center;" | [[Arquivo:Rock.png|link=Orebound]] | |||
| text-align:"center;" | [[Arquivo:Interface BDD PVE.png|24px|link=]] | |||
| text-align:"center;" | [[Arquivo:not.png|link=]] | |||
| text-align:"center;" | [[file:Atk7.png|Attack T7|link=]] | |||
|- | |||
| text-align:"center;" | #745 | |||
| text-align:"center;" | [[Arquivo:745-Lycanroc Dusk Form.png|link=Lycanroc Dusk Form]] | |||
| text-align:"center;" | [[Lycanroc Dusk Form]] | |||
| text-align:"center;" | [[Arquivo:Rock.png|link=Orebound]] | |||
| text-align:"center;" | [[Arquivo:Interface_OTDD_PVE.png|24px|link=]] | |||
| text-align:"center;" | [[Arquivo:not.png|link=]] | |||
| text-align:"center;" | [[file:Atk7.png|Attack T7|link=]] | |||
|- | |||
| text-align:"center;" | #745 | |||
| text-align:"center;" | [[Arquivo:745-Lycanroc Midnight Form.png|link=Lycanroc Midnight form]] | |||
| text-align:"center;" | [[Lycanroc Midnight Form]] | |||
| text-align:"center;" | [[Arquivo:Rock.png|link=Orebound]] | |||
| text-align:"center;" | [[Arquivo:not.png|link=]] | |||
| text-align:"center;" | [[Arquivo:Interface OffTank PVP.png|24px|link=]] | |||
| text-align:"center;" | [[file:Def7.png|Defense T7|link=]] | |||
|- | |- | ||
| text-align:"center;" | #750 | | text-align:"center;" | #750 | ||
| Linha 456: | Linha 758: | ||
| text-align:"center;" | [[Arquivo:Interface_Tank_PVE.png|24px|link=]] | | text-align:"center;" | [[Arquivo:Interface_Tank_PVE.png|24px|link=]] | ||
| text-align:"center;" | [[Arquivo:Not.png|link=]] | | text-align:"center;" | [[Arquivo:Not.png|link=]] | ||
| text-align:"center;" | [[file:Def7.png|Defense T7|link=]] | |||
|- | |- | ||
| text-align:"center;" | #770 | | text-align:"center;" | #770 | ||
| Linha 463: | Linha 766: | ||
| text-align:"center;" | [[Arquivo:Interface_SupportOT_PVE.png|24px|link=]] | | text-align:"center;" | [[Arquivo:Interface_SupportOT_PVE.png|24px|link=]] | ||
| text-align:"center;" | [[Arquivo:Not.png|link=]] | | text-align:"center;" | [[Arquivo:Not.png|link=]] | ||
| text-align:"center;" | [[file:Atk7.png|Attack T7|link=]] | |||
|- | |- | ||
| text-align:"center;" | #867 | |||
| text-align:"center;" | [[file:867 - Runerigus.png|link=Runerigus]] | |||
| text-align:"center;" | [[Runerigus]] | |||
| text-align:"center;" | [[Arquivo:Ground.png|link=Orebound]] [[Arquivo:Ghost1.png|link=Malefic]] | |||
| text-align:"center;" | [[Arquivo:Not.png|link=]] | |||
| text-align:"center;" | [[Arquivo:Interface_Support_PVP.png|24px|link=]] [[Arquivo:Interface_Tanker_PVP.png|24px|link=]] | |||
| text-align:"center;" | - | |||
|- | |||
| text-align:"center;" | #900 | |||
| text-align:"center;" | [[file:900 - Kleavor.png|link=Kleavor]] | |||
| text-align:"center;" | [[Kleavor]] | |||
| text-align:"center;" | [[Arquivo:Bug.png|link=Naturia]] [[Arquivo:Rock.png|link=Orebound]] | |||
| text-align:"center;" | [[Arquivo:Not.png|link=]] | |||
| text-align:"center;" | [[Arquivo:Interface_OffTank_PVP.png|24px|link=]] | |||
| text-align:"center;" | [[file:Atk7.png|Attack T7|link=]] | |||
|- | |||
| text-align:"center;" | #970 | |||
| text-align:"center;" | [[file:970-Glimmora.png|link=Glimmora]] | |||
| text-align:"center;" | [[Glimmora]] | |||
| text-align:"center;" | [[Arquivo:Rock.png|link=]] [[Arquivo:Poison1.png|link=Malefic]] | |||
| text-align:"center;" | [[Arquivo:Not.png|link=]] | |||
| text-align:"center;" | [[Arquivo:Interface_OffTank_PVP.png|24px|link=]] | |||
| text-align:"center;" | [[file:Atk7.png|Attack T7|link=]] [[file:Def7.png|Defense T7|link=]] | |||
|} | |} | ||
</center> | </center> | ||
'''*Observação:''' Os Pokémon [[Arquivo:075-Alolan_Graveler.png|link=Alolan Graveler]] '''[[Alolan Graveler]]''', [[Arquivo:565-Carracosta.png|link=Carracosta]] '''[[Carracosta]]''' e [[Arquivo:413-WormadamGround.png|link=Wormadam Ground]] '''[[Wormadam Ground]]''' são exclusivos de outros clãs no PvP. | '''*Observação:''' Os Pokémon [[Arquivo:075-Alolan_Graveler.png|link=Alolan Graveler]] '''[[Alolan Graveler]]''', [[Arquivo:565-Carracosta.png|link=Carracosta]] '''[[Carracosta]]''', [[Arquivo:530-Excadrill.png|link=Excadrill]] '''[[Excadrill]]''' e [[Arquivo:413-WormadamGround.png|link=Wormadam Ground]] '''[[Wormadam Ground]]''' são exclusivos de outros clãs no PvP. | ||
==Tier 3== | ==Tier 3== | ||
<center> | <center> | ||
{| class="wikitable sortable" style="text-align:center" width=" | {| class="wikitable sortable" style="text-align:center" width="65%;" | ||
|- | |- | ||
! scope="col" width=" | ! scope="col" width="10%" style="background-color: #F1C232"| <span style="color:black">Nº Dex</span> | ||
! scope="col" style="background-color: # | ! scope="col" style="background-color: #F1C232"| <span style="color:black">Ícone</span> | ||
! scope="col" width=" | ! scope="col" width="15%;" style="background-color: #F1C232"| <span style="color:black">Nome</span> | ||
! scope="col" style="background-color: # | ! scope="col" style="background-color: #F1C232"| <span style="color:black">Elementos</span> | ||
! scope="col" width=" | ! scope="col" width="15%;" style="background-color: #F1C232"| <span style="color:black">Função PvE</span> | ||
! scope="col" width=" | ! scope="col" width="15%;" style="background-color: #F1C232"| <span style="color:black">Função PvP</span> | ||
! scope="col" width="20%;" style="background-color: #F1C232"| <span style="color:black">Held Recomendado (PvP/PvE)</span> | |||
|- | |- | ||
| text-align:"center;" | #031 | | text-align:"center;" | #031 | ||
| Linha 487: | Linha 815: | ||
| text-align:"center;" | [[Arquivo:Interface_BDD_PVE.png|24px|link=]] | | text-align:"center;" | [[Arquivo:Interface_BDD_PVE.png|24px|link=]] | ||
| text-align:"center;" | [[Arquivo:Not.png|link=]] | | text-align:"center;" | [[Arquivo:Not.png|link=]] | ||
| text-align:"center;" | [[file:Atk7.png|Attack T7|link=]] | |||
|- | |- | ||
| text-align:"center;" | #034 | | text-align:"center;" | #034 | ||
| Linha 494: | Linha 823: | ||
| text-align:"center;" | [[Arquivo:Interface_BDD_PVE.png|24px|link=]] | | text-align:"center;" | [[Arquivo:Interface_BDD_PVE.png|24px|link=]] | ||
| text-align:"center;" | [[Arquivo:Not.png|link=]] | | text-align:"center;" | [[Arquivo:Not.png|link=]] | ||
| text-align:"center;" | [[file:Atk7.png|Attack T7|link=]] | |||
|- | |||
| text-align:center;" | #051 | |||
| text-align:center;" | [[Arquivo:051 - Shiny Dugtrio.png|link=Shiny Dugtrio]] | |||
| text-align:center;" | [[Shiny Dugtrio]] | |||
| text-align:center;" | [[Arquivo:Ground.png|link=]] | |||
| width="10%" | [[Arquivo:Interface_Speedster_PVE.png|24px|link=]] | |||
| width="10%" | [[Arquivo:Interface_BDD_PVP.png|24px|link=]] | |||
| text-align:"center;" | [[file:Atk7.png|Attack T7|link=]] | |||
|- | |- | ||
| text-align:center;" | #051 | | text-align:center;" | #051 | ||
| Linha 501: | Linha 839: | ||
| width="10%" | [[Arquivo:Interface_BDD_PVE.png|24px|link=]] | | width="10%" | [[Arquivo:Interface_BDD_PVE.png|24px|link=]] | ||
| width="10%" | [[Arquivo:Not.png|link=]] | | width="10%" | [[Arquivo:Not.png|link=]] | ||
| text-align:"center;" | [[file:Atk7.png|Attack T7|link=]] | |||
|- | |- | ||
| text-align:"center;" | #076 | | text-align:"center;" | #076 | ||
| Linha 508: | Linha 847: | ||
| text-align:"center;" | [[Arquivo:Interface_BDD_PVE.png|24px|link=]] | | text-align:"center;" | [[Arquivo:Interface_BDD_PVE.png|24px|link=]] | ||
| text-align:"center;" | [[Arquivo:Not.png|link=]] | | text-align:"center;" | [[Arquivo:Not.png|link=]] | ||
| text-align:"center;" | [[file:Atk7.png|Attack T7|link=]] | |||
|- | |- | ||
| text-align:"center;" | #112 | | text-align:"center;" | #112 | ||
| Linha 515: | Linha 855: | ||
| text-align:"center;" | [[Arquivo:Interface_BDD_PVE.png|24px|link=]] | | text-align:"center;" | [[Arquivo:Interface_BDD_PVE.png|24px|link=]] | ||
| text-align:"center;" | [[Arquivo:Not.png|link=]] | | text-align:"center;" | [[Arquivo:Not.png|link=]] | ||
| text-align:"center;" | [[file:Atk7.png|Attack T7|link=]] | |||
|- | |- | ||
| text-align:center;" | #139 | | text-align:center;" | #139 | ||
| Linha 522: | Linha 863: | ||
| width="10%" | [[Arquivo:Interface_OffensiveTanker_pve.png|24px|link=]] | | width="10%" | [[Arquivo:Interface_OffensiveTanker_pve.png|24px|link=]] | ||
| width="10%" | [[Arquivo:Not.png|link=]] | | width="10%" | [[Arquivo:Not.png|link=]] | ||
| text-align:"center;" | [[file:Atk7.png|Attack T7|link=]] | |||
|- | |- | ||
| text-align:"center;" | #141 | | text-align:"center;" | #141 | ||
| Linha 529: | Linha 871: | ||
| text-align:"center;" | [[Arquivo:Not.png|link=]] | | text-align:"center;" | [[Arquivo:Not.png|link=]] | ||
| text-align:"center;" | [[Arquivo:Interface_Tanker_PVP.png|24px|link=]] | | text-align:"center;" | [[Arquivo:Interface_Tanker_PVP.png|24px|link=]] | ||
| text-align:"center;" | [[file:Def7.png|Defense T7|link=]] | |||
|- | |||
| text-align:"center;" | #195 | |||
| text-align:"center;" | [[Arquivo:195 - Shiny Quagsire.png|link=Shiny Quagsire]] | |||
| text-align:"center;" | [[Shiny Quagsire]] | |||
| text-align:"center;" | [[Arquivo:Ground.png|link=]] [[Arquivo:Water.png|link=Seavell]] | |||
| text-align:"center;" | [[Arquivo:Interface_BDD_PVE.png|24px|link=]] | |||
| text-align:"center;" | [[Arquivo:Not.png|link=]] | |||
| text-align:"center;" | [[file:Atk7.png|Attack T7|link=]] | |||
|- | |- | ||
| text-align:"center;" | #219 | | text-align:"center;" | #219 | ||
| Linha 536: | Linha 887: | ||
| text-align:"center;" | [[Arquivo:Not.png|link=]] | | text-align:"center;" | [[Arquivo:Not.png|link=]] | ||
| text-align:"center;" | [[Arquivo:Interface_BDD_PVP.png|24px|link=]] | | text-align:"center;" | [[Arquivo:Interface_BDD_PVP.png|24px|link=]] | ||
| text-align:"center;" | [[file:Atk7.png|Attack T7|link=]] | |||
|- | |- | ||
| text-align:"center;" | #221 | | text-align:"center;" | #221 | ||
| Linha 543: | Linha 895: | ||
| text-align:"center;" | [[Arquivo:Not.png|link=]] | | text-align:"center;" | [[Arquivo:Not.png|link=]] | ||
| text-align:"center;" | [[Arquivo:Interface_BDD_PVP.png|24px|link=]] | | text-align:"center;" | [[Arquivo:Interface_BDD_PVP.png|24px|link=]] | ||
| text-align:"center;" | [[file:Atk7.png|Attack T7|link=]] | |||
|- | |- | ||
| text-align:"center;" | #232 | | text-align:"center;" | #232 | ||
| Linha 550: | Linha 903: | ||
| text-align:"center;" | [[Arquivo:Not.png|link=]] | | text-align:"center;" | [[Arquivo:Not.png|link=]] | ||
| text-align:"center;" | [[Arquivo:Interface_Disrupter_PVP.png|24px|link=]] | | text-align:"center;" | [[Arquivo:Interface_Disrupter_PVP.png|24px|link=]] | ||
| text-align:"center;" | [[file:Acc7.png|Accuracy T7|link=]] | |||
|- | |- | ||
| text-align:"center;" | #260 | | text-align:"center;" | #260 | ||
| Linha 557: | Linha 911: | ||
| text-align:"center;" | [[Arquivo:Not.png|link=]] | | text-align:"center;" | [[Arquivo:Not.png|link=]] | ||
| text-align:"center;" | [[Arquivo:Interface_Disrupter_PVP.png|24px|link=]] | | text-align:"center;" | [[Arquivo:Interface_Disrupter_PVP.png|24px|link=]] | ||
| text-align:"center;" | [[file:Acc7.png|Accuracy T7|link=]] | |||
|- | |- | ||
| text-align:"center;" | #323 | | text-align:"center;" | #323 | ||
| Linha 564: | Linha 919: | ||
| text-align:"center;" | [[Arquivo:Not.png|link=]] | | text-align:"center;" | [[Arquivo:Not.png|link=]] | ||
| text-align:"center;" | [[Arquivo:Interface_Disrupter_PVP.png|24px|link=]] | | text-align:"center;" | [[Arquivo:Interface_Disrupter_PVP.png|24px|link=]] | ||
| text-align:"center;" | [[file:Acc7.png|Accuracy T7|link=]] | |||
| text-align:"center;" | [[ | |||
|- | |- | ||
| text-align:center;" | #337 | | text-align:center;" | #337 | ||
| Linha 578: | Linha 927: | ||
| width="10%" | [[Arquivo:Not.png|link=]] | | width="10%" | [[Arquivo:Not.png|link=]] | ||
| width="10%" | [[Arquivo:Interface_Support_PVP.png|24px|link=]] [[Arquivo:Interface_Disrupter_PVP.png|24px|link=]] | | width="10%" | [[Arquivo:Interface_Support_PVP.png|24px|link=]] [[Arquivo:Interface_Disrupter_PVP.png|24px|link=]] | ||
| text-align:"center;" | [[file:Acc7.png|Accuracy T7|link=]] | |||
|- | |- | ||
| text-align:center;" | #338 | | text-align:center;" | #338 | ||
| Linha 585: | Linha 935: | ||
| width="10%" | [[Arquivo:Interface_BDD_PVE.png|24px|link=]] | | width="10%" | [[Arquivo:Interface_BDD_PVE.png|24px|link=]] | ||
| width="10%" | [[Arquivo:Not.png|link=]] | | width="10%" | [[Arquivo:Not.png|link=]] | ||
| text-align:"center;" | [[file:Atk7.png|Attack T7|link=]] | |||
|- | |- | ||
| text-align:center;" | #340 | | text-align:center;" | #340 | ||
| Linha 591: | Linha 942: | ||
| text-align:center;" | [[Arquivo:Water.png|link=]] [[Arquivo:Ground.png|link=Orebound]] | | text-align:center;" | [[Arquivo:Water.png|link=]] [[Arquivo:Ground.png|link=Orebound]] | ||
| width="10%" | [[Arquivo:Not.png|link=]] | | width="10%" | [[Arquivo:Not.png|link=]] | ||
| width="10%" | [[Arquivo: | | width="10%" | [[Arquivo:Interface_OffTank_PVP.png|24px|link=]] | ||
| text-align:"center;" | [[file:Atk7.png|Attack T7|link=]] | |||
|- | |- | ||
| text-align:"center;" | #344 | | text-align:"center;" | #344 | ||
| Linha 599: | Linha 951: | ||
| text-align:"center;" | [[Arquivo:Not.png|link=]] | | text-align:"center;" | [[Arquivo:Not.png|link=]] | ||
| text-align:"center;" | [[Arquivo:Interface_Disrupter_PVP.png|24px|link=]] | | text-align:"center;" | [[Arquivo:Interface_Disrupter_PVP.png|24px|link=]] | ||
| text-align:"center;" | [[file:X-Haste Tier7.png|Haste T7|link=]] | |||
|- | |- | ||
| text-align:"center;" | #558 | | text-align:"center;" | #558 | ||
| Linha 606: | Linha 959: | ||
| text-align:"center;" | [[Arquivo:Not.png|link=]] | | text-align:"center;" | [[Arquivo:Not.png|link=]] | ||
| text-align:"center;" | [[Arquivo:Interface_Tanker_PVP.png|24px|link=]] | | text-align:"center;" | [[Arquivo:Interface_Tanker_PVP.png|24px|link=]] | ||
| text-align:"center;" | [[file:Atk7.png|Attack T7|link=]] | |||
|- | |- | ||
| text-align:center;" | #660 | | text-align:center;" | #660 | ||
| text-align:center;" | [[Arquivo:660-Diggersby.png|link=Diggersby]] | | text-align:center;" | [[Arquivo:660-Diggersby.png|link=Diggersby]] | ||
| text-align:center;" | [[Diggersby]] | | text-align:center;" | [[Diggersby]] | ||
| text-align:center;" | [[Arquivo:Normal1.png|link=]] [[Arquivo:Ground.png|link= | | text-align:center;" | [[Arquivo:Normal1.png|link=]] [[Arquivo:Ground.png|link=]] | ||
| width="10%" | [[Arquivo:Not.png|link=]] | | width="10%" | [[Arquivo:Not.png|link=]] | ||
| width="10%" | [[Arquivo:Interface_Disrupter_PVP.png|24px|link=]] | | width="10%" | [[Arquivo:Interface_Disrupter_PVP.png|24px|link=]] | ||
| text-align:"center;" | [[file:Acc7.png|Accuracy T7|link=]] | |||
|- | |||
| text-align:center;" | #689 | |||
| text-align:center;" | [[Arquivo:689-Barbaracle.png|link=Barbaracle]] | |||
| text-align:center;" | [[Barbaracle]] | |||
| text-align:center;" | [[Arquivo:Rock.png|link=]] [[Arquivo:Water.png|link=]] | |||
| width="10%" | [[Arquivo:Interface_BDD_PVE.png|24px|link=]] | |||
| width="10%" | [[Arquivo:Not.png|link=]] | |||
| text-align:"center;" | [[file:Atk7.png|Attack T7|link=]] | |||
|- | |||
| text-align:center;" | #844 | |||
| text-align:center;" | [[Arquivo:844-Sandaconda.png|link=Sandaconda]] | |||
| text-align:center;" | [[Sandaconda]] | |||
| text-align:center;" | [[Arquivo:Ground.png|link=Orebound.png]] | |||
| width="10%" | [[Arquivo:Interface_OffensiveTanker_pve.png|24px|link=]] | |||
| width="10%" | [[Arquivo:Not.png|link=]] | |||
| text-align:"center;" | [[file:Atk7.png|Attack T7|link=]] | |||
|- | |- | ||
|} | |} | ||
| Linha 619: | Linha 990: | ||
=Rotação Mid-Late Game= | =Rotação Mid-Late Game= | ||
<center> | <center> | ||
{| class="wikitable | {| class="wikitable" style="text-align:center" width="50%;" | ||
|- | |- | ||
! colspan="4" scope="col" style="background-color: #432F02"| [[Arquivo:Rock.png|link=]] Rock | ! colspan="4" scope="col" style="background-color: #432F02"| [[Arquivo:Rock.png|link=]] Rock | ||
| Linha 632: | Linha 1 003: | ||
| text-align:"center;" | [[Arquivo:Interface_Tank_PVE.png|25px|link=]] | | text-align:"center;" | [[Arquivo:Interface_Tank_PVE.png|25px|link=]] | ||
| text-align:"center;" | 2 | | text-align:"center;" | 2 | ||
|- | |||
| text-align:"center;" | [[Arquivo:142M.png|link=Mega Aerodactyl]] | |||
| text-align:"center;" | [[Mega Aerodactyl]] | |||
| text-align:"center;" | [[Arquivo:Interface_OffensiveTanker_pve.png|25px|link=]] | |||
| text-align:"center;" | 1H | |||
|- | |- | ||
| text-align:"center;" | [[Arquivo:Shinygol.png|link=Shiny Golem]] | | text-align:"center;" | [[Arquivo:Shinygol.png|link=Shiny Golem]] | ||
| Linha 645: | Linha 1 021: | ||
| text-align:"center;" | [[Arquivo:409-Shiny rampardos.png|link=Shiny Rampardos]] | | text-align:"center;" | [[Arquivo:409-Shiny rampardos.png|link=Shiny Rampardos]] | ||
| text-align:"center;" | [[Shiny Rampardos]] | | text-align:"center;" | [[Shiny Rampardos]] | ||
| text-align:"center;" | [[Arquivo:Interface_BDD_PVE.png|25px|link=]] | |||
| text-align:"center;" | 1H | |||
|- | |||
| text-align:"center;" | [[Arquivo:689-Mega Barbaracle.png|link=Mega Barbaracle]] | |||
| text-align:"center;" | [[Mega Barbaracle]] | |||
| text-align:"center;" | [[Arquivo:Interface_BDD_PVE.png|25px|link=]] | | text-align:"center;" | [[Arquivo:Interface_BDD_PVE.png|25px|link=]] | ||
| text-align:"center;" | 1H | | text-align:"center;" | 1H | ||
| Linha 650: | Linha 1 031: | ||
| text-align:"center;" | [[Arquivo:409-Rampardos.png|link=Rampardos]] | | text-align:"center;" | [[Arquivo:409-Rampardos.png|link=Rampardos]] | ||
| text-align:"center;" | [[Rampardos]] | | text-align:"center;" | [[Rampardos]] | ||
| text-align:"center;" | [[Arquivo:Interface_BDD_PVE.png|25px|link=]] | |||
| text-align:"center;" | 2 | |||
|- | |||
| text-align:"center;" | [[Arquivo:745-Lycanroc.png|link=Lycanroc]] | |||
| text-align:"center;" | [[Lycanroc]] | |||
| text-align:"center;" | [[Arquivo:Interface_BDD_PVE.png|25px|link=]] | | text-align:"center;" | [[Arquivo:Interface_BDD_PVE.png|25px|link=]] | ||
| text-align:"center;" | 2 | | text-align:"center;" | 2 | ||
| Linha 663: | Linha 1 049: | ||
| text-align:"center;" | 3 | | text-align:"center;" | 3 | ||
|- | |- | ||
| text-align:"center;" | [[Arquivo:689-Barbaracle.png|link=Barbaracle]] | |||
| text-align:"center;" | [[Barbaracle]] | |||
| text-align:"center;" | [[Arquivo:Interface_BDD_PVE.png|25px|link=]] | |||
| text-align:"center;" | 3 | |||
|- | |||
| text-align:"center;" | [[Arquivo:248-Tyranitar.png|link=Tyranitar (TR)]] | |||
| text-align:"center;" | [[Tyranitar (TR)]] | |||
| text-align:"center;" | [[Arquivo:Interface BDD PVE.png|24px|link=]] | |||
| text-align:"center;" | TR | |||
|} | |} | ||
</center> | </center> | ||
<br> | <br> | ||
<center> | <center> | ||
{| class="wikitable | {| class="wikitable" style="text-align:center" width="50%;" | ||
|- | |- | ||
! colspan="4" scope="col" style="background-color: #432F02"| [[Arquivo:Ground.png|link=]] Ground | ! colspan="4" scope="col" style="background-color: #432F02"| [[Arquivo:Ground.png|link=]] Ground | ||
| Linha 685: | Linha 1 080: | ||
| text-align:"center;" | [[Arquivo:Interface_OffensiveTanker_pve.png|25px|link=]] | | text-align:"center;" | [[Arquivo:Interface_OffensiveTanker_pve.png|25px|link=]] | ||
| text-align:"center;" | 2 | | text-align:"center;" | 2 | ||
|- | |||
| text-align:"center;" | [[arquivo:844-Sandaconda.png|link=Sandaconda]] | |||
| text-align:"center;" | [[Sandaconda]] | |||
| text-align:"center;" | [[Arquivo:Interface_OffensiveTanker_pve.png|25px|link=]] | |||
| text-align:"center;" | 3 | |||
|- | |||
| text-align:"center;" | [[Arquivo:553-Shiny_Krookodile.png|link=Shiny Krookodile]] | |||
| text-align:"center;" | [[Shiny Krookodile]] | |||
| text-align:"center;" | [[Arquivo:Interface_BDD_PVE.png|25px|link=]] | |||
| text-align:"center;" | 1H | |||
|- | |||
| text-align:"center;" | [[Arquivo:530-Mega Excadrill.png|link=Mega Excadrill]] | |||
| text-align:"center;" | [[Mega Excadrill]] | |||
| text-align:"center;" | [[Arquivo:Interface_BDD_PVE.png|25px|link=]] | |||
| text-align:"center;" | 1H | |||
|- | |- | ||
| text-align:"center;" | [[Arquivo:232-ShinyDonphan.png|link=Shiny Donphan]] | | text-align:"center;" | [[Arquivo:232-ShinyDonphan.png|link=Shiny Donphan]] | ||
| Linha 710: | Linha 1 120: | ||
| text-align:"center;" | [[Arquivo:Interface_BDD_PVE.png|25px|link=]] | | text-align:"center;" | [[Arquivo:Interface_BDD_PVE.png|25px|link=]] | ||
| text-align:"center;" | 3 | | text-align:"center;" | 3 | ||
|- | |||
| text-align:"center;" | [[Arquivo:195 - Shiny Quagsire.png|link=Shiny Quagsire]] | |||
| text-align:"center;" | [[Shiny Quagsire]] | |||
| text-align:"center;" | [[Arquivo:Interface_BDD_PVE.png|25px|link=]] | |||
| text-align:"center;" | 3 | |||
|- | |||
| text-align:"center;" | [[Arquivo:Shinyrh.png|link=Shiny Rhydon (TM)]] | |||
| text-align:"center;" | [[Shiny Rhydon (TM)]] | |||
| text-align:"center;" | [[Arquivo:Interface_BDD_PVE.png|25px|link=]] | |||
| text-align:"center;" | TM Burst | |||
|- | |||
| text-align:"center;" | [[Arquivo:221-Piloswine.png|link=Piloswine (TR)]] | |||
| text-align:"center;" | [[Piloswine (TR)]] | |||
| text-align:"center;" | [[Arquivo:Interface_BDD_PVE.png|25px|link=]] | |||
| text-align:"center;" | TR | |||
|} | |} | ||
</center> | </center> <br> | ||
=Exclusividade do Clã no PvP= | =Exclusividade do Clã no PvP= | ||
| Linha 717: | Linha 1 142: | ||
<center> | <center> | ||
{| class="wikitable" style="text-align:center" width=" | {| class="wikitable" style="text-align:center" width="25%;" | ||
|- | |- | ||
! scope="col" width="5%;" style="background-color: #432F02"| Pokémon | ! scope="col" width="5%;" style="background-color: #432F02"| Pokémon | ||
! scope="col" width="15%;" style="background-color: #432F02"| Nome | ! scope="col" width="15%;" style="background-color: #432F02"| Nome | ||
|- | |- | ||
| text-align:"center;" | [[Arquivo:Shinygol.png|link=Shiny Golem]] | | text-align:"center;" | [[Arquivo:Shinygol.png|link=Shiny Golem]] | ||
| text-align:"center;" | [[Shiny Golem]] | | text-align:"center;" | [[Shiny Golem]] | ||
|- | |- | ||
| text-align:"center;" | [[Arquivo:076-AlolanGolem.png|link=Alolan Golem]] | | text-align:"center;" | [[Arquivo:076-AlolanGolem.png|link=Alolan Golem]] | ||
| text-align:"center;" | [[Alolan Golem]] | | text-align:"center;" | [[Alolan Golem]] | ||
|- | |- | ||
| text-align:"center;" | [[Arquivo:232-ShinyDonphan.png|link=Shiny Donphan]] | | text-align:"center;" | [[Arquivo:232-ShinyDonphan.png|link=Shiny Donphan]] | ||
| text-align:"center;" | [[Shiny Donphan]] | | text-align:"center;" | [[Shiny Donphan]] | ||
|- | |- | ||
| text-align:"center;" | [[Arquivo:248-MegaTyranitar.png|link=Mega Tyranitar]] | | text-align:"center;" | [[Arquivo:248-MegaTyranitar.png|link=Mega Tyranitar]] | ||
| text-align:"center;" | [[Mega Tyranitar]] | | text-align:"center;" | [[Mega Tyranitar]] | ||
|- | |- | ||
| text-align:"center;" | [[Arquivo:337-Lunatone.png|link=Lunatone]] | | text-align:"center;" | [[Arquivo:337-Lunatone.png|link=Lunatone]] | ||
| text-align:"center;" | [[Lunatone]] | | text-align:"center;" | [[Lunatone]] | ||
|- | |- | ||
| text-align:"center;" | [[Arquivo:389-Torterra.png|link=Torterra]] | | text-align:"center;" | [[Arquivo:389-Torterra.png|link=Torterra]] | ||
| text-align:"center;" | [[Torterra]] | | text-align:"center;" | [[Torterra]] | ||
| text-align:"center;" | [[Arquivo: | |||
|- | |||
| text-align:"center;" | [[Arquivo:389-Shiny_Torterra.png|link=Shiny Torterra]] | |||
| text-align:"center;" | [[Shiny Torterra]] | |||
|- | |||
| text-align:"center;" | [[File:472 - Shiny Gliscor.png|link=Shiny Gliscor]] | |||
| text-align:"center;" | [[Shiny Gliscor]] | |||
|- | |- | ||
| text-align:"center;" | [[Arquivo:567-Archeops.png|link=Archeops]] | | text-align:"center;" | [[Arquivo:567-Archeops.png|link=Archeops]] | ||
| text-align:"center;" | [[Archeops]] | | text-align:"center;" | [[Archeops]] | ||
|- | |- | ||
| text-align:"center;" | [[Arquivo:623-Shiny_Golurk.png|link=Shiny Golurk]] | | text-align:"center;" | [[Arquivo:623-Shiny_Golurk.png|link=Shiny Golurk]] | ||
| text-align:"center;" | [[Shiny Golurk]] | | text-align:"center;" | [[Shiny Golurk]] | ||
| text-align:"center;" | [[Arquivo: | |||
|- | |||
| text-align:"center;" | [[Arquivo:703-Shiny_Carbink.png|link=Shiny Carbink]] | |||
| text-align:"center;" | [[Shiny Carbink]] | |||
|- | |||
| text-align:"center;" | [[Arquivo:970-Glimmora.png|link=Glimmora]] | |||
| text-align:"center;" | [[Glimmora]] | |||
|- | |- | ||
| text-align:"center;" | [[Arquivo: | | text-align:"center;" | [[Arquivo:970-Mega Glimmora.png|link=Mega Glimmora]] | ||
| text-align:"center;" | [[ | | text-align:"center;" | [[Mega Glimmora]] | ||
|} | |} | ||
</center> | </center> | ||
| Linha 768: | Linha 1 209: | ||
Para obter um [[Arquivo:Shinygol.png|link=Shiny Golem]] '''[[Shiny Golem]]''', fale com a '''[[Pokémon_Obtidos_via_NPC#Shiny_de_Cl.C3.A3|NPC Illyana]]''', localizada na área do Clã Orebound, no Trade Center. | Para obter um [[Arquivo:Shinygol.png|link=Shiny Golem]] '''[[Shiny Golem]]''', fale com a '''[[Pokémon_Obtidos_via_NPC#Shiny_de_Cl.C3.A3|NPC Illyana]]''', localizada na área do Clã Orebound, no Trade Center. | ||
<center>[[Arquivo:NPC Illyana | <br><center>[[Arquivo:NPC Illyana Orebound.png|link=]] </center> | ||
| Linha 774: | Linha 1 215: | ||
Para obter um [[Arquivo:232-ShinyDonphan.png|link=Shiny Donphan]] '''[[Shiny Donphan]]''', fale com a '''[[Pokémon_Obtidos_via_NPC#Shiny_de_Cl.C3.A3_da_Nightmare_World|NPC Illyana]]''', na área de Orebound, na resistência de Cerulean. | Para obter um [[Arquivo:232-ShinyDonphan.png|link=Shiny Donphan]] '''[[Shiny Donphan]]''', fale com a '''[[Pokémon_Obtidos_via_NPC#Shiny_de_Cl.C3.A3_da_Nightmare_World|NPC Illyana]]''', na área de Orebound, na resistência de Cerulean. | ||
<center> [[Arquivo:NPC Illyana | <br><center> [[Arquivo:NPC NW Illyana Orebound.png|link=]] </center> | ||
=Efetividades= | =Efetividades= | ||
Edição atual tal como às 17h12min de 2 de junho de 2026
Caso encontre algum erro ou queira acrescentar alguma informação, entre em contato com um dos membros da wiki.
Introdução
Os membros do clã Orebound dedicam suas vidas para lidar com os mais fortes Pokémon do tipo ![]() Ground e
Ground e ![]() Rock para derrotar qualquer oponente que encontrarem.
Rock para derrotar qualquer oponente que encontrarem.
Ranking
- Rank 1: Orebound Sand.
- Rank 2: Orebound Rock.
- Rank 3: Orebound Solid.
- Rank 4: Orebound Hardskin.
- Rank 5: Orebound Hero/Heroine.
Acesse a página de Tasks do clã Orebound para conferir os requisitos necessários em cada um dos Rankings.
Bônus de Clã
O bônus máximo do clã é aplicado ao completar as tarefas do Rank 5. Abaixo estão as porcentagens de bônus adquiridas:
![]() Rock: Atk 25%, Def 25%
Rock: Atk 25%, Def 25%
![]() Ground: Atk 25%, Def 25%
Ground: Atk 25%, Def 25%
- É possível observar na Diamond Shop, dentro do jogo, o bônus ofensivo e defensivo que cada clã recebe no ranking 5.
- O bônus de ataque é aplicado aos movimentos do Pokémon. Se o jogador estiver usando um Pokémon de fora do seu clã, mas que execute um movimento do elemento do seu clã, o bônus de ataque ainda será concedido.
Tiers
Tier é uma classificação comum entre os Pokémon, indicando não apenas a raridade deste dentro do jogo, mas também qual executará melhor uma função, contanto que a comparação seja realizada entre dois Pokémon de mesma função. O Tier e a Função de um Pokémon pode ser conferido na ![]() Pokédex (Atalho Shift + D). Caso deseje ler mais sobre, acesse a página Tier e Funções ou Tiers (listagem) para conferir a listagem de Tier de todos os Pokémon.
Pokédex (Atalho Shift + D). Caso deseje ler mais sobre, acesse a página Tier e Funções ou Tiers (listagem) para conferir a listagem de Tier de todos os Pokémon.
Para facilitar a leitura desta página, a tabela a seguir contém a legenda de todas as Funções, PvP e PvE disponíveis no jogo.
| Função PvE | Função PvP | ||
|---|---|---|---|
| Ícone | Função | Ícone | Função |
| Tank | Tank | ||
| Offensive Tank | Offensive Tank | ||
| Burst Damage Dealer | Burst Damage Dealer | ||
| Over Time Damage Dealer | Over Time Damage Dealer | ||
| Support Overtime | Support | ||
| Speedster | Disrupter | ||
Abaixo estão listados todos os Pokémon do clã Orebound e suas respectivas funções, separados por Tier e com algumas recomendações de Held Itens.
Observação: A nossa lista de Helds Recomendados foi composta por colaboradores experientes da Wiki da PokeXGames e serve como sugestões de Held Itens para os Pokémon no âmbito do PvP e PvE, respectivamente.
O jogador ainda tem toda a liberdade de testar e utilizar outros Helds que não esses, podendo personalizar seu Pokémon de um jeito diferente. Ressaltamos que em caso de alterações nos Pokémon, essa lista pode ser alterada e não será garantido que o Pokémon seja adicionado como opção no NPC Jorge.
Observação: Na listagem, o Held PvP sugerido é o primeiro, seguido pelo Held PvE. Caso o Pokémon utilize o mesmo Held Item nos 2 âmbitos, aparecerá listado somente 1 Held Item.
Tier 1A
| Nº Dex | Ícone | Nome | Elementos | Função PvE | Função PvP | Held Recomendado (PvP/PvE) |
|---|---|---|---|---|---|---|
| #185 | Golden Sudowoodo |
Tier 1B
| Nº Dex | Ícone | Nome | Elementos | Função PvE | Função PvP | Held Recomendado (PvP/PvE) |
|---|---|---|---|---|---|---|
| #247 | Shiny Pupitar |
Tier 1C
| Nº Dex | Ícone | Nome | Elementos | Função PvE | Função PvP | Held Recomendado (PvP/PvE) |
|---|---|---|---|---|---|---|
| #059 | Hisuian Arcanine* | |||||
| #076 | Alolan Golem | |||||
| #095 | Crystal Onix | |||||
| #105 | Shiny Marowak | |||||
| #112 | Shiny Rhydon | |||||
| #142 | Aerodactyl | |||||
| #208 | Golden Steelix* | |||||
| #208 | Mega Steelix | |||||
| #219 | Shiny Magcargo | |||||
| #248 | Mega Tyranitar | |||||
| #260 | Mega Swampert | |||||
| #389 | Shiny Torterra | |||||
| #445 | Mega Garchomp* | |||||
| #464 | Rhyperior | |||||
| #472 | Shiny Gliscor | |||||
| #473 | Mamoswine | |||||
| #655 | Shiny Golurk | |||||
| #901 | Bloodmoon Ursaluna* | |||||
| #970 | Mega Glimmora |
*Observação: Os Pokémon ![]() Mega Garchomp ,
Mega Garchomp , ![]() Golden Steelix ,
Golden Steelix , ![]() Hisuian Arcanine e
Hisuian Arcanine e ![]() Bloodmoon Ursaluna são exclusivos de outros clãs no PvP.
Bloodmoon Ursaluna são exclusivos de outros clãs no PvP.
Technical Machine (TM)
| Nº Dex | Ícone | Nome | Elementos | Função PvE | Função PvP | Held Recomendado (PvE) |
|---|---|---|---|---|---|---|
| #105 | Shiny Marowak (TM) | |||||
| #112 | Shiny Rhydon (TM) | |||||
| #219 | Shiny Magcargo (TM) | |||||
| #389 | Shiny Torterra (TM) | |||||
| #467 | Rhyperior (TM) |
| Saiba Mais: Technical Machine (TM) |
Technical Records (TR)
| Nº Dex | Ícone | Nome | Elementos | Função PvE | Função PvP | Held Recomendado (PvE) |
|---|---|---|---|---|---|---|
| #221 | Piloswine (TR) | |||||
| #248 | Tyranitar (TR) |
| Saiba Mais: Technical Records (TR) |
Tier 1H
| Nº Dex | Ícone | Nome | Elementos | Função PvE | Função PvP | Held Recomendado (PvE) |
|---|---|---|---|---|---|---|
| #142 | Mega Aerodactyl | |||||
| #409 | Shiny Rampardos | |||||
| #530 | Mega Excadrill | |||||
| #553 | Shiny Krookodile | |||||
| #901 | Ursaluna | |||||
| #553 | Mega Barbaracle |
Observação: Os Pokémon T1H tem força de T1C fora da Nightmare World e são acima dos T1C dentro dela ou pelo menos tem um diferencial perante os demais Pokémon. São balanceados exclusivamente para conteúdos PvE e não podem ser utilizados em duelos PvP.
Tier 2
| Nº Dex | Ícone | Nome | Elementos | Função PvE | Função PvP | Held Recomendado (PvP/PvE) |
|---|---|---|---|---|---|---|
| #028 | Shiny Sandslash | |||||
| #075 | Alolan Graveler* | |||||
| #076 | Shiny Golem | |||||
| #095 | Big Onix | |||||
| #185 | Sudowoodo | |||||
| #208 | Steelix | |||||
| #221 | Shiny Piloswine | |||||
| #232 | Shiny Donphan | |||||
| #248 | Tyranitar | |||||
| #306 | Aggron | |||||
| #323 | Mega Camerupt | |||||
| #324 | Cradily | |||||
| #330 | Flygon | |||||
| #348 | Armaldo | |||||
| #389 | Torterra | |||||
| #409 | Rampardos | |||||
| #411 | Bastiodon | |||||
| #413 | Wormadam Ground* | |||||
| #445 | Garchomp | |||||
| #450 | Hippowdon | |||||
| #450 | Hippowdon Female | |||||
| #472 | Gliscor | |||||
| #476 | Probopass | |||||
| #530 | Excadrill* | |||||
| #553 | Krookodile | |||||
| #565 | Carracosta* | |||||
| #567 | Archeops | |||||
| #655 | Golurk | |||||
| #697 | Tyrantrum | |||||
| #699 | Aurorus | |||||
| #703 | Shiny Carbink | |||||
| #745 | Lycanroc | |||||
| #745 | Lycanroc Dusk Form | |||||
| #745 | Lycanroc Midnight Form | |||||
| #750 | Mudsdale | |||||
| #770 | Palossand | |||||
| #867 | Runerigus | - | ||||
| #900 | Kleavor | |||||
| #970 | Glimmora |
*Observação: Os Pokémon ![]() Alolan Graveler,
Alolan Graveler, ![]() Carracosta,
Carracosta, ![]() Excadrill e
Excadrill e ![]() Wormadam Ground são exclusivos de outros clãs no PvP.
Wormadam Ground são exclusivos de outros clãs no PvP.
Tier 3
| Nº Dex | Ícone | Nome | Elementos | Função PvE | Função PvP | Held Recomendado (PvP/PvE) |
|---|---|---|---|---|---|---|
| #031 | Nidoqueen | |||||
| #034 | Nidoking | |||||
| #051 | Shiny Dugtrio | |||||
| #051 | Alolan Dugtrio | |||||
| #076 | Golem | |||||
| #112 | Rhydon | |||||
| #139 | Omastar | |||||
| #141 | Kabutops | |||||
| #195 | Shiny Quagsire | |||||
| #219 | Magcargo | |||||
| #221 | Piloswine | |||||
| #232 | Donphan | |||||
| #260 | Swampert | |||||
| #323 | Camerupt | |||||
| #337 | Lunatone | |||||
| #338 | Solrock | |||||
| #340 | Whiscash | |||||
| #344 | Claydol | |||||
| #558 | Crustle | |||||
| #660 | Diggersby | |||||
| #689 | Barbaracle | |||||
| #844 | Sandaconda |
Rotação Mid-Late Game
| Pokémon | Nome | Função | Tier |
|---|---|---|---|
| Big Onix | 2 | ||
| Mega Aerodactyl | 1H | ||
| Shiny Golem | 2 | ||
| Omastar | 3 | ||
| Shiny Rampardos | 1H | ||
| Mega Barbaracle | 1H | ||
| Rampardos | 2 | ||
| Lycanroc | 2 | ||
| Golem | 3 | ||
| Solrock | 3 | ||
| Barbaracle | 3 | ||
| Tyranitar (TR) | TR | ||
| Pokémon | Nome | Função | Tier |
|---|---|---|---|
| Mudsdale | 2 | ||
| Steelix | 2 | ||
| Sandaconda | 3 | ||
| Shiny Krookodile | 1H | ||
| Mega Excadrill | 1H | ||
| Shiny Donphan | 2 | ||
| Hippowdon Female | 2 | ||
| Nidoqueen | 3 | ||
| Alolan Dugtrio | 3 | ||
| Rhydon | 3 | ||
| Shiny Quagsire | 3 | ||
| Shiny Rhydon (TM) | TM Burst | ||
| Piloswine (TR) | TR | ||
Exclusividade do Clã no PvP
| Pokémon | Nome |
|---|---|
| Shiny Golem | |
| Alolan Golem | |
| Shiny Donphan | |
| Mega Tyranitar | |
| Lunatone | |
| Torterra | |
| Shiny Torterra | |
| Shiny Gliscor | |
| Archeops | |
| Shiny Golurk | |
| Shiny Carbink | |
| Glimmora | |
| Mega Glimmora |
Observação: A exclusividade é aplicada apenas em conteúdos PvP. No PvE, o uso é liberado para todos os clãs.
Pokémon obtido via NPC de Clã
- Shiny de Clã
Para obter um ![]() Shiny Golem, fale com a NPC Illyana, localizada na área do Clã Orebound, no Trade Center.
Shiny Golem, fale com a NPC Illyana, localizada na área do Clã Orebound, no Trade Center.
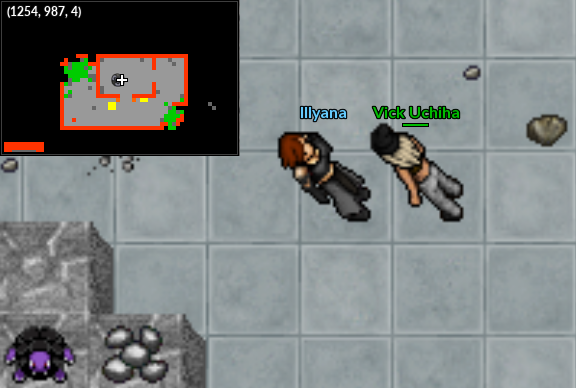
- Shiny de Clã da Nightmare World
Para obter um ![]() Shiny Donphan, fale com a NPC Illyana, na área de Orebound, na resistência de Cerulean.
Shiny Donphan, fale com a NPC Illyana, na área de Orebound, na resistência de Cerulean.
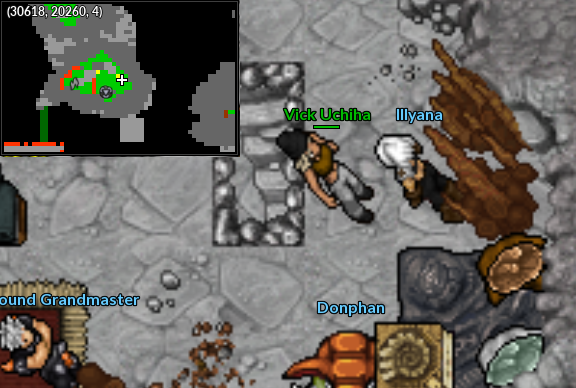
Efetividades
Abaixo são apresentadas as efetividades dos Pokémon deste clã, considerando apenas aqueles que possuem um elemento. A efetividade pode mudar caso o Pokémon possua dois elementos ou possua alguma resistência à algum elemento, como é o caso do Cradily, que possui a passiva Storm Drain, permitindo que ganhe resistência contra ataques do tipo Water (0,5x).
A efetividade de um Pokémon pode ser conferida na ![]() Pokédex ou realizando uma busca na página Pokémon (uso do Ctrl+F recomendado). Clique no ícone do elemento desejado para conferir a tabela de efetividade deste clã.
Pokédex ou realizando uma busca na página Pokémon (uso do Ctrl+F recomendado). Clique no ícone do elemento desejado para conferir a tabela de efetividade deste clã.
![]() Rock
Rock
| Dano | Elemento | |
|---|---|---|
| 0x | - | |
| Dano | Elemento | |
|---|---|---|
| 0x | - | |
![]() Ground
Ground
| Dano | Elemento | |
|---|---|---|
| 0x | ||
| Dano | Elemento | |
|---|---|---|
| 0x | ||
Mais informações poderão ser adquiridas acessando a página Efetividades.
Outfits Exclusivas
| Rank 1 | Rank 5 | ||
|---|---|---|---|

|

|

|

|
| Master | |
|---|---|

|

|