Malefic: mudanças entre as edições
(→Tier 2) |
(→Tier 3) |
||
| (64 revisões intermediárias por 9 usuários não estão sendo mostradas) | |||
| Linha 5: | Linha 5: | ||
Os membros do clã '''Malefic''' são conhecidos por serem misteriosos. Eles nunca conversam sobre sua vida pessoal com estranhos e controlam os Pokémon do tipo [[Arquivo:Ghost1.png|link=]] Ghost, [[Arquivo:Dark1.png|link=]] Dark e [[Arquivo:Poison1.png|link=]] Poison. | Os membros do clã '''Malefic''' são conhecidos por serem misteriosos. Eles nunca conversam sobre sua vida pessoal com estranhos e controlam os Pokémon do tipo [[Arquivo:Ghost1.png|link=]] Ghost, [[Arquivo:Dark1.png|link=]] Dark e [[Arquivo:Poison1.png|link=]] Poison. | ||
=Ranking= | =Ranking= | ||
| Linha 222: | Linha 12: | ||
* '''Rank 3:''' Malefic Spectre. | * '''Rank 3:''' Malefic Spectre. | ||
* '''Rank 4:''' Malefic Nightwalker. | * '''Rank 4:''' Malefic Nightwalker. | ||
* '''Rank 5:''' Malefic Lady/ | * '''Rank 5:''' Malefic Lady/Lord. | ||
Acesse a página de '''[[Malefic Tasks|Tasks]]''' do clã '''Malefic''' para conferir os requisitos necessários em cada um dos Rankings. | Acesse a página de '''[[Malefic Tasks|Tasks]]''' do clã '''Malefic''' para conferir os requisitos necessários em cada um dos Rankings. | ||
| Linha 234: | Linha 24: | ||
[[Arquivo:Dark1.png|link=]] '''Dark:''' Atk 28%, Def 28% <br> | [[Arquivo:Dark1.png|link=]] '''Dark:''' Atk 28%, Def 28% <br> | ||
=Tiers= | =Tiers= | ||
| Linha 281: | Linha 34: | ||
{| class="wikitable" style="text-align:center" width="50%;" | {| class="wikitable" style="text-align:center" width="50%;" | ||
|- | |- | ||
! colspan="2" scope="col" style="background-color: #7401DF"| | ! colspan="2" scope="col" style="background-color: #7401DF"| Função PvE | ||
! colspan="2" scope="col" style="background-color: #7401DF"| | ! colspan="2" scope="col" style="background-color: #7401DF"| Função PvP | ||
|- | |- | ||
! scope="col" style="background-color: #BCA9F5"| <span style="color:black">Ícone</span> | ! scope="col" style="background-color: #BCA9F5"| <span style="color:black">Ícone</span> | ||
| Linha 325: | Linha 78: | ||
<center> | <center> | ||
{| class="wikitable" style="text-align:center" width=" | {| class="wikitable" style="text-align:center" width="65%;" | ||
|- | |- | ||
! scope="col" width=" | ! scope="col" width="10%" style="background-color: #F1C232"| <span style="color:black">Nº Dex</span> | ||
! scope="col" style="background-color: # | ! scope="col" style="background-color: #F1C232"| <span style="color:black">Ícone</span> | ||
! scope="col" width=" | ! scope="col" width="15%;" style="background-color: #F1C232"| <span style="color:black">Nome</span> | ||
! scope="col" style="background-color: # | ! scope="col" style="background-color: #F1C232"| <span style="color:black">Elementos</span> | ||
! scope="col" width=" | ! scope="col" width="15%;" style="background-color: #F1C232"| <span style="color:black">Função PvE</span> | ||
! scope="col" width=" | ! scope="col" width="15%;" style="background-color: #F1C232"| <span style="color:black">Função PvP</span> | ||
! scope="col" width="20%;" style="background-color: #F1C232"| <span style="color:black">Held Recomendado (PvP/PvE)</span> | |||
|- | |- | ||
| text-align:center;" | #359 | | text-align:center;" | #359 | ||
| Linha 338: | Linha 92: | ||
| text-align:center;" | [[Mega Absol]] | | text-align:center;" | [[Mega Absol]] | ||
| text-align:center;" | [[Arquivo:Dark1.png|link=]] | | text-align:center;" | [[Arquivo:Dark1.png|link=]] | ||
| width="10%" | [[Arquivo: | | width="10%" | [[Arquivo:Interface_BDD_PVE.png|24px|link=]] [[Arquivo:Interface_OTDD_PVE.png|24px|link=]] | ||
| width="10%" | [[Arquivo:Interface_Tanker_PVP.png|24px|link=]] | | width="10%" | [[Arquivo:Interface_Tanker_PVP.png|24px|link=]] | ||
| text-align:"center;" | [[file:Atk7.png|Attack T7|link=]] | |||
|} | |} | ||
</center> | </center> | ||
| Linha 346: | Linha 101: | ||
<center> | <center> | ||
{| class="wikitable" style="text-align:center" width=" | {| class="wikitable" style="text-align:center" width="65%;" | ||
|- | |- | ||
! scope="col" | ! scope="col" width="10%" style="background-color: #F1C232"| <span style="color:black">Nº Dex</span> | ||
! scope="col" style="background-color: # | ! scope="col" style="background-color: #F1C232"| <span style="color:black">Ícone</span> | ||
! scope="col" width=" | ! scope="col" width="15%;" style="background-color: #F1C232"| <span style="color:black">Nome</span> | ||
! scope="col" style="background-color: # | ! scope="col" style="background-color: #F1C232"| <span style="color:black">Elementos</span> | ||
! scope="col" | ! scope="col" width="15%;" style="background-color: #F1C232"| <span style="color:black">Função PvE</span> | ||
! scope="col" width=" | ! scope="col" width="15%;" style="background-color: #F1C232"| <span style="color:black">Função PvP</span> | ||
! scope="col" width="20%;" style="background-color: #F1C232"| <span style="color:black">Held Recomendado (PvP/PvE)</span> | |||
|- | |- | ||
| text-align:center;" | #094 | | text-align:center;" | #094 | ||
| Linha 359: | Linha 115: | ||
| text-align:center;" | [[Shiny Gengar]] | | text-align:center;" | [[Shiny Gengar]] | ||
| text-align:center;" | [[Arquivo:Ghost1.png|link=]] [[Arquivo:Poison1.png|link=]] | | text-align:center;" | [[Arquivo:Ghost1.png|link=]] [[Arquivo:Poison1.png|link=]] | ||
| text-align:center;" | [[Arquivo: | | text-align:center;" | [[Arquivo:Interface_BDD_PVE.png|24px|link=]] [[Arquivo:Interface_OTDD_PVE.png|24px|link=]] | ||
| text-align:center;" | [[Arquivo:Interface_BDD_PVP.png|24px|link=]] | | text-align:center;" | [[Arquivo:Interface_BDD_PVP.png|24px|link=]] | ||
| text-align:"center;" | [[file:Atk7.png|Attack T7|link=]] | |||
|} | |} | ||
</center> | </center> | ||
| Linha 367: | Linha 124: | ||
<center> | <center> | ||
{| class="wikitable sortable" style="text-align:center" width=" | {| class="wikitable sortable" style="text-align:center" width="65%;" | ||
|- | |- | ||
! scope="col" width=" | ! scope="col" width="10%" style="background-color: #F1C232"| <span style="color:black">Nº Dex</span> | ||
! scope="col" style="background-color: # | ! scope="col" style="background-color: #F1C232"| <span style="color:black">Ícone</span> | ||
! scope="col" width=" | ! scope="col" width="15%;" style="background-color: #F1C232"| <span style="color:black">Nome</span> | ||
! scope="col" style="background-color: # | ! scope="col" style="background-color: #F1C232"| <span style="color:black">Elementos</span> | ||
! scope="col" width=" | ! scope="col" width="15%;" style="background-color: #F1C232"| <span style="color:black">Função PvE</span> | ||
! scope="col" width=" | ! scope="col" width="15%;" style="background-color: #F1C232"| <span style="color:black">Função PvP</span> | ||
! scope="col" width="20%;" style="background-color: #F1C232"| <span style="color:black">Held Recomendado (PvP/PvE)</span> | |||
|- | |- | ||
| text-align:"center;" | #003 | | text-align:"center;" | #003 | ||
| Linha 380: | Linha 138: | ||
| text-align:"center;" | [[Shiny Venusaur]] | | text-align:"center;" | [[Shiny Venusaur]] | ||
| text-align:"center;" | [[Arquivo:Grass.png|link=Naturia]] [[Arquivo:Poison1.png|link=]] | | text-align:"center;" | [[Arquivo:Grass.png|link=Naturia]] [[Arquivo:Poison1.png|link=]] | ||
| text-align:"center;" | [[Arquivo: | | text-align:"center;" | [[Arquivo:Interface_BDD_PVE.png|24px|link=]] | ||
| text-align:"center;" | [[Arquivo:Interface_Tanker_PVP.png|24px|link=]] | | text-align:"center;" | [[Arquivo:Interface_Tanker_PVP.png|24px|link=]] | ||
| text-align:"center;" | [[file:Def7.png|Defense T7|link=]] [[file:Atk7.png|Attack T7|link=]] | |||
|- | |- | ||
| text-align:"center;" | #003 | | text-align:"center;" | #003 | ||
| text-align:"center;" | [[Arquivo:003-MegaVenusaur.png|link=Mega Venusaur]] | | text-align:"center;" | [[Arquivo:003-MegaVenusaur.png|link=Mega Venusaur]] | ||
| text-align:"center;" | [[Mega Venusaur]]* | | text-align:"center;" | '''[[Mega Venusaur]]'''* | ||
| text-align:"center;" | [[Arquivo:Grass.png|link=Naturia]] [[Arquivo:Poison1.png|link=]] | | text-align:"center;" | [[Arquivo:Grass.png|link=Naturia]] [[Arquivo:Poison1.png|link=]] | ||
| text-align:"center;" | [[Arquivo: | | text-align:"center;" | [[Arquivo:Interface_BDD_PVE.png|24px|link=]] | ||
| text-align:"center;" | [[Arquivo:Interface_Tanker_PVP.png|24px|link=]] | | text-align:"center;" | [[Arquivo:Interface_Tanker_PVP.png|24px|link=]] | ||
| text-align:"center;" | [[file:Def7.png|Defense T7|link=]] [[file:Atk7.png|Attack T7|link=]] | |||
|- | |- | ||
| text-align:"center;" | #020 | | text-align:"center;" | #020 | ||
| text-align:"center;" | [[Arquivo:020-AlolanRaticate.png|link=Alolan Raticate]] | | text-align:"center;" | [[Arquivo:020-AlolanRaticate.png|link=Alolan Raticate]] | ||
| text-align:"center;" | [[Alolan Raticate]]* | | text-align:"center;" | '''[[Alolan Raticate]]'''* | ||
| text-align:"center;" | [[Arquivo:Dark1.png|link=]] [[Arquivo:Normal1.png|link=Gardestrike]] | | text-align:"center;" | [[Arquivo:Dark1.png|link=]] [[Arquivo:Normal1.png|link=Gardestrike]] | ||
| text-align:"center;" | [[Arquivo: | | text-align:"center;" | [[Arquivo:Interface_OTDD_PVE.png|24px|link=]] | ||
| text-align:"center;" | [[Arquivo:Interface_OTDD_PVP.png|24px|link=]] | | text-align:"center;" | [[Arquivo:Interface_OTDD_PVP.png|24px|link=]] | ||
| text-align:"center;" | [[file:Def7.png|Defense T7|link=]] [[file:Atk7.png|Attack T7|link=]] | |||
|- | |- | ||
| text-align:"center;" | #049 | | text-align:"center;" | #049 | ||
| Linha 403: | Linha 164: | ||
| text-align:"center;" | [[Arquivo:Not.png|link=]] | | text-align:"center;" | [[Arquivo:Not.png|link=]] | ||
| text-align:"center;" | [[Arquivo:Interface_Disrupter_PVP.png|24px|link=]] | | text-align:"center;" | [[Arquivo:Interface_Disrupter_PVP.png|24px|link=]] | ||
| text-align:"center;" | [[file:Acc7.png|Accuracy T7|link=]] | |||
|- | |- | ||
| text-align:"center;" | #073 | | text-align:"center;" | #073 | ||
| text-align:"center;" | [[Arquivo:073-Sh_Tentacruel.png|link=Shiny Tentacruel]] | | text-align:"center;" | [[Arquivo:073-Sh_Tentacruel.png|link=Shiny Tentacruel]] | ||
| text-align:"center;" | [[Shiny Tentacruel]] | | text-align:"center;" | [[Shiny Tentacruel]] | ||
| text-align:"center;" | [[Arquivo:Water.png|link=Seavell]] [[Arquivo:Poison1.png|link=]] | | text-align:"center;" | [[Arquivo:Water.png|link=Seavell]] [[Arquivo:Poison1.png|link=]] | ||
| text-align:"center;" | [[Arquivo:Interface_OTDD_PVE.png|24px|link=]] | | text-align:"center;" | [[Arquivo:Interface_OTDD_PVE.png|24px|link=]] | ||
| text-align:"center;" | [[Arquivo:Interface_OffTank_PVP.png|24px|link=]] | | text-align:"center;" | [[Arquivo:Interface_OffTank_PVP.png|24px|link=]] | ||
| text-align:"center;" | [[file:Def7.png|Defense T7|link=]] [[file:Atk7.png|Attack T7|link=]] | |||
|- | |- | ||
| text-align:"center;" | #089 | | text-align:"center;" | #089 | ||
| Linha 415: | Linha 178: | ||
| text-align:"center;" | [[Shiny Muk]] | | text-align:"center;" | [[Shiny Muk]] | ||
| text-align:"center;" | [[Arquivo:Poison1.png|link=]] | | text-align:"center;" | [[Arquivo:Poison1.png|link=]] | ||
| text-align:"center;" | [[Arquivo: | | text-align:"center;" | [[Arquivo:Interface_OTDD_PVE.png|24px|link=]] | ||
| text-align:"center;" | [[Arquivo:Interface_OffTank_PVP.png|24px|link=]] | | text-align:"center;" | [[Arquivo:Interface_OffTank_PVP.png|24px|link=]] | ||
| text-align:"center;" | [[file:Def7.png|Defense T7|link=]] [[file:Atk7.png|Attack T7|link=]] | |||
|- | |- | ||
| text-align:"center;" | #094 | | text-align:"center;" | #094 | ||
| Linha 424: | Linha 188: | ||
| text-align:"center;" | [[Arquivo:Not.png|link=]] | | text-align:"center;" | [[Arquivo:Not.png|link=]] | ||
| text-align:"center;" | [[Arquivo:Interface_Disrupter_PVP.png|24px|link=]] | | text-align:"center;" | [[Arquivo:Interface_Disrupter_PVP.png|24px|link=]] | ||
| text-align:"center;" | [[file:Acc7.png|Accuracy T7|link=]] | |||
|- | |- | ||
| text-align:"center;" | # | | text-align:"center;" | #105 | ||
| text-align:"center;" | [[Arquivo:105-AlolaMarowak.png|link=Alolan Marowak]] | | text-align:"center;" | [[Arquivo:105-AlolaMarowak.png|link=Alolan Marowak]] | ||
| text-align:"center;" | [[Alolan Marowak]] | | text-align:"center;" | [[Alolan Marowak]] | ||
| text-align:"center;" | [[Arquivo:Fire.png|link=Volcanic]] [[Arquivo:Ghost1.png|link=]] | | text-align:"center;" | [[Arquivo:Fire.png|link=Volcanic]] [[Arquivo:Ghost1.png|link=]] | ||
| text-align:"center;" | [[Arquivo: | | text-align:"center;" | [[Arquivo:Interface_OTDD_PVE.png|24px|link=]] | ||
| text-align:"center;" | [[Arquivo:Interface_Tanker_PVP.png|24px|link=]] | | text-align:"center;" | [[Arquivo:Interface_Tanker_PVP.png|24px|link=]] | ||
| text-align:"center;" | [[file:Def7.png|Defense T7|link=]] [[file:Atk7.png|Attack T7|link=]] | |||
|- | |- | ||
| text-align:"center;" | #130 | | text-align:"center;" | #130 | ||
| text-align:"center;" | [[Arquivo:130-Megagyarados.png|link=Mega Gyarados]] | | text-align:"center;" | [[Arquivo:130-Megagyarados.png|link=Mega Gyarados]] | ||
| text-align:"center;" | [[Mega Gyarados]]* | | text-align:"center;" | '''[[Mega Gyarados]]'''* | ||
| text-align:"center;" | [[Arquivo:Water.png|link=Seavell]] [[Arquivo:Dark1.png|link=]] | | text-align:"center;" | [[Arquivo:Water.png|link=Seavell]] [[Arquivo:Dark1.png|link=]] | ||
| text-align:"center;" | [[Arquivo: | | text-align:"center;" | [[Arquivo:Interface_BDD_PVE.png|24px|link=]] | ||
| text-align:"center;" | [[Arquivo:Interface_OffTank_PVP.png|24px|link=]] | | text-align:"center;" | [[Arquivo:Interface_OffTank_PVP.png|24px|link=]] | ||
| text-align:"center;" | [[file:Atk7.png|Attack T7|link=]] | |||
|- | |- | ||
| text-align:"center;" | #197 | | text-align:"center;" | #197 | ||
| Linha 445: | Linha 212: | ||
| text-align:"center;" | [[Arquivo:Not.png|link=]] | | text-align:"center;" | [[Arquivo:Not.png|link=]] | ||
| text-align:"center;" | [[Arquivo:Interface_Disrupter_PVP.png|24px|link=]] | | text-align:"center;" | [[Arquivo:Interface_Disrupter_PVP.png|24px|link=]] | ||
| text-align:"center;" | [[file:Acc7.png|Accuracy T7|link=]] | |||
|- | |- | ||
| text-align:"center;" | #229 | | text-align:"center;" | #229 | ||
| Linha 450: | Linha 218: | ||
| text-align:"center;" | [[Mega Houndoom]] | | text-align:"center;" | [[Mega Houndoom]] | ||
| text-align:"center;" | [[Arquivo:Dark1.png|link=]] [[Arquivo:Fire.png|link=Volcanic]] | | text-align:"center;" | [[Arquivo:Dark1.png|link=]] [[Arquivo:Fire.png|link=Volcanic]] | ||
| text-align:"center;" | [[Arquivo: | | text-align:"center;" | [[Arquivo:Interface_OTDD_PVE.png|24px|link=]] | ||
| text-align:"center;" | [[Arquivo:Interface_OTDD_PVP.png|24px|link=]] | | text-align:"center;" | [[Arquivo:Interface_OTDD_PVP.png|24px|link=]] | ||
| text-align:"center;" | [[file:Def7.png|Defense T7|link=]] [[file:Atk7.png|Attack T7|link=]] | |||
|- | |- | ||
| text-align:"center;" | #248 | | text-align:"center;" | #248 | ||
| text-align:"center;" | [[Arquivo:248-MegaTyranitar.png|link=Mega Tyranitar]] | | text-align:"center;" | [[Arquivo:248-MegaTyranitar.png|link=Mega Tyranitar]] | ||
| text-align:"center;" | [[Mega Tyranitar]] | | text-align:"center;" | '''[[Mega Tyranitar]]'''* | ||
| text-align:"center;" | [[Arquivo:Rock.png|link=Volcanic]] [[Arquivo:Dark1.png|link=]] | | text-align:"center;" | [[Arquivo:Rock.png|link=Volcanic]] [[Arquivo:Dark1.png|link=]] | ||
| text-align:"center;" | [[Arquivo:Interface_OTDD_PVE.png|24px|link=]] | | text-align:"center;" | [[Arquivo:Interface_OTDD_PVE.png|24px|link=]] | ||
| text-align:"center;" | [[Arquivo:Interface_OffTank_PVP.png|24px|link=]] | | text-align:"center;" | [[Arquivo:Interface_OffTank_PVP.png|24px|link=]] | ||
| text-align:"center;" | [[file:Atk7.png|Attack T7|link=]] | |||
|- | |- | ||
| text-align:"center;" | #302 | | text-align:"center;" | #302 | ||
| Linha 464: | Linha 234: | ||
| text-align:"center;" | [[Mega Sableye]] | | text-align:"center;" | [[Mega Sableye]] | ||
| text-align:"center;" | [[Arquivo:Dark1.png|link=]] [[Arquivo:Ghost1.png|link=]] | | text-align:"center;" | [[Arquivo:Dark1.png|link=]] [[Arquivo:Ghost1.png|link=]] | ||
| text-align:"center;" | [[Arquivo: | | text-align:"center;" | [[Arquivo:Interface_OTDD_PVE.png|24px|link=]] | ||
| text-align:"center;" | [[Arquivo:Interface_OffTank_PVP.png|24px|link=]] | | text-align:"center;" | [[Arquivo:Interface_OffTank_PVP.png|24px|link=]] | ||
| text-align:"center;" | [[file:Def7.png|Defense T7|link=]] [[file:Atk7.png|Attack T7|link=]] | |||
|- | |- | ||
| text-align:"center;" | #354 | | text-align:"center;" | #354 | ||
| Linha 471: | Linha 242: | ||
| text-align:"center;" | [[Mega Banette]] | | text-align:"center;" | [[Mega Banette]] | ||
| text-align:"center;" | [[Arquivo:Ghost1.png|link=]] | | text-align:"center;" | [[Arquivo:Ghost1.png|link=]] | ||
| text-align:"center;" | [[Arquivo: | | text-align:"center;" | [[Arquivo:Interface_BDD_PVE.png|24px|link=]] | ||
| text-align:"center;" | [[Arquivo:Interface_BDD_PVP.png|24px|link=]] | | text-align:"center;" | [[Arquivo:Interface_BDD_PVP.png|24px|link=]] | ||
| text-align:"center;" | [[file:Atk7.png|Attack T7|link=]] | |||
|- | |- | ||
| text-align:"center;" | #430 | | text-align:"center;" | #430 | ||
| Linha 478: | Linha 250: | ||
| text-align:"center;" | [[Shiny Honchkrow]] | | text-align:"center;" | [[Shiny Honchkrow]] | ||
| text-align:"center;" | [[Arquivo:Dark1.png|link=]] [[Arquivo:Flying.png|link=Wingeon]] | | text-align:"center;" | [[Arquivo:Dark1.png|link=]] [[Arquivo:Flying.png|link=Wingeon]] | ||
| text-align:"center;" | [[Arquivo: | | text-align:"center;" | [[Arquivo:Interface_OTDD_PVE.png|24px|link=]] | ||
| text-align:"center;" | [[Arquivo:Interface_OffTank_PVP.png|24px|link=]] | | text-align:"center;" | [[Arquivo:Interface_OffTank_PVP.png|24px|link=]] | ||
| text-align:"center;" | [[file:Atk7.png|Attack T7|link=]] | |||
|- | |- | ||
| text-align:"center;" | #477 | | text-align:"center;" | #477 | ||
| Linha 485: | Linha 258: | ||
| text-align:"center;" | [[Dusknoir]] | | text-align:"center;" | [[Dusknoir]] | ||
| text-align:"center;" | [[Arquivo:Ghost1.png|link=]] | | text-align:"center;" | [[Arquivo:Ghost1.png|link=]] | ||
| text-align:"center;" | [[Arquivo: | | text-align:"center;" | [[Arquivo:Interface_BDD_PVE.png|24px|link=]] | ||
| text-align:"center;" | [[Arquivo:Interface_OffTank_PVP.png|24px|link=]] | | text-align:"center;" | [[Arquivo:Interface_OffTank_PVP.png|24px|link=]] | ||
| text-align:"center;" | [[file:Def7.png|Defense T7|link=]] [[file:Atk7.png|Attack T7|link=]] | |||
|- | |- | ||
| text-align:"center;" | #478 | | text-align:"center;" | #478 | ||
| Linha 492: | Linha 266: | ||
| text-align:"center;" | [[Shiny Froslass]] | | text-align:"center;" | [[Shiny Froslass]] | ||
| text-align:"center;" | [[Arquivo:Ice.png|link=Seavell]] [[Arquivo:Ghost1.png|link=]] | | text-align:"center;" | [[Arquivo:Ice.png|link=Seavell]] [[Arquivo:Ghost1.png|link=]] | ||
| text-align:"center;" | [[Arquivo: | | text-align:"center;" | [[Arquivo:Interface_BDD_PVE.png|24px|link=]] | ||
| text-align:"center;" | [[Arquivo:Interface_OTDD_PVP.png|24px|link=]] | | text-align:"center;" | [[Arquivo:Interface_OTDD_PVP.png|24px|link=]] | ||
| text-align:"center;" | [[file:Atk7.png|Attack T7|link=]] | |||
|- | |- | ||
| text-align:"center;" | #623 | | text-align:"center;" | #623 | ||
| text-align:"center;" | [[Arquivo:623-Shiny_Golurk.png|link=Shiny Golurk]] | | text-align:"center;" | [[Arquivo:623-Shiny_Golurk.png|link=Shiny Golurk]] | ||
| text-align:"center;" | [[Shiny Golurk]]* | | text-align:"center;" | '''[[Shiny Golurk]]'''* | ||
| text-align:"center;" | [[Arquivo:Ground.png|link=Orebound]] [[Arquivo:Ghost1.png|link=]] | | text-align:"center;" | [[Arquivo:Ground.png|link=Orebound]] [[Arquivo:Ghost1.png|link=]] | ||
| text-align:"center;" | [[Arquivo:Not.png|link=]] | | text-align:"center;" | [[Arquivo:Not.png|link=]] | ||
| text-align:"center;" | [[Arquivo:Interface_Tanker_PVP.png|24px|link=]] | | text-align:"center;" | [[Arquivo:Interface_Tanker_PVP.png|24px|link=]] | ||
| text-align:"center;" | [[file:Def7.png|Defense T7|link=]] | |||
|} | |} | ||
</center> | </center> | ||
'''*Observação:''' | '''*Observação:''' Os Pokémon '''[[Mega Venusaur]]''', '''[[Alolan Raticate]]''', '''[[Mega Gyarados]]''', '''[[Mega Tyranitar]]''' e '''[[Shiny Golurk]]''' são exclusivos de outros clãs no PvP. <br> | ||
==Tier 1H== | ==Tier 1H== | ||
<center> | <center> | ||
{| class="wikitable" style="text-align:center" width=" | {| class="wikitable" style="text-align:center" width="65%;" | ||
|- | |- | ||
! scope="col" width=" | ! scope="col" width="10%" style="background-color: #F1C232"| <span style="color:black">Nº Dex</span> | ||
! scope="col" style="background-color: # | ! scope="col" style="background-color: #F1C232"| <span style="color:black">Ícone</span> | ||
! scope="col" width=" | ! scope="col" width="15%;" style="background-color: #F1C232"| <span style="color:black">Nome</span> | ||
! scope="col" style="background-color: # | ! scope="col" style="background-color: #F1C232"| <span style="color:black">Elementos</span> | ||
! scope="col" width=" | ! scope="col" width="15%;" style="background-color: #F1C232"| <span style="color:black">Função PvE</span> | ||
! scope="col" width=" | ! scope="col" width="15%;" style="background-color: #F1C232"| <span style="color:black">Função PvP</span> | ||
! scope="col" width="20%;" style="background-color: #F1C232"| <span style="color:black">Held Recomendado (PvE)</span> | |||
|- | |||
| text-align:"center;" | #569 | |||
| text-align:"center;" | [[Arquivo:569-Shiny Garbodor.png|link=Shiny Garbodor]] | |||
| text-align:"center;" | [[Shiny Garbodor]] | |||
| text-align:"center;" | [[Arquivo:Poison1.png|link=]] | |||
| text-align:"center;" | [[Arquivo:Interface_BDD_PVE.png|24px|link=]] | |||
| text-align:"center;" | [[Arquivo:Not.png|link=]] | |||
| text-align:"center;" | [[file:Atk7.png|Attack T7|link=]] | |||
|- | |- | ||
| text-align:"center;" | #571 | | text-align:"center;" | #571 | ||
| Linha 525: | Linha 309: | ||
| text-align:"center;" | [[Arquivo:Interface_BDD_PVE.png|24px|link=]] | | text-align:"center;" | [[Arquivo:Interface_BDD_PVE.png|24px|link=]] | ||
| text-align:"center;" | [[Arquivo:Not.png|link=]] | | text-align:"center;" | [[Arquivo:Not.png|link=]] | ||
| text-align:"center;" | [[file:Atk7.png|Attack T7|link=]] | |||
|} | |} | ||
</center> | </center> | ||
| Linha 533: | Linha 318: | ||
<center> | <center> | ||
{| class="wikitable sortable" style="text-align:center" width="65%;" | |||
{| class="wikitable sortable" style="text-align:center" width=" | |- | ||
|- | ! scope="col" width="10%" style="background-color: #F1C232"| <span style="color:black">Nº Dex</span> | ||
! scope="col" width=" | ! scope="col" style="background-color: #F1C232"| <span style="color:black">Ícone</span> | ||
! scope="col" style="background-color: # | ! scope="col" width="15%;" style="background-color: #F1C232"| <span style="color:black">Nome</span> | ||
! scope="col" width=" | ! scope="col" style="background-color: #F1C232"| <span style="color:black">Elementos</span> | ||
! scope="col" style="background-color: # | ! scope="col" width="15%;" style="background-color: #F1C232"| <span style="color:black">Função PvE</span> | ||
! scope="col" width=" | ! scope="col" width="15%;" style="background-color: #F1C232"| <span style="color:black">Função PvP</span> | ||
! scope="col" width=" | ! scope="col" width="20%;" style="background-color: #F1C232"| <span style="color:black">Held Recomendado (PvP/PvE)</span> | ||
|- | |- | ||
| text-align:"center;" | #015 | | text-align:"center;" | #015 | ||
| text-align:"center;" | [[Arquivo:015M.png|link=Mega Beedrill]] | | text-align:"center;" | [[Arquivo:015M.png|link=Mega Beedrill]] | ||
| text-align:"center;" | [[Mega Beedrill]] | | text-align:"center;" | [[Mega Beedrill]] | ||
| text-align:"center;" | [[Arquivo:Bug.png|link=Naturia]][[Arquivo:Poison1.png|link=]] | | text-align:"center;" | [[Arquivo:Bug.png|link=Naturia]][[Arquivo:Poison1.png|link=]] | ||
| text-align:"center;" | [[Arquivo:Interface_BDD_PVE.png|24px|link=]] | | text-align:"center;" | [[Arquivo:Interface_BDD_PVE.png|24px|link=]] | ||
| text-align:"center;" | [[Arquivo:Not.png|link=]] | | text-align:"center;" | [[Arquivo:Not.png|link=]] | ||
| text-align:"center;" | [[file:Atk7.png|Attack T7|link=]] | |||
|- | |- | ||
| text-align:"center;" | #031 | | text-align:"center;" | #031 | ||
| Linha 556: | Linha 342: | ||
| text-align:"center;" | [[Arquivo:Not.png|link=]] | | text-align:"center;" | [[Arquivo:Not.png|link=]] | ||
| text-align:"center;" | [[Arquivo:Interface_OffTank_PVP.png|24px|link=]] | | text-align:"center;" | [[Arquivo:Interface_OffTank_PVP.png|24px|link=]] | ||
| text-align:"center;" | [[file:Atk7.png|Attack T7|link=]] | |||
|- | |- | ||
| text-align:"center;" | #034 | | text-align:"center;" | #034 | ||
| Linha 563: | Linha 350: | ||
| text-align:"center;" | [[Arquivo:Not.png|link=]] | | text-align:"center;" | [[Arquivo:Not.png|link=]] | ||
| text-align:"center;" | [[Arquivo:Interface_OTDD_PVP.png|24px|link=]] | | text-align:"center;" | [[Arquivo:Interface_OTDD_PVP.png|24px|link=]] | ||
| text-align:"center;" | [[file:X-Poison Tier7.png|Poison T7|link=]] | |||
|- | |- | ||
| text-align:"center;" | #063 | | text-align:"center;" | #063 | ||
| Linha 570: | Linha 358: | ||
| text-align:"center;" | [[Arquivo:Not.png|link=]] | | text-align:"center;" | [[Arquivo:Not.png|link=]] | ||
| text-align:"center;" | [[Arquivo:Interface_Disrupter_PVP.png|24px|link=]] | | text-align:"center;" | [[Arquivo:Interface_Disrupter_PVP.png|24px|link=]] | ||
| text-align:"center;" | [[file:Acc7.png|Accuracy T7|link=]] | |||
|- | |- | ||
| text-align:"center;" | #089 | | text-align:"center;" | #089 | ||
| Linha 577: | Linha 366: | ||
| text-align:"center;" | [[Arquivo:Interface_BDD_PVE.png|24px|link=]] | | text-align:"center;" | [[Arquivo:Interface_BDD_PVE.png|24px|link=]] | ||
| text-align:"center;" | [[Arquivo:Not.png|link=]] | | text-align:"center;" | [[Arquivo:Not.png|link=]] | ||
| text-align:"center;" | [[file:Atk7.png|Attack T7|link=]] | |||
|- | |- | ||
| text-align:"center;" | #094 | | text-align:"center;" | #094 | ||
| Linha 584: | Linha 374: | ||
| text-align:"center;" | [[Arquivo:Interface_BDD_PVE.png|24px|link=]] | | text-align:"center;" | [[Arquivo:Interface_BDD_PVE.png|24px|link=]] | ||
| text-align:"center;" | [[Arquivo:Not.png|link=]] | | text-align:"center;" | [[Arquivo:Not.png|link=]] | ||
| text-align:"center;" | [[file:Atk7.png|Attack T7|link=]] | |||
|- | |- | ||
| text-align:"center;" | #110 | | text-align:"center;" | #110 | ||
| Linha 591: | Linha 382: | ||
| text-align:"center;" | [[Arquivo:Interface_Tank_PVE.png|24px|link=]] | | text-align:"center;" | [[Arquivo:Interface_Tank_PVE.png|24px|link=]] | ||
| text-align:"center;" | [[Arquivo:Not.png|link=]] | | text-align:"center;" | [[Arquivo:Not.png|link=]] | ||
| text-align:"center;" | [[file:Def7.png|Defense T7|link=]] | |||
|- | |- | ||
| text-align:"center;" | #169 | | text-align:"center;" | #169 | ||
| Linha 598: | Linha 390: | ||
| text-align:"center;" | [[Arquivo:Not.png|link=]] | | text-align:"center;" | [[Arquivo:Not.png|link=]] | ||
| text-align:"center;" | [[Arquivo:Interface_OTDD_PVP.png|24px|link=]] | | text-align:"center;" | [[Arquivo:Interface_OTDD_PVP.png|24px|link=]] | ||
| text-align:"center;" | [[file:Def7.png|Defense T7|link=]] | |||
|- | |- | ||
| text-align:"center;" | #172 | | text-align:"center;" | #172 | ||
| text-align:"center;" | [[Arquivo:172-DarkPichu.png|link=Dark Pichu]] | | text-align:"center;" | [[Arquivo:172-DarkPichu.png|link=Dark Pichu]] | ||
| text-align:"center;" | [[Dark Pichu]] | | text-align:"center;" | '''[[Dark Pichu]]'''* | ||
| text-align:"center;" | [[Arquivo:Electric.png|link=Raibolt]] [[Arquivo:Dark1.png|link=]] | | text-align:"center;" | [[Arquivo:Electric.png|link=Raibolt]] [[Arquivo:Dark1.png|link=]] | ||
| text-align:"center;" | [[Arquivo:Not.png|link=]] | | text-align:"center;" | [[Arquivo:Not.png|link=]] | ||
| text-align:"center;" | [[Arquivo:Interface_OTDD_PVP.png|24px|link=]] | | text-align:"center;" | [[Arquivo:Interface_OTDD_PVP.png|24px|link=]] | ||
| text-align:"center;" | [[file:Atk7.png|Attack T7|link=]] | |||
|- | |- | ||
| text-align:"center;" | #200 | | text-align:"center;" | #200 | ||
| Linha 611: | Linha 405: | ||
| text-align:"center;" | [[Arquivo:Ghost1.png|link=]] | | text-align:"center;" | [[Arquivo:Ghost1.png|link=]] | ||
| text-align:"center;" | [[Arquivo:Not.png|link=]] | | text-align:"center;" | [[Arquivo:Not.png|link=]] | ||
| text-align:"center;" | [[Arquivo:Interface_Support_PVP.png|24px|link=]] | | text-align:"center;" | [[Arquivo:Interface_Disrupter_PVP.png|24px|link=]] [[Arquivo:Interface_Support_PVP.png|24px|link=]] | ||
| text-align:"center;" | [[file:Acc7.png|Accuracy T7|link=]] | |||
|- | |- | ||
| text-align:"center;" | #211 | | text-align:"center;" | #211 | ||
| Linha 619: | Linha 414: | ||
| text-align:"center;" | [[Arquivo:Interface_OffensiveTanker_pve.png|24px|link=]] | | text-align:"center;" | [[Arquivo:Interface_OffensiveTanker_pve.png|24px|link=]] | ||
| text-align:"center;" | [[Arquivo:Not.png|link=]] | | text-align:"center;" | [[Arquivo:Not.png|link=]] | ||
| text-align:"center;" | [[file:Atk7.png|Attack T7|link=]] | |||
|- | |- | ||
| text-align:"center;" | #229 | | text-align:"center;" | #229 | ||
| Linha 626: | Linha 422: | ||
| text-align:"center;" | [[Arquivo:Not.png|link=]] | | text-align:"center;" | [[Arquivo:Not.png|link=]] | ||
| text-align:"center;" | [[Arquivo:Interface_OffTank_PVP.png|24px|link=]] | | text-align:"center;" | [[Arquivo:Interface_OffTank_PVP.png|24px|link=]] | ||
| text-align:"center;" | [[file:Def7.png|Defense T7|link=]] | |||
|- | |- | ||
| text-align:"center;" | #248 | | text-align:"center;" | #248 | ||
| text-align:"center;" | [[Arquivo:248-Tyranitar.png|link=Tyranitar]] | | text-align:"center;" | [[Arquivo:248-Tyranitar.png|link=Tyranitar]] | ||
| text-align:"center;" | [[Tyranitar]] | | text-align:"center;" | [[Tyranitar]] | ||
| text-align:"center;" | [[Arquivo:Rock.png|link=Orebound]][[Arquivo:Dark1.png|link=]] | | text-align:"center;" | [[Arquivo:Rock.png|link=Orebound]][[Arquivo:Dark1.png|link=]] | ||
| text-align:"center;" | | text-align:"center;" | [[Arquivo:Interface_OTDD_PVE.png|24px|link=]] | ||
| text-align:"center;" | [[Arquivo:Interface_BDD_PVP.png|24px|link=]] | | text-align:"center;" | [[Arquivo:Interface_BDD_PVP.png|24px|link=]] | ||
| text-align:"center;" | [[file:Atk7.png|Attack T7|link=]] | |||
|- | |- | ||
| text-align:"center;" | #262 | | text-align:"center;" | #262 | ||
| Linha 640: | Linha 438: | ||
| text-align:"center;" | [[Arquivo:Interface_OffensiveTanker_pve.png|24px|link=]] | | text-align:"center;" | [[Arquivo:Interface_OffensiveTanker_pve.png|24px|link=]] | ||
| text-align:"center;" | [[Arquivo:Not.png|link=]] | | text-align:"center;" | [[Arquivo:Not.png|link=]] | ||
| text-align:"center;" | [[file:Atk7.png|Attack T7|link=]] | |||
|- | |||
| text-align:"center;" | #317 | |||
| text-align:"center;" | [[Arquivo:317-Shiny_Swalot.png|link=Shiny Swalot]] | |||
| text-align:"center;" | [[Shiny Swalot]] | |||
| text-align:"center;" | [[Arquivo:Poison1.png|link=Malefic]] | |||
| text-align:"center;" | [[Arquivo:Interface_SupportOT_PVE.png|24px|link=]] | |||
| text-align:"center;" | [[Arquivo:Not.png|link=]] | |||
| text-align:"center;" | [[file:Atk7.png|Attack T7|link=]] | |||
|- | |- | ||
| text-align:"center;" | #332 | | text-align:"center;" | #332 | ||
| Linha 647: | Linha 454: | ||
| text-align:"center;" | [[Arquivo:Not.png|link=]] | | text-align:"center;" | [[Arquivo:Not.png|link=]] | ||
| text-align:"center;" | [[Arquivo:Interface_Disrupter_PVP.png|24px|link=]] | | text-align:"center;" | [[Arquivo:Interface_Disrupter_PVP.png|24px|link=]] | ||
| text-align:"center;" | [[file:Acc7.png|Accuracy T7|link=]] | |||
|- | |- | ||
| text-align:"center;" | #336 | | text-align:"center;" | #336 | ||
| Linha 654: | Linha 462: | ||
| text-align:"center;" | [[Arquivo:Interface_BDD_PVE.png|24px|link=]] | | text-align:"center;" | [[Arquivo:Interface_BDD_PVE.png|24px|link=]] | ||
| text-align:"center;" | [[Arquivo:Not.png|link=]] | | text-align:"center;" | [[Arquivo:Not.png|link=]] | ||
| text-align:"center;" | [[file:Atk7.png|Attack T7|link=]] | |||
|- | |- | ||
| text-align:"center;" | #356 | | text-align:"center;" | #356 | ||
| Linha 661: | Linha 470: | ||
| text-align:"center;" | [[Arquivo:Interface_Tank_PVE.png|24px|link=]] | | text-align:"center;" | [[Arquivo:Interface_Tank_PVE.png|24px|link=]] | ||
| text-align:"center;" | [[Arquivo:Not.png|link=]] | | text-align:"center;" | [[Arquivo:Not.png|link=]] | ||
| text-align:"center;" | [[file:Def7.png|Defense T7|link=]] | |||
|- | |- | ||
| text-align:"center;" | #359 | | text-align:"center;" | #359 | ||
| Linha 666: | Linha 476: | ||
| text-align:"center;" | [[Absol]] | | text-align:"center;" | [[Absol]] | ||
| text-align:"center;" | [[Arquivo:Dark1.png|link=]] | | text-align:"center;" | [[Arquivo:Dark1.png|link=]] | ||
| text-align:"center;" | [[Arquivo: | | text-align:"center;" | [[Arquivo:Interface_OTDD_PVE.png|24px|link=]] | ||
| text-align:"center;" | [[Arquivo:Interface_BDD_PVP.png|24px|link=]] | | text-align:"center;" | [[Arquivo:Interface_BDD_PVP.png|24px|link=]] | ||
| text-align:"center;" | [[file:Atk7.png|Attack T7|link=]] | |||
|- | |- | ||
| text-align:"center;" | #429 | | text-align:"center;" | #429 | ||
| Linha 674: | Linha 485: | ||
| text-align:"center;" | [[Arquivo:Ghost1.png|link=]] | | text-align:"center;" | [[Arquivo:Ghost1.png|link=]] | ||
| text-align:"center;" | [[Arquivo:Interface_OffensiveTanker_pve.png|24px|link=]] | | text-align:"center;" | [[Arquivo:Interface_OffensiveTanker_pve.png|24px|link=]] | ||
| text-align:"center;" | [[Arquivo: | | text-align:"center;" | [[Arquivo:Interface_OffTank_PVP.png|24px|link=]] | ||
| text-align:"center;" | [[file:Def7.png|Defense T7|link=]] [[file:Atk7.png|Attack T7|link=]] | |||
|- | |- | ||
| text-align:"center;" | #430 | | text-align:"center;" | #430 | ||
| Linha 682: | Linha 494: | ||
| text-align:"center;" | [[Arquivo:Not.png|link=]] | | text-align:"center;" | [[Arquivo:Not.png|link=]] | ||
| text-align:"center;" | [[Arquivo:Interface_Disrupter_PVP.png|24px|link=]] | | text-align:"center;" | [[Arquivo:Interface_Disrupter_PVP.png|24px|link=]] | ||
| text-align:"center;" | [[file:Acc7.png|Accuracy T7|link=]] | |||
|- | |||
| text-align:center;" | #442 | |||
| text-align:center;" | [[Arquivo:442-spiritomb.png|link=Spiritomb|Spiritomb]] | |||
| text-align:center;" | [[Spiritomb]] | |||
| text-align:center;" | [[Arquivo:Ghost1.png|link=Malefic]] [[Arquivo:Dark1.png|link=Malefic]] | |||
| width="10%" | [[Arquivo:Interface_SupportOT_PVE.png|24px|link=]] | |||
| width="10%" | [[Arquivo:Not.png|link=]] | |||
| text-align:"center;" | [[file:Atk7.png|Attack T7|link=]] | |||
|- | |- | ||
| text-align:"center;" | #452 | | text-align:"center;" | #452 | ||
| Linha 689: | Linha 510: | ||
| text-align:"center;" | [[Arquivo:Not.png|link=]] | | text-align:"center;" | [[Arquivo:Not.png|link=]] | ||
| text-align:"center;" | [[Arquivo:Interface_OffTank_PVP.png|24px|link=]] | | text-align:"center;" | [[Arquivo:Interface_OffTank_PVP.png|24px|link=]] | ||
| text-align:"center;" | [[file:Def7.png|Defense T7|link=]] | |||
|- | |- | ||
| text-align:"center;" | #454 | | text-align:"center;" | #454 | ||
| Linha 696: | Linha 518: | ||
| text-align:"center;" | [[Arquivo:Not.png|link=]] | | text-align:"center;" | [[Arquivo:Not.png|link=]] | ||
| text-align:"center;" | [[Arquivo:Interface_OffTank_PVP.png|24px|link=]] | | text-align:"center;" | [[Arquivo:Interface_OffTank_PVP.png|24px|link=]] | ||
| text-align:"center;" | [[file:Def7.png|Defense T7|link=]] | |||
|- | |- | ||
| text-align:"center;" | #461 | | text-align:"center;" | #461 | ||
| Linha 703: | Linha 526: | ||
| text-align:"center;" | [[Arquivo:Not.png|link=]] | | text-align:"center;" | [[Arquivo:Not.png|link=]] | ||
| text-align:"center;" | [[Arquivo:Interface_BDD_PVP.png|24px|link=]] | | text-align:"center;" | [[Arquivo:Interface_BDD_PVP.png|24px|link=]] | ||
| text-align:"center;" | [[file:Atk7.png|Attack T7|link=]] | |||
| | |||
|- | |- | ||
| text-align:"center;" | #563 | | text-align:"center;" | #563 | ||
| Linha 710: | Linha 535: | ||
| text-align:"center;" | [[Arquivo:Interface_OffensiveTanker_pve.png|24px|link=]] | | text-align:"center;" | [[Arquivo:Interface_OffensiveTanker_pve.png|24px|link=]] | ||
| text-align:"center;" | [[Arquivo:Not.png|link=]] | | text-align:"center;" | [[Arquivo:Not.png|link=]] | ||
| text-align:"center;" | [[file:Atk7.png|Attack T7|link=]] | |||
|- | |||
| text-align:"center;" | #569 | |||
| text-align:"center;" | [[Arquivo:569-Garbodor.png|link=Garbodor]] | |||
| text-align:"center;" | [[Garbodor]] | |||
| text-align:"center;" | [[Arquivo:Poison1.png|link=]] | |||
| text-align:"center;" | [[Arquivo:Interface_OTDD_PVE.png|24px|link=]] | |||
| text-align:"center;" | [[Arquivo:Not.png|link=]] | |||
| text-align:"center;" | [[file:Atk7.png|Attack T7|link=]] | |||
|- | |||
| text-align:center;" | #635 | |||
| text-align:center;" | [[Arquivo:635-Hydreigon.png|link=Hydreigon]] | |||
| text-align:center;" | [[Hydreigon]] | |||
| text-align:center;" | [[Arquivo:Dark1.png|Dark|link=Malefic]][[Arquivo:Dragon.png|link=Wingeon]] | |||
| width="10%" | [[Arquivo:Interface_OTDD_PVE.png|24px|link=]] | |||
| width="10%" | [[Arquivo:Interface_OTDD_PVP.png|24px|link=]] | |||
| text-align:"center;" | [[file:Def7.png|Defense T7|link=]] [[file:Atk7.png|Attack T7|link=]] | |||
|- | |||
| text-align:"center;" | #655 | |||
| text-align:"center;" | [[Arquivo:623-Golurk.png|link=Golurk]] | |||
| text-align:"center;" | [[Golurk]] | |||
| text-align:"center;" | [[Arquivo:Ground.png|link=Orebound]] [[Arquivo:Ghost1.png|link=Malefic]] | |||
| text-align:"center;" | [[Arquivo:Not.png|link=]] | |||
| text-align:"center;" | [[Arquivo:Interface_BDD_PVP.png|24px|link=]] | |||
| text-align:"center;" | [[file:Atk7.png|Attack T7|link=]] | |||
|- | |- | ||
| text-align:"center;" | #675 | | text-align:"center;" | #675 | ||
| Linha 717: | Linha 567: | ||
| text-align:"center;" | [[Arquivo:Not.png|link=]] | | text-align:"center;" | [[Arquivo:Not.png|link=]] | ||
| text-align:"center;" | [[Arquivo:Interface_BDD_PVP.png|24px|link=]] | | text-align:"center;" | [[Arquivo:Interface_BDD_PVP.png|24px|link=]] | ||
| text-align:"center;" | [[file:Atk7.png|Attack T7|link=]] | |||
|- | |- | ||
| text-align:"center;" | #681 | | text-align:"center;" | #681 | ||
| text-align:"center;" | [[Arquivo:681-Aegislash.png|link=Aegislash]] | | text-align:"center;" | [[Arquivo:681-Aegislash.png|link=Aegislash]] | ||
| text-align:"center;" | [[Aegislash]] | | text-align:"center;" | '''[[Aegislash]]'''* | ||
| text-align:"center;" | [[Arquivo:Steel.png|link=Ironhard]] [[Arquivo:Ghost1.png|link=]] | | text-align:"center;" | [[Arquivo:Steel.png|link=Ironhard]] [[Arquivo:Ghost1.png|link=]] | ||
| text-align:"center;" | [[Arquivo:Not.png|link=]] | | text-align:"center;" | [[Arquivo:Not.png|link=]] | ||
| text-align:"center;" | [[Arquivo:Interface_OffTank_PVP.png|24px|link=]] | | text-align:"center;" | [[Arquivo:Interface_OffTank_PVP.png|24px|link=]] | ||
| text-align:"center;" | [[file:Atk7.png|Attack T7|link=]] | |||
|- | |- | ||
| text-align:"center;" | #691 | | text-align:"center;" | #691 | ||
| text-align:"center;" | [[Arquivo:691-Dragalge.png|link=Dragalge]] | | text-align:"center;" | [[Arquivo:691-Dragalge.png|link=Dragalge]] | ||
| text-align:"center;" | [[Dragalge]] | | text-align:"center;" | '''[[Dragalge]]'''* | ||
| text-align:"center;" | [[Arquivo:Poison1.png|link=]] [[Arquivo:Dragon.png|link=Wingeon]] | | text-align:"center;" | [[Arquivo:Poison1.png|link=]] [[Arquivo:Dragon.png|link=Wingeon]] | ||
| text-align:"center;" | [[Arquivo: | | text-align:"center;" | [[Arquivo:Interface_OTDD_PVE.png|24px|link=]] | ||
| text-align:"center;" | [[Arquivo:Interface_Tanker_PVP.png|24px|link=]] | | text-align:"center;" | [[Arquivo:Interface_Tanker_PVP.png|24px|link=]] | ||
| text-align:"center;" | [[file:Def7.png|Defense T7|link=]] [[file:Atk7.png|Attack T7|link=]] | |||
|- | |||
| text-align:"center;" | #770 | |||
| text-align:"center;" | [[Arquivo:770-Palossand.png|link=Palossand]] | |||
| text-align:"center;" | [[Palossand]] | |||
| text-align:"center;" | [[Arquivo:Ghost1.png|link=Malefic]] [[Arquivo:Ground.png|link=Orebound]] | |||
| text-align:"center;" | [[Arquivo:Interface_SupportOT_PVE.png|24px|link=]] | |||
| text-align:"center;" | [[Arquivo:Not.png|link=]] | |||
| text-align:"center;" | [[file:Atk7.png|Attack T7|link=]] | |||
|- | |- | ||
| text-align:"center;" | #778 | | text-align:"center;" | #778 | ||
| text-align:"center;" | [[Arquivo:778-Mimikyu.png|link=Mimikyu]] | | text-align:"center;" | [[Arquivo:778-Mimikyu.png|link=Mimikyu]] | ||
| text-align:"center;" | [[Mimikyu]] | | text-align:"center;" | [[Mimikyu]] | ||
| text-align:"center;" | [[Arquivo:Ghost1.png|link=]] [[Arquivo:Fairy.png|link=Psycraft]] | | text-align:"center;" | [[Arquivo:Ghost1.png|link=]] [[Arquivo:Fairy.png|link=Psycraft]] | ||
| text-align:"center;" | [[Arquivo:Interface_BDD_PVE.png|24px|link=]] | | text-align:"center;" | [[Arquivo:Interface_BDD_PVE.png|24px|link=]] | ||
| text-align:"center;" | [[Arquivo:Interface_OffTank_PVP.png|24px|link=]] | | text-align:"center;" | [[Arquivo:Interface_OffTank_PVP.png|24px|link=]] | ||
| text-align:"center;" | [[file:Atk7.png|Attack T7|link=]] | |||
|- | |||
| text-align:center;" | #849 | |||
| text-align:center;" | [[Arquivo:849-Toxtricity.png|link=Toxtricity]] | |||
| text-align:center;" | <b>[[Toxtricity]]*</b> | |||
| text-align:center;" | [[Arquivo:Electric.png|link=Raibolt]] [[Arquivo:Poison1.png|link=Malefic]] | |||
| width="10%" | [[Arquivo:Not.png|link=]] | |||
| width="10%" | [[Arquivo:Interface_BDD_PVP.png|24px|link=]] | |||
| text-align:"center;" | [[file:Atk7.png|Attack T7|link=]] | |||
|- | |||
| text-align:center;" | #849 | |||
| text-align:center;" | [[Arquivo:849-Toxtricity Low Key Form.png|link=Toxtricity Low Key Form]] | |||
| text-align:center;" | [[Toxtricity Low Key Form]] | |||
| text-align:center;" | [[Arquivo:Electric.png|link=Raibolt]] [[Arquivo:Poison1.png|link=Malefic]] | |||
| width="10%" | [[Arquivo:Not.png|link=]] | |||
| width="10%" | [[Arquivo:Interface_BDD_PVP.png|24px|link=]] | |||
| text-align:"center;" | [[file:Atk7.png|Attack T7|link=]] | |||
|} | |} | ||
</center> | </center> | ||
'''*Observação:''' | '''*Observação:''' Os Pokémon '''[[Dark Pichu]]''', '''[[Aegislash]]''' , '''[[Dragalge]]''' e <b>[[Toxtricity]]</b> são exclusivos de outros clãs no PvP. | ||
==Tier 3== | ==Tier 3== | ||
<center> | <center> | ||
{| class="wikitable sortable" style="text-align:center" width=" | {| class="wikitable sortable" style="text-align:center" width="65%;" | ||
|- | |- | ||
! scope="col" width=" | ! scope="col" width="10%" style="background-color: #F1C232"| <span style="color:black">Nº Dex</span> | ||
! scope="col" style="background-color: # | ! scope="col" style="background-color: #F1C232"| <span style="color:black">Ícone</span> | ||
! scope="col" width=" | ! scope="col" width="15%;" style="background-color: #F1C232"| <span style="color:black">Nome</span> | ||
! scope="col" style="background-color: # | ! scope="col" style="background-color: #F1C232"| <span style="color:black">Elementos</span> | ||
! scope="col" width=" | ! scope="col" width="15%;" style="background-color: #F1C232"| <span style="color:black">Função PvE</span> | ||
! scope="col" width=" | ! scope="col" width="15%;" style="background-color: #F1C232"| <span style="color:black">Função PvP</span> | ||
! scope="col" width="20%;" style="background-color: #F1C232"| <span style="color:black">Held Recomendado (PvP/PvE)</span> | |||
|- | |- | ||
| text-align:"center;" | #003 | | text-align:"center;" | #003 | ||
| Linha 765: | Linha 640: | ||
| text-align:"center;" | [[Arquivo:Not.png|link=]] | | text-align:"center;" | [[Arquivo:Not.png|link=]] | ||
| text-align:"center;" | [[Arquivo:Interface_OffTank_PVP.png|24px|link=]] | | text-align:"center;" | [[Arquivo:Interface_OffTank_PVP.png|24px|link=]] | ||
| text-align:"center;" | [[file:Def7.png|Defense T7|link=]] | |||
|- | |- | ||
| text-align:"center;" | #021 | | text-align:"center;" | #021 | ||
| text-align:"center;" | [[Arquivo:015-Sh_Beedrill.png|link=Shiny Beedrill]] | | text-align:"center;" | [[Arquivo:015-Sh_Beedrill.png|link=Shiny Beedrill]] | ||
| text-align:"center;" | [[Shiny Beedrill]] | | text-align:"center;" | [[Shiny Beedrill]] | ||
| text-align:"center;" | [[Arquivo:Bug.png|link=Naturia]] [[Arquivo:Poison1.png|link=]] | | text-align:"center;" | [[Arquivo:Bug.png|link=Naturia]] [[Arquivo:Poison1.png|link=]] | ||
| text-align:"center;" | [[Arquivo:Interface_BDD_PVE.png|24px|link=]] | | text-align:"center;" | [[Arquivo:Interface_BDD_PVE.png|24px|link=]] | ||
| text-align:"center;" | [[Arquivo:Not.png|link=]] | | text-align:"center;" | [[Arquivo:Not.png|link=]] | ||
| text-align:"center;" | [[file:Atk7.png|Attack T7|link=]] | |||
|- | |- | ||
| text-align:"center;" | #024 | | text-align:"center;" | #024 | ||
| Linha 779: | Linha 656: | ||
| text-align:"center;" | [[Arquivo:Interface_OffensiveTanker_pve.png|24px|link=]] | | text-align:"center;" | [[Arquivo:Interface_OffensiveTanker_pve.png|24px|link=]] | ||
| text-align:"center;" | [[Arquivo:Not.png|link=]] | | text-align:"center;" | [[Arquivo:Not.png|link=]] | ||
| text-align:"center;" | [[file:Atk7.png|Attack T7|link=]] | |||
|- | |- | ||
| text-align:"center;" | #031 | | text-align:"center;" | #031 | ||
| text-align:"center;" | [[Arquivo:031-Nidoqueen.png|link=Nidoqueen]] | | text-align:"center;" | [[Arquivo:031-Nidoqueen.png|link=Nidoqueen]] | ||
| text-align:"center;" | [[Nidoqueen]] | | text-align:"center;" | [[Nidoqueen]] | ||
| text-align:"center;" | [[Arquivo:Poison1.png|link=]] [[Arquivo:Ground.png|link=Orebound]] | | text-align:"center;" | [[Arquivo:Poison1.png|link=]] [[Arquivo:Ground.png|link=Orebound]] | ||
| text-align:"center;" | [[Arquivo:Interface_BDD_PVE.png|24px|link=]] | | text-align:"center;" | [[Arquivo:Interface_BDD_PVE.png|24px|link=]] | ||
| text-align:"center;" | [[Arquivo:Not.png|link=]] | | text-align:"center;" | [[Arquivo:Not.png|link=]] | ||
| text-align:"center;" | [[file:Atk7.png|Attack T7|link=]] | |||
|- | |- | ||
| text-align:"center;" | #034 | | text-align:"center;" | #034 | ||
| Linha 793: | Linha 672: | ||
| text-align:"center;" | [[Arquivo:Interface_BDD_PVE.png|24px|link=]] | | text-align:"center;" | [[Arquivo:Interface_BDD_PVE.png|24px|link=]] | ||
| text-align:"center;" | [[Arquivo:Not.png|link=]] | | text-align:"center;" | [[Arquivo:Not.png|link=]] | ||
| text-align:"center;" | [[file:Atk7.png|Attack T7|link=]] | |||
|- | |- | ||
| text-align:"center;" | #053 | | text-align:"center;" | #053 | ||
| Linha 800: | Linha 680: | ||
| text-align:"center;" | [[Arquivo:Interface_Tank_PVE.png|24px|link=]] | | text-align:"center;" | [[Arquivo:Interface_Tank_PVE.png|24px|link=]] | ||
| text-align:"center;" | [[Arquivo:Not.png|link=]] | | text-align:"center;" | [[Arquivo:Not.png|link=]] | ||
| text-align:"center;" | [[file:Def7.png|Defense T7|link=]] | |||
|- | |- | ||
| text-align:"center;" | #073 | | text-align:"center;" | #073 | ||
| Linha 807: | Linha 688: | ||
| text-align:"center;" | [[Arquivo:Not.png|link=]] | | text-align:"center;" | [[Arquivo:Not.png|link=]] | ||
| text-align:"center;" | [[Arquivo:Interface_OffTank_PVP.png|24px|link=]] | | text-align:"center;" | [[Arquivo:Interface_OffTank_PVP.png|24px|link=]] | ||
| text-align:"center;" | [[file:Def7.png|Defense T7|link=]] | |||
|- | |- | ||
| text-align:"center;" | #089 | | text-align:"center;" | #089 | ||
| Linha 814: | Linha 696: | ||
| text-align:"center;" | [[Arquivo:Interface_BDD_PVE.png|24px|link=]] | | text-align:"center;" | [[Arquivo:Interface_BDD_PVE.png|24px|link=]] | ||
| text-align:"center;" | [[Arquivo:Not.png|link=]] | | text-align:"center;" | [[Arquivo:Not.png|link=]] | ||
| text-align:"center;" | [[file:Atk7.png|Attack T7|link=]] | |||
|- | |- | ||
| text-align:"center;" | #169 | | text-align:"center;" | #169 | ||
| text-align:"center;" | [[Arquivo:169-Crobat.png|link=Crobat]] | | text-align:"center;" | [[Arquivo:169-Crobat.png|link=Crobat]] | ||
| text-align:"center;" | [[Crobat]] | | text-align:"center;" | [[Crobat]] | ||
| text-align:"center;" | [[Arquivo:Poison1.png|link=]] [[Arquivo:Flying.png|link=Wingeon]] | | text-align:"center;" | [[Arquivo:Poison1.png|link=]] [[Arquivo:Flying.png|link=Wingeon]] | ||
| text-align:"center;" | [[Arquivo:Interface_BDD_PVE.png|24px|link=]] | | text-align:"center;" | [[Arquivo:Interface_BDD_PVE.png|24px|link=]] | ||
| text-align:"center;" | [[Arquivo:Not.png|link=]] | | text-align:"center;" | [[Arquivo:Not.png|link=]] | ||
| text-align:"center;" | [[file:Atk7.png|Attack T7|link=]] | |||
|- | |- | ||
| text-align:"center;" | #197 | | text-align:"center;" | #197 | ||
| Linha 828: | Linha 712: | ||
| text-align:"center;" | [[Arquivo:Not.png|link=]] | | text-align:"center;" | [[Arquivo:Not.png|link=]] | ||
| text-align:"center;" | [[Arquivo:Interface_Support_PVP.png|24px|link=]] | | text-align:"center;" | [[Arquivo:Interface_Support_PVP.png|24px|link=]] | ||
| text-align:"center;" | [[file:Def7.png|Defense T7|link=]] | |||
|- | |- | ||
| text-align:"center;" | #275 | | text-align:"center;" | #275 | ||
| Linha 835: | Linha 720: | ||
| text-align:"center;" | [[Arquivo:Not.png|link=]] | | text-align:"center;" | [[Arquivo:Not.png|link=]] | ||
| text-align:"center;" | [[Arquivo:Interface_OTDD_PVP.png|24px|link=]] | | text-align:"center;" | [[Arquivo:Interface_OTDD_PVP.png|24px|link=]] | ||
| text-align:"center;" | [[file:Def7.png|Defense T7|link=]] | |||
|- | |||
| text-align:"center;" | #317 | |||
| text-align:"center;" | [[Arquivo:317-Swalot.png|link=Swalot]] | |||
| text-align:"center;" | [[Swalot]] | |||
| text-align:"center;" | [[Arquivo:Poison1.png|link=Malefic]] | |||
| text-align:"center;" | [[Arquivo:Not.png|link=]] | |||
| text-align:"center;" | [[Arquivo:Interface_Support_PVP.png|24px|link=]] | |||
| text-align:"center;" | [[file:Def7.png|Defense T7|link=]] | |||
|- | |- | ||
| text-align:"center;" | #319 | | text-align:"center;" | #319 | ||
| Linha 842: | Linha 736: | ||
| text-align:"center;" | [[Arquivo:Not.png|link=]] | | text-align:"center;" | [[Arquivo:Not.png|link=]] | ||
| text-align:"center;" | [[Arquivo:Interface_BDD_PVP.png|24px|link=]] | | text-align:"center;" | [[Arquivo:Interface_BDD_PVP.png|24px|link=]] | ||
| text-align:"center;" | [[file:Atk7.png|Attack T7|link=]] | |||
|- | |- | ||
| text-align:"center;" | #342 | | text-align:"center;" | #342 | ||
| Linha 849: | Linha 744: | ||
| text-align:"center;" | [[Arquivo:Not.png|link=]] | | text-align:"center;" | [[Arquivo:Not.png|link=]] | ||
| text-align:"center;" | [[Arquivo:Interface_BDD_PVP.png|24px|link=]] | | text-align:"center;" | [[Arquivo:Interface_BDD_PVP.png|24px|link=]] | ||
| text-align:"center;" | [[file:Atk7.png|Attack T7|link=]] | |||
|- | |- | ||
| text-align:"center;" | #354 | | text-align:"center;" | #354 | ||
| Linha 856: | Linha 752: | ||
| text-align:"center;" | [[Arquivo:Interface_BDD_PVE.png|24px|link=]] | | text-align:"center;" | [[Arquivo:Interface_BDD_PVE.png|24px|link=]] | ||
| text-align:"center;" | [[Arquivo:Not.png|link=]] | | text-align:"center;" | [[Arquivo:Not.png|link=]] | ||
| text-align:"center;" | [[file:Atk7.png|Attack T7|link=]] | |||
|- | |- | ||
| text-align:"center;" | #407 | | text-align:"center;" | #407 | ||
| text-align:"center;" | [[Arquivo:407-Roserade.png|link=Roserade]] | | text-align:"center;" | [[Arquivo:407-Roserade.png|link=Roserade]] | ||
| text-align:"center;" | [[Roserade]] | | text-align:"center;" | [[Roserade]] | ||
| text-align:"center;" | [[Arquivo:Grass.png|link=Naturia]] [[Arquivo:Poison1.png|link=]] | | text-align:"center;" | [[Arquivo:Grass.png|link=Naturia]] [[Arquivo:Poison1.png|link=]] | ||
| text-align:"center;" | [[Arquivo:Interface_BDD_PVE.png|24px|link=]] | | text-align:"center;" | [[Arquivo:Interface_BDD_PVE.png|24px|link=]] | ||
| text-align:"center;" | [[Arquivo:Not.png|link=]] | | text-align:"center;" | [[Arquivo:Not.png|link=]] | ||
| text-align:"center;" | [[file:Atk7.png|Attack T7|link=]] | |||
|- | |- | ||
| text-align:"center;" | #478 | | text-align:"center;" | #478 | ||
| Linha 868: | Linha 766: | ||
| text-align:"center;" | [[Froslass]] | | text-align:"center;" | [[Froslass]] | ||
| text-align:"center;" | [[Arquivo:Ice.png|link=Seavell]] [[Arquivo:Ghost1.png|link=]] | | text-align:"center;" | [[Arquivo:Ice.png|link=Seavell]] [[Arquivo:Ghost1.png|link=]] | ||
| text-align:"center;" | [[Arquivo:Interface_BDD_PVE.png|24px|link=]] | |||
| text-align:"center;" | [[Arquivo:Not.png|link=]] | | text-align:"center;" | [[Arquivo:Not.png|link=]] | ||
| text-align:"center;" | [[ | | text-align:"center;" | [[file:Atk7.png|Attack T7|link=]] | ||
|- | |- | ||
| text-align:"center;" | #609 | | text-align:"center;" | #609 | ||
| Linha 877: | Linha 776: | ||
| text-align:"center;" | [[Arquivo:Not.png|link=]] | | text-align:"center;" | [[Arquivo:Not.png|link=]] | ||
| text-align:"center;" | [[Arquivo:Interface_OffTank_PVP.png|24px|link=]] | | text-align:"center;" | [[Arquivo:Interface_OffTank_PVP.png|24px|link=]] | ||
| text-align:"center;" | [[file:Atk7.png|Attack T7|link=]] | |||
|- | |- | ||
| text-align:"center;" | #625 | | text-align:"center;" | #625 | ||
| Linha 884: | Linha 784: | ||
| text-align:"center;" | [[Arquivo:Not.png|link=]] | | text-align:"center;" | [[Arquivo:Not.png|link=]] | ||
| text-align:"center;" | [[Arquivo:Interface_BDD_PVP.png|24px|link=]] | | text-align:"center;" | [[Arquivo:Interface_BDD_PVP.png|24px|link=]] | ||
| text-align:"center;" | [[file:Atk7.png|Attack T7|link=]] | |||
|} | |} | ||
</center> | </center> | ||
=Rotação Mid-Late Game= | |||
= | |||
<center> | <center> | ||
{| class="wikitable" style="text-align:center" width="50%;" | {| class="wikitable" style="text-align:center" width="50%;" | ||
|- | |- | ||
! colspan="4" scope="col" style="background-color: #7401DF"| | ! colspan="4" scope="col" style="background-color: #7401DF"| [[Arquivo:Poison1.png|link=]] Poison | ||
|- | |- | ||
! scope="col" style="background-color: #BCA9F5"| <span style="color:black">Pokémon</span> | ! scope="col" style="background-color: #BCA9F5"| <span style="color:black">Pokémon</span> | ||
| Linha 914: | Linha 813: | ||
| text-align:"center;" | [[Arquivo:Interface_OffensiveTanker_pve.png|25px|link=]] | | text-align:"center;" | [[Arquivo:Interface_OffensiveTanker_pve.png|25px|link=]] | ||
| text-align:"center;" | 3 | | text-align:"center;" | 3 | ||
|- | |||
| text-align:"center;" | [[Arquivo:569-Shiny_Garbodor.png|link=Shiny Garbodor]] | |||
| text-align:"center;" | [[Shiny Garbodor]] | |||
| text-align:"center;" | [[Arquivo:Interface_BDD_PVE.png|25px|link=]] | |||
| text-align:"center;" | 1H | |||
|- | |- | ||
| text-align:"center;" | [[Arquivo:089-AlolanMuk.png|link=Alolan Muk]] | | text-align:"center;" | [[Arquivo:089-AlolanMuk.png|link=Alolan Muk]] | ||
| Linha 936: | Linha 840: | ||
|} | |} | ||
</center> | </center> | ||
<br> | |||
<center> | <center> | ||
{| class="wikitable" style="text-align:center" width="50%;" | {| class="wikitable" style="text-align:center" width="50%;" | ||
|- | |- | ||
! colspan="4" scope="col" style="background-color: #7401DF"| | ! colspan="4" scope="col" style="background-color: #7401DF"| [[Arquivo:Dark1.png|link=]] Dark | ||
|- | |- | ||
! scope="col" style="background-color: #BCA9F5"| <span style="color:black">Pokémon</span> | ! scope="col" style="background-color: #BCA9F5"| <span style="color:black">Pokémon</span> | ||
| Linha 966: | Linha 868: | ||
|} | |} | ||
</center> | </center> | ||
<br> | |||
<center> | <center> | ||
{| class="wikitable" style="text-align:center" width="50%;" | {| class="wikitable" style="text-align:center" width="50%;" | ||
! colspan="4" scope="col" style="background-color: #7401DF"| | ! colspan="4" scope="col" style="background-color: #7401DF"| [[Arquivo:Ghost1.png|link=]] Ghost | ||
|- | |- | ||
! scope="col" style="background-color: #BCA9F5"| <span style="color:black">Pokémon</span> | ! scope="col" style="background-color: #BCA9F5"| <span style="color:black">Pokémon</span> | ||
| Linha 1 008: | Linha 910: | ||
|} | |} | ||
</center> | </center> | ||
=Exclusividade do Clã no PvP= | =Exclusividade do Clã no PvP= | ||
| Linha 1 035: | Linha 917: | ||
{| class="wikitable" style="text-align:center" width="35%;" | {| class="wikitable" style="text-align:center" width="35%;" | ||
|- | |- | ||
! scope="col" width="5%;" style="background-color: #7401DF"| | ! scope="col" width="5%;" style="background-color: #7401DF"| Pokémon | ||
! scope="col" width="15%;" style="background-color: #7401DF"| | ! scope="col" width="15%;" style="background-color: #7401DF"| Nome | ||
! scope="col" width="15%;" style="background-color: #7401DF"| | ! scope="col" width="15%;" style="background-color: #7401DF"| Requer Rank 5 | ||
|- | |- | ||
| text-align:"center;" | [[Arquivo:031-shinynidoqueen.png|link=Shiny Nidoqueen]] | | text-align:"center;" | [[Arquivo:031-shinynidoqueen.png|link=Shiny Nidoqueen]] | ||
| Linha 1 057: | Linha 939: | ||
| text-align:"center;" | [[Arquivo:430-Honchkrow.png|link=Honchkrow]] | | text-align:"center;" | [[Arquivo:430-Honchkrow.png|link=Honchkrow]] | ||
| text-align:"center;" | [[Honchkrow]] | | text-align:"center;" | [[Honchkrow]] | ||
| text-align:"center;" | [[Arquivo: | | text-align:"center;" | [[Arquivo:Yep.png|link=]] | ||
|- | |- | ||
| text-align:"center;" | [[Arquivo:478-ShinyFroslass.png|link=Shiny Froslass]] | | text-align:"center;" | [[Arquivo:478-ShinyFroslass.png|link=Shiny Froslass]] | ||
| text-align:"center;" | [[Shiny Froslass]] | | text-align:"center;" | [[Shiny Froslass]] | ||
| text-align:"center;" | [[Arquivo:Not.png|link=]] | |||
|- | |||
| text-align:"center;" | [[Arquivo:675-Pangoro.png|link=Pangoro]] | |||
| text-align:"center;" | [[Pangoro]] | |||
| text-align:"center;" | [[Arquivo:Not.png|link=]] | |||
|- | |||
| text-align:"center;" | [[Arquivo:430-Shiny_Honchkrow.png|link=Shiny Honchkrow]] | |||
| text-align:"center;" | [[Shiny Honchkrow]] | |||
| text-align:"center;" | [[Arquivo:Yep.png|link=]] | |||
|- | |||
| text-align:"center;" | [[Arquivo:849-Toxtricity Low Key Form.png|link=Toxtricity Low Key Form]] | |||
| text-align:"center;" | [[Toxtricity Low Key Form]] | |||
| text-align:"center;" | [[Arquivo:Not.png|link=]] | | text-align:"center;" | [[Arquivo:Not.png|link=]] | ||
|} | |} | ||
| Linha 1 066: | Linha 960: | ||
'''Observação:''' A exclusividade é aplicada apenas em conteúdos PvP. No PvE, o uso é liberado para todos os clãs. | '''Observação:''' A exclusividade é aplicada apenas em conteúdos PvP. No PvE, o uso é liberado para todos os clãs. | ||
=Pokémon obtido via NPC de Clã= | |||
*'''Shiny de Clã''' | |||
Para obter um [[Arquivo:Shinynid.png|link=Shiny Nidoking]] '''[[Shiny Nidoking]]''', fale com a '''[[Pokémon_Obtidos_via_NPC#Shiny_de_Cl.C3.A3|NPC Wanda]]''', localizada na área do Clã Malefic, no Trade Center. | |||
<center>[[Arquivo:NPC_Wanda_TC.png|link=]] </center> | |||
*'''Shiny de Clã da Nightmare World''' | |||
Para obter um [[Arquivo:031-shinynidoqueen.png|link=Shiny Nidoqueen]] '''[[Shiny Nidoqueen]]''', fale com a '''[[Pokémon_Obtidos_via_NPC#Shiny_de_Cl.C3.A3_da_Nightmare_World|NPC Wanda]]''', na área de Malefic, na resistência de Cerulean. | |||
<center> [[Arquivo:NPC_Wanda.png|link=]] </center> | |||
= Efetividades= | |||
Abaixo são apresentadas as efetividades dos Pokémon deste clã, considerando apenas aqueles que possuem '''um elemento'''. A efetividade pode mudar caso o Pokémon possua dois elementos ou possua alguma resistência à algum elemento, como é o caso do '''[[Cofagrigus]]''', que possui a passiva '''Mummy''', permitindo que ganhe resistência contra ataques do tipo Ghost (0,5x). | |||
A efetividade de um Pokémon pode ser conferida na [[Arquivo:PokedexIcon.png|link=]] '''Pokédex''' ou realizando uma busca na página '''[[Pokémon]]''' (uso do Ctrl+F recomendado). Clique no ícone do elemento desejado para conferir a tabela de efetividade deste clã. | |||
<span class="mw-customtoggle-myDivision66"><font size="2"> [[Arquivo:Poison1.png|20px|link=]] '''Poison''' </font></span> | |||
<div class="mw-collapsible mw-collapsed" id="mw-customcollapsible-myDivision66"> | |||
<center> | |||
{| class="wikitable" style="text-align:center" width="30%;" | |||
|- | |||
! colspan="3" scope="col" width="2%" style="background-color: #7401DF"| [[Arquivo:Poison1.png|link=]] Ofensivo | |||
|- | |||
! scope="col" width="1%" | <span style="color:black">Dano</span> | |||
! colspan="2" scope="col" width="4%" | <span style="color:black">Elemento</span> | |||
|- | |||
| rowspan="2" style="border-right-style: hidden; background-color: #01DF01;" | 2x | |||
| width="1%" style="border-bottom-style: hidden;" | [[Arquivo:Fairy.png|link=Psycraft]] | |||
| style="border-left-style: hidden; text-align:left; border-bottom-style: hidden;" | Fairy | |||
|- | |||
| width="1%" | [[Arquivo:Grass.png|link=Naturia]] | |||
| style="border-left-style: hidden; text-align:left" | Grass | |||
|- | |||
| rowspan="4" style="border-right-style: hidden; background-color: #FE2E2E"| 0.5x | |||
| width="1%" style="border-bottom-style: hidden;"| [[Arquivo:Ground.png|link=Orebound]] | |||
| style="border-left-style: hidden; text-align:left; border-bottom-style: hidden;" | Ground | |||
|- | |||
| width="1%" style="border-bottom-style: hidden;" | [[Arquivo:Poison1.png|link=]] | |||
| style="border-left-style: hidden; text-align:left; border-bottom-style: hidden;"| Poison | |||
|- | |||
| width="1%" style="border-bottom-style: hidden;" | [[Arquivo:Rock.png|link=Rock]] | |||
| style="border-left-style: hidden; text-align:left; border-bottom-style: hidden;" | Rock | |||
|- | |||
| width="1%" style="border-bottom-style: hidden;" | [[Arquivo:Ghost1.png|link=]] | |||
| style="border-left-style: hidden; text-align:left; border-bottom-style: hidden;" | Ghost | |||
|- | |||
| width="1%" style="background-color: #A4A4A4" | 0x | |||
| width="1%" | [[Arquivo:Steel.png|link=Ironhard]] | |||
| style="border-left-style: hidden; text-align:left" | Steel | |||
|} | |||
</center> | |||
<center> | |||
{| class="wikitable" style="text-align:center" width="30%;" | |||
|- | |||
! colspan="3" scope="col" width="2%" style="background-color: #7401DF"| [[Arquivo:Poison1.png|link=]] Defensivo | |||
|- | |||
! scope="col" width="1%" | <span style="color:black">Dano</span> | |||
! colspan="2" scope="col" width="4%" | <span style="color:black">Elemento</span> | |||
|- | |||
| rowspan="5" style="border-right-style: hidden; background-color: #FE2E2E;"| 0.5x | |||
| width="1%" style="border-right-style: hidden; text-align:center; border-bottom-style: hidden;"| [[Arquivo:Fighting.png|link=Gardestrike]] | |||
| style="text-align:left; border-bottom-style: hidden;" | Fighting | |||
|- | |||
| style="border-right-style: hidden; text-align:center; border-bottom-style: hidden;" | [[Arquivo:Poison1.png|link=]] | |||
| style="text-align:left; border-bottom-style: hidden;" | Poison | |||
|- | |||
| style="border-right-style: hidden; text-align:center; border-bottom-style: hidden;" | [[Arquivo:Bug.png|link=Naturia]] | |||
| style="text-align:left; border-bottom-style: hidden;" | Bug | |||
|- | |||
| style="border-right-style: hidden; text-align:center; border-bottom-style: hidden;" | [[Arquivo:Fairy.png|link=Psycraft]] | |||
| style="text-align:left; border-bottom-style: hidden;" | Fairy | |||
|- | |||
| style="border-right-style: hidden; text-align:center" | [[Arquivo:Grass.png|link=Naturia]] | |||
| style="text-align:left" | Grass | |||
|- | |||
| rowspan="2" style="border-right-style: hidden; background-color: #01DF01;"| 2x | |||
| width="1%" style="border-bottom-style: hidden;" | [[Arquivo:Ground.png|link=Orebound]] | |||
| style="border-left-style: hidden; text-align:left; border-bottom-style: hidden;" | Ground | |||
|- | |||
| width="1%" | [[Arquivo:Psychic.png|link=Psycraft]] | |||
| style="border-left-style: hidden; text-align:left" | Psychic | |||
|- | |||
| style="background-color: #A4A4A4" width="1%"| 0x | |||
| colspan="2" text-align:center" | - | |||
|} | |||
</center> | |||
</div> | |||
<span class="mw-customtoggle-myDivision67"><font size="2"> [[Arquivo:Ghost1.png|20px|link=]] '''Ghost''' </font></span> | |||
<div class="mw-collapsible mw-collapsed" id="mw-customcollapsible-myDivision67"> | |||
<center> | |||
{| class="wikitable" style="text-align:center" width="30%;" | |||
|- | |||
! colspan="3" scope="col" width="2%" style="background-color: #7401DF"| [[Arquivo:Ghost1.png|link=]] Ofensivo | |||
|- | |||
! scope="col" width="1%" | <span style="color:black">Dano</span> | |||
! colspan="2" scope="col" width="5%" | <span style="color:black">Elemento</span> | |||
|- | |||
| rowspan="2" style="background-color: #01DF01;" | 2x | |||
| width="1%" style="border-bottom-style: hidden;" | [[Arquivo:Ghost1.png|link=]] | |||
| style="border-left-style: hidden; text-align:left; border-bottom-style: hidden;" | Ghost | |||
|- | |||
| width="1%" | [[Arquivo:Psychic.png|link=Psycraft]] | |||
| style="border-left-style: hidden; text-align:left" | Psychic | |||
|- | |||
| style="background-color: #FE2E2E" | 0.5x | |||
| width="1%" | [[Arquivo:Dark1.png|link=]] | |||
| style="border-left-style: hidden; text-align:left" | Dark | |||
|- | |||
| style="background-color: #A4A4A4" | 0x | |||
| width="1%"| [[Arquivo:Normal1.png|link=Gardestrike]] | |||
| style="border-left-style: hidden; text-align:left" | Normal | |||
|- | |||
|} | |||
</center> | |||
<center> | |||
{| class="wikitable" style="text-align:center" width="30%;" | |||
|- | |||
! colspan="3" scope="col" width="2%" style="background-color: #7401DF"| [[Arquivo:Ghost1.png|link=]] Defensivo | |||
|- | |||
! scope="col" width="1%" | <span style="color:black">Dano</span> | |||
! colspan="2" scope="col" width="5%" | <span style="color:black">Elemento</span> | |||
|- | |||
| rowspan="2" style="background-color: #FE2E2E" | 0.5x | |||
| width="1%" style="border-bottom-style: hidden;"| [[Arquivo:Bug.png|link=Naturia]] | |||
| style="border-left-style: hidden; text-align:left; border-bottom-style: hidden;" | Bug | |||
|- | |||
| width="1%" | [[Arquivo:Poison1.png|link=]] | |||
| style="border-left-style: hidden; text-align:left" | Poison | |||
|- | |||
| rowspan="2" style="background-color: #01DF01;" | 2x | |||
| width="1%" style="border-bottom-style: hidden;" | [[Arquivo:Dark1.png|link=]] | |||
| style="border-left-style: hidden; text-align:left; border-bottom-style: hidden;" | Dark | |||
|- | |||
| width="1%" |[[Arquivo:Ghost1.png|link=]] | |||
| style="border-left-style: hidden; text-align:left" | Ghost | |||
|- | |||
| rowspan="2" style="background-color: #A4A4A4" | 0x | |||
| width="1%" style="border-bottom-style: hidden;" | [[Arquivo:Normal1.png|link=Gardestrike]] | |||
| style="border-left-style: hidden; text-align:left; border-bottom-style: hidden;" | Normal | |||
|- | |||
| width="1%" | [[Arquivo:Fighting.png|link=Gardestrike]] | |||
| style="border-left-style: hidden; text-align:left" | Fighting | |||
|} | |||
</center> | |||
</div> | |||
<span class="mw-customtoggle-myDivision68"><font size="2"> [[Arquivo:Dark1.png|20px|link=]] '''Dark''' </font></span> | |||
<div class="mw-collapsible mw-collapsed" id="mw-customcollapsible-myDivision68"> | |||
<center> | |||
{| class="wikitable" style="text-align:center" width="30%;" | |||
|- | |||
! colspan="3" scope="col" width="2%" style="background-color: #7401DF"| [[Arquivo:Dark1.png|link=]] Ofensivo | |||
|- | |||
! scope="col" width="1%" | <span style="color:black">Dano</span> | |||
! colspan="2" width="5%" | <span style="color:black">Elemento</span> | |||
|- | |||
| rowspan="2" style="background-color: #01DF01" | 2x | |||
| width="1%" style="border-bottom-style: hidden;" |[[Arquivo:Ghost1.png|link=]] | |||
| style="border-left-style: hidden; text-align:left; border-bottom-style: hidden;" | Ghost | |||
|- | |||
| width="1%" " | [[Arquivo:Psychic.png|link=Psycraft]] | |||
| style="border-left-style: hidden; text-align:left;" | Psychic | |||
|- | |||
| rowspan="3" style="background-color: #FE2E2E" | 0.5x | |||
| width="1%" style="border-bottom-style: hidden;" | [[Arquivo:Fairy.png|link=Psycraft]] | |||
| style="border-left-style: hidden; text-align:left; border-bottom-style: hidden;" | Fairy | |||
|- | |||
| width="1%" style="border-bottom-style: hidden;" | [[Arquivo:Fighting.png|link=Gardestrike]] | |||
| style="border-left-style: hidden; text-align:left; border-bottom-style: hidden;" | Fighting | |||
|- | |||
| width="1%" | [[Arquivo:Dark1.png|link=]] | |||
| style="border-left-style: hidden; text-align:left" | Dark | |||
|- | |||
| style="background-color: #A4A4A4" width="1%" | 0x | |||
| colspan="2" text-align:center" | - | |||
|} | |||
</center> | |||
<center> | |||
{| class="wikitable" style="text-align:center" width="30%;" | |||
|- | |||
! colspan="3" scope="col" width="2%" style="background-color: #7401DF"| [[Arquivo:Dark1.png|link=]] Defensivo | |||
|- | |||
! scope="col" width="1%" | <span style="color:black">Dano</span> | |||
! colspan="2" width="5%" | <span style="color:black">Elemento</span> | |||
|- | |||
| rowspan="2" style="background-color: #FE2E2E" | 0.5x | |||
| width="1%" style="border-bottom-style: hidden;" | [[Arquivo:Ghost1.png|link=]] | |||
| style="border-left-style: hidden; text-align:left; border-bottom-style: hidden;" | Ghost | |||
|- | |||
| width="1%" | [[Arquivo:Dark1.png|link=]] | |||
| style="border-left-style: hidden; text-align:left;" | Dark | |||
|- | |||
| rowspan="3" style="background-color: #01DF01" | 2x | |||
| width="1%" style="border-bottom-style: hidden;" | [[Arquivo:Bug.png|link=Naturia]] | |||
| style="border-left-style: hidden; text-align:left; border-bottom-style: hidden;" | Bug | |||
|- | |||
| width="1%" style="border-bottom-style: hidden;" | [[Arquivo:Fairy.png|link=Psycraft]] | |||
| style="border-left-style: hidden; text-align:left; border-bottom-style: hidden;" | Fairy | |||
|- | |||
| width="1%" | [[Arquivo:Fighting.png|link=Gardestrike]] | |||
| style="border-left-style: hidden; text-align:left;" | Fighting | |||
|- | |||
| style="background-color: #A4A4A4" | 0x | |||
| width="1%" | [[Arquivo:Psychic.png|link=Psycraft]] | |||
| style="border-left-style: hidden; text-align:left" | Psychic | |||
|} | |||
</center> | |||
</div> | |||
Mais informações poderão ser adquiridas acessando a página '''[[Efetividades]]'''. | |||
=Outfits Exclusivas= | |||
<center> | |||
{| class="wikitable" width="42%" | |||
! colspan="2" width="50%" style="background-color: #7401DF" | Rank 1 | |||
! colspan="2" width="50%" style="background-color: #7401DF" | Rank 5 | |||
|- | |||
| width="5%" align="center" | [[Arquivo:Malefic1_female.png|link=]] | |||
| width="5%" align="center" | [[Arquivo:Malefic1_male.png|link=]] | |||
| width="5%" align="center" | [[Arquivo:Malefic5_female.png|link=]] | |||
| width="5%" align="center" | [[Arquivo:Malefic5_male.png|link=]] | |||
|} | |||
</center> | |||
<center> | |||
{| class="wikitable" width="42%" | |||
! colspan="2" width="50%" style="background-color: #7401DF" | Master | |||
|- | |||
| width="5%" align="center" | [[Arquivo:Malefic_fem.gif|link=]] | |||
| width="5%" align="center" | [[Arquivo:Maleficmale.gif|100px|link=]] | |||
|} | |||
</center> | |||
Edição das 18h24min de 12 de maio de 2024
Caso encontre algum erro ou queira acrescentar alguma informação, entre em contato com um dos membros da wiki.
Introdução
Os membros do clã Malefic são conhecidos por serem misteriosos. Eles nunca conversam sobre sua vida pessoal com estranhos e controlam os Pokémon do tipo ![]() Ghost,
Ghost, ![]() Dark e
Dark e ![]() Poison.
Poison.
Ranking
- Rank 1: Malefic Troublemaker.
- Rank 2: Malefic Venomancer.
- Rank 3: Malefic Spectre.
- Rank 4: Malefic Nightwalker.
- Rank 5: Malefic Lady/Lord.
Acesse a página de Tasks do clã Malefic para conferir os requisitos necessários em cada um dos Rankings.
Bônus de Clã
O bônus máximo do clã é aplicado ao completar as tarefas do Rank 5. Abaixo estão as porcentagens de bônus adquiridas:
![]() Ghost: Atk 25%, Def 25%
Ghost: Atk 25%, Def 25%
![]() Poison: Atk 28%, Def 28%
Poison: Atk 28%, Def 28%
![]() Dark: Atk 28%, Def 28%
Dark: Atk 28%, Def 28%
Tiers
Tier é uma classificação comum entre os Pokémon, indicando não apenas a raridade deste dentro do jogo, mas também qual executará melhor uma função, contanto que a comparação seja realizada entre dois Pokémon de mesma função. O Tier e a Função de um Pokémon pode ser conferido na ![]() Pokédex (Atalho Shift + D). Caso deseje ler mais sobre, acesse a página Tier e Funções ou Tiers (listagem) para conferir a listagem de Tier de todos os Pokémon.
Pokédex (Atalho Shift + D). Caso deseje ler mais sobre, acesse a página Tier e Funções ou Tiers (listagem) para conferir a listagem de Tier de todos os Pokémon.
Para facilitar a leitura desta página, a tabela a seguir contém a legenda de todas as Funções, PvP e PvE disponíveis no jogo.
| Função PvE | Função PvP | ||
|---|---|---|---|
| Ícone | Função | Ícone | Função |
| Tank | Tank | ||
| Offensive Tank | Offensive Tank | ||
| Burst Damage Dealer | Burst Damage Dealer | ||
| Over Time Damage Dealer | Over Time Damage Dealer | ||
| Support Overtime | Support | ||
| - | Disrupter | ||
Abaixo estão listados todos os Pokémon do clã Malefic e suas respectivas funções, separados por Tier.
Tier 1A
| Nº Dex | Ícone | Nome | Elementos | Função PvE | Função PvP | Held Recomendado (PvP/PvE) |
|---|---|---|---|---|---|---|
| #359 | Mega Absol |
Tier 1B
| Nº Dex | Ícone | Nome | Elementos | Função PvE | Função PvP | Held Recomendado (PvP/PvE) |
|---|---|---|---|---|---|---|
| #094 | Shiny Gengar |
Tier 1C
| Nº Dex | Ícone | Nome | Elementos | Função PvE | Função PvP | Held Recomendado (PvP/PvE) |
|---|---|---|---|---|---|---|
| #003 | Shiny Venusaur | |||||
| #003 | Mega Venusaur* | |||||
| #020 | Alolan Raticate* | |||||
| #049 | Shiny Venomoth | |||||
| #073 | Shiny Tentacruel | |||||
| #089 | Shiny Muk | |||||
| #094 | Mega Gengar | |||||
| #105 | Alolan Marowak | |||||
| #130 | Mega Gyarados* | |||||
| #197 | Shiny Umbreon | |||||
| #229 | Mega Houndoom | |||||
| #248 | Mega Tyranitar* | |||||
| #302 | Mega Sableye | |||||
| #354 | Mega Banette | |||||
| #430 | Shiny Honchkrow | |||||
| #477 | Dusknoir | |||||
| #478 | Shiny Froslass | |||||
| #623 | Shiny Golurk* |
*Observação: Os Pokémon Mega Venusaur, Alolan Raticate, Mega Gyarados, Mega Tyranitar e Shiny Golurk são exclusivos de outros clãs no PvP.
Tier 1H
| Nº Dex | Ícone | Nome | Elementos | Função PvE | Função PvP | Held Recomendado (PvE) |
|---|---|---|---|---|---|---|
| #569 | Shiny Garbodor | |||||
| #571 | Zoroark |
Observação: Os Pokémon T1H têm a força de T1C fora da Nightmare World e são acima dos T1C dentro dela ou pelo menos possuem um diferencial perante os demais Pokémon. São balanceados exclusivamente para conteúdos PvE e não podem ser utilizados em duelos PvP.
Tier 2
| Nº Dex | Ícone | Nome | Elementos | Função PvE | Função PvP | Held Recomendado (PvP/PvE) | |
|---|---|---|---|---|---|---|---|
| #015 | Mega Beedrill | ||||||
| #031 | Shiny Nidoqueen | ||||||
| #034 | Shiny Nidoking | ||||||
| #063 | Dark Abra | ||||||
| #089 | Alolan Muk | ||||||
| #094 | Gengar | ||||||
| #110 | Shiny Weezing | ||||||
| #169 | Shiny Crobat | ||||||
| #172 | Dark Pichu* | ||||||
| #200 | Misdreavus | ||||||
| #211 | Shiny Qwilfish | ||||||
| #229 | Houndoom | ||||||
| #248 | Tyranitar | ||||||
| #262 | Mightyena | ||||||
| #317 | Shiny Swalot | ||||||
| #332 | Cacturne | ||||||
| #336 | Seviper | ||||||
| #356 | Dusclops | ||||||
| #359 | Absol | ||||||
| #429 | Mismagius | ||||||
| #430 | Honchkrow | ||||||
| #442 | Spiritomb | ||||||
| #452 | Drapion | ||||||
| #454 | Toxicroak | ||||||
| #461 | Weavile | ||||||
| #563 | Cofagrigus | ||||||
| #569 | Garbodor | ||||||
| #635 | Hydreigon | ||||||
| #655 | Golurk | ||||||
| #675 | Pangoro | ||||||
| #681 | Aegislash* | ||||||
| #691 | Dragalge* | ||||||
| #770 | Palossand | ||||||
| #778 | Mimikyu | ||||||
| #849 | Toxtricity* | ||||||
| #849 | Toxtricity Low Key Form |
*Observação: Os Pokémon Dark Pichu, Aegislash , Dragalge e Toxtricity são exclusivos de outros clãs no PvP.
Tier 3
| Nº Dex | Ícone | Nome | Elementos | Função PvE | Função PvP | Held Recomendado (PvP/PvE) |
|---|---|---|---|---|---|---|
| #003 | Venusaur | |||||
| #021 | Shiny Beedrill | |||||
| #024 | Shiny Arbok | |||||
| #031 | Nidoqueen | |||||
| #034 | Nidoking | |||||
| #053 | Alolan Persian | |||||
| #073 | Tentacruel | |||||
| #089 | Muk | |||||
| #169 | Crobat | |||||
| #197 | Umbreon | |||||
| #275 | Shiftry | |||||
| #317 | Swalot | |||||
| #319 | Sharpedo | |||||
| #342 | Crawdaunt | |||||
| #354 | Banette | |||||
| #407 | Roserade | |||||
| #478 | Froslass | |||||
| #609 | Chandelure | |||||
| #625 | Bisharp |
Rotação Mid-Late Game
| Pokémon | Nome | Função | Tier |
|---|---|---|---|
| Shiny Weezing | 2 | ||
| Shiny Qwilfish | 2 | ||
| Shiny Arbok | 3 | ||
| Shiny Garbodor | 1H | ||
| Alolan Muk | 2 | ||
| Seviper | 2 | ||
| Muk | 3 | ||
| Nidoking | 3 | ||
| Pokémon | Nome | Função | Tier |
|---|---|---|---|
| Alolan Persian | 3 | ||
| Mightyena | 2 | ||
| Zoroark | 1H | ||
| Pokémon | Nome | Função | Tier |
|---|---|---|---|
| Dusclops | 2 | ||
| Cofagrigus | 2 | ||
| Mismagius | 2 | ||
| Gengar | 2 | ||
| Mimikyu | 2 | ||
| Banette | 3 | ||
Exclusividade do Clã no PvP
| Pokémon | Nome | Requer Rank 5 |
|---|---|---|
| Shiny Nidoqueen | ||
| Shiny Nidoking | ||
| Mega Gengar | ||
| Alolan Marowak | ||
| Honchkrow | ||
| Shiny Froslass | ||
| Pangoro | ||
| Shiny Honchkrow | ||
| Toxtricity Low Key Form |
Observação: A exclusividade é aplicada apenas em conteúdos PvP. No PvE, o uso é liberado para todos os clãs.
Pokémon obtido via NPC de Clã
- Shiny de Clã
Para obter um ![]() Shiny Nidoking, fale com a NPC Wanda, localizada na área do Clã Malefic, no Trade Center.
Shiny Nidoking, fale com a NPC Wanda, localizada na área do Clã Malefic, no Trade Center.
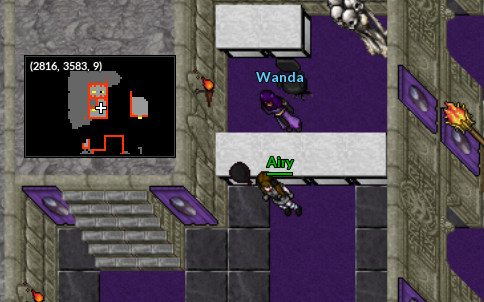
- Shiny de Clã da Nightmare World
Para obter um ![]() Shiny Nidoqueen, fale com a NPC Wanda, na área de Malefic, na resistência de Cerulean.
Shiny Nidoqueen, fale com a NPC Wanda, na área de Malefic, na resistência de Cerulean.
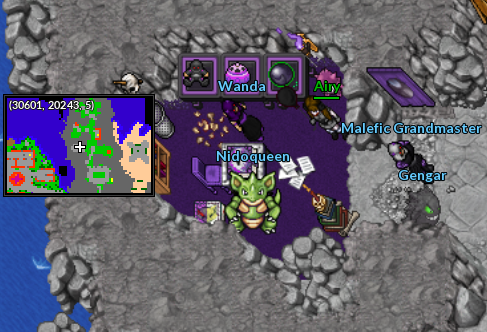
Efetividades
Abaixo são apresentadas as efetividades dos Pokémon deste clã, considerando apenas aqueles que possuem um elemento. A efetividade pode mudar caso o Pokémon possua dois elementos ou possua alguma resistência à algum elemento, como é o caso do Cofagrigus, que possui a passiva Mummy, permitindo que ganhe resistência contra ataques do tipo Ghost (0,5x).
A efetividade de um Pokémon pode ser conferida na ![]() Pokédex ou realizando uma busca na página Pokémon (uso do Ctrl+F recomendado). Clique no ícone do elemento desejado para conferir a tabela de efetividade deste clã.
Pokédex ou realizando uma busca na página Pokémon (uso do Ctrl+F recomendado). Clique no ícone do elemento desejado para conferir a tabela de efetividade deste clã.
![]() Poison
Poison
| Dano | Elemento | |
|---|---|---|
| 0x | ||
| Dano | Elemento | |
|---|---|---|
| Grass | ||
| 0x | - | |
![]() Ghost
Ghost
| Dano | Elemento | |
|---|---|---|
| 2x | ||
| 0.5x | ||
| 0x | ||
| Dano | Elemento | |
|---|---|---|
| 0.5x | ||
| 2x | ||
| 0x | ||
![]() Dark
Dark
| Dano | Elemento | |
|---|---|---|
| 2x | ||
| 0.5x | ||
| 0x | - | |
| Dano | Elemento | |
|---|---|---|
| 0.5x | ||
| 2x | ||
| 0x | ||
Mais informações poderão ser adquiridas acessando a página Efetividades.
Outfits Exclusivas
| Rank 1 | Rank 5 | ||
|---|---|---|---|

|

|

|

|
| Master | |
|---|---|
|
|