|
|
| Linha 16: |
Linha 16: |
|
| |
|
| =Andar Volcanic (36 à 39)= | | =Andar Volcanic (36 à 39)= |
| | <tabber> |
| | |-|Inimigos= |
| | Cada andar conta com um miniboss. No andar Psycraft-Malefic, os minibosses são o Cyborg Mega Alakazam e Cyborg Mega Gengar. |
| | <center> |
| | {| class="wikitable" width="70%" style="text-align:center" |
| | ! colspan="8" scope="col" width="31%" style="background-color: #660099" | <span style="color:white">Inimigos</span> |
| | |- |
| | | [[Arquivo:065-Alakazam.png|link=Alakazam]] <br> Cyborg Alakazam |
| | | [[Arquivo:344-Claydol.png|link=Claydol]] <br> Cyborg Claydol |
| | | [[Arquivo:437-Bronzong.png|link=Bronzong]] <br> Cyborg Bronzong |
| | | [[Arquivo:065-MegaAlakazam.png|link=Mega_Alakazam]] <br> Cyborg Mega Alakazam |
| | | [[Arquivo:094-Gengar.png|link=Gengar]] <br> Cyborg Gengar |
| | | [[Arquivo:342-Crawdaunt.png|link=Crawdaunt]] <br> Cyborg Crawdaunt |
| | | [[Arquivo:454-Toxicroak.png|link=Toxicroak]] <br> Cyborg Toxicroak |
| | | [[Arquivo:094-MegaGengar.png|link=Mega_Gengar]] <br> Cyborg Mega Gengar |
| | |-} |
| | </center> |
| | |-|Armadilhas= |
| | Este andar possui 5 armadilhas que causarão diferentes efeitos ao jogador e seu Pokémon. São elas:<br> |
| | <br> |
| | '''1ª Armadilha''': De tempos em tempos, essa armadilha abrirá um caminho ao qual o jogador deverá atravessar. O jogador deverá tomar cuidado ao atravessar por ela. Caso pise no local errado, tomará hit kill.<br> |
| | <center> |
| | {{#widget:Video|url={{filepath:Andar_PM_Trap1.mp4}}|width=640|height=360}} |
| | </center><br> |
| | <br> |
| | '''2ª Armadilha''': A mecânica desta armadilha é semelhante a peça "cavalo" do jogo Xadrez. O ponto seguro desta armadilha sempre será um "L" a partir da base dela. Caso o jogador ou o seu Pokémon pise no local errado, receberão dano. |
| | <center> |
| | {{#widget:Video|url={{filepath:Andar_PM_Trap2.mp4}}|width=640|height=360}} |
| | </center><br> |
| | <br> |
| | '''3ª Armadilha''': Esta armadilha é simples. Pontos amarelos serão lançados ao seu redor. O jogador deverá aguardar até que eles saiam para atravessar o caminho. Caso pise no ponto amarelo, tomará hit kill. |
| | <center> |
| | {{#widget:Video|url={{filepath:Andar_PM_Trap_3.mp4}}|width=640|height=360}} |
| | </center><br> |
| | <br> |
| | '''4ª Armadilha''': Esta armadilha além de causar dano ao jogador e seu Pokémon, também aplica o efeito stun. Medicine não removerá o status. Para atravessá-la, o jogador poderá utilizar o centro da pirâmide como safe spot. |
| | <center> |
| | {{#widget:Video|url={{filepath:Andar_PM_Trap4.mp4}}|width=640|height=360}} |
| | </center><br> |
| | <br> |
| | '''5ª Armadilha''': Esta armadilha além de causar dano ao jogador e seu Pokémon, também aplica o efeito miss. Para atravessá-la, o jogador deverá aguardar até que a armadilha não esteja ativada (sem a marcação no chão). |
| | <center> |
| | {{#widget:Video|url={{filepath:Andar_PM_Trap5.mp4}}|width=640|height=360}} |
| | </center> |
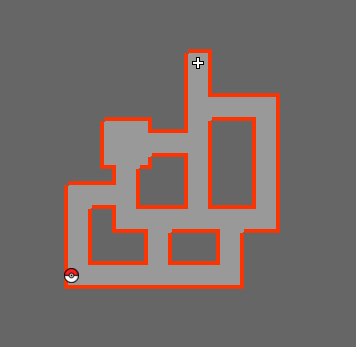
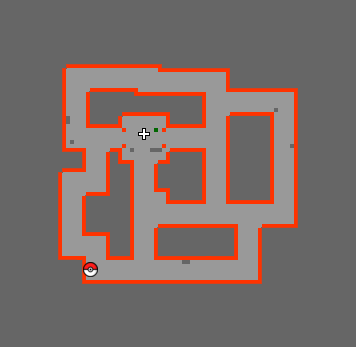
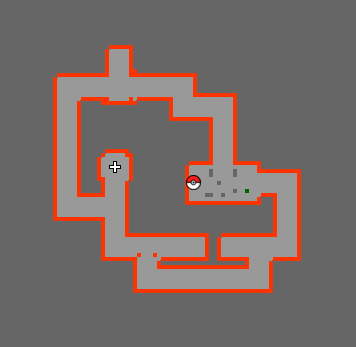
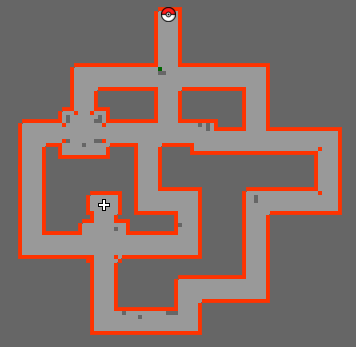
| | |-|Mapas= |
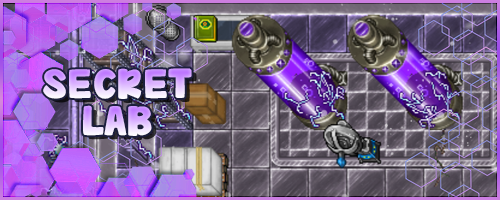
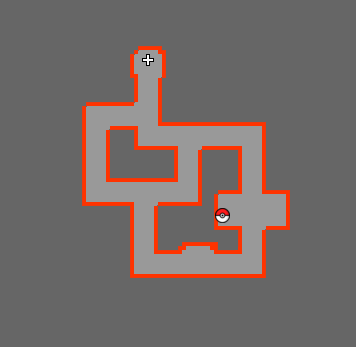
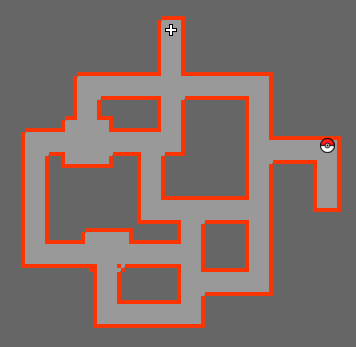
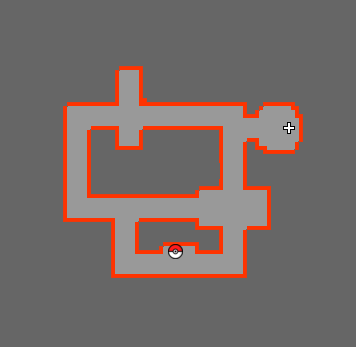
| | Ao entrar em cada andar, o jogador cairá aleatoriamente em um dos 8 mapas a seguir. Somente é possível avançar para o próximo andar ao derrotar todos os inimigos do local. O ícone de Pokéball no mapa indica a saída. |
| | <center> |
| | {| class="wikitable" width="80%" |
| | ! width="31%" style="background-color: #660099" | <span style="color:white">Andar 1 a 4 [1]</span> |
| | | width="3%" style="border-top-style: hidden; border-width: 1px; border-bottom-style: hidden; border-width: 1px" | |
| | ! width="32%" style="background-color: #660099" | <span style="color:white">Andar 1 a 4 [2]</span> |
| | |- align="center" |
| | | [[Arquivo:Andar_PM_S1.png|450px|link=]] |
| | | width="4%" style="border-top-style: hidden; border-width: 1px; border-bottom-style: hidden; border-width: 1px" | |
| | | [[Arquivo:Andar_PM_S2.png|450px|link=]] |
| | |- |
| | ! style="background-color: #660099" | <span style="color:white">Andar 1 a 4 [3]</span> |
| | | style="border-top-style: hidden; border-width: 1px; border-bottom-style: hidden; border-width: 1px" | |
| | ! style="background-color: #660099" | <span style="color:white">Andar 1 a 4 [4]</span> |
| | |- align="center" |
| | | [[Arquivo:Andar_PM_S3.png|450px|link=]] |
| | | width="4%" style="border-top-style: hidden; border-width: 1px; border-bottom-style: hidden; border-width: 1px" | |
| | | [[Arquivo:Andar_PM_S4.png|450px|link=]] |
| | |- |
| | ! style="background-color: #660099" | <span style="color:white">Andar 1 a 4 [5]</span> |
| | | style="border-top-style: hidden; border-width: 1px; border-bottom-style: hidden; border-width: 1px" | |
| | ! style="background-color: #660099" | <span style="color:white">Andar 1 a 4 [6]</span> |
| | |- align="center" |
| | | [[Arquivo:Andar_PM_S5.png|450px|link=]] |
| | | width="4%" style="border-top-style: hidden; border-width: 1px; border-bottom-style: hidden; border-width: 1px" | |
| | | [[Arquivo:Andar_PM_S6.png|450px|link=]] |
| | |- |
| | ! style="background-color: #660099" | <span style="color:white">Andar 1 a 4 [7]</span> |
| | | style="border-top-style: hidden; border-width: 1px; border-bottom-style: hidden; border-width: 1px" | |
| | ! style="background-color: #660099" | <span style="color:white">Andar 1 a 4 [8]</span> |
| | |- align="center" |
| | | [[Arquivo:Andar_PM_S7.png|450px|link=]] |
| | | width="4%" style="border-top-style: hidden; border-width: 1px; border-bottom-style: hidden; border-width: 1px" | |
| | | [[Arquivo:Andar_PM_S8.png|450px|link=]] |
| | |-} |
| | </center> |
| | |-|Boss= |
| | O boss do andar Psycraft e Malefic são o Cyborg Shiny Espeon [[Arquivo:196-shEspeon.png||link=Shiny_Espeon]] e Cyborg Shiny Umbreon [[Arquivo:197-Sh Umbreon.png|link=Shiny_Umbreon]]. A mecânica desses bosses consiste em separar eles para que evitem se curar e buffar um ao outro. |
| | <center> |
| | {{#widget:Video|url={{filepath:Andar_RI_Boss.mp4}}|width=640|height=360}} |
| | </center> |
| | |-|Recompensa= |
| | <center> |
| | {| class="wikitable" |
| | |- |
| | ! scope="col" style="background-color: #660099"| <span style="color:white">4 Nightmare Unusual Ores</span> |
| | ! scope="col" style="background-color: #660099"| <span style="color:white">25 Technological Crystals (Tier: 4)</span> |
| | ! scope="col" style="background-color: #660099"| <span style="color:white">Cyborg Cell (Psychic)</span> |
| | ! scope="col" style="background-color: #660099"| <span style="color:white">Cyborg Cell (Dark)</span> |
| | ! scope="col" style="background-color: #660099"| <span style="color:white">4 Moderate Nightmare Experience Candy</span> |
| | ! scope="col" style="background-color: #660099"| <span style="color:white">2 Small Nightmare Experience Candy</span> |
| | |- style="width:50px; text-align:center;" |
| | | [[Arquivo:NW_unusual_ore.png|Nightmare unusual ore|link=]] |
| | | [[Arquivo:Frag_tier_4.png|Technological Crystals (Tier: 4)|link=]] |
| | | [[Arquivo:Cyborg_Cell_(Psychic).png|Cyborg Cell (Psychic)|link=]] |
| | | [[Arquivo:Cyborg_Cell_(Dark).png|Cyborg Cell (Dark)|link=]] |
| | | [[Arquivo:Moderate_Nightmare_experience_candy..png|Moderate Nightmare experience candy|link=]] |
| | | [[Arquivo:Small_Nightmare_experience_candy..png|Small Nightmare experience candy|link=]] |
| | </center> |
| | |-} |
| | </tabber> |
|
| |
|
| =Andar Cyborg - Crystal Onix (41 à 44)= | | =Andar Cyborg - Crystal Onix (41 à 44)= |