| (232 revisões intermediárias por 3 usuários não estão sendo mostradas) | |||
| Linha 1: | Linha 1: | ||
<center>[[file: | =Templo de Bronzong - Informações básicas= | ||
[[Arquivo:Templo_de_bronzong_card.png|link=]] | |||
'''Tempo de conclusão:''' 15 minutos <br> | |||
'''Experiência obtida pelo aluno:''' 300 <br> | |||
'''Experiência obtida pelo jogador:''' 100.000 <br> | |||
'''Derrotar Pokémon:''' [[Arquivo:comvip.png|link=Quests]] <br> | |||
'''Capturar Pokémon:''' [[Arquivo:comvip.png|link=Quests]] <br> | |||
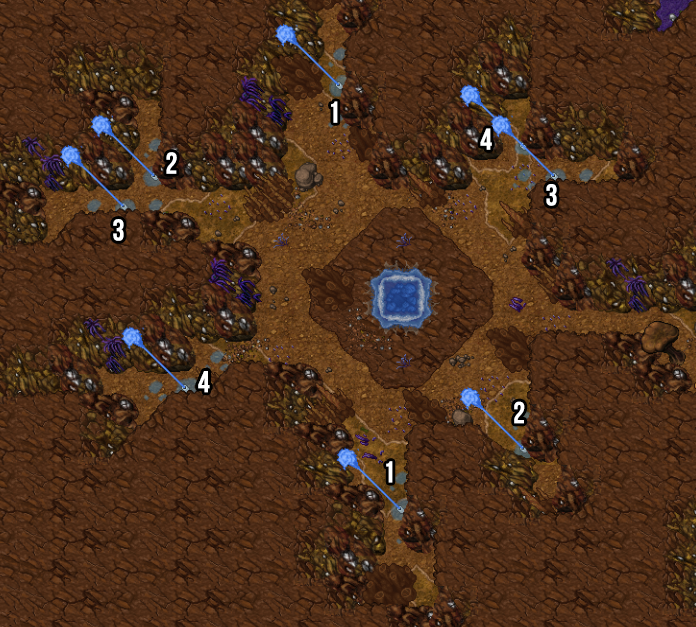
==Mapa== | |||
<center>[[Arquivo:Templo_de_bronzong_mapa.png|link=]]</center> | |||
==Pokémon== | |||
{| class="wikitable" style="text-align:center;" width="20%" | |||
|- | |||
! colspan="3" | Pokémon disponíveis | |||
|- | |||
| [[Arquivo:436-Bronzor.png|link=]] || '''Bronzong''' || [[Arquivo:Pokeball.png|15px|link=]] | |||
|- | |||
| [[Arquivo:437-Bronzong.png|link=]] || '''Bronzor''' || [[Arquivo:Pokeball.png|15px|link=]] | |||
|- | |||
| [[Arquivo:437-Sh_Bronzong.png|link=]] || '''Shiny Bronzong''' || [[Arquivo:Pokeball.png|15px|link=]] | |||
|} | |||
[[Arquivo:Pokeball.png|15px|link=]] '''= Pokémon capturáveis''' | |||
==Recompensas:== | |||
{| class ="wikitable" style="text-align:center" width="35%" | |||
! colspan="2" | Item | |||
! Quantidade | |||
! Raridade | |||
|- | |||
| [[file:Study Notes.png|link=]] || Study Notes || 20 || Comum | |||
|- | |||
| [[Arquivo:Bag_of_Nightmare_Experience_Candy.png|link=]] || Bag Of Nightmare Experience Candy || 1 || Comum | |||
|- | |||
! colspan="4" | [[Arquivo:Exp_icon.png|30px|link=]] 100.000 de experiência para o jogador | |||
|- | |||
! colspan="4" | [[Arquivo:Exp_icon.png|30px|link=]] 300 de experiência para o aluno | |||
|- | |||
|} | |||
=Caverna Shoal - Informações básicas= | |||
[[Arquivo:Caverna_shoal_card.png|link=]] | |||
'''Tempo de conclusão:''' 15 minutos <br> | |||
'''Experiência obtida pelo aluno:''' 300 <br> | |||
'''Experiência obtida pelo jogador:''' 100.000 <br> | |||
'''Derrotar Pokémon:''' [[Arquivo:comvip.png|link=Quests]] <br> | |||
'''Capturar Pokémon:''' [[Arquivo:semvip.png|link=Quests]] <br> | |||
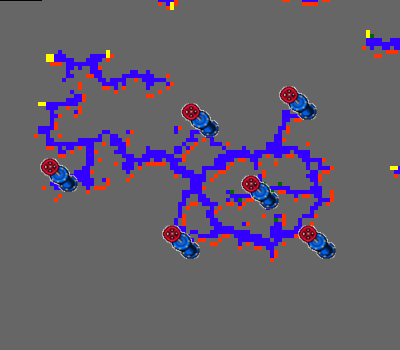
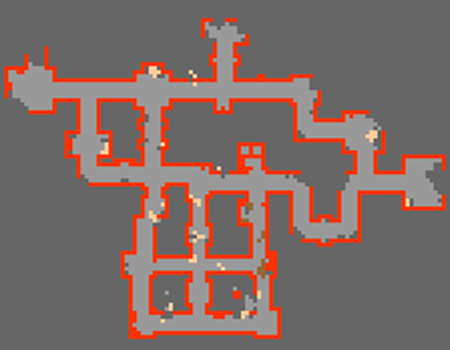
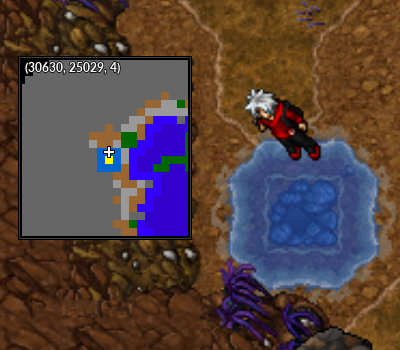
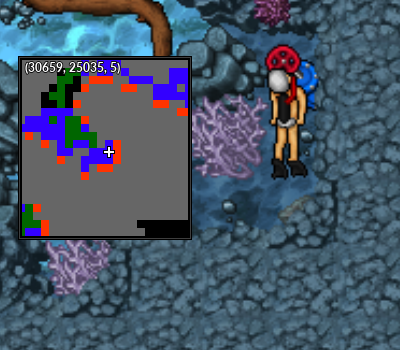
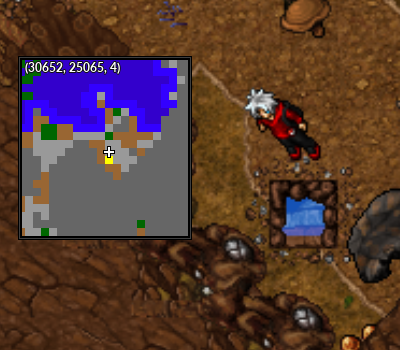
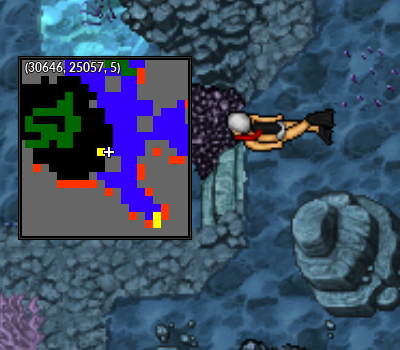
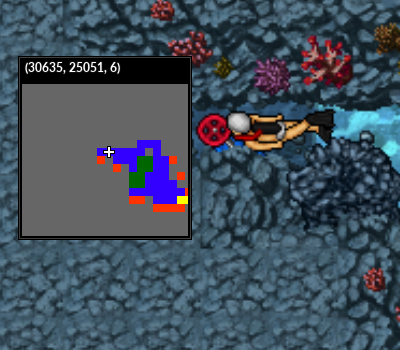
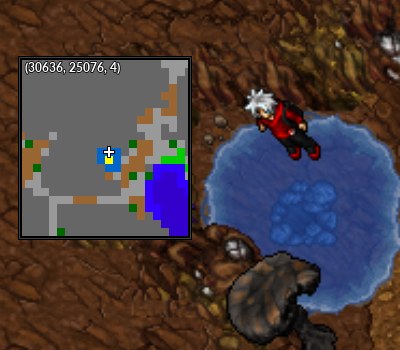
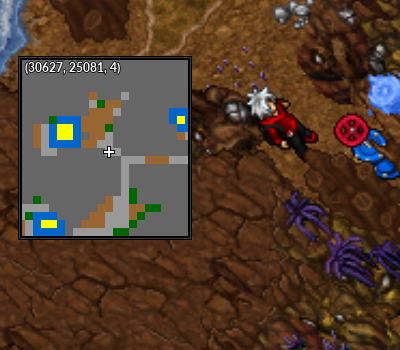
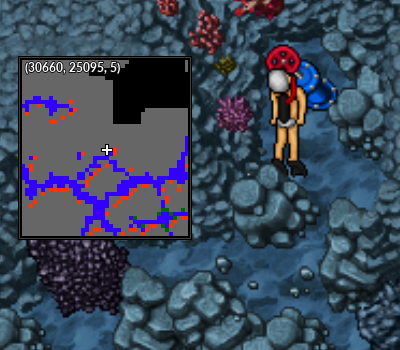
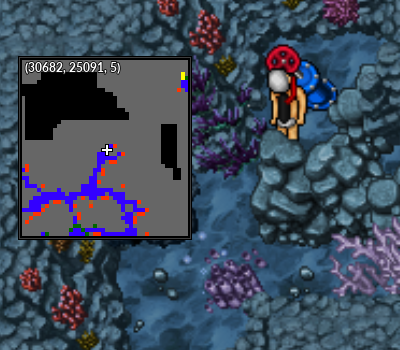
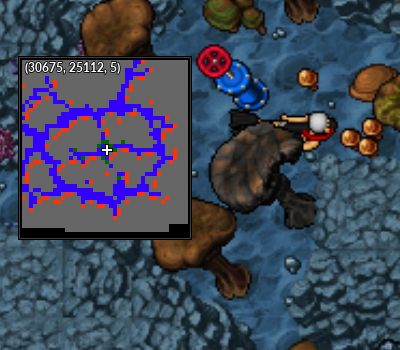
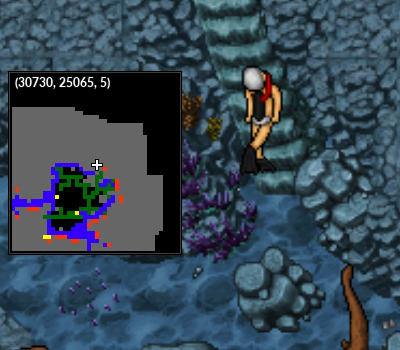
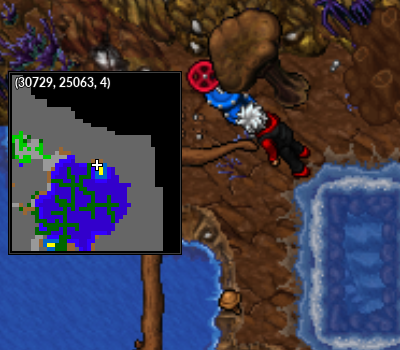
==Mapa== | |||
<center>[[Arquivo:Caverna shoal_mapa 1.png|link=]] [[Arquivo:Caverna shoal_mapa 2.png|link=]]</center> <br> | |||
<center>[[Arquivo:Caverna shoal_mapa 3.png|link=]]</center> | |||
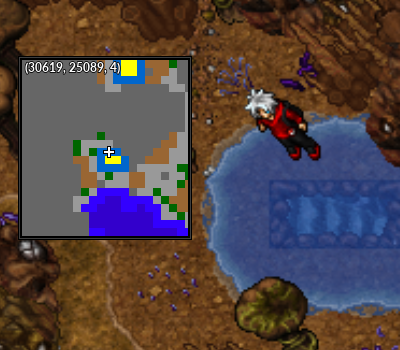
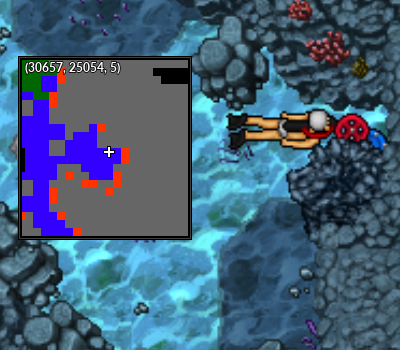
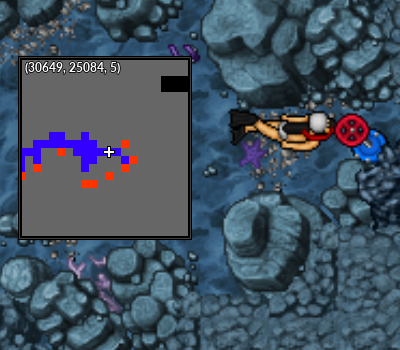
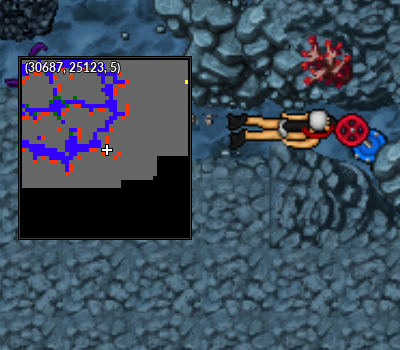
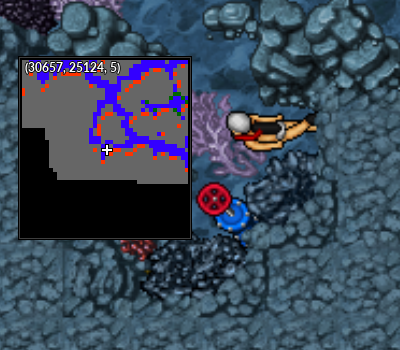
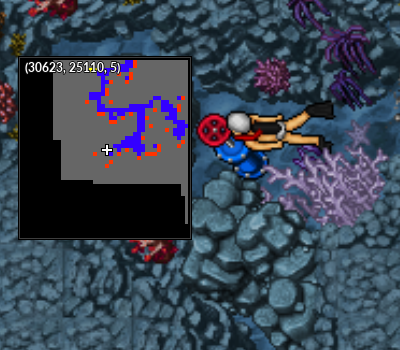
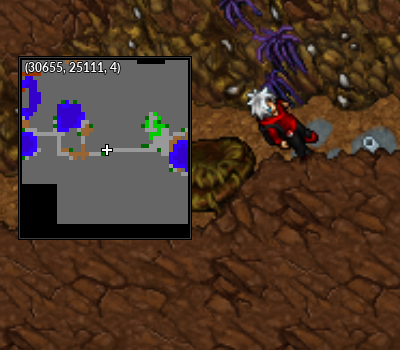
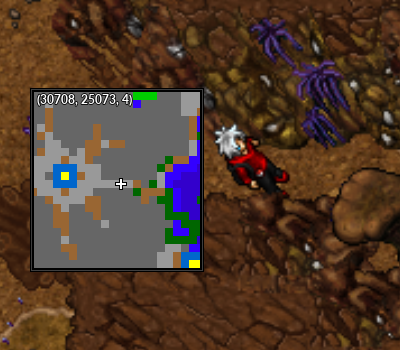
==Dica== | |||
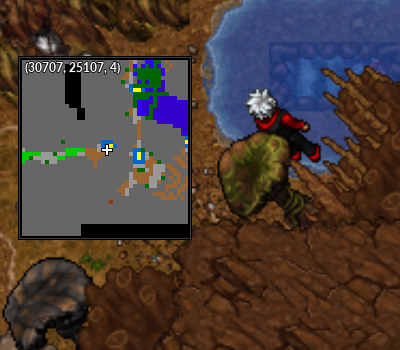
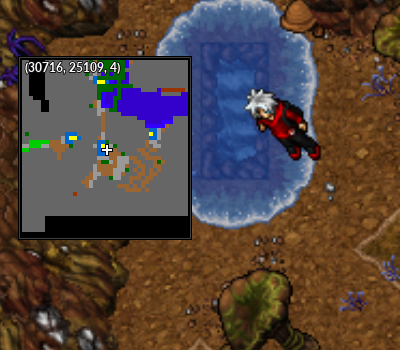
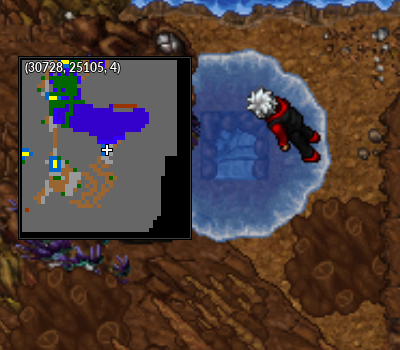
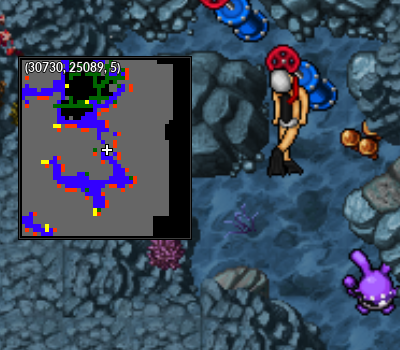
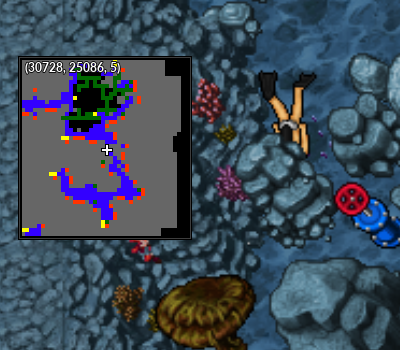
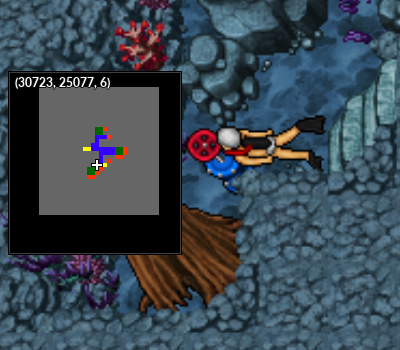
Alguns jogadores desatentos podem deixar passar despercebida a entrada para a área de gelo da dungeon. | |||
<center>[[Arquivo:Caverna shoal dica.png|link=]]</center> | |||
==Pokémon== | |||
{| class="wikitable" style="float:left" style="text-align:center;" width="20%" | |||
|- | |||
! colspan="3" | Pokémon disponíveis | |||
|- | |||
| [[Arquivo:131-Lapras.png|link=]] || '''Lapras''' || [[Arquivo:Pokeball.png|15px|link=]] | |||
|- | |||
| [[Arquivo:073-Tentacruel.png|link=]] || '''Tentacruel''' || [[Arquivo:Pokeball.png|15px|link=]] | |||
|- | |||
| [[Arquivo:362-Glalie.png|link=]] || '''Glalie''' || [[Arquivo:Pokeball.png|15px|link=]] | |||
|- | |||
| [[Arquivo:364-Sealeo.png|link=]] || '''Sealeo''' || [[Arquivo:Pokeball.png|15px|link=]] | |||
|- | |||
| [[Arquivo:225-Delibird.png|link=]] || '''Delibird''' || | |||
|- | |||
| [[Arquivo:361-Snorut.png|link=]] || '''Snorunt''' || | |||
|- | |||
| [[Arquivo:072-Tentacool.png|link=]] || '''Tentacool''' || | |||
|- | |||
| [[Arquivo:075-Graveler.png|link=]] || '''Graveler''' || | |||
|- | |||
| [[Arquivo:074-Geodude.png|link=]] || '''Geodude''' || | |||
|- | |||
| [[Arquivo:042-Golbat.png|link=]] || '''Golbat''' || | |||
|- | |||
| [[Arquivo:041-Zubat.png|link=]] || '''Zubat''' || | |||
|} | |||
{| class="wikitable" style="float:right" style="text-align:center;" width="20%" | |||
|- | |||
! colspan="3" | Shiny | |||
|- | |||
| [[Arquivo:073-Sh_Tentacruel.png|link=]] || '''Shiny Tentacruel''' || [[Arquivo:Pokeball.png|15px|link=]] | |||
|- | |||
| [[Arquivo:072-Sh_Tentacool.png|link=]] || '''Shiny Tentacool''' || [[Arquivo:Pokeball.png|15px|link=]] | |||
|- | |||
| [[Arquivo:042-Sh_Golbat.png|link=]] || '''Shiny Golbat''' || [[Arquivo:Pokeball.png|15px|link=]] | |||
|- | |||
| [[Arquivo:041-Sh_Zubat.png|link=]] || '''Shiny Zubat''' || [[Arquivo:Pokeball.png|15px|link=]] | |||
|- | |||
| [[Arquivo:225-Sh_Delibird.png|link=]] || '''Shiny Delibird''' || [[Arquivo:Pokeball.png|15px|link=]] | |||
|} | |||
[[Arquivo:Pokeball.png|15px|link=]] '''= Pokémon capturáveis''' | |||
==Recompensas:== | |||
{| class ="wikitable" style="text-align:center" width="35%" | |||
! colspan="2" | Item | |||
! Quantidade | |||
! Raridade | |||
|- | |||
| [[file:Study Notes.png|link=]] || Study Notes || 20 || Comum | |||
|- | |||
| [[Arquivo:Bag_of_Nightmare_Experience_Candy.png|link=]] || Bag Of Nightmare Experience Candy || 1 || Comum | |||
|- | |||
! colspan="4" | [[Arquivo:Exp_icon.png|30px|link=]] 100.000 de experiência para o jogador | |||
|- | |||
! colspan="4" | [[Arquivo:Exp_icon.png|30px|link=]] 300 de experiência para o aluno | |||
|- | |||
|} | |||
=Covil de Froslass - Informações básicas= | |||
[[Arquivo:Covil_de_froslass_card.png|link=]] | |||
'''Tempo de conclusão:''' 15 minutos <br> | |||
'''Experiência obtida pelo aluno:''' 300 <br> | |||
'''Experiência obtida pelo jogador:''' 100.000 <br> | |||
'''Derrotar Pokémon:''' [[Arquivo:comvip.png|link=Quests]] <br> | |||
'''Capturar Pokémon:''' [[Arquivo:semvip.png|link=Quests]] <br> | |||
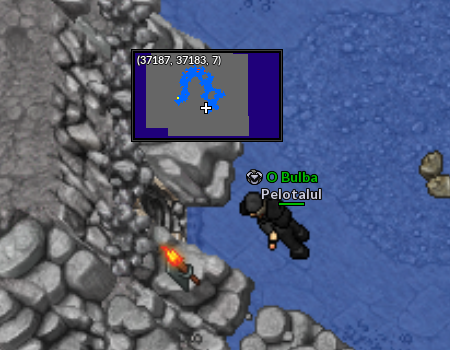
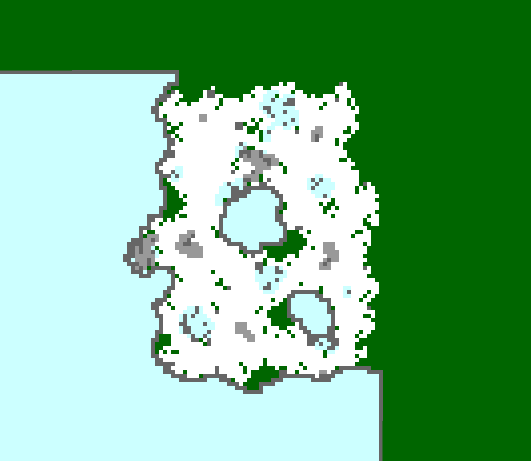
==Mapa== | |||
<center>[[Arquivo:Covil_de_froslass_mapa.png|link=]]</center> | |||
==Pokémon== | |||
{| class="wikitable" style="float:left" style="text-align:center;" width="20%" | |||
! colspan="3" | Pokémon disponíveis | |||
|- | |||
| [[Arquivo:478-Froslass.png|link=]] || '''Froslass''' || | |||
|} | |||
{| class="wikitable" style="float:right" style="text-align:center;" width="20%" | |||
! colspan="3" | Shiny | |||
|- | |||
| [[Arquivo:478-ShinyFroslass.png|link=]] || '''Shiny Froslass''' || | |||
|} | |||
[[Arquivo:Pokeball.png|15px|link=]] '''= Pokémon capturáveis''' | |||
==Recompensas:== | |||
{| class ="wikitable" style="text-align:center" width="35%" | |||
! colspan="2" | Item | |||
! Quantidade | |||
! Raridade | |||
|- | |||
| [[file:Study Notes.png|link=]] || Study Notes || 20 || Comum | |||
|- | |||
| [[Arquivo:Bag_of_Nightmare_Experience_Candy.png|link=]] || Bag Of Nightmare Experience Candy || 1 || Comum | |||
|- | |||
| [[Arquivo:Ice_Blocks.png|link=]] || Ice Blocks || 20 || Raro | |||
|- | |||
| [[Arquivo:SolidIce.png|link=]] || Solid Ice Cubes || 100 || Raro | |||
|- | |||
| [[Arquivo:IceOrb.png|link=]] || Ice Orbs || 50 || Raro | |||
|- | |||
| [[Arquivo:Dawn1.png|link=]] || Dawn Stone || 1 || Épico | |||
|- | |||
! colspan="4" | [[Arquivo:Exp_icon.png|30px|link=]] 100.000 de experiência para o jogador | |||
|- | |||
! colspan="4" | [[Arquivo:Exp_icon.png|30px|link=]] 300 de experiência para o aluno | |||
|- | |||
|} | |||
= Karen (Valencia Quest) = | |||
O jogador precisará clicar na '''parte roxa''' das árvores do caminho para derrotar as [[Arquivo:045-Vileplume.png|link=Vileplume]] '''Vileplume'''. | |||
<center>[[Arquivo:Liberar Vileplume.gif|link=]]</center> | |||
Ao derrotá-las, os '''cogumelos''' que obstruem o caminho são destruídos e o jogador pode prosseguir. | |||
<center>[[Arquivo:Vileplume caminho.gif|link=]]</center> | |||
Além disso, as '''bombas hidráulicas''' desligam as '''fontes de água''' que impedirão a passagem do jogador ao decorrer da quest. | |||
<center>[[Arquivo:Caminho 3 karen valencia.gif|link=]]</center> | |||
== Parte 1 == | |||
Ao final desse primeiro percurso, o jogador deverá entrar em um '''buraco''' com água emergindo. | |||
Depois disso, o jogador deverá seguir o caminho, derrotando alguns [[Arquivo:184-Azumarill.png|link=Azumarill]] '''Azumarill''' e ativando '''bombas hidráulicas''' que liberarão passagens para prosseguimento da quest. | |||
<center>[[Arquivo:Buraco Valencia Karen.png|link=]] [[Arquivo:Botão 1 karen valencia.png|link=]]</center> | |||
== Parte 2 == | |||
Posteriormente, o jogador deverá entrar no próximo buraco e repetir o processo. Dessa vez, o jogador deverá apertar '''3 bombas hidráulicas''' enquanto estiver debaixo dágua. | |||
<center> | |||
{| class="wikitable" width="25%" style="text-align:center" | |||
|- | |||
! Buraco !! Bomba 1 !! Bomba 2 | |||
|- | |||
|[[Arquivo:Buraco 2 Karen Valencia.png|link=]] || [[Arquivo:Botão 2 karen valencia.png|link=]] || [[Arquivo:botão 3 karen valencia.png|link=]] | |||
|}</center> | |||
= | <center> | ||
{| class="wikitable" width="25%" style="text-align:center" | |||
|- | |||
! Escada !! Bomba 3 | |||
|- | |||
|[[Arquivo:escada 1 karen valencia.png|link=]] || [[Arquivo:botão 4 karen valencia.png|link=]] | |||
|}</center> | |||
== Parte 3 == | |||
Depois disso, o jogador deverá entrar em mais um buraco, apertar uma bomba hidrálica submergida na direita e uma localizada no andar superior, acessível por uma escada à esquerda. | |||
<center> | |||
{| class="wikitable" width="25%" style="text-align:center" | |||
|- | |||
! Buraco !! Bomba 1 !! Bomba 2 | |||
|- | |||
|[[Arquivo:Buraco 3 Karen Valencia.png|link=]] || [[Arquivo:Botão 5 karen valencia.png|link=]] || [[Arquivo:botão 6 karen valencia.png|link=]] | |||
|}</center> | |||
== Parte 4 == | |||
O jogador deverá derrotar '''todas as Vileplume''' do andar superior. Depois disso, deverá descer e apertar todas as bombas hidráulicas do andar inferior. | |||
<tabber> | <tabber> | ||
|-| | |||
|-| Esquema Geral= | |||
<center>[[Arquivo:Buraco 4 Karen Valencia.png|link=]] [[Arquivo:Esquema geral 1 Karen Valencia.png|link=]]</center> | |||
|-| Bombas= | |||
<center> | |||
{| class="wikitable" width="25%" style="text-align:center" | |||
|- | |||
! Botão 1 !! Bomba 2 !! Bomba 3 | |||
|- | |||
|[[Arquivo:botão 7 karen valencia.png|link=]] || [[Arquivo:botão 8 karen valencia.png|link=]] || [[Arquivo:botão 9 karen valencia.png|link=]] | |||
|}</center> | |||
<center> | <center> | ||
{| class="wikitable | {| class="wikitable" width="25%" style="text-align:center" | ||
! | |- | ||
! Bomba 4 !! Bomba 5 !! Bomba 6 | |||
|- | |- | ||
| [[Arquivo: | |[[Arquivo:botão 10 karen valencia.png|link=]] || [[Arquivo:botão 11 karen valencia.png|link=]] || [[Arquivo:botão 12 karen valencia.png|link=]] | ||
|} | |}</center> | ||
</tabber> | |||
== Parte 5 == | |||
Ao completar a parte anterior, o jogador desligará as fontes e poderá prosseguir. | |||
<center>[[Arquivo:caminho 1 karen valencia.png|link=]]</center> | |||
o jogador deverá entrar em um buraco, derrotar uma Azumarill, sair pelo outro, derrotar algumas Vileplume, e entrar no buraco a direita. | |||
<center> | |||
{| class="wikitable" width="25%" style="text-align:center" | |||
|- | |||
! Entrada !! Saída | |||
|- | |||
|[[Arquivo:Buraco 5 Karen Valencia.png|link=]] || [[Arquivo:Buraco 6 Karen Valencia.png|link=]] | |||
|}</center> | |||
Ao entrar no buraco a direita, deverá apertar a bomba hidráulica pra iniciar a próxima parte. | |||
<center> | |||
{| class="wikitable" width="25%" style="text-align:center" | |||
|- | |||
! Buraco !! Bomba | |||
|- | |||
|[[Arquivo:Buraco 7 Karen Valencia.png|link=]] || [[Arquivo:botão 13 karen valencia.png|link=]] | |||
|}</center> | |||
== Parte 6 == | |||
Ao entrar nesse último buraco, o jogador deverá apertar quatro bombas hidráulicas para prosseguir. | |||
'''Importante:''' Cada bomba desses, permitirá que as Vileplume fiquem livres no andar superior. Caso queira ter uma experiência mais segura, o jogador poderá clicar em uma bomba hidráulica por vez e derrotar as Vileplume aos poucos. | |||
<center> | |||
{| class="wikitable" width="25%" style="text-align:center" | |||
|- | |||
! Bomba 1 !! Bomba 2 !! Bomba 3 | |||
|- | |||
|[[Arquivo:botão 14 karen valencia.png|link=]] || [[Arquivo:botão 15 karen valencia.png|link=]] || [[Arquivo:botão 16 karen valencia.png|link=]] | |||
|}</center> | |||
<center> | |||
{| class="wikitable" width="25%" style="text-align:center" | |||
|- | |||
! Escada !! Bomba 4 | |||
|- | |||
|[[Arquivo:escada 2 karen valencia.png|link=]] || [[Arquivo:botão 17 karen valencia.png|link=]] | |||
|}</center> | |||
== Parte 7 == | |||
Subindo a escada, o jogador terá que derrotar diversas Vileplume. | |||
'''Importante:''' Seguindo o esquema geral da parte 6, o jogador poderá entender quais fontes serão desligadas liberando as Vileplume. | |||
<center>[[Arquivo:Esquema geral 2 Karen Valencia.png|link=]]</center> | |||
Ao derrotar todos os Pokémon, o jogador deverá seguir o caminho a direita e procurar pelo NPC que deverá derrotar. | |||
<center>[[Arquivo:caminho 2 karen valencia.png|link=]]</center> | |||
Karen utilizará os seguintes Pokémon: | |||
<center> | <center> | ||
{| class="wikitable" | {| class="wikitable" style="text-align:center" width="15%" | ||
! Karen | |||
|- | |||
| [[Arquivo:359-Absol.png|link=Absol]] Absol | |||
|- | |||
| [[Arquivo:Megahoundoom.png|link=Mega Houndoom]] Mega Houndoom | |||
|- | |- | ||
| | | [[Arquivo:461-Weavile.png|link=Weavile]] Weavile | ||
| | |- | ||
| [[Arquivo:442-spiritomb.png|link=Spiritomb]] Spiritomb | |||
|- | |||
| [[Arquivo:197-Sh_Umbreon.png|link=Shiny Umbreon]] Shiny Umbreon | |||
|- | |||
| [[Arquivo:430-Shiny_Honchkrow.png|link=Shiny Honchkrow]] Shiny Honchkrow | |||
|} | |} | ||
</center> | </center> | ||
</center> | Ao derrotar Karen, o jogador prosseguirá com a quest. | ||
| | |||
=Pesadelos de Surge= | |||
Lt. Surge estará dormindo. Será necessário interagir com ele para adentrar seu sonho. | |||
<center>[[Arquivo:LT Surge NW 1.png|link=]]</center> | |||
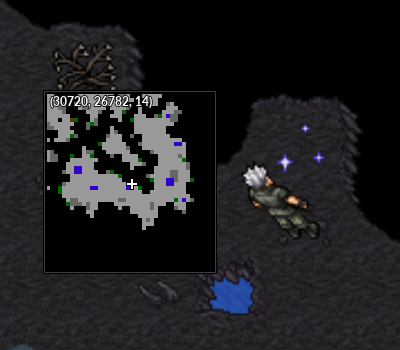
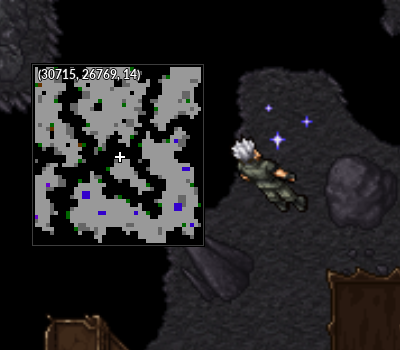
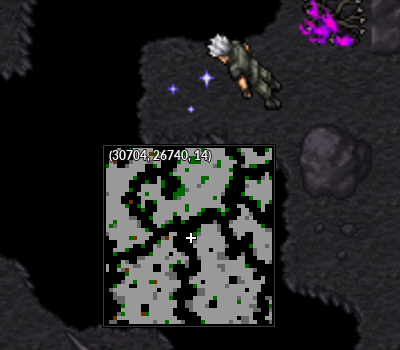
Ao entrar na dungeon, o jogador controlará Surge, e deverá pisar nos SQMs brilhantes para prosseguir. | |||
<center>[[Arquivo:LT Surge NW 2.png|link=]]</center> | |||
O jogador terá acesso a Pokémon específicos: | |||
<center> | <center> | ||
{| class="wikitable | {| class="wikitable" style="text-align:center" width="15%" | ||
! | ! Lt.Surge | ||
|- | |||
| [[Arquivo:181-Sh_Ampharos.png|link=Shiny Ampharos]] Shiny Ampharos | |||
|- | |||
| [[Arquivo:101-Sh_Electrode.png|link=Shiny Electrode]] Shiny Electrode | |||
|- | |- | ||
| [[Arquivo: | | [[Arquivo:Shinyjoe.png|link=Shiny Jolteon]] Shiny Jolteon | ||
|- | |||
| [[Arquivo:466-Electivire.png|link=Electivire]] Electivire TM | |||
|- | |||
| [[Arquivo:026-Sh_Raichu.png|link=Shiny Raichu]] Shiny Raichu | |||
|- | |||
| [[Arquivo:462-Shiny_Magnezone.png|link=Shiny Magnezone]] Shiny Magnezone | |||
|} | |} | ||
</center> | </center> | ||
Ao final dessa primeira fase, o jogador passará por diversos tipos de fobia que habitam os sonhos do Tenente Surge.<br> | |||
'''Importante:''' O jogador deverá procurar os SQMs brilhantes pra passar por cada medo. | |||
===Philophobia:=== | |||
Em um ambiente que lembra um altar, o jogador precisará derrotar o '''Padre'''.<br> | |||
A '''Philophobia''' é o medo de se apaixonar. | |||
<center> | <center> | ||
{| class="wikitable" | {|class="wikitable" | ||
! | |- | ||
! Boss !! Saída | |||
|- | |||
|[[Arquivo:Philophobia_LT_Surge_1.png|link=]] || [[Arquivo:Philophobia_LT_Surge_2.png|link=]] | |||
|- | |- | ||
| | |}</center> | ||
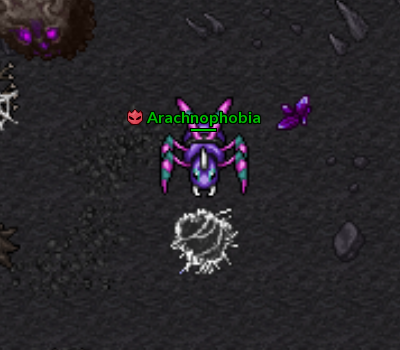
===Arachnophobia:=== | |||
Nesse local, o jogador precisará enfrentar a fobia à '''aranhas''', enfrentando Pokémon que assemelham à aracnídeos. O bosss dessa arena será a [[Arquivo:Sh_ariados.png|link=Shiny Ariados]] '''Shiny Ariados''' | |||
<center> | <center> | ||
{| class="wikitable | {|class="wikitable" | ||
|- | |- | ||
| [[Arquivo: | ! Boss !! Saída | ||
|} | |- | ||
</center> | |[[Arquivo:LT Surge NW 5.png|link=]] || [[Arquivo:LT Surge NW 6.png|link=]] | ||
|- | |||
|}</center> | |||
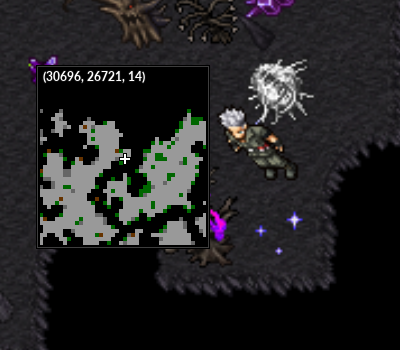
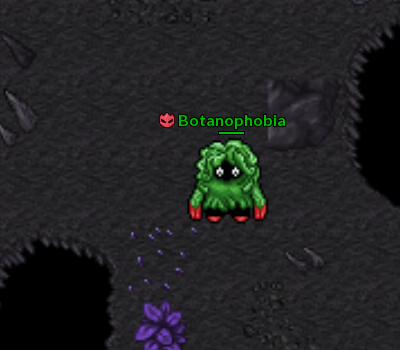
===Botanophobia:=== | |||
A '''Botanophobia''' é o medo irracional de '''plantas'''. Neste momento o jogador enfrentará diversos Pokémon que se assemelham a plantas. Entre eles, o boss [[Arquivo:ShTang.png|link=]]'''Shiny Tangrowth''' | |||
<center> | <center> | ||
{| class="wikitable" | {|class="wikitable" | ||
! | |- | ||
! Boss !! Saída | |||
|- | |||
|[[Arquivo:LT Surge NW 7.png|link=]] || [[Arquivo:LT Surge NW 8.png|link=]] | |||
|- | |- | ||
| | |}</center> | ||
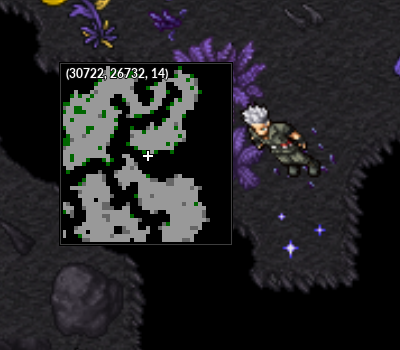
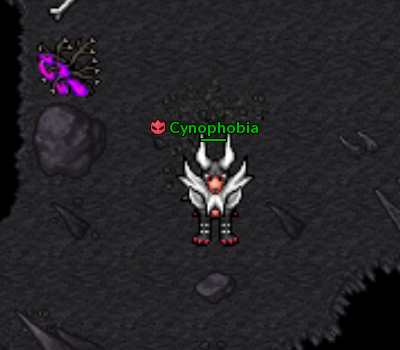
===Cynophobia:=== | |||
Nessa arena, o jogador deverá enfrentar a fobia à '''cães'''. Para isso deverá derrotar Pokémon que se assemelham a animais caninos. O boss dessa arena será o [[Arquivo:Megahoundoom.png|link=]]'''Mega Houndoom''' | |||
<center> | <center> | ||
{| class="wikitable | {|class="wikitable" | ||
|- | |- | ||
| [[Arquivo: | ! Boss !! Saída | ||
|} | |- | ||
</center> | |[[Arquivo:LT Surge NW 9.png|link=]] || [[Arquivo:LT Surge NW 10.png|link=]] | ||
|- | |||
|}</center> | |||
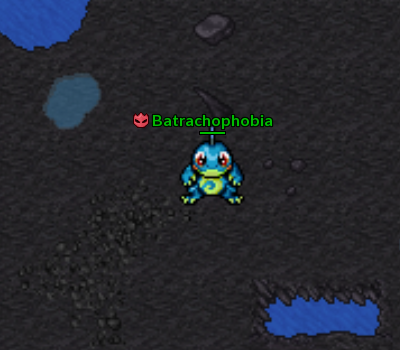
===Batrachophobia:=== | |||
A '''Batrachophobia''' é o medo de '''anfíbios'''. Para enfrentar essa fobia, o jogador deverá derrotar Pokémon que se assemelham a Anfíbios. O boss dessa arena será o [[Arquivo:186-shPolitoed.png|link=]]'''Shiny Politoed''' | |||
<center> | <center> | ||
{| class="wikitable" | {|class="wikitable" | ||
! | |- | ||
! Boss !! Saída | |||
|- | |||
|[[Arquivo:LT Surge NW 11.png|link=]] || [[Arquivo:LT Surge NW 12.png|link=]] | |||
|- | |- | ||
| | |}</center> | ||
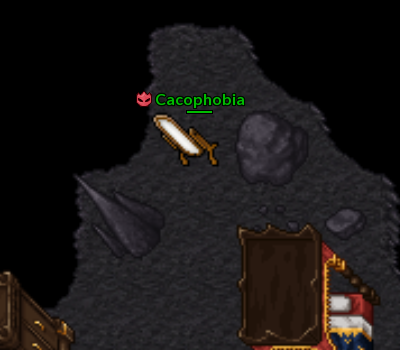
===Cacophobia:=== | |||
Nessa arena que se assemelha a um quarto, o jogador deverá derrotar um '''espelho'''.<br> | |||
A '''Cacophobia''' é o medo de se tornar '''feio'''.<br> | |||
'''Observação:''' O espelho, como esperado, permanecerá imóvel e não causará dano ao jogador, portanto, é necessário apenas derrotá-lo. | |||
<center> | <center> | ||
{| class="wikitable | {|class="wikitable" | ||
|- | |- | ||
| [[Arquivo: | ! Boss !! Saída | ||
|} | |- | ||
</center> | |[[Arquivo:LT Surge NW 13.png|link=]] || [[Arquivo:LT Surge NW 14.png|link=]] | ||
|- | |||
|}</center> | |||
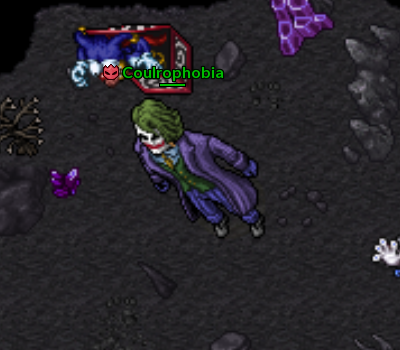
===Coulrophobia:=== | |||
Nesse momento, o jogador deverá enfrentar o medo de '''palhaços'''.<br> | |||
Nessa arena, o jogador encontrará alguns palhaços de diferentes tipos de mecânicas. Será necessário derrotar apenas o palhaço maior ('''Coringa''') que será o boss.<br> | |||
'''Importante:''' Deve-se tomar cuidado, pois alguns palhaços possuem a habilidade de pular no Pokémon do jogador.<br> | |||
'''Observação:''' Assim como o espelho da arena anterior, o boss permanecerá parado e não atacará o jogador. | |||
<center> | <center> | ||
{| class="wikitable" | {|class="wikitable" | ||
|- | |- | ||
| | ! Boss !! Saída | ||
| | |- | ||
|[[Arquivo:LT Surge NW 15.png|link=]] || [[Arquivo:LT Surge NW 16.png|link=]] | |||
< | |- | ||
|}</center> | |||
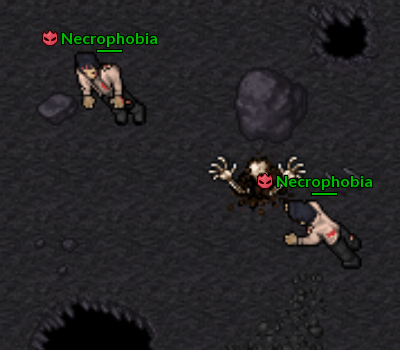
===Necrophobia:=== | |||
A '''Necrophobia''' é a fobia à qualquer coisa relacionada a '''morte'''.<br> | |||
Nessa arena, o jogador deverá derrotar alguns '''zumbis''', que apenas atacarão o jogador corpo a corpo. | |||
<center> | <center> | ||
{| class="wikitable | {|class="wikitable" | ||
|- | |- | ||
| [[Arquivo: | ! Bosses !! Saída | ||
|} | |- | ||
</center> | |[[Arquivo:LT Surge NW 17.png|link=]] || [[Arquivo:LT Surge NW 18.png|link=]] | ||
|- | |||
|}</center> | |||
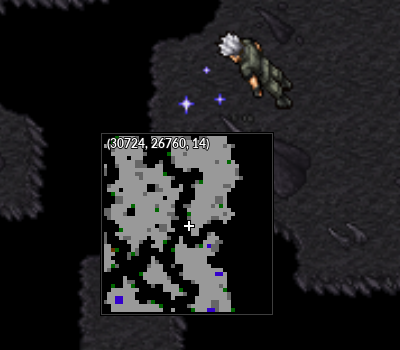
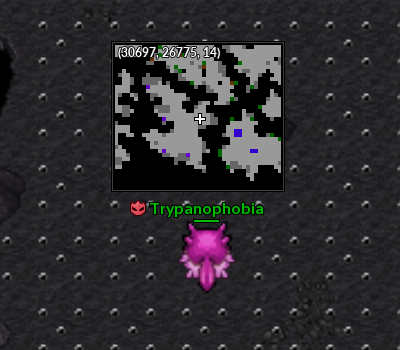
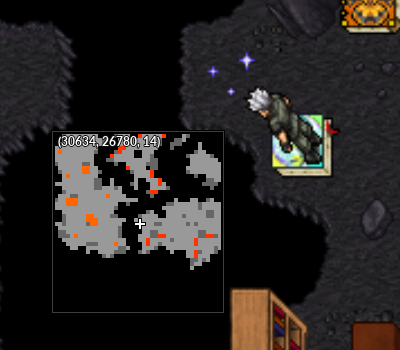
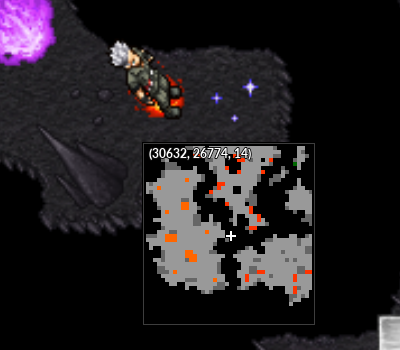
===Trypanophobia:=== | |||
A '''Trypanophobia''' é o medo de '''agulhas'''. Para enfrentá-la, o jogador deverá derrotar o boss '''Shiny Qwilfish''' em uma arena repleta de espinhos no chão. | |||
<center> | <center> | ||
{| class="wikitable" | {|class="wikitable" | ||
! | |- | ||
! Boss !! Saída | |||
|- | |||
|[[Arquivo:LT Surge NW A1.png|link=]] || [[Arquivo:LT Surge NW 12.png|link=]] | |||
|- | |- | ||
| | |}</center> | ||
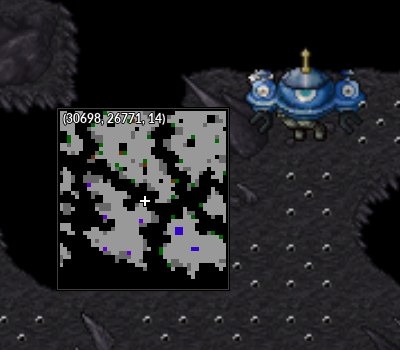
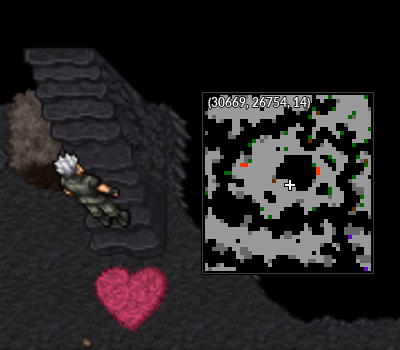
'''Dicas:''' É possível se afastar do Shinny Qwilfish para se curar. | |||
<center>[[Arquivo:LT Surge NW 21.png|link=]]</center> | |||
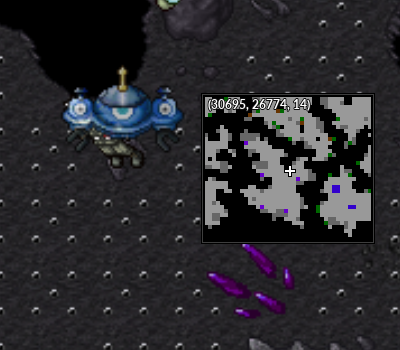
Conforme demonstrado na imagem abaixo, o jogador pode permanecer no mesmo SQM em que o Pokémon estiver. O local não possui espinho, e é '''seguro'''.<br> | |||
É importante tomar cuidado, pois, com o ataque '''"Lock on"''' do '''Shiny Magnezone''', o Pokémon terá altas chance de desmaiar. | |||
<center>[[Arquivo:LT Surge NW A2.png|link=]]</center> | |||
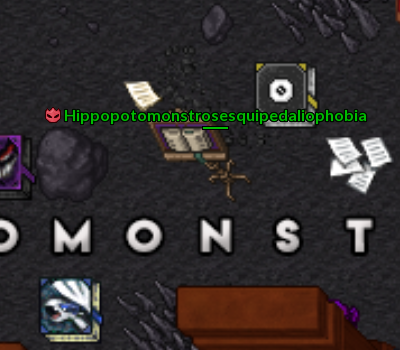
===Hippopotomonstrosesquipedaliophobia:=== | |||
A '''Hippopotomonstrosesquipedaliophobia''' é a fobia à '''palavras longas'''. Nessa arena, o jogador deverá derrotar um '''livro''' que se encontrará no centro. | |||
<center> | <center> | ||
{| class="wikitable | {|class="wikitable" | ||
! | |- | ||
! Boss !! Saída | |||
|- | |- | ||
| [[Arquivo: | |[[Arquivo:LT Surge NW 22.png|link=]] || [[Arquivo:LT Surge NW 23.png|link=]] | ||
|} | |- | ||
|}</center> | |||
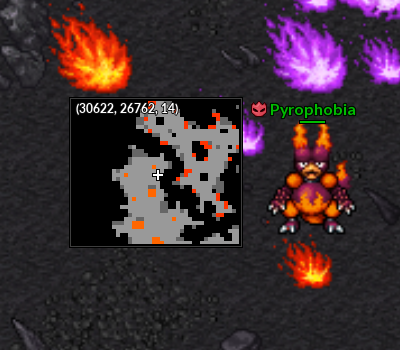
===Pyrophobia:=== | |||
A '''Pyrophobia''' é o medo de '''fogo'''. Para enfrentar essa fobia, o jogador deverá derrotar diversos Pokémon do tipo fogo. O boss desssa arena será o [[Arquivo:126-Sh_Magmar.png|link=]]'''Shiny Magmar'''. | |||
<center> | <center> | ||
{| class="wikitable" | {|class="wikitable" | ||
|- | |- | ||
| | ! Boss !! Saída | ||
|- | |||
|[[Arquivo:LT Surge NW A3.png|link=]] || [[Arquivo:LT Surge NW 24.png|link=]] | |||
|- | |||
|}</center> | |||
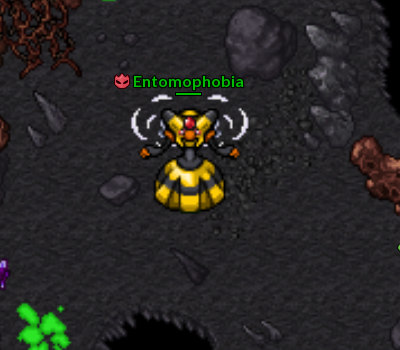
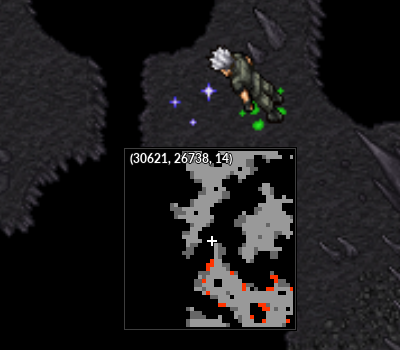
===Entomophobia:=== | |||
O jogador deverá derrotar, nessa arena o medo de '''insetos'''. Para isso, o jogador deverá derrotar, dentre diversos Pokémon, o boss [[Arquivo:416-Vespiquen.png|link=]]'''Vespiquen'''.<br> | |||
'''Importante:''' o boss Vespiquen ataca de longe. | |||
<center> | <center> | ||
{| class="wikitable | {|class="wikitable" | ||
|- | |- | ||
| [[Arquivo: | ! Boss !! Saída | ||
|} | |- | ||
|[[Arquivo:LT Surge NW 25.png|link=]] || [[Arquivo:LT Surge NW 26.png|link=]] | |||
|- | |||
|}</center> | |||
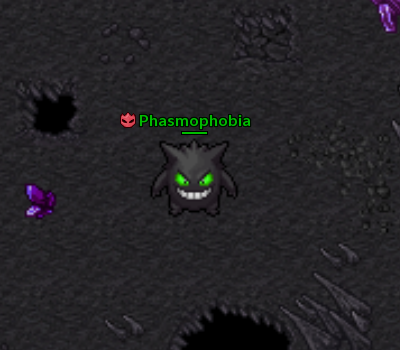
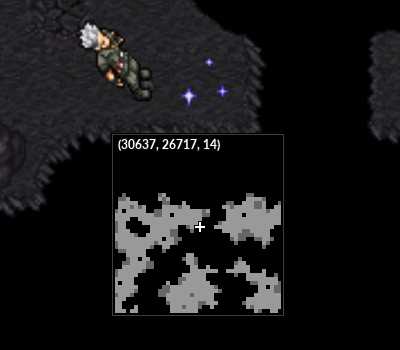
===Phasmophobia:=== | |||
'''Phasmophobia''' é o medo de '''fantasmas'''. Para enfrentá-la, o jogador deverá derrotar Pokémon do tipo Fantasma. O boss dessa arena é o [[Arquivo:Sgengar.png|link=]]'''Shiny Gengar'''.<br> | |||
'''Importante:''' o boss Shiny Gengar ataca de longe e usa a habilidade Vanish frequentemente. | |||
<center> | <center> | ||
{| class="wikitable" | {|class="wikitable" | ||
! | |- | ||
! Boss !! Saída | |||
|- | |||
|[[Arquivo:LT Surge NW 27.png|link=]] || [[Arquivo:LT Surge NW 28.png|link=]] | |||
|- | |- | ||
| | |}</center> | ||
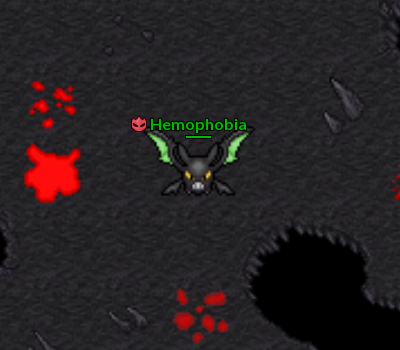
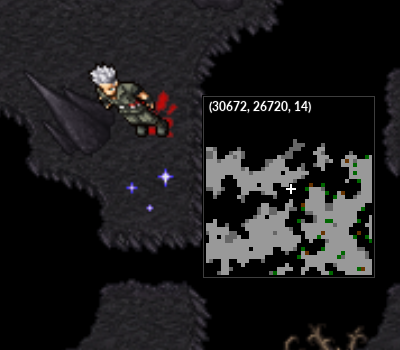
===Hemophobia:=== | |||
Nessa arena, o jogador deverá derrotar a fobia a '''sangue'''. Para isso, deverá derrotar diversos Pokémon que se assemelham a morcegos.<br> | |||
O boss dessa arena será o [[Arquivo:169-Sh_Crobat.png|link=]]'''Shiny Crobat'''.<br> | |||
'''Importante:''' Shiny Crobat ataca de longe. | |||
<center> | <center> | ||
{|class="wikitable" | |||
|- | |||
! Boss !! Saída | |||
|- | |||
|[[Arquivo:LT Surge NW 29.png|link=]] || [[Arquivo:LT Surge NW 30.png|link=]] | |||
|- | |||
|}</center> | |||
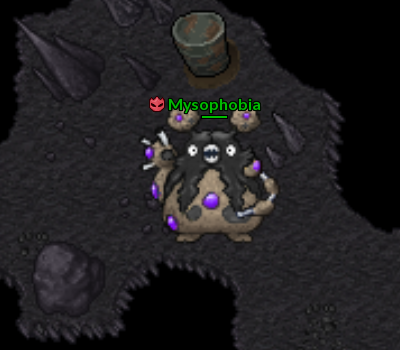
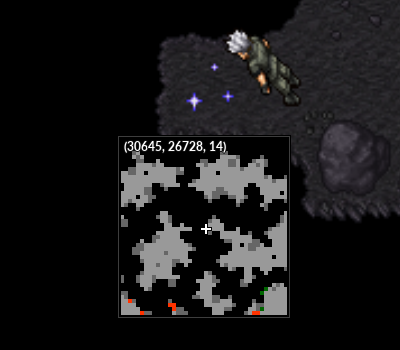
{| class="wikitable | ===Mysophobia:=== | ||
A '''Mysophobia''' é a fobia a '''germes'''. Nessa arena, o jogador deverá derrotar Pokémon que possuem relação a sujeira.<br> | |||
O boss dessa arena é o [[Arquivo:569-Shiny_Garbodor.png|link=]]'''Shiny Garbodor'''.<br> | |||
'''Importante:''' O boss Shiny Garbodor ataca de longe. | |||
<center> | |||
{|class="wikitable" | |||
|- | |- | ||
| [[Arquivo: | ! Boss !! Saída | ||
|} | |- | ||
</center> | |[[Arquivo:LT Surge NW 31.png|link=]] || [[Arquivo:LT Surge NW 32.png|link=]] | ||
|- | |||
|}</center> | |||
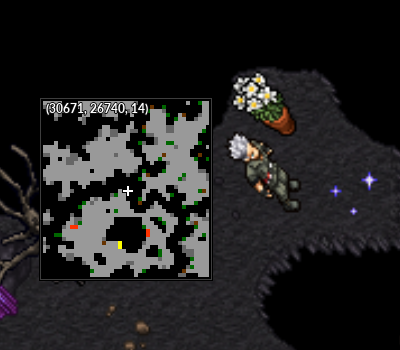
===Nyctophobia:=== | |||
A '''Nyctophobia''' é o medo de '''escuro'''. Impossibilitado de enxergar qualquer coisa, o jogador deverá derrotar algo que não consegue ver. | |||
<center> | <center> | ||
{| class="wikitable" | {|class="wikitable" | ||
|- | |- | ||
| | ! Boss !! Saída | ||
| | |- | ||
|} | |[[Arquivo:LT Surge NW 33.png|link=]] || [[Arquivo:LT Surge NW 34.png|link=]] | ||
</center> | |- | ||
|}</center> | |||
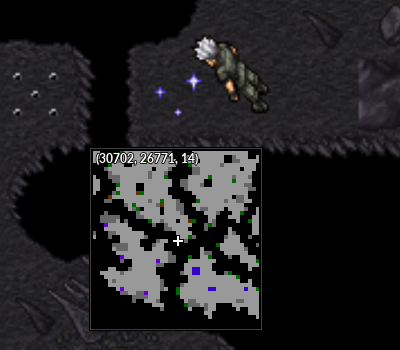
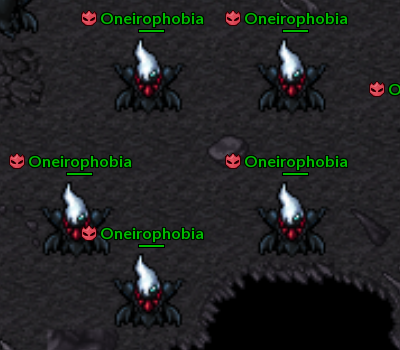
< | ===Oneirophobia:=== | ||
A '''Oneirophobia''' é a fobia a coisas relacionadas aos '''sonhos'''. Para enfrentar essa fobia, o jogador deverá derrotar diversos [[Arquivo:491-Darkrai.png|link=]]'''Darkrai minions'''.<br> | |||
O boss é um '''Darkrai minion''' mais forte. | |||
= | <center> | ||
{|class="wikitable" | |||
|- | |||
! Boss !! Saída | |||
|- | |||
|[[Arquivo:LT Surge NW 35.png|link=]] || [[Arquivo:LT Surge NW 36.png|link=]] | |||
|- | |||
|}</center> | |||
===Saída=== | |||
Para sair da dungeon, o jogador precisa subir a escada que se encontra ao final do percurso. | |||
<center | <center>[[Arquivo:LT Surge NW 37.png|link=]]</center> | ||
[[Arquivo: | |||
</center> | |||
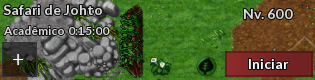
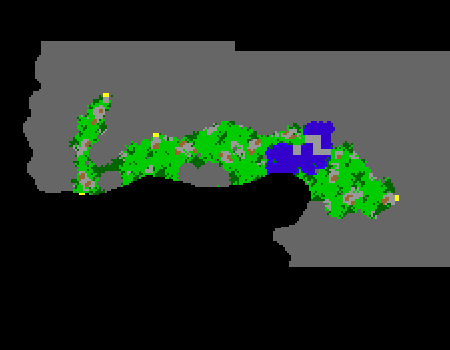
=Informações básicas= | =Safari de Johto - Informações básicas= | ||
[[Arquivo: | [[Arquivo:Safari_de_johto_card.png|link=]] | ||
'''Tempo de conclusão:''' 15 minutos <br> | '''Tempo de conclusão:''' 15 minutos <br> | ||
'''Experiência obtida pelo aluno:''' 300 <br> | '''Experiência obtida pelo aluno:''' 300 <br> | ||
'''Experiência obtida pelo jogador:''' 100.000 <br> | '''Experiência obtida pelo jogador:''' 100.000 <br> | ||
'''Derrotar Pokémon:''' [[Arquivo: | '''Derrotar Pokémon:''' [[Arquivo:semvip.png|link=Quests]] <br> | ||
'''Capturar Pokémon:''' [[Arquivo:comvip.png|link=Quests]] <br> | '''Capturar Pokémon:''' [[Arquivo:comvip.png|link=Quests]] <br> | ||
==Mapa== | ==Mapa== | ||
<center>[[Arquivo: | <center>[[Arquivo:Safari de Johto mapa 1.png|link=]] [[Arquivo:Safari de Johto mapa 2.png|link=]]</center> <br> <center>[[Arquivo:Safari de Johto mapa 3.png|link=]]</center> | ||
==Pokémon== | |||
{| class="wikitable" style="text-align:center;" width="20%" | |||
|- | |||
! colspan="3" | Pokémon disponíveis | |||
|- | |||
| [[Arquivo:069-Bellsprout.png|link=]] || '''Bellsprout''' || | |||
|- | |||
| [[Arquivo:070-Weepinbell.png|link=]] || '''Weepinbell''' || | |||
|- | |||
| [[Arquivo:108-Lickitung.png|link=]] || '''Lickitung''' || [[Arquivo:Pokeball.png|15px|link=]] | |||
|- | |||
| [[Arquivo:098-Krabby.png|link=]] || '''Krabby''' || | |||
|- | |||
| [[Arquivo:128-Tauros.png|link=]] || '''Tauros''' || | |||
|- | |||
| [[Arquivo:331.Cacnea.png|link=]] || '''Cacnea''' || | |||
|- | |||
| [[Arquivo:332.Cacturne.png|link=]] || '''Cacturne''' || | |||
|- | |||
| [[Arquivo:122-Mr.Mime.png|link=]] || '''Mr.Mime''' || [[Arquivo:Pokeball.png|15px|link=]] | |||
|- | |||
| [[Arquivo:202-Wobbuffet.png|link=]] || '''Wobbufet''' || [[Arquivo:Pokeball.png|15px|link=]] | |||
|- | |||
| [[Arquivo:188-Skiploom.png|link=]] || '''Skiploom''' || | |||
|} | |||
{| class="wikitable" style="text-align:center;" width="20%" | |||
|- | |||
! colspan="3" | Shiny | |||
|- | |||
| [[Arquivo:122-Sh_Mr.png|link=]] || '''Shiny Mr.Mime''' || [[Arquivo:Pokeball.png|15px|link=]] | |||
|- | |||
| [[Arquivo:128-shTauros.png|link=]] || '''Shiny Tauros''' || [[Arquivo:Pokeball.png|15px|link=]] | |||
|} | |||
[[Arquivo:Pokeball.png|15px|link=]] '''= Pokémon capturáveis''' | |||
==Recompensas:== | |||
{| class ="wikitable" style="text-align:center" width="35%" | |||
! colspan="2" | Item | |||
! Quantidade | |||
! Raridade | |||
|- | |||
| [[file:Study Notes.png|link=]] || Study Notes || 20 || Comum | |||
|- | |||
| [[Arquivo:Bag_of_Nightmare_Experience_Candy.png|link=]] || Bag Of Nightmare Experience Candy || 1 || Comum | |||
|- | |||
! colspan="4" | [[Arquivo:Exp_icon.png|30px|link=]] 100.000 de experiência para o jogador | |||
|- | |||
! colspan="4" | [[Arquivo:Exp_icon.png|30px|link=]] 300 de experiência para o aluno | |||
|- | |||
|} | |||
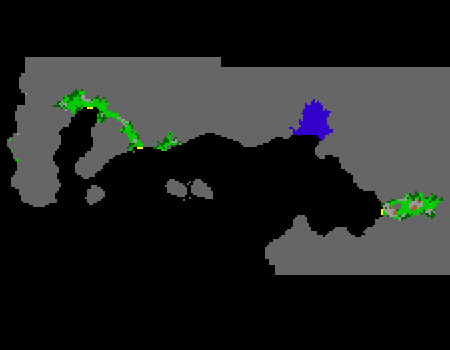
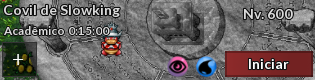
== | =Covil de Slowking - Informações básicas= | ||
[[Arquivo:Covil de slowking card.png|link=]] | |||
= | '''Tempo de conclusão:''' 15 minutos <br> | ||
'''Experiência obtida pelo aluno:''' 300 <br> | |||
'''Experiência obtida pelo jogador:''' 100.000 <br> | |||
'''Derrotar Pokémon:''' [[Arquivo:semvip.png|link=Quests]] <br> | |||
'''Capturar Pokémon:''' [[Arquivo:comvip.png|link=Quests]] <br> | |||
== | ==Mapa== | ||
<center>[[Arquivo:Covil de Slowking mapa.png|link=]]</center> | |||
==Pokémon== | ==Pokémon== | ||
| Linha 234: | Linha 704: | ||
! colspan="3" | Pokémon disponíveis | ! colspan="3" | Pokémon disponíveis | ||
|- | |- | ||
| [[Arquivo: | | [[Arquivo:079-Slowpoke.png|link=]] || '''Slowpoke''' || | ||
|- | |- | ||
| [[Arquivo: | | [[Arquivo:080-Slowbro.png|link=]] || '''Slowbro''' || | ||
|- | |- | ||
| [[Arquivo: | | [[Arquivo:199-Slowking.png|link=]] || '''Slowking''' || [[Arquivo:Pokeball.png|15px|link=]] | ||
|} | |} | ||
| Linha 260: | Linha 730: | ||
|} | |} | ||
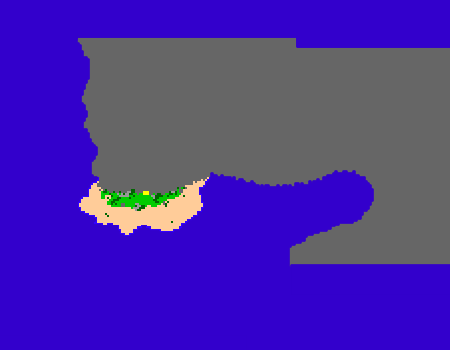
=Informações básicas= | =Infestação de Voltorb - Informações básicas= | ||
[[Arquivo: | [[Arquivo:Infestação de Voltorb card.png|link=]] | ||
'''Tempo de conclusão:''' 15 minutos <br> | '''Tempo de conclusão:''' 15 minutos <br> | ||
| Linha 271: | Linha 741: | ||
==Mapa== | ==Mapa== | ||
<center>[[Arquivo: | <center>[[Arquivo:Infestação de Voltorb mapa 2.png|link=]] [[Arquivo:Infestação de Voltorb mapa 2.png|link=]]</center> | ||
==Pokémon== | ==Pokémon== | ||
{| class="wikitable | {| class="wikitable" style="text-align:center;" width="20%" | ||
|- | |- | ||
! colspan="3" | Pokémon disponíveis | ! colspan="3" | Pokémon disponíveis | ||
|- | |- | ||
| [[Arquivo: | | [[Arquivo:100-Voltorb.png|link=]] || '''Voltorb''' || | ||
|- | |||
| [[Arquivo:101-Electrode.png|link=]] || '''Electrode''' || | |||
|} | |||
{| class="wikitable" style="text-align:center;" width="20%" | |||
|- | |||
! colspan="3" | Shiny | |||
|- | |||
| [[Arquivo:100-Sh_Voltorb.png|link=]] || '''Shiny Voltorb''' || | |||
|- | |- | ||
| [[Arquivo: | | [[Arquivo:101-Sh_Electrode.png|link=]] || '''Shiny Electrode''' || | ||
|} | |||
[[Arquivo:Pokeball.png|15px|link=]] '''= Pokémon capturáveis''' | |||
==Recompensas:== | |||
{| class ="wikitable" style="text-align:center" width="35%" | |||
! colspan="2" | Item | |||
! Quantidade | |||
! Raridade | |||
|- | |- | ||
| [[ | | [[file:Study Notes.png|link=]] || Study Notes || 20 || Comum | ||
|- | |- | ||
| [[Arquivo: | | [[Arquivo:Bag_of_Nightmare_Experience_Candy.png|link=]] || Bag Of Nightmare Experience Candy || 1 || Comum | ||
|- | |- | ||
| [[Arquivo: | ! colspan="4" | [[Arquivo:Exp_icon.png|30px|link=]] 100.000 de experiência para o jogador | ||
|- | |- | ||
| [[Arquivo: | ! colspan="4" | [[Arquivo:Exp_icon.png|30px|link=]] 300 de experiência para o aluno | ||
|- | |- | ||
| [[Arquivo: | |} | ||
=Covil de Tentacruel - Informações básicas= | |||
[[Arquivo:Covil do tentacruel card.png|link=]] | |||
'''Tempo de conclusão:''' 15 minutos <br> | |||
'''Experiência obtida pelo aluno:''' 300 <br> | |||
'''Experiência obtida pelo jogador:''' 100.000 <br> | |||
'''Derrotar Pokémon:''' [[Arquivo:semvip.png|link=Quests]] <br> | |||
'''Capturar Pokémon:''' [[Arquivo:comvip.png|link=Quests]] <br> | |||
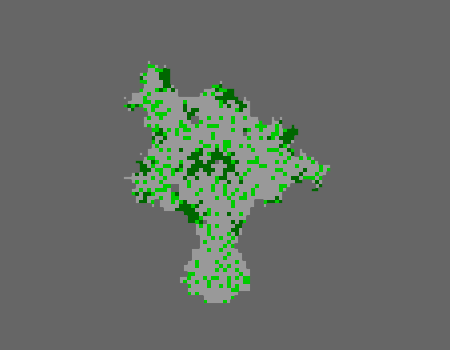
==Mapa== | |||
<center>[[Arquivo:Covil do Tentacruel mapa.png|link=]]</center> | |||
==Pokémon== | |||
{| class="wikitable" style="text-align:center;" width="20%" | |||
|- | |- | ||
! colspan="3" | Pokémon disponíveis | |||
|- | |- | ||
| [[Arquivo: | | [[Arquivo:117-Seadra.png|link=]] || '''Seadra''' || | ||
|- | |- | ||
| [[Arquivo: | | [[Arquivo:072-Tentacool.png|link=]] || '''Tentacool''' || | ||
|- | |- | ||
| [[Arquivo: | | [[Arquivo:073-Tentacruel.png|link=]] || '''Tentacruel''' || [[Arquivo:Pokeball.png|15px|link=]] | ||
|} | |} | ||
{| class="wikitable | {| class="wikitable" style="text-align:center;" width="20%" | ||
|- | |- | ||
! colspan="3" | Shiny | ! colspan="3" | Shiny | ||
|- | |- | ||
| [[Arquivo:072-Sh_Tentacool.png|link=]] || '''Shiny Tentacool''' || [[Arquivo:Pokeball.png|15px|link=]] | | [[Arquivo:072-Sh_Tentacool.png|link=]] || '''Shiny Tentacool''' || [[Arquivo:Pokeball.png|15px|link=]] | ||
|- | |- | ||
| [[Arquivo: | | [[Arquivo:073-Sh_Tentacruel.png|link=]] || '''Shiny Tentacruel''' || [[Arquivo:Pokeball.png|15px|link=]] | ||
|} | |} | ||
| Linha 335: | Linha 836: | ||
|} | |} | ||
=Informações básicas= | =Lightstorm Island - Informações básicas= | ||
[[Arquivo: | [[Arquivo:Lightstorm Island card.png|link=]] | ||
'''Tempo de conclusão:''' 15 minutos <br> | '''Tempo de conclusão:''' 15 minutos <br> | ||
'''Experiência obtida pelo aluno:''' 300 <br> | '''Experiência obtida pelo aluno:''' 300 <br> | ||
'''Experiência obtida pelo jogador:''' 100.000 <br> | '''Experiência obtida pelo jogador:''' 100.000 <br> | ||
'''Derrotar Pokémon:''' [[Arquivo: | '''Derrotar Pokémon:''' [[Arquivo:semvip.png|link=Quests]] <br> | ||
'''Capturar Pokémon:''' [[Arquivo: | '''Capturar Pokémon:''' [[Arquivo:comvip.png|link=Quests]] <br> | ||
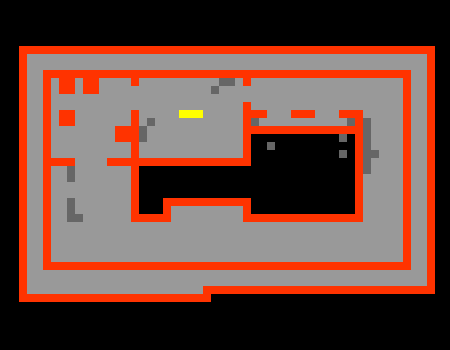
==Mapa== | ==Mapa== | ||
<center>[[Arquivo: | <center>[[Arquivo:Lightstorm Island mapa.png|link=]]</center> | ||
==Pokémon== | ==Pokémon== | ||
{| class="wikitable | {| class="wikitable" style="text-align:center;" width="20%" | ||
|- | |||
! colspan="3" | Pokémon disponíveis | ! colspan="3" | Pokémon disponíveis | ||
|- | |- | ||
| [[Arquivo: | | [[Arquivo:179-Mareep.png|link=]] || '''Mareep''' || | ||
|- | |||
| [[Arquivo:180-Flaaffy.png|link=]] || '''Flaaffy''' || | |||
|- | |||
| [[Arquivo:172-Pichu.png|link=]] || '''Pichu''' || | |||
|- | |||
| [[Arquivo:025-Pikachu.png|link=]] || '''Pikachu''' || | |||
|- | |||
| [[Arquivo:026-Raichu.png|link=]] || '''Raichu''' || [[Arquivo:Pokeball.png|15px|link=]] | |||
|- | |||
| [[Arquivo:181-Ampharos.png|link=]] || '''Ampharos''' || [[Arquivo:Pokeball.png|15px|link=]] | |||
|} | |} | ||
{| class="wikitable | {| class="wikitable" style="text-align:center;" width="20%" | ||
|- | |||
! colspan="3" | Shiny | ! colspan="3" | Shiny | ||
|- | |- | ||
| [[Arquivo: | | [[Arquivo:026-Sh_Raichu.png|link=]] || '''Shiny Raichu''' || [[Arquivo:Pokeball.png|15px|link=]] | ||
|- | |||
| [[Arquivo:181-Sh_Ampharos.png|link=]] || '''Shiny Ampharos''' || [[Arquivo:Pokeball.png|15px|link=]] | |||
|} | |} | ||
| Linha 374: | Linha 889: | ||
|- | |- | ||
| [[Arquivo:Bag_of_Nightmare_Experience_Candy.png|link=]] || Bag Of Nightmare Experience Candy || 1 || Comum | | [[Arquivo:Bag_of_Nightmare_Experience_Candy.png|link=]] || Bag Of Nightmare Experience Candy || 1 || Comum | ||
|- | |- | ||
! colspan="4" | [[Arquivo:Exp_icon.png|30px|link=]] 100.000 de experiência para o jogador | ! colspan="4" | [[Arquivo:Exp_icon.png|30px|link=]] 100.000 de experiência para o jogador | ||
| Linha 389: | Linha 896: | ||
|} | |} | ||
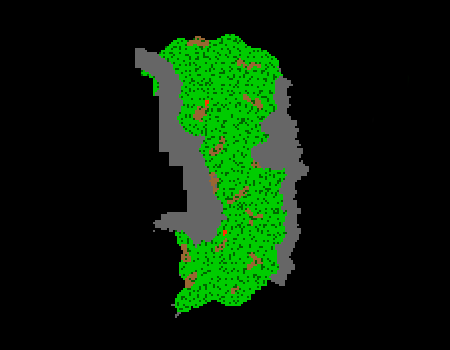
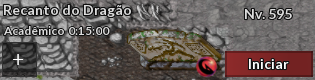
= | =Recanto do dragão - Informações básicas= | ||
[[Arquivo:Recanto do dragão card.png|link=]] | |||
< | '''Tempo de conclusão:''' 15 minutos <br> | ||
'''Experiência obtida pelo aluno:''' 300 <br> | |||
'''Experiência obtida pelo jogador:''' 100.000 <br> | |||
'''Derrotar Pokémon:''' [[Arquivo:semvip.png|link=Quests]] <br> | |||
'''Capturar Pokémon:''' [[Arquivo:comvip.png|link=Quests]] <br> | |||
== | ==Mapa== | ||
= | <center>[[Arquivo:Recanto do Dragão mapa.png|link=]]</center> | ||
==Pokémon== | |||
{| class="wikitable" style="text-align:center;" width="20%" | |||
|- | |||
! colspan="3" | Pokémon disponíveis | |||
|- | |||
| [[Arquivo:147-Dratini.png|link=]] || '''Dratini''' || [[Arquivo:Pokeball.png|15px|link=]] | |||
|- | |||
| [[Arquivo:148-Dragonair.png|link=]] || '''Dragonair''' || [[Arquivo:Pokeball.png|15px|link=]] | |||
|} | |||
{| class="wikitable" style="text-align:center;" width="20%" | |||
|- | |||
! colspan="3" | Shiny | |||
|- | |||
| [[Arquivo:147-Sh_Dratini.png|link=]] || '''Shiny Dratini''' || [[Arquivo:Pokeball.png|15px|link=]] | |||
|- | |||
| [[Arquivo:148-Sh_Dragonair.png|link=]] || '''Shiny Dragonair''' || [[Arquivo:Pokeball.png|15px|link=]] | |||
|} | |||
[[Arquivo:Pokeball.png|15px|link=]] '''= Pokémon capturáveis''' | |||
==Recompensas:== | |||
== | {| class ="wikitable" style="text-align:center" width="35%" | ||
! colspan="2" | Item | |||
! Quantidade | |||
[[Arquivo: | ! Raridade | ||
|- | |||
| [[file:Study Notes.png|link=]] || Study Notes || 20 || Comum | |||
|- | |||
| [[Arquivo:Bag_of_Nightmare_Experience_Candy.png|link=]] || Bag Of Nightmare Experience Candy || 1 || Comum | |||
|- | |||
! colspan="4" | [[Arquivo:Exp_icon.png|30px|link=]] 100.000 de experiência para o jogador | |||
|- | |||
! colspan="4" | [[Arquivo:Exp_icon.png|30px|link=]] 300 de experiência para o aluno | |||
|- | |||
|} | |||
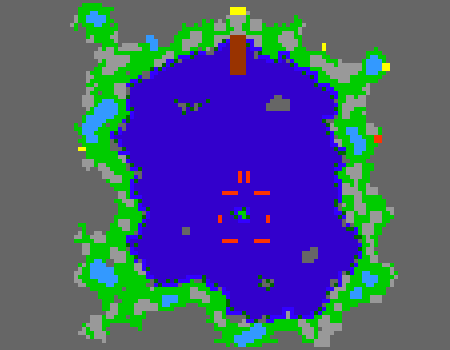
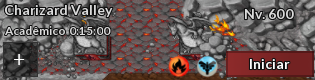
=Charizard Valley - Informações básicas= | |||
[[Arquivo:Charizard Valley card.png|link=]] | |||
< | '''Tempo de conclusão:''' 15 minutos <br> | ||
< | '''Experiência obtida pelo aluno:''' 300 <br> | ||
< | '''Experiência obtida pelo jogador:''' 100.000 <br> | ||
'''Derrotar Pokémon:''' [[Arquivo:semvip.png|link=Quests]] <br> | |||
'''Capturar Pokémon:''' [[Arquivo:comvip.png|link=Quests]] <br> | |||
< | |||
== | ==Mapa== | ||
<center>[[Arquivo:Charizard Valley mapa 1.png|link=]] [[Arquivo:Charizard Valley mapa 2.png|link=]]</center> <br> <center>[[Arquivo:Charizard Valley mapa 3.png|link=]] </center> | |||
== | ==Pokémon== | ||
== | {| class="wikitable" style="text-align:center;" width="20%" | ||
|- | |||
! colspan="3" | Pokémon disponíveis | |||
|- | |||
| [[Arquivo:006-Charizard.png|link=]] || '''Charizard''' || [[Arquivo:Pokeball.png|15px|link=]] | |||
|} | |||
{| class="wikitable" style="text-align:center;" width="20%" | |||
|- | |||
! colspan="3" | Shiny | |||
|- | |||
| [[Arquivo:006-shCharizard.png|link=]] || '''Shiny Charizard''' || [[Arquivo:Pokeball.png|15px|link=]] | |||
|} | |||
[[Arquivo:Pokeball.png|15px|link=]] ''' | [[Arquivo:Pokeball.png|15px|link=]] '''= Pokémon capturáveis''' | ||
==Recompensas:== | |||
== | {| class ="wikitable" style="text-align:center" width="35%" | ||
! colspan="2" | Item | |||
! Quantidade | |||
! Raridade | |||
|- | |||
| [[file:Study Notes.png|link=]] || Study Notes || 20 || Comum | |||
= | |- | ||
| [[Arquivo:Bag_of_Nightmare_Experience_Candy.png|link=]] || Bag Of Nightmare Experience Candy || 1 || Comum | |||
|- | |||
! colspan="4" | [[Arquivo:Exp_icon.png|30px|link=]] 100.000 de experiência para o jogador | |||
! colspan=" | |- | ||
! colspan="4" | [[Arquivo:Exp_icon.png|30px|link=]] 300 de experiência para o aluno | |||
|- | |- | ||
|} | |} | ||
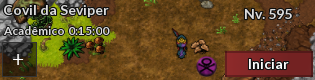
== | =Covil da Seviper - Informações básicas= | ||
[[Arquivo:Covil da seviper card.png|link=]] | |||
'''Tempo de conclusão:''' 15 minutos <br> | |||
'''Experiência obtida pelo aluno:''' 300 <br> | |||
'''Experiência obtida pelo jogador:''' 100.000 <br> | |||
'''Derrotar Pokémon:''' [[Arquivo:semvip.png|link=Quests]] <br> | |||
'''Capturar Pokémon:''' [[Arquivo:comvip.png|link=Quests]] <br> | |||
== | ==Mapa== | ||
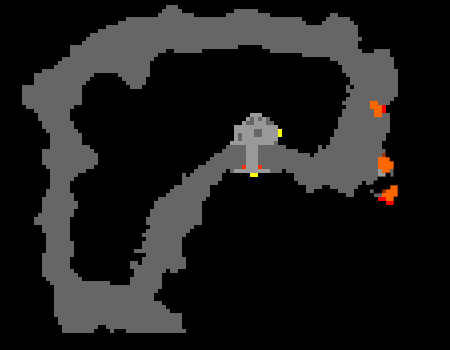
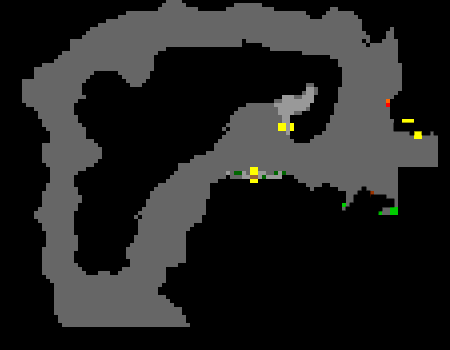
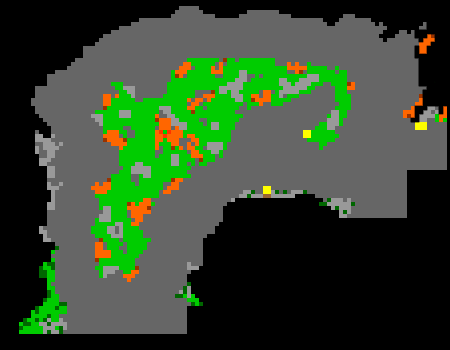
< | <center>[[Arquivo:Covil da Seviper mapa.png|link=]]</center> | ||
==Pokémon== | |||
=== | {| class="wikitable" style="text-align:center;" width="20%" | ||
|- | |||
! colspan="3" | Pokémon disponíveis | |||
|- | |||
| [[Arquivo:336-Seviper.png|link=]] || '''Seviper''' || [[Arquivo:Pokeball.png|15px|link=]] | |||
|} | |||
[[Arquivo:Pokeball.png|15px|link=]] '''= Pokémon capturáveis''' | |||
''' | |||
==Recompensas:== | |||
{| class ="wikitable" style="text-align:center" width="35%" | |||
! colspan="2" | Item | |||
! Quantidade | |||
{| class="wikitable" width=" | |||
! colspan="2" | Item | |||
! Raridade | ! Raridade | ||
|- | |- | ||
| [[file:Study Notes.png|link=]] || Study Notes || 20 || Comum | |||
| | |||
| | |||
|- | |- | ||
| [[Arquivo:Bag_of_Nightmare_Experience_Candy.png|link=]] || Bag Of Nightmare Experience Candy || 1 || Comum | |||
| | |||
| | |||
|- | |- | ||
! colspan="4" | [[Arquivo:Exp_icon.png|30px|link=]] 100.000 de experiência para o jogador | |||
|- | |- | ||
! colspan="4" | [[Arquivo:Exp_icon.png|30px|link=]] 300 de experiência para o aluno | |||
|- | |- | ||
| | |} | ||
| | |||
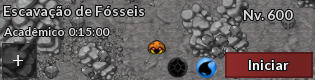
=Escavação de Fósseis - Informações básicas= | |||
[[Arquivo:Escavação de fósseis card.png|link=]] | |||
'''Tempo de conclusão:''' 15 minutos <br> | |||
'''Experiência obtida pelo aluno:''' 300 <br> | |||
'''Experiência obtida pelo jogador:''' 100.000 <br> | |||
'''Derrotar Pokémon:''' [[Arquivo:comvip.png|link=Quests]] <br> | |||
'''Capturar Pokémon:''' [[Arquivo:semvip.png|link=Quests]] <br> | |||
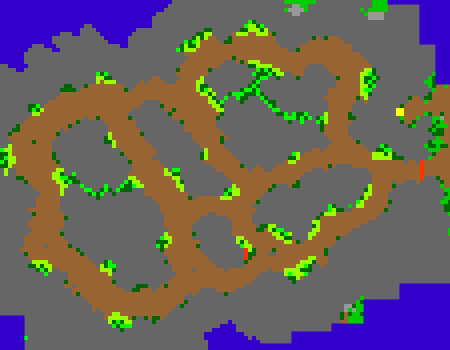
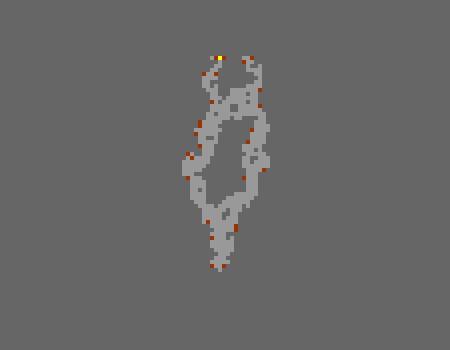
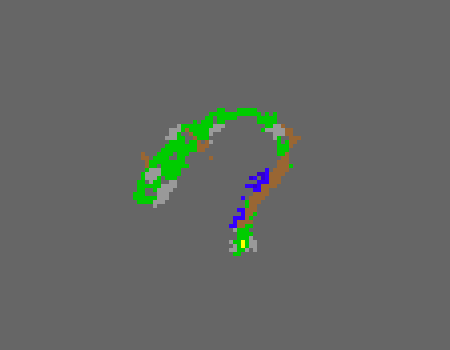
==Mapa== | |||
<center>[[Arquivo:Escavação de Fósseis mapa 1.png|link=]] [[Arquivo:Escavação de Fósseis mapa 2.png|link=]]</center> | |||
==Pokémon== | |||
{| class="wikitable" style="text-align:center;" width="20%" | |||
|- | |- | ||
! colspan="3" | Pokémon disponíveis | |||
|- | |- | ||
| [[Arquivo:140-Kabuto.png|link=]] || '''Kabuto''' || | |||
| | |} | ||
| | |||
| | [[Arquivo:Pokeball.png|15px|link=]] '''= Pokémon capturáveis''' | ||
==Recompensas:== | |||
{| class ="wikitable" style="text-align:center" width="35%" | |||
| | ! colspan="2" | Item | ||
! Quantidade | |||
! colspan="2" | Item | |||
! Raridade | ! Raridade | ||
|- | |- | ||
| [[file:Study Notes.png|link=]] || Study Notes || 20 || Comum | |||
| | |||
| | |||
|- | |- | ||
| [[Arquivo:Bag_of_Nightmare_Experience_Candy.png|link=]] || Bag Of Nightmare Experience Candy || 1 || Comum | |||
| | |||
| | |||
|- | |- | ||
! colspan="4" | [[Arquivo:Exp_icon.png|30px|link=]] 100.000 de experiência para o jogador | |||
|- | |- | ||
! colspan="4" | [[Arquivo:Exp_icon.png|30px|link=]] 300 de experiência para o aluno | |||
|- | |- | ||
| | |} | ||
| | |||
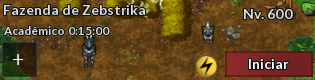
=Fazenda de Zebstrika - Informações básicas= | |||
[[Arquivo:Fazenda de zebstrika card.png|link=]] | |||
'''Tempo de conclusão:''' 15 minutos <br> | |||
'''Experiência obtida pelo aluno:''' 300 <br> | |||
'''Experiência obtida pelo jogador:''' 100.000 <br> | |||
'''Derrotar Pokémon:''' [[Arquivo:comvip.png|link=Quests]] <br> | |||
'''Capturar Pokémon:''' [[Arquivo:semvip.png|link=Quests]] <br> | |||
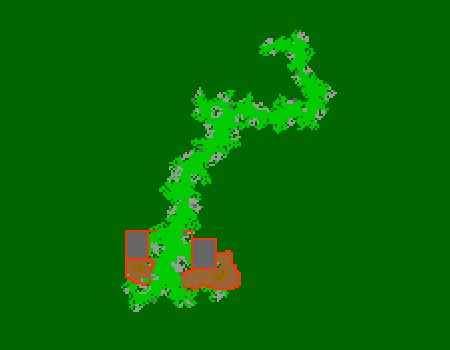
==Mapa== | |||
<center>[[Arquivo:Fazenda de Zebstrika mapa.png|link=]]</center> | |||
==Pokémon== | |||
{| class="wikitable" style="text-align:center;" width="20%" | |||
|- | |- | ||
! colspan="3" | Pokémon disponíveis | |||
|- | |- | ||
| [[Arquivo:522-Blitzle.png|link=]] || '''Blitzle''' || | |||
| | |||
| | |||
|- | |- | ||
| | | [[Arquivo:523-Zebstrika.png|link=]] || '''Zebstrika''' || | ||
| | |} | ||
[[Arquivo:Pokeball.png|15px|link=]] '''= Pokémon capturáveis''' | |||
==Recompensas:== | |||
{| class ="wikitable" style="text-align:center" width="35%" | |||
! colspan="2" | Item | |||
! Quantidade | |||
! Raridade | |||
|- | |- | ||
| [[file:Study Notes.png|link=]] || Study Notes || 20 || Comum | |||
| | |||
| | |||
|- | |- | ||
| [[Arquivo:Bag_of_Nightmare_Experience_Candy.png|link=]] || Bag Of Nightmare Experience Candy || 1 || Comum | |||
| | |||
| | |||
|- | |- | ||
! colspan="4" | [[Arquivo:Exp_icon.png|30px|link=]] 100.000 de experiência para o jogador | |||
|- | |- | ||
! colspan="4" | [[Arquivo:Exp_icon.png|30px|link=]] 300 de experiência para o aluno | |||
|- | |- | ||
|} | |} | ||
=Pirâmide de Cofagrigus - Informações básicas= | |||
[[Arquivo:Pirâmide de Cofagrigus card.png|link=]] | |||
'''Tempo de conclusão:''' 15 minutos <br> | |||
'''Experiência obtida pelo aluno:''' 300 <br> | |||
'''Experiência obtida pelo jogador:''' 100.000 <br> | |||
'''Derrotar Pokémon:''' [[Arquivo:semvip.png|link=Quests]] <br> | |||
'''Capturar Pokémon:''' [[Arquivo:comvip.png|link=Quests]] <br> | |||
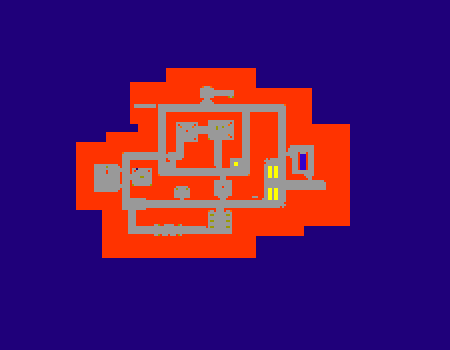
==Mapa== | |||
<center>[[Arquivo:Pirâmide de Cofagrigus mapa.png|link=]]</center> | |||
==Pokémon== | |||
{| class="wikitable" style="text-align:center;" width="20%" | |||
|- | |||
! colspan="3" | Pokémon disponíveis | |||
|- | |||
| [[Arquivo:562-Yamask.png|link=]] || '''Yamask''' || | |||
|- | |||
| [[Arquivo:563-Cofagrigus.png|link=]] || '''Cofagrigus''' || [[Arquivo:Pokeball.png|15px|link=]] | |||
|} | |||
[[Arquivo:Pokeball.png|15px|link=]] '''= Pokémon capturáveis''' | |||
[[Arquivo: | |||
==Recompensas:== | |||
{| class ="wikitable" style="text-align:center" width="35%" | |||
! colspan="2" | Item | |||
! Quantidade | |||
! Raridade | |||
|- | |||
| [[file:Study Notes.png|link=]] || Study Notes || 20 || Comum | |||
|- | |||
| [[Arquivo:Bag_of_Nightmare_Experience_Candy.png|link=]] || Bag Of Nightmare Experience Candy || 1 || Comum | |||
|- | |||
! colspan="4" | [[Arquivo:Exp_icon.png|30px|link=]] 100.000 de experiência para o jogador | |||
|- | |||
! colspan="4" | [[Arquivo:Exp_icon.png|30px|link=]] 300 de experiência para o aluno | |||
|- | |||
|} | |||

Tempo de conclusão: 15 minutos
Experiência obtida pelo aluno: 300
Experiência obtida pelo jogador: 100.000
Derrotar Pokémon: ![]()
Capturar Pokémon: ![]()
| Pokémon disponíveis | ||
|---|---|---|
| Bronzong | ||
| Bronzor | ||
| Shiny Bronzong | ||
![]() = Pokémon capturáveis
= Pokémon capturáveis
| Item | Quantidade | Raridade | |
|---|---|---|---|
| Study Notes | 20 | Comum | |
| Bag Of Nightmare Experience Candy | 1 | Comum | |

Tempo de conclusão: 15 minutos
Experiência obtida pelo aluno: 300
Experiência obtida pelo jogador: 100.000
Derrotar Pokémon: ![]()
Capturar Pokémon: ![]()


Alguns jogadores desatentos podem deixar passar despercebida a entrada para a área de gelo da dungeon.
| Pokémon disponíveis | ||
|---|---|---|
| Lapras | ||
| Tentacruel | ||
| Glalie | ||
| Sealeo | ||
| Delibird | ||
| Snorunt | ||
| Tentacool | ||
| Graveler | ||
| Geodude | ||
| Golbat | ||
| Zubat | ||
| Shiny | ||
|---|---|---|
| Shiny Tentacruel | ||
| Shiny Tentacool | ||
| Shiny Golbat | ||
| Shiny Zubat | ||
| Shiny Delibird | ||
![]() = Pokémon capturáveis
= Pokémon capturáveis
| Item | Quantidade | Raridade | |
|---|---|---|---|
| Study Notes | 20 | Comum | |
| Bag Of Nightmare Experience Candy | 1 | Comum | |
Tempo de conclusão: 15 minutos
Experiência obtida pelo aluno: 300
Experiência obtida pelo jogador: 100.000
Derrotar Pokémon: ![]()
Capturar Pokémon: ![]()
| Pokémon disponíveis | ||
|---|---|---|
| Froslass | ||
| Shiny | ||
|---|---|---|
| Shiny Froslass | ||
![]() = Pokémon capturáveis
= Pokémon capturáveis
| Item | Quantidade | Raridade | |
|---|---|---|---|
| Study Notes | 20 | Comum | |
| Bag Of Nightmare Experience Candy | 1 | Comum | |
| Ice Blocks | 20 | Raro | |
| Solid Ice Cubes | 100 | Raro | |
| Ice Orbs | 50 | Raro | |
| Dawn Stone | 1 | Épico | |
O jogador precisará clicar na parte roxa das árvores do caminho para derrotar as ![]() Vileplume.
Vileplume.
Ao derrotá-las, os cogumelos que obstruem o caminho são destruídos e o jogador pode prosseguir.

Além disso, as bombas hidráulicas desligam as fontes de água que impedirão a passagem do jogador ao decorrer da quest.
Ao final desse primeiro percurso, o jogador deverá entrar em um buraco com água emergindo.
Depois disso, o jogador deverá seguir o caminho, derrotando alguns ![]() Azumarill e ativando bombas hidráulicas que liberarão passagens para prosseguimento da quest.
Azumarill e ativando bombas hidráulicas que liberarão passagens para prosseguimento da quest.
Posteriormente, o jogador deverá entrar no próximo buraco e repetir o processo. Dessa vez, o jogador deverá apertar 3 bombas hidráulicas enquanto estiver debaixo dágua.
| Buraco | Bomba 1 | Bomba 2 |
|---|---|---|
 |
 |

|
| Escada | Bomba 3 |
|---|---|
 |
|
Depois disso, o jogador deverá entrar em mais um buraco, apertar uma bomba hidrálica submergida na direita e uma localizada no andar superior, acessível por uma escada à esquerda.
| Buraco | Bomba 1 | Bomba 2 |
|---|---|---|
 |
 |
|
O jogador deverá derrotar todas as Vileplume do andar superior. Depois disso, deverá descer e apertar todas as bombas hidráulicas do andar inferior.
| Botão 1 | Bomba 2 | Bomba 3 |
|---|---|---|
 |
 |
|
| Bomba 4 | Bomba 5 | Bomba 6 |
|---|---|---|
 |
 |
|
Ao completar a parte anterior, o jogador desligará as fontes e poderá prosseguir.
o jogador deverá entrar em um buraco, derrotar uma Azumarill, sair pelo outro, derrotar algumas Vileplume, e entrar no buraco a direita.
| Entrada | Saída |
|---|---|
 |
|
Ao entrar no buraco a direita, deverá apertar a bomba hidráulica pra iniciar a próxima parte.
| Buraco | Bomba |
|---|---|
 |
|
Ao entrar nesse último buraco, o jogador deverá apertar quatro bombas hidráulicas para prosseguir.
Importante: Cada bomba desses, permitirá que as Vileplume fiquem livres no andar superior. Caso queira ter uma experiência mais segura, o jogador poderá clicar em uma bomba hidráulica por vez e derrotar as Vileplume aos poucos.
| Bomba 1 | Bomba 2 | Bomba 3 |
|---|---|---|
 |
 |
|
| Escada | Bomba 4 |
|---|---|
 |
|
Subindo a escada, o jogador terá que derrotar diversas Vileplume.
Importante: Seguindo o esquema geral da parte 6, o jogador poderá entender quais fontes serão desligadas liberando as Vileplume.
Ao derrotar todos os Pokémon, o jogador deverá seguir o caminho a direita e procurar pelo NPC que deverá derrotar.
Karen utilizará os seguintes Pokémon:
| Karen |
|---|
Ao derrotar Karen, o jogador prosseguirá com a quest.
Lt. Surge estará dormindo. Será necessário interagir com ele para adentrar seu sonho.

Ao entrar na dungeon, o jogador controlará Surge, e deverá pisar nos SQMs brilhantes para prosseguir.

O jogador terá acesso a Pokémon específicos:
| Lt.Surge |
|---|
Ao final dessa primeira fase, o jogador passará por diversos tipos de fobia que habitam os sonhos do Tenente Surge.
Importante: O jogador deverá procurar os SQMs brilhantes pra passar por cada medo.
Em um ambiente que lembra um altar, o jogador precisará derrotar o Padre.
A Philophobia é o medo de se apaixonar.
| Boss | Saída |
|---|---|
 |
|
Nesse local, o jogador precisará enfrentar a fobia à aranhas, enfrentando Pokémon que assemelham à aracnídeos. O bosss dessa arena será a ![]() Shiny Ariados
Shiny Ariados
| Boss | Saída |
|---|---|
 |
|
A Botanophobia é o medo irracional de plantas. Neste momento o jogador enfrentará diversos Pokémon que se assemelham a plantas. Entre eles, o boss ![]() Shiny Tangrowth
Shiny Tangrowth
| Boss | Saída |
|---|---|
 |
|
Nessa arena, o jogador deverá enfrentar a fobia à cães. Para isso deverá derrotar Pokémon que se assemelham a animais caninos. O boss dessa arena será o ![]() Mega Houndoom
Mega Houndoom
| Boss | Saída |
|---|---|
 |
|
A Batrachophobia é o medo de anfíbios. Para enfrentar essa fobia, o jogador deverá derrotar Pokémon que se assemelham a Anfíbios. O boss dessa arena será o ![]() Shiny Politoed
Shiny Politoed
| Boss | Saída |
|---|---|
 |
|
Nessa arena que se assemelha a um quarto, o jogador deverá derrotar um espelho.
A Cacophobia é o medo de se tornar feio.
Observação: O espelho, como esperado, permanecerá imóvel e não causará dano ao jogador, portanto, é necessário apenas derrotá-lo.
| Boss | Saída |
|---|---|
 |
|
Nesse momento, o jogador deverá enfrentar o medo de palhaços.
Nessa arena, o jogador encontrará alguns palhaços de diferentes tipos de mecânicas. Será necessário derrotar apenas o palhaço maior (Coringa) que será o boss.
Importante: Deve-se tomar cuidado, pois alguns palhaços possuem a habilidade de pular no Pokémon do jogador.
Observação: Assim como o espelho da arena anterior, o boss permanecerá parado e não atacará o jogador.
| Boss | Saída |
|---|---|
 |
|
A Necrophobia é a fobia à qualquer coisa relacionada a morte.
Nessa arena, o jogador deverá derrotar alguns zumbis, que apenas atacarão o jogador corpo a corpo.
| Bosses | Saída |
|---|---|
 |
|
A Trypanophobia é o medo de agulhas. Para enfrentá-la, o jogador deverá derrotar o boss Shiny Qwilfish em uma arena repleta de espinhos no chão.
| Boss | Saída |
|---|---|
 |
|
Dicas: É possível se afastar do Shinny Qwilfish para se curar.
Conforme demonstrado na imagem abaixo, o jogador pode permanecer no mesmo SQM em que o Pokémon estiver. O local não possui espinho, e é seguro.
É importante tomar cuidado, pois, com o ataque "Lock on" do Shiny Magnezone, o Pokémon terá altas chance de desmaiar.
A Hippopotomonstrosesquipedaliophobia é a fobia à palavras longas. Nessa arena, o jogador deverá derrotar um livro que se encontrará no centro.
| Boss | Saída |
|---|---|
 |
|
A Pyrophobia é o medo de fogo. Para enfrentar essa fobia, o jogador deverá derrotar diversos Pokémon do tipo fogo. O boss desssa arena será o ![]() Shiny Magmar.
Shiny Magmar.
| Boss | Saída |
|---|---|
 |
|
O jogador deverá derrotar, nessa arena o medo de insetos. Para isso, o jogador deverá derrotar, dentre diversos Pokémon, o boss ![]() Vespiquen.
Vespiquen.
Importante: o boss Vespiquen ataca de longe.
| Boss | Saída |
|---|---|
 |
|
Phasmophobia é o medo de fantasmas. Para enfrentá-la, o jogador deverá derrotar Pokémon do tipo Fantasma. O boss dessa arena é o ![]() Shiny Gengar.
Shiny Gengar.
Importante: o boss Shiny Gengar ataca de longe e usa a habilidade Vanish frequentemente.
| Boss | Saída |
|---|---|
 |
|
Nessa arena, o jogador deverá derrotar a fobia a sangue. Para isso, deverá derrotar diversos Pokémon que se assemelham a morcegos.
O boss dessa arena será o ![]() Shiny Crobat.
Shiny Crobat.
Importante: Shiny Crobat ataca de longe.
| Boss | Saída |
|---|---|
 |
|
A Mysophobia é a fobia a germes. Nessa arena, o jogador deverá derrotar Pokémon que possuem relação a sujeira.
O boss dessa arena é o ![]() Shiny Garbodor.
Shiny Garbodor.
Importante: O boss Shiny Garbodor ataca de longe.
| Boss | Saída |
|---|---|
 |
|
A Nyctophobia é o medo de escuro. Impossibilitado de enxergar qualquer coisa, o jogador deverá derrotar algo que não consegue ver.
| Boss | Saída |
|---|---|
 |

|
A Oneirophobia é a fobia a coisas relacionadas aos sonhos. Para enfrentar essa fobia, o jogador deverá derrotar diversos ![]() Darkrai minions.
Darkrai minions.
O boss é um Darkrai minion mais forte.
| Boss | Saída |
|---|---|
 |

|
Para sair da dungeon, o jogador precisa subir a escada que se encontra ao final do percurso.
Tempo de conclusão: 15 minutos
Experiência obtida pelo aluno: 300
Experiência obtida pelo jogador: 100.000
Derrotar Pokémon: ![]()
Capturar Pokémon: ![]()
| Pokémon disponíveis | ||
|---|---|---|
| Bellsprout | ||
| Weepinbell | ||
| Lickitung | ||
| Krabby | ||
| Tauros | ||
| Cacnea | ||
| Cacturne | ||
| Mr.Mime | ||
| Wobbufet | ||
| Skiploom | ||
| Shiny | ||
|---|---|---|
| Shiny Mr.Mime | ||
| Shiny Tauros | ||
![]() = Pokémon capturáveis
= Pokémon capturáveis
| Item | Quantidade | Raridade | |
|---|---|---|---|
| Study Notes | 20 | Comum | |
| Bag Of Nightmare Experience Candy | 1 | Comum | |
Tempo de conclusão: 15 minutos
Experiência obtida pelo aluno: 300
Experiência obtida pelo jogador: 100.000
Derrotar Pokémon: ![]()
Capturar Pokémon: ![]()
| Pokémon disponíveis | ||
|---|---|---|
| Slowpoke | ||
| Slowbro | ||
| Slowking | ||
![]() = Pokémon capturáveis
= Pokémon capturáveis
| Item | Quantidade | Raridade | |
|---|---|---|---|
| Study Notes | 20 | Comum | |
| Bag Of Nightmare Experience Candy | 1 | Comum | |
Arquivo:Infestação de Voltorb card.png
Tempo de conclusão: 15 minutos
Experiência obtida pelo aluno: 300
Experiência obtida pelo jogador: 100.000
Derrotar Pokémon: ![]()
Capturar Pokémon: ![]()
| Pokémon disponíveis | ||
|---|---|---|
| Voltorb | ||
| Electrode | ||
| Shiny | ||
|---|---|---|
| Shiny Voltorb | ||
| Shiny Electrode | ||
![]() = Pokémon capturáveis
= Pokémon capturáveis
| Item | Quantidade | Raridade | |
|---|---|---|---|
| Study Notes | 20 | Comum | |
| Bag Of Nightmare Experience Candy | 1 | Comum | |
Tempo de conclusão: 15 minutos
Experiência obtida pelo aluno: 300
Experiência obtida pelo jogador: 100.000
Derrotar Pokémon: ![]()
Capturar Pokémon: ![]()

| Pokémon disponíveis | ||
|---|---|---|
| Seadra | ||
| Tentacool | ||
| Tentacruel | ||
| Shiny | ||
|---|---|---|
| Shiny Tentacool | ||
| Shiny Tentacruel | ||
![]() = Pokémon capturáveis
= Pokémon capturáveis
| Item | Quantidade | Raridade | |
|---|---|---|---|
| Study Notes | 20 | Comum | |
| Bag Of Nightmare Experience Candy | 1 | Comum | |
Tempo de conclusão: 15 minutos
Experiência obtida pelo aluno: 300
Experiência obtida pelo jogador: 100.000
Derrotar Pokémon: ![]()
Capturar Pokémon: ![]()
| Pokémon disponíveis | ||
|---|---|---|
| Mareep | ||
| Flaaffy | ||
| Pichu | ||
| Pikachu | ||
| Raichu | ||
| Ampharos | ||
| Shiny | ||
|---|---|---|
| Shiny Raichu | ||
| Shiny Ampharos | ||
![]() = Pokémon capturáveis
= Pokémon capturáveis
| Item | Quantidade | Raridade | |
|---|---|---|---|
| Study Notes | 20 | Comum | |
| Bag Of Nightmare Experience Candy | 1 | Comum | |
Tempo de conclusão: 15 minutos
Experiência obtida pelo aluno: 300
Experiência obtida pelo jogador: 100.000
Derrotar Pokémon: ![]()
Capturar Pokémon: ![]()
| Pokémon disponíveis | ||
|---|---|---|
| Dratini | ||
| Dragonair | ||
| Shiny | ||
|---|---|---|
| Shiny Dratini | ||
| Shiny Dragonair | ||
![]() = Pokémon capturáveis
= Pokémon capturáveis
| Item | Quantidade | Raridade | |
|---|---|---|---|
| Study Notes | 20 | Comum | |
| Bag Of Nightmare Experience Candy | 1 | Comum | |
Tempo de conclusão: 15 minutos
Experiência obtida pelo aluno: 300
Experiência obtida pelo jogador: 100.000
Derrotar Pokémon: ![]()
Capturar Pokémon: ![]()
| Pokémon disponíveis | ||
|---|---|---|
| Charizard | ||
| Shiny | ||
|---|---|---|
| Shiny Charizard | ||
![]() = Pokémon capturáveis
= Pokémon capturáveis
| Item | Quantidade | Raridade | |
|---|---|---|---|
| Study Notes | 20 | Comum | |
| Bag Of Nightmare Experience Candy | 1 | Comum | |
Tempo de conclusão: 15 minutos
Experiência obtida pelo aluno: 300
Experiência obtida pelo jogador: 100.000
Derrotar Pokémon: ![]()
Capturar Pokémon: ![]()
| Pokémon disponíveis | ||
|---|---|---|
| Seviper | ||
![]() = Pokémon capturáveis
= Pokémon capturáveis
| Item | Quantidade | Raridade | |
|---|---|---|---|
| Study Notes | 20 | Comum | |
| Bag Of Nightmare Experience Candy | 1 | Comum | |
Tempo de conclusão: 15 minutos
Experiência obtida pelo aluno: 300
Experiência obtida pelo jogador: 100.000
Derrotar Pokémon: ![]()
Capturar Pokémon: ![]()
| Pokémon disponíveis | ||
|---|---|---|
| Kabuto | ||
![]() = Pokémon capturáveis
= Pokémon capturáveis
| Item | Quantidade | Raridade | |
|---|---|---|---|
| Study Notes | 20 | Comum | |
| Bag Of Nightmare Experience Candy | 1 | Comum | |
Tempo de conclusão: 15 minutos
Experiência obtida pelo aluno: 300
Experiência obtida pelo jogador: 100.000
Derrotar Pokémon: ![]()
Capturar Pokémon: ![]()
| Pokémon disponíveis | ||
|---|---|---|
| Blitzle | ||
| Zebstrika | ||
![]() = Pokémon capturáveis
= Pokémon capturáveis
| Item | Quantidade | Raridade | |
|---|---|---|---|
| Study Notes | 20 | Comum | |
| Bag Of Nightmare Experience Candy | 1 | Comum | |

Tempo de conclusão: 15 minutos
Experiência obtida pelo aluno: 300
Experiência obtida pelo jogador: 100.000
Derrotar Pokémon: ![]()
Capturar Pokémon: ![]()
| Pokémon disponíveis | ||
|---|---|---|
| Yamask | ||
| Cofagrigus | ||
![]() = Pokémon capturáveis
= Pokémon capturáveis
| Item | Quantidade | Raridade | |
|---|---|---|---|
| Study Notes | 20 | Comum | |
| Bag Of Nightmare Experience Candy | 1 | Comum | |