|
|
Linha 1: |
Linha 1: |
| <center>[[Arquivo:Beds_OutDate.png|link=]]</center>
| | Bout |
| == Simple Bed ==
| |
| A Simple Bed, em conjunto ao "sistema de camas", permite que os treinadores possam simular uma noite de sono.
| |
|
| |
|
| Os jogadores poderão adquirir uma cama base e, então, montá-la com um conjunto temático (Toolkit) que escolher. Cada conjunto fornecerá um bônus diferente ao ser utilizado.
| | <center>[[Arquivo:Banner_ditto.jpg|link=Informações Ditto]]<br></center> |
|
| |
|
| <center> | | <!--T:1--> |
| {| class="wikitable bg-none border-0" width="20%" style="text-align:center;"
| |
| ! width="20%"| Cama Base (sem toolkit)
| |
| |-
| |
| | [[Arquivo:Simple Bed Vertical.png]]
| |
| |}
| |
| </center>
| |
|
| |
|
| == Bonus == | | === Ditto === <!--T:2--> |
|
| |
|
| <center>
| | '''Ditto''' é um Pokémon especial que não tem requerimento de level e que pode ser adquirido no '''[[Diamond Shop]]'''. A habilidade especial de Ditto é o Transform, que faz com que Ditto possa transformar-se em outro Pokémon, perdendo 25% da força original do Pokémon transformado. Para transformar o Ditto, você deve usar o botão '''Ordenar''' em outro Pokémon (o atalho para esse comando é o clique no Mouse Scroll). Caso queira reverter a transformação, use '''!revert'''. Para ver o tempo restante da transformação, você pode utilizar o comando '''!ditto''' '''(a transformação tem uma duração máxima de 6 horas).''' |
| {| class="wikitable bg-none border-0" width="80%" style="text-align:center;"
| |
| ! width="8%" | Toolkit
| |
| ! width="40%"| Descrição
| |
| ! width="20%"| Cama Montada
| |
| ! width="12%" | Tempo de Bonus
| |
| |-
| |
| | width="1%"| [[Arquivo:Bulbasaur Toolkit.png|link=]]<br> Bulbasaur Toolkit
| |
| | A cama temática do Bulbasaur fará com que o jogador receba um '''bônus de 8% de chance de captura'''.
| |
| | [[Arquivo:Bulbasaur Bed.png|link=]]
| |
| | 2 horas
| |
| |-
| |
| | width="1%"| [[Arquivo:Charmander Toolkit.png|link=]]<br> Charmander Toolkit
| |
| | A cama temática do Charmander fará com que o jogador receba um '''bônus de 12% de experiência'''.
| |
| |
| |
| [[Arquivo:Charmander Bed2.png|link=]]
| |
| | 2 horas
| |
| |-
| |
| | width="1%"| [[Arquivo:Squirtle Toolkit.png|link=]]<br> Squirtle Toolkit
| |
| | A cama temática do Squirtle fará com que o jogador receba um '''bônus de 8% de sorte ao sacar itens'''.
| |
| |
| |
| [[Arquivo:Squirtle Bed.png|link=]]
| |
| | 2 horas
| |
| |}
| |
| </center>
| |
|
| |
|
| Todos os bônus são acumulativos, podendo ser usados juntamente com elixirs, totems, Bônus do calendário e afins.
| | <center class="center-tab"><tabber> |
| </center> | | |-|Interface Padrão= |
| | | {| class="wikitable" |
| A cama tem 10 cargas de uso, ao utilizar pela décima vez, será necessário renovar o Toolkit
| | |- align="center" |
| | | |[[Arquivo:Ditto_Copy_Padrão.gif|link=]] |
| '''Nota:''' Caso a cama seja desmontada com um [[Arquivo:Package Kit2.png|link=]] Package Kit, o Toolkit será removido da cama, e ao montar ela voltará a ser a cama base (Simple Bed).
| |
| | |
| == Usando a Simple Bed == | |
| | |
| Após utilizar a cama, ela ficará desarrumada por '''8 horas'''. Após o periódo de 8 horas, é possível que outro jogador utilize a cama, porém tempo para o mesmo jogador utilizar a cama novamente é de '''20 horas'''.
| |
| | |
| 10:37 Restam 3 usos antes que sua cama precise de conserto.
| |
| | |
| Agora as camas têm reset individual no Server Save diário.
| |
| | |
| <center>
| |
| {| class="wikitable bg-none border-0" width="40%" style="text-align:center;" | |
| ! width="40%"| Camas Desarrumadas
| |
| |-
| |
| | [[Arquivo:Used Charmander Bed.png|link=]][[Arquivo:Used Bulbasaur Bed.png|link=]][[Arquivo:Used Squirtle Bed.png|link=]] | |
| |} | | |} |
| </center>
| | |-|Interface Legado= |
| | | {| class="wikitable" |
| <center>
| | |- align="center" |
| {| class="wikitable bg-none border-0" width="40%" style="text-align:center;"
| | |[[Arquivo:Ditto_Copy_Legado.gif|link=]] |
| ! width="40%"| Cama Expirada
| |
| |-
| |
| |[[Arquivo:Expired bed.png|link=]]
| |
| |}
| |
| </center>
| |
| | |
| <table class="seeMore">
| |
| <tr>
| |
| <td class="seeMore__image">[[Arquivo:Telekinetic-compass.gif|link=]]</td>
| |
| <td> '''Veja mais: [[Craft Profissões - Estilista]]'''</td>
| |
| </tr>
| |
| </table>
| |
| | |
| <!--cama; simple bed-->
| |
| | |
| =Acampamento Crystal Lake=
| |
| =='''Informações Básicas'''==
| |
| | |
| *'''Modalidade:''' Solo <br />
| |
| *'''Nivel necessário:''' 80 (Fácil), 200 (Normal) e 350 (Difícil). <br />
| |
| *'''Elemento:''' [[Arquivo:NeutralICON.png|Neutro|20px|link=Clãs]] Neutro
| |
| *'''Tempo limite:''' 5 minutos. <br />
| |
| *'''PokéView: [[Arquivo:semvip.png|link=]] ''' <br>
| |
| *'''Quantidade de Inimigos: 1.'''
| |
| <center>
| |
| {| class="wikitable" width="55%" | |
| |+ align="center" | Limitações e Bloqueios
| |
| |- | |
| ! width="1%" style="background-color: #4682B4" | Poções
| |
| ! width="1%" style="background-color: #4682B4" | Elixir
| |
| ! width="1%" style="background-color: #4682B4" | Penalidade por morte
| |
| ! width="1%" style="background-color: #4682B4" | Revive
| |
| ! width="1%" style="background-color: #4682B4" | Medicine
| |
| ! width="1%" style="background-color: #4682B4" | Berries
| |
| |-
| |
| | align="center" | [[Arquivo:comvip.png|link=]]
| |
| | align="center" | [[Arquivo:semvip.png|link=]]
| |
| | align="center" | [[Arquivo:semvip.png|link=]]
| |
| | align="center" | Ilimitado
| |
| | align="center" | [[Arquivo:semvip.png|link=]]
| |
| | align="center" | [[Arquivo:semvip.png|link=]]
| |
| |-
| |
| |} | | |} |
| | </tabber></center> |
|
| |
|
| </center>
| | '''Observação''': O jogador precisa ter o level '''igual ou superior''' ao Pokémon que ele deseja copiar. Por exemplo; para copiar um Spearow, o jogador precisar ser no mínimo level 10. |
|
| |
|
| == Localização ==
| |
|
| |
|
| Essa dungeon fica localizada próxima ao Pântano de Cerulean (Cerulean Swamp). <br>
| | ---- |
|
| |
|
| <center>
| | === Shiny Ditto === <!--T:8--> |
| {| border="1" style="text-align: center; border-collapse: collapse"
| |
| | width="100%" | [[Arquivo:Loc Acampamento Crystal Lake2.png|link=]]
| |
| |-
| |
| |}
| |
| </center>
| |
|
| |
|
| == Funcionamento==
| | <!--T:9--> |
| | O Shiny Ditto possui a mesma mecânica do Ditto comum, porém com status melhores. A redução da força do Pokémon original é de 15% (cada shiny tem uma porcentagem diferente) e o tempo de transformação é maior. Além disso, ele pode transformar-se em Pokémon shiny e é capaz de utilizar o item '''Shiny Ditto Memory'''. |
| | Ele também pode ser adquirido no '''[[Diamond Shop]]'''. Além dos diamonds, é necessário um Ditto comum +50, o qual se transformará em um [[Shiny Ditto]]. <br> |
|
| |
|
| O Jogador devera derrotar o boss '''Jason Voorhees'''. <br>
| | '''Observação:''' Ao transformar Ditto em Shiny Ditto o Pokémon não perderá seus Held Items. <br > |
|
| |
| Além do tradicional ataque básico, o Boss conta com 2 tipos de habilidades que atingirão diretamente na vida do jogador, tendo ou não um Pokémon em batalha. Ambas as habilidades podem ser evitadas se o jogador desviar no tempo correto.
| |
|
| |
|
| <center><tabber>
| | Para ver o tempo restante da transformação, você pode utilizar o comando '''!ditto (a transformação tem uma duração máxima de 12 horas).''' |
| |-|Arremesso de faca=
| |
|
| |
|
| {| style="text-align: center;"
| | '''Observações:'''<br> |
| |+ align="center" | Jason Voorhees arremessará uma faca contra jogador causando dano à distância.
| | *A '''%''' exata de força que o Shiny Ditto perde ao transformar-se não é divulgada.<br> |
| | width="100%" | [[Arquivo:Jason Habilidade 1.gif|link=]]
| | *Igual o '''[[Ditto]]''', o jogador também precisa ter o level '''igual ou superior''' ao Pokémon que ele deseja copiar no Shiny Ditto.</p> |
| |}
| | *Sabe-se que terá força consideravelmente reduzida ao copiar Pokémon T1B ou T1A. |
| <br> | |
| |-|Ataque Frontal=
| |
|
| |
|
| {| style="text-align: center;"
| |
| |+ align="center" | Jason Voorhees fará um ataque frontal que acerta tanto o Pokémon quanto o personagem.
| |
| |+ align="center" | '''Observação:''' Caso acerte o Pokémon ou o jogador, causa dano diretamente na vida do jogador.
| |
| | width="100%" | [[Arquivo:Jason Habilidade 2.gif|link=]]
| |
| |-
| |
| |}
| |
| </center></tabber>
| |
|
| |
| == Boss ==
| |
|
| |
| Ao entrar na dungeon, o Boss '''Jason Voorhees''' estará no local indicado.
| |
| <center> | | <center> |
| {| border="1" style="text-align: center; border-collapse: collapse"
| | {| class="wikitable" |
| | width="100%" | [[Arquivo:Boss map Acampamento Crystal Lake2.png|link=]]
| | |- align="center" |
| |-
| | |[[Arquivo:Shiny_Ditto_Copy.gif|link=]] |
| |}
| |
| </center>
| |
| | |
| ==Recompensas==
| |
| <center class="center-tab"><tabber>
| |
| |-|Fácil=
| |
| <center>
| |
| {| class="wikitable" width="25%"
| |
| |-
| |
| ! colspan="2" | Item
| |
| ! Raridade
| |
| |-
| |
| | align="center" | [[Arquivo:Halloween Token 2020.png|link=]]
| |
| |align="left" style="border-left-style: hidden; | 20 Halloween Token
| |
| | align="center" |Comum
| |
| |-
| |
| | align="center" | [[Arquivo:Halloween dimensional key.png|link=]]
| |
| |align="left" style="border-left-style: hidden; | Halloween Dimensional Key
| |
| | align="center" |Comum
| |
| |-
| |
| | align="center" | [[Arquivo:Jason Voorhees Hangable Mask.png|link=]]
| |
| |align="left" style="border-left-style: hidden; | Jason Voorhees Hangable Mask
| |
| |align="center" | Épico
| |
| |-
| |
| | align="center" | [[Arquivo:Bloody Machete.png|link=]]
| |
| |align="left" style="border-left-style: hidden; | Bloody Machete
| |
| |align="center" | Épico
| |
| |-
| |
| | align="center" | [[Arquivo:Pig Hangable Mask.png|link=]]
| |
| |align="left" style="border-left-style: hidden; | Pig Hangable Mask
| |
| |align="center" | Épico
| |
| |-
| |
| | align="center" | [[Arquivo:Onryo Hangable Mask.png|link=]]
| |
| |align="left" style="border-left-style: hidden; | Onryo Hangable Mask
| |
| |align="center" | Épico
| |
| |-
| |
| | align="center" | [[Arquivo:Huntress Hangable Mask.png|link=]]
| |
| |align="left" style="border-left-style: hidden; | Huntress Hangable Mask
| |
| |align="center" | Épico
| |
| |-
| |
| | align="center" | [[Arquivo:Billy Hangable Mask.png|link=]]
| |
| |align="left" style="border-left-style: hidden; | Billy Hangable Mask
| |
| |align="center" | Épico
| |
| |-
| |
| | align="center" | [[Arquivo:Shiny-gengar-locker.png|70px|link=]]
| |
| |align="left" style="border-left-style: hidden; | Shiny Gengar Locker
| |
| |align="center" | Lendário
| |
| |-
| |
| ! colspan="3" | [[Arquivo:Exp_icon.png|30px|link=]] Experiência: 100.000
| |
| |}
| |
| </center>
| |
| |-|Normal=
| |
| <center>
| |
| {| class="wikitable" width="25%"
| |
| |-
| |
| ! colspan="2" | Item
| |
| ! Raridade
| |
| |-
| |
| | align="center" | [[Arquivo:Halloween Token 2020.png|link=]]
| |
| |align="left" style="border-left-style: hidden; | 30 Halloween Token
| |
| | align="center" |Comum
| |
| |-
| |
| | align="center" | [[Arquivo:Halloween dimensional key.png|link=]]
| |
| |align="left" style="border-left-style: hidden; | Halloween Dimensional Key
| |
| | align="center" |Comum
| |
| |-
| |
| | align="center" | [[Arquivo:Jason Voorhees Hangable Mask.png|link=]]
| |
| |align="left" style="border-left-style: hidden; | Jason Voorhees Hangable Mask
| |
| |align="center" | Épico
| |
| |-
| |
| | align="center" | [[Arquivo:Bloody Machete.png|link=]]
| |
| |align="left" style="border-left-style: hidden; | Bloody Machete
| |
| |align="center" | Épico
| |
| |-
| |
| | align="center" | [[Arquivo:Pig Hangable Mask.png|link=]]
| |
| |align="left" style="border-left-style: hidden; | Pig Hangable Mask
| |
| |align="center" | Épico
| |
| |-
| |
| | align="center" | [[Arquivo:Onryo Hangable Mask.png|link=]]
| |
| |align="left" style="border-left-style: hidden; | Onryo Hangable Mask
| |
| |align="center" | Épico
| |
| |-
| |
| | align="center" | [[Arquivo:Huntress Hangable Mask.png|link=]]
| |
| |align="left" style="border-left-style: hidden; | Huntress Hangable Mask
| |
| |align="center" | Épico
| |
| |-
| |
| | align="center" | [[Arquivo:Billy Hangable Mask.png|link=]]
| |
| |align="left" style="border-left-style: hidden; | Billy Hangable Mask
| |
| |align="center" | Épico
| |
| |-
| |
| | align="center" | [[Arquivo:Shiny-gengar-locker.png|70px|link=]]
| |
| |align="left" style="border-left-style: hidden; | Shiny Gengar Locker
| |
| |align="center" | Lendário
| |
| |-
| |
| ! colspan="3" | [[Arquivo:Exp_icon.png|30px|link=]] Experiência: 150.000
| |
| |}
| |
| </center>
| |
| |-|Dificil=
| |
| <center>
| |
| {| class="wikitable" width="25%"
| |
| |-
| |
| ! colspan="2" | Item
| |
| ! Raridade
| |
| |-
| |
| | align="center" | [[Arquivo:Halloween Token 2020.png|link=]]
| |
| |align="left" style="border-left-style: hidden; | 40 Halloween Token
| |
| | align="center" |Comum
| |
| |-
| |
| | align="center" | [[Arquivo:Halloween dimensional key.png|link=]]
| |
| |align="left" style="border-left-style: hidden; | Halloween Dimensional Key
| |
| | align="center" |Comum
| |
| |-
| |
| | align="center" | [[Arquivo:Jason Voorhees Hangable Mask.png|link=]]
| |
| |align="left" style="border-left-style: hidden; | Jason Voorhees Hangable Mask
| |
| |align="center" | Épico
| |
| |-
| |
| | align="center" | [[Arquivo:Bloody Machete.png|link=]]
| |
| |align="left" style="border-left-style: hidden; | Bloody Machete
| |
| |align="center" | Épico
| |
| |-
| |
| | align="center" | [[Arquivo:Pig Hangable Mask.png|link=]]
| |
| |align="left" style="border-left-style: hidden; | Pig Hangable Mask
| |
| |align="center" | Épico
| |
| |-
| |
| | align="center" | [[Arquivo:Onryo Hangable Mask.png|link=]]
| |
| |align="left" style="border-left-style: hidden; | Onryo Hangable Mask
| |
| |align="center" | Épico
| |
| |-
| |
| | align="center" | [[Arquivo:Huntress Hangable Mask.png|link=]]
| |
| |align="left" style="border-left-style: hidden; | Huntress Hangable Mask
| |
| |align="center" | Épico
| |
| |-
| |
| | align="center" | [[Arquivo:Billy Hangable Mask.png|link=]]
| |
| |align="left" style="border-left-style: hidden; | Billy Hangable Mask
| |
| |align="center" | Épico
| |
| |-
| |
| | align="center" | [[Arquivo:Shiny-gengar-locker.png|70px|link=]]
| |
| |align="left" style="border-left-style: hidden; | Shiny Gengar Locker
| |
| |align="center" | Lendário
| |
| |-
| |
| ! colspan="3" | [[Arquivo:Exp_icon.png|30px|link=]] Experiência: 200.000
| |
| |}
| |
| </tabber>
| |
| </center>
| |
| | |
| =Cemitério Assombrado de Pewter=
| |
| =='''Informações Básicas'''==
| |
| | |
| *'''Modalidade:''' Solo <br />
| |
| *'''Nivel necessário:''' 80 (Fácil), 200 (Normal) e 350 (Difícil). <br />
| |
| *'''Elemento:''' [[Arquivo:NeutralICON.png|Neutro|20px|link=Clãs]] Neutro
| |
| *'''Tempo limite:''' 30 minutos. <br />
| |
| *'''PokéView: [[Arquivo:semvip.png|link=]] ''' <br>
| |
| *'''Quantidade de Inimigos:''' 29.
| |
| <center>
| |
| {| class="wikitable" width="55%" | |
| |+ align="center" | Limitações e Bloqueios
| |
| |-
| |
| ! width="1%" style="background-color: #4682B4" | Poções
| |
| ! width="1%" style="background-color: #4682B4" | Elixir
| |
| ! width="1%" style="background-color: #4682B4" | Penalidade por morte
| |
| ! width="1%" style="background-color: #4682B4" | Revive
| |
| ! width="1%" style="background-color: #4682B4" | Medicine
| |
| ! width="1%" style="background-color: #4682B4" | Berries
| |
| |-
| |
| | align="center" | [[Arquivo:comvip.png|link=]]
| |
| | align="center" | [[Arquivo:semvip.png|link=]]
| |
| | align="center" | [[Arquivo:semvip.png|link=]]
| |
| | align="center" | 9 Revives
| |
| | align="center" | [[Arquivo:comvip.png|link=]]
| |
| | align="center" | [[Arquivo:semvip.png|link=]]
| |
| |-
| |
| |} | | |} |
| </center> | | </center> |
|
| |
|
| == Localização ==
| |
|
| |
| Essa dungeon fica localizada próximo ao Cemetério de Pewter <br>
| |
|
| |
| <center>
| |
| {| border="1" style="text-align: center; border-collapse: collapse"
| |
| | width="100%" | [[Arquivo:Loc Cemiterio Assombrado Pewter.png|link=]]
| |
| |-
| |
| |}
| |
| </center>
| |
|
| |
| == Funcionamento==
| |
|
| |
| O Jogador devera derrotar todos os Pokémon e o Boss Final que é um '''Dusknoir'''. <br>
| |
|
| |
| Em seu primeiro andar é necessário derrotar 8 Pokémon e descer para o andar inferior.
| |
|
| |
| <center>
| |
| {| border="1" style="text-align: center; border-collapse: collapse"
| |
| |+ align="center" | Entrada para o andar inferior
| |
| | width="100%" | [[Arquivo:Descer Cemiterio Assombrado Pewter.png|link=]]
| |
| |-
| |
| |}
| |
| </center>
| |
|
| |
| == Boss ==
| |
|
| |
| O Boss '''Dusknoir''' se encontra no final do 2 andar, no local marcado.
| |
|
| |
| '''Nota:''' O Boss conta como um dos 29 Pokémon da Dungeon, não sendo necessário derrotar todos os Pokémon antes de enfrentar o Boss.
| |
| <center>
| |
| {| border="1" style="text-align: center; border-collapse: collapse"
| |
| | width="100%" | [[Arquivo:Boss map Cemiterio Assombrado Pewter.png|link=]]
| |
| |-
| |
| |}
| |
| </center>
| |
| ==Recompensas==
| |
| <center class="center-tab"><tabber>
| |
| |-|Fácil=
| |
| <center>
| |
| {| class="wikitable" width="25%"
| |
| |-
| |
| ! colspan="2" | Item
| |
| ! Raridade
| |
| |-
| |
| | align="center" | [[Arquivo:Halloween Token 2020.png|link=]]
| |
| |align="left" style="border-left-style: hidden; | 20 Halloween Token
| |
| | align="center" |Comum
| |
| |-
| |
| | align="center" | [[Arquivo:Halloween dimensional key.png|link=]]
| |
| |align="left" style="border-left-style: hidden; | Halloween Dimensional Key
| |
| | align="center" |Comum
| |
| |-
| |
| | align="center" | [[Arquivo:Shiny Gengar Emote Toy.png|link=]]
| |
| |align="left" style="border-left-style: hidden; | Shiny Gengar Emote Toy
| |
| |align="center" | Épico
| |
| |-
| |
| | align="center" | [[Arquivo:Mismagius Emote Toy.png|link=]]
| |
| |align="left" style="border-left-style: hidden; | Mismagius Emote Toy
| |
| |align="center" | Épico
| |
| |-
| |
| | align="center" | [[Arquivo:Gengar Emote Toy.png|link=]]
| |
| |align="left" style="border-left-style: hidden; | Gengar Emote Toy
| |
| |align="center" | Épico
| |
| |-
| |
| | align="center" | [[Arquivo:Sableye Emote Toy.png|link=]]
| |
| |align="left" style="border-left-style: hidden; | Sableye Emote Toy
| |
| |align="center" | Épico
| |
| |-
| |
| | align="center" | [[Arquivo:Shiny-gengar-locker.png|70px|link=]]
| |
| |align="left" style="border-left-style: hidden; | Shiny Gengar Locker
| |
| |align="center" | Lendário
| |
| |-
| |
| | align="center" | [[Arquivo:gengar-locker.png|70px|link=]]
| |
| |align="left" style="border-left-style: hidden; | Gengar Locker
| |
| |align="center" | Lendário
| |
| |-
| |
| ! colspan="3" | [[Arquivo:Exp_icon.png|30px|link=]] Experiência: 100.000
| |
| |}
| |
| </center>
| |
| |-|Normal=
| |
| <center>
| |
| {| class="wikitable" width="25%"
| |
| |-
| |
| ! colspan="2" | Item
| |
| ! Raridade
| |
| |-
| |
| | align="center" | [[Arquivo:Halloween Token 2020.png|link=]]
| |
| |align="left" style="border-left-style: hidden; | 30 Halloween Token
| |
| | align="center" |Comum
| |
| |-
| |
| | align="center" | [[Arquivo:Halloween dimensional key.png|link=]]
| |
| |align="left" style="border-left-style: hidden; | Halloween Dimensional Key
| |
| | align="center" |Comum
| |
| |-
| |
| | align="center" | [[Arquivo:Shiny Gengar Emote Toy.png|link=]]
| |
| |align="left" style="border-left-style: hidden; | Shiny Gengar Emote Toy
| |
| |align="center" | Épico
| |
| |-
| |
| | align="center" | [[Arquivo:Mismagius Emote Toy.png|link=]]
| |
| |align="left" style="border-left-style: hidden; | Mismagius Emote Toy
| |
| |align="center" | Épico
| |
| |-
| |
| | align="center" | [[Arquivo:Gengar Emote Toy.png|link=]]
| |
| |align="left" style="border-left-style: hidden; | Gengar Emote Toy
| |
| |align="center" | Épico
| |
| |-
| |
| | align="center" | [[Arquivo:Sableye Emote Toy.png|link=]]
| |
| |align="left" style="border-left-style: hidden; | Sableye Emote Toy
| |
| |align="center" | Épico
| |
| |-
| |
| | align="center" | [[Arquivo:Shiny-gengar-locker.png|70px|link=]]
| |
| |align="left" style="border-left-style: hidden; | Shiny Gengar Locker
| |
| |align="center" | Lendário
| |
| |-
| |
| | align="center" | [[Arquivo:gengar-locker.png|70px|link=]]
| |
| |align="left" style="border-left-style: hidden; | Gengar Locker
| |
| |align="center" | Lendário
| |
| |-
| |
| ! colspan="3" | [[Arquivo:Exp_icon.png|30px|link=]] Experiência: 150.000
| |
| |}
| |
| </center>
| |
| |-|Dificil=
| |
| <center>
| |
| {| class="wikitable" width="25%"
| |
| |-
| |
| ! colspan="2" | Item
| |
| ! Raridade
| |
| |-
| |
| | align="center" | [[Arquivo:Halloween Token 2020.png|link=]]
| |
| |align="left" style="border-left-style: hidden; | 40 Halloween Token
| |
| | align="center" |Comum
| |
| |-
| |
| | align="center" | [[Arquivo:Halloween dimensional key.png|link=]]
| |
| |align="left" style="border-left-style: hidden; | Halloween Dimensional Key
| |
| | align="center" |Comum
| |
| |-
| |
| | align="center" | [[Arquivo:Shiny Gengar Emote Toy.png|link=]]
| |
| |align="left" style="border-left-style: hidden; | Shiny Gengar Emote Toy
| |
| |align="center" | Épico
| |
| |-
| |
| | align="center" | [[Arquivo:Mismagius Emote Toy.png|link=]]
| |
| |align="left" style="border-left-style: hidden; | Mismagius Emote Toy
| |
| |align="center" | Épico
| |
| |-
| |
| | align="center" | [[Arquivo:Gengar Emote Toy.png|link=]]
| |
| |align="left" style="border-left-style: hidden; | Gengar Emote Toy
| |
| |align="center" | Épico
| |
| |-
| |
| | align="center" | [[Arquivo:Sableye Emote Toy.png|link=]]
| |
| |align="left" style="border-left-style: hidden; | Sableye Emote Toy
| |
| |align="center" | Épico
| |
| |-
| |
| | align="center" | [[Arquivo:Shiny-gengar-locker.png|70px|link=]]
| |
| |align="left" style="border-left-style: hidden; | Shiny Gengar Locker
| |
| |align="center" | Lendário
| |
| |-
| |
| | align="center" | [[Arquivo:gengar-locker.png|70px|link=]]
| |
| |align="left" style="border-left-style: hidden; | Gengar Locker
| |
| |align="center" | Lendário
| |
| |-
| |
| ! colspan="3" | [[Arquivo:Exp_icon.png|30px|link=]] Experiência: 200.000
| |
| |}
| |
| </tabber>
| |
| </center>
| |
|
| |
| =Uma Noite De Crime=
| |
| =='''Informações Básicas'''==
| |
|
| |
| *'''Modalidade:''' Solo <br />
| |
| *'''Nivel necessário:''' 80 (Fácil), 200 (Normal) e 350 (Difícil). <br />
| |
| *'''Elemento:''' [[Arquivo:NeutralICON.png|Neutro|20px|link=Clãs]] Neutro
| |
| *'''Tempo limite:''' 30 minutos. <br />
| |
| *'''PokéView: [[Arquivo:semvip.png|link=]] ''' <br>
| |
| *'''Quantidade de Inimigos:''' 42.
| |
| <center>
| |
| {| class="wikitable" width="55%"
| |
| |+ align="center" | Limitações e Bloqueios
| |
| |-
| |
| ! width="1%" style="background-color: #4682B4" | Poções
| |
| ! width="1%" style="background-color: #4682B4" | Elixir
| |
| ! width="1%" style="background-color: #4682B4" | Penalidade por morte
| |
| ! width="1%" style="background-color: #4682B4" | Revive
| |
| ! width="1%" style="background-color: #4682B4" | Medicine
| |
| ! width="1%" style="background-color: #4682B4" | Berries
| |
| |-
| |
| | align="center" | [[Arquivo:comvip.png|link=]]
| |
| | align="center" | [[Arquivo:semvip.png|link=]]
| |
| | align="center" | [[Arquivo:semvip.png|link=]]
| |
| | align="center" | 10 Revives
| |
| | align="center" | [[Arquivo:comvip.png|link=]]
| |
| | align="center" | [[Arquivo:semvip.png|link=]]
| |
| |-
| |
| |}
| |
| </center>
| |
|
| |
| == Localização ==
| |
|
| |
| Essa dungeon fica localizada em Celadon ao norte do Centro Pokémon
| |
|
| |
| <center>
| |
| {| border="1" style="text-align: center; border-collapse: collapse"
| |
| | width="100%" | [[Arquivo:Loc Uma Noite De Crime.png|link=]]
| |
| |-
| |
| |}
| |
| </center>
| |
|
| |
| == Funcionamento==
| |
|
| |
| O Jogador devera derrotar todos os inimigos presentes na Dungeon.
| |
|
| |
| <center>
| |
| {| border="1" style="text-align: center; border-collapse: collapse"
| |
| |+ align="center" | Caminho da Dungeon
| |
| | width="100%" | [[Arquivo:Map Uma Noite De Crime.png|link=]]
| |
| |-
| |
| |}
| |
| </center>
| |
|
| |
| == Inimigos ==
| |
|
| |
| Dentro dessa Dungeon Será possível encontrar os inimigos '''Vandal''' e '''Elite Vandal'''
| |
|
| |
| <center>
| |
| {| border="1" style="text-align: center; border-collapse: collapse"
| |
| |+ align="center" | '''Nota:''' Não é possível causar nenhum status negativo contra o inimigo '''Elite Vandal'''.
| |
| | width="100%" | [[Arquivo:Elite Vandal Uma Noite De Crime.png|link=]]
| |
| |-
| |
| |}
| |
| </center>
| |
| ==Recompensas==
| |
| <center class="center-tab"><tabber>
| |
| |-|Fácil=
| |
| <center>
| |
| {| class="wikitable" width="25%"
| |
| |-
| |
| ! colspan="2" | Item
| |
| ! Raridade
| |
| |-
| |
| | align="center" | [[Arquivo:Halloween Token 2020.png|link=]]
| |
| |align="left" style="border-left-style: hidden; | 20 Halloween Token
| |
| | align="center" |Comum
| |
| |-
| |
| | align="center" | [[Arquivo:Halloween dimensional key.png|link=]]
| |
| |align="left" style="border-left-style: hidden; | Halloween Dimensional Key
| |
| | align="center" |Comum
| |
| |-
| |
| | align="center" | [[Arquivo:Leader Hangable Mask.png|link=]]
| |
| |align="left" style="border-left-style: hidden; | Jason Voorhees Hangable Mask
| |
| |align="center" | Épico
| |
| |-
| |
| | align="center" | [[Arquivo:Pig Hangable Mask.png|link=]]
| |
| |align="left" style="border-left-style: hidden; | Pig Hangable Mask
| |
| |align="center" | Épico
| |
| |-
| |
| | align="center" | [[Arquivo:Onryo Hangable Mask.png|link=]]
| |
| |align="left" style="border-left-style: hidden; | Onryo Hangable Mask
| |
| |align="center" | Épico
| |
| |-
| |
| | align="center" | [[Arquivo:Huntress Hangable Mask.png|link=]]
| |
| |align="left" style="border-left-style: hidden; | Huntress Hangable Mask
| |
| |align="center" | Épico
| |
| |-
| |
| | align="center" | [[Arquivo:Billy Hangable Mask.png|link=]]
| |
| |align="left" style="border-left-style: hidden; | Billy Hangable Mask
| |
| |align="center" | Épico
| |
| |-
| |
| | align="center" | [[Arquivo:Shiny-gengar-locker.png|70px|link=]]
| |
| |align="left" style="border-left-style: hidden; | Shiny Gengar Locker
| |
| |align="center" | Lendário
| |
| |-
| |
| ! colspan="3" | [[Arquivo:Exp_icon.png|30px|link=]] Experiência: 100.000
| |
| |}
| |
| </center>
| |
| |-|Normal=
| |
| <center>
| |
| {| class="wikitable" width="25%"
| |
| |-
| |
| ! colspan="2" | Item
| |
| ! Raridade
| |
| |-
| |
| | align="center" | [[Arquivo:Halloween Token 2020.png|link=]]
| |
| |align="left" style="border-left-style: hidden; | 30 Halloween Token
| |
| | align="center" |Comum
| |
| |-
| |
| | align="center" | [[Arquivo:Halloween dimensional key.png|link=]]
| |
| |align="left" style="border-left-style: hidden; | Halloween Dimensional Key
| |
| | align="center" |Comum
| |
| |-
| |
| | align="center" | [[Arquivo:Leader Hangable Mask.png|link=]]
| |
| |align="left" style="border-left-style: hidden; | Jason Voorhees Hangable Mask
| |
| |align="center" | Épico
| |
| |-
| |
| | align="center" | [[Arquivo:Pig Hangable Mask.png|link=]]
| |
| |align="left" style="border-left-style: hidden; | Pig Hangable Mask
| |
| |align="center" | Épico
| |
| |-
| |
| | align="center" | [[Arquivo:Onryo Hangable Mask.png|link=]]
| |
| |align="left" style="border-left-style: hidden; | Onryo Hangable Mask
| |
| |align="center" | Épico
| |
| |-
| |
| | align="center" | [[Arquivo:Huntress Hangable Mask.png|link=]]
| |
| |align="left" style="border-left-style: hidden; | Huntress Hangable Mask
| |
| |align="center" | Épico
| |
| |-
| |
| | align="center" | [[Arquivo:Billy Hangable Mask.png|link=]]
| |
| |align="left" style="border-left-style: hidden; | Billy Hangable Mask
| |
| |align="center" | Épico
| |
| |-
| |
| | align="center" | [[Arquivo:Shiny-gengar-locker.png|70px|link=]]
| |
| |align="left" style="border-left-style: hidden; | Shiny Gengar Locker
| |
| |align="center" | Lendário
| |
| |-
| |
| ! colspan="3" | [[Arquivo:Exp_icon.png|30px|link=]] Experiência: 150.000
| |
| |}
| |
| </center>
| |
| |-|Dificil=
| |
| <center>
| |
| {| class="wikitable" width="25%"
| |
| |-
| |
| ! colspan="2" | Item
| |
| ! Raridade
| |
| |-
| |
| | align="center" | [[Arquivo:Halloween Token 2020.png|link=]]
| |
| |align="left" style="border-left-style: hidden; | 40 Halloween Token
| |
| | align="center" |Comum
| |
| |-
| |
| | align="center" | [[Arquivo:Halloween dimensional key.png|link=]]
| |
| |align="left" style="border-left-style: hidden; | Halloween Dimensional Key
| |
| | align="center" |Comum
| |
| |-
| |
| | align="center" | [[Arquivo:Leader Hangable Mask.png|link=]]
| |
| |align="left" style="border-left-style: hidden; | Jason Voorhees Hangable Mask
| |
| |align="center" | Épico
| |
| |-
| |
| | align="center" | [[Arquivo:Pig Hangable Mask.png|link=]]
| |
| |align="left" style="border-left-style: hidden; | Pig Hangable Mask
| |
| |align="center" | Épico
| |
| |-
| |
| | align="center" | [[Arquivo:Onryo Hangable Mask.png|link=]]
| |
| |align="left" style="border-left-style: hidden; | Onryo Hangable Mask
| |
| |align="center" | Épico
| |
| |-
| |
| | align="center" | [[Arquivo:Huntress Hangable Mask.png|link=]]
| |
| |align="left" style="border-left-style: hidden; | Huntress Hangable Mask
| |
| |align="center" | Épico
| |
| |-
| |
| | align="center" | [[Arquivo:Billy Hangable Mask.png|link=]]
| |
| |align="left" style="border-left-style: hidden; | Billy Hangable Mask
| |
| |align="center" | Épico
| |
| |-
| |
| | align="center" | [[Arquivo:Shiny-gengar-locker.png|70px|link=]]
| |
| |align="left" style="border-left-style: hidden; | Shiny Gengar Locker
| |
| |align="center" | Lendário
| |
| |-
| |
| ! colspan="3" | [[Arquivo:Exp_icon.png|30px|link=]] Experiência: 200.000
| |
| |}
| |
| </tabber>
| |
| </center>
| |
|
| |
|
| =Labirinto em Woodsboro=
| | ---- |
| =='''Informações Básicas'''==
| |
|
| |
|
| *'''Modalidade:''' Solo <br />
| | === Shiny Ditto Memory === <!--T:13--> |
| *'''Nivel necessário:''' 80 (Fácil), 200 (Normal) e 350 (Difícil). <br />
| |
| *'''Elemento:''' [[Arquivo:NeutralICON.png|Neutro|20px|link=Clãs]] Neutro
| |
| *'''Tempo limite:''' 30 minutos. <br />
| |
| *'''PokéView: [[Arquivo:semvip.png|link=]] ''' <br>
| |
| *'''Quantidade de Inimigos:''' 7.
| |
| <center>
| |
| {| class="wikitable" width="55%"
| |
| |+ align="center" | Limitações e Bloqueios
| |
| |-
| |
| ! width="1%" style="background-color: #4682B4" | Poções
| |
| ! width="1%" style="background-color: #4682B4" | Elixir
| |
| ! width="1%" style="background-color: #4682B4" | Penalidade por morte
| |
| ! width="1%" style="background-color: #4682B4" | Revives | |
| ! width="1%" style="background-color: #4682B4" | Medicine
| |
| ! width="1%" style="background-color: #4682B4" | Berries
| |
| |-
| |
| | align="center" | [[Arquivo:comvip.png|link=]]
| |
| | align="center" | [[Arquivo:semvip.png|link=]]
| |
| | align="center" | [[Arquivo:semvip.png|link=]]
| |
| | align="center" | Ilimitados
| |
| | align="center" | [[Arquivo:comvip.png|link=]]
| |
| | align="center" | [[Arquivo:semvip.png|link=]]
| |
| |-
| |
| |}
| |
|
| |
|
| '''Nota:''' Apesar de ilimitados, os revives são consumidos do inventário do jogador.
| | <!--T:14--> |
| </center>
| | O Shiny Ditto Memory ou Memória do Shiny Ditto é um item que você coloca em seu Shiny Ditto e com isso ele poderá memorizar até três transformações, para que você possa usá-las sem necessariamente ter um Pokémon por perto para transformar-se. |
|
| |
|
| == Localização ==
| | <!--T:15--> |
| | ;Onde adquirir? |
| | : Este item pode ser comprado de outros jogadores ou com '''3000''' pontos da [[Embedded Tower]]. |
|
| |
|
| Essa dungeon fica localizada na Jungle Island na sala da NPC Agatha
| | <!--T:16--> |
| | ;Como funciona? |
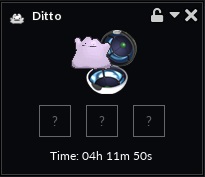
| | : Quando você adquire o item ele vai diretamente para a sua mochila, após isso, use-o em seu Shiny Ditto. Para acessar suas opções basta clicar com o botão direito do mouse no seu Shiny Ditto e selecionar a opção '''Memória do Ditto.''' Uma janela como a imagem abaixo será aberta: |
|
| |
|
| <center> | | <!--T:17--> |
| {| border="1" style="text-align: center; border-collapse: collapse"
| | <center>[[Arquivo:Dittomemorytut.jpg]]</center> |
| | width="100%" | [[Arquivo:Loc Labirinto Em Woodsboro.png|link=]]
| |
| |-
| |
| |}
| |
| </center> | |
|
| |
|
| == Funcionamento==
| | <!--T:18--> |
| | Note que há três slots disponíveis para que o Shiny Ditto memorize uma transformação, não mais que isso. Para preencher um Slot basta transformar o seu Shiny Ditto em um Pokémon e clicar neste Slot, então a foto do Pokémon copiado irá para a memória. Repita o processo com mais dois Pokémon de sua escolha e a memória estará pronta. |
|
| |
|
| O Jogador devera derrotar todos os inimigos presentes na Dungeon.
| | <!--T:19--> |
| | <center>[[Arquivo:Dittomemorytut2.jpg]]</center> |
|
| |
|
| <center> | | <!--T:20--> |
| {| border="1" style="text-align: center; border-collapse: collapse"
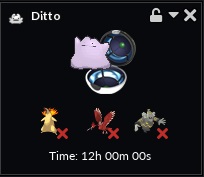
| | Note que agora temos os três slots preenchidos com a transformação de três Pokémon diferentes e uma nova informação, o tempo de transformação. Este tempo refere-se apenas ao tempo que o Shiny Ditto ainda poderá ficar transformado na forma atual, podendo ser renovada quando quiser. Não há nenhum limite de tempo para que a memória seja apagada, ela ficará até que você decida removê-la clicando no <span style="color:red">'''X'''</span> ao lado da foto do Pokémon, com isso o slot ficará novamente disponível e você poderá copiar outro Pokémon para a memória. |
| |+ align="center" | Mapa com as marcações sendo as Pokébolas vermelhas as curas e os crânios os inimigos.
| |
| | width="100%" | [[Arquivo:Map Labirinto Em Woodsboro.png|link=]]
| |
| |-
| |
| |}
| |
| </center> | |
|
| |
|
| == Inimigos ==
| |
|
| |
| Os inimigos '''Scream''' atacará o Pokémon do jogador com ataques básicos. Após ser atacado e atingir 50% de vida, uma animação na cor vermelha na tela acontecerá e a vida do personagem começará a diminuir até que o jogador derrote o inimigo.
| |
|
| |
|
| '''Nota:''' Não é possível silenciar ou stunar o inimigo '''Scream''', mas é possível causar o efeito Paralyze, miss e similares. | | <!--T:21--> |
| | ;Observações Finais |
| | : • Alterar a transformação do Shiny Ditto no meio de um duelo contará como se o Pokémon tivesse morrido, como funciona atualmente; |
| | : • O Shiny Ditto com a memória poderá ser negociado, uma vez que o item é permanente, mas não torna o pokémon único; |
| | : • Pode usar o '''comando !memory''' para aparecer a janela da Memória do seu Shiny Ditto; |
| | : • Pode ser usado os '''comandos !memory 1''', '''!memory 2''' e '''!memory 3''' para usar as devidas transformações da memória sem abrir a janela; |
| | : • É um item '''exclusivo''' para Shiny Ditto. |
|
| |
|
| <center>
| |
| {| border="1" style="text-align: center; border-collapse: collapse"
| |
| |+ align="center" | '''Nota:''' Não é possível causar nenhum status negativo contra o inimigo '''Elite Vandal'''.
| |
| | width="100%" | [[Arquivo:Elite Vandal Uma Noite De Crime.png|link=]]
| |
| |-
| |
| |}
| |
| </center>
| |
|
| |
|
| ==Recompensas== | | ---- |
| <center class="center-tab"><tabber> | | === Pokémon Bloqueados === <!--T:24--> |
| |-|Fácil=
| |
| <center> | | <center> |
| {| class="wikitable" width="25%" | | {| class="wikitable bg-none border-0" width="30%" style="text-align:center;" |
| | ! width="2%" | Pokémon |
| |- | | |- |
| ! colspan="2" | Item
| | | [[Arquivo:063-DarkAbra.png|link=Dark Abra]] [[Dark Abra]] |
| ! Raridade
| |
| |- | | |- |
| | align="center" | [[Arquivo:Halloween Token 2020.png|link=]]
| | | [[Arquivo:143-BigSnorlax.png|link=Big Snorlax]] [[Big Snorlax]] |
| |align="left" style="border-left-style: hidden; | 20 Halloween Token
| |
| | align="center" |Comum
| |
| |- | | |- |
| | align="center" | [[Arquivo:Halloween dimensional key.png|link=]]
| | | [[Arquivo:201-Unown.png|link=Unown]] [[Unown]] |
| |align="left" style="border-left-style: hidden; | Halloween Dimensional Key
| |
| | align="center" |Comum
| |
| |- | | |- |
| | align="center" | [[Arquivo:Jason Voorhees Hangable Mask.png|link=]]
| | | [[Arquivo:235-Smeargle.png|link=Smeargle]] [[Smeargle]] |
| |align="left" style="border-left-style: hidden; | Jason Voorhees Hangable Mask
| |
| |align="center" | Épico
| |
| |- | | |- |
| | align="center" | [[Arquivo:Bloody Machete.png|link=]]
| | | [[Arquivo:311-MinunEPlusle.png|link=Minun and Plusle]] [[Minun and Plusle]] |
| |align="left" style="border-left-style: hidden; | Bloody Machete
| |
| |align="center" | Épico
| |
| |- | | |- |
| | align="center" | [[Arquivo:Pig Hangable Mask.png|link=]] | | | Todos os pokémon considerados lendários pela história da PxG; |
| |align="left" style="border-left-style: hidden; | Pig Hangable Mask
| |
| |align="center" | Épico
| |
| |- | | |- |
| | align="center" | [[Arquivo:Onryo Hangable Mask.png|link=]] | | | Todos os T1H; |
| |align="left" style="border-left-style: hidden; | Onryo Hangable Mask
| |
| |align="center" | Épico
| |
| |- | | |- |
| | align="center" | [[Arquivo:Huntress Hangable Mask.png|link=]] | | | Todas as Mega Evoluções; |
| |align="left" style="border-left-style: hidden; | Huntress Hangable Mask
| |
| |align="center" | Épico
| |
| |- | | |- |
| | align="center" | [[Arquivo:Billy Hangable Mask.png|link=]] | | | Abomasnow (Apenas no Ditto normal, o Shiny Ditto pode copiar normalmente). |
| |align="left" style="border-left-style: hidden; | Billy Hangable Mask
| |
| |align="center" | Épico
| |
| |- | | |- |
| | align="center" | [[Arquivo:Shiny-gengar-locker.png|70px|link=]] | | | Dark Pichu (Apenas no Ditto normal, o Shiny Ditto pode copiar normalmente). |
| |align="left" style="border-left-style: hidden; | Shiny Gengar Locker
| |
| |align="center" | Lendário
| |
| |-
| |
| ! colspan="3" | [[Arquivo:Exp_icon.png|30px|link=]] Experiência: 100.000
| |
| |}
| |
| </center>
| |
| |-|Normal=
| |
| <center>
| |
| {| class="wikitable" width="25%"
| |
| |-
| |
| ! colspan="2" | Item
| |
| ! Raridade
| |
| |-
| |
| | align="center" | [[Arquivo:Halloween Token 2020.png|link=]]
| |
| |align="left" style="border-left-style: hidden; | 30 Halloween Token
| |
| | align="center" |Comum
| |
| |-
| |
| | align="center" | [[Arquivo:Halloween dimensional key.png|link=]]
| |
| |align="left" style="border-left-style: hidden; | Halloween Dimensional Key
| |
| | align="center" |Comum
| |
| |-
| |
| | align="center" | [[Arquivo:Jason Voorhees Hangable Mask.png|link=]]
| |
| |align="left" style="border-left-style: hidden; | Jason Voorhees Hangable Mask
| |
| |align="center" | Épico
| |
| |-
| |
| | align="center" | [[Arquivo:Bloody Machete.png|link=]]
| |
| |align="left" style="border-left-style: hidden; | Bloody Machete
| |
| |align="center" | Épico
| |
| |-
| |
| | align="center" | [[Arquivo:Pig Hangable Mask.png|link=]]
| |
| |align="left" style="border-left-style: hidden; | Pig Hangable Mask
| |
| |align="center" | Épico
| |
| |-
| |
| | align="center" | [[Arquivo:Onryo Hangable Mask.png|link=]]
| |
| |align="left" style="border-left-style: hidden; | Onryo Hangable Mask
| |
| |align="center" | Épico
| |
| |-
| |
| | align="center" | [[Arquivo:Huntress Hangable Mask.png|link=]]
| |
| |align="left" style="border-left-style: hidden; | Huntress Hangable Mask
| |
| |align="center" | Épico
| |
| |-
| |
| | align="center" | [[Arquivo:Billy Hangable Mask.png|link=]]
| |
| |align="left" style="border-left-style: hidden; | Billy Hangable Mask
| |
| |align="center" | Épico
| |
| |-
| |
| | align="center" | [[Arquivo:Shiny-gengar-locker.png|70px|link=]]
| |
| |align="left" style="border-left-style: hidden; | Shiny Gengar Locker
| |
| |align="center" | Lendário
| |
| |-
| |
| ! colspan="3" | [[Arquivo:Exp_icon.png|30px|link=]] Experiência: 150.000
| |
| |}
| |
| </center>
| |
| |-|Dificil=
| |
| <center>
| |
| {| class="wikitable" width="25%"
| |
| |-
| |
| ! colspan="2" | Item
| |
| ! Raridade
| |
| |-
| |
| | align="center" | [[Arquivo:Halloween Token 2020.png|link=]]
| |
| |align="left" style="border-left-style: hidden; | 40 Halloween Token
| |
| | align="center" |Comum
| |
| |-
| |
| | align="center" | [[Arquivo:Halloween dimensional key.png|link=]]
| |
| |align="left" style="border-left-style: hidden; | Halloween Dimensional Key
| |
| | align="center" |Comum
| |
| |-
| |
| | align="center" | [[Arquivo:Jason Voorhees Hangable Mask.png|link=]]
| |
| |align="left" style="border-left-style: hidden; | Jason Voorhees Hangable Mask
| |
| |align="center" | Épico
| |
| |-
| |
| | align="center" | [[Arquivo:Bloody Machete.png|link=]]
| |
| |align="left" style="border-left-style: hidden; | Bloody Machete
| |
| |align="center" | Épico
| |
| |-
| |
| | align="center" | [[Arquivo:Pig Hangable Mask.png|link=]]
| |
| |align="left" style="border-left-style: hidden; | Pig Hangable Mask
| |
| |align="center" | Épico
| |
| |-
| |
| | align="center" | [[Arquivo:Onryo Hangable Mask.png|link=]]
| |
| |align="left" style="border-left-style: hidden; | Onryo Hangable Mask
| |
| |align="center" | Épico
| |
| |-
| |
| | align="center" | [[Arquivo:Huntress Hangable Mask.png|link=]]
| |
| |align="left" style="border-left-style: hidden; | Huntress Hangable Mask
| |
| |align="center" | Épico
| |
| |-
| |
| | align="center" | [[Arquivo:Billy Hangable Mask.png|link=]]
| |
| |align="left" style="border-left-style: hidden; | Billy Hangable Mask
| |
| |align="center" | Épico
| |
| |-
| |
| | align="center" | [[Arquivo:Shiny-gengar-locker.png|70px|link=]]
| |
| |align="left" style="border-left-style: hidden; | Shiny Gengar Locker
| |
| |align="center" | Lendário
| |
| |-
| |
| ! colspan="3" | [[Arquivo:Exp_icon.png|30px|link=]] Experiência: 200.000
| |
| |}
| |
| </tabber>
| |
| </center>
| |
| | |
| =Cerulean Amaldiçoada=
| |
| =='''Informações Básicas'''==
| |
| | |
| *'''Modalidade:''' Solo <br />
| |
| *'''Nivel necessário:''' 80 (Fácil), 200 (Normal) e 350 (Difícil). <br />
| |
| *'''Elemento:''' [[Arquivo:NeutralICON.png|Neutro|20px|link=Clãs]] Neutro
| |
| *'''Tempo limite:''' 30 minutos. <br />
| |
| *'''PokéView: [[Arquivo:semvip.png|link=]] ''' <br>
| |
| *'''Quantidade de Inimigos:''' 21.
| |
| <center>
| |
| {| class="wikitable" width="55%"
| |
| |+ align="center" | Limitações e Bloqueios
| |
| |-
| |
| ! width="1%" style="background-color: #4682B4" | Poções
| |
| ! width="1%" style="background-color: #4682B4" | Elixir
| |
| ! width="1%" style="background-color: #4682B4" | Penalidade por morte
| |
| ! width="1%" style="background-color: #4682B4" | Revive
| |
| ! width="1%" style="background-color: #4682B4" | Medicine
| |
| ! width="1%" style="background-color: #4682B4" | Berries
| |
| |-
| |
| | align="center" | [[Arquivo:comvip.png|link=]]
| |
| | align="center" | [[Arquivo:semvip.png|link=]]
| |
| | align="center" | [[Arquivo:semvip.png|link=]]
| |
| | align="center" | 8 Revives
| |
| | align="center" | [[Arquivo:comvip.png|link=]]
| |
| | align="center" | [[Arquivo:semvip.png|link=]]
| |
| |- | | |- |
| |} | | |} |
| </center> | | </center> |
|
| |
|
| == Localização == | | '''Observações:'''<br> |
| | * '''[[Arquivo:479-Rotom.png|link=Rotom]] [[Rotom]]:''' A cópia deste Pokémon está disponível apenas para sua forma padrão (Ghost). Para ter acesso às outras formas, o jogador deverá equipar em seu Ditto o respectivo item de transformação. <br> |
| | * '''[[Arquivo:351-Castform.png|link=Castform]] [[Castform]]:''' Este Pokémon apenas pode ser copiado de outros jogadores. Uma vez copiado, poderá acessar todas suas formas normalmente. <br> |
| | * Por padrão, novos Pokémon terão suas cópias bloqueadas. |
|
| |
|
| Essa dungeon fica localizada ao sul da cidade de Cerulean. <br>
| | === Informações Extras === |
|
| |
|
| <center>
| | * É possível utilizar qualquer addon em um Ditto/Shiny Ditto, desde que esteja transformado no Pokémon que receberá o Addon. |
| {| border="1" style="text-align: center; border-collapse: collapse"
| |
| | width="100%" | [[Arquivo:Loc Cerulean Amaldicoada.png|link=]]
| |
| |-
| |
| |}
| |
| </center>
| |
|
| |
|
| == Funcionamento==
| |
|
| |
|
| O Jogador devera derrotar todos os Pokémon e o Boss Final que é um '''Ghost'''. <br>
| | <center>[[Arquivo:Ditto Addons.gif|link=]]</center> |
|
| |
| <center> | |
| {| border="1" style="text-align: center; border-collapse: collapse"
| |
| |+ align="center" | O boss se encontra no local indicado
| |
| | width="100%" | [[Arquivo:Map Cerulean Amaldicoada.png|link=]]
| |
| |-
| |
| |}
| |
| </center> | |
|
| |
|
| == Boss ==
| |
| '''Nota:''' O Boss conta como um dos 21 Pokémon da Dungeon, não sendo necessário derrotar todos os Pokémon antes de enfrentar o Boss.
| |
| <center>
| |
| {| border="1" style="text-align: center; border-collapse: collapse"
| |
| |+ align="center" | Não é possível causar nenhum status negativo no Boss '''Ghost'''
| |
| | width="100%" | [[Arquivo:Boss Cerulean Amaldicoada.png|link=]]
| |
| |-
| |
| |}
| |
| </center>
| |
|
| |
|
| ==Recompensas==
| | Todos os addons inseridos continuarão no Shiny Ditto e poderão ser visualizados utilizando o sistema de Look. |
| <center class="center-tab"><tabber>
| |
| |-|Fácil=
| |
| <center>
| |
| {| class="wikitable" width="25%"
| |
| |-
| |
| ! colspan="2" | Item
| |
| ! Raridade
| |
| |-
| |
| | align="center" | [[Arquivo:Halloween Token 2020.png|link=]]
| |
| |align="left" style="border-left-style: hidden; | 20 Halloween Token
| |
| | align="center" |Comum
| |
| |-
| |
| | align="center" | [[Arquivo:Halloween dimensional key.png|link=]]
| |
| |align="left" style="border-left-style: hidden; | Halloween Dimensional Key
| |
| | align="center" |Comum
| |
| |-
| |
| | align="center" | [[Arquivo:Shiny Gengar Emote Toy.png|link=]]
| |
| |align="left" style="border-left-style: hidden; | Shiny Gengar Emote Toy
| |
| |align="center" | Épico
| |
| |-
| |
| | align="center" | [[Arquivo:Mismagius Emote Toy.png|link=]]
| |
| |align="left" style="border-left-style: hidden; | Mismagius Emote Toy
| |
| |align="center" | Épico
| |
| |-
| |
| | align="center" | [[Arquivo:Gengar Emote Toy.png|link=]]
| |
| |align="left" style="border-left-style: hidden; | Gengar Emote Toy
| |
| |align="center" | Épico
| |
| |-
| |
| | align="center" | [[Arquivo:Sableye Emote Toy.png|link=]]
| |
| |align="left" style="border-left-style: hidden; | Sableye Emote Toy
| |
| |align="center" | Épico
| |
| |-
| |
| | align="center" | [[Arquivo:Shiny-gengar-locker.png|70px|link=]]
| |
| |align="left" style="border-left-style: hidden; | Shiny Gengar Locker
| |
| |align="center" | Lendário
| |
| |-
| |
| | align="center" | [[Arquivo:gengar-locker.png|70px|link=]]
| |
| |align="left" style="border-left-style: hidden; | Gengar Locker
| |
| |align="center" | Lendário
| |
| |-
| |
| ! colspan="3" | [[Arquivo:Exp_icon.png|30px|link=]] Experiência: 100.000
| |
| |}
| |
| </center>
| |
| |-|Normal=
| |
| <center>
| |
| {| class="wikitable" width="25%"
| |
| |-
| |
| ! colspan="2" | Item
| |
| ! Raridade
| |
| |-
| |
| | align="center" | [[Arquivo:Halloween Token 2020.png|link=]]
| |
| |align="left" style="border-left-style: hidden; | 30 Halloween Token
| |
| | align="center" |Comum
| |
| |-
| |
| | align="center" | [[Arquivo:Halloween dimensional key.png|link=]]
| |
| |align="left" style="border-left-style: hidden; | Halloween Dimensional Key
| |
| | align="center" |Comum
| |
| |-
| |
| | align="center" | [[Arquivo:Shiny Gengar Emote Toy.png|link=]]
| |
| |align="left" style="border-left-style: hidden; | Shiny Gengar Emote Toy
| |
| |align="center" | Épico
| |
| |-
| |
| | align="center" | [[Arquivo:Mismagius Emote Toy.png|link=]]
| |
| |align="left" style="border-left-style: hidden; | Mismagius Emote Toy
| |
| |align="center" | Épico
| |
| |-
| |
| | align="center" | [[Arquivo:Gengar Emote Toy.png|link=]]
| |
| |align="left" style="border-left-style: hidden; | Gengar Emote Toy
| |
| |align="center" | Épico
| |
| |-
| |
| | align="center" | [[Arquivo:Sableye Emote Toy.png|link=]]
| |
| |align="left" style="border-left-style: hidden; | Sableye Emote Toy
| |
| |align="center" | Épico
| |
| |-
| |
| | align="center" | [[Arquivo:Shiny-gengar-locker.png|70px|link=]]
| |
| |align="left" style="border-left-style: hidden; | Shiny Gengar Locker
| |
| |align="center" | Lendário
| |
| |-
| |
| | align="center" | [[Arquivo:gengar-locker.png|70px|link=]]
| |
| |align="left" style="border-left-style: hidden; | Gengar Locker
| |
| |align="center" | Lendário
| |
| |-
| |
| ! colspan="3" | [[Arquivo:Exp_icon.png|30px|link=]] Experiência: 150.000
| |
| |}
| |
| </center>
| |
| |-|Dificil=
| |
| <center>
| |
| {| class="wikitable" width="25%"
| |
| |-
| |
| ! colspan="2" | Item
| |
| ! Raridade
| |
| |-
| |
| | align="center" | [[Arquivo:Halloween Token 2020.png|link=]]
| |
| |align="left" style="border-left-style: hidden; | 40 Halloween Token
| |
| | align="center" |Comum
| |
| |-
| |
| | align="center" | [[Arquivo:Halloween dimensional key.png|link=]]
| |
| |align="left" style="border-left-style: hidden; | Halloween Dimensional Key
| |
| | align="center" |Comum
| |
| |-
| |
| | align="center" | [[Arquivo:Shiny Gengar Emote Toy.png|link=]]
| |
| |align="left" style="border-left-style: hidden; | Shiny Gengar Emote Toy
| |
| |align="center" | Épico
| |
| |-
| |
| | align="center" | [[Arquivo:Mismagius Emote Toy.png|link=]]
| |
| |align="left" style="border-left-style: hidden; | Mismagius Emote Toy
| |
| |align="center" | Épico
| |
| |-
| |
| | align="center" | [[Arquivo:Gengar Emote Toy.png|link=]]
| |
| |align="left" style="border-left-style: hidden; | Gengar Emote Toy
| |
| |align="center" | Épico
| |
| |-
| |
| | align="center" | [[Arquivo:Sableye Emote Toy.png|link=]]
| |
| |align="left" style="border-left-style: hidden; | Sableye Emote Toy
| |
| |align="center" | Épico
| |
| |-
| |
| | align="center" | [[Arquivo:Shiny-gengar-locker.png|70px|link=]]
| |
| |align="left" style="border-left-style: hidden; | Shiny Gengar Locker
| |
| |align="center" | Lendário
| |
| |-
| |
| | align="center" | [[Arquivo:gengar-locker.png|70px|link=]]
| |
| |align="left" style="border-left-style: hidden; | Gengar Locker
| |
| |align="center" | Lendário
| |
| |-
| |
| ! colspan="3" | [[Arquivo:Exp_icon.png|30px|link=]] Experiência: 200.000
| |
| |}
| |
| </tabber>
| |
| </center>
| |
| | |
| =Moro Island Amaldiçoada=
| |
| =='''Informações Básicas'''==
| |
| | |
| *'''Modalidade:''' Solo <br />
| |
| *'''Nivel necessário:''' 80 (Fácil), 200 (Normal) e 350 (Difícil). <br />
| |
| *'''Elemento:''' [[Arquivo:NeutralICON.png|Neutro|20px|link=Clãs]] Neutro
| |
| *'''Tempo limite:''' 30 minutos. <br />
| |
| *'''PokéView: [[Arquivo:semvip.png|link=]] ''' <br>
| |
| *'''Quantidade de Inimigos:''' 24.
| |
| <center>
| |
| {| class="wikitable" width="55%"
| |
| |+ align="center" | Limitações e Bloqueios
| |
| |-
| |
| ! width="1%" style="background-color: #4682B4" | Poções
| |
| ! width="1%" style="background-color: #4682B4" | Elixir
| |
| ! width="1%" style="background-color: #4682B4" | Penalidade por morte
| |
| ! width="1%" style="background-color: #4682B4" | Revive
| |
| ! width="1%" style="background-color: #4682B4" | Medicine
| |
| ! width="1%" style="background-color: #4682B4" | Berries
| |
| |-
| |
| | align="center" | [[Arquivo:comvip.png|link=]]
| |
| | align="center" | [[Arquivo:semvip.png|link=]]
| |
| | align="center" | [[Arquivo:semvip.png|link=]]
| |
| | align="center" | 8 Revives
| |
| | align="center" | [[Arquivo:comvip.png|link=]]
| |
| | align="center" | [[Arquivo:semvip.png|link=]]
| |
| |-
| |
| |}
| |
| </center>
| |
|
| |
|
| == Localização ==
| | * Ao transformar um Ditto comum em um Shiny Ditto, todos os addons serão mantidos. |
|
| |
|
| Essa dungeon fica localizada na Moro Island ao sul do Centro Pokémon. <br>
| | * É possível comprar Ditto Memory (2 slots, serve apenas para o Ditto) e Superior Shiny Ditto Memory (5 slots, serve apenas para Shiny Ditto) após finalizar a [[Ditto's Mystery Quest]] com a NPC Duplica |
| | |
| <center>
| |
| {| border="1" style="text-align: center; border-collapse: collapse"
| |
| | width="100%" | [[Arquivo:Loc Moro Island Amaldicoada2.png|link=]]
| |
| |-
| |
| |}
| |
| </center>
| |
| | |
| == Funcionamento==
| |
| | |
| O Jogador devera derrotar todos os Pokémon nos 3 andares da ilha e o Boss Final que é um '''Aerodactyl'''. <br>
| |
|
| |
| <center>
| |
| {| border="1" style="text-align: center; border-collapse: collapse"
| |
| |+ align="center" | O andar principal contém 14 Pokémon.
| |
| | width="100%" | [[Arquivo:Map1 Moro Island Amaldicoada.png|link=]]
| |
| |-
| |
| |}
| |
| <br>
| |
| {| border="1" style="text-align: center; border-collapse: collapse"
| |
| |+ align="center" | O Segundo andar contém 8 Pokémon
| |
| | width="100%" | [[Arquivo:Map2 Moro Island Amaldicoada.png|link=]]
| |
| |-
| |
| |}
| |
| <br>
| |
| {| border="1" style="text-align: center; border-collapse: collapse"
| |
| |+ align="center" | O andar do Boss ao final da ilha conta com 1 Pokémon junto do boss.
| |
| | width="100%" | [[Arquivo:Map3 Moro Island Amaldicoada.png|link=]]
| |
| |-
| |
| |}
| |
| </center>
| |
|
| |
|
| == Boss ==
| | * É possível conseguir a Ditto Makeup (Addon para Ditto/Shiny Ditto) após finalizar a [[Ditto's Mystery Quest]] |
| '''Nota:''' O Boss conta como um dos 21 Pokémon da Dungeon, não sendo necessário derrotar todos os Pokémon antes de enfrentar o Boss.
| |
| <center>
| |
| {| border="1" style="text-align: center; border-collapse: collapse"
| |
| |+ align="center" | Não é possível causar nenhum status negativo no Boss '''Aerodactyl'''
| |
| | width="100%" | [[Arquivo:Boss Moro Island Amaldicoada.png|link=]]
| |
| |-
| |
| |}
| |
| </center>
| |
|
| |
|
| ==Recompensas==
| | <!--informaçoes; informacoes--> |
| <center class="center-tab"><tabber> | |
| |-|Fácil=
| |
| <center>
| |
| {| class="wikitable" width="25%"
| |
| |-
| |
| ! colspan="2" | Item
| |
| ! Raridade
| |
| |-
| |
| | align="center" | [[Arquivo:Halloween Token 2020.png|link=]]
| |
| |align="left" style="border-left-style: hidden; | 20 Halloween Token
| |
| | align="center" |Comum
| |
| |-
| |
| | align="center" | [[Arquivo:Halloween dimensional key.png|link=]]
| |
| |align="left" style="border-left-style: hidden; | Halloween Dimensional Key
| |
| | align="center" |Comum
| |
| |-
| |
| | align="center" | [[Arquivo:Shiny Gengar Emote Toy.png|link=]]
| |
| |align="left" style="border-left-style: hidden; | Shiny Gengar Emote Toy
| |
| |align="center" | Épico
| |
| |-
| |
| | align="center" | [[Arquivo:Mismagius Emote Toy.png|link=]]
| |
| |align="left" style="border-left-style: hidden; | Mismagius Emote Toy
| |
| |align="center" | Épico
| |
| |-
| |
| | align="center" | [[Arquivo:Gengar Emote Toy.png|link=]]
| |
| |align="left" style="border-left-style: hidden; | Gengar Emote Toy
| |
| |align="center" | Épico
| |
| |-
| |
| | align="center" | [[Arquivo:Sableye Emote Toy.png|link=]]
| |
| |align="left" style="border-left-style: hidden; | Sableye Emote Toy
| |
| |align="center" | Épico
| |
| |-
| |
| | align="center" | [[Arquivo:Shiny-gengar-locker.png|70px|link=]]
| |
| |align="left" style="border-left-style: hidden; | Shiny Gengar Locker
| |
| |align="center" | Lendário
| |
| |-
| |
| | align="center" | [[Arquivo:gengar-locker.png|70px|link=]]
| |
| |align="left" style="border-left-style: hidden; | Gengar Locker
| |
| |align="center" | Lendário
| |
| |-
| |
| ! colspan="3" | [[Arquivo:Exp_icon.png|30px|link=]] Experiência: 100.000
| |
| |}
| |
| </center>
| |
| |-|Normal=
| |
| <center>
| |
| {| class="wikitable" width="25%"
| |
| |-
| |
| ! colspan="2" | Item
| |
| ! Raridade
| |
| |-
| |
| | align="center" | [[Arquivo:Halloween Token 2020.png|link=]]
| |
| |align="left" style="border-left-style: hidden; | 30 Halloween Token
| |
| | align="center" |Comum
| |
| |-
| |
| | align="center" | [[Arquivo:Halloween dimensional key.png|link=]]
| |
| |align="left" style="border-left-style: hidden; | Halloween Dimensional Key
| |
| | align="center" |Comum
| |
| |-
| |
| | align="center" | [[Arquivo:Shiny Gengar Emote Toy.png|link=]]
| |
| |align="left" style="border-left-style: hidden; | Shiny Gengar Emote Toy
| |
| |align="center" | Épico
| |
| |-
| |
| | align="center" | [[Arquivo:Mismagius Emote Toy.png|link=]]
| |
| |align="left" style="border-left-style: hidden; | Mismagius Emote Toy
| |
| |align="center" | Épico
| |
| |-
| |
| | align="center" | [[Arquivo:Gengar Emote Toy.png|link=]]
| |
| |align="left" style="border-left-style: hidden; | Gengar Emote Toy
| |
| |align="center" | Épico
| |
| |-
| |
| | align="center" | [[Arquivo:Sableye Emote Toy.png|link=]]
| |
| |align="left" style="border-left-style: hidden; | Sableye Emote Toy
| |
| |align="center" | Épico
| |
| |-
| |
| | align="center" | [[Arquivo:Shiny-gengar-locker.png|70px|link=]]
| |
| |align="left" style="border-left-style: hidden; | Shiny Gengar Locker
| |
| |align="center" | Lendário
| |
| |-
| |
| | align="center" | [[Arquivo:gengar-locker.png|70px|link=]]
| |
| |align="left" style="border-left-style: hidden; | Gengar Locker
| |
| |align="center" | Lendário
| |
| |-
| |
| ! colspan="3" | [[Arquivo:Exp_icon.png|30px|link=]] Experiência: 150.000
| |
| |}
| |
| </center>
| |
| |-|Dificil=
| |
| <center>
| |
| {| class="wikitable" width="25%"
| |
| |-
| |
| ! colspan="2" | Item
| |
| ! Raridade | |
| |-
| |
| | align="center" | [[Arquivo:Halloween Token 2020.png|link=]]
| |
| |align="left" style="border-left-style: hidden; | 40 Halloween Token
| |
| | align="center" |Comum
| |
| |-
| |
| | align="center" | [[Arquivo:Halloween dimensional key.png|link=]]
| |
| |align="left" style="border-left-style: hidden; | Halloween Dimensional Key
| |
| | align="center" |Comum
| |
| |-
| |
| | align="center" | [[Arquivo:Shiny Gengar Emote Toy.png|link=]]
| |
| |align="left" style="border-left-style: hidden; | Shiny Gengar Emote Toy
| |
| |align="center" | Épico
| |
| |-
| |
| | align="center" | [[Arquivo:Mismagius Emote Toy.png|link=]]
| |
| |align="left" style="border-left-style: hidden; | Mismagius Emote Toy
| |
| |align="center" | Épico
| |
| |-
| |
| | align="center" | [[Arquivo:Gengar Emote Toy.png|link=]]
| |
| |align="left" style="border-left-style: hidden; | Gengar Emote Toy
| |
| |align="center" | Épico
| |
| |-
| |
| | align="center" | [[Arquivo:Sableye Emote Toy.png|link=]]
| |
| |align="left" style="border-left-style: hidden; | Sableye Emote Toy
| |
| |align="center" | Épico
| |
| |-
| |
| | align="center" | [[Arquivo:Shiny-gengar-locker.png|70px|link=]]
| |
| |align="left" style="border-left-style: hidden; | Shiny Gengar Locker
| |
| |align="center" | Lendário
| |
| |-
| |
| | align="center" | [[Arquivo:gengar-locker.png|70px|link=]]
| |
| |align="left" style="border-left-style: hidden; | Gengar Locker
| |
| |align="center" | Lendário
| |
| |-
| |
| ! colspan="3" | [[Arquivo:Exp_icon.png|30px|link=]] Experiência: 200.000
| |
| |}
| |
| </tabber>
| |
| </center>
| |