Cada andar conta com um miniboss. No andar Raibolt-Ironhard, o miniboss é o Cyborg Metagross.
| Inimigos | |||
|---|---|---|---|
Cyborg Electabuzz |
Cyborg Scizor |
Cyborg Shiny Electrode |
Cyborg Metagross |
| Linha 30: | Linha 30: | ||
</center> | </center> | ||
|-|Armadilhas= | |-|Armadilhas= | ||
A armadilha deste andar são lasers capazes de causar hit kill no jogador, caso este não desvie dos raios. Os lasers não afetam ao Pokémon do jogador. | |||
<br> | <br> | ||
<center> | <center> | ||
{{#widget:Video|url={{filepath: | {{#widget:Video|url={{filepath:Andar_RI_Trap.mp4}}|width=640|height=360}} | ||
</center> | </center> | ||
|-|Mapas= | |-|Mapas= | ||
| Linha 50: | Linha 43: | ||
! width="32%" style="background-color: #660099" | <span style="color:white">Andar 1 a 4 [2]</span> | ! width="32%" style="background-color: #660099" | <span style="color:white">Andar 1 a 4 [2]</span> | ||
|- align="center" | |- align="center" | ||
| [[Arquivo: | | [[Arquivo:Andar_RI_S1.png|450px|link=]] | ||
| width="4%" style="border-top-style: hidden; border-width: 1px; border-bottom-style: hidden; border-width: 1px" | | | width="4%" style="border-top-style: hidden; border-width: 1px; border-bottom-style: hidden; border-width: 1px" | | ||
| [[Arquivo: | | [[Arquivo:Andar_RI_S2.png|450px|link=]] | ||
|- | |- | ||
! style="background-color: #660099" | <span style="color:white">Andar 1 a 4 [3]</span> | ! style="background-color: #660099" | <span style="color:white">Andar 1 a 4 [3]</span> | ||
| Linha 58: | Linha 51: | ||
! style="background-color: #660099" | <span style="color:white">Andar 1 a 4 [4]</span> | ! style="background-color: #660099" | <span style="color:white">Andar 1 a 4 [4]</span> | ||
|- align="center" | |- align="center" | ||
| [[Arquivo: | | [[Arquivo:Andar_RI_S3.png|450px|link=]] | ||
| width="4%" style="border-top-style: hidden; border-width: 1px; border-bottom-style: hidden; border-width: 1px" | | | width="4%" style="border-top-style: hidden; border-width: 1px; border-bottom-style: hidden; border-width: 1px" | | ||
| [[Arquivo: | | [[Arquivo:Andar_RI_S4.png|450px|link=]] | ||
|- | |- | ||
! style="background-color: #660099" | <span style="color:white">Andar 1 a 4 [5]</span> | ! style="background-color: #660099" | <span style="color:white">Andar 1 a 4 [5]</span> | ||
| Linha 66: | Linha 59: | ||
! style="background-color: #660099" | <span style="color:white">Andar 1 a 4 [6]</span> | ! style="background-color: #660099" | <span style="color:white">Andar 1 a 4 [6]</span> | ||
|- align="center" | |- align="center" | ||
| [[Arquivo: | | [[Arquivo:Andar_RI_S5.png|450px|link=]] | ||
| width="4%" style="border-top-style: hidden; border-width: 1px; border-bottom-style: hidden; border-width: 1px" | | | width="4%" style="border-top-style: hidden; border-width: 1px; border-bottom-style: hidden; border-width: 1px" | | ||
| [[Arquivo: | | [[Arquivo:Andar_RI_S6.png|450px|link=]] | ||
|- | |- | ||
! style="background-color: #660099" | <span style="color:white">Andar 1 a 4 [7]</span> | ! style="background-color: #660099" | <span style="color:white">Andar 1 a 4 [7]</span> | ||
| Linha 74: | Linha 67: | ||
! style="background-color: #660099" | <span style="color:white">Andar 1 a 4 [8]</span> | ! style="background-color: #660099" | <span style="color:white">Andar 1 a 4 [8]</span> | ||
|- align="center" | |- align="center" | ||
| [[Arquivo: | | [[Arquivo:Andar_RI_S7.png|450px|link=]] | ||
| width="4%" style="border-top-style: hidden; border-width: 1px; border-bottom-style: hidden; border-width: 1px" | | | width="4%" style="border-top-style: hidden; border-width: 1px; border-bottom-style: hidden; border-width: 1px" | | ||
| [[Arquivo: | | [[Arquivo:Andar_RI_S8.png|450px|link=]] | ||
|-} | |-} | ||
</center> | </center> | ||
|-|Boss= | |-|Boss= | ||
O boss do andar | O boss do andar Raibolt e Ironhard é o Cyborg Shiny Magneton [[Arquivo:082-Sh Magneton.png|link=Shiny_Magneton]]. A mecânica deste boss consiste em colocar os minion invocados pelo boss nas fumaças que tem no campo de batalha. Quando todos os minions forem derrotados, o jogador poderá derrotar o Cyborg Shiny Magneton. | ||
<center> | <center> | ||
{{#widget:Video|url={{filepath: | {{#widget:Video|url={{filepath:Andar_RI_Boss.mp4}}|width=640|height=360}} | ||
</center> | </center> | ||
|-|Recompensa= | |-|Recompensa= | ||
| Linha 90: | Linha 83: | ||
! scope="col" style="background-color: #660099"| <span style="color:white">3 Nightmare Unusual Ores</span> | ! scope="col" style="background-color: #660099"| <span style="color:white">3 Nightmare Unusual Ores</span> | ||
! scope="col" style="background-color: #660099"| <span style="color:white">50 Technological Crystals (Tier: 3)</span> | ! scope="col" style="background-color: #660099"| <span style="color:white">50 Technological Crystals (Tier: 3)</span> | ||
! scope="col" style="background-color: #660099"| <span style="color:white">Cyborg Cell ( | ! scope="col" style="background-color: #660099"| <span style="color:white">Cyborg Cell (Electric)</span> | ||
! scope="col" style="background-color: #660099"| <span style="color:white"> | ! scope="col" style="background-color: #660099"| <span style="color:white">4 Moderate Nightmare Experience Candy</span> | ||
|- style="width:50px; text-align:center;" | |- style="width:50px; text-align:center;" | ||
| [[Arquivo:NW_unusual_ore.png|Nightmare unusual ore|link=]] | | [[Arquivo:NW_unusual_ore.png|Nightmare unusual ore|link=]] | ||
| [[Arquivo:Frag_tier_3.png|Technological Crystals (Tier: 3)|link=]] | | [[Arquivo:Frag_tier_3.png|Technological Crystals (Tier: 3)|link=]] | ||
| [[Arquivo:Cyborg_Cell_( | | [[Arquivo:Cyborg_Cell_(Electric)..png|Cyborg Cell (Electric)|link=]] | ||
| [[Arquivo:Moderate_Nightmare_experience_candy..png|Moderate Nightmare experience candy|link=]] | | [[Arquivo:Moderate_Nightmare_experience_candy..png|Moderate Nightmare experience candy|link=]] | ||
</center> | </center> | ||
|-} | |-} | ||
Olá, curioso.
Nível Mínimo: 300+
Nível Recomendado: 400+
Observação: No duelo contra o Cyborg Aerodactyl é necessário level 400 ou mais.
Nível NW Necessário: 0+
Recompensa única: 12kk EXP e 150k NW Exp, acesso à sala de Craft.
Recompensa demais meses: NW Exp Váriavel, Diversos Fragmentos de Held Tier 3, 4, 5, 6 e 7, Cyber Cells e Nightmare Unusual Ores.
Caso encontre algum erro ou queira acrescentar alguma informação, entre em contato com um dos membros da wiki.
Cada andar conta com um miniboss. No andar Raibolt-Ironhard, o miniboss é o Cyborg Metagross.
| Inimigos | |||
|---|---|---|---|
Cyborg Electabuzz |
Cyborg Scizor |
Cyborg Shiny Electrode |
Cyborg Metagross |
A armadilha deste andar são lasers capazes de causar hit kill no jogador, caso este não desvie dos raios. Os lasers não afetam ao Pokémon do jogador.
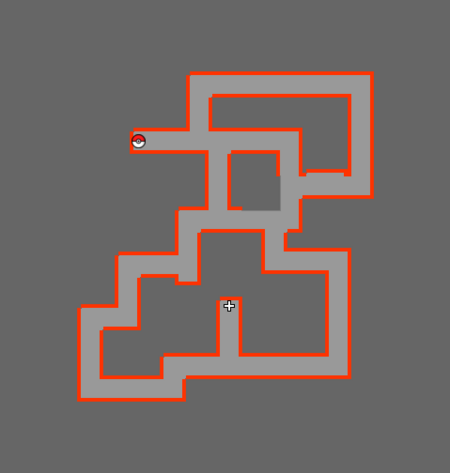
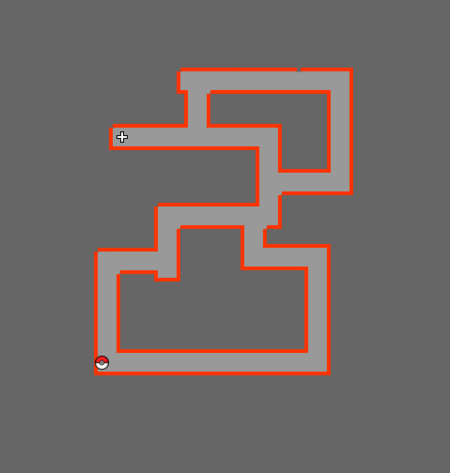
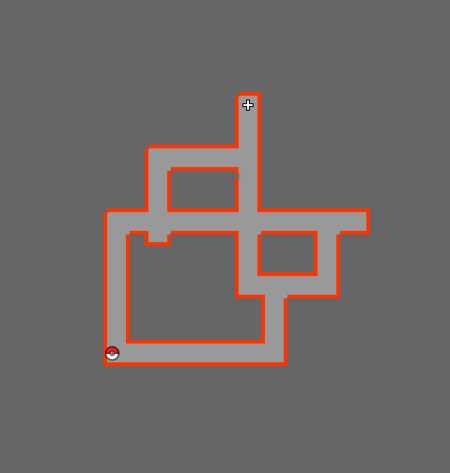
| Andar 1 a 4 [1] | Andar 1 a 4 [2] | |
|---|---|---|
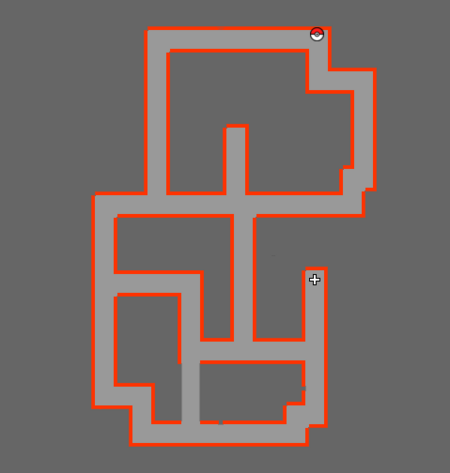
|
| |
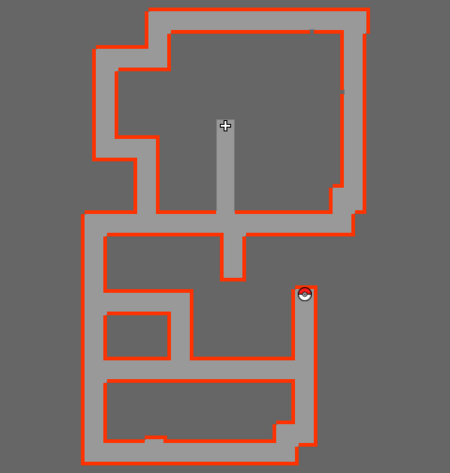
| Andar 1 a 4 [3] | Andar 1 a 4 [4] | |
|
| |
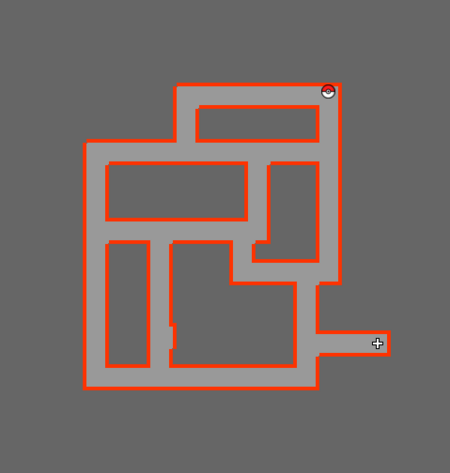
| Andar 1 a 4 [5] | Andar 1 a 4 [6] | |
|
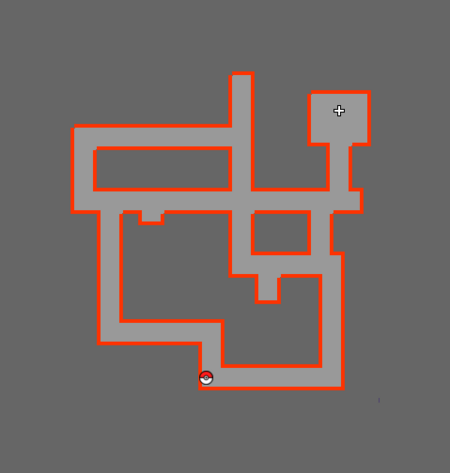
| |
| Andar 1 a 4 [7] | Andar 1 a 4 [8] | |
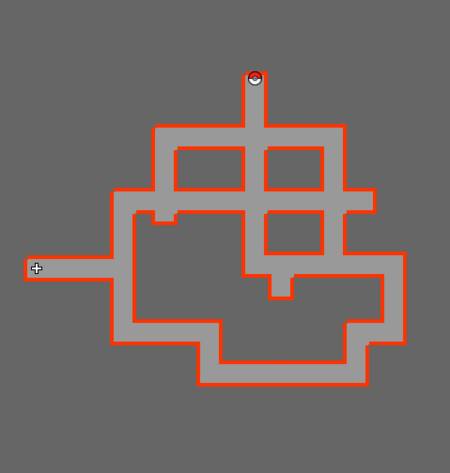
|
|
O boss do andar Raibolt e Ironhard é o Cyborg Shiny Magneton ![]() . A mecânica deste boss consiste em colocar os minion invocados pelo boss nas fumaças que tem no campo de batalha. Quando todos os minions forem derrotados, o jogador poderá derrotar o Cyborg Shiny Magneton.
. A mecânica deste boss consiste em colocar os minion invocados pelo boss nas fumaças que tem no campo de batalha. Quando todos os minions forem derrotados, o jogador poderá derrotar o Cyborg Shiny Magneton.
| 3 Nightmare Unusual Ores | 50 Technological Crystals (Tier: 3) | Cyborg Cell (Electric) | 4 Moderate Nightmare Experience Candy |
|---|---|---|---|

|
|
|
|
|