Cada andar conta com um miniboss. No andar Seavell, o miniboss é o Cyborg Mega Blastoise.
| Inimigos | |||
|---|---|---|---|
Cyborg Blastoise |
Cyborg Crawdaunt |
Cyborg Feraligatr |
Cyborg Mega Blastoise |
| Linha 16: | Linha 16: | ||
=Andar Raibolt e Ironhard (26 à 29)= | =Andar Raibolt e Ironhard (26 à 29)= | ||
<tabber> | |||
|-|Inimigos= | |||
Cada andar conta com um miniboss. No andar Seavell, o miniboss é o Cyborg Mega Blastoise. | |||
<center> | |||
{| class="wikitable" width="60%" style="text-align:center" | |||
! colspan="4" scope="col" width="31%" style="background-color: #660099" | <span style="color:white">Inimigos</span> | |||
|- | |||
| [[Arquivo:0009-Blastoise.png|link=Blastoise]] <br> Cyborg Blastoise | |||
| [[Arquivo:342-Crawdaunt.png|link=Crawdaunt]] <br> Cyborg Crawdaunt | |||
| [[Arquivo:160-Feraligatr.png|link=Feraligatr]] <br> Cyborg Feraligatr | |||
| [[Arquivo:MegaBlastoise.png|link=Mega_Blastoise]] <br> Cyborg Mega Blastoise | |||
|-} | |||
</center> | |||
|-|Armadilhas= | |||
Este andar possui duas armadilhas, que causam dano. Sendo elas: | |||
<br> | |||
'''1ª Armadilha - Chuva''': Essa armadilha causará dano e lentidão ao jogador e seu Pokémon. | |||
<br> | |||
<center> | |||
{{#widget:Video|url={{filepath:Andar_S_Chuva.mp4}}|width=640|height=360}} | |||
</center> | |||
<br> | |||
'''2ª Armadilha - Redemoinho''': Essa armadilha puxará ao jogador, causando dano e aplicando o efeito "Sleep". Para sair dele, o jogador deverá usar medicine no personagem e caminhar na direção oposta ao redemoinho. | |||
<center> | |||
{{#widget:Video|url={{filepath:Andar_S_Rede.mp4}}|width=640|height=360}} | |||
</center> | |||
|-|Mapas= | |||
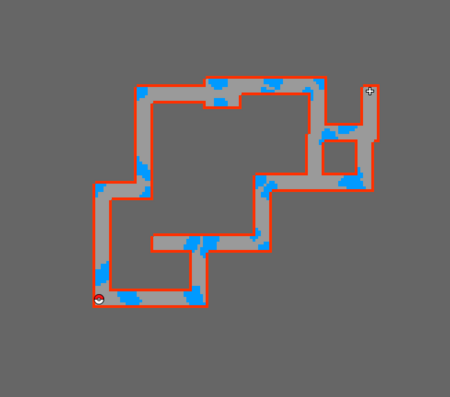
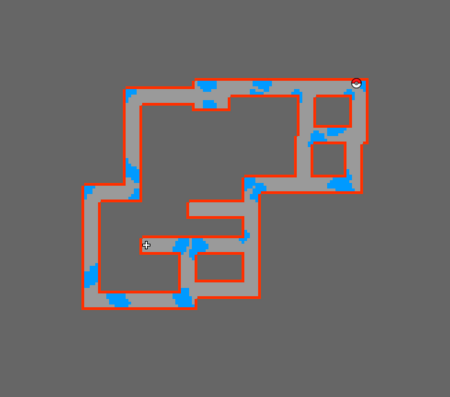
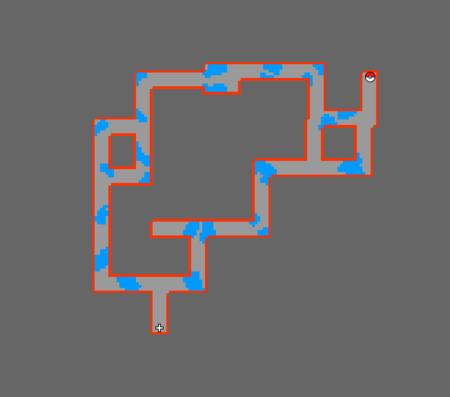
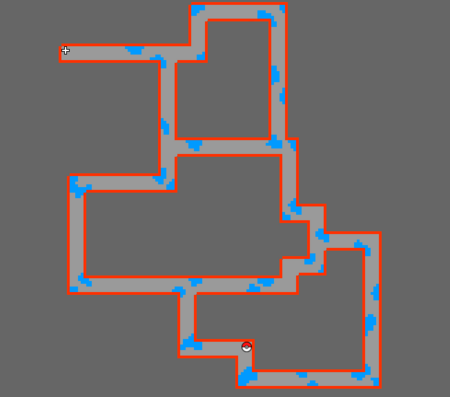
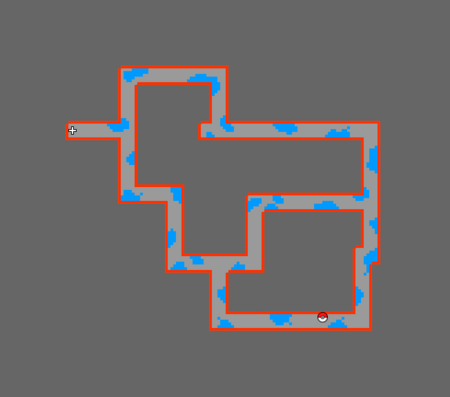
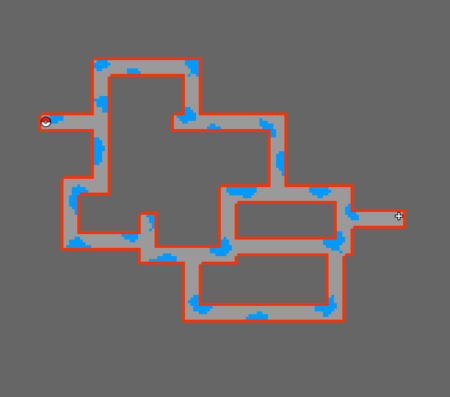
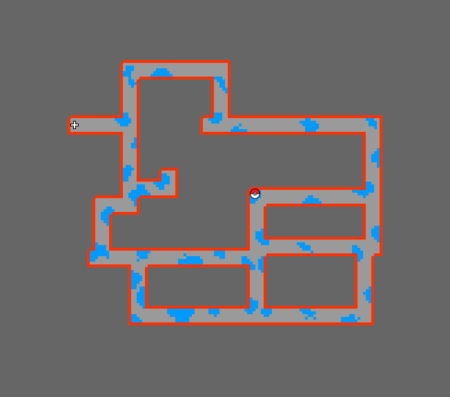
Ao entrar em cada andar, o jogador cairá aleatoriamente em um dos 8 mapas a seguir. Somente é possível avançar para o próximo andar ao derrotar todos os inimigos do local. O ícone de Pokéball no mapa indica a saída. | |||
<center> | |||
{| class="wikitable" width="80%" | |||
! width="31%" style="background-color: #660099" | <span style="color:white">Andar 1 a 4 [1]</span> | |||
| width="3%" style="border-top-style: hidden; border-width: 1px; border-bottom-style: hidden; border-width: 1px" | | |||
! width="32%" style="background-color: #660099" | <span style="color:white">Andar 1 a 4 [2]</span> | |||
|- align="center" | |||
| [[Arquivo:Andar_S_S1.png|450px|link=]] | |||
| width="4%" style="border-top-style: hidden; border-width: 1px; border-bottom-style: hidden; border-width: 1px" | | |||
| [[Arquivo:Andar_S_S2.png|450px|link=]] | |||
|- | |||
! style="background-color: #660099" | <span style="color:white">Andar 1 a 4 [3]</span> | |||
| style="border-top-style: hidden; border-width: 1px; border-bottom-style: hidden; border-width: 1px" | | |||
! style="background-color: #660099" | <span style="color:white">Andar 1 a 4 [4]</span> | |||
|- align="center" | |||
| [[Arquivo:Andar_S_S3.png|450px|link=]] | |||
| width="4%" style="border-top-style: hidden; border-width: 1px; border-bottom-style: hidden; border-width: 1px" | | |||
| [[Arquivo:Andar_S_S4.png|450px|link=]] | |||
|- | |||
! style="background-color: #660099" | <span style="color:white">Andar 1 a 4 [5]</span> | |||
| style="border-top-style: hidden; border-width: 1px; border-bottom-style: hidden; border-width: 1px" | | |||
! style="background-color: #660099" | <span style="color:white">Andar 1 a 4 [6]</span> | |||
|- align="center" | |||
| [[Arquivo:Andar_S_S5.png|450px|link=]] | |||
| width="4%" style="border-top-style: hidden; border-width: 1px; border-bottom-style: hidden; border-width: 1px" | | |||
| [[Arquivo:Andar_S_S6.png|450px|link=]] | |||
|- | |||
! style="background-color: #660099" | <span style="color:white">Andar 1 a 4 [7]</span> | |||
| style="border-top-style: hidden; border-width: 1px; border-bottom-style: hidden; border-width: 1px" | | |||
! style="background-color: #660099" | <span style="color:white">Andar 1 a 4 [8]</span> | |||
|- align="center" | |||
| [[Arquivo:Andar_S_S7.png|450px|link=]] | |||
| width="4%" style="border-top-style: hidden; border-width: 1px; border-bottom-style: hidden; border-width: 1px" | | |||
| [[Arquivo:Andar_S_S8.png|450px|link=]] | |||
|-} | |||
</center> | |||
|-|Boss= | |||
O boss do andar Seavell é o Cyborg Shiny Politoed [[Arquivo:186-shPolitoed.png|link=Shiny_Politoed]]. A mecânica desse boss consiste em evitar levar dano do Waterfall, pois ele dá hit kill. Em seu último estágio, o boss usará a skill Tongue Hook e ficará puxando o Pokémon do jogador. Além disso, no campo de batalha cai uma chuva semelhante ao Rain Dance, aplicando ao efeito "Silence". | |||
<center> | |||
{{#widget:Video|url={{filepath:Andar_G_Boss.mp4}}|width=640|height=360}} | |||
</center> | |||
|-|Recompensa= | |||
<center> | |||
{| class="wikitable" | |||
|- | |||
! scope="col" style="background-color: #660099"| <span style="color:white">3 Nightmare Unusual Ores</span> | |||
! scope="col" style="background-color: #660099"| <span style="color:white">50 Technological Crystals (Tier: 3)</span> | |||
! scope="col" style="background-color: #660099"| <span style="color:white">Cyborg Cell (Water)</span> | |||
! scope="col" style="background-color: #660099"| <span style="color:white">3 Moderate Nightmare Experience Candy</span> | |||
! scope="col" style="background-color: #660099"| <span style="color:white">Small Nightmare Experience Candy</span> | |||
|- style="width:50px; text-align:center;" | |||
| [[Arquivo:NW_unusual_ore.png|Nightmare unusual ore|link=]] | |||
| [[Arquivo:Frag_tier_3.png|Technological Crystals (Tier: 3)|link=]] | |||
| [[Arquivo:Cyborg_Cell_(Water)..png|Cyborg Cell (Waterl)|link=]] | |||
| [[Arquivo:Moderate_Nightmare_experience_candy..png|Moderate Nightmare experience candy|link=]] | |||
| [[Arquivo:Small_Nightmare_experience_candy..png|Small Nightmare experience candy|link=]] | |||
</center> | |||
|-} | |||
</tabber> | |||
=Andar Psycraft e Malefic (31 à 34)= | =Andar Psycraft e Malefic (31 à 34)= | ||
Olá, curioso.
Nível Mínimo: 300+
Nível Recomendado: 400+
Observação: No duelo contra o Cyborg Aerodactyl é necessário level 400 ou mais.
Nível NW Necessário: 0+
Recompensa única: 12kk EXP e 150k NW Exp, acesso à sala de Craft.
Recompensa demais meses: NW Exp Váriavel, Diversos Fragmentos de Held Tier 3, 4, 5, 6 e 7, Cyber Cells e Nightmare Unusual Ores.
Caso encontre algum erro ou queira acrescentar alguma informação, entre em contato com um dos membros da wiki.
Cada andar conta com um miniboss. No andar Seavell, o miniboss é o Cyborg Mega Blastoise.
| Inimigos | |||
|---|---|---|---|
Cyborg Blastoise |
Cyborg Crawdaunt |
Cyborg Feraligatr |
Cyborg Mega Blastoise |
Este andar possui duas armadilhas, que causam dano. Sendo elas:
1ª Armadilha - Chuva: Essa armadilha causará dano e lentidão ao jogador e seu Pokémon.
2ª Armadilha - Redemoinho: Essa armadilha puxará ao jogador, causando dano e aplicando o efeito "Sleep". Para sair dele, o jogador deverá usar medicine no personagem e caminhar na direção oposta ao redemoinho.
| Andar 1 a 4 [1] | Andar 1 a 4 [2] | |
|---|---|---|
|
| |
| Andar 1 a 4 [3] | Andar 1 a 4 [4] | |
|
| |
| Andar 1 a 4 [5] | Andar 1 a 4 [6] | |

|
| |
| Andar 1 a 4 [7] | Andar 1 a 4 [8] | |
|
|
O boss do andar Seavell é o Cyborg Shiny Politoed ![]() . A mecânica desse boss consiste em evitar levar dano do Waterfall, pois ele dá hit kill. Em seu último estágio, o boss usará a skill Tongue Hook e ficará puxando o Pokémon do jogador. Além disso, no campo de batalha cai uma chuva semelhante ao Rain Dance, aplicando ao efeito "Silence".
. A mecânica desse boss consiste em evitar levar dano do Waterfall, pois ele dá hit kill. Em seu último estágio, o boss usará a skill Tongue Hook e ficará puxando o Pokémon do jogador. Além disso, no campo de batalha cai uma chuva semelhante ao Rain Dance, aplicando ao efeito "Silence".
| 3 Nightmare Unusual Ores | 50 Technological Crystals (Tier: 3) | Cyborg Cell (Water) | 3 Moderate Nightmare Experience Candy | Small Nightmare Experience Candy |
|---|---|---|---|---|

|
|
|
|
|