DZ Shiny Noctowl: mudanças entre as edições
Ir para navegação
Ir para pesquisar
(Criou página com '== <span style="color: Purple">'''Informações Básicas'''</span> == <span style="color: red">'''Grupo: </span>4 jogadores.''' <br /> <span style="color: red">'''Experiênci...') |
(Renomeando imagem: Berrie 23.png → Lum Berry.webp) |
||
| (21 revisões intermediárias por 6 usuários não estão sendo mostradas) | |||
| Linha 1: | Linha 1: | ||
= | <center>[[Arquivo:Banner DZ Shiny Noctowl.png|link=]]<br></center> | ||
</center> | |||
== Informações Importantes== | |||
'''Grupo:''' 3 Jogadores. | |||
<br>'''Experiência recompensada:''' 150k (Beginner), 190k (Talented), 250k (Intermediate), 300k (Advanced) e 350k (Expert). | |||
<br>'''Revives:''' É possível utilizar até 10 Revives. | |||
<br>'''Tempo limite:''' 1 hora. | |||
<center> | |||
</center> | |||
== Inimigos== | |||
'''Quantidade''':62. | |||
<center> | <center> | ||
{|class="wikitable" width="30%" style= "text-align:center" | |||
|- | |||
! colspan="2" width="50%" | Pokémon | |||
! Elemento | |||
|- | |||
|style="border-right-style: hidden;" | [[Arquivo:Shinyfea.png|link=Shiny Fearow]] || [[Shiny Fearow]] | |||
| [[Arquivo:Flying.png|link=]] '''Flying''' | |||
|- | |||
|style="border-right-style: hidden;" | [[Arquivo:018-Pidgeot.png|link=pidgeot]] || [[Pidgeot]] | |||
| [[Arquivo:Flying.png|link=]] '''Flying''' [[Arquivo:Normal1.png|link=]] '''Normal''' | |||
|- | |||
|style="border-right-style: hidden;" | [[Arquivo:277-Swellow.png|link=swellow]] || [[Swellow]] | |||
| [[Arquivo:Flying.png|link=]] '''Flying''' [[Arquivo:Normal1.png|link=]] '''Normal''' | |||
|- | |||
|style="border-right-style: hidden;" | [[Arquivo:169-Crobat.png|link=crobat]] || [[Crobat]] | |||
| [[Arquivo:Flying.png|link=]] '''Flying''' [[Arquivo:poison1.png|link=]] '''Poison''' | |||
|- | |||
|style="border-right-style: hidden;" | [[Arquivo:164-Noctowl.png|link=noctowl]] || [[Noctowl]] | |||
| [[Arquivo:Flying.png|link=]] '''Flying''' [[Arquivo:Normal1.png|link=]] '''Normal''' | |||
|- | |||
|style="border-right-style: hidden;" | [[Arquivo:163-Shiny Hoothoot.png|link=Shiny Hoothoot]] || [[Shiny Hoothoot]] | |||
| [[Arquivo:Flying.png|link=]] '''Flying''' | |||
|-' | |||
|style="border-right-style: hidden;" | [[Arquivo:164-Sh Noctowl.png|link=Shiny Noctowl]] || '''Shiny Noctowl (Boss)''' | |||
| [[Arquivo:Flying.png|link=]] '''Flying''' | |||
|- | |||
'' | |||
|- | |||
|} | |||
</center> | </center> | ||
== < | == Possíveis Capturas == | ||
<center> | |||
{|class="wikitable" width="30%" style= "text-align:center" | |||
|- | |||
! colspan="2" width="50%" | Pokémon | |||
! Pokébolas Indicadas | |||
|- | |||
|style="border-right-style: hidden;" | [[Arquivo:169-Crobat.png|link=crobat]] || [[Crobat]] | |||
| [[Arquivo:Ultra-ball(1).png|link=Pokébolas]] [[Arquivo:Sora-ball.png|link=Pokébolas]] [[Arquivo:Fast-ball.png|link=Pokébolas]] [[Arquivo:Janguru-ball.png|link=Pokébolas]] [[Arquivo:Premier-ball(1).png|link=Pokébolas]] | |||
|- | |||
|style="border-right-style: hidden;" | [[Arquivo:163-Shiny Hoothoot.png|link=Shiny Hoothoot]] || [[Shiny Hoothoot]] | |||
| [[Arquivo:Ultra-ball(1).png|link=Pokébolas]] [[Arquivo:Sora-ball.png|link=Pokébolas]] [[Arquivo:Fast-ball.png|link=Pokébolas]] [[Arquivo:Premier-ball(1).png|link=Pokébolas]] | |||
|- | |||
|style="border-right-style: hidden;" | [[Arquivo:164-Sh Noctowl.png|link=Shiny Noctowl]] || [[Shiny Noctowl]] | |||
| [[Arquivo:Ultra-ball(1).png|link=Pokébolas]] [[Arquivo:Sora-ball.png|link=Pokébolas]] [[Arquivo:Fast-ball.png|link=Pokébolas]] [[Arquivo:Premier-ball(1).png|link=Pokébolas]] | |||
|- | |||
</center> | |||
|} | |||
</center> | |||
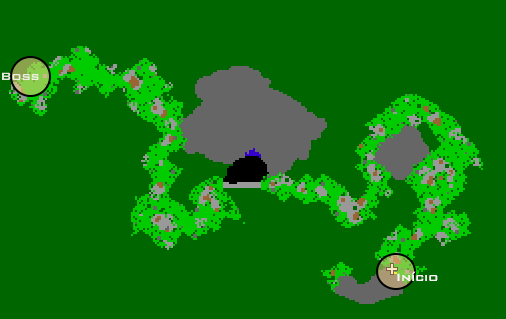
== | == Mapa == | ||
<center> | |||
<center><br />[[Arquivo: | <center><br />[[Arquivo:Mapa DZ Shiny Noctowl.png|link=DZ Shiny Noctowl]] </center> | ||
</center> | |||
== | == Dicas == | ||
''' | * O Shiny Noctowl usa muito o Golpe "fly", que o deixa invulnerável, sem atacar por alguns segundos e depois aplica '''SILENCE''' em quem for atingido. Por isso, o jogador que estiver defendendo seus golpes pode facilmente curar seus Pokémon durante seus golpes, enquanto os outros atacam. Uma ótima estratégia é levar um Pokémon que possui o Golpe ''Selfdestruction''. | ||
''' | * Os Pokémon nessa dungeon infligem muitos status negativos como '''STUN''', '''PARALYZE''' e '''CONFUSION''', o ideal é carregar consigo bastante [[Arquivo:Medicine.png|link=Poções]] '''Medicine''' ou utilizar uma [[Arquivo:Lum Berry.webp|link=Berries]] '''Lum Berry'''. | ||
''' | *O Dano dessa dungeon é predominantemente [[Arquivo:Flying.png|link=Efetividades]] '''Flying''' mas também há alguns danos [[Arquivo:poison1.png|link=Efetividades]] '''Poison''' e [[Arquivo:Normal1.png|link=Efetividades]] '''Normal''', por isso, [[Arquivo:Berrie_13.png|link=Berries]] '''Coba Berry''', [[Arquivo:Berrie_15.png|link=Berries]] '''Kebia Berry''' e [[Arquivo:Berrie_11.png|link=Berries]] '''Chilan Berry''' serão de grande ajuda. | ||
''' | * Os Pokémon com ataques dos tipos [[Arquivo:Electric.png|link=Efetividades]] Electric, [[Arquivo:Rock.png|link=Efetividades]] Rock e [[Arquivo:Ice.png|link=Efetividades]] Ice são as melhores opções para essa Dimensional Zone. | ||
''' | <br>'''Observação:''' É possível conferir as habilidades dos Pokémon utilizando a [[Arquivo:PokedexIcon.png|link=]] '''Pokédex'''. | ||
''' | |||
''' | == Possíveis Prêmios dos báus == | ||
''' | <center> | ||
''' | |||
== | {| class="wikitable" width="30%" style= "text-align:center" | ||
|- | |||
! Item | |||
|- | |||
| [[Arquivo:Dimensional.png|link=Dimensional Stone]] Dimensional Stone (1 - ??) | |||
|- | |||
| [[Arquivo:Emeralds.png|link=]] Emerald (1 - ??) | |||
|- | |||
| [[Arquivo:Topaz1.png|link=]] Topaz (1 - ??) | |||
|- | |||
| [[Arquivo:Sapphires.png|link=]] Sapphire (1-??) | |||
|- | |||
| [[Arquivo:SilverKey.png|link=]] Silver Dimensional Key (1-2) | |||
|- | |||
| [[Arquivo:Birdtoken.png|link=DZ Shiny Noctowl]] Bird Token (1-2) | |||
|- | |||
| [[Arquivo:Scrolls.gif|link=DZ Shiny Noctowl]] Scroll of Knowledge<br> (Dinosaur Togekiss) | |||
|- | |||
| [[Arquivo:Scrolls.gif|link=DZ Shiny Noctowl]] Scroll of Knowledge<br>(Valkyrie Togekiss) | |||
|- | |||
| [[Arquivo:Scrolls.gif|link=DZ Shiny Noctowl]] Scroll of Knowledge<br>(Hawk Togekiss) | |||
|- | |||
| [[Arquivo:UnpackedToy.png|link=DZ Shiny Noctowl]] Unpacked Toy (Ultra Raro) | |||
|} | |||
Edição atual tal como às 00h19min de 13 de junho de 2026
Informações Importantes
Grupo: 3 Jogadores.
Experiência recompensada: 150k (Beginner), 190k (Talented), 250k (Intermediate), 300k (Advanced) e 350k (Expert).
Revives: É possível utilizar até 10 Revives.
Tempo limite: 1 hora.
Inimigos
Quantidade:62.
| Pokémon | Elemento | |
|---|---|---|
| Shiny Fearow | ||
| Pidgeot | ||
| Swellow | ||
| Crobat | ||
| Noctowl | ||
| Shiny Hoothoot | ||
| Shiny Noctowl (Boss) | ||
Possíveis Capturas
| Pokémon | Pokébolas Indicadas | |
|---|---|---|
| Crobat | ||
| Shiny Hoothoot | ||
| Shiny Noctowl | ||
Mapa
Dicas
- O Shiny Noctowl usa muito o Golpe "fly", que o deixa invulnerável, sem atacar por alguns segundos e depois aplica SILENCE em quem for atingido. Por isso, o jogador que estiver defendendo seus golpes pode facilmente curar seus Pokémon durante seus golpes, enquanto os outros atacam. Uma ótima estratégia é levar um Pokémon que possui o Golpe Selfdestruction.
- Os Pokémon nessa dungeon infligem muitos status negativos como STUN, PARALYZE e CONFUSION, o ideal é carregar consigo bastante
 Medicine ou utilizar uma
  Lum Berry.
 - O Dano dessa dungeon é predominantemente
 Flying mas também há alguns danos
  Poison e
  Normal, por isso,
  Coba Berry,
  Kebia Berry e
  Chilan Berry serão de grande ajuda.
 - Os Pokémon com ataques dos tipos
 Electric,
  Rock e
  Ice são as melhores opções para essa Dimensional Zone.
Observação: É possível conferir as habilidades dos Pokémon utilizando a ![]() Pokédex.
Pokédex.
Possíveis Prêmios dos báus
| Item |
|---|
(Dinosaur Togekiss) |
(Valkyrie Togekiss) |
(Hawk Togekiss) |