|
|
| (191 revisões intermediárias pelo mesmo usuário não estão sendo mostradas) |
| Linha 1: |
Linha 1: |
| | Shadow |
|
| |
|
| | <center> [[Arquivo:Banner_Hunting Spirit Quest.png|link=]] </center> <br> |
|
| |
|
| | <span style="color:red">'''Nível necessário:'''</span> 300 <br> |
|
| |
|
| DUNGEONS
| | <p><font color="red">'''Nível NW Necessário:</font> 0+''' </p> |
|
| |
|
| | <span style="color:red">'''Recompensa:'''</span> Liberação de diária de Spiritomb, Pokémon Spiritomb na Pokéball e possibilidade de colocar Spiritomb na Premier Ball. <br> |
|
| |
|
| As Haunted Dungeons aparecerão em locais fixos pelo mapa. Após dirigir-se ao local, o jogador poderá selecionar o nível de dificuldade que deseja enfrentar. Após isso, ele será levado para a dungeon, e o desafio será iniciado. Cada dungeon pode ser concluída apenas uma vez por dia, sendo resetada após o Server Save diário, que ocorre às 7h40 BRT.
| | <b>Caso encontre algum erro ou queira acrescentar alguma informação, entre em contato com [[Nossa Equipe|um dos membros da wiki.]]</b> |
|
| |
|
| É possível verificar quais dungeons foram concluídas em um mesmo dia pela interface de dungeons no calendário (C).
| |
|
| |
|
| <center>
| |
|
| |
|
| {| class="wikitable" width="80%"
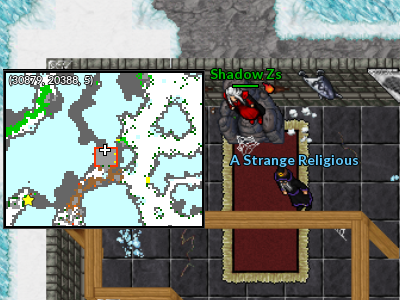
| | Para iniciar a quest o jogador deverá ir até a residência de Lavender e falar com o NPC A Strange Religious. |
|
| |
|
| |- align="center" | | <center> [[Arquivo:Localização A Strange Religious.png|link=]] </center> |
|
| |
|
| !align="center" width="1%" colspan="9" style="background-color: #9d1a64" |<span style="color:white">'''Level Recomendado'''</span>
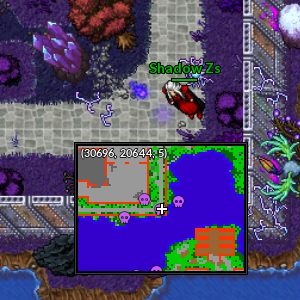
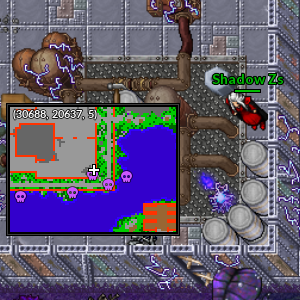
| | Ele dará uma [[Arquivo:Odd Keystone.png|link=]] Odd Keystone para que o jogador colete os espíritos de Pokémon mortos espalhados no Nightmare World. |
|
| |
|
| |-
| |
|
| |
|
| !width="10% |Fácil
| | Serão ao todo 108 espíritos. |
|
| |
|
| !width="10% |Médio
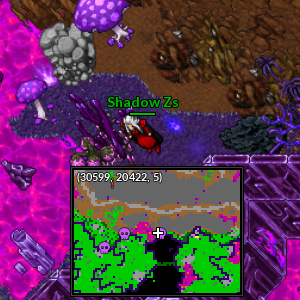
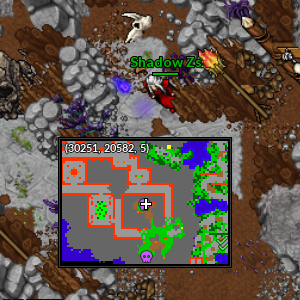
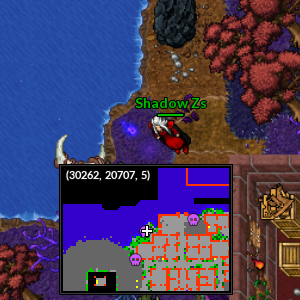
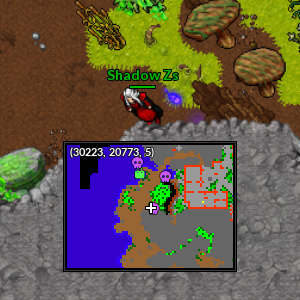
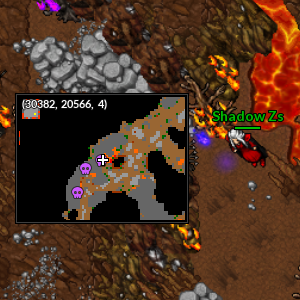
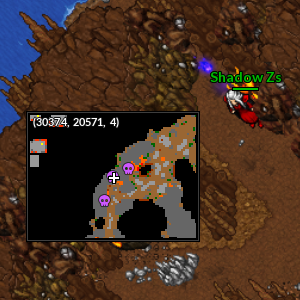
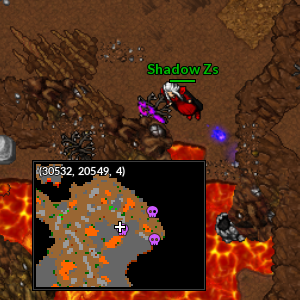
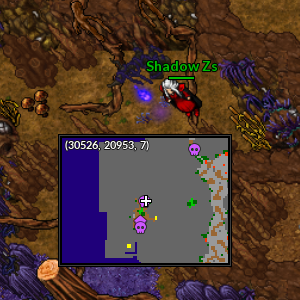
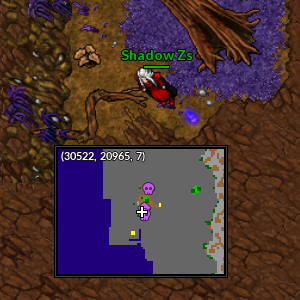
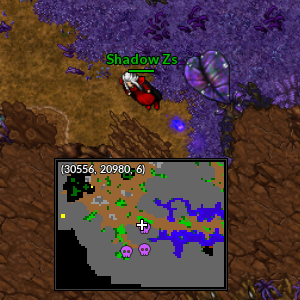
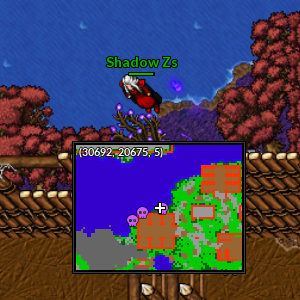
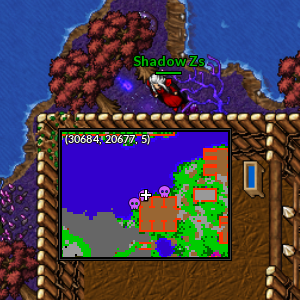
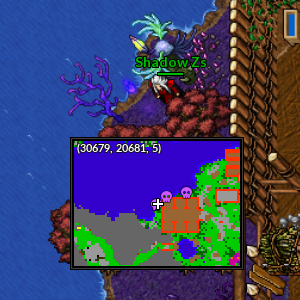
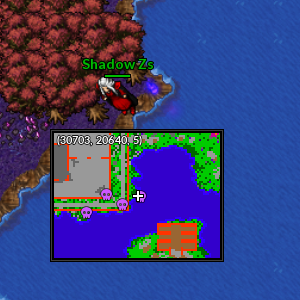
| | == Localização dos espíritos == |
|
| |
|
| !width="10% |Difícil
| | '''Obs.:''' Para coletar os espíritos basta conversar com eles. |
|
| |
|
| |- align="center"
| |
|
| |
|
| | Level 100
| | <center class="center-tab"><tabber> |
|
| |
|
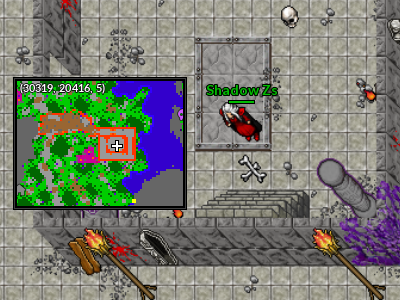
| | Level 250 | | |-|Região de Lavender= |
|
| |
|
| | Level 400
| | São 15 espíritos ao total nessa região. |
| | |
| |}
| |
| | |
| </center>
| |
| | |
| | |
| | |
| <center>
| |
| | |
| {| class="wikitable" width="50%"
| |
| | |
| |- align="center"
| |
| | |
| !align="center" width="1%" colspan="9" style="background-color: #9d1a64" |<span style="color:white">'''Recompensas gerais'''</span>
| |
| | |
| |-
| |
| | |
| |- align="center"
| |
| | |
| | rowspan="6"|Recompensa
| |
| | |
| |- align="center"
| |
|
| |
|
| | {| class="wikitable" width="70%" |
| | ! width="5%" style="background-color: #9d1a64" | Localização |
| | ! width="20%" style="background-color: #9d1a64" | Posição |
| | |- |
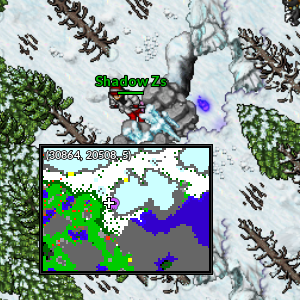
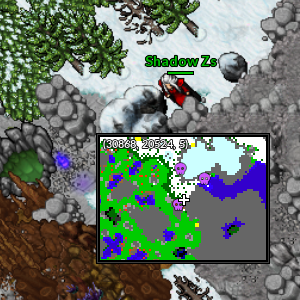
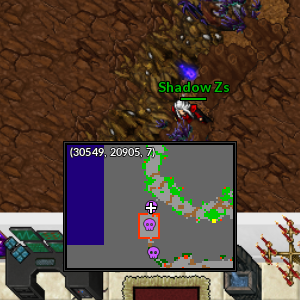
| | | align="center" | [[Arquivo:30866, 20508, 5.png|link=]] |
| | | align="center" | Respawn de Sneasel <br> 30866, 20508, 5 |
| | |- |
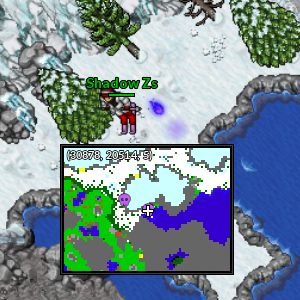
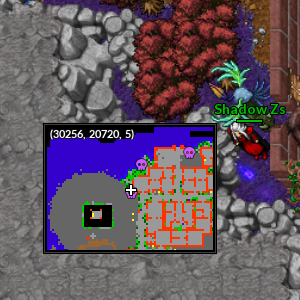
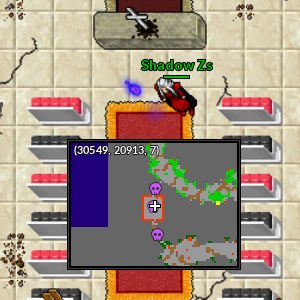
| | | align="center" | [[Arquivo:30879, 20514, 5.png|link=]] |
| | | align="center" | Respawn de Sneasel <br> 30879, 20514, 5 |
| | |- |
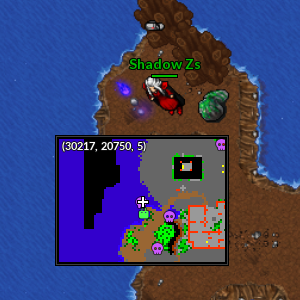
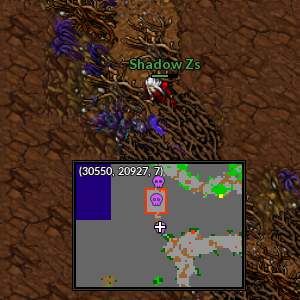
| | | align="center" | [[Arquivo:30865, 20526, 5.png|link=]] |
| | | align="center" | Entre o respawn de Sneasel e Cranidos <br> 30865, 20526, 5 |
| | |- |
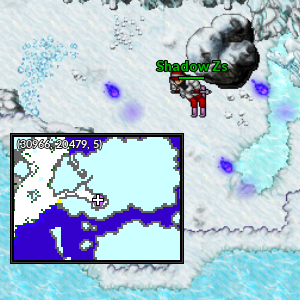
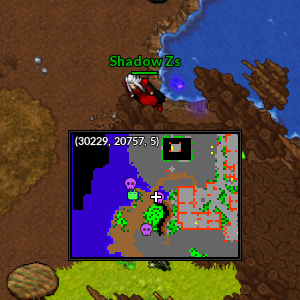
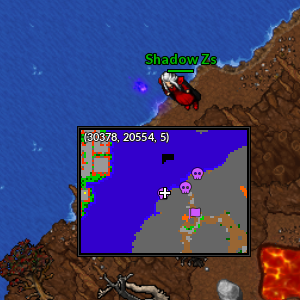
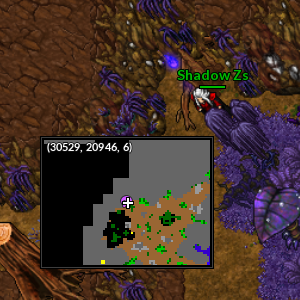
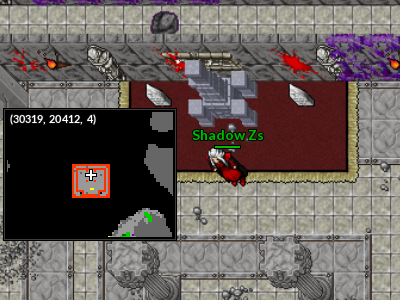
| | | align="center" | [[Arquivo:30966, 20479, 5.png|link=]] |
| | | align="center" | Andar inferior ao respawn de Cloyster <br> 30966, 20479, 5 <br> '''Obs.:''' Nesse local tem três espíritos. |
| |- | | |- |
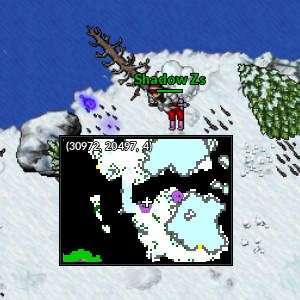
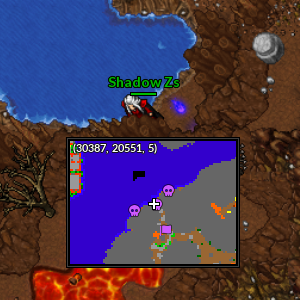
| | align="center" style="border-right-style: hidden;" | [[Arquivo:Exp_icon.png|30px|link=]] | | | align="center" | [[Arquivo:30970, 20497, 4.png|link=]] |
| | Experiência | | | align="center" | Respawn de Cloyster <br> 30970, 20497, 4 |
| |- | | |- |
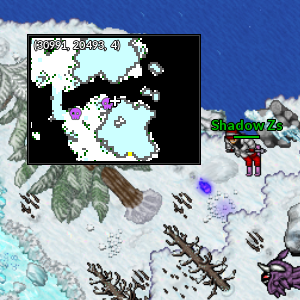
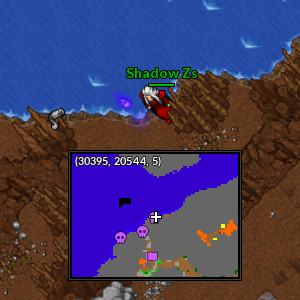
| | align="center" style="border-right-style: hidden;" | [[Arquivo:Halloween_Token_2020.png|link=]] | | | align="center" | [[Arquivo:30990, 20494, 4.png|link=]] |
| | Halloween Token | | | align="center" | Respawn de Cloyster <br> 30990, 20494, 4 |
| |- | | |- |
| | align="center" style="border-right-style: hidden;" | [[Arquivo:GoldenKey.png|link=]] | | | align="center" | [[Arquivo:30987, 20503, 3.png|link=]] |
| | Halloween Dimensional Key | | | align="center" | Respawn de Cloyster <br> 30987, 20503, 3 |
| |- | | |- |
| |} | | | align="center" | [[Arquivo:30920, 20417, 4.png|link=]] |
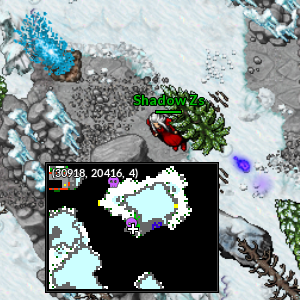
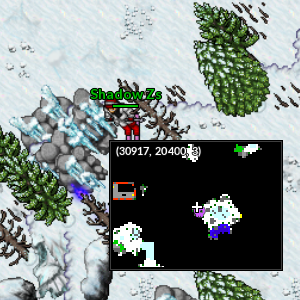
| | | | align="center" | Respawn de Snover e Abomasnow <br> 30920, 20417, 4 |
| </center>
| |
| | |
| | |
| | |
| | |
| == Dungeons com objetivo de derrotar Pokémon ==
| |
| | |
| === Lavender's Haunted Cemetery ===
| |
| | |
| (Lavender) free
| |
| | |
| <center>
| |
| | |
| {| class="wikitable" width="50%"
| |
| | |
| |- align="center"
| |
| | |
| !align="center" width="1%" colspan="9" style="background-color: #9d1a64" |<span style="color:white">'''Informações'''</span>
| |
| | |
| |- | |
| | |
| !Localização
| |
| | |
| !colspan="2"|Recompensa
| |
| | |
| |- align="center" | |
| | |
| | rowspan="10"| Cemitério de Lavender (Free)
| |
| |- | | |- |
| | align="center" style="border-right-style: hidden;" | [[Arquivo:Exp_icon.png|30px|link=]] | | | align="center" | [[Arquivo:30907, 20391, 4.png|link=]] |
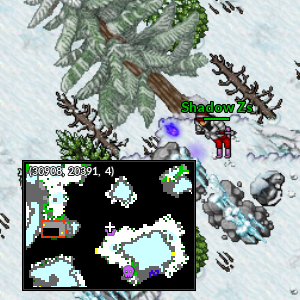
| | Experiência | | | align="center" | Respawn de Snover e Abomasnow <br> 30907, 20391, 4 |
| |- | | |- |
| | align="center" style="border-right-style: hidden;" | [[Arquivo:Halloween_Token_2020.png|link=]] | | | align="center" | [[Arquivo:30916, 20402, 3.png|link=]] |
| | Halloween Token | | | align="center" | Respawn de Snover e Abomasnow <br> 30916, 20402, 3 |
| |- | | |- |
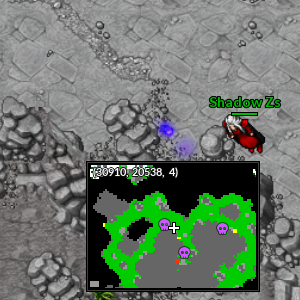
| | align="center" style="border-right-style: hidden;" | [[Arquivo:GoldenKey.png|link=]] | | | align="center" | [[Arquivo:30908, 20538, 4.png|link=]] |
| | Halloween Dimensional Key | | | align="center" | Respawn de Tyranitar <br> 30908, 20538, 4 |
| |- | | |- |
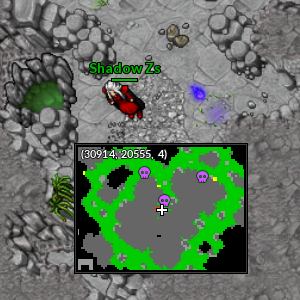
| | align="center" style="border-right-style: hidden;" | [[Arquivo:Gengar-locker.png|50px|link=]] | | | align="center" | [[Arquivo:30916, 20555, 4.png|link=]] |
| | Gengar Locker | | | align="center" | Respawn de Tyranitar <br> 30916, 20555, 4 |
| |- | | |- |
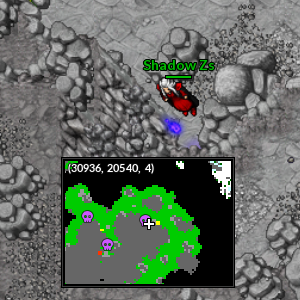
| | align="center" style="border-right-style: hidden;" | [[Arquivo:Shiny-gengar-locker.png|50px|link=]] | | | align="center" | [[Arquivo:30936, 20541, 4.png|link=]] |
| | Shiny Gengar Locker | | | align="center" | Respawn de Tyranitar <br> 30936, 20541, 4 |
| |- | | |- |
| |} | | |} |
| | |
| </center>
| |
| | |
| === Pewter's Haunted Cemetery ===
| |
| (Pewter) free
| |
| === Cursed Cerulean ===
| |
| (Cerulean) free
| |
| === Cursed Moro Island ===
| |
| (Moro island) vip
| |
| === Haunted Desert ===
| |
| (Sphinx) vip
| |
| | |
| == Dungeons com objetivo de derrotar NPC ==
| |
| | |
| === Lonely House in Texas ===
| |
| (ascorbia) vip
| |
| === Haddonfield, Illinois: Myers' House ===
| |
| (Lavender) free
| |
| === Maze on Woodsboro ===
| |
| (jungle island) vip
| |
| === The Purge ===
| |
| (celadon) free
| |
| === Factory on Elm Street ===
| |
| (cinnabar) free
| |
| === Family Picnic by The Cornfield ===
| |
| (Pallet) free
| |
| | |
| == Dungeon especial ==
| |
|
| |
|
| Forest Soul Warden (lost island) *free
| |
|
| |
|
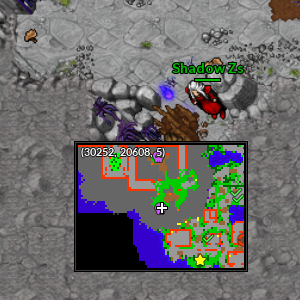
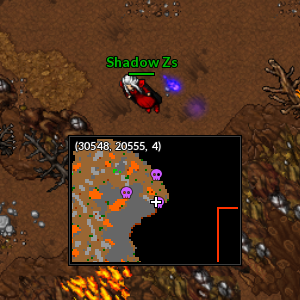
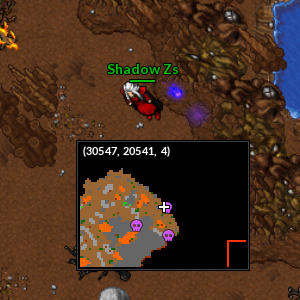
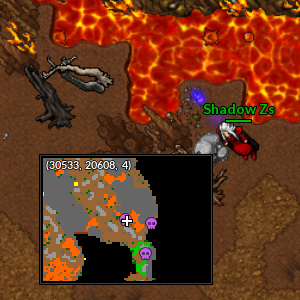
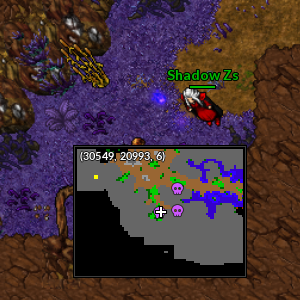
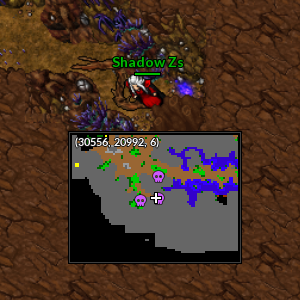
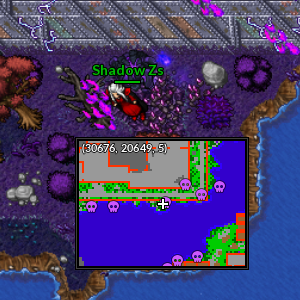
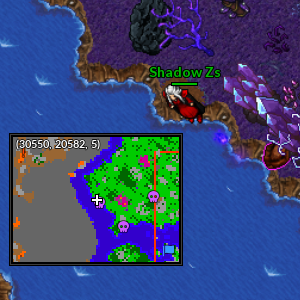
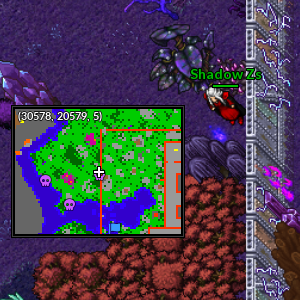
| | |-|Região de Cerulean= |
|
| |
|
| == Halloween ==
| | São 27 espíritos ao total nessa região. |
|
| |
|
| === Addons ===
| | {| class="wikitable" width="70%" |
| | | ! width="5%" style="background-color: #9d1a64" | Localização |
| Durante o evento de Halloween é disponibilizado algumas Addons. A seguir tem uma tabela com todas as Addons exclusivo do evento de Halloween.
| | ! width="20%" style="background-color: #9d1a64" | Posição |
| | |
| '''Obs.:''' Existe a possibilidade desta addons voltar nos eventos de '''Halloween'''.
| |
| | |
| <center>
| |
| {| class="wikitable" width="90%" | |
| ! width="1%" style="background-color: #9d1a64" | <span style="color:white">Traje</span>
| |
| ! width="1%" style="background-color: #9d1a64" | <span style="color:white">Pokémon</span>
| |
| ! width="1%" style="background-color: #9d1a64" | <span style="color:white">Ícone</span>
| |
| ! width="4%" style="background-color: #9d1a64" | <span style="color:white">Nome</span>
| |
| ! width="5%" style="background-color: #9d1a64" | <span style="color:white">Onde conseguir</span> | |
| ! width="1%" style="background-color: #9d1a64" | <span style="color:white">Customizável</span> | |
| |- | | |- |
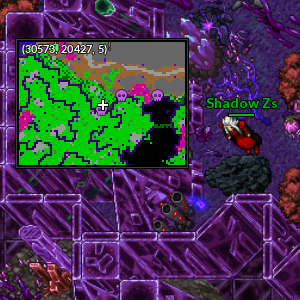
| | align="center" | [[Arquivo:Alolan-Dugtrio_Hedjet.png|link=]] | | | align="center" | [[Arquivo:30572, 20429, 5.png|link=]] |
| | align="center" | [[Arquivo:051-AlolanDugtrio.png|link=Alolan Dugtrio]]<br/> [[Alolan Dugtrio]] | | | align="center" | Respawn de Alolan Digglet <br> 30572, 20429, 5 |
| | align="center" | [[Arquivo:Hedjet-Alolan Dugtrio.png|link=]]
| |
| | align="center" | Hedjet
| |
| | align="center" | Diamond Shop
| |
| | align="center" | Não
| |
| |- | | |- |
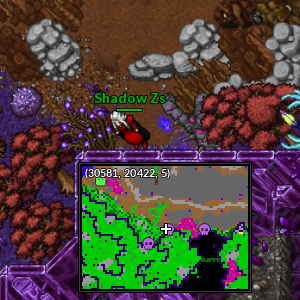
| | align="center" | [[Arquivo:Alolan-Persian_God-Cat.png|link=]] | | | align="center" | [[Arquivo:30582, 20422, 5.png|link=]] |
| | align="center" | [[Arquivo:053-AlolanPersian.png|link=Alolan Persian]]<br/> [[Alolan Persian]] | | | align="center" | Respawn de Alolan Digglet <br> 30582, 20422, 5 |
| | align="center" | [[Arquivo:God Cat.png|link=]]
| |
| | align="center" | God Cat
| |
| | align="center" | Diamond Shop
| |
| | align="center" | Não
| |
| |- | | |- |
| | align="center" | [[Arquivo:Alolan-Raichu_Mummy.png|link=]] | | | align="center" | [[Arquivo:30600, 20422, 5.png|link=]] |
| | align="center" | [[Arquivo:026-AlolanRaichu.png|link=Alolan Raichu]]<br/> [[Alolan Raichu]] | | | align="center" | Respawn de Alolan Digglet <br> 30600, 20422, 5 |
| | align="center" | [[Arquivo:Mummy Costume.png|link=]]
| |
| | align="center" | Mummy
| |
| | align="center" | Diamond Shop
| |
| | align="center" | Não
| |
| |- | | |- |
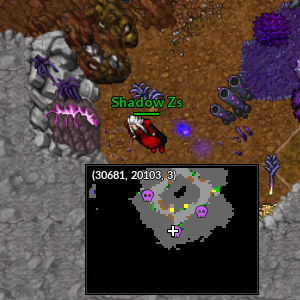
| | align="center" | [[Arquivo:Azumarill_Ghost-Costume.png|link=]] | | | align="center" | [[Arquivo:30682, 20103, 3.png|link=]] |
| | align="center" | [[Arquivo:184-Azumarill.png|link=Azumarill]]<br/> [[Azumarill]] | | | align="center" | Respawn de Galarian Farfetch'd <br> 30682, 20103, 3 |
| | align="center" | [[Arquivo:Ghost Costume-Azumarill.png|link=]]
| |
| | align="center" | Ghost Costume
| |
| | align="center" | Halloween Workshop
| |
| | align="center" | Não
| |
| |- | | |- |
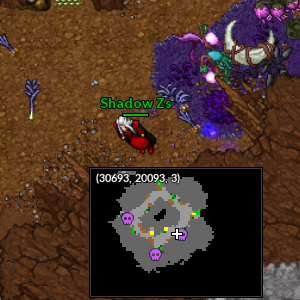
| | align="center" | [[Arquivo:Cacturne_Scarecrow-Costume.png|link=]] | | | align="center" | [[Arquivo:30695, 20093, 3.png|link=]] |
| | align="center" | [[Arquivo:332.Cacturne.png|link=Cacturne]]<br/> [[Cacturne]] | | | align="center" | Respawn de Galarian Farfetch'd <br> 30695, 20093, 3 |
| | align="center" | [[Arquivo:Scarecrow Costume.png|link=]]
| |
| | align="center" | Scarecrow Costume
| |
| | align="center" | Halloween Workshop
| |
| | align="center" | Não
| |
| |- | | |- |
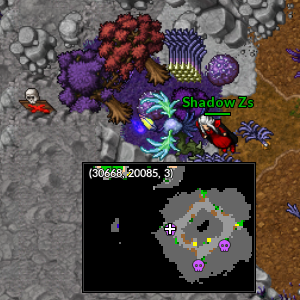
| | align="center" | [[Arquivo:Claydol_Sticky-Brain-Costume.png|link=]] | | | align="center" | [[Arquivo:30666, 20085, 3.png|link=]] |
| | align="center" | [[Arquivo:344-Claydol.png|link=Claydol]]<br/> [[Claydol]] | | | align="center" | Respawn de Galarian Farfetch'd <br> 30666, 20085, 3 |
| | align="center" | [[Arquivo:Sticky Brain.png|link=]]
| |
| | align="center" | Sticky Brain
| |
| | align="center" | Diamond Shop
| |
| | align="center" | Não
| |
| |- | | |- |
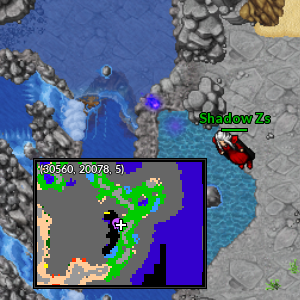
| | align="center" | [[Arquivo:Cofagrigus_Iron-Maiden.png|link=]] | | | align="center" | [[Arquivo:30558, 20077, 5.png|link=]] |
| | align="center" | [[Arquivo:563-Cofagrigus.png|link=Cofagrigus]]<br/> [[Cofagrigus]] | | | align="center" | Respawn de Mantyke <br> 30558, 20077, 5 |
| | align="center" | [[Arquivo:Iron Maiden.png|link=]]
| |
| | align="center" | Iron Maiden
| |
| | align="center" | Halloween Workshop
| |
| | align="center" | Não
| |
| |- | | |- |
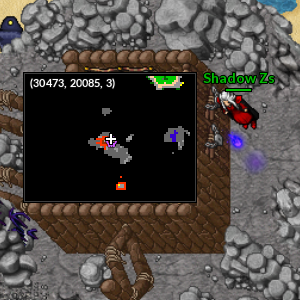
| | align="center" | [[Arquivo:Elite-Hitmontop_Pumpkin-Mask.png|link=]] | | | align="center" | [[Arquivo:30473, 20086, 3.png|link=]] |
| | align="center" | [[Arquivo:237-EliteHitmontop.png|link=Elite Hitmontop]]<br/> [[Elite Hitmontop]] | | | align="center" | Respawn de Mantine <br> 30473, 20086, 3 |
| | align="center" | [[Arquivo:Pumpkin Mask.png|link=]]
| |
| | align="center" | Pumpkin Mask
| |
| | align="center" | Diamond Shop
| |
| | align="center" | Não
| |
| |- | | |- |
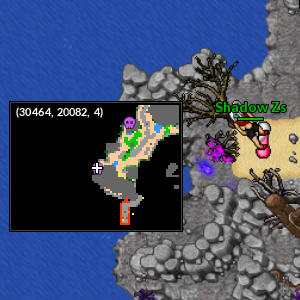
| | align="center" | [[Arquivo:Forretress_Poisonous-Spike-Costume.png|link=]] | | | align="center" | [[Arquivo:30463, 20083, 4.png|link=]] |
| | align="center" | [[Arquivo:205-Forretress.png|link=Forretress]]<br/> [[Forretress]] | | | align="center" | Respawn de Mantine <br> 30463, 20083, 4 |
| | align="center" | [[Arquivo:Poisonous Spike Costume.png|link=]]
| |
| | align="center" | Poisonous Spike Costume
| |
| | align="center" | Diamond Shop
| |
| | align="center" | Não
| |
| |- | | |- |
| | align="center" | [[Arquivo:Gallade_Gentleman-Costume_1.png|link=]] | | | align="center" | [[Arquivo:30480, 20059, 4.png|link=]] |
| | align="center" | [[Arquivo:475-Gallade.png|link=Gallade]]<br/> [[Gallade]] | | | align="center" | Respawn de Mantine <br> 30480, 20059, 4 |
| | align="center" | [[Arquivo:Gentleman Costume 1.png|link=]]
| |
| | align="center" | Gentleman Costume 1
| |
| | align="center" | Diamond Shop
| |
| | align="center" | Não
| |
| |- | | |- |
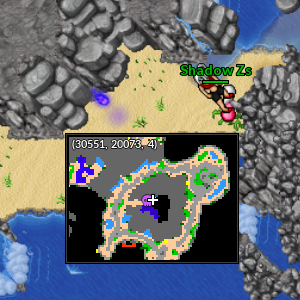
| | align="center" | [[Arquivo:Gallade_Gentleman-Costume_2.png|link=]] | | | align="center" | [[Arquivo:30548, 20073, 4.png|link=]] |
| | align="center" | [[Arquivo:475-Gallade.png|link=Gallade]]<br/> [[Gallade]] | | | align="center" | Respawn de Mantine <br> 30548, 20073, 4 |
| | align="center" | [[Arquivo:Gentleman Costume 2.png|link=]]
| |
| | align="center" | Gentleman Costume 2
| |
| | align="center" | Diamond Shop
| |
| | align="center" | Não
| |
| |- | | |- |
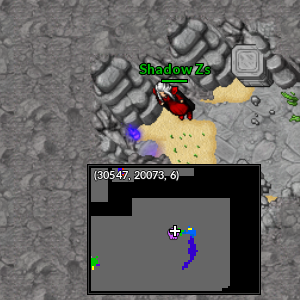
| | align="center" | [[Arquivo:Gardevoir_Dark-Bride-Costume_1.png|link=]] | | | align="center" | [[Arquivo:30546, 20074, 6.png|link=]] |
| | align="center" | [[Arquivo:282-Gardevoir.png|link=Gardevoir]]<br/> [[Gardevoir]] | | | align="center" | Respawn de Mantine, próximo ao locker de Hacker <br> 30546, 20074, 6 |
| | align="center" | [[Arquivo:Dark Bride Costume 1.png|link=]]
| |
| | align="center" | Dark Bride Costume 1
| |
| | align="center" | Diamond Shop
| |
| | align="center" | Não
| |
| |- | | |- |
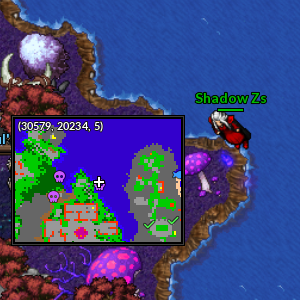
| | align="center" | [[Arquivo:Gardevoir_Dark-Bride-Costume_2.png|link=]] | | | align="center" | [[Arquivo:30579, 20235, 5.png|link=]] |
| | align="center" | [[Arquivo:282-Gardevoir.png|link=Gardevoir]]<br/> [[Gardevoir]] | | | align="center" | Cidade de Cerulean, próximo ao Raul's Shiny Snorlax <br> 30579, 20235, 5 |
| | align="center" | [[Arquivo:Dark Bride Costume 2.png|link=]]
| |
| | align="center" | Dark Bride Costume 2
| |
| | align="center" | Diamond Shop
| |
| | align="center" | Não
| |
| |- | | |- |
| | align="center" | [[Arquivo:Gardevoir_Little-Devil-Costume.png|link=]] | | | align="center" | [[Arquivo:30559, 20231, 5.png|link=]] |
| | align="center" | [[Arquivo:282-Gardevoir.png|link=Gardevoir]]<br/> [[Gardevoir]] | | | align="center" | Cidade de Cerulean <br> 30559, 20231, 5 |
| | align="center" | [[Arquivo:Little Devil Costume.png|link=]]
| |
| | align="center" | Little Devil Costume
| |
| | align="center" | Diamond Shop
| |
| | align="center" | Não
| |
| |- | | |- |
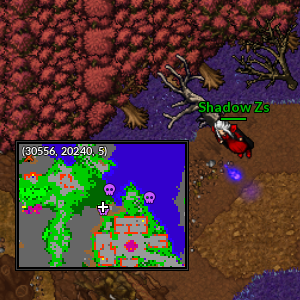
| | align="center" | [[Arquivo:Gogoat_Cursed-Totem.png|link=]] | | | align="center" | [[Arquivo:30556, 20241, 5.png|link=]] |
| | align="center" | [[Arquivo:673-Gogoat.png|link=Gogoat]]<br/> [[Gogoat]] | | | align="center" | Cidade de Cerulean <br> 30556, 20241, 5 |
| | align="center" | [[Arquivo:Cursed Totem.png|link=]]
| |
| | align="center" | Cursed Totem
| |
| | align="center" | Halloween Workshop
| |
| | align="center" | Não
| |
| |- | | |- |
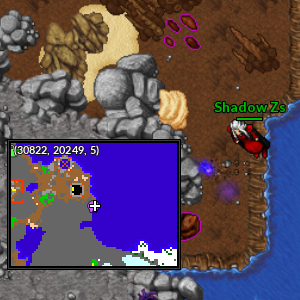
| | align="center" | [[Arquivo:Kricketune_Assassin-Costume.png|link=]] | | | align="center" | [[Arquivo:30821, 20250, 5.png|link=]] |
| | align="center" | [[Arquivo:402.Kricketune.png|link=Kricketune]]<br/> [[Kricketune]] | | | align="center" | Respawn de Spoink <br> 30821, 20250, 5 |
| | align="center" | [[Arquivo:Assassin Costume-Kricketune.png|link=]]
| |
| | align="center" | Assassin Costume
| |
| | align="center" | Halloween Workshop
| |
| | align="center" | Não
| |
| |- | | |- |
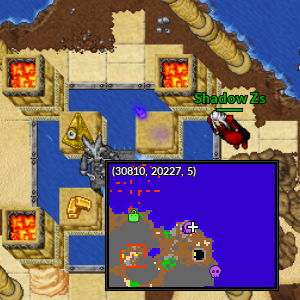
| | align="center" | [[Arquivo:Lapras_Ice-Queen-Costume.png|link=]] | | | align="center" | [[Arquivo:30808, 20227, 5.png|link=]] |
| | align="center" | [[Arquivo:131-Lapras.png|link=Lapras]]<br/> [[Lapras]] | | | align="center" | Respawn de Spoink <br> 30808, 20227, 5 |
| | align="center" | [[Arquivo:Ice Queen.png|link=]]
| |
| | align="center" | Ice Queen
| |
| | align="center" | Diamond Shop
| |
| | align="center" | Não
| |
| |- | | |- |
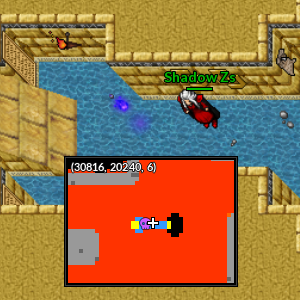
| | align="center" | [[Arquivo:Manectric_Thunder-Spark-Costume.png|link=]] | | | align="center" | [[Arquivo:30814, 20240, 6.png|link=]] |
| | align="center" | [[Arquivo:310-Manectric.png|link=Manectric]]<br/> [[Manectric]] | | | align="center" | Entrada respawn de Starmie <br> 30814, 20240, 6 |
| | align="center" | [[Arquivo:Thunder Spark Costume.png|link=]]
| |
| | align="center" | Thunder Spark Costume
| |
| | align="center" | Diamond Shop
| |
| | align="center" | Não
| |
| |- | | |- |
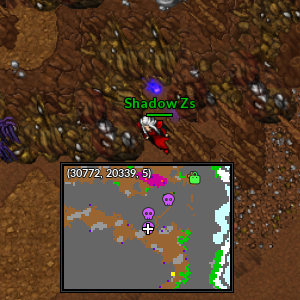
| | align="center" | [[Arquivo:Mega_Beedrill_Hedjet.png|link=]] | | | align="center" | [[Arquivo:30772, 20338, 5.png|link=]] |
| | align="center" | [[Arquivo:015M.png|link=Mega Beedrill]]<br/> [[Mega Beedrill]] | | | align="center" | Respawn de Rhydon <br> 30772, 20338, 5 |
| | align="center" | [[Arquivo:Hedjet-Mega Beedrill.png|link=]]
| |
| | align="center" | Hedjet
| |
| | align="center" | Diamond Shop
| |
| | align="center" | Não
| |
| |- | | |- |
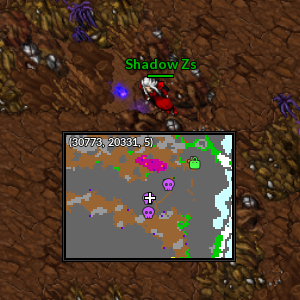
| | align="center" | [[Arquivo:Mega-Lucario_Pharaoh-Costume.png|link=]] | | | align="center" | [[Arquivo:30772, 20331, 5.png|link=]] |
| | align="center" | [[Arquivo:448-MegaLucario.png|link=Mega Lucario]]<br/> [[Mega Lucario]] | | | align="center" | Respawn de Rhydon <br> 30772, 20331, 5 |
| | align="center" | [[Arquivo:Pharaoh Costume.png|link=]]
| |
| | align="center" | Pharaoh Costume
| |
| | align="center" | Golden Relic 3 - 2019 <br> (Legado)
| |
| | align="center" | Não
| |
| |- | | |- |
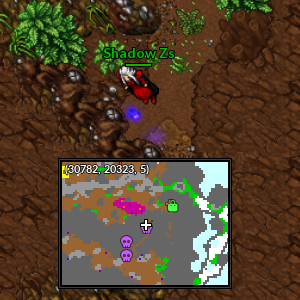
| | align="center" | [[Arquivo:Mimikyu_Witch-Costume.png|link=]] | | | align="center" | [[Arquivo:30782, 20324, 5.png|link=]] |
| | align="center" | [[Arquivo:778-Mimikyu.png|link=Mimikyu]]<br/> [[Mimikyu]] | | | align="center" | Respawn de Rhydon <br> 30782, 20324, 5 |
| | align="center" | [[Arquivo:Witch_Costume%28Mimikyu%29.png|link=]]
| |
| | align="center" | Witch Costume
| |
| | align="center" | Exclusivo da [[Arquivo:778-Mimikyu.png|link=]] [[Haunted Farm]]
| |
| | align="center" | Não
| |
| |- | | |- |
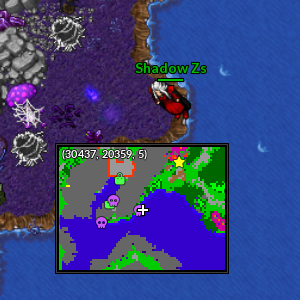
| | align="center" | [[Arquivo:Mudsdale_Underworld-Saddle.png|link=]] | | | align="center" | [[Arquivo:30435, 20359, 5.png|link=]] |
| | align="center" | [[Arquivo:750-Mudsdale.png|link=Mudsdale]]<br/> [[Mudsdale]] | | | align="center" | Respawn Sul de Beedrill <br> 30435, 20359, 5 |
| | align="center" | [[Arquivo:Underworld Saddle.png|link=]]
| |
| | align="center" | Underworld Saddle
| |
| | align="center" | Halloween Workshop
| |
| | align="center" | Não
| |
| |- | | |- |
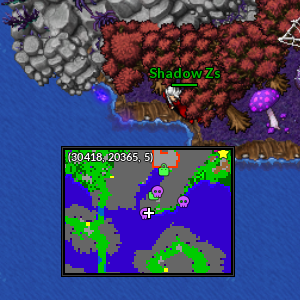
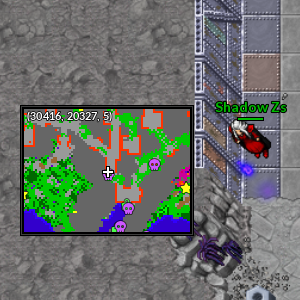
| | align="center" | [[Arquivo:Pinsir_Super-Insectoid-Costume.png|link=]] | | | align="center" | [[Arquivo:30416, 20365, 5.png|link=]] |
| | align="center" | [[Arquivo:127-Pinsir.png|link=Pinsir]]<br/> [[Pinsir]] | | | align="center" | Respawn Sul de Beedrill <br> 30416, 20365, 5 |
| | align="center" | [[Arquivo:Super Insectoid Costume.png|link=]]
| |
| | align="center" | Super Insectoid Costume
| |
| | align="center" | Diamond Shop
| |
| | align="center" | Não
| |
| |- | | |- |
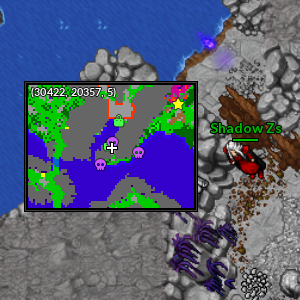
| | align="center" | [[Arquivo:Pyroar_Male_Hedjet.png|link=]] | | | align="center" | [[Arquivo:30422, 20357, 5.png|link=]] |
| | align="center" | [[Arquivo:668-PyroarMale.png|link=Pyroar]]<br/> [[Pyroar]] | | | align="center" | Respawn Sul de Beedrill <br> 30422, 20357, 5 <br> '''Obs.:''' Necessário rock smash |
| | align="center" | [[Arquivo:Hedjet-Pyroar Male.png|link=]]
| |
| | align="center" | Hedjet
| |
| | align="center" | Diamond Shop
| |
| | align="center" | Não
| |
| |- | | |- |
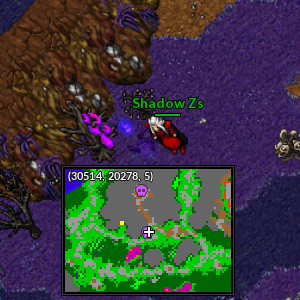
| | align="center" | [[Arquivo:Sawk_Gangster-Costume.png|link=]] | | | align="center" | [[Arquivo:30513, 20278, 5.png|link=]] |
| | align="center" | [[Arquivo:539-Sawk.png|link=Sawk]]<br/> [[Sawk]] | | | align="center" | Respawn Norte de Beedrill <br> 30513, 20278, 5 |
| | align="center" | [[Arquivo:Gangster Costume.png|link=]]
| |
| | align="center" | Gangster Costume
| |
| | align="center" | Halloween Workshop
| |
| | align="center" | Não
| |
| |- | | |- |
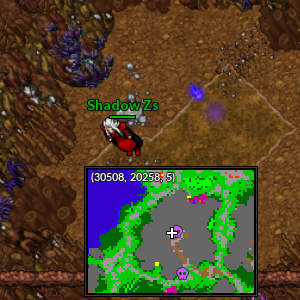
| | align="center" | [[Arquivo:Sawk_Secret-Agent-Costume.png|link=]] | | | align="center" | [[Arquivo:30510, 20257, 5.png|link=]] |
| | align="center" | [[Arquivo:539-Sawk.png|link=Sawk]]<br/> [[Sawk]] | | | align="center" | Respawn Norte de Beedrill <br> 30510, 20257, 5 |
| | align="center" | [[Arquivo:Secret Agent Costume.png|link=]]
| |
| | align="center" | Secret Agent Costume
| |
| | align="center" | Halloween Workshop
| |
| | align="center" | Não
| |
| |- | | |- |
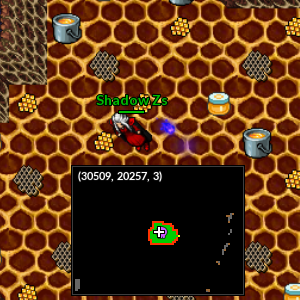
| | align="center" | [[Arquivo:Seviper_Rocket-Costume.png|link=]] | | | align="center" | [[Arquivo:30510, 20257, 3.png|link=]] |
| | align="center" | [[Arquivo:336-Seviper.png|link=Seviper]]<br/> [[Seviper]] | | | align="center" | Respawn Norte de Beedrill, na Vespiquen <br> 30510, 20257, 3 |
| | align="center" | [[Arquivo:Rocket Costume.png|link=]]
| |
| | align="center" | Rocket Costume
| |
| | align="center" | Diamond Shop
| |
| | align="center" | Não
| |
| |- | | |- |
| | align="center" | [[Arquivo:Shiny-Cloyster_Hedjet.png|link=]]
| | |
| | align="center" | [[Arquivo:091-ShinyCloyster.png|link=Shiny Cloyster]]<br/> [[Shiny Cloyster]]
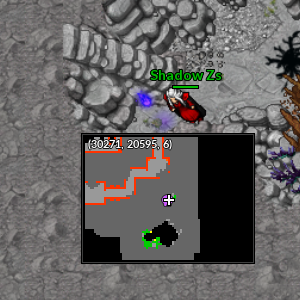
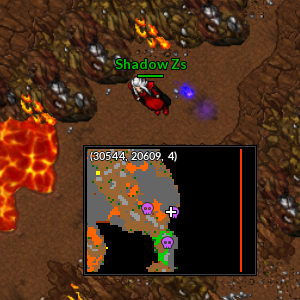
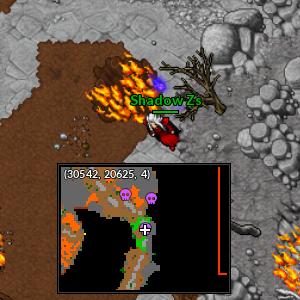
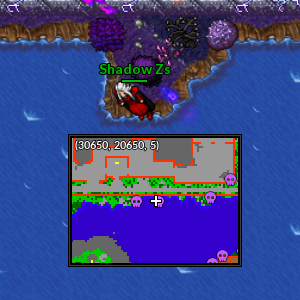
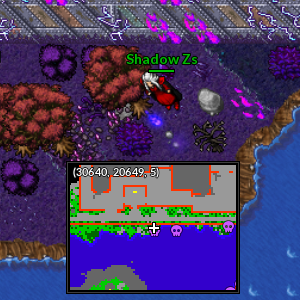
| | |-|Região de Pewter= |
| | align="center" | [[Arquivo:Hedjet-Shiny Cloyster.png|link=]]
| | |
| | align="center" | Hedjet
| | São 15 espíritos ao total nessa região. |
| | align="center" | Diamond Shop
| | |
| | align="center" | Não
| | {| class="wikitable" width="70%" |
| |-
| | ! width="5%" style="background-color: #9d1a64" | Localização |
| | align="center" | [[Arquivo:Shiny-Donphan_Golden-Mask.png|link=]]
| | ! width="20%" style="background-color: #9d1a64" | Posição |
| | align="center" | [[Arquivo:232-ShinyDonphan.png|link=Shiny Donphan]]<br/> [[Shiny Donphan]]
| |
| | align="center" | [[Arquivo:Golden Mask.png|link=]]
| |
| | align="center" | Golden Mask
| |
| | align="center" | Diamond Shop
| |
| | align="center" | Não
| |
| |-
| |
| | align="center" | [[Arquivo:Shiny-Elekid_Hedjet.png|link=]]
| |
| | align="center" | [[Arquivo:239-ShinyElekid1.png|link=Shiny Elekid]]<br/> [[Shiny Elekid]]
| |
| | align="center" | [[Arquivo:Hedjet-Shiny Elekid.png|link=]]
| |
| | align="center" | Hedjet
| |
| | align="center" | Diamond Shop
| |
| | align="center" | Não
| |
| |-
| |
| | align="center" | [[Arquivo:Shiny-Fearow_Crow-Costume.png|link=]]
| |
| | align="center" | [[Arquivo:Shinyfea.png|link=Shiny Fearow]]<br/> [[Shiny Fearow]]
| |
| | align="center" | [[Arquivo:Crow Costume.png|link=]]
| |
| | align="center" | Crow Costume
| |
| | align="center" | Diamond Shop
| |
| | align="center" | Não
| |
| |-
| |
| | align="center" | [[Arquivo:Shiny-Flareon_Dark-Robe.png|link=]]
| |
| | align="center" | [[Arquivo:Shinyfla.png|link=Shiny Flareon]]<br/> [[Shiny Flareon]]
| |
| | align="center" | [[Arquivo:Dark Robe.png|link=]]
| |
| | align="center" | Dark Robe
| |
| | align="center" | Diamond Shop
| |
| | align="center" | Não
| |
| |-
| |
| | align="center" | [[Arquivo:Shiny-Forretress_Hedjet.png|link=]]
| |
| | align="center" | [[Arquivo:205-ShinyForretress.png|link=Shiny Forretress]]<br/> [[Shiny Forretress]] | |
| | align="center" | [[Arquivo:Hedjet-Shiny Forretress.png|link=]]
| |
| | align="center" | Hedjet
| |
| | align="center" | Diamond Shop
| |
| | align="center" | Não
| |
| |-
| |
| | align="center" | [[Arquivo:Shiny-Forretress_Pumpkin-Costume.png|link=]]
| |
| | align="center" | [[Arquivo:205-ShinyForretress.png|link=Shiny Forretress]]<br/> [[Shiny Forretress]]
| |
| | align="center" | [[Arquivo:Pumpkin Costume.png|link=]]
| |
| | align="center" | Pumpkin Costume | |
| | align="center" | Halloween Workshop
| |
| | align="center" | Não
| |
| |-
| |
| | align="center" | [[Arquivo:Shiny-Golem_Dark-Skull-Costume.png|link=]]
| |
| | align="center" | [[Arquivo:Shinygol.png|link=Shiny Golem]]<br/> [[Shiny Golem]]
| |
| | align="center" | [[Arquivo:Dark Skull Costume.png|link=]]
| |
| | align="center" | Dark Skull Costume
| |
| | align="center" | Diamond Shop
| |
| | align="center" | Não
| |
| |-
| |
| | align="center" | [[Arquivo:Shiny-Grumpig_Hedjet.png|link=]]
| |
| | align="center" | [[Arquivo:326-ShinyGrumpig.png|link=Shiny Grumpig]]<br/> [[Shiny Grumpig]]
| |
| | align="center" | [[Arquivo:Hedjet-Shiny Grumpig.png|link=]]
| |
| | align="center" | Hedjet
| |
| | align="center" | Diamond Shop
| |
| | align="center" | Não
| |
| |-
| |
| | align="center" | [[Arquivo:Shiny-Hypno_Scream-Mask.png|link=]]
| |
| | align="center" | [[Arquivo:Shinyhyp.png|link=Shiny Hypno]]<br/> [[Shiny Hypno]]
| |
| | align="center" | [[Arquivo:Scream Mask.png|link=]]
| |
| | align="center" | Scream Mask
| |
| | align="center" | Diamond Shop
| |
| | align="center" | Não
| |
| |-
| |
| | align="center" | [[Arquivo:Shiny-Jolteon_Vampire-Costume.png|link=]]
| |
| | align="center" | [[Arquivo:Shinyjoe.png|link=Shiny Jolteon]]<br/> [[Shiny Jolteon]]
| |
| | align="center" | [[Arquivo:Vampire Costume-Shiny Jolteon.png|link=]]
| |
| | align="center" | Vampire Costume
| |
| | align="center" | Diamond Shop
| |
| | align="center" | Não
| |
| |-
| |
| | align="center" | [[Arquivo:Shiny-Klinklang_Chainsaw-Kit.png|link=]]
| |
| | align="center" | [[Arquivo:S.klinklang.png|link=Shiny Klinklang]]<br/> [[Shiny Klinklang]]
| |
| | align="center" | [[Arquivo:Chainsaw Kit.png|link=]]
| |
| | align="center" | Chainsaw Kit
| |
| | align="center" | Halloween Workshop
| |
| | align="center" | Não
| |
| |-
| |
| | align="center" | [[Arquivo:Shiny-Lucario_Anubis-Costume.png|link=]]
| |
| | align="center" | [[Arquivo:Shinyluc.png|link=Shiny Lucario]]<br/> [[Shiny Lucario]]
| |
| | align="center" | [[Arquivo:Anubis Costume-Shiny Lucario.png|link=]]
| |
| | align="center" | Anubis Costume
| |
| | align="center" | Diamond Shop
| |
| | align="center" | Não
| |
| |-
| |
| | align="center" | [[Arquivo:Shiny-Magby_Hedjet.png|link=]]
| |
| | align="center" | [[Arquivo:Shmagby.png|link=Shiny Magby]]<br/> [[Shiny Magby]]
| |
| | align="center" | [[Arquivo:Hedjet-Shiny Magby.png|link=]]
| |
| | align="center" | Hedjet
| |
| | align="center" | Diamond Shop
| |
| | align="center" | Não
| |
| |-
| |
| | align="center" | [[Arquivo:Shiny-Marowak_Reaper-Costume_Blue.png|link=]]
| |
| | align="center" | [[Arquivo:105-Sh Marowak.png|link=Shiny Marowak]]<br/> [[Shiny Marowak]]
| |
| | align="center" | [[Arquivo:Reaper Costume-Blue.png|link=]]
| |
| | align="center" | Reaper Costume
| |
| | align="center" | Exclusivo da [[Arquivo:105-Sh Marowak.png|link=]] [[DZ Halloween 2018]] <br> (Legado)
| |
| | align="center" | Não
| |
| |-
| |
| | align="center" | [[Arquivo:Shiny-Marowak_Reaper-Costume_Yellow.png|link=]]
| |
| | align="center" | [[Arquivo:105-Sh Marowak.png|link=Shiny Marowak]]<br/> [[Shiny Marowak]]
| |
| | align="center" | [[Arquivo:Reaper Costume-Yellow.png|link=]]
| |
| | align="center" | Reaper Costume
| |
| | align="center" | Exclusivo da [[Arquivo:105-Sh Marowak.png|link=]] [[DZ Halloween 2018]] <br> (Legado)
| |
| | align="center" | Não
| |
| |-
| |
| | align="center" | [[Arquivo:Shiny-Munchlax_Hedjet.png|link=]]
| |
| | align="center" | [[Arquivo:446-ShinyMunchlax1.png|link=Shiny Munchlax]]<br/> [[Shiny Munchlax]]
| |
| | align="center" | [[Arquivo:Hedjet-Shiny Munchlax.png|link=]]
| |
| | align="center" | Hedjet
| |
| | align="center" | Diamond Shop
| |
| | align="center" | Não
| |
| |-
| |
| | align="center" | [[Arquivo:Shiny-Nidoking_Werewolf-Costume.png|link=]]
| |
| | align="center" | [[Arquivo:Shinynid.png|link=Shiny Nidoking]]<br/> [[Shiny Nidoking]]
| |
| | align="center" | [[Arquivo:Werewolf Costume.png|link=]]
| |
| | align="center" | Werewolf Costume
| |
| | align="center" | Diamond Shop
| |
| | align="center" | Não
| |
| |-
| |
| | align="center" | [[Arquivo:Shiny-Nidoqueen_Hedjet.png|link=]]
| |
| | align="center" | [[Arquivo:031-shinynidoqueen.png|link=Shiny Nidoqueen]]<br/> [[Shiny Nidoqueen]]
| |
| | align="center" | [[Arquivo:Hedjet-Shiny Nidoqueen.png|link=]]
| |
| | align="center" | Hedjet
| |
| | align="center" | Diamond Shop
| |
| | align="center" | Não
| |
| |-
| |
| | align="center" | [[Arquivo:Shiny-Togetic_Hedjet.png|link=]]
| |
| | align="center" | [[Arquivo:Shiny Togetic.png|link=Shiny Togetic]]<br/> [[Shiny Togetic]]
| |
| | align="center" | [[Arquivo:Hedjet-Shiny Togetic.png|link=]]
| |
| | align="center" | Hedjet
| |
| | align="center" | Diamond Shop
| |
| | align="center" | Não
| |
| |-
| |
| | align="center" | [[Arquivo:Shiny-Vaporeon_Witch-Costume.png|link=]]
| |
| | align="center" | [[Arquivo:Shinyvap.png|link=Shiny Vaporeon]]<br/> [[Shiny Vaporeon]]
| |
| | align="center" | [[Arquivo:Witch Costume-Shiny Vaporeon.png|link=]]
| |
| | align="center" | Witch Costume
| |
| | align="center" | Diamond Shop
| |
| | align="center" | Não
| |
| |- | | |- |
| | align="center" | [[Arquivo:Shiny-Venusaur_Forest-Soul-Warden-Costume.png|link=]] | | | align="center" | [[Arquivo:30416, 20328, 5.png|link=]] |
| | align="center" | [[Arquivo:Sh venu.png|link=Shiny Venusaur]]<br/> [[Shiny Venusaur]] | | | align="center" | Respawn de Klink e Klang <br> 30416, 20328, 5 |
| | align="center" | [[Arquivo:Forest Soul Warden Costume.png|link=]]
| |
| | align="center" | Forest Soul Warden Costume
| |
| | align="center" | Exclusivo da [[Arquivo:Sh venu.png|link=]] Forest Soul Warden Dungeon
| |
| | align="center" | Não
| |
| |- | | |- |
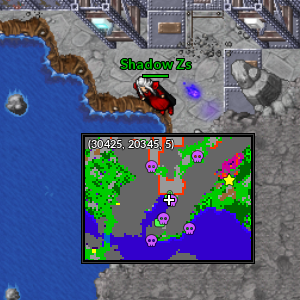
| | align="center" | [[Arquivo:Shiny-Vileplume_Zombie-Costume.png|link=]] | | | align="center" | [[Arquivo:30426, 20345, 5.png|link=]] |
| | align="center" | [[Arquivo:Shinyvil.png|link=Shiny Vileplume]]<br/> [[Shiny Vileplume]] | | | align="center" | Respawn de Klink e Klang <br> 30426, 20345, 5 |
| | align="center" | [[Arquivo:Zombie Costume.png|link=]]
| |
| | align="center" | Zombie Costume
| |
| | align="center" | Diamond Shop
| |
| | align="center" | Não
| |
| |- | | |- |
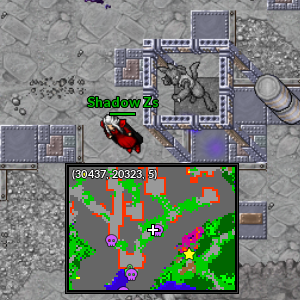
| | align="center" | [[Arquivo:Staraptor_Reaper-Costume.png|link=]] | | | align="center" | [[Arquivo:30439, 20323, 5.png|link=]] |
| | align="center" | [[Arquivo:398-Staraptor.png|link=Staraptor]]<br/> [[Staraptor]] | | | align="center" | Respawn de Klink e Klang <br> 30439, 20323, 5 |
| | align="center" | [[Arquivo:Reaper Costume-Staraptor.png|link=]]
| |
| | align="center" | Reaper Costume
| |
| | align="center" | Halloween Workshop
| |
| | align="center" | Não
| |
| |- | | |- |
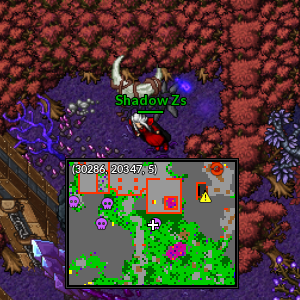
| | align="center" | [[Arquivo:Throh_Gangster-Costume.png|link=]] | | | align="center" | [[Arquivo:30287, 20346, 5.png|link=]] |
| | align="center" | [[Arquivo:538-Throh.png|link=Throh]]<br/> [[Throh]] | | | align="center" | Próximo a entrada da Sarkies Fortress <br> 30287, 20346, 5 |
| | align="center" | [[Arquivo:Gangster Costume.png|link=]]
| |
| | align="center" | Gangster Costume
| |
| | align="center" | Halloween Workshop
| |
| | align="center" | Não
| |
| |- | | |- |
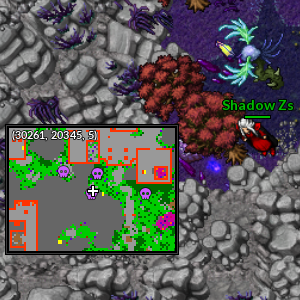
| | align="center" | [[Arquivo:Throh_Secret-Agent-Costume.png|link=]] | | | align="center" | [[Arquivo:30260, 20346, 5.png|link=]] |
| | align="center" | [[Arquivo:538-Throh.png|link=Throh]]<br/> [[Throh]] | | | align="center" | Próximo a entrada da Sarkies Fortress <br> 30260, 20346, 5 |
| | align="center" | [[Arquivo:Secret Agent Costume.png|link=]]
| |
| | align="center" | Secret Agent Costume
| |
| | align="center" | Halloween Workshop
| |
| | align="center" | Não
| |
| |- | | |- |
| | align="center" | [[Arquivo:Weavile_Egyptian-Costume.png|link=]] | | | align="center" | [[Arquivo:30263, 20336, 5.png|link=]] |
| | align="center" | [[Arquivo:461-Weavile.png|link=Weavile]]<br/> [[Weavile]] | | | align="center" | Próximo a entrada da Sarkies Fortress <br> 30263, 20336, 5 |
| | align="center" | [[Arquivo:Egyptian Costume.png|link=]]
| |
| | align="center" | Egyptian Costume
| |
| | align="center" | Diamond Shop
| |
| | align="center" | Não
| |
| |- | | |- |
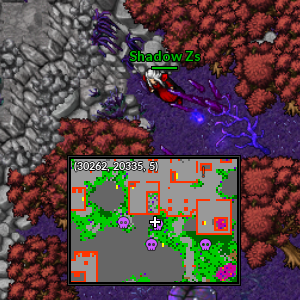
| | align="center" | [[Arquivo:Wormadam_Plant-Cloak.png|link=]] | | | align="center" | [[Arquivo:30352, 20400, 5.png|link=]] |
| | align="center" | [[Arquivo:413-WormadamPlantCloak.png|link=Wormadam]]<br/> [[Wormadam]] | | | align="center" | Respawn de Darkrai Minion no térreo da Peaky Mountains <br> 30352, 20400, 5 |
| | align="center" | [[Arquivo:Plant Cloak.png|link=]]
| |
| | align="center" | Plant Cloak
| |
| | align="center" | Diamond Shop
| |
| | align="center" | Não
| |
| |- | | |- |
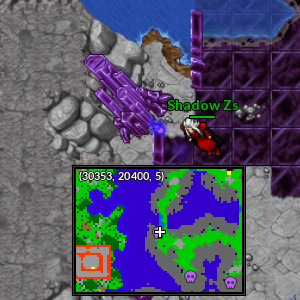
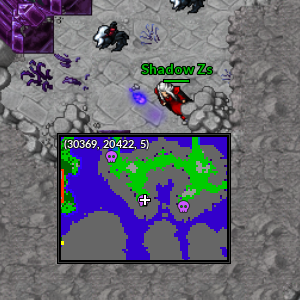
| | align="center" | [[Arquivo:Wormadame_Sandy-Cloak.png|link=]] | | | align="center" | [[Arquivo:30368, 20422, 5.png|link=]] |
| | align="center" | [[Arquivo:413-WormadamGround.png|link=Wormadam Ground]]<br/> [[Wormadam Ground]] | | | align="center" | Respawn de Darkrai Minion no térreo da Peaky Mountains <br> 30368, 20422, 5 |
| | align="center" | [[Arquivo:Sandy Cloak.png|link=]]
| |
| | align="center" | Sandy Cloak
| |
| | align="center" | Diamond Shop
| |
| | align="center" | Não
| |
| |- | | |- |
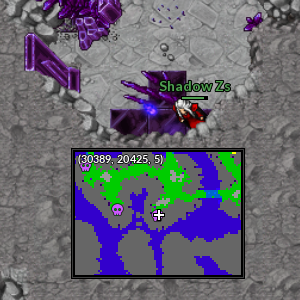
| | align="center" | [[Arquivo:Wormadams_Trash-Cloak.png|link=]] | | | align="center" | [[Arquivo:30388, 20425, 5.png|link=]] |
| | align="center" | [[Arquivo:413-WormadamSteel.png|link=Wormadam Steel]]<br/> [[Wormadam Steel]] | | | align="center" | Respawn de Darkrai Minion no térreo da Peaky Mountains <br> 30388, 20425, 5 |
| | align="center" | [[Arquivo:Trash Cloak.png|link=]]
| |
| | align="center" | Trash Cloak
| |
| | align="center" | Diamond Shop
| |
| | align="center" | Não
| |
| |- | | |- |
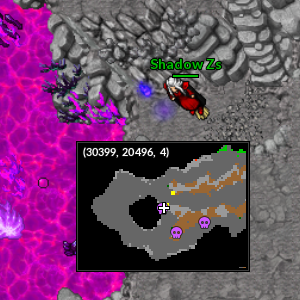
| | align="center" | [[Arquivo:Xatu_Plague-Mask.png|link=]] | | | align="center" | [[Arquivo:30398, 20496, 4.png|link=]] |
| | align="center" | [[Arquivo:178-Xatu.png|link=Xatu]]<br/> [[Xatu]] | | | align="center" | Respawn de Rufflet <br> 30398, 20496, 4 |
| | align="center" | [[Arquivo:Plague Mask.png|link=]]
| |
| | align="center" | Plague Mask
| |
| | align="center" | Halloween Workshop
| |
| | align="center" | Não
| |
| |- | | |- |
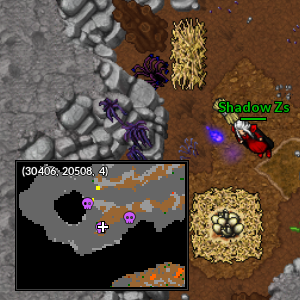
| | align="center" | [[Arquivo:Zangoose_Freddy-Krueger-Costume.png|link=]] | | | align="center" | [[Arquivo:30405, 20508, 4.png|link=]] |
| | align="center" | [[Arquivo:335-Zangoose.png|link=Zangoose]]<br/> [[Zangoose]] | | | align="center" | Respawn de Rufflet <br> 30405, 20508, 4 |
| | align="center" | [[Arquivo:Freddy Krueger Costume-Zangoose.png|link=]]
| |
| | align="center" | Freddy Krueger Costume
| |
| | align="center" | Diamond Shop
| |
| | align="center" | Não
| |
| |- | | |- |
| |} | | | align="center" | [[Arquivo:30419, 20503, 4.png|link=]] |
| </center>
| | | align="center" | Respawn de Rufflet <br> 30419, 20503, 4 |
| | |
| == PKS Quest ==
| |
| | |
| <span style="color:red">'''Nível Mínimo:</span> 150.'''<br>
| |
| <span style="color:red">'''Recompensa:</span> XXkk de Experiência, 100 Rough Gem Stone, Honorary Membership Medal, Kid's Squad (Outfit)
| |
| | |
| === Falando com os membros ===
| |
| | |
| Para dar início na quest converse com o Nigel próximo ao CP de Agate.
| |
| | |
| [[Arquivo:PKS_Localização Nigel.jpg|link=]]
| |
| | |
| Nigel dirá que o jogador parece forte para auxiliar nos planos que eles estão fazendo e se pretende ajudá-los nesta operação secreta. Mas para isto, deverá ir ao Agente Número Dois, o Hogarth, o construtor do esquadrão. Ele está próximo ao Market de Agate
| |
| | |
| [[Arquivo:PKS_Localização Hogarth.jpg|link=]]
| |
| | |
| Hogarth irá pedir que o jogador vá ao Agente Número Três, o Kuki, que está no respawn de Slakoth em Agate
| |
| | |
| [[Arquivo:PKS_Localização Kuki.jpg|link=]]
| |
| | |
| Kuki pedirá então para ir procurar pelo Agente Número Quatro, o Wallabee, que está próximo da Heather em Agate
| |
| | |
| [[Arquivo:PKS_Localização Wallabee.jpg|link=]]
| |
| | |
| Wallabee então pedirá que fale com o Agente Número 5, a Abigail, que está próximo a entrada do HQ Lab em Agate
| |
| | |
| [[Arquivo:PKS_Localização Abigail.jpg|link=]] | |
| | |
| === Missão Nigel ===
| |
| | |
| Com todos aceitando que o jogador faça parte da missão, retorne ao Nigel no CP de Agate.
| |
| Ao informar isto à Nigel, ele pedirá para aguardar por 1 minuto, para que ele fale com os membros também.
| |
| Após isto, ele dirá que será de grande valia sua ajuda para a missão e pede que derrote [[Arquivo:295-Exploud.png|link=Exploud]] 300 Exploud.
| |
| | |
| <center>
| |
| {| class="wikitable" width="30%"
| |
| ! width="50%" style="background-color: #9d1a64" | <span style="color:white">Derrotar</span>
| |
| ! width="50%" style="background-color: #9d1a64" | <span style="color:white">Quantidade</span>
| |
| |- | | |- |
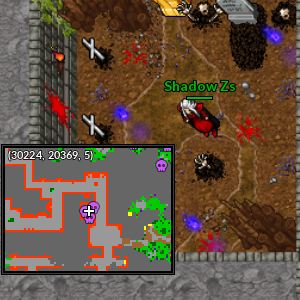
| | width="5%" align="center" | [[Arquivo:295-Exploud.png|link=Exploud]] | | | align="center" | [[Arquivo:30224, 20369, 5.png|link=]] |
| | width="5%" align="center" | 300 | | | align="center" | Respawn de Alolan Meowth <br> 30224, 20369, 5 <br> '''Obs.:''' Nesse local tem três espíritos. |
| |}
| |
| | |
| </center> | |
| | |
| Ao derrotar, o jogador receberá [[Arquivo:Exp_icon.png|30px|link=]] 615600 de experiência.
| |
| | |
| === Missão Hogarth ===
| |
| | |
| Depois disto, Nigel pedirá que encontre novamente o Agente Número Dois, o Hogarth. Ele estará no mesmo local novamente.
| |
| Chegando lá, Hogarth pedirá que entregue alguns materiais para ele, são 5000 Screw e 5000 Piece of Steel.
| |
| | |
| <center>
| |
| {| class="wikitable" width="42%"
| |
| ! colspan="2" width="50%" style="background-color: #9d1a64" | <span style="color:white">Entregar</span>
| |
| |- | | |- |
| | width="5%" align="center" |''' 5000 Screw ''' <br> [[Arquivo:Screw.png|link=Drop de Itens]]
| |
| | width="5%" align="center" |''' 5000 Piece of Steel ''' <br> [[Arquivo:PieceOfSteel.png|link=Drop de Itens]]
| |
| |}
| |
| </center>
| |
|
| |
|
| |
|
| Ele lhe devolverá 10.000 Dollars como recompensa.
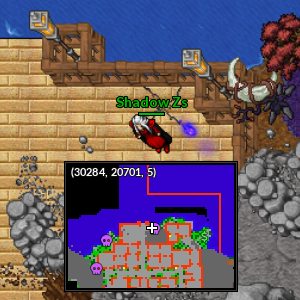
| | |-|Região de Viridian= |
|
| |
|
| === Missão Kuki ===
| | São 3 espíritos ao total nessa região. |
|
| |
|
| Após isto, Hogarth pedirá que ajude a Número Três, Kuki. Kuki pedirá que '''capture''' um Vigoroth para ela e o '''entregue'''.
| | {| class="wikitable" width="70%" |
| | | ! width="5%" style="background-color: #9d1a64" | Localização |
| <center>
| | ! width="20%" style="background-color: #9d1a64" | Posição |
| {| class="wikitable" width="30%" | |
| ! width="50%" style="background-color: #9d1a64" | <span style="color:white">Capturar e entregar</span> | |
| |- | | |- |
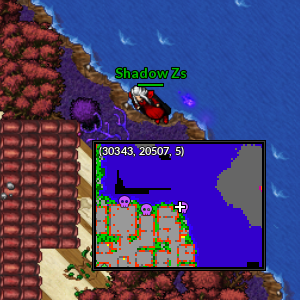
| | width="5%" align="center" | [[Arquivo:288-Vigoroth.png|link=Vigoroth]] | | | align="center" | [[Arquivo:30344, 20507, 5.png|link=]] |
| | | | align="center" | Arredores da cidade de Viridian <br> 30344, 20507, 5 |
| |} | |
| | |
| </center>
| |
| | |
| Kuki irá entregar 30.000 dollars como recompensa.
| |
| | |
| === Missão Wallabee === | |
| | |
| Após isto, Kuki pedirá que ajude a Agente Número 4, Wallabee.
| |
| Wallabe irá lhe pedir 1 Ice Stone e 1 Crystal Stone para que ele possa evoluir seu Sealeo.
| |
| | |
| <center>
| |
| {| class="wikitable" width="42%"
| |
| ! colspan="2" width="50%" style="background-color: #9d1a64" | <span style="color:white">Entregar</span>
| |
| |- | | |- |
| | width="5%" align="center" |''' 1 Ice Stone ''' <br> [[Arquivo:Ice-stone.gif|link=Drop de Itens]] | | | align="center" | [[Arquivo:30326, 20508, 5.png|link=]] |
| | width="5%" align="center" |''' 1 Crystal Stone ''' <br> [[Arquivo:Crystal-stone.gif|link=Drop de Itens]] | | | align="center" | Arredores da cidade de Viridian <br> 30326, 20508, 5 |
| |}
| |
| </center>
| |
| | |
| Ele entregará 85.000 dollars como recompensa para o jogador.
| |
| | |
| === Missão Abigail ===
| |
| | |
| Após isto, Wallabee pede para que ajude a Agente Número 5, Abigail.
| |
| Abigail irá lhe entregar um [[Arquivo:Darren's_Key.png|20px|link=]] Bunch of Old Keys
| |
| O jogador deverá procurar por um baú no respawn de Blaziken e usar a chave neste baú.
| |
| | |
| [[Arquivo:PKS localização baú Blaziken.jpg|link=]]
| |
| | |
| Observação: Deve ter derrotado todos os Pokémon próximos para usar o Baú.
| |
| | |
| Ao usar, receberá uma [[Arquivo:Abigail's Master Key.png|20px|link=]] Abigail's Master Key. E com isto deverá retornar para Abigail e entregar as chaves.
| |
| Após isto, deve retornar ao Nigel.
| |
| | |
| === Esconderijo Count Spank ===
| |
| | |
| Nigel pedirá que encontre o esconderijo do Count Spank, um terrível vilão que acaba com todas as missões deles. Ele está escondido na '''Moro Island''', segundo os relatos da Número 5.
| |
| | |
| O jogador deverá utilizar a '''habilidade Light''' na posição indicada e descer a pedra.
| |
| | |
| [[Arquivo:PKS localização Count Spank.jpg|link=]]
| |
| | |
| Ao descer encontrará o Count Spank em sua sala:
| |
| | |
| [[Arquivo:PKS localização sala Count Spak.jpg|link=]]
| |
| | |
| O jogador irá duelar contra ele. Count Spank utiliza os seguintes Pokémon: [[Arquivo:169-Crobat.png|link=Crobat]] Crobat, [[Arquivo:042-Sh Golbat.png|link=Shiny Golbat]] Shiny Golbat, [[Arquivo:472-Gliscor.png|link=Gliscor]] Gliscor, [[Arquivo:452-Drapion.png|link=Drapion]] Drapion, [[Arquivo:563-Cofagrigus.png|link=Cofagrigus]] Cofagrigus e [[Arquivo:429-Mismagius.png|link=Mismagius]] Mismagius.
| |
| Ao derrotá-lo, Count Spank irá dar [[Arquivo:Exp_icon.png|30px|link=]] 50.000 de experiência como recompensa.
| |
| | |
| Após isto, volte ao Nigel e diga que derrotou o Count Spank.
| |
| | |
| === Missão R.E.G.U.L.A.R. ===
| |
| | |
| Nigel irá lhe entregar um [[Arquivo:P.K.S. Operation Plan Paper.png|20px|link=]] P.K.S. Operation Plan Paper e o jogador deve aprender sobre a missão R.E.G.U.L.A.R.
| |
| Nigel dirá para ir falar com o Hogarth e verificar se ele precisa de alguma ajuda na construção da bomba. Ele pedirá 100 Electronic Scraps (item que engenheiro coleta ao quebrar materiais eletrônicos).
| |
| | |
| <center>
| |
| {| class="wikitable" width="42%"
| |
| ! colspan="2" width="50%" style="background-color: #9d1a64" | <span style="color:white">Entregar</span>
| |
| |- | | |- |
| | width="5%" align="center" |''' 100 Electronic Scraps ''' <br> [[Arquivo:Electronic_Scraps.png|link=]] | | | align="center" | [[Arquivo:30315, 20504, 5.png|link=]] |
| |} | | | align="center" | Arredores da cidade de Viridian <br> 30315, 20504, 5 |
| </center>
| |
| | |
| Hogarth irá entregar 10.000 dollars como recompensa. E pedirá que fale com a Kuki.
| |
| | |
| Kuki dirá que está preocupada com Wallabee e pedirá que novamente vá conversar com ele.
| |
| | |
| Wallabee estava preparando um presente para Kuki e pedirá que entregue para ela. Ele lhe entregará uma [[Arquivo:Banana.png|link=]] Banana <br>
| |
| Ela irá agradecer e pedirá que vá novamente falar com Wallabee.
| |
| | |
| Ao retornar, Wallabee dirá que está quase superando o medo dele de mergulhar e a Número 5 disse ter algo interessante para ele, mas que está em um baú em Butwal. O baú fica nas Kingdra de '''Butwal'''
| |
| | |
| [[Arquivo:PKS localização baú Kingdra.jpg|link=]]
| |
| | |
| Observação: Deve derrotar todos os Pokémon ao redor para pegá-lo.
| |
| | |
| Ao pegar o baú, receberá um [[Arquivo:Diving Suit.png|20px|link=]] Diving Suit, retorne ao Wallabee e entregue para ele.
| |
| | |
| Após isto, Wallabee pedirá que vá para a Número 5 e informe que o medo dele acabou e verifique se ela precisa de alguma ajuda com o plano.
| |
| Abigail pedirá que derrote 1 Shiny Golbat e 1 Shiny Crobat, pois ela está investigando os Pokémon que podem estar guardando o esconderijo.
| |
| | |
| <center>
| |
| {| class="wikitable" width="42%"
| |
| ! colspan="2" width="50%" style="background-color: #9d1a64" | <span style="color:white">Derrotar</span>
| |
| |- | | |- |
| | width="5%" align="center" |''' 1 Shiny Golbat ''' <br> [[Arquivo:042-Sh Golbat.png|link=Shiny Golbat]]
| |
| | width="5%" align="center" |''' 1 Shiny Crobat ''' <br> [[Arquivo:169-Sh Crobat.png|link=Shiny Crobat]]
| |
| |}
| |
| </center>
| |
|
| |
| Ao derrotar, Abigail dará [[Arquivo:Exp_icon.png|30px|link=]] 200000 de experiência para o jogador e dirá que acredita que está tudo certo para executarem o plano. Retorne ao Nigel para contar isto.
| |
|
| |
| Nigel dirá que vai mais uma vez derrotar o Count Spank, para distraí-lo e que precisará da sua ajuda para isto. Ele pedirá pela sua estratégia e experiência para derrotar o Count Spank novamente.
| |
|
| |
| Com isto, ele te teleportará para o esconderijo do Count Spank. Fale com o Nigel novamente dentro do esconderijo e derrote o Count Spank.
| |
|
| |
| Desta vez, o jogador entrará como se fosse uma dungeon, com o Count Spank atacando diretamente o jogador também. Count Spank utiliza os mesmos Pokémon do outro duelo.
| |
|
| |
| [[Arquivo:PKS duelo Count Spank2.jpg|link=]]
| |
|
| |
| Observação: O jogador poderá utilizar no máximo 18 Revives e 20 Poções neste local com limite de 5 minutos para completar.<br/>
| |
| Observação: Não há penalidade de experiência e bless ao ser derrotado.
| |
|
| |
| Ao derrotá-lo, retorne ao Nigel para lhe contar que o derrotou. O jogador receberá [[Arquivo:Exp_icon.png|30px|link=]] 50.000 de experiência.
| |
|
| |
| === Sabotando o esconderijo ===
| |
|
| |
| Nigel pedirá que fale com a Kuki que está à esquerda, ajude a quebrar as barreiras no mapa. Retire todos os Pokémon em sua mochila para isto.
| |
|
| |
| O jogador estará "controlando" a Kuki. Ela lhe dará um Vigoroth e sua missão é quebrar as 24 barreiras que há no mapa, num período de 1 minuto e 30 segundos.
| |
|
| |
| [[Arquivo:PKS DG Kuki.jpg|link=]]
| |
|
| |
| Ao terminar, Kuki mandará retornar ao Nigel e ele lhe concederá [[Arquivo:Exp_icon.png|30px|link=]] 20.000 de experiência.
| |
|
| |
| Nigel pedirá que ajude Hogarth, na direita, com as bombas, novamente não poderá carregar nenhum Pokémon.
| |
| O jogador será direcionado para uma dungeon, com algumas traps. Sua missão é plantar as bombas nos computadores, começando pelos de cima e finalizando nos de baixo. O jogador terá 50 segundos para terminar esta missão.
| |
|
| |
| [[Arquivo:PKS DG Hogarth.jpg|link=]]
| |
|
| |
| Após isto, retorne novamente ao Nigel, ele lhe dará [[Arquivo:Exp_icon.png|30px|link=]] 30.000 de experiência. E pedirá para ajudar Abigail. Não poderá carregar nenhum Pokémon novamente.
| |
|
| |
| Nesta dungeon, o jogador deverá passar por alguns "runners" de Zubat, Shiny Zubat e Shiny Golbat. São parecidos aos da Chosen One Quest, onde receberá uma certa porcentagem de dano em sua HP a cada dano tomado. O jogador deve ir até o final da dungeon, utilizar a chave recebida no computador ao fim da Dungeon e retornar para a saída. Terá 1 minuto e 50 segundos para completar a dungeon.
| |
|
| |
| [[Arquivo:PKS DG Abigail.jpg|link=]]
| |
|
| |
| Ao retornar ao Nigel, ele entregará [[Arquivo:Exp_icon.png|30px|link=]] 30.000 de experiência e pedirá que ajude o Wallabee. Novamente, não poderá carregar nenhum Pokémon.
| |
|
| |
| Nessa dungeon, o jogador estará debaixo dágua, e deverá passar por algumas traps, até chegar no computador e plantar uma bomba. Ao plantar a bomba, retorne para a saída. O jogador tem 1 minuto e 10s para completar esta dungeon.
| |
|
| |
| [[Arquivo:PKS DG Wallabee.jpg|link=]]
| |
|
| |
| Retornando ao Nigel, ele lhe dará [[Arquivo:Exp_icon.png|30px|link=]] 20.000 de experiência. E dirá para ir à entrada Norte, encontrar com os outros por lá.
| |
|
| |
| Ao pisar no SQM em frente ao da imagem indicado abaixo, o jogador será levado para uma cinematic. Ao terminar, retorne ao Nigel. Ele pedirá que derrote o Boss do Count Spank. Ele fica no mesmo local onde ativa a cinematic.
| |
|
| |
| [[Arquivo:PKS DG Final.jpg|link=]]
| |
|
| |
| O Mecha Shiny Crobat irá sumonar 3 Shinies Zubat quando estiver com 90% de HP, 3 Shinies Golbat quando estiver com 80% de HP, 1 Gliscor 1 Drapion e 1 Crobat quando estiver com 70% de HP, 1 Cofagrigus e 1 Mismagius com 50% de HP e ao chegar em 30% de HP, ele irá ter um buff de Ataque, Velocidade e Defesa.
| |
| O jogador tem 8 minutos para derrotar o Boss e poderá utilizar revives e somente 100 poções.
| |
|
| |
|
| Ao derrotá-lo, volte ao Nigel, que lhe dará [[Arquivo:Exp_icon.png|30px|link=]] 250.000 de experiência. Após isto, dirá que tem uma surpresa e lhe entregará em 30 segundos.
| | |-|Região de Pallet= |
|
| |
|
| Após os 30 segundos, Nigel lhe entregará uma [[Arquivo:Honorary Membership Medal.png|20px|link=]] Honorary Membership Medal, [[Arquivo:Exp_icon.png|30px|link=]] 4.000.000 de experiência e 100 Rough Gem Stones. E ao finalizar, Nigel irá lhe teleportar novamente para Agate.
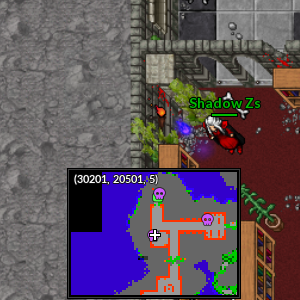
| | São 9 espíritos ao total nessa região. |
|
| |
|
| == <center> <span style="color:white"> Itens Raros </span> <br> [[Arquivo:Itens Raros.png|link=Drop de Itens#Itens Raros]]</center> ==
| | {| class="wikitable" width="70%" |
| | | ! width="5%" style="background-color: #9d1a64" | Localização |
| {| class="wikitable" width="100%" | | ! width="20%" style="background-color: #9d1a64" | Posição |
| ! colspan="2" width="13%" | Item | |
| ! width="18%" | Pokémon
| |
| | width="1%" style="border-top-style: hidden; border-width: 1px; border-bottom-style: hidden; border-width: 1px" |
| |
| ! colspan="2" width="12%" | Item | |
| ! width="14%" | Pokémon
| |
| | width="1%" style="border-top-style: hidden; border-width: 1px; border-bottom-style: hidden; border-width: 1px" |
| |
| ! colspan="2" width="17%" | Item
| |
| ! width="16%" | Pokémon
| |
| |-
| |
| | width="1%" align="center" | [[Arquivo:Bee Wing.png|link=]] || align="center" | Bee Wing || align="center" | [[Arquivo:015-Beedrill.png|link=Beedrill]]
| |
| | width="1%" style="border-top-style: hidden; border-width: 1px; border-bottom-style: hidden; border-width: 1px" |
| |
| | width="1%" align="center" | [[Arquivo:Corrupted Feather.png|link=]] || align="center" | Corrupted Feather || align="center" | [[Arquivo:018-Pidgeot.png|link=Pidgeot]]
| |
| | width="1%" style="border-top-style: hidden; border-width: 1px; border-bottom-style: hidden; border-width: 1px" |
| |
| | width="1%" align="center" | [[Arquivo:Corrupted Magnet.png|link=]]|| align="center" | Corrupted Magnet || align="center" | [[Arquivo:026-Raichu.png|link=Raichu]] [[Arquivo:239-Elekid.png|link=Elekid]] [[Arquivo:310-Manectric.png|link=Manectric]]
| |
| |-
| |
| | width="1%" align="center" | [[Arquivo:Alolan Electric Rat Tail.png|link=]] || align="center" | Alolan Electric Rat Tail || align="center" | [[Arquivo:026-AlolanRaichu.png|link=Alolan Raichu]]
| |
| | width="1%" style="border-top-style: hidden; border-width: 1px; border-bottom-style: hidden; border-width: 1px" |
| |
| | width="1%" align="center" | [[Arquivo:Corrupted Pot Of Lava.png|link=]] || align="center" | Corrupted Pot Of Lava || align="center" | [[Arquivo:038-Ninetales.png|link=Ninetales]] [[Arquivo:229-Houndoom.png|link=Houndoom]]
| |
| | width="1%" style="border-top-style: hidden; border-width: 1px; border-bottom-style: hidden; border-width: 1px" |
| |
| | width="1%" align="center" | [[Arquivo: Mole Hair.png|link=]] || align="center" | Mole Hair || align="center" | [[Arquivo:050-AlolanDiglett.png|link=Alolan Diglett]] [[Arquivo:051-AlolanDugtrio.png|link=Alolan Dugtrio]]
| |
| |-
| |
| | width="1%" align="center" | [[Arquivo:Mole Big Hair.png|link=]] || align="center" | Mole Big Hair || align="center" | [[Arquivo:051-AlolanDugtrio.png|link=Alolan Dugtrio]]
| |
| | width="1%" style="border-top-style: hidden; border-width: 1px; border-bottom-style: hidden; border-width: 1px" |
| |
| | width="1%" align="center" | [[Arquivo: Black Wool Ball.png|link=]] || align="center" | Black Wool Ball || align="center" | [[Arquivo:052-AlolanMeowth.png|link=Alolan Meowth]] [[Arquivo:053-AlolanPersian.png|link=Alolan Persian]]
| |
| | width="1%" style="border-top-style: hidden; border-width: 1px; border-bottom-style: hidden; border-width: 1px" |
| |
| | width="1%" align="center" | [[Arquivo:Psychic Mustache.png|link=]] || align="center" | Psychic Mustache || align="center" | [[Arquivo:065-Alakazam.png|link=Alakazam]]
| |
| |-
| |
| | width="1%" align="center" | [[Arquivo:Corrupted Champion Belt.png|link=]]|| align="center" | Corrupted Champion Belt || align="center" |[[Arquivo:067-Machoke.png|link=Machoke]] [[Arquivo:068-Machamp.png|link=Machamp]]
| |
| | width="1%" style="border-top-style: hidden; border-width: 1px; border-bottom-style: hidden; border-width: 1px" |
| |
| | width="1%" align="center" | [[Arquivo:Corrupted Leaves.png|link=]] || align="center" | Corrupted Leaves || align="center" | [[Arquivo:070-Weepinbell.png|link=Weepinbell]] [[Arquivo:103-Exeggutor.png|link=Exeggutor]]
| |
| | width="1%" style="border-top-style: hidden; border-width: 1px; border-bottom-style: hidden; border-width: 1px" |
| |
| | width="1%" align="center" | [[Arquivo:Small Bird Beak.png|link=]] || align="center" | Small Bird Beak || align="center" | [[Arquivo:083-Farfetch-D.png|link=Farfetch'D]]
| |
| |-
| |
| | width="1%" align="center" | [[Arquivo:Toxic Gosme.png|link=]] || align="center" | Toxic Gosme || align="center" | [[Arquivo:088-Grimer.png|link=Grimer]] [[Arquivo:088-AlolanGrimer.png|link=Alolan Grimer]] [[Arquivo:089-AlolanMuk.png|link=Alolan Muk]]
| |
| | width="1%" style="border-top-style: hidden; border-width: 1px; border-bottom-style: hidden; border-width: 1px" |
| |
| | width="1%" align="center" | [[Arquivo:Purple Shell.png|link=]] || align="center" | Purple Shell || align="center" | [[Arquivo:091-Cloyster.png|link=Cloyster]]
| |
| | width="1%" style="border-top-style: hidden; border-width: 1px; border-bottom-style: hidden; border-width: 1px" |
| |
| | width="1%" align="center" | [[Arquivo:Corrupted Venom Flute.png|link=]] || align="center" | Corrupted Venom Flute || align="center" | [[Arquivo:110-Weezing.png|link=Weezing]]
| |
| |-
| |
| | width="1%" align="center" | [[Arquivo:Corrupted Horn Drill.png|link=]] || align="center" | Corrupted Horn Drill || align="center" | [[Arquivo:112-Rhydon.png|link=Rhydon]]
| |
| | width="1%" style="border-top-style: hidden; border-width: 1px; border-bottom-style: hidden; border-width: 1px" |
| |
| | width="1%" align="center" | [[Arquivo:Corrupted Vines.png|link=]] || align="center" | Corrupted Vines || align="center" | [[Arquivo:114-Tangela.png|link=Tangela]]
| |
| | width="1%" style="border-top-style: hidden; border-width: 1px; border-bottom-style: hidden; border-width: 1px" |
| |
| | width="1%" align="center" | [[Arquivo:Corrupted Gem Star.png|link=]] || align="center" | Corrupted Gem Star || align="center" | [[Arquivo:121-Starmie.png|link=Starmie]]
| |
| |-
| |
| | width="1%" align="center" | [[Arquivo:Corrupted Pinsir Horn.png|link=]] || align="center" | Corrupted Pinsir Horn || align="center" | [[Arquivo:127-Pinsir.png|link=Pinsir]]
| |
| | width="1%" style="border-top-style: hidden; border-width: 1px; border-bottom-style: hidden; border-width: 1px" |
| |
| | width="1%" align="center" | [[Arquivo:Virtual Tail.png|link=]] || align="center" | Virtual Tail || align="center" | [[Arquivo:137-Porygon.png|link=Porygon]] [[Arquivo:233-Porygon2.png|link=Porygon2]]
| |
| | width="1%" style="border-top-style: hidden; border-width: 1px; border-bottom-style: hidden; border-width: 1px" |
| |
| | width="1%" align="center" | [[Arquivo:Corrupted Dragon Tooth.png|link=]] || align="center" | Corrupted Dragon Tooth || align="center" | [[Arquivo:147-Dratini.png|link=Dratini]] [[Arquivo:148-Dragonair.png|link=Dragonair]] [[Arquivo:149-Dragonite.png|link=Dragonite]] [[Arquivo:371-Bagon.png|link=Bagon]] [[Arquivo:372-Shelgon.png|link=Shelgon]]
| |
| |-
| |
| | width="1%" align="center" | [[Arquivo:Lovely Topknot.png|link=]] || align="center" | Lovely Topknot || align="center" | [[Arquivo:176-Togetic.png|link=Togetic]] [[Arquivo:468-Togekiss.png|link=Togekiss]]
| |
| | width="1%" style="border-top-style: hidden; border-width: 1px; border-bottom-style: hidden; border-width: 1px" |
| |
| | width="1%" align="center" | [[Arquivo:Corrupted Tree Branch.png|link=]] || align="center" | Corrupted Tree Branch || align="center" | [[Arquivo:185-Sudowoodo.png|link=Sudowoodo]]
| |
| | width="1%" style="border-top-style: hidden; border-width: 1px; border-bottom-style: hidden; border-width: 1px" |
| |
| | width="1%" align="center" | [[Arquivo:Corrupted Miss Trace.png|link=]] || align="center" | Corrupted Miss Trace || align="center" | [[Arquivo:200-Misdreavus.png|link=Misdreavus]]
| |
| |-
| |
| | width="1%" align="center" | [[Arquivo:Corrupted Steelix Tail.png|link=]] || align="center" | Corrupted Steelix Tail || align="center" | [[Arquivo:208-Steelix.png|link=Steelix]]
| |
| | width="1%" style="border-top-style: hidden; border-width: 1px; border-bottom-style: hidden; border-width: 1px" |
| |
| | width="1%" align="center" | [[Arquivo:Corrupted Scizor Claw.png|link=]] || align="center" | Corrupted Scizor Claw || align="center" | [[Arquivo:Scizor.png|link=Scizor]]
| |
| | width="1%" style="border-top-style: hidden; border-width: 1px; border-bottom-style: hidden; border-width: 1px" |
| |
| | width="1%" align="center" | [[Arquivo:Razor Claw.png|link=]] || align="center" | Razor Claw || align="center" | [[Arquivo:215-Sneasel.png|link=Sneasel]] [[Arquivo:461-Weavile.png|link=Weavile]]
| |
| |-
| |
| | width="1%" align="center" | [[Arquivo:Bear Arm.png|link=]] || align="center" | Bear Arm || align="center" | [[Arquivo:217-Ursaring.png|link=Ursaring]]
| |
| | width="1%" style="border-top-style: hidden; border-width: 1px; border-bottom-style: hidden; border-width: 1px" |
| |
| | width="1%" align="center" | [[Arquivo:Giant Tusk.png|link=]] || align="center" | Giant Tusk || align="center" | [[Arquivo:221-Piloswine.png|link=Piloswine]]
| |
| | width="1%" style="border-top-style: hidden; border-width: 1px; border-bottom-style: hidden; border-width: 1px" |
| |
| | width="1%" align="center" | [[Arquivo:Corrupted Streak Tail.png|link=]] || align="center" | Corrupted Streak Tail || align="center" | [[Arquivo:226-Mantine.png|link=Mantine]]
| |
| |-
| |
| | width="1%" align="center" | [[Arquivo:Elephant Hoof.png|link=]] || align="center" | Elephant Hoof || align="center" | [[Arquivo:231-Phanpy.png|link=Phanpy]]
| |
| | width="1%" style="border-top-style: hidden; border-width: 1px; border-bottom-style: hidden; border-width: 1px" |
| |
| | width="1%" align="center" | [[Arquivo:Magma Hair.png|link=]] || align="center" | Magma Hair || align="center" | [[Arquivo:240-Magby.png|link=Magby]]
| |
| | width="1%" style="border-top-style: hidden; border-width: 1px; border-bottom-style: hidden; border-width: 1px" |
| |
| | width="1%" align="center" | [[Arquivo:Corrupted Cow Tail.png|link=]] || align="center" | Corrupted Cow Tail || align="center" | [[Arquivo:241-Miltank.png|link=Miltank]]
| |
| |-
| |
| | width="1%" align="center" | [[Arquivo:Corrupted Lizard Tail.png|link=]] || align="center" | Corrupted Lizard Tail || align="center" | [[Arquivo:248-Tyranitar.png|link=Tyranitar]]
| |
| | width="1%" style="border-top-style: hidden; border-width: 1px; border-bottom-style: hidden; border-width: 1px" |
| |
| | width="1%" align="center" | [[Arquivo:White Hair.png|link=]] || align="center" | White Hair || align="center" | [[Arquivo:274-Nuzleaf.png|link=Nuzleaf]] [[Arquivo:275-Shiftry.png|link=Shiftry]]
| |
| | width="1%" style="border-top-style: hidden; border-width: 1px; border-bottom-style: hidden; border-width: 1px" |
| |
| | width="1%" align="center" | [[Arquivo:Dark_Ear_Shiftry_NW.png|link=]] || align="center" | Dark Ear || align="center" | [[Arquivo:275-Shiftry.png|link=Shiftry]]
| |
| |-
| |
| | width="1%" align="center" | [[Arquivo:Green Hair.png|link=]] || align="center" | Green Hair || align="center" | [[Arquivo:280-Ralts.png|link=Ralts]] [[Arquivo:281-Kirlia.png|link=Kirlia]] [[Arquivo:282-Gardevoir.png|link=Gardevoir]]
| |
| | width="1%" style="border-top-style: hidden; border-width: 1px; border-bottom-style: hidden; border-width: 1px" |
| |
| | width="1%" align="center" | [[Arquivo:Sloth Topknot.png|link=]] || align="center" | Sloth Topknot || align="center" | [[Arquivo:288-Vigoroth.png|link=Vigoroth]]
| |
| | width="1%" style="border-top-style: hidden; border-width: 1px; border-bottom-style: hidden; border-width: 1px" |
| |
| | width="1%" align="center" | [[Arquivo:Savage Fin.png|link=]] || align="center" | Savage Fin || align="center" | [[Arquivo:318-Carvanha.png|link=Carvanha]] [[Arquivo:319-Sharpedo.png|link=Sharpedo]]
| |
| |-
| |
| | width="1%" align="center" | [[Arquivo:Brutal Fin.png|link=]] || align="center" | Brutal Fin || align="center" | [[Arquivo:319-Sharpedo.png|link=Sharpedo]]
| |
| | width="1%" style="border-top-style: hidden; border-width: 1px; border-bottom-style: hidden; border-width: 1px" |
| |
| | width="1%" align="center" | [[Arquivo:Corrupted Black Hull.png|link=]] || align="center" | Corrupted Black Hull || align="center" | [[Arquivo:324-Torkoal.png|link=Torkoal]]
| |
| | width="1%" style="border-top-style: hidden; border-width: 1px; border-bottom-style: hidden; border-width: 1px" |
| |
| | width="1%" align="center" | [[Arquivo:Curly Pig Tail.png|link=]] || align="center" | Curly Pig Tail || align="center" | [[Arquivo:325-Spoink.png|link=Spoink]]
| |
| |-
| |
| | width="1%" align="center" | [[Arquivo:Pig Ear.png|link=]] || align="center" | Pig Ear || align="center" | [[Arquivo:326-Grumpig.png|link=Grumpig]]
| |
| | width="1%" style="border-top-style: hidden; border-width: 1px; border-bottom-style: hidden; border-width: 1px" |
| |
| | width="1%" align="center" | [[Arquivo:Corrupted Cloud.png|link=]] || align="center" | Corrupted Cloud || align="center" | [[Arquivo:334-Altaria.png|link=Altaria]]
| |
| | width="1%" style="border-top-style: hidden; border-width: 1px; border-bottom-style: hidden; border-width: 1px" |
| |
| | width="1%" align="center" | [[Arquivo:Corrupted Poisonous Tail.png|link=]] || align="center" | Corrupted Poisonous Tail || align="center" | [[Arquivo:336-Seviper.png|link=Seviper]]
| |
| |-
| |
| | width="1%" align="center" | [[Arquivo:Moon Piece.png|link=]] || align="center" | Moon Piece || align="center" | [[Arquivo:337-Lunatone.png|link=Lunatone]]
| |
| | width="1%" style="border-top-style: hidden; border-width: 1px; border-bottom-style: hidden; border-width: 1px" |
| |
| | width="1%" align="center" | [[Arquivo:Sun Piece.png|link=]] || align="center" | Sun Piece || align="center" | [[Arquivo:338-Solrock.png|link=Solrock]]
| |
| | width="1%" style="border-top-style: hidden; border-width: 1px; border-bottom-style: hidden; border-width: 1px" |
| |
| | width="1%" align="center" | [[Arquivo:Whiskers Fin.png|link=]] || align="center" | Whiskers Fin || align="center" | [[Arquivo:339.png|link=Barboach]] [[Arquivo:340-Whiscash.png|link=Whiscash]]
| |
| |-
| |
| | width="1%" align="center" | [[Arquivo:Catfish Tail.png|link=]] || align="center" | Catfish Tail || align="center" | [[Arquivo:340-Whiscash.png|link=Whiscash]]
| |
| | width="1%" style="border-top-style: hidden; border-width: 1px; border-bottom-style: hidden; border-width: 1px" |
| |
| | width="1%" align="center" | [[Arquivo:Corrupted Doll Star.png|link=]] || align="center" | Corrupted Doll Star || align="center" | [[Arquivo:353-Shuppet.png|link=Shuppet]] [[Arquivo:354-Banette.png|link=Banette]]
| |
| | width="1%" style="border-top-style: hidden; border-width: 1px; border-bottom-style: hidden; border-width: 1px" |
| |
| | width="1%" align="center" | [[Arquivo:Corrupted Ice Piece.png|link=]] || align="center" | Corrupted Ice Piece || align="center" | [[Arquivo:361-Snorut.png|link=Snorunt]] [[Arquivo:362-Glalie.png|link=Glalie]]
| |
| |-
| |
| | width="1%" align="center" | [[Arquivo:Red Spike.png|link=]] || align="center" | Red Spike || align="center" | [[Arquivo:362-Glalie.png|link=Glalie]]
| |
| | width="1%" style="border-top-style: hidden; border-width: 1px; border-bottom-style: hidden; border-width: 1px" |
| |
| | width="1%" align="center" | [[Arquivo:Continent Thorn.png|link=]] || align="center" | Continent Thorn || align="center" | [[Arquivo:389-Torterra.png|link=Torterra]]
| |
| | width="1%" style="border-top-style: hidden; border-width: 1px; border-bottom-style: hidden; border-width: 1px" |
| |
| | width="1%" align="center" | [[Arquivo:Flame Tail.png|link=]] || align="center" | Flame Tail || align="center" | [[Arquivo:392-Infernape.png|link=Infernape]]
| |
| |-
| |
| | width="1%" align="center" | [[Arquivo:Emperor Trident.png|link=]] || align="center" | Emperor Trident || align="center" | [[Arquivo:395-Empoleon.png|link=Empoleon]]
| |
| | width="1%" style="border-top-style: hidden; border-width: 1px; border-bottom-style: hidden; border-width: 1px" |
| |
| | width="1%" align="center" | [[Arquivo:Gleam Tail.png|link=]] || align="center" | Gleam Tail || align="center" | [[Arquivo:405-Luxray.png|link=Luxray]]
| |
| | width="1%" style="border-top-style: hidden; border-width: 1px; border-bottom-style: hidden; border-width: 1px" |
| |
| | width="1%" align="center" | [[Arquivo:Solid Head.png|link=]] || align="center" | Solid Head || align="center" | [[Arquivo:408-Cranidos.png|link=Cranidos]] [[Arquivo:409-Rampardos(1).png|link=Rampardos]]
| |
| |-
| |
| | width="1%" align="center" | [[Arquivo:Bagworm Green Leaves.png|link=]] || align="center" | Bagworm Green Leaves || align="center" | [[Arquivo:413-WormadamPlantCloak.png|link=Wormadam]]
| |
| | width="1%" style="border-top-style: hidden; border-width: 1px; border-bottom-style: hidden; border-width: 1px" |
| |
| | width="1%" align="center" | [[Arquivo:Bagworm Stone.png|link=]] || align="center" | Bagworm Stone || align="center" | [[Arquivo:413-WormadamGround.png|link=Wormadam Ground]]
| |
| | width="1%" style="border-top-style: hidden; border-width: 1px; border-bottom-style: hidden; border-width: 1px" |
| |
| | width="1%" align="center" | [[Arquivo:Bagworm Pink Leaves.png|link=]] || align="center" | Bagworm Pink Leaves || align="center" | [[Arquivo:413-WormadamSteel.png|link=Wormadam Steel]]
| |
| |- | | |- |
| | width="1%" align="center" | [[Arquivo:Bucket of Honey.png|link=]] || align="center" | Bucket of Honey || align="center" | [[Arquivo:416-Vespiquen.png|link=Vespiquen]]
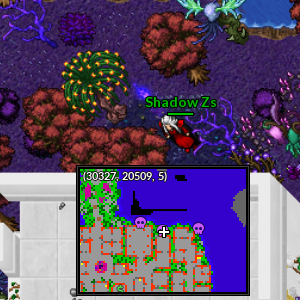
| | | align="center" | [[Arquivo:30227, 20493, 5.png|link=]] |
| | width="1%" style="border-top-style: hidden; border-width: 1px; border-bottom-style: hidden; border-width: 1px" | | | | align="center" | Respawn de Shuppet <br> 30227, 20493, 5 |
| | width="1%" align="center" | [[Arquivo:Big Boss Hat.png|link=]] || align="center" | Big Boss Hat || align="center" | [[Arquivo:430-Honchkrow.png|link=Honchkrow]]
| |
| | width="1%" style="border-top-style: hidden; border-width: 1px; border-bottom-style: hidden; border-width: 1px" |
| |
| | width="1%" align="center" | [[Arquivo:Land Shark Horn.png|link=]] || align="center" | Land Shark Horn || align="center" | [[Arquivo:443-Gible.png|link=Gible]] [[Arquivo:445-Garchomp(1).png|link=Garchomp]]
| |
| |- | | |- |
| | width="1%" align="center" | [[Arquivo:Cave Nail.png|link=]] || align="center" | Cave Nail || align="center" | [[Arquivo:444-Gabite.png|link=Gabite]] [[Arquivo:445-Garchomp(1).png|link=Garchomp]]
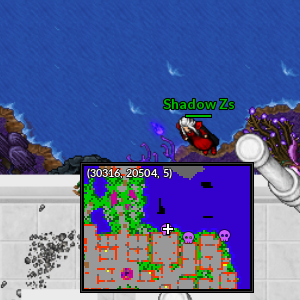
| | | align="center" | [[Arquivo:30203, 20480, 5.png|link=]] |
| | width="1%" style="border-top-style: hidden; border-width: 1px; border-bottom-style: hidden; border-width: 1px" |
| | | align="center" | Respawn de Shuppet <br> 30203, 20480, 5 |
| | width="1%" align="center" | [[Arquivo:Mach Nail.png|link=]] || align="center" | Mach Nail || align="center" | [[Arquivo:445-Garchomp(1).png|link=Garchomp]]
| |
| | width="1%" style="border-top-style: hidden; border-width: 1px; border-bottom-style: hidden; border-width: 1px" |
| |
| | width="1%" align="center" | [[Arquivo:Kite Antenna.png|link=]] || align="center" | Kite Antenna || align="center" | [[Arquivo:458-Mantyke(1).png|link=Mantyke]] [[Arquivo:226-Mantine.png|link=Mantine]]
| |
| |- | | |- |
| | width="1%" align="center" | [[Arquivo:Frosty Tail.png|link=]] || align="center" | Frosty Tail || align="center" | [[Arquivo:459-Snover.png|link=Snover]]
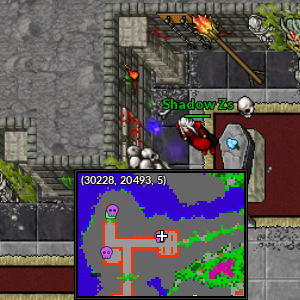
| | | align="center" | [[Arquivo:30200, 20501, 5.png|link=]] |
| | width="1%" style="border-top-style: hidden; border-width: 1px; border-bottom-style: hidden; border-width: 1px" |
| | | align="center" | Respawn de Shuppet <br> 30200, 20501, 5 |
| | width="1%" align="center" | [[Arquivo:Frosty Hand.png|link=]] || align="center" | Frosty Hand || align="center" | [[Arquivo:460-Abomasnow.png|link=Abomasnow]]
| |
| | width="1%" style="border-top-style: hidden; border-width: 1px; border-bottom-style: hidden; border-width: 1px" | | |
| | width="1%" align="center" | [[Arquivo:Blade Horn.png|link=]] || align="center" | Blade Horn || align="center" | [[Arquivo:475-Gallade.png|link=Gallade]]
| |
| |- | | |- |
| | width="1%" align="center" | [[Arquivo:Fire Monkey Hair.png|link=]] || align="center" | Fire Monkey Hair || align="center" | [[Arquivo:513-Pansear.png|link=Pansear]] [[Arquivo:514-Simisear(1).png|link=Simisear]]
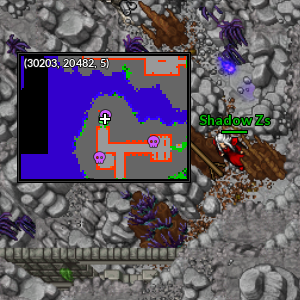
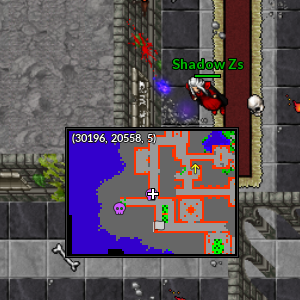
| | | align="center" | [[Arquivo:30195, 20558, 5.png|link=]] |
| | width="1%" style="border-top-style: hidden; border-width: 1px; border-bottom-style: hidden; border-width: 1px" |
| | | align="center" | Respawn de Shuppet <br> 30195, 20558, 5 |
| | width="1%" align="center" | [[Arquivo:Gear Thorn.png|link=]] || align="center" | Gear Thorn || align="center" | [[Arquivo:599-Klink.png|link=Klink]] [[Arquivo:600-Klang.png|link=Klang]] [[Arquivo:601-Klinklang.png|link=Klinklang]]
| |
| | width="1%" style="border-top-style: hidden; border-width: 1px; border-bottom-style: hidden; border-width: 1px" |
| |
| | width="1%" align="center" | [[Arquivo:Remains Of Gears.png|link=]] || align="center" | <font size='2'> Remains Of Gears </font> || align="center" | [[Arquivo:601-Klinklang.png|link=Klinklang]]
| |
| |- | | |- |
| | width="1%" align="center" | [[Arquivo:Elefish Fin.png|link=]] || align="center" | Elefish Fin || align="center" | [[Arquivo:602-Tynamo.png|link=Tynamo]] [[Arquivo:604-Eelektross.png|link=Eelektross]]
| | | align="center" | [[Arquivo:30179, 20565, 5.png|link=]] |
| | width="1%" style="border-top-style: hidden; border-width: 1px; border-bottom-style: hidden; border-width: 1px" |
| | | align="center" | Respawn de Shuppet <br> 30179, 20565, 5 |
| | width="1%" align="center" | [[Arquivo:Electric Fish Tail.png|link=]] || align="center" | Electric Fish Tail || align="center" | [[Arquivo:603-Eelektrik.png|link=Eelektrik]] [[Arquivo:604-Eelektross.png|link=Eelektross]]
| |
| | width="1%" style="border-top-style: hidden; border-width: 1px; border-bottom-style: hidden; border-width: 1px" |
| |
| | width="1%" align="center" | [[Arquivo:Royal Mane.png|link=]] || align="center" | Royal Mane || align="center" | [[Arquivo:667-Litleo.png|link=Litleo]] [[Arquivo:668-PyroarMale.png|link=Pyroar]] [[Arquivo:668-Pyroar_Female.png|link=Pyroar_Female]]
| |
| |-
| |
| | width="1%" align="center" | [[Arquivo:Royal Tail.png|link=]] || align="center" | Royal Tail || align="center" | [[Arquivo:668-PyroarMale.png|link=Pyroar]] [[Arquivo:668-Pyroar_Female.png|link=Pyroar_Female]]
| |
| | width="1%" style="border-top-style: hidden; border-width: 1px; border-bottom-style: hidden; border-width: 1px" |
| |
| | width="1%" align="center" | [[Arquivo:Mount Horn.png|link=]] || align="center" | Mount Horn || align="center" | [[Arquivo:672-Skiddo.png|link=Skiddo]] [[Arquivo:673-Gogoat.png|link=Gogoat]]
| |
| | width="1%" style="border-top-style: hidden; border-width: 1px; border-bottom-style: hidden; border-width: 1px" |
| |
| | width="1%" align="center" | [[Arquivo:Mount Big Horn.png|link=]] || align="center" | Mount Big Horn || align="center" | [[Arquivo:673-Gogoat.png|link=Gogoat]]
| |
| |}
| |
| | |
| | |
| | |
| | |
| SHINYS / Angry
| |
| | |
| [[Arquivo:089-Sh Muk.png|link=Shiny Muk]]
| |
| [[Arquivo:673-Shiny Gogoat.png|link=Shiny Gogoat]]
| |
| [[Arquivo:604-Shiny_Eelektross.png|link=Shiny_Eelektross]]
| |
| [[Arquivo:475-Shiny Gallade.png|link=Shiny Gallade]]
| |
| [[Arquivo:462-Shiny Magnezone.png|link=Shiny Magnezone]]
| |
| [[Arquivo:473-Mamoswine.png|link=Mamoswine]]
| |
| [[Arquivo:474-PorygonZ.png|link=Porygon-Z]]
| |
| [[Arquivo:430-Shiny Honchkrow.png|link=Shiny Honchkrow]]
| |
| [[Arquivo:395-Shiny Empoleon.png|link=Shiny Empoleon]]
| |
| [[Arquivo:405-Shiny Luxray.png|link=Shiny Luxray]]
| |
| [[Arquivo:389-Shiny Torterra.png|link=Shiny Torterra]]
| |
| [[Arquivo:Shiny Infernape.png|link=Shiny Infernape]]
| |
| [[Arquivo:Mega_Salamencee.png|link=Mega Salamence]]
| |
| [[Arquivo:Megabanette.png|link=Mega Banette]]
| |
| [[Arquivo:Shiny_Whiscashh.png|link=Shiny Whiscash]]
| |
| [[Arquivo:Shiny_Torkoall.png|link=Shiny Torkoal]]
| |
| [[Arquivo:Megahoundoom.png|link=Mega Houndoom]]
| |
| [[Arquivo:Shiny granbull.png|link=Shiny Granbull]]
| |
| [[Arquivo:Shiny steelix.png|link=Golden Steelix]]
| |
| [[Arquivo:Shiny Sudowoodo.png|link=Golden Sudowoodo]]
| |
| [[Arquivo:Shiny_snorlax.png|link=Shiny Snorlax]]
| |
| [[Arquivo:Megapinsir.png|link=Mega Pinsir]]
| |
| [[Arquivo:Shiny starmie.png|link=Shiny Starmie]]
| |
| [[Arquivo:124-shJynx.png|link=Shiny Jynx]]
| |
| [[Arquivo:114-Sh Tangela.png|link=Shiny Tangela]]
| |
| [[Arquivo:Shiny Weezing.png|link=Shiny Weezing]]
| |
| [[Arquivo:Shiny Machoke1.png|link=Shiny Machoke]]
| |
| [[Arquivo:109-Shiny_Koffing.png|link=Shiny Koffing]]
| |
| [[Arquivo:015M.png|link=Mega Beedrill]]
| |
| [[Arquivo:083-shFarfetch-D.png|link=Elite Farfetch'D]]
| |
| | |
| | |
| Hoenn
| |
| | |
| {| class="wikitable" width="100%"
| |
| ! colspan="2" width="13%" | Item
| |
| ! width="18%" | Pokémon
| |
| | width="1%" style="border-top-style: hidden; border-width: 1px; border-bottom-style: hidden; border-width: 1px" |
| |
| ! colspan="2" width="12%" | Item
| |
| ! width="14%" | Pokémon
| |
| | width="1%" style="border-top-style: hidden; border-width: 1px; border-bottom-style: hidden; border-width: 1px" |
| |
| ! colspan="2" width="17%" | Item
| |
| ! width="16%" | Pokémon
| |
| |- | | |- |
| | width="1%" align="center" | [[Arquivo:Tiny Raccon Fur.png|link=]] || align="center" | Tiny Raccon Fur || align="center" | [[Arquivo:263_Zigzagoon_sp.png|link=Zigzagoon]] [[Arquivo:264_Linoone_sp.png|link=Linoone]]
| | | align="center" | [[Arquivo:30194, 20575, 4.png|link=]] |
| | width="1%" style="border-top-style: hidden; border-width: 1px; border-bottom-style: hidden; border-width: 1px" |
| | | align="center" | Respawn de Shuppet <br> 30194, 20575, 4 |
| | width="1%" align="center" | [[Arquivo:Worm Horn.png|link=]] || align="center" | Worm Horn || align="center" | [[Arquivo:265_Wurmple_sp.png|link=Wurmple]]
| |
| | width="1%" style="border-top-style: hidden; border-width: 1px; border-bottom-style: hidden; border-width: 1px" |
| |
| | width="1%" align="center" | [[Arquivo:White Cocoon Thorn.png|link=]]|| align="center" | <font size=1 > White Cocoon Thorn </font> || align="center" | [[Arquivo:266_Silcoon_sp.png|link=Silcoon]]
| |
| |- | | |- |
| | width="1%" align="center" | [[Arquivo:Purple Cocoon Thorn.png|link=]] || align="center" | <font size=1> Purple Cocoon Thorn </font> || align="center" | [[Arquivo:268_Cascoon_sp.png|link=Cascoon]] | | | align="center" | [[Arquivo:30250, 20582, 5.png|link=]] |
| | width="1%" style="border-top-style: hidden; border-width: 1px; border-bottom-style: hidden; border-width: 1px" |
| | | align="center" | Respawn de Shuppet <br> 30250, 20582, 5 |
| | width="1%" align="center" | [[Arquivo:Poison Moth Wings.png|link=]] || align="center" | Poison Moth Wings || align="center" | [[Arquivo:269_Dustox_sp.png|link=Dustox]]
| |
| | width="1%" style="border-top-style: hidden; border-width: 1px; border-bottom-style: hidden; border-width: 1px" |
| |
| | width="1%" align="center" | [[Arquivo:Pond Skater Legs.png|link=]] || align="center" | Pond Skater Legs || align="center" | [[Arquivo:283_Surskit_sp.png|link=Surskit]]
| |
| |- | | |- |
| | width="1%" align="center" | [[Arquivo:Eyeball Wings.png|link=]] || align="center" | Eyeball Wings || align="center" | [[Arquivo:284_Masquerain_sp.png|link=Masquerain]] | | | align="center" | [[Arquivo:30251, 20608, 5.png|link=]] |
| | | | align="center" | Respawn de Shuppet <br> 30251, 20608, 5 |
| |}
| |
| | |
| | |
| | |
| Sentinel
| |
| | |
| {| class="wikitable" width="100%"
| |
| ! colspan="2" width="13%" | Item
| |
| ! width="18%" | Pokémon
| |
| | width="1%" style="border-top-style: hidden; border-width: 1px; border-bottom-style: hidden; border-width: 1px" |
| |
| ! colspan="2" width="12%" | Item
| |
| ! width="14%" | Pokémon
| |
| | width="1%" style="border-top-style: hidden; border-width: 1px; border-bottom-style: hidden; border-width: 1px" |
| |
| ! colspan="2" width="17%" | Item
| |
| ! width="16%" | Pokémon
| |
| |- | | |- |
| | width="1%" align="center" | [[Arquivo:MetalScraps.png|link=]] || align="center" | Metal Scraps || align="center" | Small Sentinel e Sentinel | | | align="center" | [[Arquivo:30270, 20595, 6.png|link=]] |
| | width="1%" style="border-top-style: hidden; border-width: 1px; border-bottom-style: hidden; border-width: 1px" |
| | | align="center" | Respawn de Shuppet <br> 30270, 20595, 6 |
| | width="1%" align="center" | [[Arquivo:Nightmare_Gem.png|link=]] || align="center" | Nightmare Gem || align="center" | Small Sentinel <br> Sentinel <br>[[Arquivo:003-Venusaur.png|link=Venusaur]] [[Arquivo:006-Charizard.png|link=Charizard]] [[Arquivo:0009-Blastoise.png|link=Blastoise]] [[Arquivo:143-Snorlax.png|link=Snorlax]] [[Arquivo:154-Meganium.png|link=Meganium]] [[Arquivo:157-Typhlosion.png|link=Typhlosion]] [[Arquivo:160-Feraligatr.png|link=Feraligatr]] [[Arquivo:Scizor.png|link=Scizor]] [[Arquivo:342-Crawdaunt.png|link=Crawdaunt]] [[Arquivo:357-Tropius.png|link=Tropius]] [[Arquivo:460-Abomasnow.png|link=Abomasnow]]
| |
| | width="1%" style="border-top-style: hidden; border-width: 1px; border-bottom-style: hidden; border-width: 1px" |
| |
| | width="1%" align="center" | [[Arquivo:NW_ore.png|link=]]|| align="center" | Nightmare Ore || align="center" | [[Arquivo:003-Venusaur.png|link=Venusaur]] [[Arquivo:006-Charizard.png|link=Charizard]] [[Arquivo:0009-Blastoise.png|link=Blastoise]] [[Arquivo:143-Snorlax.png|link=Snorlax]] [[Arquivo:154-Meganium.png|link=Meganium]] [[Arquivo:157-Typhlosion.png|link=Typhlosion]] [[Arquivo:160-Feraligatr.png|link=Feraligatr]] [[Arquivo:Scizor.png|link=Scizor]] [[Arquivo:342-Crawdaunt.png|link=Crawdaunt]] [[Arquivo:357-Tropius.png|link=Tropius]] [[Arquivo:460-Abomasnow.png|link=Abomasnow]]
| |
| |- | | |- |
| |}
| |
|
| |
|
| |
|
| |
| T1h
| |
|
| |
| Shiny Sceptile - T1h Treecko, Grovyle e Sceptile
| |
| Shiny Gardevoir - t1h Ralts, kirlia, voir
| |
| t1h Makuhita e hariyama - Shiny Hariyama
| |
| t1h Mawile e Shiny Mawile
| |
| Mega Glalie, t1h snorunt e glalie
| |
| Shiny Rampardos t1h cranids e rampardos
| |
| Zoroark - t1h zorua
| |
| t1h pachirisu, shiny pachirisu
| |
| t1h heatmor - Shiny heatmor
| |
| t1h pidgey, pidgeotto, pidgeot e mega pidgeot
| |
|
| |
| == Mapas de Aventureiro ==
| |
|
| |
| Um dos objetivos dos Aventureiros no jogo é encontrar tesouros escondidos pelo mapa. Uma das formas é através de Mapas, que mostrarão a localização exata do local que o jogador deverá cavar para cair em uma Dungeon aleatória.
| |
| Existem diversas Dungeons e cada uma terá uma recompensa diferente para o jogador que conseguir chegar até o baú.
| |
|
| |
| == Como conseguir ==
| |
|
| |
| Os mapas podem ser obtidos através do Baú Dourado, que aparece de forma aleatória pelo mapa do jogo. <br>
| |
| Existe uma tradição dos jogadores de vender os baús encontrados, portanto, uma forma de conseguir tais baús também pode ser através de anúncio no Trade Center. <br>
| |
|
| |
| '''Importante:''' O "rank" do mapa é definido no momento em que o jogador abre o baú. Sendo assim, caso o jogador abra o baú enquanto está no Rank D da profissão, o mapa será sempre referente ao Rank D, ainda que o jogador tenha aumentado seu Rank.
| |
|
| |
| == Funcionamento das Coordenadas ==
| |
|
| |
| Para ter as coordenadas ativadas, o jogador deverá seguir os seguintes passos: <br>
| |
|
| |
| '''1.''' Abrir o Menu Opções (O); <br>
| |
| '''2.''' Na aba Interface, clicar em Minimapa; <br>
| |
| '''3.''' Ativar a opção "Exibir coordenadas". <br>
| |
|
| |
| Dessa forma, as coordenadas ficarão visíveis no mapa e minimapa (M) do jogo no canto superior esquerdo.<br>
| |
|
| |
| As coordenadas são definidas por 3 conjuntos de números, por exemplo: '''3508, 3208, 6'''. <br>
| |
| O primeiro conjunto de números é referente à longitude, ou seja, é modificado conforme o jogador anda na horizontal, sendo para a direita ou para a esquerda. <br>
| |
| O segundo conjunto de números é referente à latitude, sendo assim, é modificado conforme o jogador anda na forma vertical, sendo para cima ou para baixo. <br>
| |
| Por último, é o número de andares no mapa. Por exemplo, se o jogador subir ou descer do fly, o número será modificado. <br>
| |
|
| |
| Após entender o funcionamento das coordenadas, o jogador poderá usar como referência para chegar até o local exato onde o baú é localizado.
| |
|
| |
|
| |
|
| | |-|Região de Cinnabar= |
|
| |
|
| === "X" em local de Grama/Floresta ===
| | São 18 espíritos ao total nessa região. |
|
| |
|
| <center>
| | {| class="wikitable" width="70%" |
| {| class="wikitable" width="90%" | | ! width="5%" style="background-color: #9d1a64" | Localização |
| ! width="1%" style="background-color: #9d1a64" | <span style="color:white">Mapa</span> | | ! width="20%" style="background-color: #9d1a64" | Posição |
| ! width="1%" style="background-color: #9d1a64" | <span style="color:white">Localização</span>
| |
| ! width="1%" style="background-color: #9d1a64" | <span style="color:white">Posição</span> | |
| |- | | |- |
| | align="center" | [[Arquivo:MapaADV-X_Grama_Kanto.png|link=]] | | | align="center" | [[Arquivo:30285, 20701, 5.png|link=]] |
| | align="center" | Charicific Valley | | | align="center" | Arredores da cidade de Cinnabar <br> 30285, 20701, 5 |
| | align="center" | 3508, 3208, 6
| |
| |- | | |- |
| | align="center" | [[Arquivo:3522,_3264,_5.png|link=]] | | | align="center" | [[Arquivo:30261, 20707, 5.png|link=]] |
| | align="center" | Charicific Valley | | | align="center" | Arredores da cidade de Cinnabar <br> 30261, 20707, 5 |
| | align="center" | 3522, 3264, 5
| |
| |- | | |- |
| | align="center" | [[Arquivo:3561,_3256,_4.png|link=]] | | | align="center" | [[Arquivo:30256, 20721, 5.png|link=]] |
| | align="center" | Charicific Valley | | | align="center" | Arredores da cidade de Cinnabar <br> 30256, 20721, 5 |
| | align="center" | 3561, 3256, 4
| |
| |- | | |- |
| | align="center" | [[Arquivo:3652,_3189,_4.png|link=]] | | | align="center" | [[Arquivo:30216, 20750, 5.png|link=]] |
| | align="center" | Charicific Valley | | | align="center" | Respawn de Grimer <br> 30216, 20750, 5 |
| | align="center" | 3652, 3189, 4
| |
| |- | | |- |
| | align="center" | [[Arquivo:3623,_3301,_7.png|link=]] | | | align="center" | [[Arquivo:30230, 20757, 5.png|link=]] |
| | align="center" | Ilha próxima ao do Lance, Norte de Pewter | | | align="center" | Respawn de Grimer <br> 30230, 20757, 5 |
| | align="center" | 3623, 3301, 7
| |
| |- | | |- |
| | align="center" | [[Arquivo:3611,_3440,_7.png|link=]] | | | align="center" | [[Arquivo:30224, 20773, 5.png|link=]] |
| | align="center" | Floresta ao Oeste de Pewter | | | align="center" | Respawn de Grimer <br> 30224, 20773, 5 |
| | align="center" | 3611, 3440, 7
| |
| |- | | |- |
| | align="center" | [[Arquivo:3645,_3504,_6.png|link=]] | | | align="center" | [[Arquivo:30377, 20554, 5.png|link=]] |
| | align="center" | Saída Oeste de Pewter | | | align="center" | Respawn de Magby e Pansear <br> 30377, 20554, 5 |
| | align="center" | 3645, 3504, 6
| |
| |- | | |- |
| | align="center" | [[Arquivo:3748,_3564,_7.png|link=]] | | | align="center" | [[Arquivo:30388, 20551, 5.png|link=]] |
| | align="center" | Respawn de Paras em Pewter | | | align="center" | Respawn de Magby e Pansear <br> 30388, 20551, 5 |
| | align="center" | 3748, 3564, 7
| |
| |- | | |- |
| | align="center" | [[Arquivo:3768,_3499,_5.png|link=]] | | | align="center" | [[Arquivo:30394, 20544, 5.png|link=]] |
| | align="center" | Respawn de Igglybuff no Mt. Moon | | | align="center" | Respawn de Magby e Pansear <br> 30394, 20544, 5 |
| | align="center" | 3768, 3499, 5
| |
| |- | | |- |
| | align="center" | [[Arquivo:3847,_3348,_7.png|link=]] | | | align="center" | [[Arquivo:30381, 20566, 4.png|link=]] |
| | align="center" | Green Island | | | align="center" | Respawn de Ninetales, Houndoom e Simisear <br> 30381, 20566, 4 |
| | align="center" | 3847, 3348, 7
| |
| |- | | |- |
| | align="center" | [[Arquivo:3949,_3522,_8.png|link=]] | | | align="center" | [[Arquivo:30373, 20570, 4.png|link=]] |
| | align="center" | Cerulean Quest | | | align="center" | Respawn de Ninetales, Houndoom e Simisear <br> 30373, 20570, 4 |
| | align="center" | 3949, 3522, 8
| |
| |- | | |- |
| | align="center" | [[Arquivo:4637,_3333,_7.png|link=]] | | | align="center" | [[Arquivo:30369, 20582, 4.png|link=]] |
| | align="center" | Lighstorm Island | | | align="center" | Respawn de Ninetales, Houndoom e Simisear <br> 30369, 20582, 4 |
| | align="center" | 4637, 3333, 7
| |
| |- | | |- |
| | align="center" | [[Arquivo:3900,_3529,_6.png|link=]] | | | align="center" | [[Arquivo:30549, 20555, 4.png|link=]] |
| | align="center" | Pântano de Cerulean | | | align="center" | Respawn de Ninetales, Houndoom e Simisear <br> 30549, 20555, 4 |
| | align="center" | 3900, 3529, 6
| |
| |- | | |- |
| | align="center" | [[Arquivo:4159,_3548,_7.png|link=]] | | | align="center" | [[Arquivo:30548, 20541, 4.png|link=]] |
| | align="center" | Floresta de Cerulean | | | align="center" | Respawn de Ninetales, Houndoom e Simisear <br> 30548, 20541, 4 |
| | align="center" | 4159, 3548, 7
| |
| |- | | |- |
| | align="center" | [[Arquivo:4267,_3457,_7.png|link=]] | | | align="center" | [[Arquivo:30533, 20550, 4.png|link=]] |
| | align="center" | Pequena floresta acima do Rock Tunnel | | | align="center" | Respawn de Ninetales, Houndoom e Simisear <br> 30533, 20550, 4 |
| | align="center" | 4267, 3457, 7
| |
| |- | | |- |
| | align="center" | [[Arquivo:4377,_3523,_7.png|link=]] | | | align="center" | [[Arquivo:30532, 20607, 4.png|link=]] |
| | align="center" | Pequena floresta na direita da Power Plant | | | align="center" | Respawn de Ninetales, Houndoom e Simisear <br> 30532, 20607, 4 |
| | align="center" | 4377, 3523, 7
| |
| |- | | |- |
| | align="center" | [[Arquivo:4398,_3508,_7.png|link=]] | | | align="center" | [[Arquivo:30545, 20609, 4.png|link=]] |
| | align="center" | Caverna no respawn de Minun e Plusle próximo de Cerulean | | | align="center" | Respawn de Ninetales, Houndoom e Simisear <br> 30545, 20609, 4 |
| | align="center" | 4398, 3508, 7
| |
| |- | | |- |
| | align="center" | [[Arquivo:4457,_3453,_7.png|link=]] | | | align="center" | [[Arquivo:30542, 20624, 4.png|link=]] |
| | align="center" | Pequena ilha em redor do Aerodactyl | | | align="center" | Respawn de Ninetales, Houndoom e Simisear <br> 30542, 20624, 4 |
| | align="center" | 4457, 3453, 7
| |
| |- | | |- |
|
| |
|
| |} | | |-|Região de Fuchsia= |
| </center>
| |
|
| |
|
| === "X" em local Subaquático ===
| | São 21 espíritos ao total nessa região. |
|
| |
|
| <center>
| | {| class="wikitable" width="70%" |
| {| class="wikitable" width="90%" | | ! width="5%" style="background-color: #9d1a64" | Localização |
| ! width="1%" style="background-color: #9d1a64" | <span style="color:white">Mapa</span> | | ! width="20%" style="background-color: #9d1a64" | Posição |
| ! width="1%" style="background-color: #9d1a64" | <span style="color:white">Localização</span> | | |- |
| ! width="1%" style="background-color: #9d1a64" | <span style="color:white">Posição</span>
| | | align="center" | [[Arquivo:30549, 20904, 7.png|link=]] |
| | | align="center" | Igreja entre o respawn de Gardevoir e Torterra <br> 30549, 20904, 7 |
| |- | | |- |
| | align="center" | [[Arquivo:3469,_3454,_8.png|link=]] | | | align="center" | [[Arquivo:30548, 20913, 7.png|link=]] |
| | align="center" | Local subaquático de Pewter | | | align="center" | Igreja entre o respawn de Gardevoir e Torterra <br> 30548, 20913, 7 |
| | align="center" | 3469, 3454, 8
| |
| |- | | |- |
| | align="center" | [[Arquivo:3595,_3562,_8.png|link=]] | | | align="center" | [[Arquivo:30550, 20928, 7.png|link=]] |
| | align="center" | Local subaquático de Pewter | | | align="center" | Igreja entre o respawn de Gardevoir e Torterra <br> 30550, 20928, 7 |
| | align="center" | 3595, 3562, 8
| |
| |- | | |- |
| | align="center" | [[Arquivo:4278,_3327,_7.png|link=]] | | | align="center" | [[Arquivo:30528, 20945, 6.png|link=]] |
| | align="center" | Shell Island | | | align="center" | Respawn de Skiddo e Nuzleaf <br> 30528, 20945, 6 |
| | align="center" | 4278, 3327, 7
| |
| |- | | |- |
| | align="center" | [[Arquivo:4352,_3351,_7.png|link=]] | | | align="center" | [[Arquivo:30525, 20953, 7.png|link=]] |
| | align="center" | Shell Island | | | align="center" | Respawn de Skiddo e Nuzleaf <br> 30525, 20953, 7 |
| | align="center" | 4352, 3351, 7
| |
| |- | | |- |
| |} | | | align="center" | [[Arquivo:30523, 20966, 7.png|link=]] |
| </center>
| | | align="center" | Respawn de Skiddo e Nuzleaf <br> 30523, 20966, 7 |
| | | |- |
| === "X" em local de Lama/Terra ===
| | | align="center" | [[Arquivo:30548, 20993, 6.png|link=]] |
| | | | align="center" | Respawn de Skiddo e Nuzleaf <br> 30548, 20993, 6 |
| <center>
| |
| {| class="wikitable" width="90%"
| |
| ! width="1%" style="background-color: #9d1a64" | <span style="color:white">Mapa</span>
| |
| ! width="1%" style="background-color: #9d1a64" | <span style="color:white">Localização</span>
| |
| ! width="1%" style="background-color: #9d1a64" | <span style="color:white">Posição</span>
| |
| |- | | |- |
| | align="center" | [[Arquivo:3666,_3415,_7.png|link=]] | | | align="center" | [[Arquivo:30557, 20992, 6.png|link=]] |
| | align="center" | Entrada cemitério de Pewter | | | align="center" | Respawn de Skiddo e Nuzleaf <br> 30557, 20992, 6 |
| | align="center" | 3666, 3415, 7
| |
| |- | | |- |
| | align="center" | [[Arquivo:4054,_3277,_6.png|link=]] | | | align="center" | [[Arquivo:30557, 20981, 6.png|link=]] |
| | align="center" | Wildwind Island | | | align="center" | Respawn de Skiddo e Nuzleaf <br> 30557, 20981, 6 |
| | align="center" | 4054, 3277, 6
| |
| |- | | |- |
| | align="center" | [[Arquivo:4135,_3305,_5.png|link=]] | | | align="center" | [[Arquivo:30693, 20675, 5.png|link=]] |
| | align="center" | Hurricane Island | | | align="center" | Arredores do respawn de Miltank <br> 30693, 20675, 5 |
| | align="center" | 4135, 3305, 5
| |
| |- | | |- |
| | align="center" | [[Arquivo:4150,_3283,_4.png|link=]] | | | align="center" | [[Arquivo:30683, 20677, 5.png|link=]] |
| | align="center" | Hurricane Island | | | align="center" | Arredores do respawn de Miltank <br> 30683, 20677, 5 |
| | align="center" | 4150, 3283, 4
| |
| |- | | |- |
| | align="center" | [[Arquivo:4624,_3263,_6.png|link=]] | | | align="center" | [[Arquivo:30678, 20681, 5.png|link=]] |
| | align="center" | Lighstorm Island | | | align="center" | Arredores do respawn de Miltank <br> 30678, 20681, 5 |
| | align="center" | 4624, 3263, 6
| |
| |- | | |- |
| | align="center" | [[Arquivo:4191,_3516,_7.png|link=]] | | | align="center" | [[Arquivo:30704, 20640, 5.png|link=]] |
| | align="center" | Floresta de Cerulean | | | align="center" | Arredores do respawn de Elekid <br> 30704, 20640, 5 |
| | align="center" | 4191, 3516, 7
| |
| |- | | |- |
| |} | | | align="center" | [[Arquivo:30677, 20648, 5.png|link=]] |
| | | | align="center" | Arredores do respawn de Elekid <br> 30677, 20648, 5 |
| </center>
| |
| | |
| === "X" em local de Pedra ===
| |
| | |
| <center>
| |
| {| class="wikitable" width="90%"
| |
| ! width="1%" style="background-color: #9d1a64" | <span style="color:white">Mapa</span>
| |
| ! width="1%" style="background-color: #9d1a64" | <span style="color:white">Localização</span>
| |
| ! width="1%" style="background-color: #9d1a64" | <span style="color:white">Posição</span>
| |
| |- | | |- |
| | align="center" | [[Arquivo:3670,_3538,_7.png|link=]] | | | align="center" | [[Arquivo:30651, 20650, 5.png|link=]] |
| | align="center" | Caminho da Pewter Quest | | | align="center" | Arredores do respawn de Elekid <br> 30651, 20650, 5 |
| | align="center" | 3670, 3538, 7
| |
| |- | | |- |
| | align="center" | [[Arquivo:3732,_3546,_6.png|link=]] | | | align="center" | [[Arquivo:30640, 20650, 5.png|link=]] |
| | align="center" | Caverna em cima do respawn de Paras em Pewter | | | align="center" | Arredores do respawn de Elekid <br> 30640, 20650, 5 |
| | align="center" | 3732, 3546, 6
| |
| |- | | |- |
| | align="center" | [[Arquivo:3851,_3490,_2.png|link=]] | | | align="center" | [[Arquivo:30695, 20644, 5.png|link=]] |
| | align="center" | Mt. Moon | | | align="center" | Respawn de Elekid <br> 30695, 20644, 5 |
| | align="center" | 3851, 3490, 2
| |
| |- | | |- |
| | align="center" | [[Arquivo:3867,_3508,_7.png|link=]] | | | align="center" | [[Arquivo:30687, 20639, 5.png|link=]] |
| | align="center" | Mt. Moon | | | align="center" | Respawn de Elekid <br> 30687, 20639, 5 |
| | align="center" | 3867, 3508, 7
| |
| |- | | |- |
| | align="center" | [[Arquivo:4342,_3311,_6.png|link=]] | | | align="center" | [[Arquivo:30551, 20583, 5.png|link=]] |
| | align="center" | Shell Island | | | align="center" | Respawn de Darkrai Minion no arredores do respawn de Elekid <br> 30551, 20583, 5 |
| | align="center" | 4342, 3311, 6
| |
| |- | | |- |
| | align="center" | [[Arquivo:4224,_3572,_6.png|link=]] | | | align="center" | [[Arquivo:30564, 20596, 5.png|link=]] |
| | align="center" | Segundo andar do Rock Tunnel | | | align="center" | Respawn de Darkrai Minion no arredores do respawn de Elekid <br> 30564, 20596, 5 |
| | align="center" | 4224, 3572, 6
| |
| |- | | |- |
| | align="center" | [[Arquivo:4261,_3477,_5.png|link=]] | | | align="center" | [[Arquivo:30578, 20580, 5.png|link=]] |
| | align="center" | Terceiro andar do Rock Tunnel | | | align="center" | Respawn de Darkrai Minion no arredores do respawn de Elekid <br> 30578, 20580, 5 |
| | align="center" | 4261, 3477, 5
| |
| |- | | |- |
| |}
| |
| </center>
| |
|
| |
|
| === "X" em local de Praias/Desertos ===
| | </tabber></center> |
|
| |
|
| <center>
| |
| {| class="wikitable" width="90%"
| |
| ! width="1%" style="background-color: #9d1a64" | <span style="color:white">Mapa</span>
| |
| ! width="1%" style="background-color: #9d1a64" | <span style="color:white">Localização</span>
| |
| ! width="1%" style="background-color: #9d1a64" | <span style="color:white">Posição</span>
| |
| |-
| |
| | align="center" | [[Arquivo:3780,_3326,_7.png|link=]]
| |
| | align="center" | Green Island
| |
| | align="center" | 3780, 3326, 7
| |
| |-
| |
| | align="center" | [[Arquivo:3969,_3300,_7.png|link=]]
| |
| | align="center" | Wildwind Island
| |
| | align="center" | 3969, 3300, 7
| |
| |-
| |
| | align="center" | [[Arquivo:4002,_3320,_7.png|link=]]
| |
| | align="center" | Wildwind Island
| |
| | align="center" | 4002, 3320, 7
| |
| |-
| |
| | align="center" | [[Arquivo:4166,_3302,_7.png|link=]]
| |
| | align="center" | Hurricane Island
| |
| | align="center" | 4166, 3302, 7
| |
| |-
| |
| | align="center" | [[Arquivo:4266,_3359,_7.png|link=]]
| |
| | align="center" | Shell Island
| |
| | align="center" | 4266, 3359, 7
| |
| |-
| |
| | align="center" | [[Arquivo:4299,_3333,_6.png|link=]]
| |
| | align="center" | Shell Island
| |
| | align="center" | 4299, 3333, 6
| |
| |-
| |
| | align="center" | [[Arquivo:4434,_3503,_7.png|link=]]
| |
| | align="center" | Respawn de Minun e Plusle próximo de Cerulean
| |
| | align="center" | 4434, 3503, 7
| |
| |-
| |
| | align="center" | [[Arquivo:4699,_3495,_7.png|link=]]
| |
| | align="center" | Dark Light Island
| |
| | align="center" | 4699, 3495, 7
| |
| |-
| |
| |}
| |
| </center>
| |
|
| |
|
| === "X" em local de Gelo/Neve ===
| | Após coletar todos os espíritos retorne ao NPC A Strange Religious na resistência de Lavender para receber o Spiritomb na Pokéball, além de liberar a possibilidade de ser feito na Premier Ball e a liberação da diária. |
|
| |
|
| <center>
| | == Diária == |
| {| class="wikitable" width="90%"
| |
| ! width="1%" style="background-color: #9d1a64" | <span style="color:white">Mapa</span>
| |
| ! width="1%" style="background-color: #9d1a64" | <span style="color:white">Localização</span>
| |
| ! width="1%" style="background-color: #9d1a64" | <span style="color:white">Posição</span>
| |
| |-
| |
|
| |
|
| |-
| | A diária consiste em derrotar um Spiritomb por dia, para isso o jogador deve se dirigir ao respawn de Darkrai Minion entre a rota de Viridian e Pewter. |
| |}
| |
| </center>
| |
|
| |
|
| === "X" em local de Tapete, Pirâmide, Azulejo, Metal === | | <center> [[Arquivo:Localização Altar.png|link=]] [[Arquivo:Localização Altar2.png|link=]] </center> |
|
| |
|
| <center>
| | Converse com o altar que estará no 2º andar do local, um Spiritomb irá nascer, derrote ele e converse novamente com o altar para receber sua recompensa que consiste em 1 Nightmare Token, 250k de EXP e 1k de NW EXP. |
| {| class="wikitable" width="90%"
| |
| ! width="1%" style="background-color: #9d1a64" | <span style="color:white">Mapa</span>
| |
| ! width="1%" style="background-color: #9d1a64" | <span style="color:white">Localização</span>
| |
| ! width="1%" style="background-color: #9d1a64" | <span style="color:white">Posição</span>
| |
| |-
| |
| | align="center" | [[Arquivo:3698,_3447,_8.png|link=]]
| |
| | align="center" | Cemitério de Pewter
| |
| | align="center" | 3670, 3538, 7
| |
| |-
| |
| |}
| |
| </center>
| |