|
|
| (83 revisões intermediárias pelo mesmo usuário não estão sendo mostradas) |
| Linha 1: |
Linha 1: |
| == Aventureiro rank S ==
| | Shadow |
|
| |
|
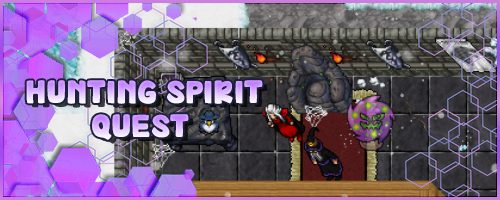
| === Rank S === | | <center> [[Arquivo:Banner_Hunting Spirit Quest.png|link=]] </center> <br> |
|
| |
|
| <center>'''Skill 100 a 120''' <br> Necessário: Level 300<br><br> | | <span style="color:red">'''Nível necessário:'''</span> 300 <br> |
|
| |
|
| [[Arquivo:WorkshopSadventurer.png|link=]] </center>
| | <p><font color="red">'''Nível NW Necessário:</font> 0+''' </p> |
|
| |
|
| | <span style="color:red">'''Recompensa:'''</span> Liberação de diária de Spiritomb, Pokémon Spiritomb na Pokéball e possibilidade de colocar Spiritomb na Premier Ball. <br> |
| | |
| | <b>Caso encontre algum erro ou queira acrescentar alguma informação, entre em contato com [[Nossa Equipe|um dos membros da wiki.]]</b> |
| | |
| | |
| | |
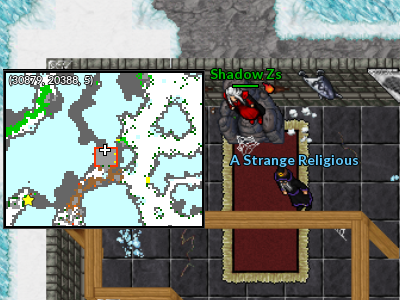
| | Para iniciar a quest o jogador deverá ir até a residência de Lavender e falar com o NPC A Strange Religious. |
| | |
| | <center> [[Arquivo:Localização A Strange Religious.png|link=]] </center> |
| | |
| | Ele dará uma [[Arquivo:Odd Keystone.png|link=]] Odd Keystone para que o jogador colete os espíritos de Pokémon mortos espalhados no Nightmare World. |
| | |
| | |
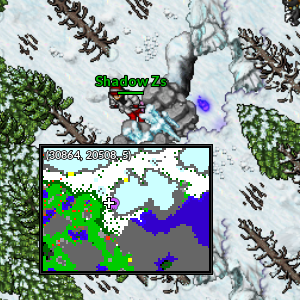
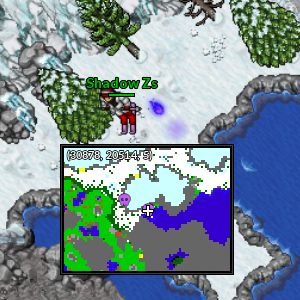
| | Serão ao todo 108 espíritos. |
| | |
| | == Localização dos espíritos == |
| | |
| | '''Obs.:''' Para coletar os espíritos basta conversar com eles. |
| | |
| | |
| | <center class="center-tab"><tabber> |
| | |
| | |-|Região de Lavender= |
| | |
| | São 15 espíritos ao total nessa região. |
|
| |
|
| <center>
| |
| {| class="wikitable" width="70%" | | {| class="wikitable" width="70%" |
| ! width="2%" style="background-color: #9d1a64" | Item | | ! width="5%" style="background-color: #9d1a64" | Localização |
| ! width="1%" style="background-color: #9d1a64" | Habilidade | | ! width="20%" style="background-color: #9d1a64" | Posição |
| ! width="1%" style="background-color: #9d1a64" | Tempo de espera
| | |- |
| ! width="5%" style="background-color: #9d1a64" | Materiais
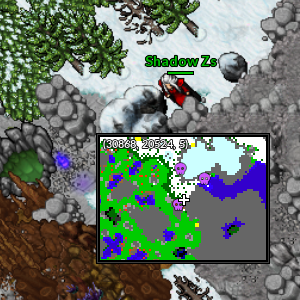
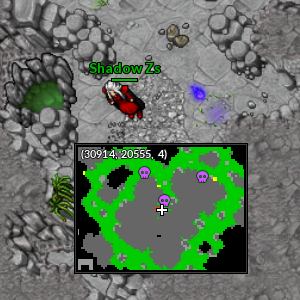
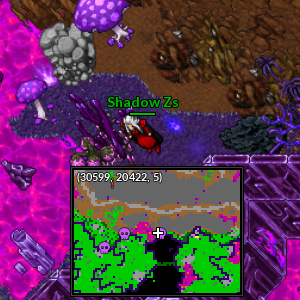
| | | align="center" | [[Arquivo:30866, 20508, 5.png|link=]] |
| | | align="center" | Respawn de Sneasel <br> 30866, 20508, 5 |
| | |- |
| | | align="center" | [[Arquivo:30879, 20514, 5.png|link=]] |
| | | align="center" | Respawn de Sneasel <br> 30879, 20514, 5 |
| | |- |
| | | align="center" | [[Arquivo:30865, 20526, 5.png|link=]] |
| | | align="center" | Entre o respawn de Sneasel e Cranidos <br> 30865, 20526, 5 |
| | |- |
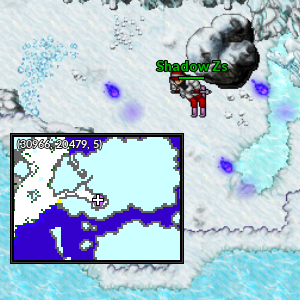
| | | align="center" | [[Arquivo:30966, 20479, 5.png|link=]] |
| | | align="center" | Andar inferior ao respawn de Cloyster <br> 30966, 20479, 5 <br> '''Obs.:''' Nesse local tem três espíritos. |
| | |- |
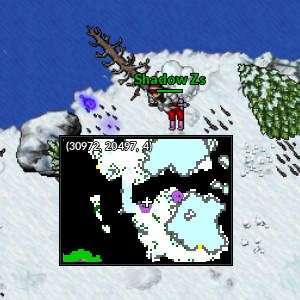
| | | align="center" | [[Arquivo:30970, 20497, 4.png|link=]] |
| | | align="center" | Respawn de Cloyster <br> 30970, 20497, 4 |
| | |- |
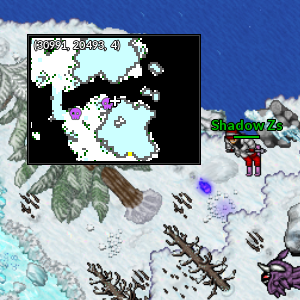
| | | align="center" | [[Arquivo:30990, 20494, 4.png|link=]] |
| | | align="center" | Respawn de Cloyster <br> 30990, 20494, 4 |
| |- | | |- |
| | align="center" | [[Arquivo:Treasure Map.png|link=]] <br> Treasure Map | | | align="center" | [[Arquivo:30987, 20503, 3.png|link=]] |
| | align="center" | Skill 100
| | | align="center" | Respawn de Cloyster <br> 30987, 20503, 3 |
| | align="center" | 30 Minutos
| |
| | align="center" | [[Arquivo:Hidden Relic.png|link=]] 18 Hidden Relic <br> [[Arquivo:Corrupted-Pot-of-Lava.gif|link=]] 3 Corrupted Pot Of Lava <br> [[Arquivo:Mole Hair.png|link=]] 1 Mole Hair <br> [[Arquivo:Black Wool Ball.png|link=]] 1 Black Wool Ball <br> [[Arquivo:Fire Monkey Hair.png|link=]] 1 Fire Monkey Hair | |
| |- | | |- |
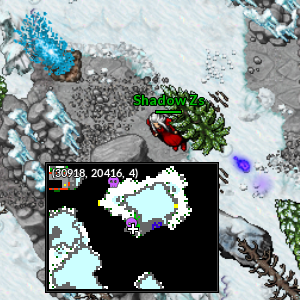
| | align="center" | [[Arquivo:Old Map1.png|link=]] <br> Old Map | | | align="center" | [[Arquivo:30920, 20417, 4.png|link=]] |
| | align="center" | Skill 100
| | | align="center" | Respawn de Snover e Abomasnow <br> 30920, 20417, 4 |
| | align="center" | 1 Hora
| |
| | align="center" | [[Arquivo:Corrupted Gold Bar.png|link=]] 3 Corrupted Gold Bar <br> [[file:Corrupted-Leaves.gif|link=]] 5 Corrupted Leaves <br> [[file:Corrupted-Belt-of-Champion.gif|link=]] 4 Corrupted Champion Belt <br> [[file: Mole Hair.png|link=]] 1 Mole Hair <br> | |
| |- | | |- |
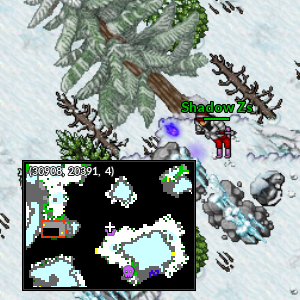
| | align="center" | [[Arquivo:Old Map2.png|link=]] <br> Old Map | | | align="center" | [[Arquivo:30907, 20391, 4.png|link=]] |
| | align="center" | Skill 100
| | | align="center" | Respawn de Snover e Abomasnow <br> 30907, 20391, 4 |
| | align="center" | 1 Hora | |
| | align="center" | [[Arquivo:Corrupted Gold Bar.png|link=]] 3 Corrupted Gold Bar <br> [[file:Corrupted-Leaves.gif|link=]] 5 Corrupted Leaves <br> [[file:Royal Mane.png|link=]] 3 Royal Mane <br> [[file:Corrupted-Streak-Tail.gif|link=]] 2 Corrupted Streak Tail <br>
| |
| |- | | |- |
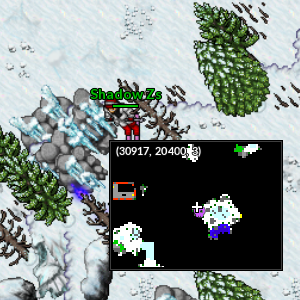
| | align="center" | [[Arquivo:Old Map3.png|link=]] <br> Old Map | | | align="center" | [[Arquivo:30916, 20402, 3.png|link=]] |
| | align="center" | Skill 100 | | | align="center" | Respawn de Snover e Abomasnow <br> 30916, 20402, 3 |
| | align="center" | 1 Hora
| |
| | align="center" | [[Arquivo:Corrupted Gold Bar.png|link=]] 3 Corrupted Gold Bar <br> [[file:Corrupted-Leaves.gif|link=]] 5 Corrupted Leaves <br> [[file:Fire Monkey Hair.png|link=]] 3 Fire Monkey Hair <br> [[file:Green Hair.png|link=]] 1 Green Hair <br>
| |
| |- | | |- |
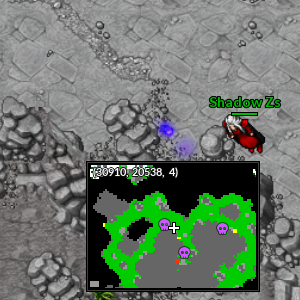
| | align="center" | [[Arquivo:Old Map4.png|link=]] <br> Old Map | | | align="center" | [[Arquivo:30908, 20538, 4.png|link=]] |
| | align="center" | Skill 100
| | | align="center" | Respawn de Tyranitar <br> 30908, 20538, 4 |
| | align="center" | 1 Hora | |
| | align="center" | [[Arquivo:Corrupted Gold Bar.png|link=]] 3 Corrupted Gold Bar <br> [[file:Corrupted-Leaves.gif|link=]] 5 Corrupted Leaves <br> [[file:Elefish Fin.png|link=]] 3 Elefish Fin <br> [[file:Corrupted-Ice-Orb.gif |link=]] 2 Corrupted Ice Orb <br>
| |
| |- | | |- |
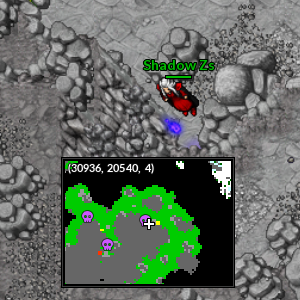
| | align="center" | [[Arquivo:Nightmare Rift.png|link=]] <br> Lost Jungle Rift Crystal | | | align="center" | [[Arquivo:30916, 20555, 4.png|link=]] |
| | align="center" | Skill 100
| | | align="center" | Respawn de Tyranitar <br> 30916, 20555, 4 |
| | align="center" | 1 Hora | |
| | align="center" | [[Arquivo:Hidden Relic.png|link=]] 120 Hidden Relic <br> [[Arquivo:Corrupted-Leaves.gif|link=]] 8 Corrupted Leaves <br> [[Arquivo:Corrupted-Streak-Tail.gif|link=]] 7 Corrupted Streak Tail <br> [[Arquivo:Savage Fin.png|link=]] 6 Savage Fin <br> [[Arquivo:Mount Horn.png|link=]] 1 Mount Horn
| |
| |- | | |- |
| | align="center" | [[Arquivo:Nightmare Rift.png|link=]] <br> Forgotten Fortress Rift Crystal | | | align="center" | [[Arquivo:30936, 20541, 4.png|link=]] |
| | align="center" | Skill 100
| | | align="center" | Respawn de Tyranitar <br> 30936, 20541, 4 |
| | align="center" | 1 Hora
| |
| | align="center" | [[Arquivo:Hidden Relic.png|link=]] 120 Hidden Relic <br> [[Arquivo:Toxic Gosme.png|link=]] 10 Toxic Gosme <br> [[Arquivo:Elefish Fin.png|link=]] 10 Elefish Fin <br> [[Arquivo:Savage Fin.png|link=]] 8 Savage Fin <br> [[Arquivo:Black Wool Ball.png|link=]] 8 Black Wool Ball | |
| |- | | |- |
| | align="center" | [[Arquivo:Nightmare Rift.png|link=]] <br> Rainbow Woods Rift Crystal | | |} |
| | align="center" | Skill 100 | | |
| | align="center" | 1 Hora
| | |
| | align="center" | [[Arquivo:Hidden Relic.png|link=]] 120 Hidden Relic <br> [[Arquivo:Mole Hair.png|link=]] 8 Mole Hair <br> [[Arquivo:Corrupted-Doll-Star.gif|link=]] 10 Corrupted Doll Star <br> [[Arquivo:Royal Mane.png|link=]] 9 Royal Mane <br> [[Arquivo:Savage Fin.png|link=]] 5 Savage Fin
| | |-|Região de Cerulean= |
| | |
| | São 27 espíritos ao total nessa região. |
| | |
| | {| class="wikitable" width="70%" |
| | ! width="5%" style="background-color: #9d1a64" | Localização |
| | ! width="20%" style="background-color: #9d1a64" | Posição |
| |- | | |- |
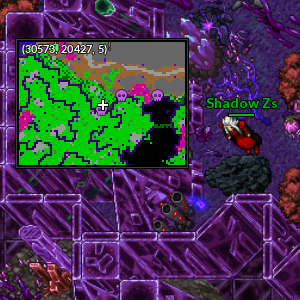
| | align="center" | [[Arquivo:Nightmare Rift.png|link=]] <br> Fronzen Tunnels Rift Crystal | | | align="center" | [[Arquivo:30572, 20429, 5.png|link=]] |
| | align="center" | Skill 100
| | | align="center" | Respawn de Alolan Digglet <br> 30572, 20429, 5 |
| | align="center" | 1 Hora | |
| | align="center" | [[Arquivo:Hidden Relic.png|link=]] 120 Hidden Relic <br> [[Arquivo:Corrupted-Magnet.gif|link=]] 16 Corrupted Magnet <br> [[Arquivo:Corrupted-Belt-of-Champion.gif|link=]] 8 Corrupted Belt Champion <br> [[Arquivo:Fire Monkey Hair.png|link=]] 8 Fire Monkey Hair <br> [[Arquivo:Solid Head.png|link=]] 1 Solid Head
| |
| |- | | |- |
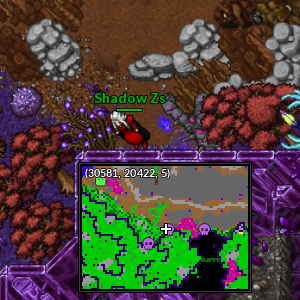
| | align="center" | [[Arquivo:Gold Chest.png|link=]] <br> Gold Chest | | | align="center" | [[Arquivo:30582, 20422, 5.png|link=]] |
| | align="center" | Skill 100
| | | align="center" | Respawn de Alolan Digglet <br> 30582, 20422, 5 |
| | align="center" | 3 Horas
| |
| | align="center" | [[Arquivo:Corrupted Gold Bar.png|link=]] 12 Corrupted Gold Bar <br> [[file: Mole Hair.png|link=]] 13 Mole Hair <br> [[file:Toxic Gosme.png|link=]] 10 Toxic Gosme <br> [[Arquivo:Black Lucky Charm.png|link=]] 9 Black Lucky Charm <br> | |
| |- | | |- |
| | align="center" | [[Arquivo:Bronze Chest.png|link=]] <br> Bronze Chest | | | align="center" | [[Arquivo:30600, 20422, 5.png|link=]] |
| | align="center" | Skill 100
| | | align="center" | Respawn de Alolan Digglet <br> 30600, 20422, 5 |
| | align="center" | 3 Horas
| |
| | align="center" | [[Arquivo:Corrupted Gold Bar.png|link=]] 12 Corrupted Gold Bar <br> [[file:Savage Fin.png|link=]] 11 Savage Fin <br> [[Arquivo:Black Lucky Charm.png|link=]] 10 Black Lucky Charm <br> [[file:Toxic Gosme.png|link=]] 10 Toxic Gosme <br> | |
| |- | | |- |
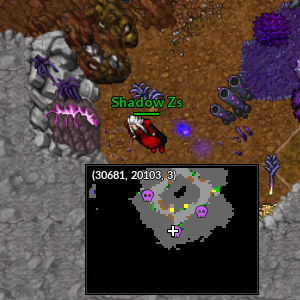
| | align="center" | [[Arquivo:Air Fryer.png|link=]] <br> Air Fryer | | | align="center" | [[Arquivo:30682, 20103, 3.png|link=]] |
| | align="center" | Skill 100
| | | align="center" | Respawn de Galarian Farfetch'd <br> 30682, 20103, 3 |
| | align="center" | 2 Dias | |
| | align="center" | [[Arquivo:Food Bag.png|link=]] 150 Food Bag <br> [[file:Fire Monkey Hair.png|link=]] 20 Fire Monkey Hair <br> [[file:Cave Nail.png|link=]] 15 Cave Nail <br> [[file: Mole Hair.png|link=]] 10 Mole Hair <br> [[file:Toxic Gosme.png|link=]] 10 Toxic Gosme <br> [[file:Solid Head.png|link=]] 2 Solid Head <br> [[file:Mount Horn.png|link=]] 1 Mount Horn <br>
| |
| |- | | |- |
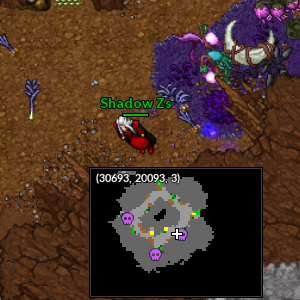
| | align="center" | [[Arquivo:Silver Air Fryer.png|link=]] <br> Silver Air Fryer | | | align="center" | [[Arquivo:30695, 20093, 3.png|link=]] |
| | align="center" | Skill 100
| | | align="center" | Respawn de Galarian Farfetch'd <br> 30695, 20093, 3 |
| | align="center" | 2 Dias
| |
| | align="center" | [[Arquivo:Food Bag.png|link=]] 150 Food Bag <br> [[Arquivo:Corrupted-Dragon-Tooth.gif|link=]] 47 Corrupted Dragon Thooth <br> [[Arquivo:Corrupted-Magnet.gif|link=]] 20 Corrupted Magnet <br> [[file:Corrupted-Doll-Star.gif|link=]] 10 Corrupted Doll Star <br> [[file:Corrupted-Ice-Piece.gif|link=]] 10 Corrupted Ice Piece <br> [[file:Corrupted-Streak-Tail.gif|link=]] 10 Corrupted Streak Tail <br> | |
| |- | | |- |
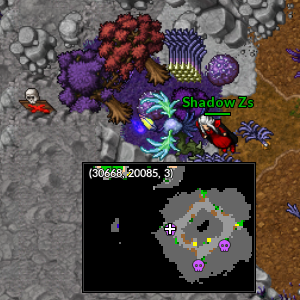
| | align="center" | [[Arquivo:Microwave.png|link=]] <br> Microwave | | | align="center" | [[Arquivo:30666, 20085, 3.png|link=]] |
| | align="center" | Skill 100 | | | align="center" | Respawn de Galarian Farfetch'd <br> 30666, 20085, 3 |
| | align="center" | 2 Dias
| |
| | align="center" | [[Arquivo:Food Bag.png|link=]] 150 Food Bag <br> [[Arquivo:Black Lucky Charm.png|link=]] 30 Black Lucky Charm <br> [[file:Royal Mane.png|link=]] 20 Royal Mane <br> [[file:Whiskers Fin.png|link=]] 15 Whiskers Fin <br> [[file:Corrupted-Leaves.gif|link=]] 13 Corrupted Leaves <br> [[file:Corrupted-Magnet.gif|link=]] 10 Corrupted Magnet <br>
| |
| |- | | |- |
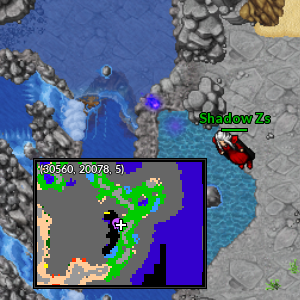
| | align="center" | [[Arquivo:Futurist Stove.png|link=]] <br> Futurist Stove | | | align="center" | [[Arquivo:30558, 20077, 5.png|link=]] |
| | align="center" | Skill 103
| | | align="center" | Respawn de Mantyke <br> 30558, 20077, 5 |
| | align="center" | 4 Dias
| |
| | align="center" | [[Arquivo:Food Bag.png|link=]] 600 Food Bag <br> [[file: Black Wool Ball.png|link=]] 50 Black Wool Ball <br> [[Arquivo:Corrupted-Ice-Piece.gif|link=]] 40 Corrupted Ice Piece <br> [[Arquivo:Corrupted-Belt-of-Champion.gif|link=]] 40 Corrupted Champion Belt <br> [[Arquivo:Corrupted-Streak-Tail.gif|link=]] 40 Corrupted Streak Tail <br> [[Arquivo:Compressed Nightmare Gems.png|link=]] 20 Compressed Nightmare Gem <br> [[file:Bagworm Pink Leaves.png|link=]] 2 Bagworm Pink Leaves | |
| |- | | |- |
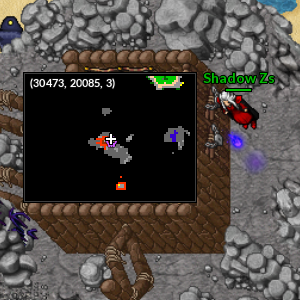
| | align="center" | [[Arquivo:Adventurer's Utility Belt.png|link=]] <br> Adventurer's Utility Belt | | | align="center" | [[Arquivo:30473, 20086, 3.png|link=]] |
| | align="center" | Skill 105
| | | align="center" | Respawn de Mantine <br> 30473, 20086, 3 |
| | align="center" | 2 Dias | |
| | align="center" | [[Arquivo:Hidden Relic.png|link=]] 3000 Hidden Relics <br> [[Arquivo:Corrupted-Magnet.gif|link=]] 150 Corrupted Magnet <br> [[Arquivo:Black Lucky Charm.png|link=]] 100 Black Lucky Charm <br> [[Arquivo:Corrupted-Vines.gif|link=]] 100 Corrupted Vines <br> [[Arquivo:Corrupted-Horn-Drill.gif|link=]] 100 Corrupted Horn Drill <br> [[Arquivo:Green Hair.png|link=]] 100 Green Hair <br> [[Arquivo:Corrupted-Belt-of-Champion.gif|link=]] 100 Corrupted Champion Belt <br> [[Arquivo:Corrupted-Pot-of-Lava.gif|link=]] 100 Corrupted Pot Of Lava <br> [[Arquivo:Catfish Tail.png|link=]] 4 Catfish Tail <br> [[Arquivo:Bagworm Stone.png|link=]] 4 Bagworm Stone
| |
| |- | | |- |
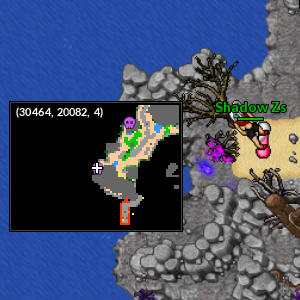
| | align="center" | [[Arquivo:Golden Finder.png|link=]] <br> Golden Finder | | | align="center" | [[Arquivo:30463, 20083, 4.png|link=]] |
| | align="center" | Skill 107
| | | align="center" | Respawn de Mantine <br> 30463, 20083, 4 |
| | align="center" | 1 Dia | |
| | align="center" | [[Arquivo:Strange Gold Bar.png|link=]] 12 Strange Gold Bar <br> [[Arquivo:Red Spike.png|link=]] 10 Red Spike <br> [[Arquivo:Black Lucky Charm.png|link=]] 10 Black Lucky Charm <br> [[Arquivo:White Hair.png|link=]] 8 White Hair <br> [[Arquivo:Strange Fur.png|link=]] 8 Strange Fur <br> [[Arquivo:Corrupted-Belt-of-Champion.gif|link=]] 8 Corrupted Belt Champion <br> [[Arquivo:Psychic Mustache.png|link=]] 8 Psychic Mustache <br> [[Arquivo:Small Bird Beak.png|link=]] 7 Small Bird Beak
| |
| |- | | |- |
| | align="center" | [[Arquivo:Silver Finder.png|link=]] <br> Silver Finder | | | align="center" | [[Arquivo:30480, 20059, 4.png|link=]] |
| | align="center" | Skill 110 | | | align="center" | Respawn de Mantine <br> 30480, 20059, 4 |
| | align="center" | 1 Dia
| |
| | align="center" | [[Arquivo:Strange Gold Bar.png|link=]] 21 Strange Gold Bar <br> [[Arquivo:Royal Mane.png|link=]] 10 Royal Mane <br> [[Arquivo:Bear Arm.png|link=]] 10 Bear Arm <br> [[Arquivo:Mole Hair.png|link=]] 10 Mole Hair <br> [[Arquivo:Corrupted-Ice-Piece.gif|link=]] 8 Corrupted Ice Piece <br> [[Arquivo:Solid Head.png|link=]] 5 Solid Head <br> [[Arquivo:Dog Ear-Granbull NW.png|link=]] 1 Dog Ear
| |
| |- | | |- |
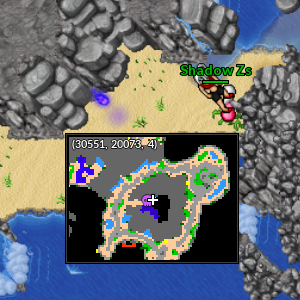
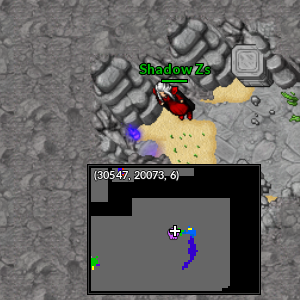
| | align="center" | [[Arquivo:Nightmare Compass.gif|link=]] <br> Nightmare Compass | | | align="center" | [[Arquivo:30548, 20073, 4.png|link=]] |
| | align="center" | Skill 110
| | | align="center" | Respawn de Mantine <br> 30548, 20073, 4 |
| | align="center" | 3 Dias
| |
| | align="center" | [[Arquivo:Hidden Relic.png|link=]] 6000 Hidden Relics <br> [[Arquivo:Black Lucky Charm.png|link=]] 120 Black Lucky Charm <br> [[Arquivo:Strange Fur.png|link=]] 120 Strange Fur <br> [[Arquivo:Corrupted-Streak-Tail.gif|link=]] 120 Corrupted Streak Tail <br> [[Arquivo:Dragon Wings.png|link=]] 120 Dragon Wings <br> [[Arquivo:Corrupted-Lizard-Tail.gif|link=]] 120 Corrupted Lizard Tail <br> [[Arquivo:Corrupted-Feather.gif|link=]] 90 Corrupted Feather <br> [[Arquivo:Dark_Ear_Shiftry_NW.png|link=]] 90 Dark Ear <br> [[Arquivo:Corrupted-Miss-Traces.gif|link=]] 90 Corrupted Miss Trace <br> [[Arquivo:Toxic Gosme.png|link=]] 90 Toxic Gosme <br> [[Arquivo:Bagworm Green Leaves.png|link=]] 90 Bagworm Green Leaves <br> [[Arquivo:Bear Arm.png|link=]] 90 Bear Arm <br> [[Arquivo:Magnet Remains.png|link=]] 1 Magnet Remains <br> [[Arquivo:Mecha Reactor.png|link=]] 1 Mecha Reactor | |
| |- | | |- |
| | align="center" | [[Arquivo:Flame Chest.png|link=]] <br> Flame Chest | | | align="center" | [[Arquivo:30546, 20074, 6.png|link=]] |
| | align="center" | Skill 110
| | | align="center" | Respawn de Mantine, próximo ao locker de Hacker <br> 30546, 20074, 6 |
| | align="center" | 6 Horas
| |
| | align="center" | [[Arquivo:Corrupted Gold Bar.png|link=]] 60 Corrupted Gold Bar <br> [[file:Fire Monkey Hair.png|link=]] 40 Fire Monkey Hair <br> [[file:Land Shark Horn.png|link=]] 40 Land Shark Horn <br> [[file:Corrupted-Ice-Orb.gif |link=]] 40 Corrupted Ice Orb <br> [[file:Corrupted-Ice-Piece.gif|link=]] 25 Corrupted Ice Piece <br> | |
| |- | | |- |
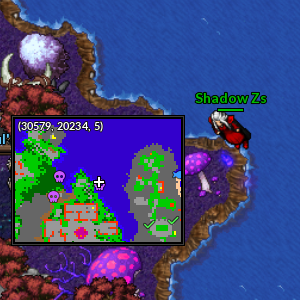
| | align="center" | [[Arquivo:Purple Flame Chest.png|link=]] <br> Purple Flame Chest | | | align="center" | [[Arquivo:30579, 20235, 5.png|link=]] |
| | align="center" | Skill 110
| | | align="center" | Cidade de Cerulean, próximo ao Raul's Shiny Snorlax <br> 30579, 20235, 5 |
| | align="center" | 6 Horas
| |
| | align="center" | [[Arquivo:Corrupted Gold Bar.png|link=]] 60 Corrupted Gold Bar <br> [[file:Corrupted-Black-Hull.gif|link=]|link=]] 50 Corrupted Black Hull <br> [[file:Toxic Gosme.png|link=]] 20 Toxic Gosme <br> [[file:Corrupted-Streak-Tail.gif|link=]] 30 Corrupted Streak Tail <br> [[file:Corrupted-Tree-Branch.gif|link=]] 15 Corrupted Tree Branch <br> | |
| |- | | |- |
| | align="center" | [[Arquivo:Green Flame Chest .png|link=]] <br> Green Flame Chest | | | align="center" | [[Arquivo:30559, 20231, 5.png|link=]] |
| | align="center" | Skill 110 | | | align="center" | Cidade de Cerulean <br> 30559, 20231, 5 |
| | align="center" | 6 Horas
| |
| | align="center" | [[Arquivo:Corrupted Gold Bar.png|link=]] 60 Corrupted Gold Bar <br> [[Arquivo:Corrupted_Pot_Of_Moss_Bug.gif|link=]] 30 Corrupted Pot Of Moss Bug <br> [[file:Green Hair.png|link=]] 30 Green Hair <br> [[file:Corrupted-Belt-of-Champion.gif|link=]] 20 Corrupted Champion Belt <br> [[file:Mount Horn.png|link=]] 5 Mount Horn <br>
| |
| |- | | |- |
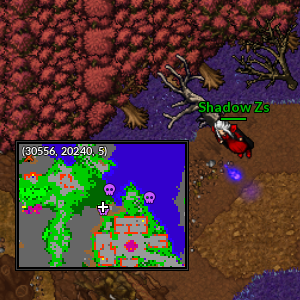
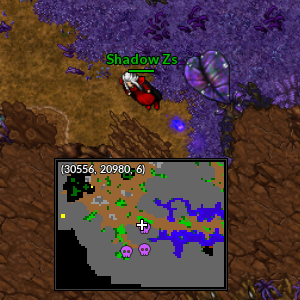
| | align="center" | [[Arquivo:Blue Flame Chest .png|link=]] <br> Blue Flame Chest | | | align="center" | [[Arquivo:30556, 20241, 5.png|link=]] |
| | align="center" | Skill 110
| | | align="center" | Cidade de Cerulean <br> 30556, 20241, 5 |
| | align="center" | 6 Horas
| |
| | align="center" | [[Arquivo:Corrupted Gold Bar.png|link=]] 60 Corrupted Gold Bar <br> [[file:Whiskers Fin.png|link=]] 45 Whiskers Fin <br> [[file:Corrupted-Streak-Tail.gif|link=]] 35 Corrupted Streak Tail <br> [[file:Cave Nail.png|link=]] 35 Cave Nail <br> [[file:Corrupted-Lizard-Tail.gif|link=]] 30 Corrupted Lizard Tail <br> | |
| |- | | |- |
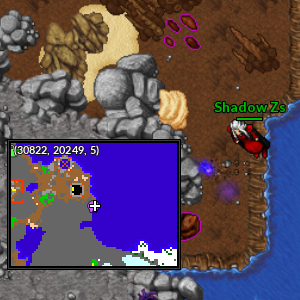
| | align="center" | [[Arquivo:Red Heavy Chest .png|link=]] <br> Red Heavy Chest | | | align="center" | [[Arquivo:30821, 20250, 5.png|link=]] |
| | align="center" | Skill 110 | | | align="center" | Respawn de Spoink <br> 30821, 20250, 5 |
| | align="center" | 6 Horas
| |
| | align="center" | [[Arquivo:Corrupted Gold Bar.png|link=]] 60 Corrupted Gold Bar <br> [[file:Corrupted-Belt-of-Champion.gif|link=]] 50 Corrupted Champion Belt <br> [[file:Corrupted-Cloud.gif|link=]] 30 Corrupted Cloud <br> [[file:Gear Nose.png|link=]] 5 Gear Nose <br> [[file:Solid Head.png|link=]] 5 Solid Head <br>
| |
| |- | | |- |
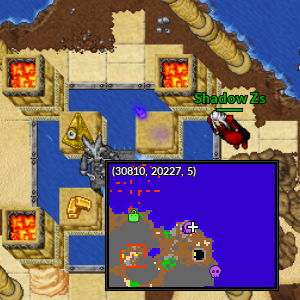
| | align="center" | [[Arquivo:Blue Heavy Chest .png|link=]] <br> Blue Heavy Chest | | | align="center" | [[Arquivo:30808, 20227, 5.png|link=]] |
| | align="center" | Skill 110
| | | align="center" | Respawn de Spoink <br> 30808, 20227, 5 |
| | align="center" | 6 Horas
| |
| | align="center" | [[Arquivo:Corrupted Gold Bar.png|link=]] 60 Corrupted Gold Bar <br> [[file:Corrupted-Magnet.gif|link=]] 90 Corrupted Magnet <br> [[file:Fire Monkey Hair.png|link=]] 36 Fire Monkey Hair <br> [[file:Cave Nail.png|link=]] 35 Cave Nail <br> [[file:Corrupted-Belt-of-Champion.gif|link=]] 35 Corrupted Champion Belt <br> | |
| |- | | |- |
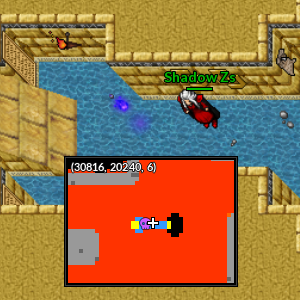
| | align="center" | [[Arquivo:Imperial Chest .png|link=]] <br> Imperial Chest | | | align="center" | [[Arquivo:30814, 20240, 6.png|link=]] |
| | align="center" | Skill 110
| | | align="center" | Entrada respawn de Starmie <br> 30814, 20240, 6 |
| | align="center" | 6 Horas | |
| | align="center" | [[Arquivo:Corrupted Gold Bar.png|link=]] 60 Corrupted Gold Bar <br> [[Arquivo:Black Lucky Charm.png|link=]] 55 Black Lucky Charm <br> [[file:Toxic Gosme.png|link=]] 55 Toxic Gosme <br> [[file:Small Bird Beak.png|link=]] 55 Small Bird Beak <br> [[file:Green Hair.png|link=]] 10 Green Hair <br>
| |
| |- | | |- |
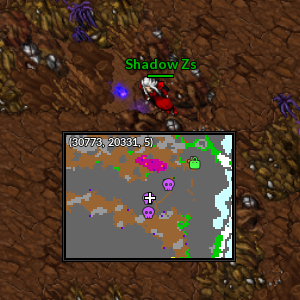
| | align="center" | [[Arquivo:Mew & Mewtwo Sculpture.gif|link=]] <br> Mew & Mewtwo Sculpture | | | align="center" | [[Arquivo:30772, 20338, 5.png|link=]] |
| | align="center" | Skill 115
| | | align="center" | Respawn de Rhydon <br> 30772, 20338, 5 |
| | align="center" | 5 Dias | |
| | align="center" | [[Arquivo:Corrupted Gold Bar.png|link=]] 600 Corrupted Gold Bar <br> [[Arquivo:Enigma-stone.gif|link=]] 200 Enigma Stone <br>[[file:Pig Ear.png|link=]] 200 Pig Ear <br> [[file:Green Hair.png|link=]] 100 Green Hair <br> [[file:Psychic Mustache.png|link=]] 100 Psychic Mustache <br> [[file:Curly Pig Tail.png|link=]] 100 Curly Pig Tail <br> [[file:Alolan Electric Rat Tail.png|link=]] 20 Alolan Electric Rat Tail <br> [[Arquivo:Cerise_Shard.png|link=]] 10 Cerise Shard <br> [[Arquivo:Star Remains.png|link=]] 10 Star Remains
| |
| |- | | |- |
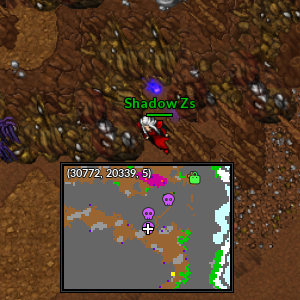
| | align="center" | [[Arquivo:Celebi Sculpture.png|link=]] <br> Celebi Sculpture | | | align="center" | [[Arquivo:30772, 20331, 5.png|link=]] |
| | align="center" | Skill 115
| | | align="center" | Respawn de Rhydon <br> 30772, 20331, 5 |
| | align="center" | 5 Dias | |
| | align="center" | [[Arquivo:Corrupted Gold Bar.png|link=]] 600 Corrupted Gold Bar <br> [[Arquivo:PsycraftEssence.png|link=]] 200 Psycraft Essence <br> [[file:Land Shark Horn.png|link=]] 200 Land Shark Horn <br> [[file:Fire Monkey Hair.png|link=]] 200 Fire Monkey Hair <br> [[file:Corrupted-Magnet.gif|link=]] 200 Corrupted Magnet <br> [[file:Corrupted-Horn-Drill.gif|link=]] 100 Corrupted Horn Drill <br> [[file:Corrupted-Streak-Tail.gif|link=]] 50 Corrupted Streak Tail <br> [[file:Red Spike.png|link=]] 50 Red Spike <br> [[Arquivo:Ancient-stone.gif|link=]] 50 Ancient Stone <br> [[file:Solid Head.png|link=]] 40 Solid Head <br> [[Arquivo:Beetle Horn.png|link=]] 5 Beetle Horn
| |
| |- | | |- |
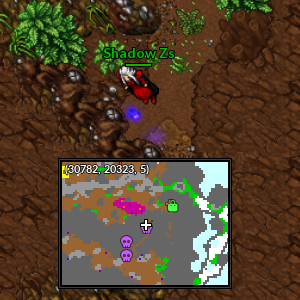
| | align="center" | [[Arquivo:Celebi Sculpture2.gif|link=]] <br> Celebi Sculpture | | | align="center" | [[Arquivo:30782, 20324, 5.png|link=]] |
| | align="center" | Skill 115
| | | align="center" | Respawn de Rhydon <br> 30782, 20324, 5 |
| | align="center" | 5 Dias | |
| | align="center" | [[Arquivo:Corrupted Gold Bar.png|link=]] 600 Corrupted Gold Bar <br> [[file: Black Wool Ball.png|link=]] 100 Black Wool Ball <br> [[Arquivo:Compressed Nightmare Gems.png|link=]] 80 Compressed Nightmare Gem <br> [[file:Cave Nail.png|link=]] 50 Cave Nail <br> [[file:Corrupted-Horn-Drill.gif|link=]] 40 Corrupted Horn Drill <br> [[file:Alolan Electric Rat Tail.png|link=]] 40 Alolan Electric Rat Tail <br> [[file:Corrupted-Belt-of-Champion.gif|link=]] 40 Corrupted Champion Belt <br> [[file:Razor Claw.png|link=]] 30 Razor Claw <br> [[file:Mole Big Hair.png|link=]] 20 Mole Big Hair <br> [[file:Bagworm Stone.png|link=]] 10 Bagworm Stone <br> [[Arquivo:Dragon Armor.png|link=]] 5 Dragon Armor
| |
| |- | | |- |
| | align="center" | [[Arquivo:Entei Sculpture.png|link=]] <br> Entei Sculpture | | | align="center" | [[Arquivo:30435, 20359, 5.png|link=]] |
| | align="center" | Skill 115
| | | align="center" | Respawn Sul de Beedrill <br> 30435, 20359, 5 |
| | align="center" | 5 Dias | |
| | align="center" | [[Arquivo:Corrupted Gold Bar.png|link=]] 600 Corrupted Gold Bar <br> [[Arquivo:Fire-stone.gif|link=]] 200 Fire Stone <br> [[file:Corrupted-Pot-of-Lava.gif|link=]] 200 Corrupted Pot Of Lava <br> [[file: Black Wool Ball.png|link=]] 100 Black Wool Ball <br> [[file:Royal Mane.png|link=]] 100 Royal Mane <br> [[file:Fire Monkey Hair.png|link=]] 100 Fire Monkey Hair <br> [[file:Corrupted-Black-Hull.gif|link=]|link=]] 50 Corrupted Black Hull <br> [[Arquivo:Entei's_Legendary_Fur.png|link=]] 30 Entei's Legendary Fur <br> [[file:Royal Tail.png|link=]] 10 Royal Tail <br> [[Arquivo: Scarlet Shard.png|link=]] 5 Scarlet Shard <br> [[file:Flame Tail.png|link=]] 3 Flame Tail <br> [[Arquivo:Flame-Essence.gif|link=]] 1 Flame Essence <br>
| |
| |- | | |- |
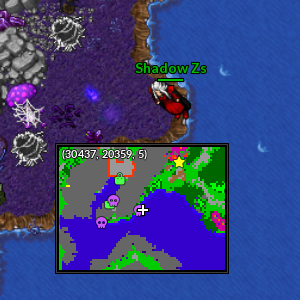
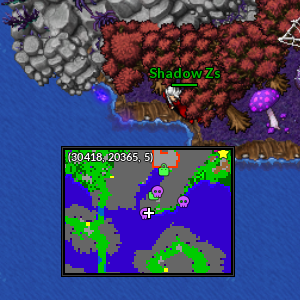
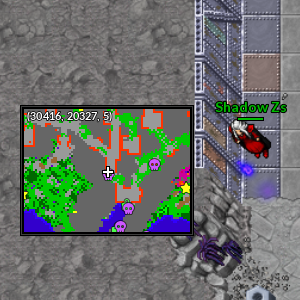
| | align="center" | [[Arquivo:Suicune Sculpture.png|link=]] <br> Suicune Sculpture | | | align="center" | [[Arquivo:30416, 20365, 5.png|link=]] |
| | align="center" | Skill 115
| | | align="center" | Respawn Sul de Beedrill <br> 30416, 20365, 5 |
| | align="center" | 5 Dias
| |
| | align="center" | [[Arquivo:Corrupted Gold Bar.png|link=]] 600 Corrupted Gold Bar <br> [[Arquivo:Water-stone.gif|link=]] 200 Water Stone <br> [[file:Corrupted-Gem-Star.gif|link=]] 110 Corrupted Gem Star <br> [[file:Corrupted-Black-Hull.gif|link=]|link=]] 100 Corrupted Black Hull <br> [[file:Savage Fin.png|link=]] 100 Savage Fin <br> [[file:Whiskers Fin.png|link=]] 100 Whiskers Fin <br> [[Arquivo:Suicune%27s_Legendary_Tail.png|link=]] 30 Suicune's Legendary Tail <br> [[file:Catfish_Tail.png|link=]] 10 Catfish Tail <br> [[Arquivo: Azure Shard.png|link=]] 5 Azure Shard <br> [[file:Emperor Trident.png|link=]] 3 Emperor Trident <br> [[Arquivo:Water-Essencev2.gif|link=]] 1 Water Essence <br> | |
| |- | | |- |
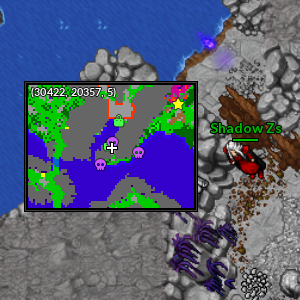
| | align="center" | [[Arquivo:Raikou Sculpture.png|link=]] <br> Raikou Sculpture | | | align="center" | [[Arquivo:30422, 20357, 5.png|link=]] |
| | align="center" | Skill 115
| | | align="center" | Respawn Sul de Beedrill <br> 30422, 20357, 5 <br> '''Obs.:''' Necessário rock smash |
| | align="center" | 5 Dias
| |
| | align="center" | [[Arquivo:Corrupted Gold Bar.png|link=]] 600 Corrupted Gold Bar <br> [[Arquivo:Thunder-stone.gif|link=]] 200 Thunder Stone <br> [[file:Corrupted-Magnet.gif|link=]] 200 Corrupted Magnet <br> [[file:Corrupted-Doll-Star.gif|link=]] 100 Corrupted Doll Star <br> [[file:Elefish Fin.png|link=]] 100 Elefish Fin <br> [[Arquivo:Raikou's_Legendary_Tail.png|link=]] 35 Raikou's Legendary Tail <br> [[file:Electric Fish Tail.png|link=]] 20 Electric Fish Tail <br> [[file:Alolan Electric Rat Tail.png|link=]] 10 Alolan Electric Rat Tail <br> [[Arquivo: Sunflower Shard.png|link=]] 5 Sunflower Shard <br> [[file:Gleam Tail.png|link=]] 3 Gleam Tail <br> [[Arquivo:Thunder-Essence.gif|link=]] 1 Thunder Essence <br> | |
| |- | | |- |
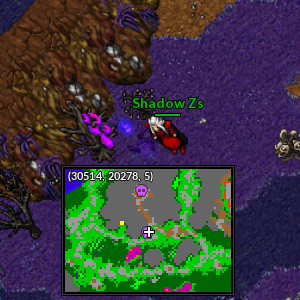
| | align="center" | [[Arquivo:Block7.png|link=]] <br> X-Block (Tier: 7) | | | align="center" | [[Arquivo:30513, 20278, 5.png|link=]] |
| | align="center" | Skill 115
| | | align="center" | Respawn Norte de Beedrill <br> 30513, 20278, 5 |
| | align="center" | 3 Dias
| |
| | align="center" | [[Arquivo:Corrupted Gold Bar.png|link=]] Corrupted Gold Bar <br> [[file:Corrupted-Dragon-Tooth.gif|link=]] Corrupted Dragon Tooth <br> [[file: Black Wool Ball.png|link=]] Black Wool Ball <br> [[file:Curly Pig Tail.png|link=]] Curly Pig Tail <br> [[file:Corrupted-Venom-Flute.gif|link=]] Corrupted Venom Flute <br> [[file:Corrupted-Cloud.gif|link=]] Corrupted Cloud <br> [[file:Corrupted-Ice-Piece.gif|link=]] Corrupted Ice Piece <br> [[file:Corrupted-Belt-of-Champion.gif|link=]] Corrupted Champion Belt <br> [[file:Toxic Gosme.png|link=]] Toxic Gosme <br> [[file:Royal Mane.png|link=]] Royal Mane <br> [[file:Gear Nose.png|link=]] Gear Nose <br> [[Arquivo:Golden Nuggets.png|link=]] 5 Golden Nuggets <br> [[Arquivo:Dragon Remains.png|link=]] 4 Dragon Remains <br> [[Arquivo:Turtle Shell.png|link=]] 3 Turtle Shell <br> | |
| |- | | |- |
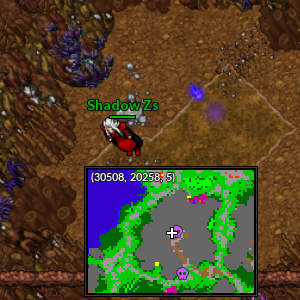
| | align="center" | [[Arquivo:Block8.png|link=]] <br> X-Block (Tier: 8) | | | align="center" | [[Arquivo:30510, 20257, 5.png|link=]] |
| | align="center" | Skill 120 | | | align="center" | Respawn Norte de Beedrill <br> 30510, 20257, 5 |
| | align="center" | 4 Dias | | |- |
| | align="center" | [[Arquivo:Corrupted Gold Bar.png|link=]] 750 Corrupted Gold Bar <br> [[file:Corrupted-Tree-Branch.gif|link=]] 200 Corrupted Tree Branch <br> [[file:Corrupted-Leaves.gif|link=]] 100 Corrupted Leaves <br> [[file:Corrupted-Cow-Tail.gif|link=]] 100 Corrupted Cow Tail <br> [[file:Corrupted-Horn-Drill.gif|link=]] 100 Corrupted Horn Drill <br> [[file:Lovely Topknot.png|link=]] 100 Lovely Topknot <br> [[file:Corrupted-Steelix-Tail.gif|link=]] 100 Corrupted Steelix Tail <br> [[Arquivo:Catfish Whiskers.png|link=]] 100 Catfish Whiskers <br> [[file:Alolan Electric Rat Tail.png|link=]] 100 Alolan Electric Rat Tail <br> [[file:Corrupted-Ice-Piece.gif|link=]] 100 Corrupted Ice Piece <br> [[file:Mach Nail.png|link=]] 50 Mach Nail <br> [[file:Corrupted-Doll-Star.gif|link=]] 20 Corrupted Doll Star <br> [[file:Fire Monkey Hair.png|link=]] 20 Fire Monkey Hair <br> [[file:Razor Claw.png|link=]] 10 Razor Claw <br> [[Arquivo:Star Remains.png|link=]] 3 Star Remains <br> [[Arquivo:Dragon Remains.png|link=]] 3 Dragon Remains <br> [[Arquivo:Bear Feet.png|link=]] 2 Bear Feet <br> [[Arquivo:Magnet Remains.png|link=]] 1 Magnet Remains <br> [[Arquivo:Mecha Reactor.png|link=]] 2 Mecha Reactor <br> | | | align="center" | [[Arquivo:30510, 20257, 3.png|link=]] |
| | | align="center" | Respawn Norte de Beedrill, na Vespiquen <br> 30510, 20257, 3 |
| |- | | |- |
| |}
| |
| </center>
| |
|
| |
|
| == Estudantes ==
| | |-|Região de Pewter= |
|
| |
|
| <center class="center-tab"><tabber>
| | São 15 espíritos ao total nessa região. |
| |-|Malefic=
| |
| <center>
| |
| <b>
| |
|
| |
|
| {| class="wikitable" width="70%" | | {| class="wikitable" width="70%" |
| ! width="2%" style="background-color: #9d1a64" | Card | | ! width="5%" style="background-color: #9d1a64" | Localização |
| ! width="1%" style="background-color: #9d1a64" | Level | | ! width="20%" style="background-color: #9d1a64" | Posição |
| ! width="1%" style="background-color: #9d1a64" | Pokémon
| |
| |- | | |- |
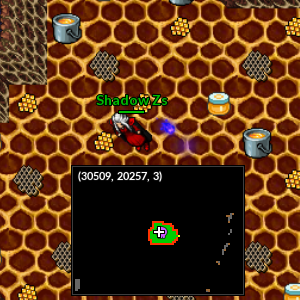
| | align="center" | [[Arquivo:Shaggy Student Card.png|link=]] <br> Shaggy Student Card | | | align="center" | [[Arquivo:30416, 20328, 5.png|link=]] |
| | align="center" | 150 | | | align="center" | Respawn de Klink e Klang <br> 30416, 20328, 5 |
| | align="center" | [[Arquivo:229-Houndoom.png|link=Houndoom]] [[Arquivo:562-Yamask.png|link=Yamask]] [[Arquivo:584-Vanilluxe.png|link=Vanilluxe]]
| |
| |- | | |- |
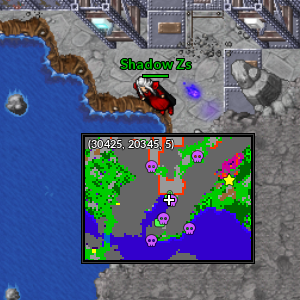
| | align="center" | [[Arquivo:Akame Student Card.png|link=]] <br> Akame Student Card | | | align="center" | [[Arquivo:30426, 20345, 5.png|link=]] |
| | align="center" | 350 | | | align="center" | Respawn de Klink e Klang <br> 30426, 20345, 5 |
| | align="center" | [[Arquivo:680-Doublade.png|link=Doublade]] [[Arquivo:681-Aegislash.png|link=Aegislash]] [[Arquivo:778-Mimikyu.png|link=Mimikyu]]
| |
| |- | | |- |
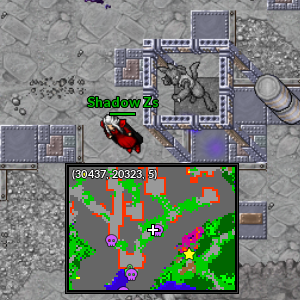
| | align="center" | [[Arquivo:Nezuko Kamado Student Card.png|link=]] <br> Nezuko Kamado Student Card | | | align="center" | [[Arquivo:30439, 20323, 5.png|link=]] |
| | align="center" | 350 | | | align="center" | Respawn de Klink e Klang <br> 30439, 20323, 5 |
| | align="center" | [[Arquivo:094-MegaGengar.png|link=Mega Gengar]] [[Arquivo:Megahoundoom.png|link=Mega Houndoom]] [[Arquivo:778-Mimikyu.png|link=Mimikyu]]
| |
| |- | | |- |
| </center>
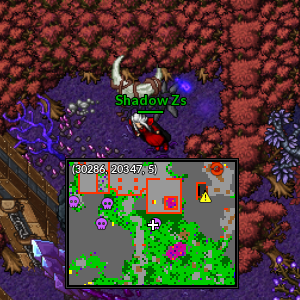
| | | align="center" | [[Arquivo:30287, 20346, 5.png|link=]] |
| </b> | | | align="center" | Próximo a entrada da Sarkies Fortress <br> 30287, 20346, 5 |
| | | |- |
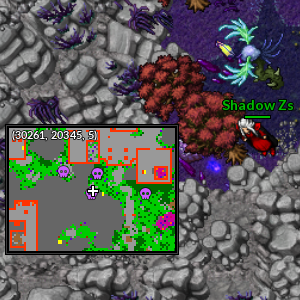
| |-|Gardestrike= | | | align="center" | [[Arquivo:30260, 20346, 5.png|link=]] |
| | | | align="center" | Próximo a entrada da Sarkies Fortress <br> 30260, 20346, 5 |
| {| class="wikitable" width="70%"
| | |- |
| ! width="2%" style="background-color: #9d1a64" | Card
| | | align="center" | [[Arquivo:30263, 20336, 5.png|link=]] |
| ! width="1%" style="background-color: #9d1a64" | Level
| | | align="center" | Próximo a entrada da Sarkies Fortress <br> 30263, 20336, 5 |
| ! width="1%" style="background-color: #9d1a64" | Pokémon
| | |- |
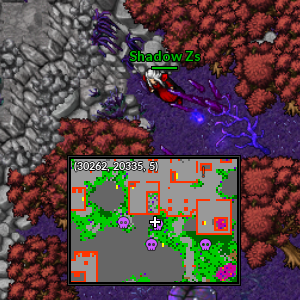
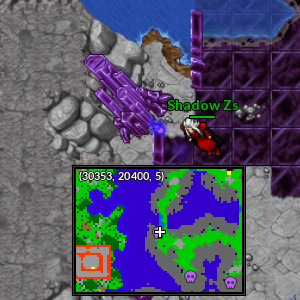
| | | align="center" | [[Arquivo:30352, 20400, 5.png|link=]] |
| | | align="center" | Respawn de Darkrai Minion no térreo da Peaky Mountains <br> 30352, 20400, 5 |
| | |- |
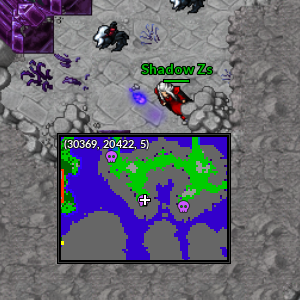
| | | align="center" | [[Arquivo:30368, 20422, 5.png|link=]] |
| | | align="center" | Respawn de Darkrai Minion no térreo da Peaky Mountains <br> 30368, 20422, 5 |
| |- | | |- |
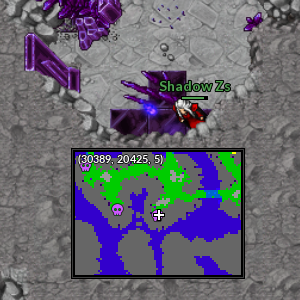
| | align="center" | [[Arquivo:Chuck Student Card.png|link=]] <br> Chuck Student Card | | | align="center" | [[Arquivo:30388, 20425, 5.png|link=]] |
| | align="center" | 300 | | | align="center" | Respawn de Darkrai Minion no térreo da Peaky Mountains <br> 30388, 20425, 5 |
| | align="center" | [[Arquivo:057-Champion Primeape.png|link=Champion Primeape]] [[Arquivo:062-Poliwrath.png|link=Poliwrath]] [[Arquivo:068-Sh Machamp.png|link=Shiny Machamp]]
| |
| |- | | |- |
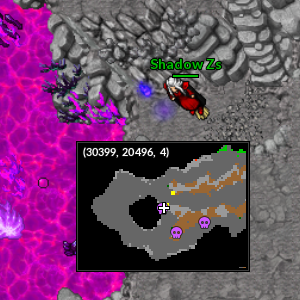
| | align="center" | [[Arquivo:Luffy Student Card.png|link=]] <br> Luffy Student Card | | | align="center" | [[Arquivo:30398, 20496, 4.png|link=]] |
| | align="center" | 300 | | | align="center" | Respawn de Rufflet <br> 30398, 20496, 4 |
| | align="center" | [[Arquivo:057-Champion Primeape.png|link=Champion Primeape]] [[Arquivo:068-Sh Machamp.png|link=Shiny Machamp]] [[Arquivo:107-Hitmonchan.png|link-Elite Hitmonchan]]
| |
| |- | | |- |
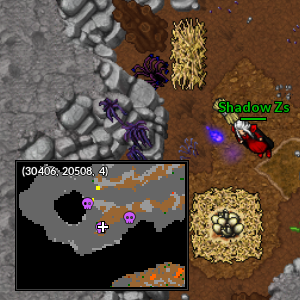
| | align="center" | [[Arquivo:Norman Student Card.png|link=]] <br> Norman Student Card | | | align="center" | [[Arquivo:30405, 20508, 4.png|link=]] |
| | align="center" | 300 | | | align="center" | Respawn de Rufflet <br> 30405, 20508, 4 |
| | align="center" | [[Arquivo:115-MegaKangaskhan.png|link=Mega Kangaskhan]] [[Arquivo:289-Slaking.png|link=Slaking]] [[Arquivo:289-Shiny Slaking.png|link=]]
| |
| |- | | |- |
| | align="center" | [[Arquivo:Sanji Student Card.png|link=]] <br> Sanji Student Card | | | align="center" | [[Arquivo:30419, 20503, 4.png|link=]] |
| | align="center" | 300 | | | align="center" | Respawn de Rufflet <br> 30419, 20503, 4 |
| | align="center" | [[Arquivo:Elite_Hitmonlee.png|link=Elite Hitmonlee]] [[Arquivo:257-MegaBlaziken.png|link=Mega Blaziken]] [[Arquivo:815-Cinderace.png|link=Cinderace]]
| |
| |- | | |- |
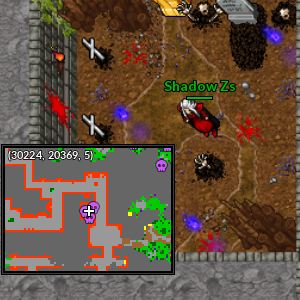
| | align="center" | [[Arquivo:Harley Quinn Student Card.png|link=]] <br> Harley Quinn Student Card | | | align="center" | [[Arquivo:30224, 20369, 5.png|link=]] |
| | align="center" | 350 | | | align="center" | Respawn de Alolan Meowth <br> 30224, 20369, 5 <br> '''Obs.:''' Nesse local tem três espíritos. |
| | align="center" | [[Arquivo:257-MegaBlaziken.png|link=Mega Blaziken]] [[Arquivo:428-MegaLopunny.png|link=Mega Lopunny]] [[Arquivo:448-MegaLucario.png|link=Mega Lucario]]
| |
| |- | | |- |
| </center>
| |
| </b>
| |
|
| |
|
| |-|Seavell= | | |-|Região de Viridian= |
| | |
| | São 3 espíritos ao total nessa região. |
|
| |
|
| {| class="wikitable" width="70%" | | {| class="wikitable" width="70%" |
| ! width="2%" style="background-color: #9d1a64" | Card | | ! width="5%" style="background-color: #9d1a64" | Localização |
| ! width="1%" style="background-color: #9d1a64" | Level | | ! width="20%" style="background-color: #9d1a64" | Posição |
| ! width="1%" style="background-color: #9d1a64" | Pokémon
| |
| |- | | |- |
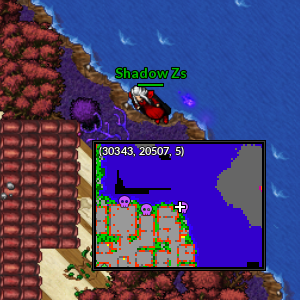
| | align="center" | [[Arquivo:Jon Snow Student Card.png|link=]] <br> Jon Snow Student Card | | | align="center" | [[Arquivo:30344, 20507, 5.png|link=]] |
| | align="center" | 300 | | | align="center" | Arredores da cidade de Viridian <br> 30344, 20507, 5 |
| | align="center" | [[Arquivo:059-Sh Arcanine.png|link=Shiny Arcanine]] [[Arquivo:262-Mightyena.png|link=Mightyena]] [[Arquivo:448-MegaLucario.png|link=Mega Lucario]]
| |
| |- | | |- |
| | align="center" | [[Arquivo:Pryce Student Card.png|link=]] <br> Pryce Student Card | | | align="center" | [[Arquivo:30326, 20508, 5.png|link=]] |
| | align="center" | 300 | | | align="center" | Arredores da cidade de Viridian <br> 30326, 20508, 5 |
| | align="center" | [[Arquivo:124-shJynx.png|link=Shiny Jynx]] [[Arquivo:461-Weavile.png|link=Weavile]] [[Arquivo:473-Mamoswine.png|link=Mamoswine]] | | |- |
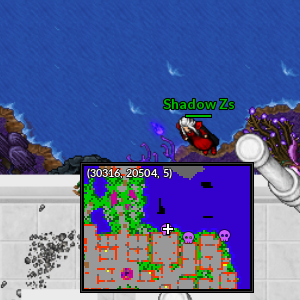
| | | align="center" | [[Arquivo:30315, 20504, 5.png|link=]] |
| | | align="center" | Arredores da cidade de Viridian <br> 30315, 20504, 5 |
| |- | | |- |
| </center>
| |
| </b>
| |
|
| |
|
| |-|Volcanic= | | |-|Região de Pallet= |
| | |
| | São 9 espíritos ao total nessa região. |
|
| |
|
| {| class="wikitable" width="70%" | | {| class="wikitable" width="70%" |
| ! width="2%" style="background-color: #9d1a64" | Card | | ! width="5%" style="background-color: #9d1a64" | Localização |
| ! width="1%" style="background-color: #9d1a64" | Level | | ! width="20%" style="background-color: #9d1a64" | Posição |
| ! width="1%" style="background-color: #9d1a64" | Pokémon
| |
| |- | | |- |
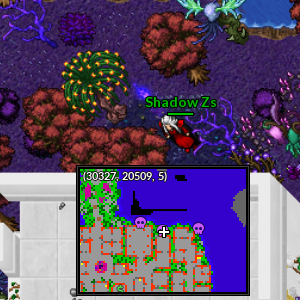
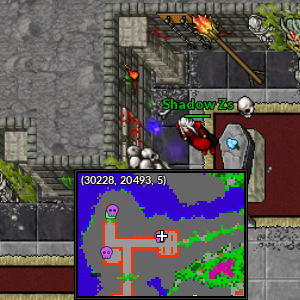
| | align="center" | [[Arquivo:Goh Student Card.png|link=]] <br> Goh Student Card | | | align="center" | [[Arquivo:30227, 20493, 5.png|link=]] |
| | align="center" | 200 | | | align="center" | Respawn de Shuppet <br> 30227, 20493, 5 |
| | align="center" | [[Arquivo:555-Darmanitan.png|link=Darmanitan]] [[Arquivo:815-Cinderace.png|link=Cinderace]] [[Arquivo:815-ShinyCinderace.png|link=Shiny Cinderace]]
| |
| |- | | |- |
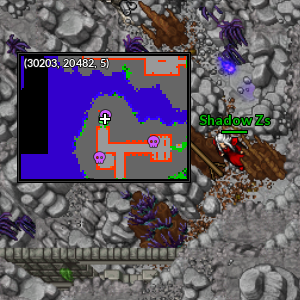
| | align="center" | [[Arquivo:Rin Okumura Student Card.png|link=]] <br> Rin Okumura Student Card | | | align="center" | [[Arquivo:30203, 20480, 5.png|link=]] |
| | align="center" | 250 | | | align="center" | Respawn de Shuppet <br> 30203, 20480, 5 |
| | align="center" | [[Arquivo:006-MegaCharizardX.png|link=Mega Charizard X]] [[Arquivo:078-Rapidash.png|link=Rapidash]] [[Arquivo:157-Sh Typhlosion.png|link=Shiny Typhlosion]]
| |
| |- | | |- |
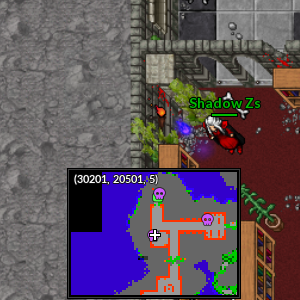
| | align="center" | [[Arquivo:Annie Student Card.png|link=]] <br> Annie Student Card | | | align="center" | [[Arquivo:30200, 20501, 5.png|link=]] |
| | align="center" | 350 | | | align="center" | Respawn de Shuppet <br> 30200, 20501, 5 |
| | align="center" | [[Arquivo:157-Sh Typhlosion.png|link=Shiny Typhlosion]] [[Arquivo:217-Ursaring.png|link=Ursaring]] [[Arquivo:467-Magmortar.png|link=Magmortar]]
| |
| |- | | |- |
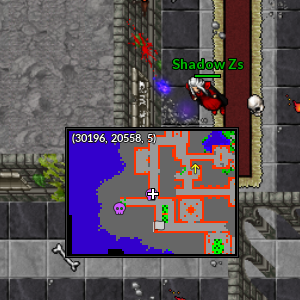
| | align="center" | [[Arquivo:Gold Student Card.png|link=]] <br> Gold Student Card | | | align="center" | [[Arquivo:30195, 20558, 5.png|link=]] |
| | align="center" | 500 | | | align="center" | Respawn de Shuppet <br> 30195, 20558, 5 |
| | align="center" | [[Arquivo:157-Sh Typhlosion.png|link=Shiny Typhlosion]] [[Arquivo:186-shPolitoed.png|link=Shiny Politoed]] [[Arquivo:Shiny Sudowoodo.png|link=Golden Sudowoodo]] | | |- |
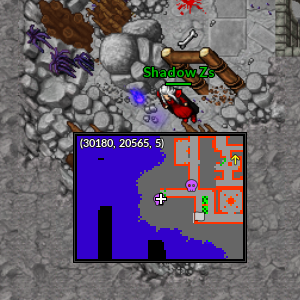
| | | align="center" | [[Arquivo:30179, 20565, 5.png|link=]] |
| | | align="center" | Respawn de Shuppet <br> 30179, 20565, 5 |
| | |- |
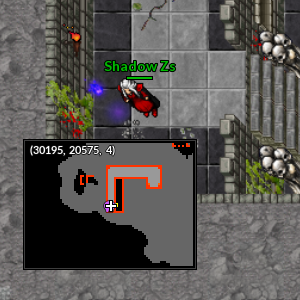
| | | align="center" | [[Arquivo:30194, 20575, 4.png|link=]] |
| | | align="center" | Respawn de Shuppet <br> 30194, 20575, 4 |
| | |- |
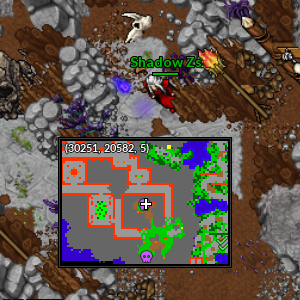
| | | align="center" | [[Arquivo:30250, 20582, 5.png|link=]] |
| | | align="center" | Respawn de Shuppet <br> 30250, 20582, 5 |
| | |- |
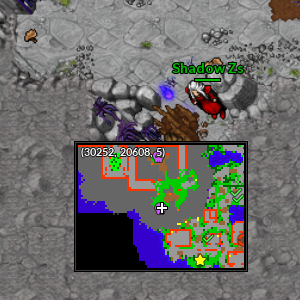
| | | align="center" | [[Arquivo:30251, 20608, 5.png|link=]] |
| | | align="center" | Respawn de Shuppet <br> 30251, 20608, 5 |
| | |- |
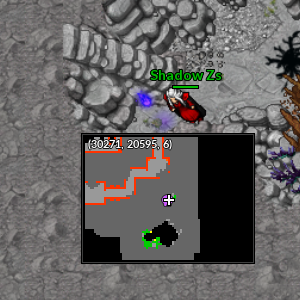
| | | align="center" | [[Arquivo:30270, 20595, 6.png|link=]] |
| | | align="center" | Respawn de Shuppet <br> 30270, 20595, 6 |
| |- | | |- |
|
| |
|
| </center>
| | |-|Região de Cinnabar= |
| </b>
| |
|
| |
|
| |-|Raibolt=
| | São 18 espíritos ao total nessa região. |
|
| |
|
| {| class="wikitable" width="70%" | | {| class="wikitable" width="70%" |
| ! width="2%" style="background-color: #9d1a64" | Card | | ! width="5%" style="background-color: #9d1a64" | Localização |
| ! width="1%" style="background-color: #9d1a64" | Level | | ! width="20%" style="background-color: #9d1a64" | Posição |
| ! width="1%" style="background-color: #9d1a64" | Pokémon
| | |- |
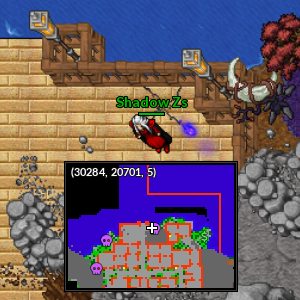
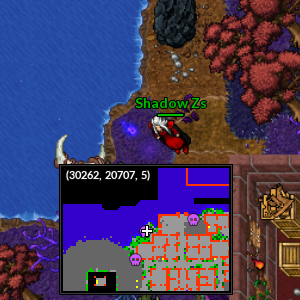
| | | align="center" | [[Arquivo:30285, 20701, 5.png|link=]] |
| | | align="center" | Arredores da cidade de Cinnabar <br> 30285, 20701, 5 |
| |- | | |- |
| | align="center" | [[Arquivo:Ritchie Student Card.png|link=]] <br> Ritchie Student Card | | | align="center" | [[Arquivo:30261, 20707, 5.png|link=]] |
| | align="center" | 150 | | | align="center" | Arredores da cidade de Cinnabar <br> 30261, 20707, 5 |
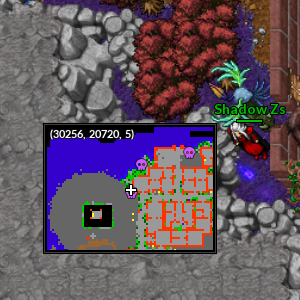
| | align="center" | [[Arquivo:005-Charmeleon.png|link=Charmeleon]] [[Arquivo:012-Butterfree.png|link=Butterfree]] [[Arquivo:025-Pikachu.png|link=Pikachu]] | | |- |
| | | align="center" | [[Arquivo:30256, 20721, 5.png|link=]] |
| | | align="center" | Arredores da cidade de Cinnabar <br> 30256, 20721, 5 |
| | |- |
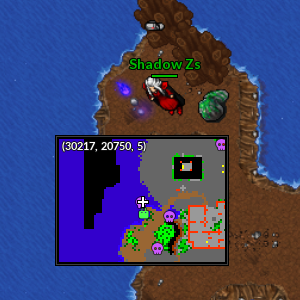
| | | align="center" | [[Arquivo:30216, 20750, 5.png|link=]] |
| | | align="center" | Respawn de Grimer <br> 30216, 20750, 5 |
| | |- |
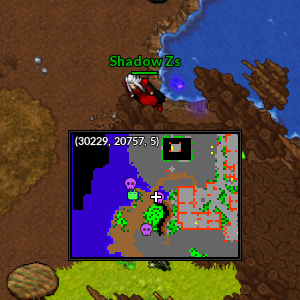
| | | align="center" | [[Arquivo:30230, 20757, 5.png|link=]] |
| | | align="center" | Respawn de Grimer <br> 30230, 20757, 5 |
| | |- |
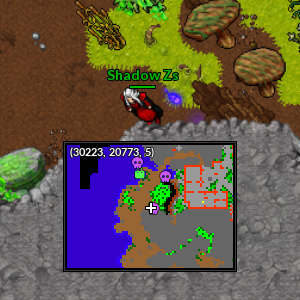
| | | align="center" | [[Arquivo:30224, 20773, 5.png|link=]] |
| | | align="center" | Respawn de Grimer <br> 30224, 20773, 5 |
| | |- |
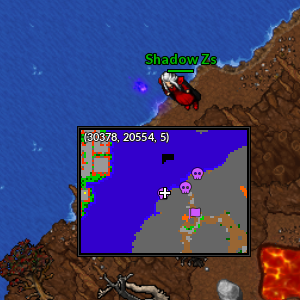
| | | align="center" | [[Arquivo:30377, 20554, 5.png|link=]] |
| | | align="center" | Respawn de Magby e Pansear <br> 30377, 20554, 5 |
| | |- |
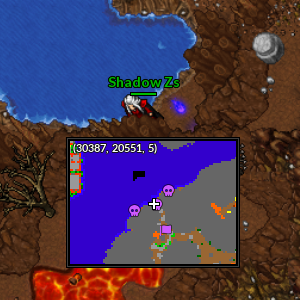
| | | align="center" | [[Arquivo:30388, 20551, 5.png|link=]] |
| | | align="center" | Respawn de Magby e Pansear <br> 30388, 20551, 5 |
| | |- |
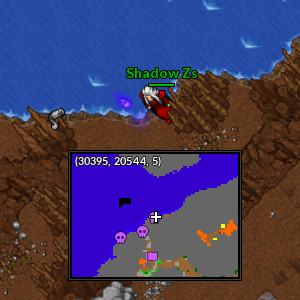
| | | align="center" | [[Arquivo:30394, 20544, 5.png|link=]] |
| | | align="center" | Respawn de Magby e Pansear <br> 30394, 20544, 5 |
| | |- |
| | | align="center" | [[Arquivo:30381, 20566, 4.png|link=]] |
| | | align="center" | Respawn de Ninetales, Houndoom e Simisear <br> 30381, 20566, 4 |
| | |- |
| | | align="center" | [[Arquivo:30373, 20570, 4.png|link=]] |
| | | align="center" | Respawn de Ninetales, Houndoom e Simisear <br> 30373, 20570, 4 |
| | |- |
| | | align="center" | [[Arquivo:30369, 20582, 4.png|link=]] |
| | | align="center" | Respawn de Ninetales, Houndoom e Simisear <br> 30369, 20582, 4 |
| | |- |
| | | align="center" | [[Arquivo:30549, 20555, 4.png|link=]] |
| | | align="center" | Respawn de Ninetales, Houndoom e Simisear <br> 30549, 20555, 4 |
| | |- |
| | | align="center" | [[Arquivo:30548, 20541, 4.png|link=]] |
| | | align="center" | Respawn de Ninetales, Houndoom e Simisear <br> 30548, 20541, 4 |
| | |- |
| | | align="center" | [[Arquivo:30533, 20550, 4.png|link=]] |
| | | align="center" | Respawn de Ninetales, Houndoom e Simisear <br> 30533, 20550, 4 |
| | |- |
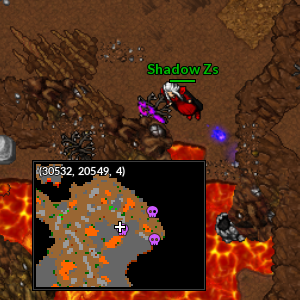
| | | align="center" | [[Arquivo:30532, 20607, 4.png|link=]] |
| | | align="center" | Respawn de Ninetales, Houndoom e Simisear <br> 30532, 20607, 4 |
| | |- |
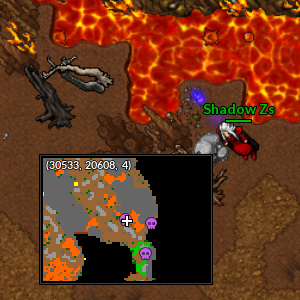
| | | align="center" | [[Arquivo:30545, 20609, 4.png|link=]] |
| | | align="center" | Respawn de Ninetales, Houndoom e Simisear <br> 30545, 20609, 4 |
| | |- |
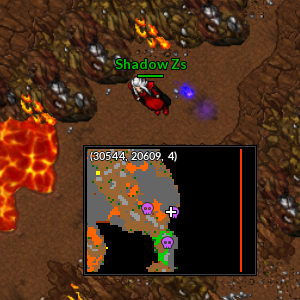
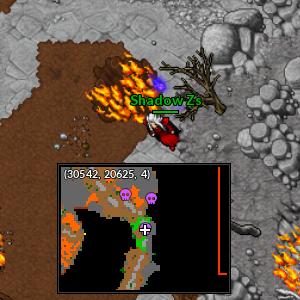
| | | align="center" | [[Arquivo:30542, 20624, 4.png|link=]] |
| | | align="center" | Respawn de Ninetales, Houndoom e Simisear <br> 30542, 20624, 4 |
| |- | | |- |
| </center>
| |
| </b>
| |
|
| |
|
| |-|Naturia= | | |-|Região de Fuchsia= |
| | |
| | São 21 espíritos ao total nessa região. |
|
| |
|
| {| class="wikitable" width="70%" | | {| class="wikitable" width="70%" |
| ! width="2%" style="background-color: #9d1a64" | Card | | ! width="5%" style="background-color: #9d1a64" | Localização |
| ! width="1%" style="background-color: #9d1a64" | Level | | ! width="20%" style="background-color: #9d1a64" | Posição |
| ! width="1%" style="background-color: #9d1a64" | Pokémon
| |
| |- | | |- |
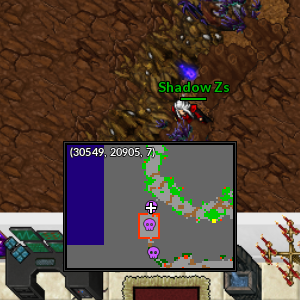
| | align="center" | [[Arquivo:Lyra Student Card.png|link=]] <br> Lyra Student Card | | | align="center" | [[Arquivo:30549, 20904, 7.png|link=]] |
| | align="center" | 250 | | | align="center" | Igreja entre o respawn de Gardevoir e Torterra <br> 30549, 20904, 7 |
| | align="center" | [[Arquivo:Sh venu.png|link=Shiny Venusaur]] [[Arquivo:Tang.png|link=Tangrowth]] [[Arquivo:474-PorygonZ.png|link=Porygon-Z]]
| |
| |- | | |- |
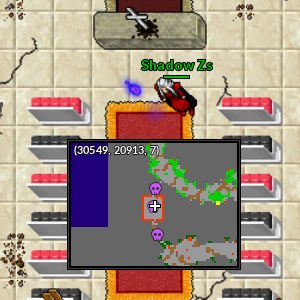
| | align="center" | [[Arquivo:Bugsy Student Card.png|link=]] <br> Bugsy Student Card | | | align="center" | [[Arquivo:30548, 20913, 7.png|link=]] |
| | align="center" | 300 | | | align="center" | Igreja entre o respawn de Gardevoir e Torterra <br> 30548, 20913, 7 |
| | align="center" | [[Arquivo:123-Sh Scyther.png|link=Shiny Scyther]] [[Arquivo:127-Sh Pinsir.png|link=Shiny Pinsir]] [[Arquivo:212-MegaScizor.png|link=Mega Scizor]]
| |
| |- | | |- |
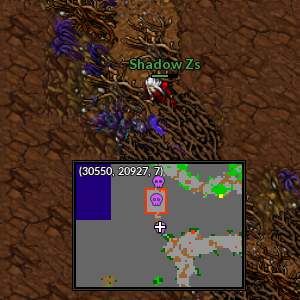
| | align="center" | [[Arquivo:Doflamingo Student Card.png|link=]] <br> Doflamingo Student Card | | | align="center" | [[Arquivo:30550, 20928, 7.png|link=]] |
| | align="center" | 350 | | | align="center" | Igreja entre o respawn de Gardevoir e Torterra <br> 30550, 20928, 7 |
| | align="center" | [[Arquivo:065-shAlakazam.png|link=Shiny Alakazam]] [[Arquivo:Sh ariados.png|link=Shiny Ariados]] [[Arquivo:463-Lickilicky.png|link=Lickilicky]]
| |
| |- | | |- |
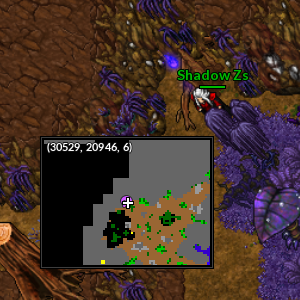
| | align="center" | [[Arquivo:Green Student Card.png|link=]] <br> Green Student Card | | | align="center" | [[Arquivo:30528, 20945, 6.png|link=]] |
| | align="center" | 550 | | | align="center" | Respawn de Skiddo e Nuzleaf <br> 30528, 20945, 6 |
| | align="center" | [[Arquivo:MegaBlastoise.png|link=Mega Blastoise]] [[Arquivo:038-AlolanNinetales.png|link=Alolan Ninetales]] [[Arquivo:071-Shiny_Victreebel.png|link=]]
| |
| |- | | |- |
| </center>
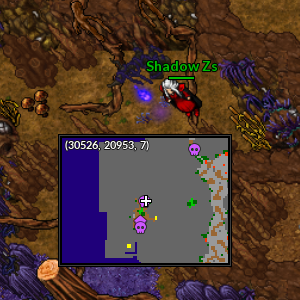
| | | align="center" | [[Arquivo:30525, 20953, 7.png|link=]] |
| </b> | | | align="center" | Respawn de Skiddo e Nuzleaf <br> 30525, 20953, 7 |
| | | |- |
| |-|Orebound= | | | align="center" | [[Arquivo:30523, 20966, 7.png|link=]] |
| | | | align="center" | Respawn de Skiddo e Nuzleaf <br> 30523, 20966, 7 |
| {| class="wikitable" width="70%"
| | |- |
| ! width="2%" style="background-color: #9d1a64" | Card
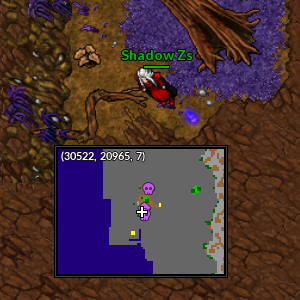
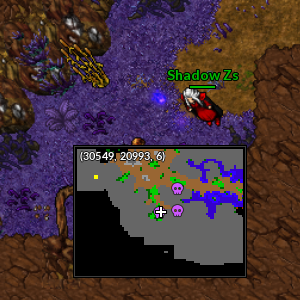
| | | align="center" | [[Arquivo:30548, 20993, 6.png|link=]] |
| ! width="1%" style="background-color: #9d1a64" | Level
| | | align="center" | Respawn de Skiddo e Nuzleaf <br> 30548, 20993, 6 |
| ! width="1%" style="background-color: #9d1a64" | Pokémon
| | |- |
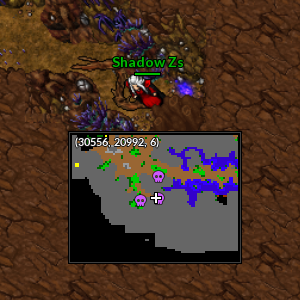
| | | align="center" | [[Arquivo:30557, 20992, 6.png|link=]] |
| | | align="center" | Respawn de Skiddo e Nuzleaf <br> 30557, 20992, 6 |
| | |- |
| | | align="center" | [[Arquivo:30557, 20981, 6.png|link=]] |
| | | align="center" | Respawn de Skiddo e Nuzleaf <br> 30557, 20981, 6 |
| |- | | |- |
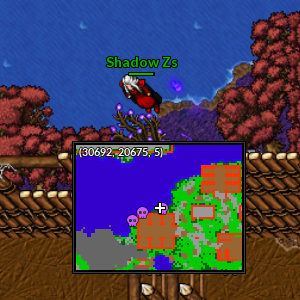
| | align="center" | [[Arquivo:Roxanne Student Card.png|link=]] <br> Roxanne Student Card | | | align="center" | [[Arquivo:30693, 20675, 5.png|link=]] |
| | align="center" | 300 | | | align="center" | Arredores do respawn de Miltank <br> 30693, 20675, 5 |
| | align="center" | [[Arquivo:346-Cradily.png|link=Cradily]] [[Arquivo:348-Armaldo.png|link=Armaldo]] [[Arquivo:476-Probopass.png|link=Probopass]]
| |
| |- | | |- |
| </center>
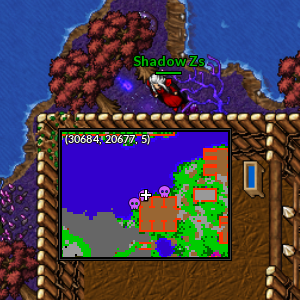
| | | align="center" | [[Arquivo:30683, 20677, 5.png|link=]] |
| </b>
| | | align="center" | Arredores do respawn de Miltank <br> 30683, 20677, 5 |
| | |
| |-|Wingeon= | |
| | |
| {| class="wikitable" width="70%"
| |
| ! width="2%" style="background-color: #9d1a64" | Card
| |
| ! width="1%" style="background-color: #9d1a64" | Level
| |
| ! width="1%" style="background-color: #9d1a64" | Pokémon
| |
| |- | | |- |
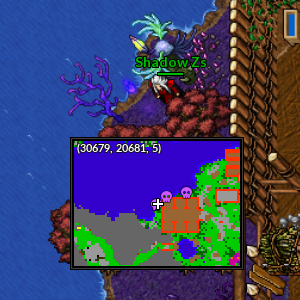
| | align="center" | [[Arquivo:Daenerys Targaryen Student Card.png|link=]] <br> Daenerys Targaryen Student Card | | | align="center" | [[Arquivo:30678, 20681, 5.png|link=]] |
| | align="center" | 300 | | | align="center" | Arredores do respawn de Miltank <br> 30678, 20681, 5 |
| | align="center" | [[Arquivo:006-MegaCharizardY.png|link=Mega Charizard Y]] [[Arquivo:148-Sh Dragonair.png|link=Shiny Dragonair]] [[Arquivo:Mega_Salamencee.png|link=Mega Salamence]]
| |
| |- | | |- |
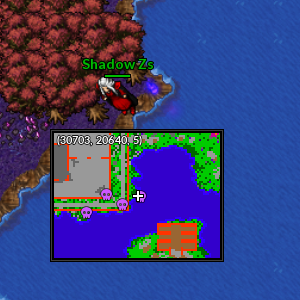
| | align="center" | [[Arquivo:Falkner Student Card.png|link=]] <br> Falkner Student Card | | | align="center" | [[Arquivo:30704, 20640, 5.png|link=]] |
| | align="center" | 300 | | | align="center" | Arredores do respawn de Elekid <br> 30704, 20640, 5 |
| | align="center" | [[Arquivo:018M.png|link=Mega Pidgeot]] [[Arquivo:398-Staraptor.png|link=Staraptor]] [[Arquivo:430-Shiny Honchkrow.png|link=Shiny Honchkrow]]
| |
| |- | | |- |
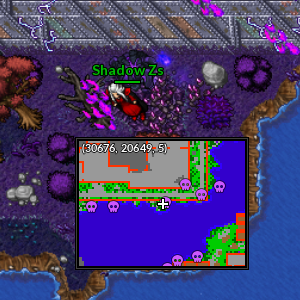
| | align="center" | [[Arquivo:Winona Student Card.png|link=]] <br> Winona Student Card | | | align="center" | [[Arquivo:30677, 20648, 5.png|link=]] |
| | align="center" | 300 | | | align="center" | Arredores do respawn de Elekid <br> 30677, 20648, 5 |
| | align="center" | [[Arquivo:227-Skarmory.png|link=Skarmory]] [[Arquivo:279-Pelipper.png|link=Pelipper]] [[Arquivo:334-MegaAltaria.png|link=Mega Altaria]]
| |
| |- | | |- |
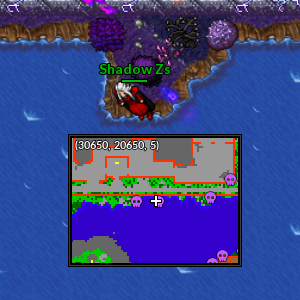
| | align="center" | [[Arquivo:Cynthia Student Card.png|link=]] <br> Cynthia Student Card | | | align="center" | [[Arquivo:30651, 20650, 5.png|link=]] |
| | align="center" | 500 | | | align="center" | Arredores do respawn de Elekid <br> 30651, 20650, 5 |
| | align="center" | [[Arquivo:350-Milotic.png|link=Milotic]] [[Arquivo:445-MegaGarchomp.png|link=Mega Garchomp]] [[Arquivo:468-Togekiss.png|link=Togekiss]]
| |
| |- | | |- |
| </center>
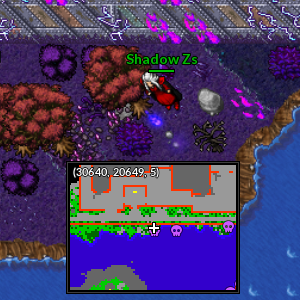
| | | align="center" | [[Arquivo:30640, 20650, 5.png|link=]] |
| </b>
| | | align="center" | Arredores do respawn de Elekid <br> 30640, 20650, 5 |
| | |
| |-|Psycraft= | |
| | |
| {| class="wikitable" width="70%"
| |
| ! width="2%" style="background-color: #9d1a64" | Card
| |
| ! width="1%" style="background-color: #9d1a64" | Level
| |
| ! width="1%" style="background-color: #9d1a64" | Pokémon
| |
| |- | | |- |
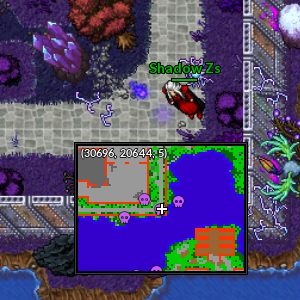
| | align="center" | [[Arquivo:Velma Student Card.png|link=]] <br> Velma Student Card | | | align="center" | [[Arquivo:30695, 20644, 5.png|link=]] |
| | align="center" | 150 | | | align="center" | Respawn de Elekid <br> 30695, 20644, 5 |
| | align="center" | [[Arquivo:065-Alakazam.png|link=Alakazam]] [[Arquivo:229-Houndoom.png|link=Houndoom]] [[Arquivo:562-Yamask.png|link=Yamask]]
| |
| |- | | |- |
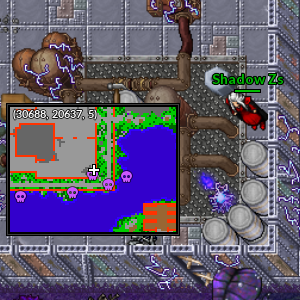
| | align="center" | [[Arquivo:Liza Student Card.png|link=]] <br> Liza Student Card | | | align="center" | [[Arquivo:30687, 20639, 5.png|link=]] |
| | align="center" | 300 | | | align="center" | Respawn de Elekid <br> 30687, 20639, 5 |
| | align="center" | [[Arquivo:178-shXatu.png|link=Shiny Xatu]] [[Arquivo:282-MegaGardevoir.png|link=Mega Gardevoir]] [[Arquivo:337-Lunatone.png|link=Lunatone]]
| |
| |- | | |- |
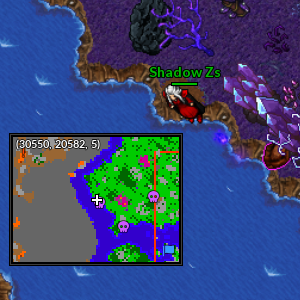
| | align="center" | [[Arquivo:Ahri Student Card.png|link=]] <br> Ahri Student Card | | | align="center" | [[Arquivo:30551, 20583, 5.png|link=]] |
| | align="center" | 350 | | | align="center" | Respawn de Darkrai Minion no arredores do respawn de Elekid <br> 30551, 20583, 5 |
| | align="center" | [[Arquivo:038-Sh Ninetales.png.png|link=Shiny Ninetales]] [[Arquivo:038-AlolanNinetales.png|link=Alolan Ninetales]] [[Arquivo:655-ShinyDelphox.png|link=Shiny Delphox]]
| |
| |- | | |- |
| | align="center" | [[Arquivo:Satoru Gojo Student Card.png|link=]] <br> Satoru Gojo Student Card | | | align="center" | [[Arquivo:30564, 20596, 5.png|link=]] |
| | align="center" | 350 | | | align="center" | Respawn de Darkrai Minion no arredores do respawn de Elekid <br> 30564, 20596, 5 |
| | align="center" | [[Arquivo:122-Sh Mr.png|link=Shiny Mr.Mime]] [[Arquivo:196-Espeon.png|link=Espeon]] [[Arquivo:202-Wobbuffet.png|link=Wobbuffet]]
| |
| |- | | |- |
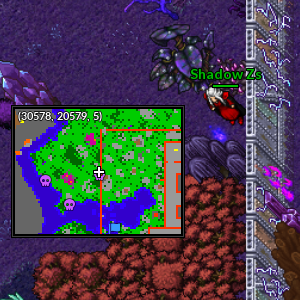
| | align="center" | [[Arquivo:Trafalgar Law Student Card.png|link=]] <br> Trafalgar Law Student Card | | | align="center" | [[Arquivo:30578, 20580, 5.png|link=]] |
| | align="center" | 350 | | | align="center" | Respawn de Darkrai Minion no arredores do respawn de Elekid <br> 30578, 20580, 5 |
| | align="center" | [[Arquivo:065-shAlakazam.png|link=Shiny Alakazam]] [[Arquivo:065-MegaAlakazam.png|link=Mega Alakazam]] [[Arquivo:475-Shiny Gallade.png|link=Shiny Gallade]]
| |
| |- | | |- |
| </center>
| |
| </b>
| |
|
| |
|
| |-|Ironhard=
| | </tabber></center> |
| | |
| | |
| | Após coletar todos os espíritos retorne ao NPC A Strange Religious na resistência de Lavender para receber o Spiritomb na Pokéball, além de liberar a possibilidade de ser feito na Premier Ball e a liberação da diária. |
| | |
| | == Diária == |
|
| |
|
| {| class="wikitable" width="70%"
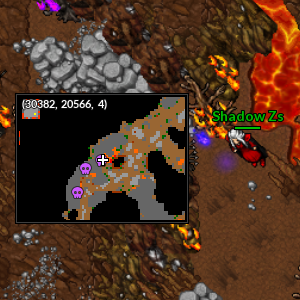
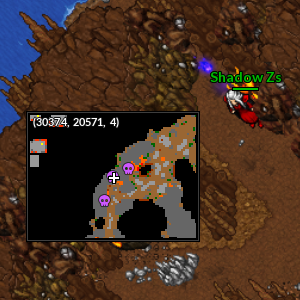
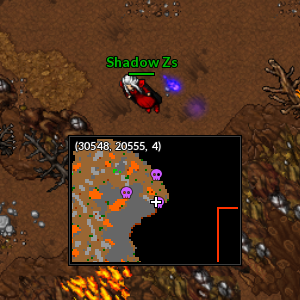
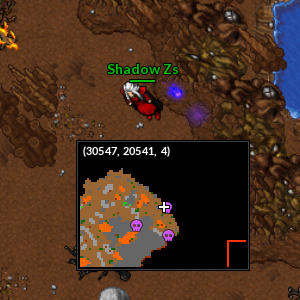
| | A diária consiste em derrotar um Spiritomb por dia, para isso o jogador deve se dirigir ao respawn de Darkrai Minion entre a rota de Viridian e Pewter. |
| ! width="2%" style="background-color: #9d1a64" | Card
| |
| ! width="1%" style="background-color: #9d1a64" | Level
| |
| ! width="1%" style="background-color: #9d1a64" | Pokémon
| |
| |-
| |
| | align="center" | [[Arquivo:Jasmine Student Card.png|link=]] <br> Jasmine Student Card
| |
| | align="center" | 300
| |
| | align="center" | [[Arquivo:Shiny steelix.png|link=Golden Steelix]] [[Arquivo:208-MegaSteelix.png|link=Mega Steelix]] [[Arquivo:462-Shiny Magnezone.png|link=Shiny Magnezone]]
| |
| |-
| |
| </center>
| |
| </b>
| |
|
| |
|
| |} | | <center> [[Arquivo:Localização Altar.png|link=]] [[Arquivo:Localização Altar2.png|link=]] </center> |
| </center> | |
|
| |
|
| </tabber>
| | Converse com o altar que estará no 2º andar do local, um Spiritomb irá nascer, derrote ele e converse novamente com o altar para receber sua recompensa que consiste em 1 Nightmare Token, 250k de EXP e 1k de NW EXP. |
| </center>
| |