|
|
| (160 revisões intermediárias pelo mesmo usuário não estão sendo mostradas) |
| Linha 1: |
Linha 1: |
| | Shadow |
|
| |
|
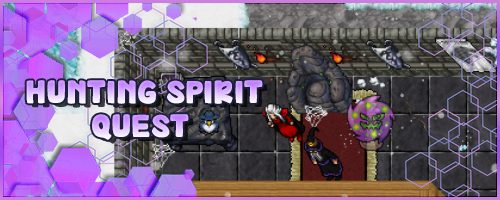
| | <center> [[Arquivo:Banner_Hunting Spirit Quest.png|link=]] </center> <br> |
|
| |
|
| | <span style="color:red">'''Nível necessário:'''</span> 300 <br> |
|
| |
|
| DUNGEONS
| | <p><font color="red">'''Nível NW Necessário:</font> 0+''' </p> |
|
| |
|
| | <span style="color:red">'''Recompensa:'''</span> Liberação de diária de Spiritomb, Pokémon Spiritomb na Pokéball e possibilidade de colocar Spiritomb na Premier Ball. <br> |
|
| |
|
| As Haunted Dungeons aparecerão em locais fixos pelo mapa. Após dirigir-se ao local, o jogador poderá selecionar o nível de dificuldade que deseja enfrentar. Após isso, ele será levado para a dungeon, e o desafio será iniciado. Cada dungeon pode ser concluída apenas uma vez por dia, sendo resetada após o Server Save diário, que ocorre às 7h40 BRT.
| | <b>Caso encontre algum erro ou queira acrescentar alguma informação, entre em contato com [[Nossa Equipe|um dos membros da wiki.]]</b> |
|
| |
|
| É possível verificar quais dungeons foram concluídas em um mesmo dia pela interface de dungeons no calendário (C).
| |
|
| |
|
| <center>
| |
|
| |
|
| {| class="wikitable" width="80%"
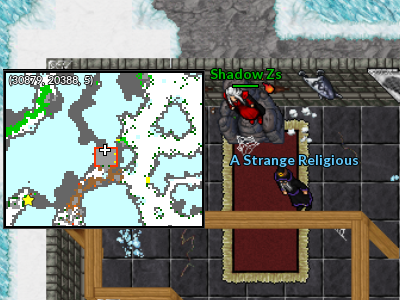
| | Para iniciar a quest o jogador deverá ir até a residência de Lavender e falar com o NPC A Strange Religious. |
|
| |
|
| |- align="center" | | <center> [[Arquivo:Localização A Strange Religious.png|link=]] </center> |
|
| |
|
| !align="center" width="1%" colspan="9" style="background-color: #9d1a64" |<span style="color:white">'''Level Recomendado'''</span>
| | Ele dará uma [[Arquivo:Odd Keystone.png|link=]] Odd Keystone para que o jogador colete os espíritos de Pokémon mortos espalhados no Nightmare World. |
|
| |
|
| |-
| |
|
| |
|
| !width="10% |Fácil
| | Serão ao todo 108 espíritos. |
|
| |
|
| !width="10% |Médio
| | == Localização dos espíritos == |
|
| |
|
| !width="10% |Difícil
| | '''Obs.:''' Para coletar os espíritos basta conversar com eles. |
|
| |
|
| |- align="center"
| |
|
| |
|
| | Level 100
| | <center class="center-tab"><tabber> |
|
| |
|
| | Level 250 | | |-|Região de Lavender= |
|
| |
|
| | Level 400
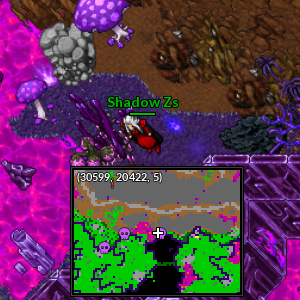
| | São 15 espíritos ao total nessa região. |
| | |
| |}
| |
| | |
| </center>
| |
| | |
| | |
| | |
| <center>
| |
| | |
| {| class="wikitable" width="50%"
| |
| | |
| |- align="center"
| |
| | |
| !align="center" width="1%" colspan="9" style="background-color: #9d1a64" |<span style="color:white">'''Recompensas gerais'''</span>
| |
| | |
| |-
| |
| | |
| |- align="center"
| |
| | |
| | rowspan="6"|Recompensa
| |
| | |
| |- align="center"
| |
|
| |
|
| | {| class="wikitable" width="70%" |
| | ! width="5%" style="background-color: #9d1a64" | Localização |
| | ! width="20%" style="background-color: #9d1a64" | Posição |
| | |- |
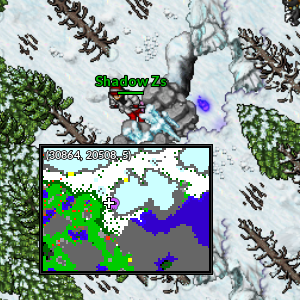
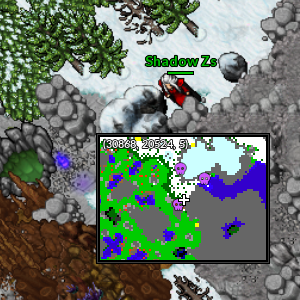
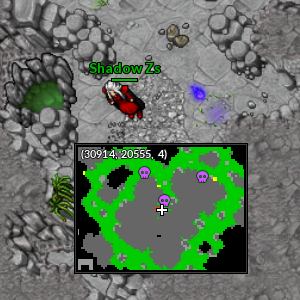
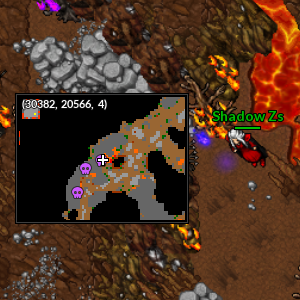
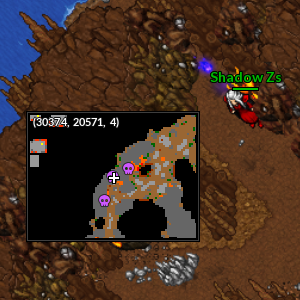
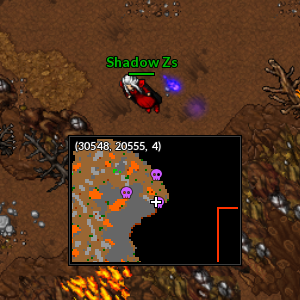
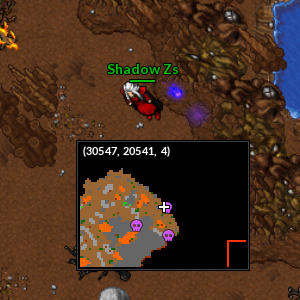
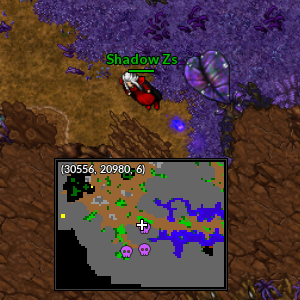
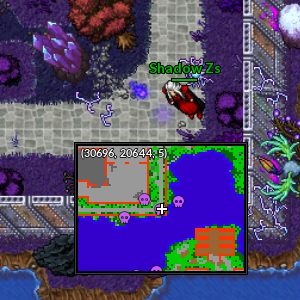
| | | align="center" | [[Arquivo:30866, 20508, 5.png|link=]] |
| | | align="center" | Respawn de Sneasel <br> 30866, 20508, 5 |
| | |- |
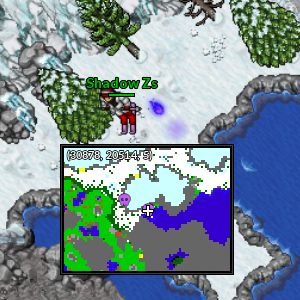
| | | align="center" | [[Arquivo:30879, 20514, 5.png|link=]] |
| | | align="center" | Respawn de Sneasel <br> 30879, 20514, 5 |
| | |- |
| | | align="center" | [[Arquivo:30865, 20526, 5.png|link=]] |
| | | align="center" | Entre o respawn de Sneasel e Cranidos <br> 30865, 20526, 5 |
| | |- |
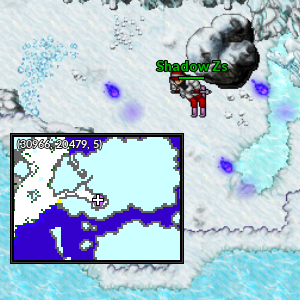
| | | align="center" | [[Arquivo:30966, 20479, 5.png|link=]] |
| | | align="center" | Andar inferior ao respawn de Cloyster <br> 30966, 20479, 5 <br> '''Obs.:''' Nesse local tem três espíritos. |
| |- | | |- |
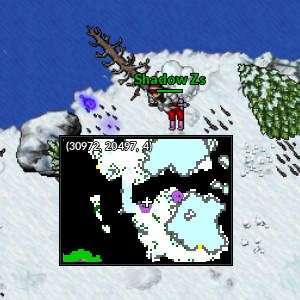
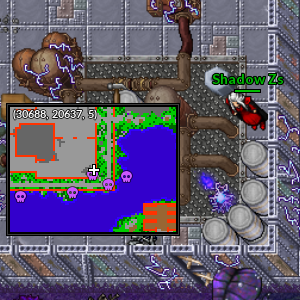
| | align="center" style="border-right-style: hidden;" | [[Arquivo:Exp_icon.png|30px|link=]] | | | align="center" | [[Arquivo:30970, 20497, 4.png|link=]] |
| | Experiência | | | align="center" | Respawn de Cloyster <br> 30970, 20497, 4 |
| |- | | |- |
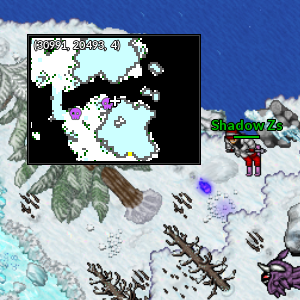
| | align="center" style="border-right-style: hidden;" | [[Arquivo:Halloween_Token_2020.png|link=]] | | | align="center" | [[Arquivo:30990, 20494, 4.png|link=]] |
| | Halloween Token | | | align="center" | Respawn de Cloyster <br> 30990, 20494, 4 |
| |- | | |- |
| | align="center" style="border-right-style: hidden;" | [[Arquivo:GoldenKey.png|link=]] | | | align="center" | [[Arquivo:30987, 20503, 3.png|link=]] |
| | Halloween Dimensional Key | | | align="center" | Respawn de Cloyster <br> 30987, 20503, 3 |
| |- | | |- |
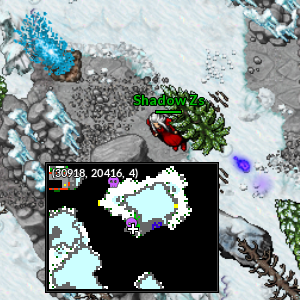
| |} | | | align="center" | [[Arquivo:30920, 20417, 4.png|link=]] |
| | | | align="center" | Respawn de Snover e Abomasnow <br> 30920, 20417, 4 |
| </center>
| |
| | |
| | |
| | |
| | |
| == Dungeons com objetivo de derrotar Pokémon ==
| |
| | |
| === Lavender's Haunted Cemetery ===
| |
| | |
| (Lavender) free
| |
| | |
| <center>
| |
| | |
| {| class="wikitable" width="50%"
| |
| | |
| |- align="center"
| |
| | |
| !align="center" width="1%" colspan="9" style="background-color: #9d1a64" |<span style="color:white">'''Informações'''</span>
| |
| | |
| |- | |
| | |
| !Localização
| |
| | |
| !colspan="2"|Recompensa
| |
| | |
| |- align="center" | |
| | |
| | rowspan="10"| Cemitério de Lavender (Free)
| |
| |- | | |- |
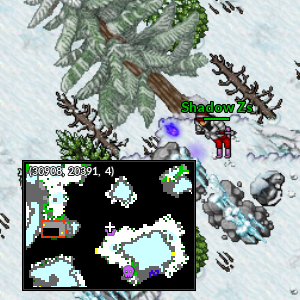
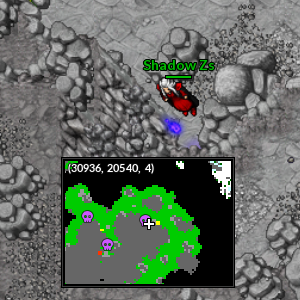
| | align="center" style="border-right-style: hidden;" | [[Arquivo:Exp_icon.png|30px|link=]] | | | align="center" | [[Arquivo:30907, 20391, 4.png|link=]] |
| | Experiência | | | align="center" | Respawn de Snover e Abomasnow <br> 30907, 20391, 4 |
| |- | | |- |
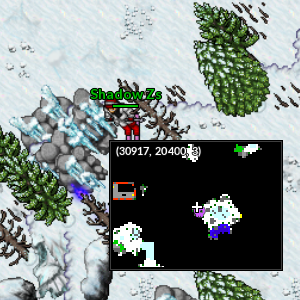
| | align="center" style="border-right-style: hidden;" | [[Arquivo:Halloween_Token_2020.png|link=]] | | | align="center" | [[Arquivo:30916, 20402, 3.png|link=]] |
| | Halloween Token | | | align="center" | Respawn de Snover e Abomasnow <br> 30916, 20402, 3 |
| |- | | |- |
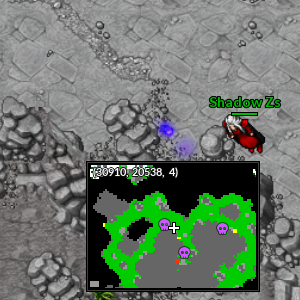
| | align="center" style="border-right-style: hidden;" | [[Arquivo:GoldenKey.png|link=]] | | | align="center" | [[Arquivo:30908, 20538, 4.png|link=]] |
| | Halloween Dimensional Key | | | align="center" | Respawn de Tyranitar <br> 30908, 20538, 4 |
| |- | | |- |
| | align="center" style="border-right-style: hidden;" | [[Arquivo:Gengar-locker.png|50px|link=]] | | | align="center" | [[Arquivo:30916, 20555, 4.png|link=]] |
| | Gengar Locker | | | align="center" | Respawn de Tyranitar <br> 30916, 20555, 4 |
| |- | | |- |
| | align="center" style="border-right-style: hidden;" | [[Arquivo:Shiny-gengar-locker.png|50px|link=]] | | | align="center" | [[Arquivo:30936, 20541, 4.png|link=]] |
| | Shiny Gengar Locker | | | align="center" | Respawn de Tyranitar <br> 30936, 20541, 4 |
| |- | | |- |
| |} | | |} |
| | |
| </center>
| |
| | |
| === Pewter's Haunted Cemetery ===
| |
| (Pewter) free
| |
| === Cursed Cerulean ===
| |
| (Cerulean) free
| |
| === Cursed Moro Island ===
| |
| (Moro island) vip
| |
| === Haunted Desert ===
| |
| (Sphinx) vip
| |
| | |
| == Dungeons com objetivo de derrotar NPC ==
| |
| | |
| === Lonely House in Texas ===
| |
| (ascorbia) vip
| |
| === Haddonfield, Illinois: Myers' House ===
| |
| (Lavender) free
| |
| === Maze on Woodsboro ===
| |
| (jungle island) vip
| |
| === The Purge ===
| |
| (celadon) free
| |
| === Factory on Elm Street ===
| |
| (cinnabar) free
| |
| === Family Picnic by The Cornfield ===
| |
| (Pallet) free
| |
| | |
| == Dungeon especial ==
| |
| | |
| Forest Soul Warden (lost island) *free
| |
| | |
| | |
| | |
| | |
| = Suicune =
| |
| | |
| == Introducao ==
| |
| Introdução
| |
| | |
| Efetividade
| |
| | |
| Pokémon bons
| |
| | |
| Mecânicas
| |
| | |
| Rewards
| |
| Entei eh um dos tres caes lendarios que protegem a Outland, jogadores experientes podem enfrenta-lo.
| |
|
| |
|
| == Efetividade ==
| |
|
| |
|
| O Suicune possui tipo Water, entao sofre dano efetivo para Elétrico e grama.
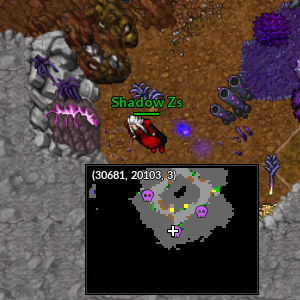
| | |-|Região de Cerulean= |
|
| |
|
| === Pokemon Recomendados ===
| | São 27 espíritos ao total nessa região. |
|
| |
|
| Tanks Recomendados
| | {| class="wikitable" width="70%" |
| {| class="wikitable" | | ! width="5%" style="background-color: #9d1a64" | Localização |
| |-
| | ! width="20%" style="background-color: #9d1a64" | Posição |
| ! Pokémon | |
| |-
| |
| | [[Arquivo:181-Ampharos.png|link=Ampharos]] <br> Ampharos
| |
| |-
| |
| | [[Arquivo:470-Leafeon.png|link=Leafeon]] <br> Leafeon
| |
| |}
| |
| <br>
| |
| Damage Recomendados
| |
| {| class="wikitable"
| |
| |- | |
| ! Pokémon
| |
| |- | | |- |
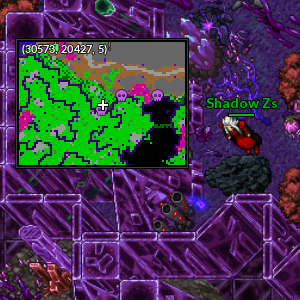
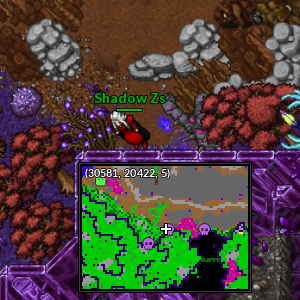
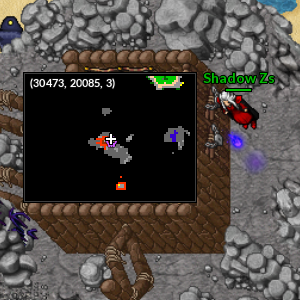
| | [[Arquivo:114-Sh_Tangela.png|link=Shiny_Tangela]] <br> Shiny Tangela | | | align="center" | [[Arquivo:30572, 20429, 5.png|link=]] |
| | | align="center" | Respawn de Alolan Digglet <br> 30572, 20429, 5 |
| |- | | |- |
| | [[Arquivo:125-Sh_Electabuzz.png|link=Shiny_Electabuzz]] <br> Shiny Electabuzz | | | align="center" | [[Arquivo:30582, 20422, 5.png|link=]] |
| | | align="center" | Respawn de Alolan Digglet <br> 30582, 20422, 5 |
| |- | | |- |
| | [[Arquivo:Shinyjoe.png|link=Shiny_Jolteon]] <br> Shiny Jolteon | | | align="center" | [[Arquivo:30600, 20422, 5.png|link=]] |
| | | align="center" | Respawn de Alolan Digglet <br> 30600, 20422, 5 |
| |- | | |- |
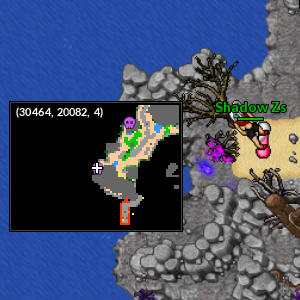
| | [[Arquivo:310-Sh_Manectric.png|link=Shiny_Manectric]] <br> Shiny Manectric | | | align="center" | [[Arquivo:30682, 20103, 3.png|link=]] |
| | | align="center" | Respawn de Galarian Farfetch'd <br> 30682, 20103, 3 |
| |- | | |- |
| | [[Arquivo:462-Shiny_Magnezone.png|link=Shiny_Magnezone]] <br> Shiny Magnezone | | | align="center" | [[Arquivo:30695, 20093, 3.png|link=]] |
| | | align="center" | Respawn de Galarian Farfetch'd <br> 30695, 20093, 3 |
| |- | | |- |
| | [[Arquivo:470-Sh_Leafeon.png|link=Shiny_Leafeon]] <br> Shiny Leafeon | | | align="center" | [[Arquivo:30666, 20085, 3.png|link=]] |
| | | align="center" | Respawn de Galarian Farfetch'd <br> 30666, 20085, 3 |
| |- | | |- |
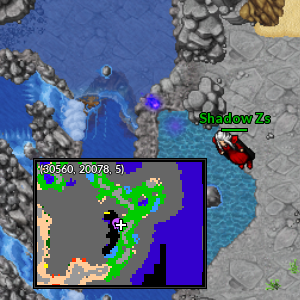
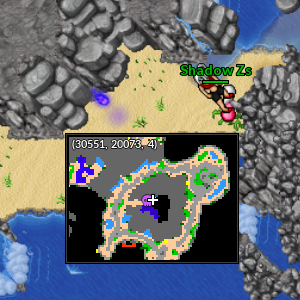
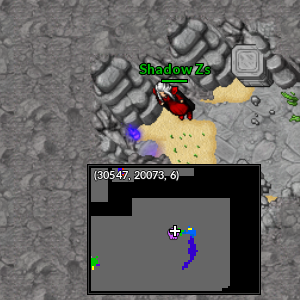
| | [[Arquivo:479-ShinyRotomMow.png|link=Shiny_Rotom_(mow)]] <br> Shiny Rotom (Mow) | | | align="center" | [[Arquivo:30558, 20077, 5.png|link=]] |
| | | align="center" | Respawn de Mantyke <br> 30558, 20077, 5 |
| |- | | |- |
| | [[Arquivo:Shiny_Sudowoodo.png|link=Golden_Sudowoodo]] <br> Golden Sudowoodo | | | align="center" | [[Arquivo:30473, 20086, 3.png|link=]] |
| | | align="center" | Respawn de Mantine <br> 30473, 20086, 3 |
| |- | | |- |
| | [[Arquivo:673-Shiny_Gogoat.png|link=Shiny_Gogoat]] <br> Shiny Gogoat | | | align="center" | [[Arquivo:30463, 20083, 4.png|link=]] |
| | | align="center" | Respawn de Mantine <br> 30463, 20083, 4 |
| |- | | |- |
| | [[Arquivo:738-ShinyVikavolt.png|link=Shiny_Vikavolt]] <br> Shiny Vikavolt | | | align="center" | [[Arquivo:30480, 20059, 4.png|link=]] |
| |} | | | align="center" | Respawn de Mantine <br> 30480, 20059, 4 |
| <br> | |
| Support Recomendado
| |
| {| class="wikitable"
| |
| |- | | |- |
| ! Pokémon
| | | align="center" | [[Arquivo:30548, 20073, 4.png|link=]] |
| | | align="center" | Respawn de Mantine <br> 30548, 20073, 4 |
| |- | | |- |
| | [[Arquivo:201-UnownLegion.png|link=Unown_Legion]] <br> Unown Legion | | | align="center" | [[Arquivo:30546, 20074, 6.png|link=]] |
| |} | | | align="center" | Respawn de Mantine, próximo ao locker de Hacker <br> 30546, 20074, 6 |
| | |
| == Habilidades == | |
| | |
| <center>
| |
| <tabber>
| |
| |-|Bubbles =
| |
| | |
| Suicune atirará uma bolha de água, causando dano ao seu alvo atual.<br>
| |
| | |
| {{#widget:Video|url={{filepath:Bubbles_Suicune.mp4}}|}}
| |
| | |
| |-|Bubble Beam=
| |
| | |
| Suicune atirará três bolhas de água em um de seus inimigos próximos, exceto seu alvo atual, causando dano equivalente a 18% do HP máximo do inimigo (9% contra alvos de nível inferior).<br>
| |
| | |
| {{#widget:Video|url={{filepath:Bubble_Beam_Suicune.mp4}}|}}
| |
| | |
| |-|Water Ball=
| |
| | |
| Suicune carregará energia. Em seguida, ele atirará bolas de água que causarão dano dentro da área em que todos os inimigos próximos, exceto seu alvo atual, estavam quando a habilidade começou.<br>
| |
| | |
| {{#widget:Video|url={{filepath:Water_Ball_Suicune.mp4}}|}}
| |
| | |
| |-|Water Pulse=
| |
| | |
| Suicune carregará energia. Em seguida, ele criará uma explosão de água que danificará os inimigos dentro de uma grande área ao seu redor. Enquanto estiver usando esta habilidade, Suicune não se moverá nem usará outras habilidades. Após usar esta habilidade, Suicune escolherá um novo alvo aleatóriamente.<br>
| |
| | |
| {{#widget:Video|url={{filepath:Water_Pulse_Suicune.mp4}}|}}
| |
| | |
| |-|Waterfall=
| |
| | |
| Causa dano progressivamente ao redor do Pokémon. <br>
| |
| | |
| {{#widget:Video|url={{filepath:Waterfall_Suicune.mp4}}|}}
| |
| | |
| |-|Hyper Beam=
| |
| | |
| Suicune carregará energia. Em seguida, ele disparará uma explosão de energia que danificará todos os inimigos dentro de uma área frontal. Enquanto estiver usando esta habilidade, Suicune não se moverá nem usará outros ataques. <br>
| |
| | |
| {{#widget:Video|url={{filepath:Hyper_Beam_Suicune.mp4}}|}}
| |
| | |
| |-|Hydropump=
| |
| | |
| Suicune carregará energia. Em seguida, ele criará uma explosão de água que danificará os inimigos em posição aleatórias. <br>
| |
| | |
| {{#widget:Video|url={{filepath:Hydropump_Suicune.mp4}}|}}
| |
| | |
| |-|Water Spout=
| |
| | |
| Suicune puxará todos os inimigos próximos. Em seguida, ele criará várias explosões enormes de água que causarão dano aos inimigos dentro da área de efeito. Enquanto estiver usando esta habilidade, Suicune não se moverá ou usará outras habilidades. <br>
| |
| | |
| {{#widget:Video|url={{filepath:Water_Spout_Suicune.mp4}}|}}
| |
| | |
| |-|Heavy Rain=
| |
| | |
| Suicune carregará energia. Então, chuva forte cairá em muitos pontos aleatórios dentro de uma grande área ao redor de Suicune, causando dano e aplicando o efeito SLOW por 5 segundos a todos os inimigos que estiverem sobre eles. <br>
| |
| | |
| {{#widget:Video|url={{filepath:Heavy_Rain_Suicune.mp4}}|}}
| |
| | |
| |-|Aqua Ring=
| |
| | |
| Suicune rugirá e carregará energia. Em seguida, ele criará um escudo por 4 segundos. Se Suicune receber algum dano durante esse período, ele puxará todos os inimigos e criará uma explosão de energia que causará uma grande quantidade de dano. <br>
| |
| | |
| {{#widget:Video|url={{filepath:Aqua_Ring_Suicune.mp4}}|}}
| |
| | |
| |-|Extreme Speed=
| |
|
| |
| Suicune perseguirá seu alvo a uma velocidade incrível, causando 45% do HP máximo do alvo, Suicune só usará esta habilidade se seu alvo estiver a mais de três SQMs de distância dele.<br>
| |
| | |
| {{#widget:Video|url={{filepath:Extreme_Speed_Suicune.mp4}}|}}
| |
| </tabber>
| |
| | |
| </center>
| |
| | |
| == Recompensas ==
| |
| <tabber>
| |
| |-|Facil=
| |
| <center>
| |
| <b>
| |
| {| class="wikitable"
| |
| |- | | |- |
| ! colspan="2" | Item
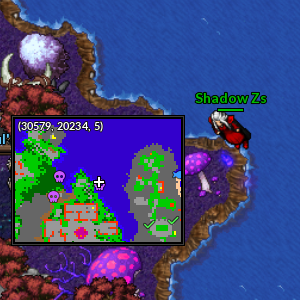
| | | align="center" | [[Arquivo:30579, 20235, 5.png|link=]] |
| ! Raridade
| | | align="center" | Cidade de Cerulean, próximo ao Raul's Shiny Snorlax <br> 30579, 20235, 5 |
| |- | | |- |
| | [[Arquivo:Suicune_Loot_Bag.png|link=]] | | | align="center" | [[Arquivo:30559, 20231, 5.png|link=]] |
| | style="border-left-style: hidden; | Suicune Loot Bag (Fácil) | | | align="center" | Cidade de Cerulean <br> 30559, 20231, 5 |
| | Comum | |
| |- | | |- |
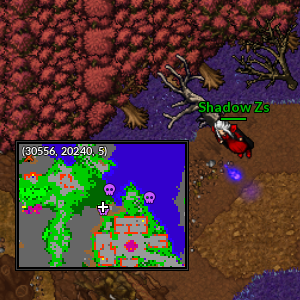
| | [[Arquivo:Water-Essence.gif|link=]] | | | align="center" | [[Arquivo:30556, 20241, 5.png|link=]] |
| | style="border-left-style: hidden; | Water Essence | | | align="center" | Cidade de Cerulean <br> 30556, 20241, 5 |
| | Épico | |
| |- | | |- |
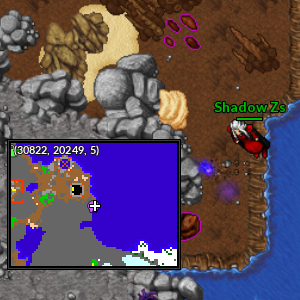
| | [[Arquivo:Suicune_Legendary_sewing_thread.png|link=]] | | | align="center" | [[Arquivo:30821, 20250, 5.png|link=]] |
| | style="border-left-style: hidden; | Suicune Legendary Sewing Thread | | | align="center" | Respawn de Spoink <br> 30821, 20250, 5 |
| | Lendário | |
| |- | | |- |
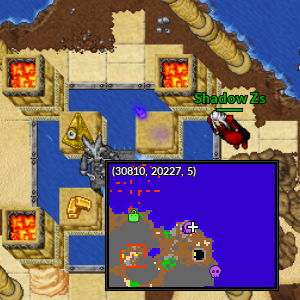
| | [[Arquivo:Suicune_TV-Cam.gif|link=]] | | | align="center" | [[Arquivo:30808, 20227, 5.png|link=]] |
| | style="border-left-style: hidden; | Suicune TV Camera | | | align="center" | Respawn de Spoink <br> 30808, 20227, 5 |
| | Lendário | |
| |- | | |- |
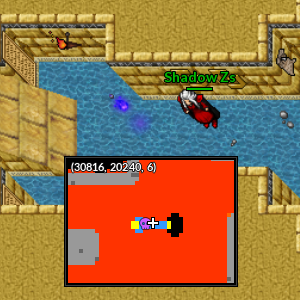
| | [[Arquivo:Suicune_Backpack.gif|link=]] | | | align="center" | [[Arquivo:30814, 20240, 6.png|link=]] |
| | style="border-left-style: hidden; | Suicune Backpack | | | align="center" | Entrada respawn de Starmie <br> 30814, 20240, 6 |
| | Lendário | |
| |- | | |- |
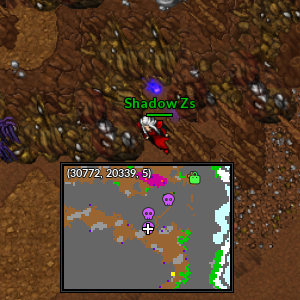
| | [[Arquivo:Suicune-novo-png.png|link=]] | | | align="center" | [[Arquivo:30772, 20338, 5.png|link=]] |
| | style="border-left-style: hidden; | Suicune Amulet | | | align="center" | Respawn de Rhydon <br> 30772, 20338, 5 |
| | Lendário | |
| |- | | |- |
| ! colspan="3" | [[Arquivo:Exp_icon.png|30px|link=]] Experiencia: 1.000.000
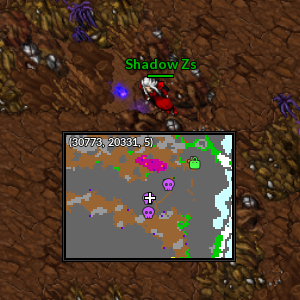
| | | align="center" | [[Arquivo:30772, 20331, 5.png|link=]] |
| |} <br> | | | align="center" | Respawn de Rhydon <br> 30772, 20331, 5 |
| </b>
| |
| </center>
| |
| Dentro da Suicune Loot Bag (Fácil) eh possível obter os seguintes itens:<br>
| |
| <center>
| |
| <b>
| |
| {| class="wikitable"
| |
| |- | | |- |
| ! colspan="4" | [[Arquivo:Suicune_Loot_Bag.png|link=]] Suicune Loot Bag (Fácil)
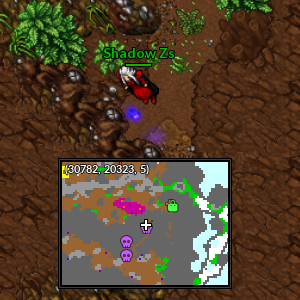
| | | align="center" | [[Arquivo:30782, 20324, 5.png|link=]] |
| | | align="center" | Respawn de Rhydon <br> 30782, 20324, 5 |
| |- | | |- |
| ! colspan="2" | Item
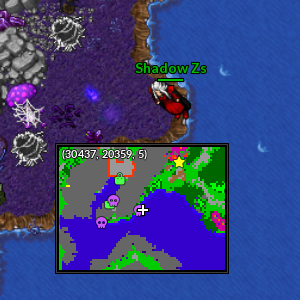
| | | align="center" | [[Arquivo:30435, 20359, 5.png|link=]] |
| ! Quantidade
| | | align="center" | Respawn Sul de Beedrill <br> 30435, 20359, 5 |
| ! Raridade
| |
| |- | | |- |
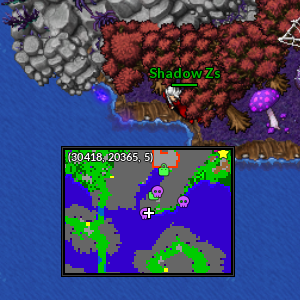
| | [[Arquivo:Suicune's_Legendary_Fur.png|link=]] | | | align="center" | [[Arquivo:30416, 20365, 5.png|link=]] |
| | style="border-left-style: hidden; | Suicune Legendary Fur | | | align="center" | Respawn Sul de Beedrill <br> 30416, 20365, 5 |
| | 2 a 4
| |
| | Comum | |
| |- | | |- |
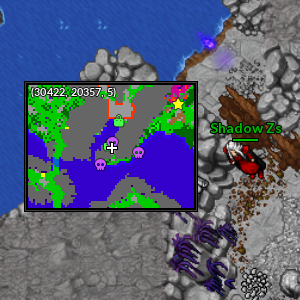
| | [[Arquivo:Rough_Gemstone.png|link=]] | | | align="center" | [[Arquivo:30422, 20357, 5.png|link=]] |
| | style="border-left-style: hidden; | Rough Gemstone | | | align="center" | Respawn Sul de Beedrill <br> 30422, 20357, 5 <br> '''Obs.:''' Necessário rock smash |
| | 4 a 6
| |
| | Comum
| |
| |- | | |- |
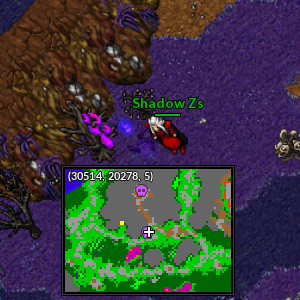
| | [[Arquivo:Water-stone.gif|link=]] | | | align="center" | [[Arquivo:30513, 20278, 5.png|link=]] |
| | style="border-left-style: hidden; | Water Stone | | | align="center" | Respawn Norte de Beedrill <br> 30513, 20278, 5 |
| | 4 a 6
| |
| | Comum | |
| |- | | |- |
| | [[Arquivo:Crystal-stone.gif|link=]] | | | align="center" | [[Arquivo:30510, 20257, 5.png|link=]] |
| | style="border-left-style: hidden; | Crystal Stone | | | align="center" | Respawn Norte de Beedrill <br> 30510, 20257, 5 |
| | 1
| |
| | Raro | |
| |- | | |- |
| | [[Arquivo:Ancient-stone.gif|link=]] | | | align="center" | [[Arquivo:30510, 20257, 3.png|link=]] |
| | style="border-left-style: hidden; | Ancient Stone | | | align="center" | Respawn Norte de Beedrill, na Vespiquen <br> 30510, 20257, 3 |
| | 1
| |
| | Raro | |
| |- | | |- |
| | [[Arquivo:Seavell_Urn.png|link=]]
| |
| | style="border-left-style: hidden; | Seavell Urn
| |
| | 1
| |
| | Raro
| |
| |-
| |
| |}
| |
| </center>
| |
| </b>
| |
|
| |
|
| |-|Normal= | | |-|Região de Pewter= |
| <center>
| | |
| <b>
| | São 15 espíritos ao total nessa região. |
| {| class="wikitable" | | |
| | {| class="wikitable" width="70%" |
| | ! width="5%" style="background-color: #9d1a64" | Localização |
| | ! width="20%" style="background-color: #9d1a64" | Posição |
| |- | | |- |
| ! colspan="2" | Item
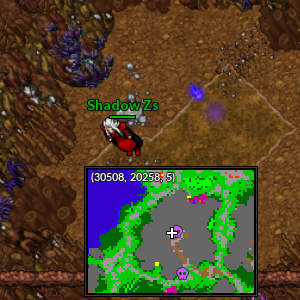
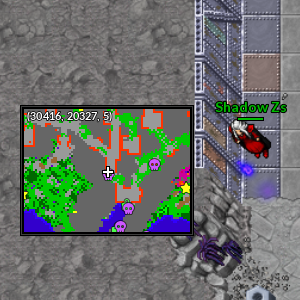
| | | align="center" | [[Arquivo:30416, 20328, 5.png|link=]] |
| ! Raridade
| | | align="center" | Respawn de Klink e Klang <br> 30416, 20328, 5 |
| |- | | |- |
| | [[Arquivo:Suicune_Loot_Bag.png|link=]] | | | align="center" | [[Arquivo:30426, 20345, 5.png|link=]] |
| | style="border-left-style: hidden; | Suicune Loot Bag (Médio) | | | align="center" | Respawn de Klink e Klang <br> 30426, 20345, 5 |
| | Comum | |
| |- | | |- |
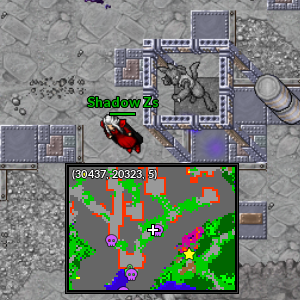
| | [[Arquivo:Water-Essence.gif|link=]] | | | align="center" | [[Arquivo:30439, 20323, 5.png|link=]] |
| | style="border-left-style: hidden; | Water Essence | | | align="center" | Respawn de Klink e Klang <br> 30439, 20323, 5 |
| | Raro | |
| |- | | |- |
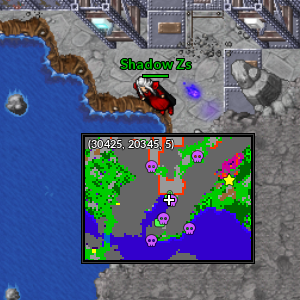
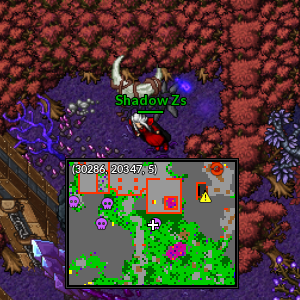
| | [[Arquivo:Suicune_Legendary_sewing_thread.png|link=]] | | | align="center" | [[Arquivo:30287, 20346, 5.png|link=]] |
| | style="border-left-style: hidden; | Suicune Legendary Sewing Thread | | | align="center" | Próximo a entrada da Sarkies Fortress <br> 30287, 20346, 5 |
| | Épico | |
| |- | | |- |
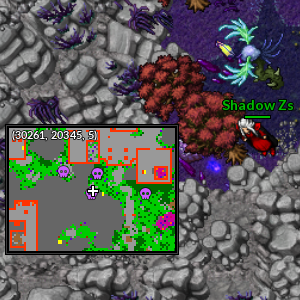
| | [[Arquivo:Suicune_TV-Cam.gif|link=]] | | | align="center" | [[Arquivo:30260, 20346, 5.png|link=]] |
| | style="border-left-style: hidden; | Suicune TV Camera | | | align="center" | Próximo a entrada da Sarkies Fortress <br> 30260, 20346, 5 |
| | Lendário | |
| |- | | |- |
| | [[Arquivo:Suicune_Backpack.gif|link=]] | | | align="center" | [[Arquivo:30263, 20336, 5.png|link=]] |
| | style="border-left-style: hidden; | Suicune Backpack | | | align="center" | Próximo a entrada da Sarkies Fortress <br> 30263, 20336, 5 |
| | Lendário | |
| |- | | |- |
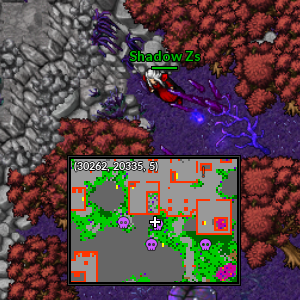
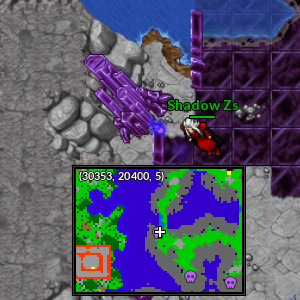
| | [[Arquivo:Suicune-novo-png.png|link=]] | | | align="center" | [[Arquivo:30352, 20400, 5.png|link=]] |
| | style="border-left-style: hidden; | Suicune Amulet | | | align="center" | Respawn de Darkrai Minion no térreo da Peaky Mountains <br> 30352, 20400, 5 |
| | Lendário | |
| |- | | |- |
| ! colspan="3" | [[Arquivo:Exp_icon.png|30px|link=]] Experiencia: 1.500.000
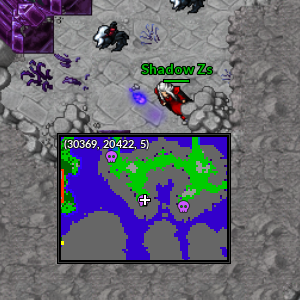
| | | align="center" | [[Arquivo:30368, 20422, 5.png|link=]] |
| |} | | | align="center" | Respawn de Darkrai Minion no térreo da Peaky Mountains <br> 30368, 20422, 5 |
| | |
| </b>
| |
| </center>
| |
| Dentro da Suicune Loot Bag (Médio) é possível obter os seguintes itens:<br>
| |
| <center>
| |
| <b>
| |
| {| class="wikitable"
| |
| |- | | |- |
| ! colspan="4" | [[Arquivo:Suicune_Loot_Bag.png|link=]] Suicune Loot Bag (Médio)
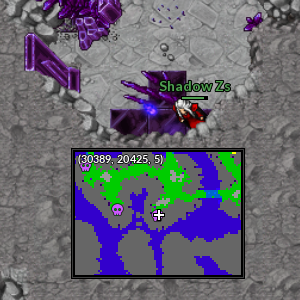
| | | align="center" | [[Arquivo:30388, 20425, 5.png|link=]] |
| | | align="center" | Respawn de Darkrai Minion no térreo da Peaky Mountains <br> 30388, 20425, 5 |
| |- | | |- |
| ! colspan="2" | Item
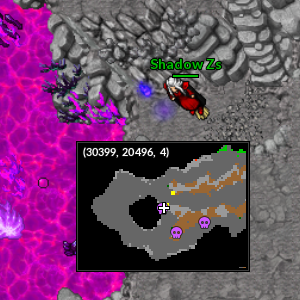
| | | align="center" | [[Arquivo:30398, 20496, 4.png|link=]] |
| ! Quantidade
| | | align="center" | Respawn de Rufflet <br> 30398, 20496, 4 |
| ! Raridade
| |
| |- | | |- |
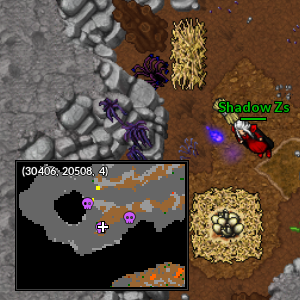
| | [[Arquivo:Suicune's_Legendary_Fur.png|link=]] | | | align="center" | [[Arquivo:30405, 20508, 4.png|link=]] |
| | style="border-left-style: hidden; | Suicune Legendary Fur | | | align="center" | Respawn de Rufflet <br> 30405, 20508, 4 |
| | 6 a 10
| |
| | Comum | |
| |- | | |- |
| | [[Arquivo:Rough_Gemstone.png|link=]] | | | align="center" | [[Arquivo:30419, 20503, 4.png|link=]] |
| | style="border-left-style: hidden; | Rough Gemstone | | | align="center" | Respawn de Rufflet <br> 30419, 20503, 4 |
| | 8 a 12
| |
| | Comum | |
| |- | | |- |
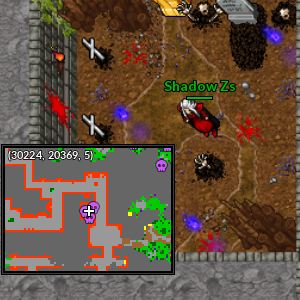
| | [[Arquivo:Water-stone.gif|link=]] | | | align="center" | [[Arquivo:30224, 20369, 5.png|link=]] |
| | style="border-left-style: hidden; | Water Stone | | | align="center" | Respawn de Alolan Meowth <br> 30224, 20369, 5 <br> '''Obs.:''' Nesse local tem três espíritos. |
| | 8 a 12
| |
| | Comum
| |
| |- | | |- |
| | [[Arquivo:Crystal-stone.gif|link=]] | | |
| | style="border-left-style: hidden; | Crystal Stone
| | |-|Região de Viridian= |
| | 1
| | |
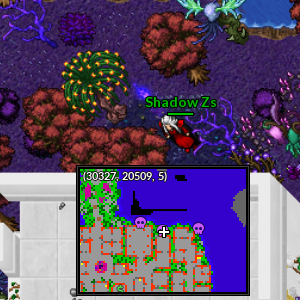
| | Raro | | São 3 espíritos ao total nessa região. |
| | |
| | {| class="wikitable" width="70%" |
| | ! width="5%" style="background-color: #9d1a64" | Localização |
| | ! width="20%" style="background-color: #9d1a64" | Posição |
| |- | | |- |
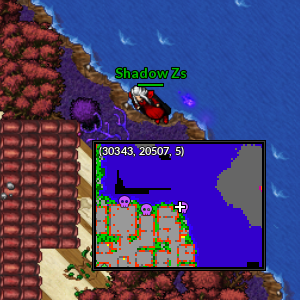
| | [[Arquivo:Ancient-stone.gif|link=]] | | | align="center" | [[Arquivo:30344, 20507, 5.png|link=]] |
| | style="border-left-style: hidden; | Ancient Stone | | | align="center" | Arredores da cidade de Viridian <br> 30344, 20507, 5 |
| | 1
| |
| | Raro | |
| |- | | |- |
| | [[Arquivo:Seavell_Urn.png|link=]] | | | align="center" | [[Arquivo:30326, 20508, 5.png|link=]] |
| | style="border-left-style: hidden; | Seavell Urn | | | align="center" | Arredores da cidade de Viridian <br> 30326, 20508, 5 |
| | 1
| |
| | Raro
| |
| |-
| |
| |}
| |
| </center>
| |
| </b>
| |
| |-|Dificil= | |
| <center> | |
| <b>
| |
| {| class="wikitable"
| |
| |- | | |- |
| ! colspan="2" | Item
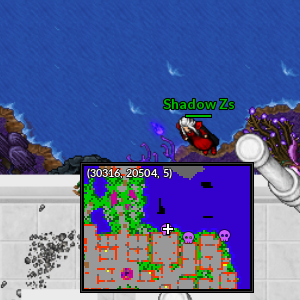
| | | align="center" | [[Arquivo:30315, 20504, 5.png|link=]] |
| ! Raridade
| | | align="center" | Arredores da cidade de Viridian <br> 30315, 20504, 5 |
| |- | | |- |
| | [[Arquivo:Suicune_Loot_Bag.png|link=]] | | |
| | style="border-left-style: hidden; | Suicune Loot Bag (Dificil) | | |-|Região de Pallet= |
| | Comum | | |
| | São 9 espíritos ao total nessa região. |
| | |
| | {| class="wikitable" width="70%" |
| | ! width="5%" style="background-color: #9d1a64" | Localização |
| | ! width="20%" style="background-color: #9d1a64" | Posição |
| | |- |
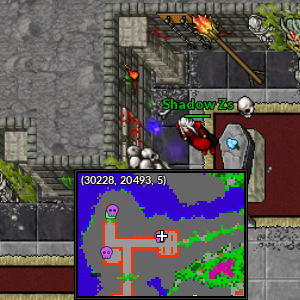
| | | align="center" | [[Arquivo:30227, 20493, 5.png|link=]] |
| | | align="center" | Respawn de Shuppet <br> 30227, 20493, 5 |
| |- | | |- |
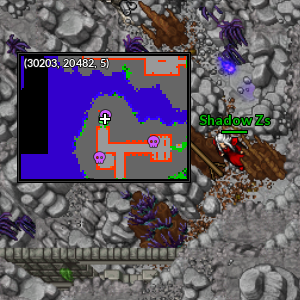
| | [[Arquivo:Water-Essence.gif|link=]] | | | align="center" | [[Arquivo:30203, 20480, 5.png|link=]] |
| | style="border-left-style: hidden; | Water Essence | | | align="center" | Respawn de Shuppet <br> 30203, 20480, 5 |
| | Raro | |
| |- | | |- |
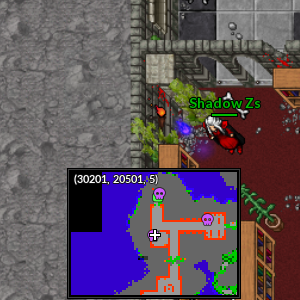
| | [[Arquivo:Yellow-Star-Piece.gif|link=]] | | | align="center" | [[Arquivo:30200, 20501, 5.png|link=]] |
| | style="border-left-style: hidden; | Yellow Star Piece | | | align="center" | Respawn de Shuppet <br> 30200, 20501, 5 |
| | Raro | |
| |- | | |- |
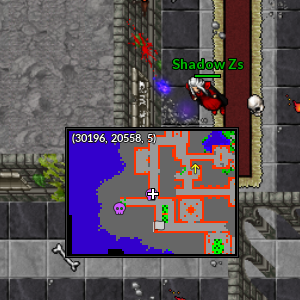
| | [[Arquivo:Green-Star-Piece.gif|link=]] | | | align="center" | [[Arquivo:30195, 20558, 5.png|link=]] |
| | style="border-left-style: hidden; | Green Star Piece | | | align="center" | Respawn de Shuppet <br> 30195, 20558, 5 |
| | Raro | |
| |- | | |- |
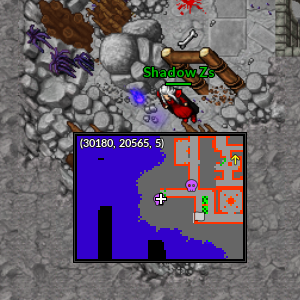
| | [[Arquivo:Red-Star-Piece.gif|link=]] | | | align="center" | [[Arquivo:30179, 20565, 5.png|link=]] |
| | style="border-left-style: hidden; | Red Star Piece | | | align="center" | Respawn de Shuppet <br> 30179, 20565, 5 |
| | Raro | |
| |- | | |- |
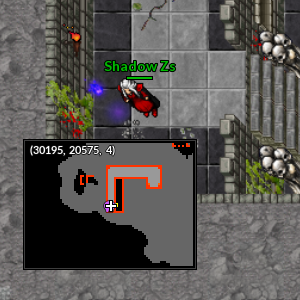
| | [[Arquivo:Suicune_Legendary_sewing_thread.png|link=]] | | | align="center" | [[Arquivo:30194, 20575, 4.png|link=]] |
| | style="border-left-style: hidden; | Suicune Legendary Sewing Thread | | | align="center" | Respawn de Shuppet <br> 30194, 20575, 4 |
| | Épico | |
| |- | | |- |
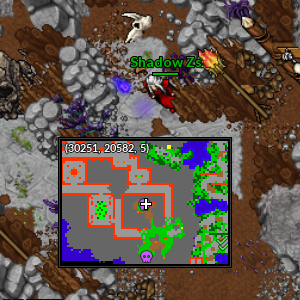
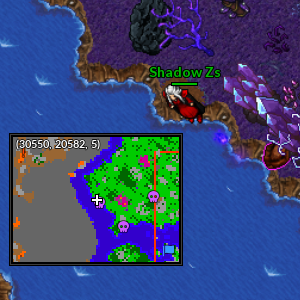
| | [[Arquivo:Suicune_TV-Cam.gif|link=]] | | | align="center" | [[Arquivo:30250, 20582, 5.png|link=]] |
| | style="border-left-style: hidden; | Suicune TV Camera | | | align="center" | Respawn de Shuppet <br> 30250, 20582, 5 |
| | Lendário | |
| |- | | |- |
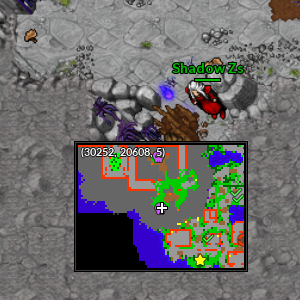
| | [[Arquivo:Suicune_Backpack.gif|link=]] | | | align="center" | [[Arquivo:30251, 20608, 5.png|link=]] |
| | style="border-left-style: hidden; | Suicune Backpack | | | align="center" | Respawn de Shuppet <br> 30251, 20608, 5 |
| | Lendário | |
| |- | | |- |
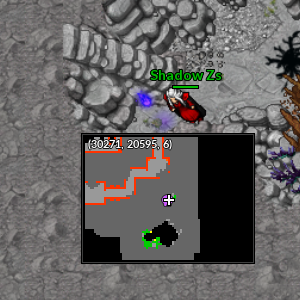
| | [[Arquivo:Suicune-novo-png.png|link=]] | | | align="center" | [[Arquivo:30270, 20595, 6.png|link=]] |
| | style="border-left-style: hidden; | Suicune Amulet | | | align="center" | Respawn de Shuppet <br> 30270, 20595, 6 |
| | Lendário | |
| |- | | |- |
| ! colspan="3" | [[Arquivo:Exp_icon.png|30px|link=]] Experiencia: 2.500.000
| |
| |}
| |
|
| |
|
| </b>
| | |-|Região de Cinnabar= |
| </center>
| | |
| Dentro da Suicune Loot Bag (Difícil) é possível obter os seguintes itens:<br>
| | São 18 espíritos ao total nessa região. |
| <center>
| | |
| <b>
| | {| class="wikitable" width="70%" |
| {| class="wikitable" | | ! width="5%" style="background-color: #9d1a64" | Localização |
| | ! width="20%" style="background-color: #9d1a64" | Posição |
| |- | | |- |
| ! colspan="4" | [[Arquivo:Suicune_Loot_Bag.png|link=]] Suicune Loot Bag (Difícil)
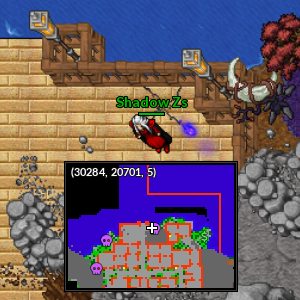
| | | align="center" | [[Arquivo:30285, 20701, 5.png|link=]] |
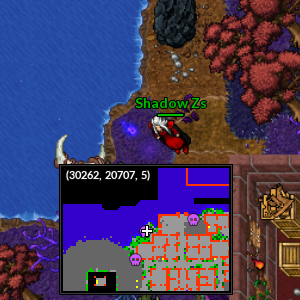
| | | align="center" | Arredores da cidade de Cinnabar <br> 30285, 20701, 5 |
| |- | | |- |
| ! colspan="2" | Item
| | | align="center" | [[Arquivo:30261, 20707, 5.png|link=]] |
| ! Quantidade
| | | align="center" | Arredores da cidade de Cinnabar <br> 30261, 20707, 5 |
| ! Raridade
| |
| |- | | |- |
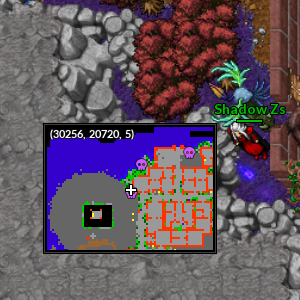
| | [[Arquivo:Suicune 's_Legendary_Fur.png|link=]] | | | align="center" | [[Arquivo:30256, 20721, 5.png|link=]] |
| | style="border-left-style: hidden; | Suicune Legendary Fur | | | align="center" | Arredores da cidade de Cinnabar <br> 30256, 20721, 5 |
| | 11 a 15
| |
| | Comum | |
| |- | | |- |
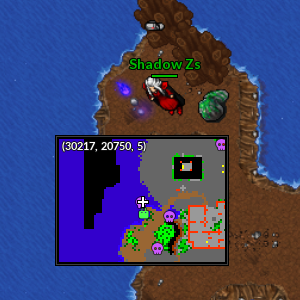
| | [[Arquivo:Rough_Gemstone.png|link=]] | | | align="center" | [[Arquivo:30216, 20750, 5.png|link=]] |
| | style="border-left-style: hidden; | Rough Gemstone | | | align="center" | Respawn de Grimer <br> 30216, 20750, 5 |
| | 14 a 18
| |
| | Comum | |
| |- | | |- |
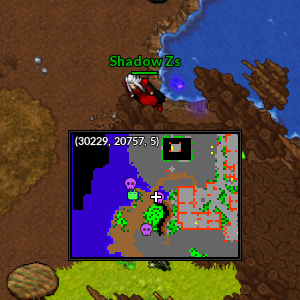
| | [[Arquivo:Water-stone.gif|link=]] | | | align="center" | [[Arquivo:30230, 20757, 5.png|link=]] |
| | style="border-left-style: hidden; | Water Stone | | | align="center" | Respawn de Grimer <br> 30230, 20757, 5 |
| | 14 a 18
| |
| | Comum | |
| |- | | |- |
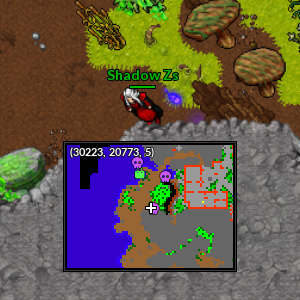
| | [[Arquivo:Crystal-stone.gif|link=]] | | | align="center" | [[Arquivo:30224, 20773, 5.png|link=]] |
| | style="border-left-style: hidden; | Crystal Stone | | | align="center" | Respawn de Grimer <br> 30224, 20773, 5 |
| | 1 a 2
| |
| | Comum | |
| |- | | |- |
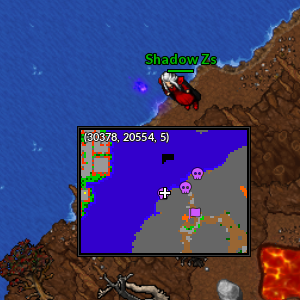
| | [[Arquivo:Ancient-stone.gif|link=]] | | | align="center" | [[Arquivo:30377, 20554, 5.png|link=]] |
| | style="border-left-style: hidden; | Ancient Stone | | | align="center" | Respawn de Magby e Pansear <br> 30377, 20554, 5 |
| | 1 a 2
| |
| | Comum | |
| |- | | |- |
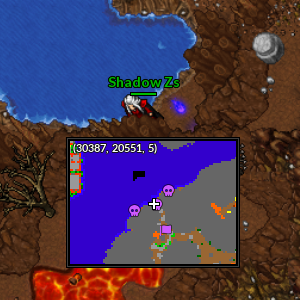
| | [[Arquivo:Seavell_Urn.png|link=]] | | | align="center" | [[Arquivo:30388, 20551, 5.png|link=]] |
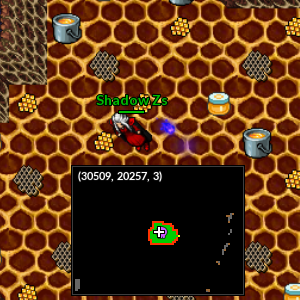
| | style="border-left-style: hidden; | Seavell Urn | | | align="center" | Respawn de Magby e Pansear <br> 30388, 20551, 5 |
| | 1
| | |- |
| | Raro
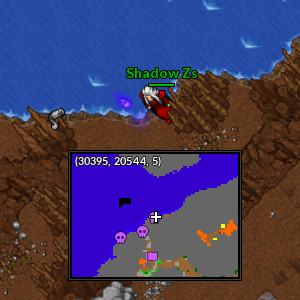
| | | align="center" | [[Arquivo:30394, 20544, 5.png|link=]] |
| |-
| | | align="center" | Respawn de Magby e Pansear <br> 30394, 20544, 5 |
| |} | |
| </center>
| |
| </tabber>
| |
| | |
| == Addons Natal ==
| |
| | |
| Durante o evento de Natal é disponibilizado algumas Addons. A seguir tem uma tabela com todas as Addons exclusivo do evento de Natal.
| |
| | |
| '''Obs.:''' Existe a possibilidade desta addons voltar nos eventos de '''Natal'''.
| |
| | |
| <center> | |
| {| class="wikitable" width="90%"
| |
| ! width="1%" style="background-color: #9d1a64" | <span style="color:white">Traje</span>
| |
| ! width="1%" style="background-color: #9d1a64" | <span style="color:white">Pokémon</span>
| |
| ! width="1%" style="background-color: #9d1a64" | <span style="color:white">Ícone</span>
| |
| ! width="4%" style="background-color: #9d1a64" | <span style="color:white">Nome</span>
| |
| ! width="5%" style="background-color: #9d1a64" | <span style="color:white">Onde conseguir</span>
| |
| ! width="1%" style="background-color: #9d1a64" | <span style="color:white">Customizável</span>
| |
| |- | | |- |
| | align="center" | [[Arquivo:Abomasnow-Ski_Clothes.png|link=]] | | | align="center" | [[Arquivo:30381, 20566, 4.png|link=]] |
| | align="center" | [[Arquivo:460-Abomasnow.png|link=Abomasnow]]<br/> [[Abomasnow]] | | | align="center" | Respawn de Ninetales, Houndoom e Simisear <br> 30381, 20566, 4 |
| | align="center" | [[Arquivo:Ski Clothes.png|link=]]
| |
| | align="center" | Ski Clothes
| |
| | align="center" | Diamond Shop
| |
| | align="center" | Não
| |
| |- | | |- |
| | align="center" | [[Arquivo:Aggron_Snowman-Hat.png|link=]] | | | align="center" | [[Arquivo:30373, 20570, 4.png|link=]] |
| | align="center" | [[Arquivo:306-Aggron.png|link=Aggron]]<br/> [[Aggron]] | | | align="center" | Respawn de Ninetales, Houndoom e Simisear <br> 30373, 20570, 4 |
| | align="center" | [[Arquivo:Snowman Hat.png|link=]]
| |
| | align="center" | Snowman Hat
| |
| | align="center" | Árvores de Natal
| |
| | align="center" | Não
| |
| |- | | |- |
| | align="center" | [[Arquivo:Alakazam_Santa-Claus-Costume.png|link=]] | | | align="center" | [[Arquivo:30369, 20582, 4.png|link=]] |
| | align="center" | [[Arquivo:065-Alakazam.png|link=Alakazam]]<br/> [[Alakazam]] | | | align="center" | Respawn de Ninetales, Houndoom e Simisear <br> 30369, 20582, 4 |
| | align="center" | [[Arquivo:Santa Claus Costume.png|link=]]
| |
| | align="center" | Santa Claus Costume
| |
| | align="center" | Árvores de Natal
| |
| | align="center" | Não
| |
| |- | | |- |
| | align="center" | [[Arquivo:Ampharos-winter-clothes.png|link=]] | | | align="center" | [[Arquivo:30549, 20555, 4.png|link=]] |
| | align="center" | [[Arquivo:181-Ampharos.png|link=Ampharos]]<br/> [[Ampharos]] | | | align="center" | Respawn de Ninetales, Houndoom e Simisear <br> 30549, 20555, 4 |
| | align="center" | [[Arquivo:Winter Clothes.png|link=]]
| |
| | align="center" | Winter Clothes
| |
| | align="center" | Árvores de Natal
| |
| | align="center" | Não
| |
| |- | | |- |
| | align="center" | [[Arquivo:Armaldo_Elf-Clothes.png|link=]] | | | align="center" | [[Arquivo:30548, 20541, 4.png|link=]] |
| | align="center" | [[Arquivo:348-Armaldo.png|link=Armaldo]]<br/> [[Armaldo]] | | | align="center" | Respawn de Ninetales, Houndoom e Simisear <br> 30548, 20541, 4 |
| | align="center" | [[Arquivo:Elf Clothes.png|link=]]
| |
| | align="center" | Elf Clothes
| |
| | align="center" | Árvores de Natal
| |
| | align="center" | Não
| |
| |- | | |- |
| | align="center" | [[Arquivo:Banette_Elf-Hat.png|link=]] | | | align="center" | [[Arquivo:30533, 20550, 4.png|link=]] |
| | align="center" | [[Arquivo:354-Banette.png|link=Banette]]<br/> [[Banette]] | | | align="center" | Respawn de Ninetales, Houndoom e Simisear <br> 30533, 20550, 4 |
| | align="center" | [[Arquivo:Elf Hat.png|link=]]
| |
| | align="center" | Elf Hat
| |
| | align="center" | Árvores de Natal
| |
| | align="center" | Não
| |
| |- | | |- |
| | align="center" | [[Arquivo:Beartic_Christmas-Hat.png|link=]] | | | align="center" | [[Arquivo:30532, 20607, 4.png|link=]] |
| | align="center" | [[Arquivo:614-Beartic.png|link=Beartic]]<br/> [[Beartic]] | | | align="center" | Respawn de Ninetales, Houndoom e Simisear <br> 30532, 20607, 4 |
| | align="center" | [[Arquivo:Christmas Hat-Beartic.png|link=]]
| |
| | align="center" | Christmas Hat
| |
| | align="center" | Diamond Shop
| |
| | align="center" | Não
| |
| |- | | |- |
| | align="center" | [[Arquivo:Beartic_Christmas-Hat.png|link=]] | | | align="center" | [[Arquivo:30545, 20609, 4.png|link=]] |
| | align="center" | [[Arquivo:614-Beartic.png|link=Beartic]]<br/> [[Beartic]] | | | align="center" | Respawn de Ninetales, Houndoom e Simisear <br> 30545, 20609, 4 |
| | align="center" | [[Arquivo:Christmas Hat-Beartic.png|link=]]
| |
| | align="center" | Christmas Hat
| |
| | align="center" | Árvores de Natal
| |
| | align="center" | Não
| |
| |- | | |- |
| | align="center" | [[Arquivo:Blissey_Santa-Clothes.png|link=]] | | | align="center" | [[Arquivo:30542, 20624, 4.png|link=]] |
| | align="center" | [[Arquivo:242-Blissey.png|link=Blissey]]<br/> [[Blissey]] | | | align="center" | Respawn de Ninetales, Houndoom e Simisear <br> 30542, 20624, 4 |
| | align="center" | [[Arquivo:Santa Clothes.png|link=]]
| |
| | align="center" | Santa Clothes
| |
| | align="center" | Árvores de Natal
| |
| | align="center" | Não
| |
| |- | | |- |
| | align="center" | [[Arquivo:Elite-Hitmontop_Christmas-Hat.png|link=]] | | |
| | align="center" | [[Arquivo:237-EliteHitmontop.png|link=Elite Hitmontop]]<br/> [[Elite Hitmontop]] | | |-|Região de Fuchsia= |
| | align="center" | [[Arquivo:Christmas-Hat.png|link=]]
| | |
| | align="center" | Christmas Hat
| | São 21 espíritos ao total nessa região. |
| | align="center" | Árvores de Natal
| | |
| | align="center" | Não
| | {| class="wikitable" width="70%" |
| | ! width="5%" style="background-color: #9d1a64" | Localização |
| | ! width="20%" style="background-color: #9d1a64" | Posição |
| |- | | |- |
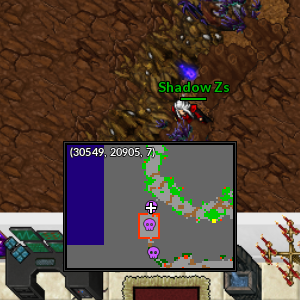
| | align="center" | [[Arquivo:Empoleon_Christmas-Clothes.png|link=]] | | | align="center" | [[Arquivo:30549, 20904, 7.png|link=]] |
| | align="center" | [[Arquivo:395-Empoleon.png|link=Empoleon]]<br/> [[Empoleon]] | | | align="center" | Igreja entre o respawn de Gardevoir e Torterra <br> 30549, 20904, 7 |
| | align="center" | [[Arquivo:Empoleon_Christmas Clothes-Icon.png|link=]]
| |
| | align="center" | Christmas Clothes
| |
| | align="center" | Árvores de Natal
| |
| | align="center" | Não
| |
| |- | | |- |
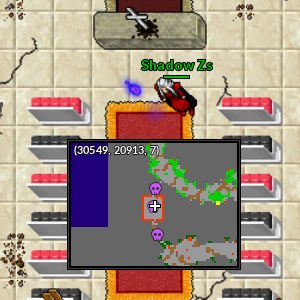
| | align="center" | [[Arquivo:Gengar-DJ_Costume.png|link=]] | | | align="center" | [[Arquivo:30548, 20913, 7.png|link=]] |
| | align="center" | [[Arquivo:094-Gengar.png|link=Gengar]]<br/> [[Gengar]] | | | align="center" | Igreja entre o respawn de Gardevoir e Torterra <br> 30548, 20913, 7 |
| | align="center" | [[Arquivo:DJ_Costume-Icon.png|link=]]
| |
| | align="center" | DJ Costume
| |
| | align="center" | Diamond Shop
| |
| | align="center" | Não
| |
| |- | | |- |
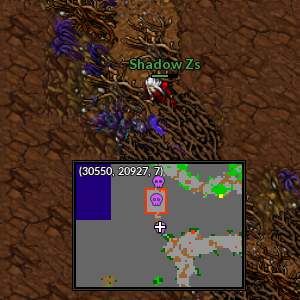
| | align="center" | [[Arquivo:Ludicolo_Glowing-Tree.png|link=]] | | | align="center" | [[Arquivo:30550, 20928, 7.png|link=]] |
| | align="center" | [[Arquivo:272-Ludicolo.png|link=Ludicolo]]<br/> [[Ludicolo]] | | | align="center" | Igreja entre o respawn de Gardevoir e Torterra <br> 30550, 20928, 7 |
| | align="center" | [[Arquivo:Glowing-Tree-Icon.png|link=]]
| |
| | align="center" | Glowing Tree
| |
| | align="center" | Árvores de Natal
| |
| | align="center" | Não
| |
| |- | | |- |
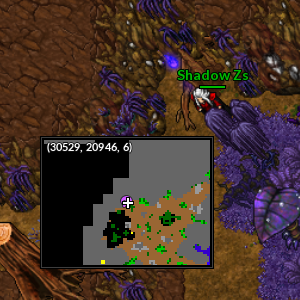
| | align="center" | [[Arquivo:Mantine_Christmas-Hat.png|link=]] | | | align="center" | [[Arquivo:30528, 20945, 6.png|link=]] |
| | align="center" | [[Arquivo:226-Mantine.png|link=Mantine]]<br/> [[Mantine]] | | | align="center" | Respawn de Skiddo e Nuzleaf <br> 30528, 20945, 6 |
| | align="center" | [[Arquivo:Christmas-Hat.png|link=]]
| |
| | align="center" | Christmas Hat
| |
| | align="center" | Árvores de Natal
| |
| | align="center" | Não
| |
| |- | | |- |
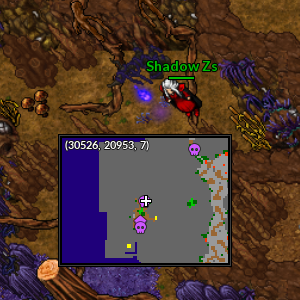
| | align="center" | [[Arquivo:Miltank_Christmas-Deer.png|link=]] | | | align="center" | [[Arquivo:30525, 20953, 7.png|link=]] |
| | align="center" | [[Arquivo:241-Miltank.png|link=Miltank]]<br/> [[Miltank]] | | | align="center" | Respawn de Skiddo e Nuzleaf <br> 30525, 20953, 7 |
| | align="center" | [[Arquivo:Christmas Deer-Icon.png|link=]]
| |
| | align="center" | Christmas Deer
| |
| | align="center" | Árvores de Natal
| |
| | align="center" | Não
| |
| |- | | |- |
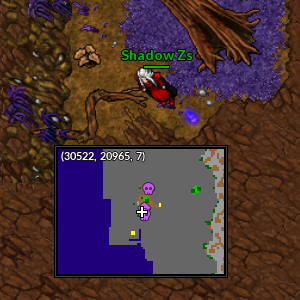
| | align="center" | [[Arquivo:Mr.Mime_-_Christmas_Hat.png|link=]] | | | align="center" | [[Arquivo:30523, 20966, 7.png|link=]] |
| | align="center" | [[Arquivo:122-Mr.Mime.png|link=Mr.Mime]]<br/> [[Mr.Mime]] | | | align="center" | Respawn de Skiddo e Nuzleaf <br> 30523, 20966, 7 |
| | align="center" | [[Arquivo:Christmas-Hat.png|link=]]
| |
| | align="center" | Christmas Hat
| |
| | align="center" | Diamond Shop
| |
| | align="center" | Não
| |
| |- | | |- |
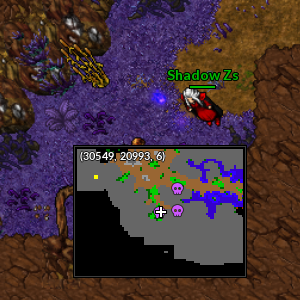
| | align="center" | [[Arquivo:Rampardos-winter-clothes.png|link=]] | | | align="center" | [[Arquivo:30548, 20993, 6.png|link=]] |
| | align="center" | [[Arquivo:409-Rampardos%281%29.png|link=Rampardos]]<br/> [[Rampardos]] | | | align="center" | Respawn de Skiddo e Nuzleaf <br> 30548, 20993, 6 |
| | align="center" | [[Arquivo:Winter Clothes-Rampardos.png|link=]]
| |
| | align="center" | Winter Clothes
| |
| | align="center" | Árvores de Natal
| |
| | align="center" | Não
| |
| |- | | |- |
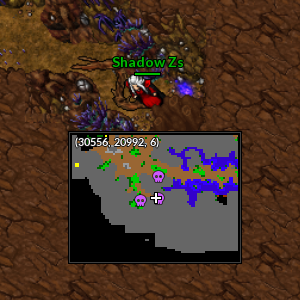
| | align="center" | [[Arquivo:Shiny-Fearow_Christmas-Hat.png|link=]] | | | align="center" | [[Arquivo:30557, 20992, 6.png|link=]] |
| | align="center" | [[Arquivo:Shinyfea.png|link=Shiny Fearow]]<br/> [[Shiny Fearow]] | | | align="center" | Respawn de Skiddo e Nuzleaf <br> 30557, 20992, 6 |
| | align="center" | [[Arquivo:Christmas-Hat.png|link=]]
| |
| | align="center" | Christmas Hat
| |
| | align="center" | Árvores de Natal
| |
| | align="center" | Não
| |
| |- | | |- |
| | align="center" | [[Arquivo:Shiny-Flareon_Christmas-Hat.png|link=]] | | | align="center" | [[Arquivo:30557, 20981, 6.png|link=]] |
| | align="center" | [[Arquivo:Shinyfla.png|link=Shiny Flareon]]<br/> [[Shiny Flareon]] | | | align="center" | Respawn de Skiddo e Nuzleaf <br> 30557, 20981, 6 |
| | align="center" | [[Arquivo:Christmas-Hat.png|link=]]
| |
| | align="center" | Christmas Hat
| |
| | align="center" | Árvores de Natal
| |
| | align="center" | Não
| |
| |- | | |- |
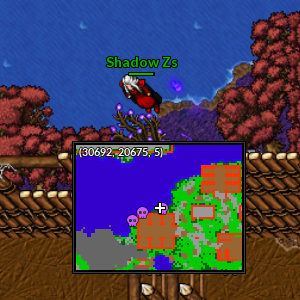
| | align="center" | [[Arquivo:Shiny-Golem_Christmas-Hat.png|link=]] | | | align="center" | [[Arquivo:30693, 20675, 5.png|link=]] |
| | align="center" | [[Arquivo:Shinygol.png|link=Shiny Golem]]<br/> [[Shiny Golem]] | | | align="center" | Arredores do respawn de Miltank <br> 30693, 20675, 5 |
| | align="center" | [[Arquivo:Christmas-Hat.png|link=]]
| |
| | align="center" | Christmas Hat
| |
| | align="center" | Árvores de Natal
| |
| | align="center" | Não
| |
| |- | | |- |
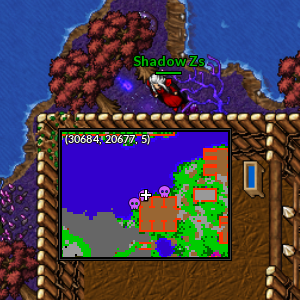
| | align="center" | [[Arquivo:Shiny-Hypno_Christmas-Hat.png|link=]] | | | align="center" | [[Arquivo:30683, 20677, 5.png|link=]] |
| | align="center" | [[Arquivo:Shinyhyp.png|link=Shiny Hypno]]<br/> [[Shiny Hypno]] | | | align="center" | Arredores do respawn de Miltank <br> 30683, 20677, 5 |
| | align="center" | [[Arquivo:Christmas-Hat.png|link=]]
| |
| | align="center" | Christmas Hat
| |
| | align="center" | Árvores de Natal
| |
| | align="center" | Não
| |
| |- | | |- |
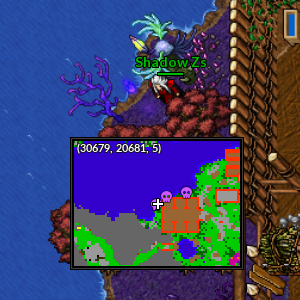
| | align="center" | [[Arquivo:Shiny-Jolteon_Christmas-Hat.png|link=]] | | | align="center" | [[Arquivo:30678, 20681, 5.png|link=]] |
| | align="center" | [[Arquivo:Shinyjoe.png|link=Shiny Jolteon]]<br/> [[Shiny Jolteon]] | | | align="center" | Arredores do respawn de Miltank <br> 30678, 20681, 5 |
| | align="center" | [[Arquivo:Christmas-Hat.png|link=]]
| |
| | align="center" | Christmas Hat
| |
| | align="center" | Árvores de Natal
| |
| | align="center" | Não
| |
| |- | | |- |
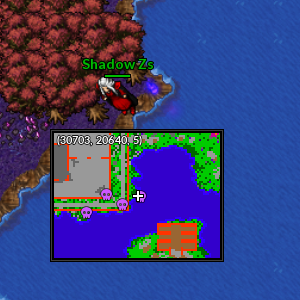
| | align="center" | [[Arquivo:Shiny-Kingler_Christmas-Gift.png|link=]] | | | align="center" | [[Arquivo:30704, 20640, 5.png|link=]] |
| | align="center" | [[Arquivo:099-Sh_Kingler.png|link=Shiny Kingler]]<br/> [[Shiny Kingler]] | | | align="center" | Arredores do respawn de Elekid <br> 30704, 20640, 5 |
| | align="center" | [[Arquivo:Christmas-Gift.png|link=]]
| |
| | align="center" | Christmas Gift
| |
| | align="center" | Árvores de Natal
| |
| | align="center" | Não
| |
| |- | | |- |
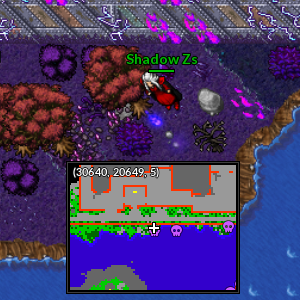
| | align="center" | [[Arquivo:Shiny-Lucario_Christmas-Hat.png|link=]] | | | align="center" | [[Arquivo:30677, 20648, 5.png|link=]] |
| | align="center" | [[Arquivo:Shinyluc.png|link=Shiny Lucario]]<br/> [[Shiny Lucario]] | | | align="center" | Arredores do respawn de Elekid <br> 30677, 20648, 5 |
| | align="center" | [[Arquivo:Christmas-Hat.png|link=]]
| |
| | align="center" | Christmas Hat
| |
| | align="center" | Árvores de Natal
| |
| | align="center" | Não
| |
| |- | | |- |
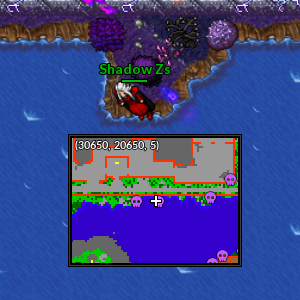
| | align="center" | [[Arquivo:Shiny-Nidoking_Christmas-Hat.png|link=]] | | | align="center" | [[Arquivo:30651, 20650, 5.png|link=]] |
| | align="center" | [[Arquivo:Shinynid.png|link=Shiny Nidoking]]<br/> [[Shiny Nidoking]] | | | align="center" | Arredores do respawn de Elekid <br> 30651, 20650, 5 |
| | align="center" | [[Arquivo:Christmas-Hat.png|link=]]
| |
| | align="center" | Christmas Hat
| |
| | align="center" | Árvores de Natal
| |
| | align="center" | Não
| |
| |- | | |- |
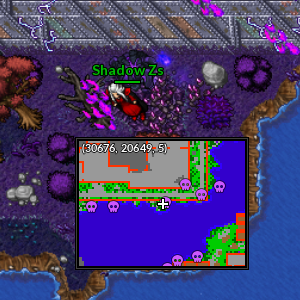
| | align="center" | [[Arquivo:Shiny-Vaporeon_Christmas-Hat.png|link=]] | | | align="center" | [[Arquivo:30640, 20650, 5.png|link=]] |
| | align="center" | [[Arquivo:Shinyvap.png|link=Shiny Vaporeon]]<br/> [[Shiny Vaporeon]] | | | align="center" | Arredores do respawn de Elekid <br> 30640, 20650, 5 |
| | align="center" | [[Arquivo:Christmas-Hat.png|link=]]
| |
| | align="center" | Christmas Hat
| |
| | align="center" | Árvores de Natal
| |
| | align="center" | Não
| |
| |- | | |- |
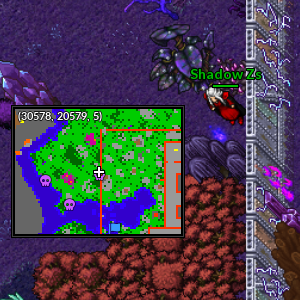
| | align="center" | [[Arquivo:Shiny-Vileplume_Christmas-Hat.png|link=]] | | | align="center" | [[Arquivo:30695, 20644, 5.png|link=]] |
| | align="center" | [[Arquivo:Shinyvil.png|link=Shiny Vileplume]]<br/> [[Shiny Vileplume]] | | | align="center" | Respawn de Elekid <br> 30695, 20644, 5 |
| | align="center" | [[Arquivo:Christmas-Hat.png|link=]]
| |
| | align="center" | Christmas Hat
| |
| | align="center" | Árvores de Natal
| |
| | align="center" | Não
| |
| |- | | |- |
| | align="center" | [[Arquivo:Sirfetch_d_Candy-Guard-Costume.png|link=]] | | | align="center" | [[Arquivo:30687, 20639, 5.png|link=]] |
| | align="center" | [[Arquivo:865-Sirfetch%27d.png|link=Sirfetch'd]]<br/> [[Sirfetch'd]] | | | align="center" | Respawn de Elekid <br> 30687, 20639, 5 |
| | align="center" | [[Arquivo:Candy Guard Costume.png|link=]]
| |
| | align="center" | Candy Guard Costume
| |
| | align="center" | Árvores de Natal
| |
| | align="center" | Não
| |
| |- | | |- |
| | align="center" | [[Arquivo:Sudowoodo Christmas-Tree.png|link=]] | | | align="center" | [[Arquivo:30551, 20583, 5.png|link=]] |
| | align="center" | [[Arquivo:185-Sudowoodo.png|link=Sudowoodo]]<br/> [[Sudowoodo]] | | | align="center" | Respawn de Darkrai Minion no arredores do respawn de Elekid <br> 30551, 20583, 5 |
| | align="center" | [[Arquivo:Christmas_Tree-Sudowoodo.png|link=]]
| |
| | align="center" | Christmas Tree
| |
| | align="center" | Árvores de Natal
| |
| | align="center" | Não
| |
| |- | | |- |
| | align="center" | [[Arquivo:Swellow Feather-Hat.png|link=]] | | | align="center" | [[Arquivo:30564, 20596, 5.png|link=]] |
| | align="center" | [[Arquivo:277-Swellow.png|link=Swellow]]<br/> [[Swellow]] | | | align="center" | Respawn de Darkrai Minion no arredores do respawn de Elekid <br> 30564, 20596, 5 |
| | align="center" | [[Arquivo:Feather Hat.png|link=]]
| |
| | align="center" | Feather Hat
| |
| | align="center" | Árvores de Natal
| |
| | align="center" | Não
| |
| |- | | |- |
| | align="center" | [[Arquivo:Vanilluxe-ice-cream-costume.png|link=]] | | | align="center" | [[Arquivo:30578, 20580, 5.png|link=]] |
| | align="center" | [[Arquivo:584-Vanilluxe.png|link=Vanilluxe]]<br/> [[Vanilluxe]] | | | align="center" | Respawn de Darkrai Minion no arredores do respawn de Elekid <br> 30578, 20580, 5 |
| | align="center" | [[Arquivo:Vanilluxe-ice-cream-costume-item.png|link=]]
| |
| | align="center" | Ice Cream Costume
| |
| | align="center" | Exclusivo da [[Arquivo:584-Vanilluxe.png|link=Christmas Town]] [[Christmas Town]]
| |
| | align="center" | Não
| |
| |- | | |- |
| |} | | |
| </center> | | </tabber></center> |
| | |
| | |
| | Após coletar todos os espíritos retorne ao NPC A Strange Religious na resistência de Lavender para receber o Spiritomb na Pokéball, além de liberar a possibilidade de ser feito na Premier Ball e a liberação da diária. |
| | |
| | == Diária == |
| | |
| | A diária consiste em derrotar um Spiritomb por dia, para isso o jogador deve se dirigir ao respawn de Darkrai Minion entre a rota de Viridian e Pewter. |
| | |
| | <center> [[Arquivo:Localização Altar.png|link=]] [[Arquivo:Localização Altar2.png|link=]] </center> |
| | |
| | Converse com o altar que estará no 2º andar do local, um Spiritomb irá nascer, derrote ele e converse novamente com o altar para receber sua recompensa que consiste em 1 Nightmare Token, 250k de EXP e 1k de NW EXP. |