Predefinição:Teste22: mudanças entre as edições
(Criou página com 'sin') |
Sem resumo de edição |
||
| Linha 1: | Linha 1: | ||
<center>[[Arquivo:Banner stacy quest.jpg|link=Stacy Quest]]<br></center> | |||
<!--T:1--> | |||
<span style="color:red">'''Nível necessário:</span> 80 | |||
<!--T:2--> | |||
<span style="color:red">'''Recompensa:</span> 2KK EXP, 1 Mini Wing, 1 Baby Pokémon Egg, 1 Urn Aura Z, 1 Pokémon Clan Egg, 20 Running Elixir, 1 Winseman Elixir, 5 Fisherman's Elixir, 5 Juggernaut's Elixir, 1 Fortune Elixir, 2 Bounty Elixir, 5 Healing Elixir, 5 Swordsman's Elixir, 5 Attack Elixir, 2 Mogul Kahn's Elixir, 5 Shield Elixir, 2 Shielder's Elixir, 5 Defense Elixir, 2 Speedster's Elixir, Libera troca de itens boss (100K Npc) no valor de 100K. | |||
<!--T:3--> | |||
<b>Caso encontre algum erro ou queira acrescentar alguma informação,</b> <span style="color:red">'''entre em contato com um dos membros da wiki.</span> | |||
==<b>1ª Parte</b>== <!--T:4--> | |||
<!--T:5--> | |||
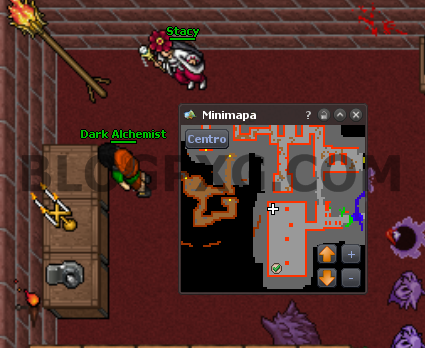
Para começar a quest, encontre a <b>Npc Stacy, no cemitério de Lavender</b>, no respawn de Gengar: | |||
<!--T:6--> | |||
[[Arquivo:Stacy1.png|link=Stacy_Quest]] | |||
<!--T:7--> | |||
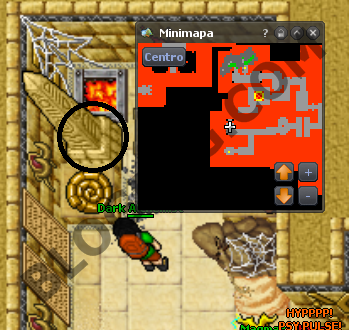
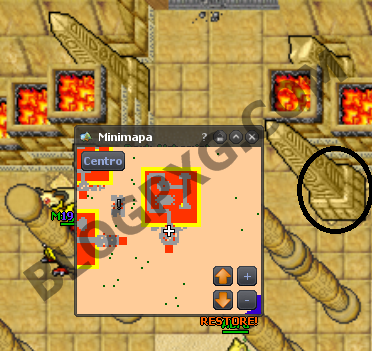
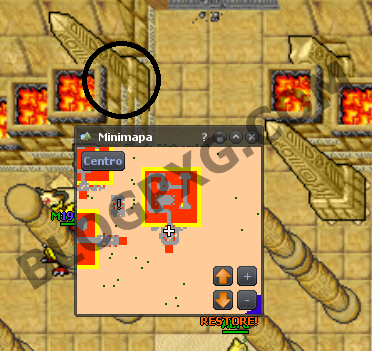
Stacy irá precisar de sua ajuda com um <b>enigma, na Desert Island</b>, você irá precisar clicar em <b>obeliscos nas pirâmides</b>, na ordem correta, qualquer erro, você terá que começar tudo novamente: | |||
<!--T:8--> | |||
<b>1 - Pirâmide dos drowzee, no respawn dos hypno. | |||
<!--T:9--> | |||
[[Arquivo:Stacy2.png|link=Stacy_Quest]] | |||
<!--T:10--> | |||
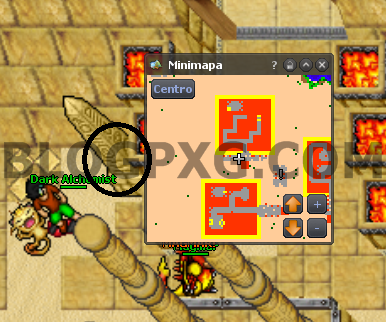
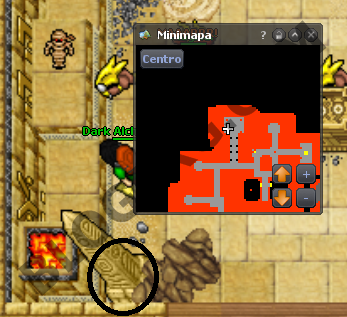
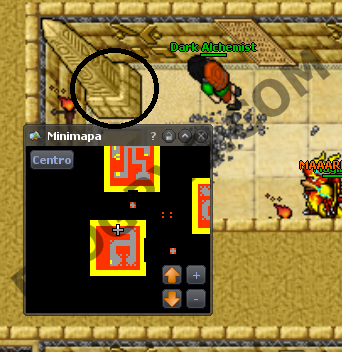
2 - Pirâmide dos persians, bem na entrada, o da esquerda. | |||
<!--T:11--> | |||
[[Arquivo:Stacy3.png|link=Stacy_Quest]] | |||
<!--T:12--> | |||
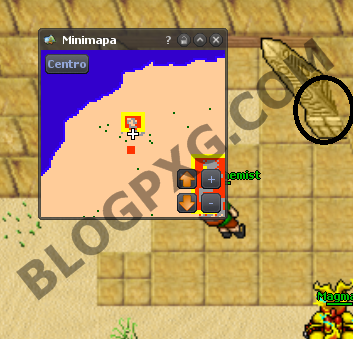
3 - Pirâmide da Desert Quest, na entrada, o da direita. | |||
<!--T:13--> | |||
[[Arquivo:Stacy4.png|link=Stacy_Quest]] | |||
<!--T:14--> | |||
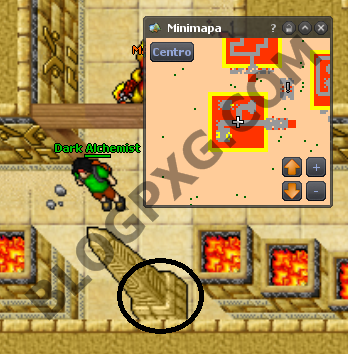
4 - Pirâmide pequena no respawn de alakazam, respawn da esquerda/cima. | |||
<!--T:15--> | |||
[[Arquivo:Stacy5.png|link=Stacy_Quest]] | |||
<!--T:16--> | |||
5 - Pirâmide pequena, na entrada, o da direita. | |||
<!--T:17--> | |||
[[Arquivo:Stacy6.png|link=Stacy_Quest]] | |||
<!--T:18--> | |||
6 - Pirâmide dos drowzee, no meio. | |||
<!--T:19--> | |||
[[Arquivo:Stacy7.png|link=Stacy_Quest]] | |||
<!--T:20--> | |||
7 - Pirâmide da Desert Quest, na entrada, no mesmo local do terceiro obelisco, o da esquerda dessa vez. | |||
<!--T:21--> | |||
[[Arquivo:Stacy8.png|link=Stacy_Quest]] | |||
<!--T:22--> | |||
8 - Pirâmide dos drowzee, antes da escada, o de cima.</b> | |||
<!--T:23--> | |||
[[Arquivo:Stacy9.png|link=Stacy_Quest]] | |||
<!--T:24--> | |||
Ao acertar a ordem dos 8 obeliscos, volte a Stacy e receba sua recompensa. | |||
==<b>2ª Parte</b>== <!--T:25--> | |||
<!--T:26--> | |||
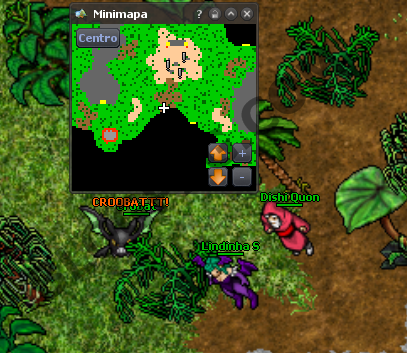
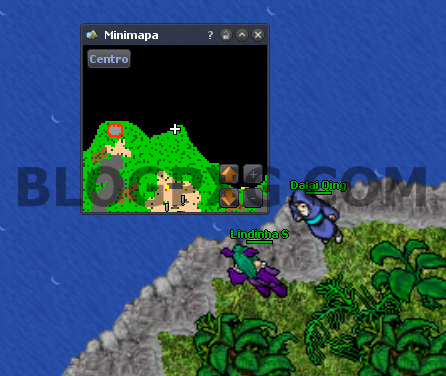
Stacy irá lhe fazer várias perguntas pessoais, e em base as suas respostas, te mandar a procura do npc referente ao elemento que ela achar que mais te representa, serão 7 perguntas, cada pergunta tem 3 respostas, cada resposta te da 1 ponto para cada elemento, quando o jogador completar 3 pontos em determinado elemento o npc define qual elemento você irá cair, respostas que fazem menção a algo mais agitado, agressivo, etc. remetem ao elemento fogo, ao oposto disso algo que remete a uma pessoa mais calma, mais pacífica, mais tranquila remete ao elemento água, e respostas que sejam meio termo entre os outros dois remetem ao elemento planta, | |||
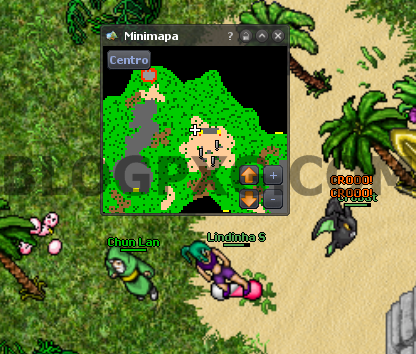
<b> os 3 Npcs se encontram na Golden Island, cada um representa um elemento (Dishi Quon - Fogo, Dalai Qing - Água, Chun Lan - Planta)</b>, os Npcs se encontram nos seguintes locais na ilha: | |||
<!--T:27--> | |||
[[Arquivo:Stacy10.png|link=Stacy_Quest]] | |||
<!--T:28--> | |||
[[Arquivo:Stacy11.png|link=Stacy_Quest]] | |||
<!--T:29--> | |||
[[Arquivo:Stacy12.png|link=Stacy_Quest]] | |||
<!--T:30--> | |||
Dependendo de qual Npc escolher, as missões serão iguais, sua primeira missão será capturar em <b>menos de 2 horas</b> um: | |||
<table border="1" cellpadding="3" cellspacing="1" class="modernTable" style="padding: 0px; border: 0px; font-size: 10.88px; width: 650px;"> | |||
<tr> | |||
<td style="text-align: center; width: 150px;>'''[[Arquivo:004-Charmander.png|link=Charmander]]'''</td> | |||
<td style="text-align: center; width: 150px;">'''<b>Fogo - Charmander</b>'''</td> | |||
</tr> | |||
<tr> | |||
<td style="text-align: center; width: 150px;>'''[[Arquivo:007-Squirtle.png|link=Squirtle]]'''</td> | |||
<td style="text-align: center; width: 150px;">'''<b>Água - Squirtle</b>'''</td> | |||
</tr> | |||
<tr> | |||
<td style="text-align: center; width: 150px;>'''[[Arquivo:001-Bulbasaur.png|link=Bulbasaur]]'''</td> | |||
<td style="text-align: center; width: 150px;">'''<b>Planta - Bulbasaur</b>'''</td> | |||
</tr> | |||
</table> | |||
<!--T:31--> | |||
Capturando, volte ao seu Npc e receba sua recompensa. <br> | |||
<span style="color:red"> '''Obs.: '''Você receberá um [https://wiki.pokexgames.com/index.php/Pok%C3%A9mon_Egg#Baby_Pok.C3.A9mon_Egg Baby Pokémon Egg] e dentro poderá vir um Baby Pokémon '''aleatório'''.</span> | |||
==<b>3ª Parte</b>== <!--T:32--> | |||
<!--T:33--> | |||
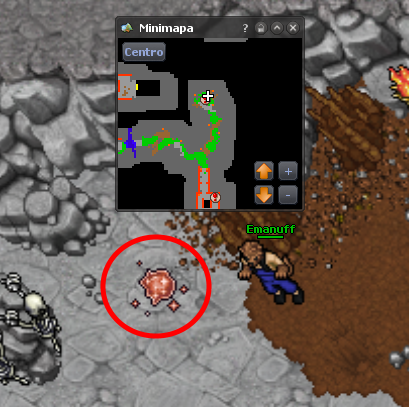
Sua segunda missão será <b>tirar fotos</b> com a câmera que o Npc te entregar, de lugares onde frequentam os pokémon do elemento escolhido: | |||
<!--T:34--> | |||
<b>(Imagens de todos os itens em breve)</b> | |||
<!--T:35--> | |||
<span style="color:red">'''Fogo: (Você irá encontrar todos os itens que precisa em Cinnabar, Magma Island, Charizard Valley, Ascorbia no respawn fire, Ilha do Moltres, Outland Ghost ou no respawn de Unown de Mandarin para o Candelabrum)</span> | |||
<center> | |||
{| class="wikitable sortable" width="50%" | |||
! width="1%" style="background-color: #7F0000" | <span style="color:white">Nº</span> | |||
! width="10%" style="background-color: #7F0000" | <span style="color:white">Imagem</span> | |||
! width="20%" style="background-color: #7F0000" | <span style="color:white">Nome</span> | |||
! width="30%" style="background-color: #7F0000" | <span style="color:white">Localização do mapa</span> | |||
! width="1%" style="background-color: #7F0000" | <span style="color:white">Mapa</span> | |||
|- | |||
! align="center" | <font size='5'>'''4'''</font> | |||
| align="center" | [[Arquivo:Beach_Umbrella_3.png|link=]] | |||
| align="center" | '''Dead Tree''' | |||
| align="center" | Hamlin | |||
| align="center" | [[Arquivo:Beach_umbrella_3_mapa.jpg|link=]] | |||
|- | |||
! align="center" | <font size='5'>'''5'''</font> | |||
| align="center" | [[Arquivo:Blastoise_Hull.png|link=]] | |||
| align="center" | '''Dead Tree''' | |||
| align="center" | Diving Spot | |||
| align="center" | [[Arquivo:Blastoise_hull_mapa.jpg|link=]] | |||
|- | |||
! align="center" | <font size='5'>'''6'''</font> | |||
| align="center" | [[Arquivo:Broken_Anchor.png|link=]] | |||
| align="center" | '''Dead Tree''' | |||
| align="center" | Lost Island | |||
| align="center" | [[Arquivo:Broken_anchor_mapa.jpg|link=]] | |||
|- | |||
! align="center" | <font size='5'>'''7'''</font> | |||
| align="center" | [[Arquivo:Coconut_palm.png|link=]] | |||
| align="center" | '''Dead Tree''' | |||
| align="center" | Leek Island | |||
| align="center" | [[Arquivo:Coconut_palm_mapa.jpg|link=]] | |||
|- | |||
! align="center" | <font size='5'>'''8'''</font> | |||
| align="center" | [[Arquivo:Coral.png|link=]] | |||
| align="center" | '''Dead Tree''' | |||
| align="center" | Kinnow Island | |||
| align="center" | [[Arquivo:Coral_mapa.jpg|link=]] | |||
|- | |||
! align="center" | <font size='5'>'''9'''</font> | |||
| align="center" | [[Arquivo:Coral_reef_1.png|link=]] | |||
| align="center" | '''Dead Tree''' | |||
| align="center" | Kinnow Island | |||
| align="center" | [[Arquivo:Coral_reef_1_mapa.jpg|link=]] | |||
|- | |||
! align="center" | <font size='5'>'''10'''</font> | |||
| align="center" | [[Arquivo:Coral_reef_2.png|link=]] | |||
| align="center" | '''Mammoth Totem''' | |||
| align="center" | Kinnow Island | |||
| align="center" | [[Arquivo:Coral_reef_2_mapa.jpg|link=]] | |||
|- | |||
! align="center" | <font size='5'>'''11'''</font> | |||
| align="center" | [[Arquivo:Coral_reef_3.png|link=]] | |||
| align="center" | '''Campfire''' | |||
| align="center" | Kinnow Island | |||
| align="center" | [[Arquivo:Coral_reef_3_mapa.jpg|link=]] | |||
|- | |||
! align="center" | <font size='5'>'''12'''</font> | |||
| align="center" | [[Arquivo:Coral_reef_4.png|link=]] | |||
| align="center" | '''Campfire''' | |||
| align="center" | Kinnow Island | |||
| align="center" | [[Arquivo:Coral_reef_4_mapa.jpg|link=]] | |||
|- | |||
! align="center" | <font size='5'>'''13'''</font> | |||
| align="center" | [[Arquivo:Coral_reef_5.png|link=]] | |||
| align="center" | '''Charizard Heart Statue''' | |||
| align="center" | Kinnow Island | |||
| align="center" | [[Arquivo:Coral_reef_5_mapa.jpg|link=]] | |||
|- | |||
! align="center" | <font size='5'>'''14'''</font> | |||
| align="center" | [[Arquivo:Coral_reef_6.png|link=]] | |||
| align="center" | '''Lava Fountain''' | |||
| align="center" | Kinnow Island | |||
| align="center" | [[Arquivo:Coral_reef_6_mapa.jpg|link=]] | |||
|- | |||
! align="center" | <font size='5'>'''15'''</font> | |||
| align="center" | [[Arquivo:Damaged_Mast_1.png|link=]] | |||
| align="center" | '''Lava Fountain''' | |||
| align="center" | Diving Spot | |||
| align="center" | [[Arquivo:Damaged_mast_1_mapa.jpg|link=]] | |||
|- | |||
! align="center" | <font size='5'>'''16'''</font> | |||
| align="center" | [[Arquivo:Damaged_Mast_2.png|link=]] | |||
| align="center" | '''Rustic Column''' | |||
| align="center" | Diving Spot | |||
| align="center" | [[Arquivo:Damaged_mast_2_mapa.jpg|link=]] | |||
|- | |||
! align="center" | <font size='5'>'''17'''</font> | |||
| align="center" | [[Arquivo:Damaged_Mast_3.png|link=]] | |||
| align="center" | '''Candles''' | |||
| align="center" | Diving Spot | |||
| align="center" | [[Arquivo:Damaged_mast_3_mapa.jpg|link=]] | |||
|- | |||
! align="center" | <font size='5'>'''18'''</font> | |||
| align="center" | [[Arquivo:Damaged_Mast_4.png|link=]] | |||
| align="center" | '''Hot Cauldron''' | |||
| align="center" | Diving Spot | |||
| align="center" | [[Arquivo:Damaged_mast_4_mapa.jpg|link=]] | |||
|- | |||
! align="center" | <font size='5'>'''19'''</font> | |||
| align="center" | [[Arquivo:Damaged_Mast_5.png|link=]] | |||
| align="center" | '''Stone Coal Basin''' | |||
| align="center" | Respawn Subaquatico, próximo a Viridian e Celadon | |||
| align="center" | [[Arquivo:Damaged_mast_5_mapa.jpg|link=]] | |||
|- | |||
! align="center" | <font size='5'>'''20'''</font> | |||
| align="center" | [[Arquivo:Damaged_Mast_6.png|link=]] | |||
| align="center" | '''Magmar Statue''' | |||
| align="center" | Respawn Subaquatico, próximo a Viridian e Celadon | |||
| align="center" | [[Arquivo:Damaged_mast_6_mapa.jpg|link=]] | |||
|- | |||
! align="center" | <font size='5'>'''21'''</font> | |||
| align="center" | [[Arquivo:Firefly-pronto.gif|link=]] | |||
| align="center" | '''Dragon Flag''' | |||
| align="center" | Diving Spot | |||
| align="center" | [[Arquivo:Firefly_mapa.jpg|link=]] | |||
|- | |||
! align="center" | <font size='5'>'''22'''</font> | |||
| align="center" | [[Arquivo:Kelp.png|link=]] | |||
| align="center" | '''Statue''' | |||
| align="center" | Kinnow Island | |||
| align="center" | [[Arquivo:Kelp_mapa.jpg|link=]] | |||
|- | |||
! align="center" | <font size='5'>'''23'''</font> | |||
| align="center" | [[Arquivo:Open oyster.png|link=]] | |||
| align="center" | '''Skull''' | |||
| align="center" | Kinnow Island | |||
| align="center" | [[Arquivo:Open oyster mapa.jpg|link=]] | |||
|- | |||
! align="center" | <font size='5'>'''24'''</font> | |||
| align="center" | [[Arquivo:Palm_Tree.png|link=]] | |||
| align="center" | '''Skull''' | |||
| align="center" | Leek Island | |||
| align="center" | [[Arquivo:Palm_tree_mapa.jpg|link=]] | |||
|- | |||
! align="center" | <font size='5'>'''25'''</font> | |||
| align="center" | [[Arquivo:Shell_1.png|link=]] | |||
| align="center" | '''Skull''' | |||
| align="center" | Leek Island | |||
| align="center" | [[Arquivo:Shells_1_mapa.jpg|link=]] | |||
|- | |||
! align="center" | <font size='5'>'''26'''</font> | |||
| align="center" | [[Arquivo:Shell_2.png|link=]] | |||
| align="center" | '''Volcanic Carpet''' | |||
| align="center" | Leek Island | |||
| align="center" | [[Arquivo:Shells_2_mapa.jpg|link=]] | |||
|- | |||
! align="center" | <font size='5'>'''27'''</font> | |||
| align="center" | [[Arquivo:Shell_3.png|link=]] | |||
| align="center" | '''Candelabrum''' | |||
| align="center" | Leek Island | |||
| align="center" | [[Arquivo:Shells_3_mapa.jpg|link=]] | |||
|- | |||
! align="center" | <font size='5'>'''28'''</font> | |||
| align="center" | [[Arquivo:Shell_4.png|link=]] | |||
| align="center" | '''Torch''' | |||
| align="center" | Leek Island<editar daqui pra cima | |||
| align="center" | [[Arquivo:Shells_4_mapa.jpg|link=]] | |||
|- | |||
! align="center" | <font size='5'>'''29'''</font> | |||
| align="center" | [[Arquivo:Starfish.png|link=]] | |||
| align="center" | '''Lava Hole''' | |||
| align="center" | (conferir) | |||
| align="center" | [[Arquivo:Starfish_mapa.jpg|link=]] | |||
|- | |||
! align="center" | <font size='5'>'''30'''</font> | |||
| align="center" | [[Arquivo:Steering_wheel.png|link=]] | |||
| align="center" | '''Skull Candle''' | |||
| align="center" | (verificar se tem sem ser no npc) | |||
| align="center" | [[Arquivo:Steering_wheel_mapa.jpg|link=]] | |||
|- | |||
! align="center" | <font size='5'>'''31'''</font> | |||
| align="center" | [[Arquivo:Underwater_volcano.png|link=]] | |||
| align="center" | '''Coal Basin''' | |||
| align="center" | Pinkan Island | |||
| align="center" | [[Arquivo:Underwater_volcano_mapa.jpg|link=]] | |||
|} | |||
</center> | |||
<!--T:36--> | |||
<span style="color:blue">'''Água: (Você irá encontrar todos os itens que precisa em Moro no barco, Kinnown Islands, Tropical Island, Shell Island, Diving Spot, Lost Island.)</span> | |||
<center> | |||
{| class="wikitable sortable" width="50%" | |||
! width="1%" style="background-color: #7F0000" | <span style="color:white">Nº</span> | |||
! width="10%" style="background-color: #7F0000" | <span style="color:white">Imagem</span> | |||
! width="20%" style="background-color: #7F0000" | <span style="color:white">Nome</span> | |||
! width="30%" style="background-color: #7F0000" | <span style="color:white">Localização do mapa</span> | |||
! width="1%" style="background-color: #7F0000" | <span style="color:white">Mapa</span> | |||
|- | |||
! align="center" | <font size='5'>'''1'''</font> | |||
| align="center" | [[Arquivo:Algae.png|link=]] | |||
| align="center" | '''Algae''' | |||
| align="center" | Kinnow Island | |||
| align="center" | [[Arquivo:Algae_mapa.jpg|link=]] | |||
|- | |||
! align="center" | <font size='5'>'''2'''</font> | |||
| align="center" | [[Arquivo:Beach_Umbrella_1.png|link=]] | |||
| align="center" | '''Beach Umbrella''' | |||
| align="center" | Hamlin | |||
| align="center" | [[Arquivo:Beach_umbrella_1_mapa.jpg|link=]] | |||
|- | |||
! align="center" | <font size='5'>'''3'''</font> | |||
| align="center" | [[Arquivo:Beach_Umbrella_2.png|link=]] | |||
| align="center" | '''Beach Umbrella''' | |||
| align="center" | Hamlin | |||
| align="center" | [[Arquivo:Beach_umbrella_2_mapa.jpg|link=]] | |||
|- | |||
! align="center" | <font size='5'>'''4'''</font> | |||
| align="center" | [[Arquivo:Beach_Umbrella_3.png|link=]] | |||
| align="center" | '''Beach Umbrella''' | |||
| align="center" | Hamlin | |||
| align="center" | [[Arquivo:Beach_umbrella_3_mapa.jpg|link=]] | |||
|- | |||
! align="center" | <font size='5'>'''5'''</font> | |||
| align="center" | [[Arquivo:Blastoise_Hull.png|link=]] | |||
| align="center" | '''Blastoise Hull''' | |||
| align="center" | Diving Spot | |||
| align="center" | [[Arquivo:Blastoise_hull_mapa.jpg|link=]] | |||
|- | |||
! align="center" | <font size='5'>'''6'''</font> | |||
| align="center" | [[Arquivo:Broken_Anchor.png|link=]] | |||
| align="center" | '''Broken Anchor''' | |||
| align="center" | Lost Island | |||
| align="center" | [[Arquivo:Broken_anchor_mapa.jpg|link=]] | |||
|- | |||
! align="center" | <font size='5'>'''7'''</font> | |||
| align="center" | [[Arquivo:Coconut_palm.png|link=]] | |||
| align="center" | '''Coconut Palm''' | |||
| align="center" | Leek Island | |||
| align="center" | [[Arquivo:Coconut_palm_mapa.jpg|link=]] | |||
|- | |||
! align="center" | <font size='5'>'''8'''</font> | |||
| align="center" | [[Arquivo:Coral.png|link=]] | |||
| align="center" | '''Coral''' | |||
| align="center" | Kinnow Island | |||
| align="center" | [[Arquivo:Coral_mapa.jpg|link=]] | |||
|- | |||
! align="center" | <font size='5'>'''9'''</font> | |||
| align="center" | [[Arquivo:Coral_reef_1.png|link=]] | |||
| align="center" | '''Coral Reef''' | |||
| align="center" | Kinnow Island | |||
| align="center" | [[Arquivo:Coral_reef_1_mapa.jpg|link=]] | |||
|- | |||
! align="center" | <font size='5'>'''10'''</font> | |||
| align="center" | [[Arquivo:Coral_reef_2.png|link=]] | |||
| align="center" | '''Coral Reef''' | |||
| align="center" | Kinnow Island | |||
| align="center" | [[Arquivo:Coral_reef_2_mapa.jpg|link=]] | |||
|- | |||
! align="center" | <font size='5'>'''11'''</font> | |||
| align="center" | [[Arquivo:Coral_reef_3.png|link=]] | |||
| align="center" | '''Coral Reef''' | |||
| align="center" | Kinnow Island | |||
| align="center" | [[Arquivo:Coral_reef_3_mapa.jpg|link=]] | |||
|- | |||
! align="center" | <font size='5'>'''12'''</font> | |||
| align="center" | [[Arquivo:Coral_reef_4.png|link=]] | |||
| align="center" | '''Coral Reef''' | |||
| align="center" | Kinnow Island | |||
| align="center" | [[Arquivo:Coral_reef_4_mapa.jpg|link=]] | |||
|- | |||
! align="center" | <font size='5'>'''13'''</font> | |||
| align="center" | [[Arquivo:Coral_reef_5.png|link=]] | |||
| align="center" | '''Coral Reef''' | |||
| align="center" | Kinnow Island | |||
| align="center" | [[Arquivo:Coral_reef_5_mapa.jpg|link=]] | |||
|- | |||
! align="center" | <font size='5'>'''14'''</font> | |||
| align="center" | [[Arquivo:Coral_reef_6.png|link=]] | |||
| align="center" | '''Coral Reef''' | |||
| align="center" | Kinnow Island | |||
| align="center" | [[Arquivo:Coral_reef_6_mapa.jpg|link=]] | |||
|- | |||
! align="center" | <font size='5'>'''15'''</font> | |||
| align="center" | [[Arquivo:Damaged_Mast_1.png|link=]] | |||
| align="center" | '''Damaged Mast''' | |||
| align="center" | Diving Spot | |||
| align="center" | [[Arquivo:Damaged_mast_1_mapa.jpg|link=]] | |||
|- | |||
! align="center" | <font size='5'>'''16'''</font> | |||
| align="center" | [[Arquivo:Damaged_Mast_2.png|link=]] | |||
| align="center" | '''Damaged Mast''' | |||
| align="center" | Diving Spot | |||
| align="center" | [[Arquivo:Damaged_mast_2_mapa.jpg|link=]] | |||
|- | |||
! align="center" | <font size='5'>'''17'''</font> | |||
| align="center" | [[Arquivo:Damaged_Mast_3.png|link=]] | |||
| align="center" | '''Damaged Mast''' | |||
| align="center" | Diving Spot | |||
| align="center" | [[Arquivo:Damaged_mast_3_mapa.jpg|link=]] | |||
|- | |||
! align="center" | <font size='5'>'''18'''</font> | |||
| align="center" | [[Arquivo:Damaged_Mast_4.png|link=]] | |||
| align="center" | '''Damaged Mast''' | |||
| align="center" | Diving Spot | |||
| align="center" | [[Arquivo:Damaged_mast_4_mapa.jpg|link=]] | |||
|- | |||
! align="center" | <font size='5'>'''19'''</font> | |||
| align="center" | [[Arquivo:Damaged_Mast_5.png|link=]] | |||
| align="center" | '''Damaged Mast''' | |||
| align="center" | Respawn Subaquatico, próximo a Viridian e Celadon | |||
| align="center" | [[Arquivo:Damaged_mast_5_mapa.jpg|link=]] | |||
|- | |||
! align="center" | <font size='5'>'''20'''</font> | |||
| align="center" | [[Arquivo:Damaged_Mast_6.png|link=]] | |||
| align="center" | '''Damaged Mast''' | |||
| align="center" | Respawn Subaquatico, próximo a Viridian e Celadon | |||
| align="center" | [[Arquivo:Damaged_mast_6_mapa.jpg|link=]] | |||
|- | |||
! align="center" | <font size='5'>'''21'''</font> | |||
| align="center" | [[Arquivo:Firefly-pronto.gif|link=]] | |||
| align="center" | '''Firefly''' | |||
| align="center" | Diving Spot | |||
| align="center" | [[Arquivo:Firefly_mapa.jpg|link=]] | |||
|- | |||
! align="center" | <font size='5'>'''22'''</font> | |||
| align="center" | [[Arquivo:Kelp.png|link=]] | |||
| align="center" | '''Kelp''' | |||
| align="center" | Kinnow Island | |||
| align="center" | [[Arquivo:Kelp_mapa.jpg|link=]] | |||
|- | |||
! align="center" | <font size='5'>'''23'''</font> | |||
| align="center" | [[Arquivo:Open oyster.png|link=]] | |||
| align="center" | '''Open Oyster''' | |||
| align="center" | Kinnow Island | |||
| align="center" | [[Arquivo:Open oyster mapa.jpg|link=]] | |||
|- | |||
! align="center" | <font size='5'>'''24'''</font> | |||
| align="center" | [[Arquivo:Palm_Tree.png|link=]] | |||
| align="center" | '''Palm Tree''' | |||
| align="center" | Leek Island | |||
| align="center" | [[Arquivo:Palm_tree_mapa.jpg|link=]] | |||
|- | |||
! align="center" | <font size='5'>'''25'''</font> | |||
| align="center" | [[Arquivo:Shell_1.png|link=]] | |||
| align="center" | '''Shells''' | |||
| align="center" | Leek Island | |||
| align="center" | [[Arquivo:Shells_1_mapa.jpg|link=]] | |||
|- | |||
! align="center" | <font size='5'>'''26'''</font> | |||
| align="center" | [[Arquivo:Shell_2.png|link=]] | |||
| align="center" | '''Shells''' | |||
| align="center" | Leek Island | |||
| align="center" | [[Arquivo:Shells_2_mapa.jpg|link=]] | |||
|- | |||
! align="center" | <font size='5'>'''27'''</font> | |||
| align="center" | [[Arquivo:Shell_3.png|link=]] | |||
| align="center" | '''Shells''' | |||
| align="center" | Leek Island | |||
| align="center" | [[Arquivo:Shells_3_mapa.jpg|link=]] | |||
|- | |||
! align="center" | <font size='5'>'''28'''</font> | |||
| align="center" | [[Arquivo:Shell_4.png|link=]] | |||
| align="center" | '''Shells''' | |||
| align="center" | Leek Island | |||
| align="center" | [[Arquivo:Shells_4_mapa.jpg|link=]] | |||
|- | |||
! align="center" | <font size='5'>'''29'''</font> | |||
| align="center" | [[Arquivo:Starfish.png|link=]] | |||
| align="center" | '''Starfish''' | |||
| align="center" | Leek Island | |||
| align="center" | [[Arquivo:Starfish_mapa.jpg|link=]] | |||
|- | |||
! align="center" | <font size='5'>'''30'''</font> | |||
| align="center" | [[Arquivo:Steering_wheel.png|link=]] | |||
| align="center" | '''Steering Wheel''' | |||
| align="center" | Lost Island | |||
| align="center" | [[Arquivo:Steering_wheel_mapa.jpg|link=]] | |||
|- | |||
! align="center" | <font size='5'>'''31'''</font> | |||
| align="center" | [[Arquivo:Underwater_volcano.png|link=]] | |||
| align="center" | '''Underwater Volcano''' | |||
| align="center" | Kinnow Island | |||
| align="center" | [[Arquivo:Underwater_volcano_mapa.jpg|link=]] | |||
|} | |||
</center> | |||
<!--T:37--> | |||
<span style="color:green">'''Planta: (Você irá encontrar todos os itens que precisa em Green Island, Viridian Florest, Jungle Island, Swamp, Lost Island, Butwal Island, Lakeshore Island, Kinnown Islands, Mandarin na parte grass, Golden Island, Murcott Island, Outland Grass, Petalgroove Island) </span> | |||
<center> | |||
{| class="wikitable sortable" width="50%" | |||
! width="1%" style="background-color: #7F0000" | <span style="color:white">Nº</span> | |||
! width="10%" style="background-color: #7F0000" | <span style="color:white">Imagem</span> | |||
! width="20%" style="background-color: #7F0000" | <span style="color:white">Nome</span> | |||
! width="30%" style="background-color: #7F0000" | <span style="color:white">Localização do mapa</span> | |||
! width="1%" style="background-color: #7F0000" | <span style="color:white">Mapa</span> | |||
|- | |||
! align="center" | <font size='5'>'''1'''</font> | |||
| align="center" | [[Arquivo:Algae.png|link=]] | |||
| align="center" | '''Thread Tree''' | |||
| align="center" | Kinnow Island | |||
| align="center" | [[Arquivo:Algae_mapa.jpg|link=]] | |||
|- | |||
! align="center" | <font size='5'>'''1'''</font> | |||
| align="center" | [[Arquivo:Algae.png|link=]] | |||
| align="center" | '''Yellow Royal Blossom''' | |||
| align="center" | Kinnow Island | |||
| align="center" | [[Arquivo:Algae_mapa.jpg|link=]] | |||
|- | |||
! align="center" | <font size='5'>'''1'''</font> | |||
| align="center" | [[Arquivo:Algae.png|link=]] | |||
| align="center" | '''Red Royal Blossom''' | |||
| align="center" | Kinnow Island | |||
| align="center" | [[Arquivo:Algae_mapa.jpg|link=]] | |||
|- | |||
! align="center" | <font size='5'>'''1'''</font> | |||
| align="center" | [[Arquivo:Algae.png|link=]] | |||
| align="center" | '''Pink Royal Blossom''' | |||
| align="center" | Kinnow Island | |||
| align="center" | [[Arquivo:Algae_mapa.jpg|link=]] | |||
|- | |||
! align="center" | <font size='5'>'''1'''</font> | |||
| align="center" | [[Arquivo:Algae.png|link=]] | |||
| align="center" | '''Jungle Maw''' | |||
| align="center" | Kinnow Island | |||
| align="center" | [[Arquivo:Algae_mapa.jpg|link=]] | |||
|- | |||
! align="center" | <font size='5'>'''1'''</font> | |||
| align="center" | [[Arquivo:Algae.png|link=]] | |||
| align="center" | '''Fairy Queen''' | |||
| align="center" | Kinnow Island | |||
| align="center" | [[Arquivo:Algae_mapa.jpg|link=]] | |||
|- | |||
! align="center" | <font size='5'>'''1'''</font> | |||
| align="center" | [[Arquivo:Algae.png|link=]] | |||
| align="center" | '''Purple Kiss Bush''' | |||
| align="center" | Kinnow Island | |||
| align="center" | [[Arquivo:Algae_mapa.jpg|link=]] | |||
|- | |||
! align="center" | <font size='5'>'''1'''</font> | |||
| align="center" | [[Arquivo:Algae.png|link=]] | |||
| align="center" | '''Dragon Nest Tree''' | |||
| align="center" | Kinnow Island | |||
| align="center" | [[Arquivo:Algae_mapa.jpg|link=]] | |||
|- | |||
! align="center" | <font size='5'>'''1'''</font> | |||
| align="center" | [[Arquivo:Algae.png|link=]] | |||
| align="center" | '''Cactus''' | |||
| align="center" | Kinnow Island | |||
| align="center" | [[Arquivo:Algae_mapa.jpg|link=]] | |||
|- | |||
! align="center" | <font size='5'>'''1'''</font> | |||
| align="center" | [[Arquivo:Algae.png|link=]] | |||
| align="center" | '''Purple Cardinal''' | |||
| align="center" | Kinnow Island | |||
| align="center" | [[Arquivo:Algae_mapa.jpg|link=]] | |||
|- | |||
! align="center" | <font size='5'>'''1'''</font> | |||
| align="center" | [[Arquivo:Algae.png|link=]] | |||
| align="center" | '''Amazonian Tree''' | |||
| align="center" | Kinnow Island | |||
| align="center" | [[Arquivo:Algae_mapa.jpg|link=]] | |||
|- | |||
! align="center" | <font size='5'>'''1'''</font> | |||
| align="center" | [[Arquivo:Algae.png|link=]] | |||
| align="center" | '''Jungle Umbrella''' | |||
| align="center" | Kinnow Island | |||
| align="center" | [[Arquivo:Algae_mapa.jpg|link=]] | |||
|- | |||
! align="center" | <font size='5'>'''1'''</font> | |||
| align="center" | [[Arquivo:Algae.png|link=]] | |||
| align="center" | '''Jungle Umbrella''' | |||
| align="center" | Kinnow Island | |||
| align="center" | [[Arquivo:Algae_mapa.jpg|link=]] | |||
|- | |||
! align="center" | <font size='5'>'''1'''</font> | |||
| align="center" | [[Arquivo:Algae.png|link=]] | |||
| align="center" | '''Mushrooms''' | |||
| align="center" | Kinnow Island | |||
| align="center" | [[Arquivo:Algae_mapa.jpg|link=]] | |||
|- | |||
! align="center" | <font size='5'>'''1'''</font> | |||
| align="center" | [[Arquivo:Algae.png|link=]] | |||
| align="center" | '''Moldy Mushroom''' | |||
| align="center" | Kinnow Island | |||
| align="center" | [[Arquivo:Algae_mapa.jpg|link=]] | |||
|- | |||
! align="center" | <font size='5'>'''2'''</font> | |||
| align="center" | [[Arquivo:Beach_Umbrella_1.png|link=]] | |||
| align="center" | '''Crane Plant''' | |||
| align="center" | Hamlin | |||
| align="center" | [[Arquivo:Beach_umbrella_1_mapa.jpg|link=]] | |||
|- | |||
! align="center" | <font size='5'>'''3'''</font> | |||
| align="center" | [[Arquivo:Beach_Umbrella_2.png|link=]] | |||
| align="center" | '''Wild Plant''' | |||
| align="center" | Hamlin | |||
| align="center" | [[Arquivo:Beach_umbrella_2_mapa.jpg|link=]] | |||
|- | |||
! align="center" | <font size='5'>'''4'''</font> | |||
| align="center" | [[Arquivo:Beach_Umbrella_3.png|link=]] | |||
| align="center" | '''Jungle dweller bush''' | |||
| align="center" | Hamlin | |||
| align="center" | [[Arquivo:Beach_umbrella_3_mapa.jpg|link=]] | |||
|- | |||
! align="center" | <font size='5'>'''5'''</font> | |||
| align="center" | [[Arquivo:Blastoise_Hull.png|link=]] | |||
| align="center" | '''Witches Cauldron''' | |||
| align="center" | Diving Spot | |||
| align="center" | [[Arquivo:Blastoise_hull_mapa.jpg|link=]] | |||
|- | |||
! align="center" | <font size='5'>'''6'''</font> | |||
| align="center" | [[Arquivo:Broken_Anchor.png|link=]] | |||
| align="center" | '''Large Pearl Flower''' | |||
| align="center" | Lost Island | |||
| align="center" | [[Arquivo:Broken_anchor_mapa.jpg|link=]] | |||
|- | |||
! align="center" | <font size='5'>'''7'''</font> | |||
| align="center" | [[Arquivo:Coconut_palm.png|link=]] | |||
| align="center" | '''Bees Ballroom''' | |||
| align="center" | Leek Island | |||
| align="center" | [[Arquivo:Coconut_palm_mapa.jpg|link=]] | |||
|- | |||
! align="center" | <font size='5'>'''8'''</font> | |||
| align="center" | [[Arquivo:Coral.png|link=]] | |||
| align="center" | '''Swamp Plant''' | |||
| align="center" | Kinnow Island | |||
| align="center" | [[Arquivo:Coral_mapa.jpg|link=]] | |||
|- | |||
! align="center" | <font size='5'>'''9'''</font> | |||
| align="center" | [[Arquivo:Coral_reef_1.png|link=]] | |||
| align="center" | '''Moonflowers''' | |||
| align="center" | Kinnow Island | |||
| align="center" | [[Arquivo:Coral_reef_1_mapa.jpg|link=]] | |||
|- | |||
! align="center" | <font size='5'>'''10'''</font> | |||
| align="center" | [[Arquivo:Coral_reef_2.png|link=]] | |||
| align="center" | '''Heaven Blossom''' | |||
| align="center" | Kinnow Island | |||
| align="center" | [[Arquivo:Coral_reef_2_mapa.jpg|link=]] | |||
|- | |||
! align="center" | <font size='5'>'''11'''</font> | |||
| align="center" | [[Arquivo:Coral_reef_3.png|link=]] | |||
| align="center" | '''White Flower''' | |||
| align="center" | Kinnow Island | |||
| align="center" | [[Arquivo:Coral_reef_3_mapa.jpg|link=]] | |||
|- | |||
! align="center" | <font size='5'>'''12'''</font> | |||
| align="center" | [[Arquivo:Coral_reef_4.png|link=]] | |||
| align="center" | '''White Flowers''' | |||
| align="center" | Kinnow Island | |||
| align="center" | [[Arquivo:Coral_reef_4_mapa.jpg|link=]] | |||
|- | |||
! align="center" | <font size='5'>'''13'''</font> | |||
| align="center" | [[Arquivo:Coral_reef_5.png|link=]] | |||
| align="center" | '''White Flowers''' | |||
| align="center" | Kinnow Island | |||
| align="center" | [[Arquivo:Coral_reef_5_mapa.jpg|link=]] | |||
|- | |||
! align="center" | <font size='5'>'''14'''</font> | |||
| align="center" | [[Arquivo:Coral_reef_6.png|link=]] | |||
| align="center" | '''Jungle Bells''' | |||
| align="center" | Kinnow Island | |||
| align="center" | [[Arquivo:Coral_reef_6_mapa.jpg|link=]] | |||
|- | |||
! align="center" | <font size='5'>'''15'''</font> | |||
| align="center" | [[Arquivo:Damaged_Mast_1.png|link=]] | |||
| align="center" | '''Strange Tree''' | |||
| align="center" | Diving Spot | |||
| align="center" | [[Arquivo:Damaged_mast_1_mapa.jpg|link=]] | |||
|- | |||
! align="center" | <font size='5'>'''16'''</font> | |||
| align="center" | [[Arquivo:Damaged_Mast_2.png|link=]] | |||
| align="center" | '''Pack of Mushrooms''' | |||
| align="center" | Diving Spot | |||
| align="center" | [[Arquivo:Damaged_mast_2_mapa.jpg|link=]] | |||
|- | |||
! align="center" | <font size='5'>'''17'''</font> | |||
| align="center" | [[Arquivo:Damaged_Mast_3.png|link=]] | |||
| align="center" | '''Monkey Tail''' | |||
| align="center" | Diving Spot | |||
| align="center" | [[Arquivo:Damaged_mast_3_mapa.jpg|link=]] | |||
|- | |||
! align="center" | <font size='5'>'''18'''</font> | |||
| align="center" | [[Arquivo:Damaged_Mast_4.png|link=]] | |||
| align="center" | '''Small sunflower''' | |||
| align="center" | Diving Spot | |||
| align="center" | [[Arquivo:Damaged_mast_4_mapa.jpg|link=]] | |||
|- | |||
! align="center" | <font size='5'>'''19'''</font> | |||
| align="center" | [[Arquivo:Damaged_Mast_5.png|link=]] | |||
| align="center" | '''Pearl Flower''' | |||
| align="center" | Respawn Subaquatico, próximo a Viridian e Celadon | |||
| align="center" | [[Arquivo:Damaged_mast_5_mapa.jpg|link=]] | |||
|- | |||
! align="center" | <font size='5'>'''20'''</font> | |||
| align="center" | [[Arquivo:Damaged_Mast_6.png|link=]] | |||
| align="center" | '''Pearl Flower''' | |||
| align="center" | Respawn Subaquatico, próximo a Viridian e Celadon | |||
| align="center" | [[Arquivo:Damaged_mast_6_mapa.jpg|link=]] | |||
|- | |||
! align="center" | <font size='5'>'''21'''</font> | |||
| align="center" | [[Arquivo:Firefly-pronto.gif|link=]] | |||
| align="center" | '''Yellow Maple''' | |||
| align="center" | Diving Spot | |||
| align="center" | [[Arquivo:Firefly_mapa.jpg|link=]] | |||
|- | |||
! align="center" | <font size='5'>'''22'''</font> | |||
| align="center" | [[Arquivo:Kelp.png|link=]] | |||
| align="center" | '''Bush''' | |||
| align="center" | Kinnow Island | |||
| align="center" | [[Arquivo:Kelp_mapa.jpg|link=]] | |||
|- | |||
! align="center" | <font size='5'>'''23'''</font> | |||
| align="center" | [[Arquivo:Open oyster.png|link=]] | |||
| align="center" | '''Tulip''' | |||
| align="center" | Kinnow Island | |||
| align="center" | [[Arquivo:Open oyster mapa.jpg|link=]] | |||
|- | |||
! align="center" | <font size='5'>'''24'''</font> | |||
| align="center" | [[Arquivo:Palm_Tree.png|link=]] | |||
| align="center" | '''Velvet Petal''' | |||
| align="center" | Leek Island | |||
| align="center" | [[Arquivo:Palm_tree_mapa.jpg|link=]] | |||
|- | |||
! align="center" | <font size='5'>'''25'''</font> | |||
| align="center" | [[Arquivo:Shell_1.png|link=]] | |||
| align="center" | '''Jungle Maw''' | |||
| align="center" | Leek Island | |||
| align="center" | [[Arquivo:Shells_1_mapa.jpg|link=]] | |||
|- | |||
! align="center" | <font size='5'>'''26'''</font> | |||
| align="center" | [[Arquivo:Shell_2.png|link=]] | |||
| align="center" | '''Gorgeous Tree''' | |||
| align="center" | Leek Island | |||
| align="center" | [[Arquivo:Shells_2_mapa.jpg|link=]] | |||
|- | |||
! align="center" | <font size='5'>'''27'''</font> | |||
| align="center" | [[Arquivo:Shell_3.png|link=]] | |||
| align="center" | '''Pinkan Tree''' | |||
| align="center" | Leek Island | |||
| align="center" | [[Arquivo:Shells_3_mapa.jpg|link=]] | |||
|- | |||
! align="center" | <font size='5'>'''28'''</font> | |||
| align="center" | [[Arquivo:Shell_4.png|link=]] | |||
| align="center" | '''Chill Nettle''' | |||
| align="center" | Leek Island<editar daqui pra cima | |||
| align="center" | [[Arquivo:Shells_4_mapa.jpg|link=]] | |||
|- | |||
! align="center" | <font size='5'>'''29'''</font> | |||
| align="center" | [[Arquivo:Starfish.png|link=]] | |||
| align="center" | '''Red Maple''' | |||
| align="center" | (conferir) | |||
| align="center" | [[Arquivo:Starfish_mapa.jpg|link=]] | |||
|- | |||
! align="center" | <font size='5'>'''30'''</font> | |||
| align="center" | [[Arquivo:Steering_wheel.png|link=]] | |||
| align="center" | '''Indoor Plant''' | |||
| align="center" | (verificar se tem sem ser no npc) | |||
| align="center" | [[Arquivo:Steering_wheel_mapa.jpg|link=]] | |||
|- | |||
! align="center" | <font size='5'>'''31'''</font> | |||
| align="center" | [[Arquivo:Underwater_volcano.png|link=]] | |||
| align="center" | '''Plant''' | |||
| align="center" | Pinkan Island | |||
| align="center" | [[Arquivo:Underwater_volcano_mapa.jpg|link=]] | |||
|} | |||
</center> | |||
<!--T:38--> | |||
Ao tirar todas as fotos retorne ao Npc e receba sua recompensa. | |||
==<b>4ª Parte</b>== <!--T:39--> | |||
<!--T:40--> | |||
O Npc de seu elemento agora irá lhe fazer algumas perguntas para testar seu conhecimento no elemento escolhido: | |||
<!--T:41--> | |||
<span style="color:red">'''Fogo:</span> | |||
<!--T:42--> | |||
1 - Camerupt | |||
<!--T:43--> | |||
2 - 38 | |||
<!--T:44--> | |||
3 - Morcego | |||
<!--T:45--> | |||
4 - Heatran | |||
<!--T:46--> | |||
5 - 8 | |||
<!--T:47--> | |||
<span style="color:blue">'''Água:</span> | |||
<!--T:48--> | |||
1 - Blastoise | |||
<!--T:49--> | |||
2 - Marill | |||
<!--T:50--> | |||
3 - 107 | |||
<!--T:51--> | |||
4 - Water Spout | |||
<!--T:52--> | |||
5 - 29 | |||
<!--T:53--> | |||
<span style="color:green">'''Planta:</span> | |||
<!--T:54--> | |||
1 - 47 | |||
<!--T:55--> | |||
2 - Jumpluff | |||
<!--T:56--> | |||
3 - 99 | |||
<!--T:57--> | |||
4 - Breloom | |||
<!--T:58--> | |||
5 - Abomasnow | |||
<!--T:59--> | |||
Ao completar, você receberá sua recompensa, e será mandado de volta para falar com a Stacy.<br> | |||
<span style="color:red"> '''Obs.: '''Você receberá um [[Pokémon_Egg#Stacy_Quest_Eggs|Flame/Waterfall/Sprout Egg]] e dentro poderá vir um Pokémon '''aleatório''' de acordo com o elemento do Egg.</span> | |||
==<b>5ª Parte</b>== <!--T:60--> | |||
<!--T:61--> | |||
Stacy irá dar a sua última e difícil missão, derrotar o boss (no respawn de gengar a direita da stacy): | |||
<table border="1" cellpadding="3" cellspacing="1" class="modernTable" style="padding: 0px; border: 0px; font-size: 10.88px; width: 650px;"> | |||
<tr> | |||
<td style="text-align: center; width: 150px;>'''[[Arquivo:429-Shiny_Mismagius.png|link=Shiny Mismagius]]'''</td> | |||
<td style="text-align: center; width: 150px;">'''<b>Shiny Mismagius</b>'''</td> | |||
</tr> | |||
</table> | |||
<!--T:62--> | |||
<b>Clique com o botão direito do seu mouse no seguinte local para encontrar o respawn:</b> | |||
<!--T:63--> | |||
[[Arquivo:Stacy13.png|link=Stacy_Quest]] | |||
<!--T:64--> | |||
Ao entrar, use o item no pokémon fantasiado <b>(Ghost)</b> ao sul do respawn, a mismagius irá aparecer, tome muito cuidado, você terá um certo tempo para conseguir derrotá-la. | |||
<!--T:65--> | |||
Após derrotá-lo, retorne a Stacy e receba sua recompensa. | |||
Edição das 03h32min de 16 de janeiro de 2023
Nível necessário: 80
Recompensa: 2KK EXP, 1 Mini Wing, 1 Baby Pokémon Egg, 1 Urn Aura Z, 1 Pokémon Clan Egg, 20 Running Elixir, 1 Winseman Elixir, 5 Fisherman's Elixir, 5 Juggernaut's Elixir, 1 Fortune Elixir, 2 Bounty Elixir, 5 Healing Elixir, 5 Swordsman's Elixir, 5 Attack Elixir, 2 Mogul Kahn's Elixir, 5 Shield Elixir, 2 Shielder's Elixir, 5 Defense Elixir, 2 Speedster's Elixir, Libera troca de itens boss (100K Npc) no valor de 100K.
Caso encontre algum erro ou queira acrescentar alguma informação, entre em contato com um dos membros da wiki.
1ª Parte
Para começar a quest, encontre a Npc Stacy, no cemitério de Lavender, no respawn de Gengar:
Stacy irá precisar de sua ajuda com um enigma, na Desert Island, você irá precisar clicar em obeliscos nas pirâmides, na ordem correta, qualquer erro, você terá que começar tudo novamente:
1 - Pirâmide dos drowzee, no respawn dos hypno.
2 - Pirâmide dos persians, bem na entrada, o da esquerda.
3 - Pirâmide da Desert Quest, na entrada, o da direita.
4 - Pirâmide pequena no respawn de alakazam, respawn da esquerda/cima.
5 - Pirâmide pequena, na entrada, o da direita.
6 - Pirâmide dos drowzee, no meio.
7 - Pirâmide da Desert Quest, na entrada, no mesmo local do terceiro obelisco, o da esquerda dessa vez.
8 - Pirâmide dos drowzee, antes da escada, o de cima.
Ao acertar a ordem dos 8 obeliscos, volte a Stacy e receba sua recompensa.
2ª Parte
Stacy irá lhe fazer várias perguntas pessoais, e em base as suas respostas, te mandar a procura do npc referente ao elemento que ela achar que mais te representa, serão 7 perguntas, cada pergunta tem 3 respostas, cada resposta te da 1 ponto para cada elemento, quando o jogador completar 3 pontos em determinado elemento o npc define qual elemento você irá cair, respostas que fazem menção a algo mais agitado, agressivo, etc. remetem ao elemento fogo, ao oposto disso algo que remete a uma pessoa mais calma, mais pacífica, mais tranquila remete ao elemento água, e respostas que sejam meio termo entre os outros dois remetem ao elemento planta, os 3 Npcs se encontram na Golden Island, cada um representa um elemento (Dishi Quon - Fogo, Dalai Qing - Água, Chun Lan - Planta), os Npcs se encontram nos seguintes locais na ilha:
Dependendo de qual Npc escolher, as missões serão iguais, sua primeira missão será capturar em menos de 2 horas um:
| Fogo - Charmander | |
| Água - Squirtle | |
| Planta - Bulbasaur |
Capturando, volte ao seu Npc e receba sua recompensa.
Obs.: Você receberá um Baby Pokémon Egg e dentro poderá vir um Baby Pokémon aleatório.
3ª Parte
Sua segunda missão será tirar fotos com a câmera que o Npc te entregar, de lugares onde frequentam os pokémon do elemento escolhido:
(Imagens de todos os itens em breve)
Fogo: (Você irá encontrar todos os itens que precisa em Cinnabar, Magma Island, Charizard Valley, Ascorbia no respawn fire, Ilha do Moltres, Outland Ghost ou no respawn de Unown de Mandarin para o Candelabrum)
| Nº | Imagem | Nome | Localização do mapa | Mapa |
|---|---|---|---|---|
| 4 | 
|
Dead Tree | Hamlin | 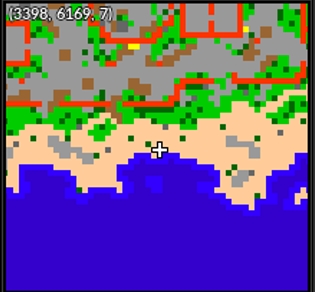
|
| 5 | 
|
Dead Tree | Diving Spot | 
|
| 6 | 
|
Dead Tree | Lost Island | 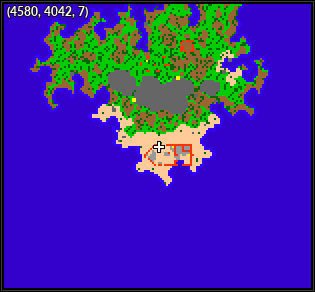
|
| 7 | 
|
Dead Tree | Leek Island | 
|
| 8 | Dead Tree | Kinnow Island | 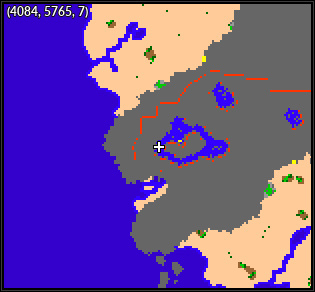
| |
| 9 | Dead Tree | Kinnow Island | 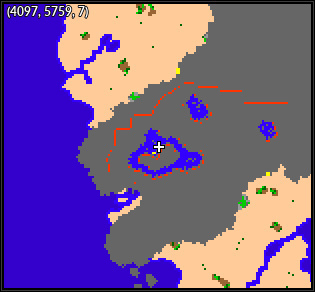
| |
| 10 | 
|
Mammoth Totem | Kinnow Island | 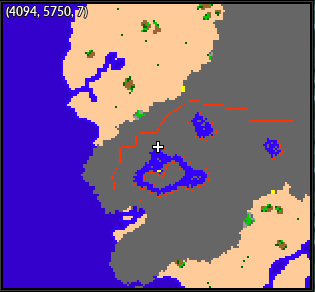
|
| 11 | 
|
Campfire | Kinnow Island | 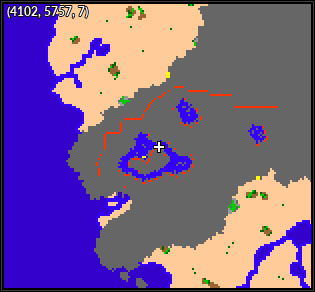
|
| 12 | 
|
Campfire | Kinnow Island | 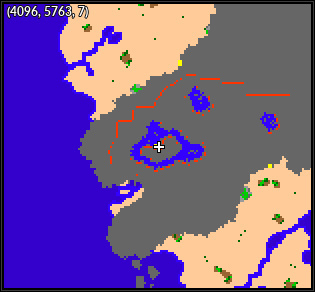
|
| 13 | 
|
Charizard Heart Statue | Kinnow Island | 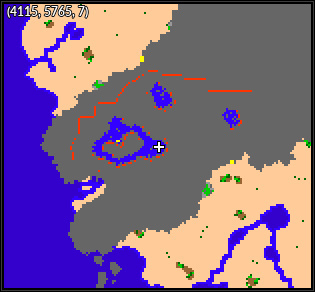
|
| 14 | Lava Fountain | Kinnow Island | 
| |
| 15 | 
|
Lava Fountain | Diving Spot | 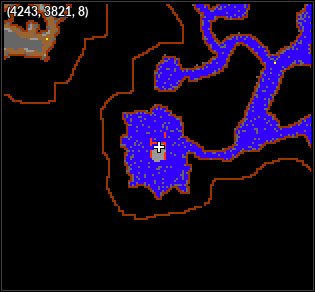
|
| 16 | 
|
Rustic Column | Diving Spot | 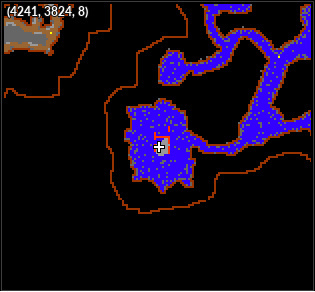
|
| 17 | 
|
Candles | Diving Spot | 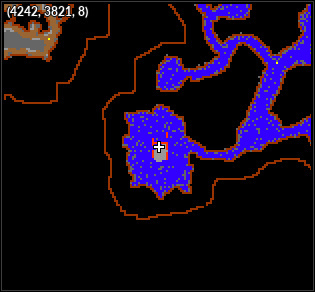
|
| 18 | 
|
Hot Cauldron | Diving Spot | 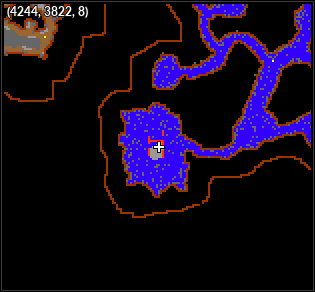
|
| 19 | 
|
Stone Coal Basin | Respawn Subaquatico, próximo a Viridian e Celadon | 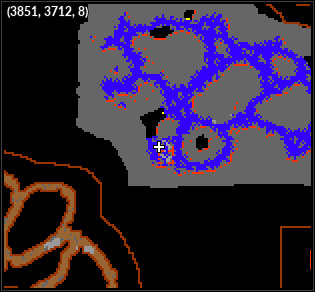
|
| 20 | 
|
Magmar Statue | Respawn Subaquatico, próximo a Viridian e Celadon | 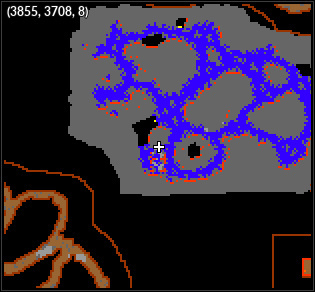
|
| 21 | 
|
Dragon Flag | Diving Spot | 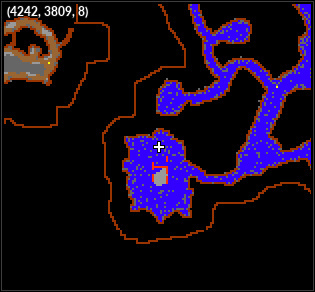
|
| 22 | 
|
Statue | Kinnow Island | 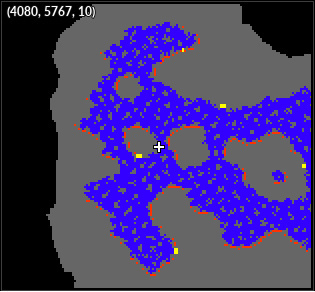
|
| 23 | 
|
Skull | Kinnow Island | 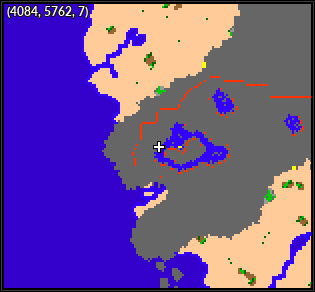
|
| 24 | 
|
Skull | Leek Island | 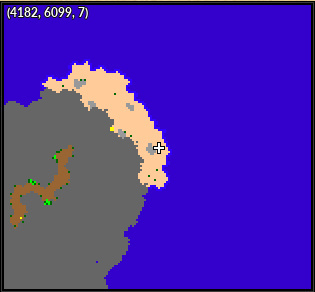
|
| 25 | Skull | Leek Island | 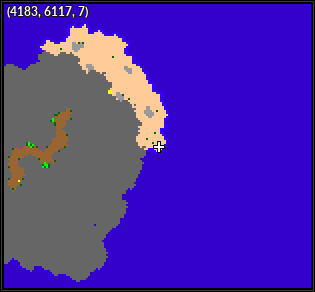
| |
| 26 | 
|
Volcanic Carpet | Leek Island | 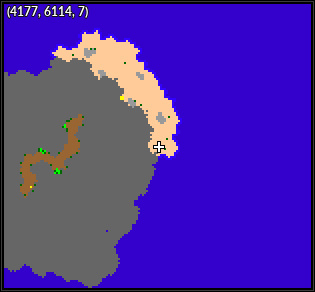
|
| 27 | Candelabrum | Leek Island | 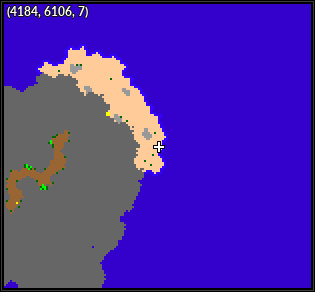
| |
| 28 | Torch | Leek Island<editar daqui pra cima | 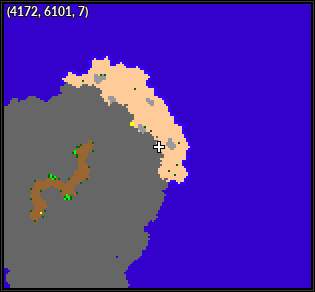
| |
| 29 | Lava Hole | (conferir) | 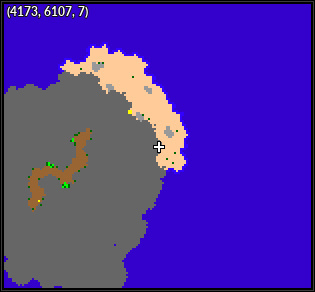
| |
| 30 | 
|
Skull Candle | (verificar se tem sem ser no npc) | 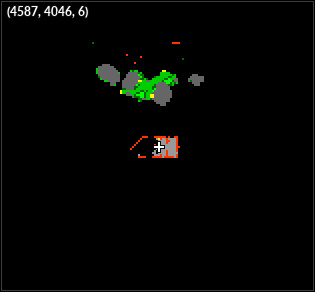
|
| 31 | 
|
Coal Basin | Pinkan Island | 
|
Água: (Você irá encontrar todos os itens que precisa em Moro no barco, Kinnown Islands, Tropical Island, Shell Island, Diving Spot, Lost Island.)
| Nº | Imagem | Nome | Localização do mapa | Mapa |
|---|---|---|---|---|
| 1 | 
|
Algae | Kinnow Island | 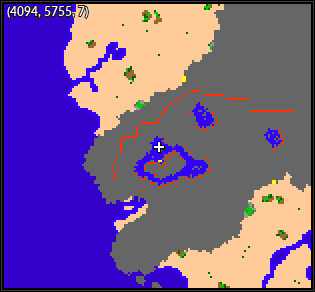
|
| 2 | 
|
Beach Umbrella | Hamlin | 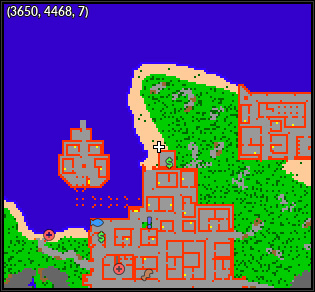
|
| 3 | 
|
Beach Umbrella | Hamlin | 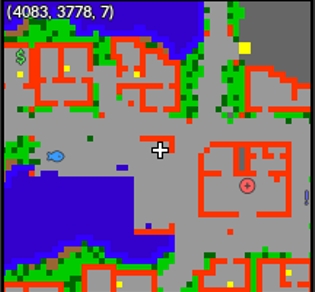
|
| 4 |
|
Beach Umbrella | Hamlin |
|
| 5 |
|
Blastoise Hull | Diving Spot |
|
| 6 |
|
Broken Anchor | Lost Island |
|
| 7 |
|
Coconut Palm | Leek Island |
|
| 8 | Coral | Kinnow Island |
| |
| 9 | Coral Reef | Kinnow Island |
| |
| 10 |
|
Coral Reef | Kinnow Island |
|
| 11 |
|
Coral Reef | Kinnow Island |
|
| 12 |
|
Coral Reef | Kinnow Island |
|
| 13 |
|
Coral Reef | Kinnow Island |
|
| 14 | Coral Reef | Kinnow Island |
| |
| 15 |
|
Damaged Mast | Diving Spot |
|
| 16 |
|
Damaged Mast | Diving Spot |
|
| 17 |
|
Damaged Mast | Diving Spot |
|
| 18 |
|
Damaged Mast | Diving Spot |
|
| 19 |
|
Damaged Mast | Respawn Subaquatico, próximo a Viridian e Celadon |
|
| 20 |
|
Damaged Mast | Respawn Subaquatico, próximo a Viridian e Celadon |
|
| 21 |
|
Firefly | Diving Spot |
|
| 22 |
|
Kelp | Kinnow Island |
|
| 23 |
|
Open Oyster | Kinnow Island |
|
| 24 |
|
Palm Tree | Leek Island |
|
| 25 | Shells | Leek Island |
| |
| 26 |
|
Shells | Leek Island |
|
| 27 | Shells | Leek Island |
| |
| 28 | Shells | Leek Island |
| |
| 29 | Starfish | Leek Island |
| |
| 30 |
|
Steering Wheel | Lost Island |
|
| 31 |
|
Underwater Volcano | Kinnow Island |
|
Planta: (Você irá encontrar todos os itens que precisa em Green Island, Viridian Florest, Jungle Island, Swamp, Lost Island, Butwal Island, Lakeshore Island, Kinnown Islands, Mandarin na parte grass, Golden Island, Murcott Island, Outland Grass, Petalgroove Island)
| Nº | Imagem | Nome | Localização do mapa | Mapa |
|---|---|---|---|---|
| 1 |
|
Thread Tree | Kinnow Island |
|
| 1 |
|
Yellow Royal Blossom | Kinnow Island |
|
| 1 |
|
Red Royal Blossom | Kinnow Island |
|
| 1 |
|
Pink Royal Blossom | Kinnow Island |
|
| 1 |
|
Jungle Maw | Kinnow Island |
|
| 1 |
|
Fairy Queen | Kinnow Island |
|
| 1 |
|
Purple Kiss Bush | Kinnow Island |
|
| 1 |
|
Dragon Nest Tree | Kinnow Island |
|
| 1 |
|
Cactus | Kinnow Island |
|
| 1 |
|
Purple Cardinal | Kinnow Island |
|
| 1 |
|
Amazonian Tree | Kinnow Island |
|
| 1 |
|
Jungle Umbrella | Kinnow Island |
|
| 1 |
|
Jungle Umbrella | Kinnow Island |
|
| 1 |
|
Mushrooms | Kinnow Island |
|
| 1 |
|
Moldy Mushroom | Kinnow Island |
|
| 2 |
|
Crane Plant | Hamlin |
|
| 3 |
|
Wild Plant | Hamlin |
|
| 4 |
|
Jungle dweller bush | Hamlin |
|
| 5 |
|
Witches Cauldron | Diving Spot |
|
| 6 |
|
Large Pearl Flower | Lost Island |
|
| 7 |
|
Bees Ballroom | Leek Island |
|
| 8 | Swamp Plant | Kinnow Island |
| |
| 9 | Moonflowers | Kinnow Island |
| |
| 10 |
|
Heaven Blossom | Kinnow Island |
|
| 11 |
|
White Flower | Kinnow Island |
|
| 12 |
|
White Flowers | Kinnow Island |
|
| 13 |
|
White Flowers | Kinnow Island |
|
| 14 | Jungle Bells | Kinnow Island |
| |
| 15 |
|
Strange Tree | Diving Spot |
|
| 16 |
|
Pack of Mushrooms | Diving Spot |
|
| 17 |
|
Monkey Tail | Diving Spot |
|
| 18 |
|
Small sunflower | Diving Spot |
|
| 19 |
|
Pearl Flower | Respawn Subaquatico, próximo a Viridian e Celadon |
|
| 20 |
|
Pearl Flower | Respawn Subaquatico, próximo a Viridian e Celadon |
|
| 21 |
|
Yellow Maple | Diving Spot |
|
| 22 |
|
Bush | Kinnow Island |
|
| 23 |
|
Tulip | Kinnow Island |
|
| 24 |
|
Velvet Petal | Leek Island |
|
| 25 | Jungle Maw | Leek Island |
| |
| 26 |
|
Gorgeous Tree | Leek Island |
|
| 27 | Pinkan Tree | Leek Island |
| |
| 28 | Chill Nettle | Leek Island<editar daqui pra cima |
| |
| 29 | Red Maple | (conferir) |
| |
| 30 |
|
Indoor Plant | (verificar se tem sem ser no npc) |
|
| 31 |
|
Plant | Pinkan Island |
|
Ao tirar todas as fotos retorne ao Npc e receba sua recompensa.
4ª Parte
O Npc de seu elemento agora irá lhe fazer algumas perguntas para testar seu conhecimento no elemento escolhido:
Fogo:
1 - Camerupt
2 - 38
3 - Morcego
4 - Heatran
5 - 8
Água:
1 - Blastoise
2 - Marill
3 - 107
4 - Water Spout
5 - 29
Planta:
1 - 47
2 - Jumpluff
3 - 99
4 - Breloom
5 - Abomasnow
Ao completar, você receberá sua recompensa, e será mandado de volta para falar com a Stacy.
Obs.: Você receberá um Flame/Waterfall/Sprout Egg e dentro poderá vir um Pokémon aleatório de acordo com o elemento do Egg.
5ª Parte
Stacy irá dar a sua última e difícil missão, derrotar o boss (no respawn de gengar a direita da stacy):
| Shiny Mismagius |
Clique com o botão direito do seu mouse no seguinte local para encontrar o respawn:
Ao entrar, use o item no pokémon fantasiado (Ghost) ao sul do respawn, a mismagius irá aparecer, tome muito cuidado, você terá um certo tempo para conseguir derrotá-la.
Após derrotá-lo, retorne a Stacy e receba sua recompensa.