Predefinição:Teste2: mudanças entre as edições
Ir para navegação
Ir para pesquisar
Sem resumo de edição |
Sem resumo de edição Etiqueta: Reversão manual |
||
| (45 revisões intermediárias por 2 usuários não estão sendo mostradas) | |||
| Linha 1: | Linha 1: | ||
== Encontrando Seymour == | |||
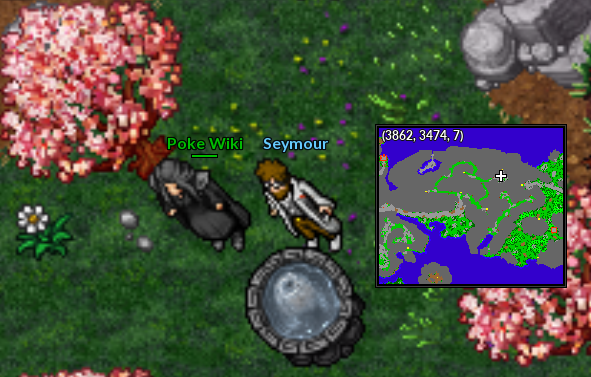
Seymour é um pesquisador de Pokémon, e durante uma experiência de evolução da sua preferida Clefairy, ela começou a correr e se esconder. | |||
< | <center> | ||
{| border="1" style="text-align: center; border-collapse: collapse" | |||
| width="100%" | [[Arquivo:Seymour_Npc.png|link=]] | |||
[[Arquivo: | |||
|- | |- | ||
|} | |||
</center> <br /> | |||
|} | |||
== Siga a Seymour Clefairy == | |||
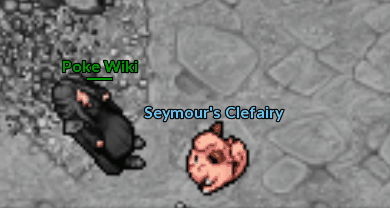
Seymour precisa da sua ajuda para segui-la.<br> | |||
<center> | |||
{| | {| border="1" style="text-align: center; border-collapse: collapse" | ||
| width="100%" | [[Arquivo:Seymour_Clefairy.gif|link=]] | |||
|- | |- | ||
|} | |||
</center> <br /> | |||
<center> | <center> | ||
{| class="wikitable | {| class="wikitable" width="15%" | ||
! width=" | ! width="50%" style="background-color: #9d1a64" | No caminho você enfrentará alguns Pokémon, sendo estes: | ||
|- | |- | ||
| width="5%" align="center" | [[Arquivo:074-Geodude.png|link=Geodude]] Geodude | |||
|- | |- | ||
| width="5%" align="center" | [[Arquivo:075-Graveler.png|link=Graveler]] Graveler | |||
|- | |- | ||
| width="5%" align="center" | [[Arquivo:076-Golem.png|link=Golem]] Golem | |||
|- | |- | ||
| width="5%" align="center" | [[Arquivo:035-Clefairy.png|link=Clefairy]] Clefairy | |||
|- | |- | ||
| width="5%" align="center" | [[Arquivo:036-Clefable.png|link=Clefable]] Clefable | |||
|- | |- | ||
| width="5%" align="center" | [[Arquivo:039-Jigglypuff.png|link=Jigglypuff]] Jigglypuff | |||
|- | |- | ||
| width="5%" align="center" | [[Arquivo:041-Zubat.png|link=Zubat]] Zubat | |||
|- | |- | ||
| width="5%" align="center" | [[Arquivo:042-Golbat.png|link=Golbat]] Golbat | |||
|} | |||
| | |||
|} | |||
</center> | </center> | ||
OBS: Certifique-se de que não há outros Pokémon por perto. Derrote-os primeiro. | |||
== A evolução surpreendente == | |||
< | Quem diria que a Clefairy só queria mostrar sua evolução para Clefable pela Moon Stone?!<br> | ||
< | Vá até Seymour, conte o que você viu e receba a sua recompensa!<br> | ||
gif cinematic? | |||
< | <center> | ||
Recompensa:[[Arquivo:Exp_icon.png|30px|link=]]30000 de experiência e [[Arquivo:Heart-stone.gif|link=]]1 Heart Stone. | |||
< | <b> Boa sorte, e tome cuidado!</b> | ||
Edição atual tal como às 01h35min de 28 de março de 2024
Encontrando Seymour
Seymour é um pesquisador de Pokémon, e durante uma experiência de evolução da sua preferida Clefairy, ela começou a correr e se esconder.
|
Siga a Seymour Clefairy
Seymour precisa da sua ajuda para segui-la.
|
| No caminho você enfrentará alguns Pokémon, sendo estes: |
|---|
OBS: Certifique-se de que não há outros Pokémon por perto. Derrote-os primeiro.
A evolução surpreendente
Quem diria que a Clefairy só queria mostrar sua evolução para Clefable pela Moon Stone?!
Vá até Seymour, conte o que você viu e receba a sua recompensa!
gif cinematic?
Recompensa:![]() 30000 de experiência e
30000 de experiência e ![]() 1 Heart Stone.
1 Heart Stone.
Boa sorte, e tome cuidado!