Ao matar ![]() Darkrai Minions, o jogador pode "estudar" os corpos das criaturas para adquirir
Darkrai Minions, o jogador pode "estudar" os corpos das criaturas para adquirir ![]() Darkrai Essences.
Darkrai Essences.
Sem resumo de edição |
|||
| (114 revisões intermediárias por 2 usuários não estão sendo mostradas) | |||
| Linha 3: | Linha 3: | ||
=Introdução= | =Introdução= | ||
Os | Os '''alquimistas''' são responsáveis pela criação de itens muito importantes para jogadores de alto nível, como[[Arquivo:Pink-Star-Piece.gif|link=]] '''Pink Star Piece''' (Boost +80), [[Arquivo:Philosopher%27s_Stone.png|link=]] '''Philosopher's Stone''', [[Arquivo:Ganlon_berry.png|link=]] '''Ganlon Berry''', '''Elixires''' exclusivos, entre outros. | ||
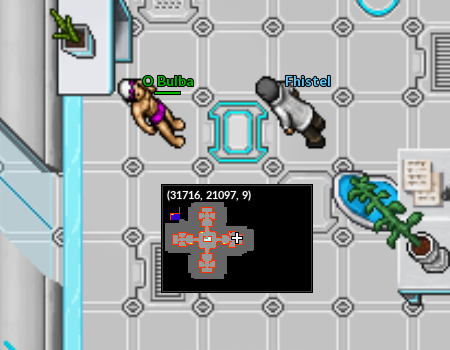
Para escolher esta especialização, o jogador deverá ir até '''Cerulean''' na '''Nightmare World''', descer as escadas do CP e procurar o '''NPC Fhistel.''' | |||
<center>[[Arquivo:Localização_NPC_Fhistel.png|link=]]</center> | |||
<table class="seeMore"> | <table class="seeMore"> | ||
<tr> | <tr> | ||
<td class="seeMore__image">[[Arquivo:Telekinetic-compass.gif|link=]]</td> | <td class="seeMore__image">[[Arquivo:Telekinetic-compass.gif|link=]]</td> | ||
<td> '''Veja mais: [[ | <td> '''Veja mais: [[Introdução às Especializações]], [[Tabela_de_Boost#Boost_+80|Pink Star Piece]], [[Craft_Philosopher's_Stone|Philosopher's Stone]], [[Berries]], [[Elixir#Elixir_de_Alquimista|Elixires]] e [[Poções]]'''</td> | ||
</tr> | </tr> | ||
</table> | </table> | ||
== | =Outfits= | ||
Ao se tornar '''Alquimista''', o jogador recebe a '''outfit''' referente à sua especialização. | |||
{|class="wikitable" width = "10%" | |||
{| class="wikitable" width=" | !colspan="2" | Outfits | ||
! | |||
|- | |- | ||
! Masculina | |||
! Feminina | |||
|- | |||
|<Center>[[Arquivo:Outfit_Especializacao_Alchemist_Male.png|link=]] || <center>[[Arquivo:Outfit_Especializacao_Alchemist_Female.png|link=]] | |||
| | |||
| | |||
| | |||
|} | |} | ||
</center> | </center> | ||
=== | =Recursos= | ||
'''Alquimistas''' podem realizar suas coletas utilizando o [[Arquivo:Tablet.png|link=]] '''Tablet''' e o [[Arquivo:Alchemist_Empty_Becker.png|link=]] '''Alchemist Empty Becker'''. | |||
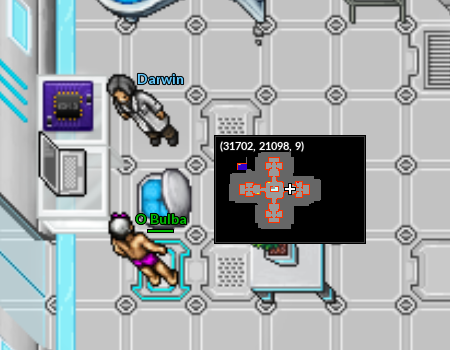
Para comprar suas '''ferramentas de trabalho''', o jogador deverá ir até o '''NPC Darwin''', que estará localizado próximo ao NPC Fhistel. | |||
<center> | <center>[[Arquivo:Localização_NPC_Darwin.png|link=]]</center> | ||
</center> | |||
Além disso, este NPC permitirá que o jogador compre '''Medicinal Leaves''', [[Arquivo:Gardening_Bag.png|link=]] '''Gardening Bag''', [[Arquivo:Alchemist_Empty_Becker.png|link=]] '''Alchemist Empty Becker''', [[Arquivo:Mortar.png|link=]] '''Mortar''' e [[Arquivo:Tablet.png|link=]] '''Tablet'''. | |||
''' | Estes itens serão extremamente importantes para o '''Alquimista'''. | ||
==Recurso Base == | |||
Ao utilizar o [[Arquivo:Tablet.png|link=]] '''Tablet''', o jogador pode coletar a alma dos [[Arquivo:491-Darkrai.png|25px|link=]] '''Darkrai Minion''' e dos [[Arquivo:Nightmare_Crystal.png|25px|link=]] '''Nightmare Crystal'''. | |||
Este tipo de coleta é comum entre as duas especializações de Professor ('''alquimista''' e '''acadêmico'''). | |||
<tabber> | |||
|-|Darkrai Essence= | |||
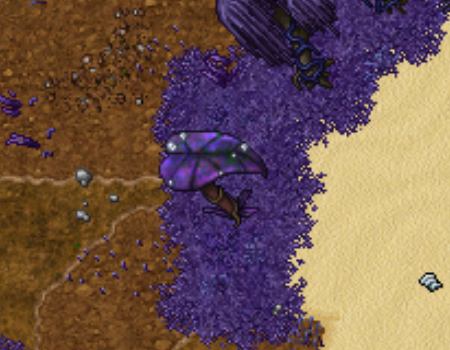
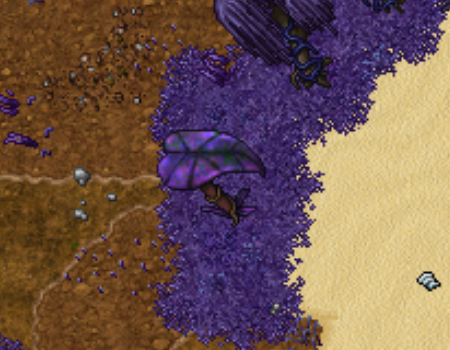
Ao matar [[Arquivo:491-Darkrai.png|25px|link=]] '''Darkrai Minions''', o jogador pode '''"estudar"''' os corpos das criaturas para adquirir [[Arquivo:Darkrai-Essence.gif|link=]] '''Darkrai Essences'''. | |||
<center | <center>[[Arquivo:Recurso_Darkrai_Minion.gif|link=]]</center> | ||
[[Arquivo: | |||
</center> | |||
|-|Black Darkrai Essence= | |||
= | Ao derrotar '''Nightmare Crystals''', o jogador pode utilizar o '''tablet''' no '''Crystal''' destruído para receber '''1 [[Arquivo:Black-Darkrai-Essence.gif|link=]] Black Darkrai Essence'''. | ||
'''Observação:''' O jogador pode estudar essas criaturas e entidades sem tê-las derrotado. Para isso, deve estar no mesmo '''grupo''' da pessoa que os derrotou. | |||
<center>[[Arquivo:Recurso_Nightmare_Crystal.gif|link=]]</center> | |||
<center>[[Arquivo: | |||
</tabber> | |||
==Mortar== | |||
O [[Arquivo:Mortar.png|link=]] '''Mortar''' é um item usado pelos professores ('''Acadêmicos''' e '''Alquimistas'''), para transformar '''Medicinal Leaves''' em '''Crushed Leaves'''. | |||
<center>[[Arquivo:Mortar_Uso.gif|link=]]</center> | |||
Para isso, será necessário encontrar a erva em seu estado natural: | |||
O jogador pode encontrar '''3 tipos''' de '''Medicinal Herbs'''. | |||
{| class="wikitable" width = "20%" | |||
|+ | |||
{| class="wikitable" | |||
|- | |- | ||
! | ! Green Medicinal Herb!! Yellow Medicinal Herb !! Red Medicinal Herb | ||
! | |||
! | |||
|- | |- | ||
| align="center" | [[Arquivo:Green_Medicinal_Herb.gif|25px|link=]] | |||
| align="center" | [[Arquivo:Yellow_Medicinal_Herb.gif|25px|link=]] | |||
| align="center" | [[Arquivo:Red_Medicinal_Herb.gif|28px|link=]] | |||
| [[Arquivo: | |||
| [[Arquivo: | |||
| [[Arquivo: | |||
|} | |} | ||
Este recurso é coletável por '''qualquer jogador''', porém os itens que os utilizam são craftáveis apenas por '''alquimistas''' e '''acadêmicos'''. | |||
<center>[[Arquivo:Medicinal_Herb.png|link=]]</center> | |||
</center | |||
Ao coletar as '''Medicinal Herbs''', o jogador receberá em seu inventário '''Medicinal Leaves''', que por fim, ao utilizar o [[Arquivo:Mortar.png|link=]] '''Mortar''', se tornarão '''Crushed Leaves'''. | |||
==Recurso exclusivo== | |||
Ao utilizar o [[Arquivo:Alchemist_Empty_Becker.png|link=]] '''Alchemist Empty Becker''' em uma '''Wet Strange Plant''', o jogador consegue coletar [[Arquivo:Dew_Becker.png|link=]] '''Dew Beckers''', que servirão como recurso para diversos itens de confecção '''exclusiva''' da especialização de Alquimista. | |||
<center>[[Arquivo:Recurso_Dew_Becker.gif|link=]]</center> | |||
</ | |||
Ao coletar o recurso, o jogador retirará o '''orvalho''' da planta, fazendo com que esta fique seca, e se torne uma '''Strange Plant'''. | |||
{| class="wikitable" | <center> | ||
{| class="wikitable" | |||
|+ | |||
|- | |||
! Wet Strange Plant !! Strange Plant | |||
|- | |- | ||
| [[Arquivo:Wet_Strange_Plant.png|link=]] || [[Arquivo:Strange_Plant.png|link=]] | |||
| [[Arquivo: | |||
|- | |- | ||
|} | |} | ||
</center> | </center> | ||
= | =Árvore de Berry= | ||
'''Alquimistas''' podem coletar recursos da '''Árvore de Berry''', obtendo '''Berries''' e '''Medicinal Leaves'''. | |||
''' | <span style="color:red">'''Atenção:'''</span> Apenas as '''2 coletas''' da Árvore de Berry concederão '''Berries'''. Após isso, o jogador receberá apenas '''Medicinal Leaves.''' | ||
<center>[[Arquivo:Árvore_de_Berries.gif|link=]]</center> | |||
=Crafts Exclusivos= | |||
<tabber> | |||
|-|Crafts Workshop= | |||
<center> | |||
{| class="wikitable sortable" width="70%" | |||
! width="2%" class="unsortable" | Item | |||
! width="1%" | Habilidade | |||
! width="1%" class="unsortable" | Tempo de espera | |||
! width="5%" class="unsortable" | Materiais | |||
|- | |||
| align="center" | [[Arquivo:Ganlon_Seed.png|link=]]<br>Ganlon Seed | |||
| align="center" | Skill 103 | |||
| align="center" | 1 Hora | |||
< | | align="center" | [[Arquivo:Dew_Becker.png|link=]] 225 Dew Beckers <br> [[Arquivo:Nightmare-Seed-Bag.gif|link=]] 5 Nightmare Seed Bags <br> [[Arquivo:Corrupted-Streak-Tail.gif|link=]] 2 Corrupted Streak Tails <br> [[Arquivo:Corrupted-Ice-Piece.gif|link=]] 2 Corrupted Ice Pieces <br> [[Arquivo:Fire_Monkey_Hair.png|link=]] 1 Fire Monkey Hairs | ||
|- | |||
= | | align="center" | [[Arquivo:Kamikaze_Elixir.png|link=]]<br>Kamikaze Elixir (10x) | ||
| align="center" | Skill 103 | |||
| align="center" | 20 Segundos | |||
| align="center" | [[Arquivo:Dew_Becker.png|link=]] 240 Dew Beckers <br> [[Arquivo:Red_Crushed_Leaf.png|link=]] 750 Red Crushed Leaves <br> [[Arquivo:Green_Crushed_Leaf.png|link=]] 750 Green Crushed Leaves <br> [[Arquivo:Yellow_Crushed_Leaf.png|link=]] 750 Yellow Crushed Leaves | |||
|- | |||
| align="center" | [[Arquivo:Iron_Wall_Elixir.png|link=]]<br>Iron Wall Elixir (10x) | |||
< | | align="center" | Skill 105 | ||
| align="center" | 20 Segundos | |||
| align="center" | [[Arquivo:Dew_Becker.png|link=]] 240 Dew Beckers <br> [[Arquivo:Red_Crushed_Leaf.png|link=]] 750 Red Crushed Leaves <br> [[Arquivo:Green_Crushed_Leaf.png|link=]] 750 Green Crushed Leaves <br> [[Arquivo:Yellow_Crushed_Leaf.png|link=]] 750 Yellow Crushed Leaves | |||
|- | |||
< | | align="center" | [[Arquivo:Salvation_Elixir.png|link=]]<br>Salvation Elixir | ||
| align="center" | Skill 107 | |||
| align="center" | 20 Segundos | |||
| align="center" | [[Arquivo:Dew_Becker.png|link=]] 135 Dew Beckers <br> [[Arquivo:Red_Crushed_Leaf.png|link=]] 420 Red Crushed Leaves <br> [[Arquivo:Yellow_Crushed_Leaf.png|link=]] 420 Yellow Crushed Leaves <br> [[Arquivo:Green_Crushed_Leaf.png|link=]] 420 Green Crushed Leaves <br> | |||
|- | |||
| align="center" | [[Arquivo:Hot_Nightmare_Potion.png|link=]]<br>Hot Nightmare Potion (100x) | |||
== | | align="center" | Skill 102 | ||
| align="center" | 1 Hora | |||
| align="center" | [[Arquivo:Red_Crushed_Leaf.png|link=]] 353 Red Crushed Leaves <br> [[Arquivo:Yellow_Crushed_Leaf.png|link=]] 353 Yellow Crushed Leaves <br> [[Arquivo:Green_Crushed_Leaf.png|link=]] 353 Green Crushed Leaves <br> [[Arquivo:Dew_Becker.png|link=]] 113 Dew Beckers | |||
|- | |||
| align="center" | [[Arquivo:Black_Nightmare_Potion.png|link=]]<br>Black Nightmare Potion (100x) | |||
| align="center" | Skill 101 | |||
| align="center" | 1 Hora | |||
| align="center" | [[Arquivo:Red_Crushed_Leaf.png|link=]] 333 Red Crushed Leaves <br> [[Arquivo:Yellow_Crushed_Leaf.png|link=]] 333 Yellow Crushed Leaves <br> [[Arquivo:Green_Crushed_Leaf.png|link=]] 333 Green Crushed Leaves <br> [[Arquivo:Dew_Becker.png|link=]] 105 Dew Beckers | |||
== | |- | ||
| align="center" | [[Arquivo:Superior_Nightmare_Revive.png|link=]]<br>Superior Nightmare Revive | |||
| align="center" | Skill 110 | |||
| align="center" | 30 Minutos | |||
| align="center" | [[Arquivo:Dew_Becker.png|link=]] 24 Dew Beckers <br> [[Arquivo:Red_Crushed_Leaf.png|link=]] 75 Red Crushed Leaves <br> [[Arquivo:Yellow_Crushed_Leaf.png|link=]] 75 Yellow Crushed Leaves <br> [[Arquivo:Green_Crushed_Leaf.png|link=]] 75 Green Crushed Leaves | |||
|- | |||
| align="center" | [[Arquivo:Fertilizer.png|link=]]<br>Fertilizer | |||
| align="center" | Skill 100 | |||
| align="center" | 30 Minutos | |||
| align="center" | [[Arquivo:Green_Crushed_Leaf.png|link=]] 140 Green Crushed Leaves <br> [[Arquivo:Dew_Becker.png|link=]] 15 Dew Beckers | |||
|- | |||
| align="center" | [[Arquivo:Cell_Culture_Tubes.png|link=]]<br>Cell Culture Tubes | |||
| align="center" | Skill 100 | |||
| align="center" | 2 Horas | |||
| align="center" | [[Arquivo:Dew_Becker.png|link=]] 600 Dew Beckers <br> [[Arquivo:Corrupted-Streak-Tail.gif|link=]] 10 Corrupted Streak Tails <br> [[Arquivo:Red_Spike.png|link=]] 10 Red Spikes <br> [[Arquivo:Toxic_Gosme.png|link=]] 5 Toxic Gosmes | |||
|- | |||
| align="center" | [[Arquivo:Philosopher's_Stone.png|link=]]<br>Philosopher's Stone | |||
| align="center" | Skill 120 | |||
| align="center" | 10 Dias | |||
| align="center" | [[Arquivo:Dew_Becker.png|link=]] 36000 Dew Beckers <br> [[Arquivo:Diamond.png|link=]] 20 Diamonds <br> [[Arquivo:Black-Darkrai-Essence.gif|link=]] 10 Black Darkrai Essences <br> [[Arquivo:Fire_Monkey_Hair.png|link=]] 60 Fire Monkey Hairs <br> [[Arquivo:Corrupted-Feather.gif|link=]] 60 Corrupted Feathers <br> [[Arquivo:Petite_Leaves.png|link=]] 60 Petite Leaves <br> [[Arquivo:Corrupted-Pot-of-Lava.gif|link=]] 60 Corrupted Pots Of Lava <br> [[Arquivo:Red_Spike.png|link=]] 60 Red Spikes <br> [[Arquivo:Pig_Ear.png|link=]] 60 Pig Ears <br> [[Arquivo:Big Eagle Feather.png|link=]] 60 Big Eagle Feather <br> [[Arquivo:Solid_Head.png|link=]] 10 Solid Heads <br> [[Arquivo:Compressed_Nightmare_Gems.png|link=]] 10 Compressed Nightmare Gems <br> [[Arquivo:Royal_Mane.png|link=]] 5 Royal Manes <br> [[Arquivo:Flame_Tail.png|link=]] 1 Flame Tails <br> [[Arquivo:Turtle_Shell.png|link=]] 3 Turtle Shells <br> [[Arquivo:Sentry_Remains.png|link=]] 40 Sentry Remains <br> [[Arquivo:Red-Star-Piece.gif|link=]] 2 Red Star Piece | |||
|- | |||
| align="center" | [[Arquivo:Pink-Star-Piece.gif|link=]]<br>Pink Star Piece | |||
| align="center" | Skill 120 | |||
| align="center" | 5 Horas | |||
| align="center" | [[Arquivo:Dew_Becker.png|link=]] 6000 Dew Beckers <br> [[Arquivo:Star_Dust.png|link=]] 150 Star Dusts <br> [[Arquivo:Boost1.png|link=]] 5 Boost Stones | |||
|- | |||
|} | |||
</center> | |||
|-|Craft Philosopher's Stone= | |||
A [[Arquivo:Philosopher%27s_Stone.png|link=]] '''Philosopher's Stone''' é um item fabricado pelo Alquimista que o permite produzir um '''elixir''' muito útil em diversos conteúdos do jogo. | |||
Para fabricá-la, o jogador precisará coletar [[Arquivo:Black-Darkrai-Essence.gif|link=]] '''Black Darkrai Essences'''. | |||
== | Apesar de ser coletável por '''Alquimistas''' e '''Acadêmicos''', as [[Arquivo:Black-Darkrai-Essence.gif|link=]] '''Black Darkrai Essences''' só podem ser utilizadas, por '''Alquimistas''', para fabricar a [[Arquivo:Philosopher%27s_Stone.png|link=]] '''Philosopher's Stone''' (Craft Exclusivo de Alquimista). | ||
<span style="color:#FF0000">'''Atenção:'''</span> Ao coletar a '''Philosopher's Stone''', o item se tornará '''único''', não podendo ser trocado entre jogadores. Caso o jogador toque de profissão, o item não será inutilizado. Já coletado, o item poderá ser usado pelo jogador em qualquer profissão. | |||
=Elixir Of Life= | |||
O [[Arquivo:Elixir_of_Life.png|link=]] '''Elixir of Life''' irá '''aumentar''' a '''HP''' do jogador em '''2.000''' e '''reduzirá''' o '''dano de armadilhas''' em '''25%''' por '''3 horas.''' | |||
<center> | <center> | ||
{| class="wikitable | {| class="wikitable" width="70%" | ||
! width=" | ! width="2%" style="background-color: #9d1a64" | Item | ||
! width="1%" style="background-color: #9d1a64" | Habilidade | |||
! width="1%" style="background-color: #9d1a64" | Tempo de espera | |||
! width="5%" style="background-color: #9d1a64" | Materiais | |||
|- | |- | ||
|[[Arquivo: | | align="center" | [[Arquivo:Elixir_of_Life.png|link=]]<br>Elixir of Life | ||
| align="center" | Skill 120 | |||
| align="center" | 3 Horas | |||
| align="center" | [[Arquivo:Red_Crushed_Leaf.png|link=]] 330 Red Crushed Leaves <br> [[Arquivo:Yellow_Crushed_Leaf.png|link=]] 330 Yellow Crushed Leaves <br> [[Arquivo:Green_Crushed_Leaf.png|link=]] 330 Green Crushed Leaves <br> | |||
|- | |- | ||
|} | |} | ||
</center> | </center> | ||
== | <table class="seeMore"> | ||
<tr> | |||
<td class="seeMore__image">[[Arquivo:Telekinetic-compass.gif|link=]]</td> | |||
<td> '''Veja mais: [[Craft_Profissões_-_Professor#Rank_S|Crafts Professor Rank S]]'''</td> | |||
</tr> | |||
</table> | |||
</tabber> | |||
Os alquimistas são responsáveis pela criação de itens muito importantes para jogadores de alto nível, como![]() Pink Star Piece (Boost +80),
Pink Star Piece (Boost +80), ![]() Philosopher's Stone,
Philosopher's Stone, ![]() Ganlon Berry, Elixires exclusivos, entre outros.
Ganlon Berry, Elixires exclusivos, entre outros.
Para escolher esta especialização, o jogador deverá ir até Cerulean na Nightmare World, descer as escadas do CP e procurar o NPC Fhistel.
| Veja mais: Introdução às Especializações, Pink Star Piece, Philosopher's Stone, Berries, Elixires e Poções |
Ao se tornar Alquimista, o jogador recebe a outfit referente à sua especialização.
| Outfits | |
|---|---|
| Masculina | Feminina |
 |

|
Alquimistas podem realizar suas coletas utilizando o ![]() Tablet e o
Tablet e o ![]() Alchemist Empty Becker.
Alchemist Empty Becker.
Para comprar suas ferramentas de trabalho, o jogador deverá ir até o NPC Darwin, que estará localizado próximo ao NPC Fhistel.
Além disso, este NPC permitirá que o jogador compre Medicinal Leaves, ![]() Gardening Bag,
Gardening Bag, ![]() Alchemist Empty Becker,
Alchemist Empty Becker, ![]() Mortar e
Mortar e ![]() Tablet.
Tablet.
Estes itens serão extremamente importantes para o Alquimista.
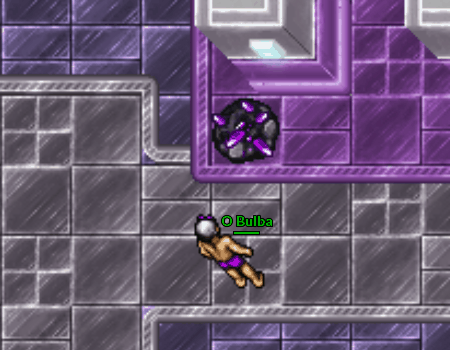
Ao utilizar o ![]() Tablet, o jogador pode coletar a alma dos
Tablet, o jogador pode coletar a alma dos ![]() Darkrai Minion e dos
Darkrai Minion e dos ![]() Nightmare Crystal.
Nightmare Crystal.
Este tipo de coleta é comum entre as duas especializações de Professor (alquimista e acadêmico).
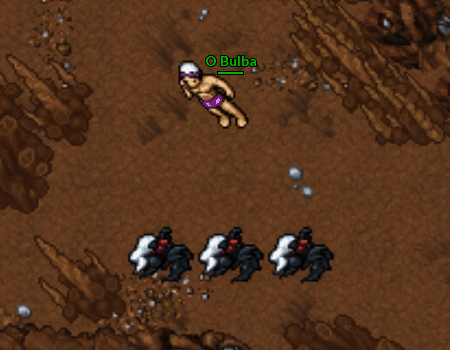
Ao matar ![]() Darkrai Minions, o jogador pode "estudar" os corpos das criaturas para adquirir
Darkrai Minions, o jogador pode "estudar" os corpos das criaturas para adquirir ![]() Darkrai Essences.
Darkrai Essences.
Ao derrotar Nightmare Crystals, o jogador pode utilizar o tablet no Crystal destruído para receber 1 ![]() Black Darkrai Essence.
Black Darkrai Essence.
Observação: O jogador pode estudar essas criaturas e entidades sem tê-las derrotado. Para isso, deve estar no mesmo grupo da pessoa que os derrotou.
O ![]() Mortar é um item usado pelos professores (Acadêmicos e Alquimistas), para transformar Medicinal Leaves em Crushed Leaves.
Mortar é um item usado pelos professores (Acadêmicos e Alquimistas), para transformar Medicinal Leaves em Crushed Leaves.
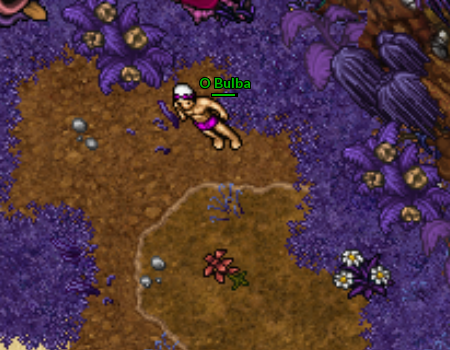
Para isso, será necessário encontrar a erva em seu estado natural:
O jogador pode encontrar 3 tipos de Medicinal Herbs.
| Green Medicinal Herb | Yellow Medicinal Herb | Red Medicinal Herb |
|---|---|---|
Este recurso é coletável por qualquer jogador, porém os itens que os utilizam são craftáveis apenas por alquimistas e acadêmicos.
Ao coletar as Medicinal Herbs, o jogador receberá em seu inventário Medicinal Leaves, que por fim, ao utilizar o ![]() Mortar, se tornarão Crushed Leaves.
Mortar, se tornarão Crushed Leaves.
Ao utilizar o ![]() Alchemist Empty Becker em uma Wet Strange Plant, o jogador consegue coletar
Alchemist Empty Becker em uma Wet Strange Plant, o jogador consegue coletar ![]() Dew Beckers, que servirão como recurso para diversos itens de confecção exclusiva da especialização de Alquimista.
Dew Beckers, que servirão como recurso para diversos itens de confecção exclusiva da especialização de Alquimista.
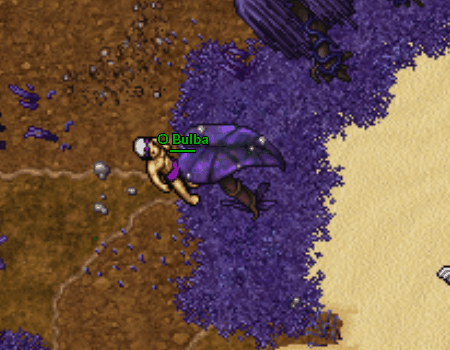
Ao coletar o recurso, o jogador retirará o orvalho da planta, fazendo com que esta fique seca, e se torne uma Strange Plant.
| Wet Strange Plant | Strange Plant |
|---|---|
 |
|
Alquimistas podem coletar recursos da Árvore de Berry, obtendo Berries e Medicinal Leaves.
Atenção: Apenas as 2 coletas da Árvore de Berry concederão Berries. Após isso, o jogador receberá apenas Medicinal Leaves.
| Item | Habilidade | Tempo de espera | Materiais |
|---|---|---|---|
Ganlon Seed |
Skill 103 | 1 Hora | |
Kamikaze Elixir (10x) |
Skill 103 | 20 Segundos | |
Iron Wall Elixir (10x) |
Skill 105 | 20 Segundos | |
Salvation Elixir |
Skill 107 | 20 Segundos | |
Hot Nightmare Potion (100x) |
Skill 102 | 1 Hora | |
Black Nightmare Potion (100x) |
Skill 101 | 1 Hora | |
Superior Nightmare Revive |
Skill 110 | 30 Minutos | |
Fertilizer |
Skill 100 | 30 Minutos | |
Cell Culture Tubes |
Skill 100 | 2 Horas | |
Philosopher's Stone |
Skill 120 | 10 Dias | |
Pink Star Piece |
Skill 120 | 5 Horas |
A ![]() Philosopher's Stone é um item fabricado pelo Alquimista que o permite produzir um elixir muito útil em diversos conteúdos do jogo.
Philosopher's Stone é um item fabricado pelo Alquimista que o permite produzir um elixir muito útil em diversos conteúdos do jogo.
Para fabricá-la, o jogador precisará coletar ![]() Black Darkrai Essences.
Black Darkrai Essences.
Apesar de ser coletável por Alquimistas e Acadêmicos, as ![]() Black Darkrai Essences só podem ser utilizadas, por Alquimistas, para fabricar a
Black Darkrai Essences só podem ser utilizadas, por Alquimistas, para fabricar a ![]() Philosopher's Stone (Craft Exclusivo de Alquimista).
Philosopher's Stone (Craft Exclusivo de Alquimista).
Atenção: Ao coletar a Philosopher's Stone, o item se tornará único, não podendo ser trocado entre jogadores. Caso o jogador toque de profissão, o item não será inutilizado. Já coletado, o item poderá ser usado pelo jogador em qualquer profissão.
O ![]() Elixir of Life irá aumentar a HP do jogador em 2.000 e reduzirá o dano de armadilhas em 25% por 3 horas.
Elixir of Life irá aumentar a HP do jogador em 2.000 e reduzirá o dano de armadilhas em 25% por 3 horas.
| Item | Habilidade | Tempo de espera | Materiais |
|---|---|---|---|
Elixir of Life |
Skill 120 | 3 Horas |
| Veja mais: Crafts Professor Rank S |