|
|
| (131 revisões intermediárias pelo mesmo usuário não estão sendo mostradas) |
| Linha 3: |
Linha 3: |
| =Introdução= | | =Introdução= |
|
| |
|
| Os Pokémon '''T1H''' são indispensáveis para uma hunt de alta qualidade no nightmare world. | | * Os '''alquimistas''' são responsáveis pela criação de itens muito importantes para jogadores de alto nível, como[[Arquivo:Pink-Star-Piece.gif|link=]] '''Pink Star Piece''' (Boost +80), [[Arquivo:Philosopher%27s_Stone.png|link=]] '''Philosopher's Stone''', [[Arquivo:Ganlon_berry.png|link=]] '''Ganlon Berry''', entre outros. |
|
| |
|
| Atualmente, duas quests possibilitam que o jogador capture estes T1H, a '''Cosmic Quest '''e a''' Desert Quest.'''
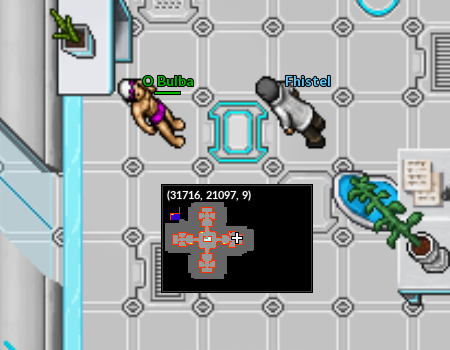
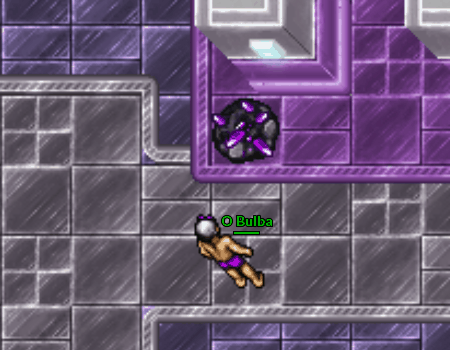
| | * Para escolher esta especialização, o jogador deverá ir até '''Cerulean''' na '''Nightmare World''', descer as escadas do CP e procurar o '''NPC Fhistel.''' |
|
| |
|
| <table class="seeMore"> | | <center>[[Arquivo:Localização_NPC_Fhistel.png|link=]]</center> |
| <tr>
| | |
| <td class="seeMore__image">[[Arquivo:Telekinetic-compass.gif|link=]]</td>
| | =Outfits= |
| <td> '''Veja mais: [[Cosmic Quest]] e [[Desert Quest]]'''</td>
| |
| </tr>
| |
| </table>
| |
|
| |
|
| === T1H Cosmic Quest ===
| | * Ao se tornar '''Alquimista''', o jogador recebe a '''outfit''' referente à sua especialização. |
| Alguns dos T1H podem ser capturados após a conclusão da Cosmic Quest. São Pokémon essenciais para jogadores em locais de caça fortes, bem como podem facilitar diversos conteúdos dentro do jogo. Abaixo é possível visualizar a lista dos T1H Pokémon disponíveis para obtenção após a Cosmic Quest. <br>
| |
|
| |
|
| <center>
| | {|class="wikitable" width = "10%" |
| {| class="wikitable" width="30%" | | !colspan="2" | Outfits |
| ! width="1%" style="background-color: #4682B4" | Elemento
| |
| ! width="1%" style="background-color: #4682B4" | Ícone
| |
| ! width="10%" style="background-color: #4682B4" | Pokémon | |
| |- | | |- |
| | align="center" | [[Arquivo:Grass.png|link=]]
| | ! Masculina |
| | align="center" | [[Arquivo:254-Shiny_Sceptile.png|link=Shiny Sceptile]]
| | ! Feminina |
| | align="center" | '''[[Shiny Sceptile]]'''
| | |- |
| |-
| | |<Center>[[Arquivo:Outfit_Especializacao_Alchemist_Male.png|link=]] || <center>[[Arquivo:Outfit_Especializacao_Alchemist_Female.png|link=]] |
| | align="center" | [[Arquivo:Steel.png|link=]]
| |
| | align="center" | [[Arquivo:Shiny_Mawlie.png|link=Shiny Mawile]]
| |
| | align="center" | '''[[Shiny Mawile]]'''
| |
| |-
| |
| | align="center" | [[arquivo:Fighting.png|link=]]
| |
| | align="center" | [[Arquivo:297-Shiny_Hariyama.png|link=Shiny Hariyama]]
| |
| | align="center" | '''[[Shiny Hariyama]]'''
| |
| |-
| |
| | align="center" | [[arquivo:Fairy.png|link=]]
| |
| | align="center" | [[Arquivo:282-Shiny_Gardevoir.png|link=Shiny Gardevoir]]
| |
| | align="center" | '''[[Shiny Gardevoir]]'''
| |
| |-
| |
| | align="center" | [[arquivo:Rock.png|link=]]
| |
| | align="center" | [[Arquivo:409-Shiny_rampardos.png|link=Shiny Rampardos]]
| |
| | align="center" | '''[[Shiny Rampardos]]'''
| |
| |-
| |
| | align="center" | [[arquivo:Fire.png|link=]]
| |
| | align="center" | [[Arquivo:631-Shiny_Heatmor.png|link=Shiny Heatmor]]
| |
| | align="center" | '''[[Shiny Heatmor]]'''
| |
| |-
| |
| | align="center" | [[arquivo:Electric.png|link=]]
| |
| | align="center" | [[Arquivo:417-Shiny_Pachirisu.png|link=Shiny Pachirisu]]
| |
| | align="center" | '''[[Shiny Pachirisu]]'''
| |
| |-
| |
| | align="center" | [[arquivo:Dark1.png|link=]]
| |
| | align="center" | [[Arquivo:571-Zoroark%281%29.png|link=Zoroark]] | |
| | align="center" | '''[[Zoroark]]''' | |
| |-
| |
| | align="center" | [[arquivo:Flying.png|link=]]
| |
| | align="center" | [[Arquivo:018M.png|link=Mega Pidgeot]]
| |
| | align="center" | '''[[Mega Pidgeot]]'''
| |
| |-
| |
| | align="center" | [[arquivo:Ice.png|link=]] | |
| | align="center" | [[Arquivo:Megaglalie.png|link=Mega Glalie]]
| |
| | align="center" | '''[[Mega Glalie]]'''
| |
| |} | | |} |
| </center> | | </center> |
|
| |
|
| === T1H Desert Quest === | | =Recursos= |
| | |
| | * '''Alquimistas''' podem realizar suas coletas de '''duas''' formas. |
|
| |
|
| Por outro lado, com a chegada da Nightmare Desert Quest novos T1H Pokémon foram disponibilizados para que os jogadores possam tentar capturar. Assim como os outros, são essenciais para os jogadores nos locais de caça fortes, facilitando diversos conteúdos. Além disso, alguns possuem elementos diferentes dos obtidos pela Cosmic Quest, o que traz uma versatilidade interessante para os jogadores.
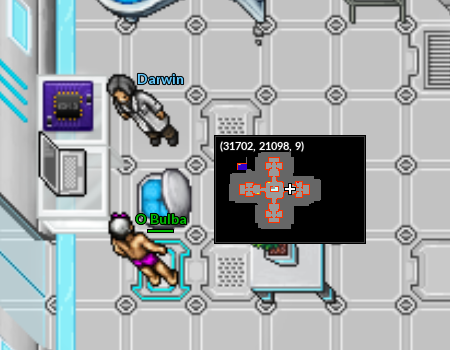
| | * Para comprar suas '''ferramentas de trabalho''', o jogador deverá ir até o '''NPC Darwin''', que estará localizado próximo ao NPC Fhistel. |
| | |
| | <center>[[Arquivo:Localização_NPC_Darwin.png|link=]]</center> |
| | |
| | * Além disso, este NPC permitirá que o jogador compre '''Medicinal Leaves''', recurso de extrema importância para '''professores''' com mais de '''100''' níveis de profissão. |
|
| |
|
| <center> | | <center> |
| {| class="wikitable" width="30%" | | {| class="wikitable sortable" width="25%" |
| ! width="1%" style="background-color: #4682B4" | Elemento
| | |+ |
| ! width="1%" style="background-color: #4682B4" | Ícone
| |
| ! width="10%" style="background-color: #4682B4" | Pokémon
| |
| |-
| |
| | align="center" | [[arquivo:Bug.png|link=]]
| |
| | align="center" | [[Arquivo:469-Shiny_Yanmega.png|link=Shiny Yanmega]]
| |
| | align="center" | '''[[Shiny Yanmega]]'''
| |
| |-
| |
| | align="center" | [[arquivo:Steel.png|link=]]
| |
| | align="center" | [[Arquivo:681-Shiny_Aegislash.png|link=Shiny Aegislash]]
| |
| | align="center" | '''[[Shiny Aegislash]]'''
| |
| |- | | |- |
| | align="center" | [[arquivo:Fighting.png|link=]]
| | ! class="unsortable" colspan="2" | Item !! Preço |
| | align="center" | [[Arquivo:620-Shiny_Mienshao.png|link=Shiny Mienshao]]
| |
| | align="center" | '''[[Shiny Mienshao]]'''
| |
| |- | | |- |
| | align="center" | [[arquivo:Psychic.png|link=]] | | | align="center" | [[Arquivo:Green_Medicinal_Leaf.png|link=]] || align="center" | '''Green Medicinal Leaf''' || '''500 Dólares''' |
| | align="center" | [[Arquivo:575-Shiny_Gothitelle.png|link=Shiny Gothitelle]] | |
| | align="center" | '''[[Shiny Gothitelle]]''' | |
| |- | | |- |
| | align="center" | [[arquivo:Ground.png|link=]] | | | align="center" | [[Arquivo:Yellow_Medicinal_Leaf.png|link=]] || align="center" | '''Yellow Medicinal Leaf''' || '''500 Dólares''' |
| | align="center" | [[Arquivo:553-Shiny_Krookodile.png|link=Shiny Krookodile]] | |
| | align="center" | '''[[Shiny Krookodile]]''' | |
| |- | | |- |
| | align="center" | [[arquivo:Fire.png|link=]] | | | align="center" | [[Arquivo:Red_Medicinal_Leaf.png|link=]] || align="center" | '''Red Medicinal Leaf''' || '''500 Dólares''' |
| | align="center" | [[Arquivo:609-Shiny_Chandelure.png|link=Shiny Chandelure]] | |
| | align="center" | '''[[Shiny Chandelure]]''' | |
| |- | | |- |
| | align="center" | [[arquivo:Electric.png|link=]] | | | align="center" | [[Arquivo:Gardening_Bag.png|link=]] || align="center" | '''Gardening Bag''' || '''2.500 Dólares''' |
| | align="center" | [[Arquivo:849-Shiny_Toxtricity.png|link=Shiny Toxtricity]] | |
| | align="center" | '''[[Shiny Toxtricity]]'''
| |
| |- | | |- |
| | align="center" | [[arquivo:Poison1.png|link=]] | | | align="center" | [[Arquivo:Alchemist_Empty_Becker.png|link=]] || align="center" | '''Alchemist Empty Becker''' || '''10.000 Dólares''' |
| | align="center" | [[Arquivo:569-Shiny_Garbodor.png|link=Shiny Garbodor]] | |
| | align="center" | '''[[Shiny Garbodor]]'''
| |
| |- | | |- |
| | align="center" | [[arquivo:Dragon.png|link=]] | | | align="center" | [[Arquivo:Mortar.png|link=]] || align="center" | '''Mortar''' || '''10.000 Dólares''' |
| | align="center" | [[Arquivo:635-Shiny_Hydreigon.png|link=Shiny Hydreigon]] | |
| | align="center" | '''[[Shiny Hydreigon]]'''
| |
| |- | | |- |
| | align="center" | [[arquivo:Water.png|link=]] | | | align="center" | [[Arquivo:Tablet.png|link=]] || align="center" | '''Tablet''' || '''10.000 Dólares''' |
| | align="center" | [[Arquivo:419-Shiny_Floatzel.png|link=Shiny Floatzel]] | |
| | align="center" | '''[[Shiny Floatzel]]'''
| |
| |} | | |} |
| </center> | | </center> |
|
| |
|
| | ==Recursos Comuns [[Arquivo:Darkrai-Essence.gif|link=]] [[Arquivo:Black-Darkrai-Essence.gif|link=]] [[Arquivo:Green_Medicinal_Leaf.png|link=]] [[Arquivo:Yellow_Medicinal_Leaf.png|link=]] [[Arquivo:Red_Medicinal_Leaf.png|link=]]== |
|
| |
|
| '''Observação:''' O Pokémon [[Arquivo:201-UnownLegion.png|link=]] '''Unown Legion''' também é um T1H, entretanto, ele possui a função de [[Arquivo:Interface_SupportOT_PVE.png|20px|link=]] Suporte Contínuo. Ele é extremamente importante em diversos conteúdos como Boss Fight e algumas missões em geral. Além disso, o método de obtenção dele é totalmente diferente dos outros T1H considerados [[Arquivo:Interface_BDD_PVE.png|20px|link=]] Causadores de Dano Explosivo. <br>
| | * Ao utilizar o [[Arquivo:Tablet.png|link=]] '''Tablet''', o jogador pode coletar a alma dos [[Arquivo:491-Darkrai.png|25px|link=]] '''Darkrai Minion''' e dos [[Arquivo:Nightmare_Crystal.png|25px|link=]] '''Nightmare Crystal'''. |
|
| |
|
| <table class="seeMore">
| | * Este tipo de coleta é comum entre as duas especializações de Professor ('''alquimista''' e '''acadêmico'''). |
| <tr>
| |
| <td class="seeMore__image">[[Arquivo:Telekinetic-compass.gif|link=]]</td>
| |
| <td> '''Veja mais: [[Pokémon_Obtidos_via_NPC#Unown_Legion|Unown Legion]]'''</td>
| |
| </tr>
| |
| </table>
| |
|
| |
|
| | <tabber> |
|
| |
|
| =Sistema De Mérito=
| | |-|Darkrai Essence= |
|
| |
|
| Após completar cada quest, o jogador libera a possibilidade de captura dos T1H.
| | * Ao matar [[Arquivo:491-Darkrai.png|25px|link=]] '''Darkrai Minions''', o jogador pode '''"estudar"''' os corpos das criaturas para adquirir [[Arquivo:Darkrai-Essence.gif|link=]] '''Darkrai Essences'''. |
|
| |
|
| Nestas locais de caça, em específico, há um '''sistema de méritos:'''
| | <center>[[Arquivo:Recurso_Darkrai_Minion.gif|link=]]</center> |
| * A cada 10 balls jogadas em '''T1H''', o jogador recebe uma mensagem informando que suas chances de capturar o Pokémon aumentaram.
| |
| * No caso de Pokémon Mega, a cada 10 coletas de loot, as chances de obter a '''Mega Stone''' do Pokémon desejado aumentam.
| |
| * No caso do Pokémon [[Arquivo:745-Lycanroc_Dusk_Form.png|link=Lycanroc_Dusk_Form]] '''Lycanroc Dusk Form''', a cada 10 coletas de seu loot, as chances de obter a '''Moon Stone''' aumentam.
| |
|
| |
|
| <span style="color:#FF0000">'''Atenção:'''</span> As desvantagens de baixa '''Stamina''' não afetam a captura nem o drop dos T1H
| | |-|Black Darkrai Essence= |
|
| |
|
| <center>[[Arquivo:Banner_Pokémon-T1H.png|link=]]</center>
| | * Ao derrotar '''Nightmare Crystals''', o jogador pode utilizar o '''tablet''' no '''Crystal''' destruído para receber '''1 [[Arquivo:Black-Darkrai-Essence.gif|link=]] Black Darkrai Essence'''. |
|
| |
|
| =Cosmic Island=
| | '''Observação:''' O jogador pode estudar essas criaturas e entidades sem tê-las derrotado. Para isso, deve estar no mesmo '''grupo''' da pessoa que os derrotou. |
|
| |
|
| Na Cosmic Island o jogador pode projetar seu próprio T1H.
| | <center>[[Arquivo:Recurso_Nightmare_Crystal.gif|link=]]</center> |
|
| |
|
| Ao concluir a '''[[Cosmic Quest]]''', o jogador poderá escolher qual respawn deseja caçar e fazer a Task. Falar com o '''NPC Resistance Member''' levará o jogador até a área de respawn de T1H.
| | </tabber> |
| <center>[[Arquivo:Entrada_Cosmic.png|link=]]</center> <br /> | |
|
| |
|
| Após escolher seu respawn o jogador deverá ir à área de entrada desejada, falar com o '''Líder''' para iniciar a Task e com o '''Resistance Member''' para entrar na Hunt. <br />
| | ===Medicinal Herbs=== |
| <center>
| |
| [[Arquivo:Respawn_T1H_Cosmic.png|link=]]
| |
| </center>
| |
| É possível trocar de Task '''apenas uma vez''' no Merchant que se localiza no Subterrâneo da Cosmic Island. Caso troque, o jogador terá que '''recomeçar''' a Task no novo respawn escolhido.
| |
| <center>[[Arquivo:Merchant_Cosmic_Island.png|link=]]</center><br />
| |
|
| |
|
| Ao concluir a task, receberá como recompensa:
| | * O jogador pode encontrar '''3 tipos''' de '''Medicinal Herbs'''. |
|
| |
|
| <center>
| | {| class="wikitable" width = "20%" |
| {| class="wikitable" width="35%" | | |+ |
| |- align="center"
| |
| !align="center" width="1%" colspan="4" style="background-color: #660099" | '''Recompensas'''
| |
| |-
| |
| !width="5% | Nightmare Box
| |
| !width="30% | 500 na contagem para o mérito
| |
| |- align="center"
| |
| | [[Arquivo:Nightmare_box.png|link=]]
| |
| | Ganhará 500 pontos acumulativos na contagem para a captura/drop do T1H.
| |
| |}
| |
| </center>
| |
| | |
| | |
| Ao abrir a[[Arquivo:Nightmare_box.png|link=]]'''Nightmare box''', receberá em sua mochila os seguintes itens:
| |
| | |
| <center>
| |
| {| class="wikitable" style="color:white" width="35%"
| |
| |-
| |
| ! scope="col" style="background-color: #660099" | 2x Big Fortune Totem
| |
| ! scope="col" style="background-color: #660099" | Empty Premier Balls
| |
| ! scope="col" style="background-color: #660099" | Empty Beast Balls
| |
| ! scope="col" style="background-color: #660099" | Empty Nightmare Balls
| |
| |- style="width:50px; text-align:center;"
| |
| | [[Arquivo:Big-fortune-totem4.png|link=Sistema de Pokémon T1H]]
| |
| | [[Arquivo:Stack-premier-balls.png|link=Sistema de Pokémon T1H]] | |
| | [[Arquivo:Stack-beast-balls.png|link=Sistema de Pokémon T1H]]
| |
| | [[Arquivo:Stack-nightmare-balls.png|link=Sistema de Pokémon T1H]]
| |
| |}
| |
| </center>
| |
| ==Task== <!--T:4-->
| |
| | |
| <tabber>
| |
| |-|Zoroark=
| |
| <center>
| |
| [[Arquivo:Morty7.png|link=]] <br> [[Arquivo:Malefi1c.png|link=]] '''Morty''' <br>
| |
| {| class="wikitable" style="color:white"
| |
| |- | | |- |
| ! scope="col" style="background-color: #660099" | 1º Task | | ! Green Medicinal Herb!! Yellow Medicinal Herb !! Red Medicinal Herb |
| ! scope="col" style="background-color: #660099" | 2º Task | |
| ! scope="col" style="background-color: #660099" | 3º Task | |
| |- style="width:70px; text-align:center; color:black"
| |
| | [[Arquivo:570-Zorua.png|link=]]<br> 1000 T1H Zorua
| |
| | [[Arquivo:Shadow_Fox_Tail.png|link=Drop de Itens]]<br> 50 Shadow Fox Tail
| |
| | [[Arquivo:571-Zoroark%281%29.png|link=]]<br> 500 Zoroark
| |
| |}
| |
| </center>
| |
| |-|Shiny Mawile=
| |
| <center>
| |
| [[Arquivo:Jasmine7.png|link=]] <BR> [[Arquivo:Ironhard1.png|link=Clã]] '''Jasmine''' <br>
| |
| <center>
| |
| {| class="wikitable" style="color:white"
| |
| |- | | |- |
| ! scope="col" style="background-color: #660099" | 1º Task
| | | align="center" | [[Arquivo:Green_Medicinal_Herb.gif|25px|link=]] |
| ! scope="col" style="background-color: #660099" | 2º Task
| | | align="center" | [[Arquivo:Yellow_Medicinal_Herb.gif|25px|link=]] |
| ! scope="col" style="background-color: #660099" | 3º Task
| | | align="center" | [[Arquivo:Red_Medicinal_Herb.gif|28px|link=]] |
| |- style="width:70px; text-align:center; color:black"
| |
| | [[Arquivo:303-Mawile.png|link=]]<br> 1000 T1H Mawile | |
| | [[Arquivo:Metal_Pink_Jaw.png|link=Drop de Itens]]<br> 50 Metal Pink Jaw | |
| | [[Arquivo:Shiny_Mawlie.png|link=]]<br> 500 Shiny Mawile | |
| |} | | |} |
| </center>
| |
| |-|Shiny Pachirisu=
| |
| <center>
| |
|
| |
|
| [[Arquivo:L%C3%ADder_Wattson.png|link=]] <br> [[Arquivo:Raibol1t.png|link=]] '''Wattson''' <br>
| | * Este recurso é coletável por '''qualquer jogador''', porém os itens que os utilizam são craftáveis apenas por '''alquimistas''' e '''acadêmicos'''. |
|
| |
|
| {| class="wikitable" style="color:white"
| | <center>[[Arquivo:Medicinal_Herb.png|link=]]</center> |
| |-
| |
| ! scope="col" style="background-color: #660099" | 1º Task
| |
| ! scope="col" style="background-color: #660099" | 2º Task
| |
| ! scope="col" style="background-color: #660099" | 3º Task
| |
| |- style="width:70px; text-align:center; color:black"
| |
| | [[Arquivo:417-Pachirisu.png|link=]]<br> 1000 T1H Pachirisu
| |
| | [[Arquivo:Electric_Pink_Box.png|link=Drop de Itens]]<br> 50 Electric Pink Box
| |
| | [[Arquivo:417-Shiny_Pachirisu.png|link=]]<br> 500 Shiny Pachirisu
| |
| |}
| |
| </center> | |
| |-|Shiny Heatmor=
| |
| <center>
| |
| [[Arquivo:Flannery7.png|link=]] <br> [[Arquivo:Volcanic1.png|link=Clã]] '''Flannery''' <br>
| |
|
| |
|
| {| class="wikitable" style="color:white"
| | * Ao coletar o recurso, o jogador receberá em seu inventário '''Medicinal Leaves''' de acordo com a cor da '''Medicinal Herb''' coletada. |
| |-
| |
| ! scope="col" style="background-color: #660099" | 1º Task
| |
| ! scope="col" style="background-color: #660099" | 2º Task
| |
| ! scope="col" style="background-color: #660099" | 3º Task
| |
| |- style="width:70px; text-align:center; color:black"
| |
| | [[Arquivo:631-Heatmor.png|link=]]<br> 1000 T1H Heatmor
| |
| | [[Arquivo:Pot_Of_Dark_Lava.png|link=Drop de Itens]]<br> 50 Pot of Dark Lava
| |
| | [[Arquivo:631-Shiny_Heatmor.png|link=]]<br> 500 Shiny Heatmor
| |
| |}
| |
| </center>
| |
| |-|Shiny Hariyama=
| |
| <center>
| |
| [[Arquivo:Npc-chuck.png|link=]] <br> [[Arquivo:Gardestrike1.png|link=]] '''Chuck'''<br>
| |
| {| class="wikitable" style="color:white"
| |
| |-
| |
| ! scope="col" style="background-color: #660099" | 1º Task
| |
| ! scope="col" style="background-color: #660099" | 2º Task
| |
| ! scope="col" style="background-color: #660099" | 3º Task
| |
| |- style="width:70px; text-align:center; color:black"
| |
| | [[Arquivo:296-Makuhita.png|link=]] [[Arquivo:297-Hariyama.png|link=]]<br>1000 T1H Makuhita ou T1H Hariyama
| |
| | [[Arquivo:Big_Red_Hand.png|link=Drop de Itens]]<br> 50 Big Red Hand
| |
| | [[Arquivo:297-Shiny_Hariyama.png|link=]]<br> 500 Shiny Hariyama
| |
| |}
| |
| </center>
| |
| |-|Mega Glalie=
| |
| <center>
| |
| [[Arquivo:L%C3%ADder_Pryce.png|link=]] <br> [[Arquivo:Seave1ll.png|link=]] '''Price''' <br>
| |
| | |
| {| class="wikitable" style="color:white"
| |
| |-
| |
| ! scope="col" style="background-color: #660099" | 1º Task
| |
| ! scope="col" style="background-color: #660099" | 2º Task
| |
| ! scope="col" style="background-color: #660099" | 3º Task
| |
| |- style="width:70px; text-align:center; color:black"
| |
| | [[Arquivo:361-Snorut.png|link=]] [[Arquivo:362-Glalie.png|link=]]<br>1000 T1H Snorunt ou T1H Glalie
| |
| | [[Arquivo:Snow_Blocks.png|link=Drop de Itens]]<br> 50 Snow Blocks
| |
| | [[Arquivo:Megaglalie.png|link=]]<br> 500 Mega Glalie
| |
| |}
| |
| </center>
| |
| |-|Shiny Rampardos=
| |
| <center>
| |
| [[Arquivo:Roxanne.png|link=]] <br> [[Arquivo:Orebound1.png|link=]] '''Roxanne'''<br>
| |
|
| |
|
| {| class="wikitable" style="color:white" | | {| class="wikitable" width = "20%" |
| | |+ |
| |- | | |- |
| ! scope="col" style="background-color: #660099" | 1º Task | | ! Green Medicinal Leaves!! Yellow Medicinal Leaves !! Red Medicinal Leaves |
| ! scope="col" style="background-color: #660099" | 2º Task | |
| ! scope="col" style="background-color: #660099" | 3º Task | |
| |- style="width:70px; text-align:center; color:black"
| |
| | [[Arquivo:408-Cranidos.png|link=]] [[Arquivo:409-Rampardos%281%29.png|link=]]<br>1000 T1H Cranidos ou T1H Rampardos
| |
| | [[Arquivo:Solid_Red_Head.png|link=Drop de Itens]]<br> 50 Solid Red Head
| |
| | [[Arquivo:409-Shiny_rampardos.png|link=]]<br> 500 Shiny Rampardos
| |
| |}
| |
| </center>
| |
| |-|Shiny Sceptile=
| |
| <center>
| |
| [[Arquivo:Erika7.png|link=]] <br> [[Arquivo:Naturia1.png|link=Clã]] '''Erika''' <br>
| |
| | |
| {| class="wikitable" style="color:white"
| |
| |- | | |- |
| ! scope="col" style="background-color: #660099" | 1º Task
| | | align="center" | [[Arquivo:Green_Medicinal_Leaf.png|link=]] |
| ! scope="col" style="background-color: #660099" | 2º Task
| | | align="center" | [[Arquivo:Yellow_Medicinal_Leaf.png|link=]] |
| ! scope="col" style="background-color: #660099" | 3º Task
| | | align="center" | [[Arquivo:Red_Medicinal_Leaf.png|link=]] |
| |- style="width:70px; text-align:center; color:black"
| |
| | [[Arquivo:252-Treecko.png|link=]] [[Arquivo:253-Grovyle.png|link=]] [[Arquivo:254-Sceptile.png|link=]]<br>1000 T1H Treecko, T1H Grovyle ou T1H Sceptile | |
| | [[Arquivo:Blue_Greens.png|link=Drop de Itens]]<br> 50 Blue Greens | |
| | [[Arquivo:254-Shiny_Sceptile.png|link=]] <br>500 Shiny Sceptile | |
| |} | | |} |
| </center>
| |
| |-|Mega Pidgeot=
| |
| <center>
| |
|
| |
|
| [[Arquivo:L%C3%ADder_Falkner.png|link=]] <br> [[Arquivo:Wingeon1.png|link=Clã]] '''Falkner''' <br> | | * O jogador deverá usar o [[Arquivo:Mortar.png|link=]] '''Mortar''', para transformar os '''Medicinal Leaves''' em '''Crushed Leaves'''. Esta é a forma utilizada para fabricar os itens da profissão. |
|
| |
|
| {| class="wikitable" style="color:white" | | {| class="wikitable" width = "20%" |
| | |+ |
| |- | | |- |
| ! scope="col" style="background-color: #660099" | 1º Task | | ! Green Crushed Leaves!! Yellow Crushed Leaves !! Red Crushed Leaves |
| ! scope="col" style="background-color: #660099" | 2º Task | |
| ! scope="col" style="background-color: #660099" | 3º Task | |
| |- style="width:70px; text-align:center; color:black"
| |
| | [[Arquivo:016-Pidgey.png|link=]] [[Arquivo:017-Pidgeotto.png|link=]] [[Arquivo:018-Pidgeot.png|link=]]<br>1000 T1H Pidgey, T1H Pidgeotto ou T1H Pidgeot
| |
| | [[Arquivo:Shiny_Feather.png|link=Drop de Itens]]<br> 50 Shiny Feather
| |
| | [[Arquivo:018M.png|link=]]<br> 500 Mega Pidgeot
| |
| |}
| |
| </center>
| |
| |-|Shiny Gardevoir=
| |
| <center>
| |
| | |
| [[Arquivo:Sabruna7.png|link=]] <br> [[Arquivo:Psycraft1.png|link=]] '''Sabrina''' <br>
| |
| | |
| {| class="wikitable" style="color:white"
| |
| |- | | |- |
| ! scope="col" style="background-color: #660099" | 1º Task
| | | align="center" | [[Arquivo:Green_Crushed_Leaf.png|link=]] |
| ! scope="col" style="background-color: #660099" | 2º Task
| | | align="center" | [[Arquivo:Yellow_Crushed_Leaf.png|link=]] |
| ! scope="col" style="background-color: #660099" | 3º Task
| | | align="center" | [[Arquivo:Red_Crushed_Leaf.png|link=]] |
| |- style="width:70px; text-align:center; color:black"
| |
| | [[Arquivo:280-Ralts.png|link=]] [[Arquivo:281-Kirlia.png|link=]] [[Arquivo:282-Gardevoir.png|link=]]<br>1000 T1H Ralts, T1H Kirlia ou T1H Gardevoir | |
| | [[Arquivo:Fairy_Flower.png|link=Drop de Itens]]<br> 50 Fairy Flower | |
| | [[Arquivo:282-Shiny_Gardevoir.png|link=]]<br> 500 Shiny Gardevoir | |
| |} | | |} |
| </center>
| |
| </tabber>
| |
|
| |
| ==Troca T1H ==
| |
|
| |
| * Após finalizar a Task T1H o jogador poderá trocar, apenas uma vez, qualquer (inclusive o mesmo) T1H por outro na [[Arquivo:Premier-ball%281%29.png|link=]] '''Premier Ball'''. <br>
| |
|
| |
| '''Observação:''' Caso o jogador queira trocar o T1H pelo mesmo na [[Arquivo:Premier-ball%281%29.png|link=]] '''Premier Ball''', não perderá held nem boost. Entretanto, caso tente trocar um T1H com helds e boost por outro na premier ball, '''perderá todos os atributos''' deste Pokémon.
| |
|
| |
|
| * Primeiro o treinador deverá ter finalizado a Task e possuir um T1H na Bag, depois ir ao NPC representante do Clã do T1H com o mesmo na Bag e falar com o NPC para escolher qual T1H deseja receber.
| | ==Recurso exclusivo [[Arquivo:Dew_Becker.png|link=]]== |
|
| |
|
| <span style="color:#FF0000">'''Atenção:'''</span> Caso pegue uma das Megas stones o jogador poderá ir na entrada do respawn e conversar com o Resistance Member para trocá-la pelo mesmo Pokémon na Premier Ball, sem gastar a troca única.
| | * Ao utilizar o [[Arquivo:Alchemist_Empty_Becker.png|link=]] '''Alchemist Empty Becker''' em uma '''Wet Strange Plant''', o jogador consegue coletar [[Arquivo:Dew_Becker.png|link=]] '''Dew Beckers''', que servirão como recurso para diversos itens de confecção '''exclusiva''' da especialização de Alquimista. |
|
| |
|
| == NPCs Cosmic Island == <!--T:7--> | | <center>[[Arquivo:Recurso_Dew_Becker.gif|link=]]</center> |
|
| |
|
| Na Cosmic Island, o jogador poderá encontrar diversos '''NPCs''' que o auxiliarão com tasks, trocas, etc.
| | * Ao coletar o recurso, o jogador retirará o '''orvalho''' da planta, fazendo com que esta fique seca, e se torne uma '''Strange Plant'''. |
| | |
| {{#widget:container|class=npcCard__list justify-center}}
| |
| {{#widget:npccard|url={{filepath:Carmilla.png|60px}}|name=NPC Carmilla|link={{fullurl:NPC_Carmilla}} }}
| |
| {{#widget:npccard|url={{filepath:Npc-shea.png|60px}}|name=NPC Shea|link={{fullurl:NPC_Shea}} }}
| |
| {{#widget:npccard|url={{filepath:Raven.png|60px}}|name=NPC Raven|link={{fullurl:NPC_Raven}} }}
| |
| {{#widget:npccard|url={{filepath:NPC_Yuki.png|50px}}|name=NPC Yuki|link={{fullurl:NPC_Yuki}} }}
| |
| {{#widget:closecontainer}}
| |
| | |
| | |
| <center>[[Arquivo:Banner_Pokémon-T1H.png|link=]]</center>
| |
| | |
| =Desert Island=
| |
| | |
| * Na Desert Island o jogador pode projetar seu próprio T1H.
| |
| | |
| * Ao concluir a '''Desert Quest''', o jogador poderá caçar qualquer T1H dos disponíveis na Desert Island. Para ir até este local, o jogador deverá falar com '''Renata''', em cima do centro Pokémon de '''Lavender'''. | |
| | |
| <center>[[Arquivo:NPC_Renata.png|link=]]</center>
| |
| | |
| * Ao chegar na '''Desert Island''', o jogador poderá escolher o local onde quer caçar.
| |
| | |
| <center>[[Arquivo:Localização_Respawn_Desert_Island.png|link=]]</center>
| |
| | |
| '''Observação:''' Ao falar com o NPC '''Nyx Trainee''' as localizações dos portais serão marcadas no mapa do jogador.
| |
| | |
| <center>[[Arquivo:Nyx_Trainee.png|link=]]</center>
| |
| | |
| ==Lycanroc*==
| |
| | |
| * A hunt de [[Arquivo:745-Lycanroc.png|link=Lycanroc]] '''Lycanroc''' tem um sistema parecido com os T1H de Mega Stone da Cosmic Island.
| |
| | |
| *Ao matar o [[Arquivo:745-Lycanroc_Dusk_Form.png|link=Lycanroc_Dusk_Form]] '''Lycanroc Dusk Form''', o jogador deve coletar o loot para que o '''sistema de mérito''' funcione. Cada coleta equivale a uma tentativa de captura nos T1H tradicionais da Desert Island.
| |
| | |
| *Ao dropar a [[Arquivo:Moon_stone.png|25px|link=]] '''Moon Stone''', o jogador pode trocá-la por um dos T1H no '''NPC Sebastian'''. Este NPC só pode realizar a troca de um T1H (ou '''Moon Stone''') uma vez. Caso o jogador já tenha realizado a troca, poderá vendê-la pra outro jogador.
| |
| | |
| ==Fogueiras==
| |
| | |
| * '''Fogueiras''' localizadas nas entradas dos Respawn de cada portal '''curam''' e '''restauram''' o cooldown das skills dos Pokémon.
| |
| | |
| * O jogador precisará esperar '''30 minutos''' para utilizar a fogueira novamente.
| |
| | |
| <center>[[Arquivo:Fogueira_Desert_Island.png|link=]]</center>
| |
| | |
| ==Rifts==
| |
| | |
| * As '''Rifts''' são um tipo de dungeon nas quais o jogador encontrará 43 Pokémon da hunt que escolher, dentre eles '''17''' serão o T1H escolhido. Neste local o jogador poderá tentar capturá-los.
| |
| | |
| * Para entrar, o jogador precisa juntar 7 [[Arquivo:Rift_Fragment.png|10px|link=]] '''Fragmentos de rift.'''
| |
| | |
| <center>[[Arquivo:Desert_Island_Rifts.png|link=]]</center>
| |
|
| |
|
| <center> | | <center> |
| {| class="wikitable bg-none border-0" width="25%" style="text-align:center;" | | {| class="wikitable" |
| ! width="50%" colspan="1"| Recompensas !! Raridade
| | |+ |
| |- | | |- |
| |[[Arquivo:Desert_Addon_Recipe.png|link=]] '''Desert Addon Recipe''' || '''Lendário'''
| | ! Wet Strange Plant !! Strange Plant |
| |- | | |- |
| ! colspan="3" | [[Arquivo:Exp_icon.png|30px|link=]] Experiência: 50.000
| | | [[Arquivo:Wet_Strange_Plant.png|link=]] || [[Arquivo:Strange_Plant.png|link=]] |
| |- | | |- |
| ! colspan="3" | [[Arquivo:Exp_icon_nw.png|30px|link=]] NW Experiência: 1.020
| |
| |} | | |} |
| </center> | | </center> |
|
| |
|
| ==NPCs Desert Island== | | =Árvore de Berry= |
|
| |
|
| Na '''Desert Island''', o jogador poderá encontrar diversos NPCs que o auxiliarão com tasks, trocas, etc.
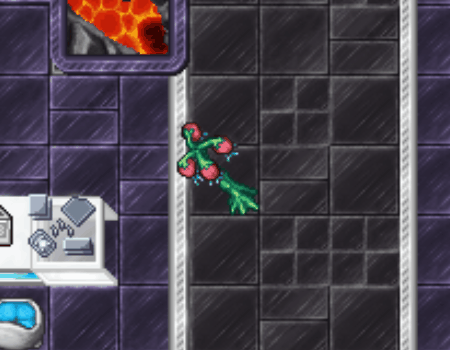
| | * '''Alquimistas''' podem coletar recursos da '''Árvore de Berry''', obtendo '''Berries''' e '''Medicinal Leaves'''. |
|
| |
|
| {{#widget:container|class=npcCard__list justify-center}}
| | <span style="color:red">'''Atenção:'''</span> Apenas as '''2 coletas''' da Árvore de Berry concederão '''Berries'''. Após isso, o jogador receberá apenas '''Medicinal Leaves.''' |
| {{#widget:npccard|url={{filepath:NPC_Nyx_Trainee.png|60px}}|name=NPC Nyx Trainee|link={{fullurl:NPC_Nyx_Trainee}} }}
| |
| {{#widget:npccard|url={{filepath:NPC_Joel.png|60px}}|name=NPC Joel|link={{fullurl:NPC_Joel}} }}
| |
| {{#widget:npccard|url={{filepath:NPC_Sebastian.png|60px}}|name=NPC Sebastian|link={{fullurl:NPC_Sebastian}} }}
| |
| {{#widget:npccard|url={{filepath:NPC_Mike.png|50px}}|name=NPC Mike|link={{fullurl:NPC_Mike}} }}
| |
| {{#widget:npccard|url={{filepath:NPC_Blanca.png|50px}}|name=NPC Blanca|link={{fullurl:NPC_Blanca}} }}
| |
| {{#widget:npccard|url={{filepath:NPC_Renata_Desert.png|50px}}|name=NPC Renata|link={{fullurl:NPC_Renata}} }}
| |
| {{#widget:closecontainer}}
| |
|
| |
|
| =NPC Shea= | | <center>[[Arquivo:Árvore_de_Berries.gif|link=]]</center> |
|
| |
|
| <center>[[Arquivo:Npc-shea.png|60px|link=]]</center>
| | =Crafts Exclusivos= |
| <center>'''NPC Shea'''</center>
| |
|
| |
|
| ==Função:==
| | *Apenas '''alquimistas''' podem confeccionar estes itens. |
|
| |
|
| Shea é responsável por informar quantos [[Arquivo:018M.png|link=]] '''Mega Pidgeot''' e [[Arquivo:Megaglalie.png|link=]] '''Mega Glalie''' o jogador já derrotou.
| | <table class="seeMore"> |
| | <tr> |
| | <td class="seeMore__image">[[Arquivo:Telekinetic-compass.gif|link=]]</td> |
| | <td> '''Veja Também: [[Craft_Profissões_-_Professor#Rank_S|Crafts Professor - Rank S]]'''. </td> |
| | </tr> |
| | </table> |
|
| |
|
| Após dropar a Mega Stone, o NPC informará quantos Mega Pokémon precisou derrotar pra dropá-la.
| | ==Elixires Exclusivos== |
|
| |
|
| ==Localização:==
| | * '''Alquimistas''' são capazes de confeccionar '''elixires especiais''' com diferentes funções, respeitando o princípio básico da ''Alquimia''. A '''Troca Equivalente''': ''Para conseguir algo, é preciso sacrificar algo de valor equivalente.'' |
| ===Nightmare World:===
| |
|
| |
|
| [[Arquivo:Localização_Shea.png|link=]]
| | <center class="center-tab"><tabber> |
|
| |
|
| =NPC Raven=
| | |-|Kamikaze Elixir= |
|
| |
|
| <center>[[Arquivo:Raven.png|link=]]</center>
| | '''Benefício:''' O [[Arquivo:Kamikaze_Elixir.png|link=]] '''Kamikaze Elixir''' aumenta o '''ataque''' do Pokémon do jogador em '''80%''' por '''6 segundos'''. |
| <center>'''NPC Raven'''</center>
| |
|
| |
|
| ==Função:== | | <span style="color:red">'''Malefício:'''</span> A '''velocidade''' do Pokémon do jogador diminuirá em '''50%''' por '''6 segundos'''. |
|
| |
|
| Raven é responsável por conceder uma '''missão diária''' ao jogador.
| | '''Recarga:''' '''3 Minutos e 30 Segundos.''' |
|
| |
|
| O jogador deverá escolher 100 Pokémon das hunts de Cosmic T1H para derrotar.
| | |-|Iron Wall Elixir= |
|
| |
|
| <center>
| | '''Benefício:''' O [[Arquivo:Iron_Wall_Elixir.png|link=]] '''Iron Wall Elixir''' aumenta a '''defesa''' do Pokémon do jogador em '''75%''' por '''15 segundos'''. |
| {| class="wikitable bg-none border-0" width="50%" style="text-align:center;"
| |
| ! Elemento
| |
| ! Pokémon
| |
| ! Quantidade
| |
| |-
| |
| | [[Arquivo:Dark1.png|Dark|link=]]
| |
| | [[Arquivo:570-Zorua.png|T1H Zorua|link=]]
| |
| | '''100'''
| |
| |-
| |
| |[[Arquivo:Electric.png|Electric|link=]]
| |
| |[[Arquivo:417-Pachirisu.png|T1H Pachirisu|link=]]
| |
| | '''100'''
| |
| |-
| |
| |[[Arquivo:Fairy.png|Fairy|link=]]
| |
| |[[Arquivo:280-Ralts.png|T1H Ralts|link=]] [[Arquivo:281-Kirlia.png|T1H Kirlia|link=]] [[Arquivo:282-Gardevoir.png|T1H Gardevoir|link=]]
| |
| | '''100'''
| |
| |-
| |
| |[[Arquivo:Fighting.png|Fighting|link=]]
| |
| |[[Arquivo:296-Makuhita.png|T1H Makuhita|link=]] [[Arquivo:297-Hariyama.png|T1H Hariyama|link=]]
| |
| |'''100'''
| |
| |-
| |
| |[[Arquivo:Fire.png|Fire|link=]]
| |
| |[[Arquivo:631-Heatmor.png|T1H Heatmor|link=]]
| |
| | '''100'''
| |
| |-
| |
| |[[Arquivo:Flying.png|Flying|link=]]
| |
| |[[Arquivo:016-Pidgey.png|T1H Pidgey|link=]] [[Arquivo:017-Pidgeotto.png|T1H Pidgeotto|link=]] [[Arquivo:018-Pidgeot.png|T1H Pidgeot|link=]]
| |
| | '''100'''
| |
| |-
| |
| |[[Arquivo:Grass.png|Grass|link=]]
| |
| |[[Arquivo:252-Treecko.png|T1H Treecko|link=]] [[Arquivo:253-Grovyle.png|T1H Grovyle|link=]] [[Arquivo:254-Sceptile.png|T1H Sceptile|link=]]
| |
| | '''100'''
| |
| |-
| |
| |[[Arquivo:ice.png|Ice|link=]]
| |
| |[[Arquivo:361-Snorut.png|T1H Snorunt|link=]] [[Arquivo:362-Glalie.png|T1H Glalie|link=]]
| |
| | '''100'''
| |
| |-
| |
| |[[Arquivo:Rock.png|Rock|link=]]
| |
| |[[Arquivo:408-Cranidos.png|T1H Cranidos|link=]] [[Arquivo:409-Rampardos(1).png|T1H Rampardos|link=]]
| |
| | '''100'''
| |
| |-
| |
| |[[Arquivo:Steel.png|Steel|link=]]
| |
| |[[Arquivo:303-Mawile.png|T1H Mawile|link=]]
| |
| | '''100'''
| |
| |}
| |
| </center>
| |
|
| |
|
| ==Recompensa:== | | <span style="color:red">'''Malefício:'''</span> A '''velocidade''' do Pokémon do jogador diminuirá, e seu '''ataque''' será reduzido em '''25%''' por '''15 segundos'''. |
|
| |
|
| <center>
| | '''Recarga:''' '''3 Minutos e 30 Segundos.''' |
| {| {| class="wikitable bg-none border-0" width="50%"
| |
| |- align="center"
| |
| !align="center" width="1%" colspan="12" style="background-color: #4682B4" |'''Recompensas'''
| |
| |-
| |
| !width="20% | XP Variável
| |
| !width="20% | 1.020 de XP NW
| |
| ! width="20% | 2 Nightmare Tokens
| |
| ! width="20% | 1 Cosmic Token
| |
| ! width="20% | 1 Incenso de acordo com a diária escolhida
| |
| |- align="center"
| |
| | [[Arquivo:Exp_icon.png|30px|link=]]
| |
| | [[Arquivo:Exp_icon_nw.png|30px|link=]]
| |
| | [[Arquivo:Nightmare_Token.png|link=]]
| |
| | [[Arquivo:Cosmic_Token.gif|link=]]
| |
| | [[Arquivo:T1H incense.gif|link=]]
| |
| |-
| |
| |}
| |
| </center>
| |
|
| |
|
| ==Localização:==
| | |-|Salvation Elixir= |
| ===Nightmare World:===
| |
|
| |
|
| <center>[[Arquivo:Localização_Raven.png|link=]]</center>
| | '''Benefício:''' O [[Arquivo:Salvation_Elixir.png|link=]] '''Salvation Elixir''' cura '''90%''' da '''HP''' Pokémon do jogador, aumentando sua '''defesa''' em '''20%''' por '''10 segundos''' |
|
| |
|
| =NPC Yuki= | | <span style="color:red">'''Malefício:'''</span> O '''ataque''' do Pokémon do jogador será reduzido em '''20%''' por '''10 segundos'''. |
|
| |
|
| <center>[[Arquivo:NPC_Yuki.png|60px|link=]]</center>
| | '''Recarga:''' '''3 Minutos e 30 Segundos.''' |
| <center>'''NPC Yuki'''</center>
| |
|
| |
|
| <center> | | </tabber></center> |
| {| class="wikitable bg-none border-0" width="50%" style="text-align:center;"
| |
| ! width="3%" colspan="1"| Função:
| |
| |-
| |
| | '''Este NPC mantém o held, boost e addon do Pokémon ao transformar a Poké Ball em Premier Ball.'''
| |
| |}
| |
| </center> | |
|
| |
|
| ==Localização:== | | ==Potions e Revive Exclusivos== |
| ===Nightmare World:===
| |
|
| |
|
| [[Arquivo:Localização_Yuki.png|link=]]
| | * As '''potions''' e '''revives''' confeccionados pelos '''alquimistas''' são consideravelmente mais fortes que as convencionais. |
|
| |
|
| =NPC Nyx Trainee= | | <center class="center-tab"><tabber> |
|
| |
|
| <center>[[Arquivo:NPC_Nyx_Trainee.png|60px|link=]]</center>
| | |-|Hot Nightmare Potion= |
| <center>'''NPC Nyx Trainee'''</center>
| |
|
| |
|
| <center>
| | A [[Arquivo:Hot_Nightmare_Potion.png|link=]] '''Hot Nightmare Potion''' segue o mesmo princípio básico da '''troca equivalente''' dos elixires de alquimista: |
| {| class="wikitable bg-none border-0" width="50%" style="text-align:center;"
| |
| ! width="3%" colspan="1"| Função:
| |
| |-
| |
| | '''O NPC Nyx Trainee é responsável por mostrar no mapa a localização dos portais que levarão o jogador para a hunt desejada.'''
| |
| |}
| |
| </center>
| |
|
| |
|
| ==Localização:==
| | '''Benefício:''' Ao Utilizá-la, a '''velocidade''' de movimento do Pokémon do jogador aumentará em '''60%''', e sua '''regeneração de HP''' será um pouco '''mais rápida''' que as poções convencionais. |
| ===Nightmare World:===
| |
|
| |
|
| [[Arquivo:Nyx_Trainee.png|link=]]
| | <span style="color:red">'''Malefício:'''</span> A '''HP atual''' do Pokémon do jogador reduzirá em '''35%'''. |
|
| |
|
| =NPC Joel=
| | |-|Black Nightmare Potion= |
|
| |
|
| <center>[[Arquivo:NPC_Joel.png|60px|link=]]</center>
| | A [[Arquivo:Black_Nightmare_Potion.png|link=]] '''Black Nightmare Potion''' irá '''curar''' uma grande quantidade de '''HP''' do Pokémon do jogador em um período um pouco mais rápido do que as poções convencionais. |
| <center>'''NPC Joel'''</center>
| |
|
| |
|
| <center>
| | |-|Superior Nightmare Revive= |
| {| class="wikitable bg-none border-0" width="50%" style="text-align:center;"
| |
| ! width="3%" colspan="1"| Função:
| |
| |-
| |
| | '''O NPC Joel é responsável por entregar recompensas de acordo com a quantidade de Shiny T1H derrotadas pelo jogador. Esta task é dividida em três partes.'''
| |
| |}
| |
| </center>
| |
|
| |
|
| <center>
| | O [[Arquivo:Superior_Nightmare_Revive.png|link=]] '''Superior Nightmare Revive''' permitirá que o jogador '''reviva''' o Pokémon na Nightmare World com uma recarga '''menor''' do que a do revive convencional. |
| {| class="wikitable bg-none border-0" width="50%" style="text-align:center;"
| |
| ! width="10%" colspan="1"| NPC Joel !! width="10%"| Partes !! width="20%"| Tarefa !! Recompensa
| |
| |-
| |
| | rowspan="4"|[[Arquivo:NPC_Joel.png|60px|link=]]
| |
| |-
| |
| |'''Parte 1''' || '''Matar 150 Shiny T1H''' || '''5 [[Arquivo:Beast_Ball.png|link=]] Beast Balls, 20 [[Arquivo:Premier-ball%281%29.png|link=]] Premier Balls e 1 [[Arquivo:Big-fortune-totem4.png|25px|link=]] Big Fortune Totem'''
| |
| |-
| |
| |'''Parte 2''' || '''Matar 150 Shiny T1H''' || '''5 [[Arquivo:Beast_Ball.png|link=]] Beast Balls, 20 [[Arquivo:Premier-ball%281%29.png|link=]] Premier Balls e 1 [[Arquivo:Big-fortune-totem4.png|25px|link=]] Big Fortune Totem'''
| |
| |-
| |
| |'''Parte 3''' || '''Matar 200 Shiny T1H''' || '''5 [[Arquivo:Beast_Ball.png|link=]] Beast Balls, 20 [[Arquivo:Premier-ball%281%29.png|link=]] Premier Balls, 1 [[Arquivo:Big-fortune-totem4.png|25px|link=]] Big Fortune Totem e 210 [[Arquivo:Rift_Fragment.png|link=]] Fragmentos de Rift'''
| |
| |}
| |
| </center>
| |
|
| |
|
| * Ao completar a Task, Joel poderá trocar o T1H dessa região pelo mesmo Pokémon na [[Arquivo:Premier-ball%281%29.png|link=]] '''premier ball'''. A '''primeira''' troca será '''gratuita'''. Caso o jogador queira fazer mais de uma troca, a partir da segunda, deverá entregar 20KK para o NPC.
| | '''Recarga:''' '''4 Minutos.''' |
|
| |
|
| ==Localização:==
| | </tabber></center> |
| ===Nightmare World:===
| |
|
| |
|
| [[Arquivo:Localização_Joel.png|link=]]
| | ==Ganlon Seed== |
|
| |
|
| =NPC Sebastian= | | * A [[Arquivo:Ganlon_Seed.png|link=]] '''Ganlon Seed''' é uma semente que pode ser cultivada da mesma forma que as outras. |
|
| |
|
| <center>[[Arquivo:NPC_Sebastian.png|60px|link=]]</center>
| | * Seu tempo de '''amadurecimento''' é de '''14 horas'''. Levando '''42 horas''' para que '''apodreça'''. |
| <center>'''NPC Sebastian'''</center>
| |
|
| |
|
| <center>
| | * A [[Arquivo:Ganlon_berry.png|link=]] '''Ganlon Berry''' reduz o dano recebido pelo pokémon em até '''30%''' de acordo com a HP. (Quanto mais ferido o Pokémon estiver, mais defesa receberá). |
| {| class="wikitable bg-none border-0" width="50%" style="text-align:center;"
| |
| ! width="3%" colspan="1"| Função:
| |
| |-
| |
| | '''O NPC Sebastian é responsável por trocar o T1H (ou [[Arquivo:Moon_stone.png|25px|link=]] Moon Stone) do jogador por qualquer outro T1H da Desert Island. Só é possível realizar esta troca 1 vez.'''
| |
| |}
| |
| </center>
| |
|
| |
|
| ==Localização:== | | ==Fertilizer== |
| ===Nightmare World:===
| |
|
| |
|
| [[Arquivo:Localização_Sebastian.png|link=]] | | * O [[Arquivo:Fertilizer.png|link=]] '''Fertilizer''' permite que o jogador diminua o tempo de germinação de uma berry. |
|
| |
|
| =NPC Mike=
| | * Para utilizá-lo é necessário possuir um [[Arquivo:Empty_Vase.png]] '''Empty Vase''' em seu inventário e clicar com o botão direito sobre o item. O vaso se transformará em um novo [[Arquivo:Empty_Vase_Fertilizado.png]] '''Empty Vase'''. Ao plantar uma semente ele será consumido com prioridade. Este item '''não''' afeta o tempo que a planta permanece pronta para ser colhida. |
|
| |
|
| <center>[[Arquivo:NPC_Mike.png|60px|link=]]</center>
| | ==Cell Culture Tubes== |
| <center>'''NPC Mike'''</center>
| |
| | |
| <center>
| |
| {| class="wikitable bg-none border-0" width="50%" style="text-align:center;"
| |
| ! width="3%" colspan="1"| Função:
| |
| |-
| |
| | '''O NPC Mike é responsável por informar quantos [[Arquivo:745-Lycanroc_Dusk_Form.png|link=Lycanroc Dusk Form|link=]] Lycanrock Dusk Form o jogador já derrotou.'''
| |
| |}
| |
| </center>
| |
|
| |
|
| ==Localização:==
| | * Os [[Arquivo:Cell_Culture_Tubes.png|link=]] '''Cell Culture Tubes''' são itens meramente decorativos, e podem ser utilizados para compor uma atmosfera de laboratório digna de um '''Alquimista'''! |
| ===Nightmare World:===
| |
|
| |
|
| [[Arquivo:Localização_Mike.png|link=]] | | <center>[[Arquivo:Cell_Culture_Tubes_Wall.gif|link=]]</center> |
|
| |
|
| =NPC Blanca= | | ==Philosopher's Stone== |
|
| |
|
| <center>[[Arquivo:NPC_Blanca.png|60px|link=]]</center>
| | * Apesar de ser coletável por '''Alquimistas''' e '''Acadêmicos''', as [[Arquivo:Black-Darkrai-Essence.gif|link=]] '''Black Darkrai Essences''' só podem ser utilizadas para fabricar a [[Arquivo:Philosopher%27s_Stone.png|link=]] '''Philosopher's Stone''' (Craft Exclusivo de Alquimista). |
| <center>'''NPC Blanca'''</center>
| |
|
| |
|
| <center>
| | * A [[Arquivo:Philosopher%27s_Stone.png|link=]] '''Philosopher's Stone''' permite que o jogador confeccione [[Arquivo:Elixir_of_Life.png|link=]] '''Elixir of Life'''. |
| {| class="wikitable bg-none border-0" width="50%" style="text-align:center;"
| |
| ! width="3%" colspan="1"| Função:
| |
| |-
| |
| | '''A NPC Blanca é responsável por conceder uma tarefa diária ao jogador''' | |
| |}
| |
| </center>
| |
|
| |
|
| <center>
| | {| class="wikitable" |
| {| class="wikitable bg-none border-0" width="50%" style="text-align:center;" | | |+ |
| ! width="18%" colspan="1"| NPC Blanca !! Tarefa !! Recompensa
| |
| |- | | |- |
| | rowspan="4"|[[Arquivo:NPC_Blanca.png|60px|link=]] || rowspan="4" | '''Derrotar 100 Pokémon Selvagens da Desert Island''' || 3 [[Arquivo:Nightmare_Token.png|link=]] Nightmare Tokens
| | ! colspan="2" | Materiais necessários |
| |- | | |- |
| | 1 [[Arquivo:Rift_Fragment.png|link=]] Rift Fragment | | | [[Arquivo:Green_Crushed_Leaf.png|link=]] || '''333 Green Crushed Leaves''' |
| |- | | |- |
| | [[Arquivo:Exp_icon.png|30px|link=]] Experiência: 112.500 | | | [[Arquivo:Yellow_Crushed_Leaf.png|link=]] || '''333 Yellow Crushed Leaves''' |
| |- | | |- |
| | [[Arquivo:Exp_icon_nw.png|30px|link=]] NW Experiência: 1.020 | | | [[Arquivo:Red_Crushed_Leaf.png|link=]] || '''333 Red Crushed Leaves''' |
| |} | |
| </center>
| |
| | |
| ==Localização:==
| |
| ===Nightmare World:===
| |
| | |
| [[Arquivo:Localização_Blanca.png|link=]]
| |
| | |
| =NPC Renata=
| |
| | |
| <center>[[Arquivo:NPC_Renata_Desert.png|60px|link=]]</center>
| |
| <center>'''NPC Sebastian'''</center>
| |
| | |
| <center>
| |
| {| class="wikitable bg-none border-0" width="50%" style="text-align:center;"
| |
| ! width="3%" colspan="1"| Função:
| |
| |- | | |- |
| | '''A NPC Renata é responsável por levar o jogador de volta a Lavender.''' | | ! colspan="2" | Tempo de confecção: 3 Horas |
| |} | | |} |
| </center>
| |
|
| |
|
| ==Localização:==
| | * Este elixir da vida '''aumentará''' a '''HP''' do jogador em '''2.000''' e '''reduzirá''' o '''dano de armadilhas''' em '''25%''' por '''3 horas.''' |
| ===Nightmare World:===
| |
|
| |
|
| '''Lavender:'''
| | ==Pink Star Piece== |
|
| |
|
| [[Arquivo:Localização_Renata_L.png|link=]] | | A [[Arquivo:Pink-Star-Piece.gif|link=]]'''Pink Star Piece''' é o item responsável por boostar Pokémon do nível '''70''' ao '''80'''. |
|
| |
|
| '''Desert Island:''' | | * Além dos benefícios do boost, o Pokémon que estiver nível '''80''' poderá incorporar as [[Arquivo:TM_Simbol.png|link=]] '''Technical Machine Collections (TMs)'''. |
|
| |
|
| [[Arquivo:Localização_Renata_DI.png|link=]]
| | * Para evoluir 10 níveis do Pokémon ('''70''' ao '''80'''), o jogador deverá utilizar as '''10 Pink Star Pieces'''. A forma de boost é a mesma do nível '''50''' ao '''70''' (utilizando a '''Boost Machine'''). |
 Darkrai Minions, o jogador pode "estudar" os corpos das criaturas para adquirir
  Darkrai Essences.