Predefinição:Teste11: mudanças entre as edições
Ir para navegação
Ir para pesquisar
Sem resumo de edição |
|||
| Linha 20: | Linha 20: | ||
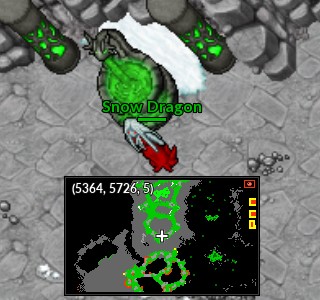
==Localização Bosses== | ==Localização Bosses== | ||
<center> | |||
{| class="wikitable" width="48%" style="float:left" | |||
|- | |||
! width="24%" align="center" style="background-color: #4682B4" | <span style="color:white">Rhyperior - Respawn de Claydol</span> | |||
|- | |||
| width="24%" align="center" | [[Arquivo:Dungeon_Rhyperior.jpg|link=]] | |||
|- | |||
| width="24%" align="center" | Inimigos: 1x Rhyperior ([[Arquivo:464-Rhyperior.png|link=]]) | |||
{| class="wikitable" width="48 | |||
|- | |||
! width="24%" align="center" | |||
| | |||
< | |||
|- | |||
| width="24%" align="center" | [[Arquivo: | |||
| | |||
|} | |} | ||
{| class="wikitable" width="48%" style="float:right" | |||
|- | |||
! width="24%" align="center" style="background-color: #4682B4" | <span style="color:white">Slaking - Respawn de Zangoose</span> | |||
|- | |||
| width="24%" align="center" | [[Arquivo:Dungeon_Slaking.jpg|link=]] | |||
|- | |||
{| class="wikitable" width="48 | | width="24%" align="center" | Inimigos: 1x Slaking ([[Arquivo:289-Slaking.png|link=]]) | ||
|- | |||
! width="24%" align="center" | < | |||
|- | |||
| width="24%" align="center" | [[Arquivo: | |||
|} | |} | ||
{| width="100%" | {| width="100%" | ||
| | | | ||
|} | |} | ||
{| class="wikitable" width="48%" style="float:left" | |||
{| class="wikitable" width="48 | |||
|- | |- | ||
! width="24%" align="center" | < | ! width="24%" align="center" style="background-color: #4682B4" | <span style="color:white">Electivire - Respawn de Hariyama</span> | ||
|- | |- | ||
| width="24%" align="center" | [[Arquivo: | | width="24%" align="center" | [[Arquivo:Dungeon_Electivire.jpg|link=]] | ||
|- | |||
| width="24%" align="center" | Inimigos: 1x Electivire ([[Arquivo:466-Electivire.png|link=]]) | |||
|} | |} | ||
{| class="wikitable" width="48%" style="float:right" | |||
{| class="wikitable" width="48 | |||
|- | |- | ||
! width="24%" align="center" | < | ! width="24%" align="center" style="background-color: #4682B4" | <span style="color:white">Metagross - Respawn de Metang</span> | ||
|- | |- | ||
| width="24%" align="center" | [[Arquivo: | | width="24%" align="center" | [[Arquivo:Dungeon_Metagross.jpg|link=]] | ||
|- | |||
| width="24%" align="center" | Inimigos: 1x Metagross ([[Arquivo:376-Metagross.png|link=]]) | |||
|} | |} | ||
{| width="100%" | {| width="100%" | ||
| | | | ||
|} | |} | ||
{| class="wikitable" width="48%" style="float:left" | |||
{| class="wikitable" width="48 | |||
|- | |- | ||
! width="24%" align="center" | < | ! width="24%" align="center" style="background-color: #4682B4" | <span style="color:white">Quinta Fonte</span> | ||
|- | |- | ||
| width="24%" align="center" | [[Arquivo: | | width="24%" align="center" | [[Arquivo:Fonte_6_Kenny.jpg|link=]] | ||
|} | |} | ||
{| width="100%" | {| width="100%" | ||
| | | | ||
|} | |} | ||
</center> | |||
Edição das 22h38min de 26 de fevereiro de 2022
Pagina do Snow
Dungeons da Tower
Requisitos para o acesso: Conclusão da Wes Quest.
Introdução
Após o jogador finalizar a Wes Quest, ficará disponível o craft de dois novos itens no painel da Tower, o Alpha Antidote (![]() ), que são para Dungeons de Bosses, e o Omega Antidote (
), que são para Dungeons de Bosses, e o Omega Antidote (![]() ), que são para Dungeons de Megas.
), que são para Dungeons de Megas.
Revisar É possível comprar um item de cada por semana, ao comprar eles são utilizados automaticamente e resetam toda segunda-feira, não sendo possível acomular para gastar depois.
Dentro dessas Dungeons, é possível capturar ou dropar a mega stone dos respectivos pokémon.
Localização Bosses
| Rhyperior - Respawn de Claydol |
|---|
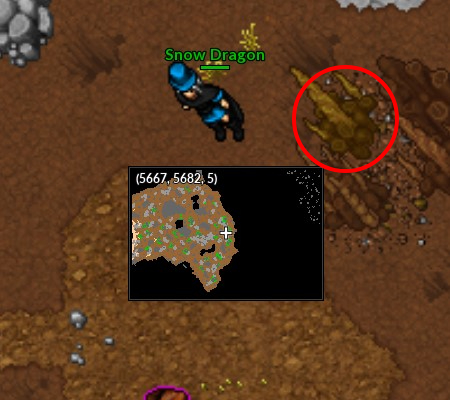
|
| Inimigos: 1x Rhyperior ( |
| Slaking - Respawn de Zangoose |
|---|
|
| Inimigos: 1x Slaking ( |
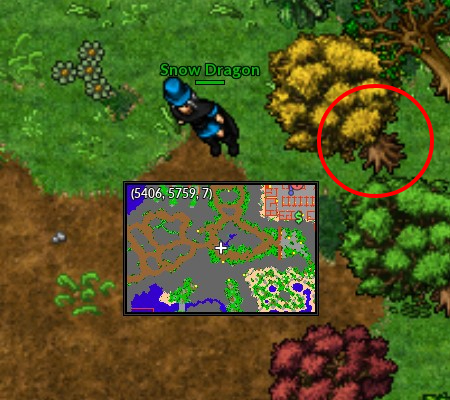
| Electivire - Respawn de Hariyama |
|---|
|
| Inimigos: 1x Electivire ( |
| Metagross - Respawn de Metang |
|---|
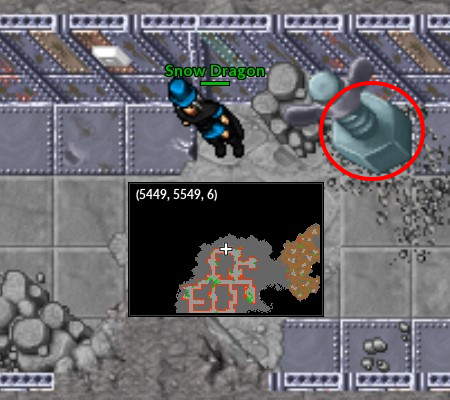
|
| Inimigos: 1x Metagross ( |
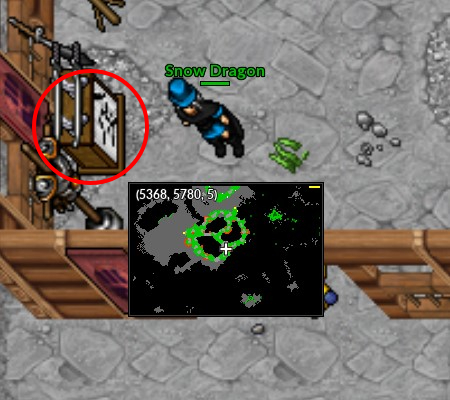
| Quinta Fonte |
|---|
|