Emilia Quest/en: mudanças entre as edições
(Criou página com '{| class="wikitable" width="48%%" style="float:left" |- ! width="24%" align="center" | <b>(7/31) - On the water top left side of Charicific Valley:</b> |- | width="24%" align=...') |
(Criou página com '<b>Good Luck!</b> After defeating dusknoir, go back with Emilia and tell her you have finished the mission to receive your reward. <b>Note: After completing the quest you...') |
||
| (33 revisões intermediárias pelo mesmo usuário não estão sendo mostradas) | |||
| Linha 289: | Linha 289: | ||
{| class="wikitable" width="48%%" style="float:right" | {| class="wikitable" width="48%%" style="float:right" | ||
|- | |- | ||
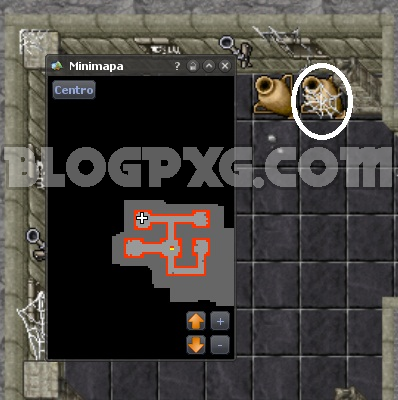
! width="24%" align="center" | <b>(8/31) - | ! width="24%" align="center" | <b>(8/31) - On top of Coliseum:</b> | ||
|- | |- | ||
| width="24%" align="center" | [[Arquivo:Emilia27.png|link=Emilia_Quest]] | | width="24%" align="center" | [[Arquivo:Emilia27.png|link=Emilia_Quest]] | ||
| Linha 307: | Linha 307: | ||
{| class="wikitable" width="48%%" style="float:right" | {| class="wikitable" width="48%%" style="float:right" | ||
|- | |- | ||
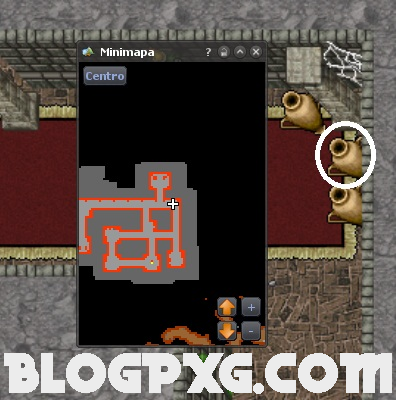
! width="24%" align="center" | <b>(10/31) - Lost Island | ! width="24%" align="center" | <b>(10/31) - Right of Lost Island:</b> | ||
|- | |- | ||
| width="24%" align="center" | [[Arquivo:Emilia29.png|link=Emilia_Quest]] | | width="24%" align="center" | [[Arquivo:Emilia29.png|link=Emilia_Quest]] | ||
| Linha 318: | Linha 318: | ||
{| class="wikitable" width="48%%" style="float:left" | {| class="wikitable" width="48%%" style="float:left" | ||
|- | |- | ||
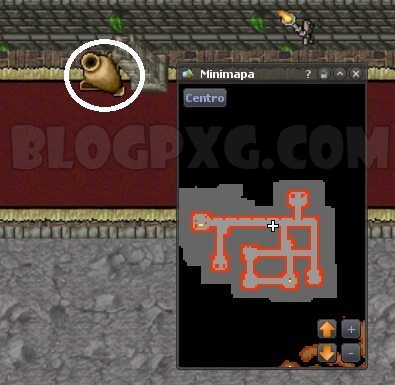
! width="24%" align="center" | <b>(11/31) - Cinnabar | ! width="24%" align="center" | <b>(11/31) - Southwest in Cinnabar:</b> | ||
|- | |- | ||
| width="24%" align="center" | [[Arquivo:Emilia30.png|link=Emilia_Quest]] | | width="24%" align="center" | [[Arquivo:Emilia30.png|link=Emilia_Quest]] | ||
| Linha 325: | Linha 325: | ||
{| class="wikitable" width="48%%" style="float:right" | {| class="wikitable" width="48%%" style="float:right" | ||
|- | |- | ||
! width="24%" align="center" | <b>(12/31) - Saffari 1 ( | ! width="24%" align="center" | <b>(12/31) - Saffari 1 (Moutain near saffari entrance):</b> | ||
|- | |- | ||
| width="24%" align="center" | [[Arquivo:Emilia31.png|link=Emilia_Quest]] | | width="24%" align="center" | [[Arquivo:Emilia31.png|link=Emilia_Quest]] | ||
| Linha 336: | Linha 336: | ||
{| class="wikitable" width="48%%" style="float:left" | {| class="wikitable" width="48%%" style="float:left" | ||
|- | |- | ||
! width="24%" align="center" | <b>(13/31) - Saffari 2 ( | ! width="24%" align="center" | <b>(13/31) - Saffari 2 (Mountain behind Mr. Mmie houses to the north.):</b> | ||
|- | |- | ||
| width="24%" align="center" | [[Arquivo:Emilia32.png|link=Emilia_Quest]] | | width="24%" align="center" | [[Arquivo:Emilia32.png|link=Emilia_Quest]] | ||
| Linha 354: | Linha 354: | ||
{| class="wikitable" width="48%%" style="float:left" | {| class="wikitable" width="48%%" style="float:left" | ||
|- | |- | ||
! width="24%" align="center" | <b>(15/31) - Diving spot | ! width="24%" align="center" | <b>(15/31) - Diving spot south to the cp at the bridge:</b> | ||
|- | |- | ||
| width="24%" align="center" | [[Arquivo:Emilia34.png|link=Emilia_Quest]] | | width="24%" align="center" | [[Arquivo:Emilia34.png|link=Emilia_Quest]] | ||
| Linha 361: | Linha 361: | ||
{| class="wikitable" width="48%%" style="float:right" | {| class="wikitable" width="48%%" style="float:right" | ||
|- | |- | ||
! width="24%" align="center" | <b>(16/31) - | ! width="24%" align="center" | <b>(16/31) - Kabutops island near fuchsia:</b> | ||
|- | |- | ||
| width="24%" align="center" | [[Arquivo:Emilia35.png|link=Emilia_Quest]] | | width="24%" align="center" | [[Arquivo:Emilia35.png|link=Emilia_Quest]] | ||
| Linha 372: | Linha 372: | ||
{| class="wikitable" width="48%%" style="float:left" | {| class="wikitable" width="48%%" style="float:left" | ||
|- | |- | ||
! width="24%" align="center" | <b>(17/31) - | ! width="24%" align="center" | <b>(17/31) - Jynx respawn that has 1 dratini underneath, biggest seafoam island:</b> | ||
|- | |- | ||
| width="24%" align="center" | [[Arquivo:Emilia36.png|link=Emilia_Quest]] | | width="24%" align="center" | [[Arquivo:Emilia36.png|link=Emilia_Quest]] | ||
| Linha 379: | Linha 379: | ||
{| class="wikitable" width="48%%" style="float:right" | {| class="wikitable" width="48%%" style="float:right" | ||
|- | |- | ||
! width="24%" align="center" | <b>(18/31) - Seafoam | ! width="24%" align="center" | <b>(18/31) - Seafoam on the way to the ice quest going left after goind down the ladder:</b> | ||
|- | |- | ||
| width="24%" align="center" | [[Arquivo:Emilia37.png|link=Emilia_Quest]] | | width="24%" align="center" | [[Arquivo:Emilia37.png|link=Emilia_Quest]] | ||
| Linha 390: | Linha 390: | ||
{| class="wikitable" width="48%%" style="float:left" | {| class="wikitable" width="48%%" style="float:left" | ||
|- | |- | ||
! width="24%" align="center" | <b>(19/31) - Respawn | ! width="24%" align="center" | <b>(19/31) - Cleopatra Togekiss Respawn:</b> | ||
|- | |- | ||
| width="24%" align="center" | [[Arquivo:Emilia38.png|link=Emilia_Quest]] | | width="24%" align="center" | [[Arquivo:Emilia38.png|link=Emilia_Quest]] | ||
| Linha 397: | Linha 397: | ||
{| class="wikitable" width="48%%" style="float:right" | {| class="wikitable" width="48%%" style="float:right" | ||
|- | |- | ||
! width="24%" align="center" | <b>(20/31) - Respawn | ! width="24%" align="center" | <b>(20/31) - Shamouti Gengar Respawn:</b> | ||
|- | |- | ||
| width="24%" align="center" | [[Arquivo:Emilia39.png|link=Emilia_Quest]] | | width="24%" align="center" | [[Arquivo:Emilia39.png|link=Emilia_Quest]] | ||
| Linha 408: | Linha 408: | ||
{| class="wikitable" width="48%%" style="float:left" | {| class="wikitable" width="48%%" style="float:left" | ||
|- | |- | ||
! width="24%" align="center" | <b>(21/31) - Respawn | ! width="24%" align="center" | <b>(21/31) - Shamouti Steelix Respawn:</b> | ||
|- | |- | ||
| width="24%" align="center" | [[Arquivo:Emilia40.png|link=Emilia_Quest]] | | width="24%" align="center" | [[Arquivo:Emilia40.png|link=Emilia_Quest]] | ||
| Linha 415: | Linha 415: | ||
{| class="wikitable" width="48%%" style="float:right" | {| class="wikitable" width="48%%" style="float:right" | ||
|- | |- | ||
! width="24%" align="center" | <b>(22/31) - | ! width="24%" align="center" | <b>(22/31) - Left to Zapdos island 1:</b> | ||
|- | |- | ||
| width="24%" align="center" | [[Arquivo:Emilia41.png|link=Emilia_Quest]] | | width="24%" align="center" | [[Arquivo:Emilia41.png|link=Emilia_Quest]] | ||
| Linha 426: | Linha 426: | ||
{| class="wikitable" width="48%%" style="float:left" | {| class="wikitable" width="48%%" style="float:left" | ||
|- | |- | ||
! width="24%" align="center" | <b>(23/31) - | ! width="24%" align="center" | <b>(23/31) - Left to Zapdos island 2 (a little bit more to the left):</b> | ||
|- | |- | ||
| width="24%" align="center" | [[Arquivo:Emilia42.png|link=Emilia_Quest]] | | width="24%" align="center" | [[Arquivo:Emilia42.png|link=Emilia_Quest]] | ||
| Linha 433: | Linha 433: | ||
{| class="wikitable" width="48%%" style="float:right" | {| class="wikitable" width="48%%" style="float:right" | ||
|- | |- | ||
! width="24%" align="center" | <b>(24/31) - | ! width="24%" align="center" | <b>(24/31) - South of Moltres island, near the sea:</b> | ||
|- | |- | ||
| width="24%" align="center" | [[Arquivo:Emilia43.png|link=Emilia_Quest]] | | width="24%" align="center" | [[Arquivo:Emilia43.png|link=Emilia_Quest]] | ||
| Linha 444: | Linha 444: | ||
{| class="wikitable" width="48%%" style="float:left" | {| class="wikitable" width="48%%" style="float:left" | ||
|- | |- | ||
! width="24%" align="center" | <b>(25/31) - Seven Grapefruit Islands | ! width="24%" align="center" | <b>(25/31) - South of the last island of Seven Grapefruit Islands:</b> | ||
|- | |- | ||
| width="24%" align="center" | [[Arquivo:Emilia44.png|link=Emilia_Quest]] | | width="24%" align="center" | [[Arquivo:Emilia44.png|link=Emilia_Quest]] | ||
| Linha 451: | Linha 451: | ||
{| class="wikitable" width="48%%" style="float:right" | {| class="wikitable" width="48%%" style="float:right" | ||
|- | |- | ||
! width="24%" align="center" | <b>(26/31) - | ! width="24%" align="center" | <b>(26/31) - Kabuto Island Togekiss Respawn:</b> | ||
|- | |- | ||
| width="24%" align="center" | [[Arquivo:Emilia45.png|link=Emilia_Quest]] | | width="24%" align="center" | [[Arquivo:Emilia45.png|link=Emilia_Quest]] | ||
| Linha 462: | Linha 462: | ||
{| class="wikitable" width="48%%" style="float:left" | {| class="wikitable" width="48%%" style="float:left" | ||
|- | |- | ||
! width="24%" align="center" | <b>(27/31) - | ! width="24%" align="center" | <b>(27/31) - On the water south of Kabuto Island:</b> | ||
|- | |- | ||
| width="24%" align="center" | [[Arquivo:Emilia46.png|link=Emilia_Quest]] | | width="24%" align="center" | [[Arquivo:Emilia46.png|link=Emilia_Quest]] | ||
| Linha 469: | Linha 469: | ||
{| class="wikitable" width="48%%" style="float:right" | {| class="wikitable" width="48%%" style="float:right" | ||
|- | |- | ||
! width="24%" align="center" | <b>(28/31) - Mandarin, | ! width="24%" align="center" | <b>(28/31) - Mandarin, underneath the bridge next to Golduck respawn:</b> | ||
|- | |- | ||
| width="24%" align="center" | [[Arquivo:Emilia47.png|link=Emilia_Quest]] | | width="24%" align="center" | [[Arquivo:Emilia47.png|link=Emilia_Quest]] | ||
| Linha 480: | Linha 480: | ||
{| class="wikitable" width="48%%" style="float:left" | {| class="wikitable" width="48%%" style="float:left" | ||
|- | |- | ||
! width="24%" align="center" | <b>(29/31) - | ! width="24%" align="center" | <b>(29/31) - Mandarin Desert:</b> | ||
|- | |- | ||
| width="24%" align="center" | [[Arquivo:Emilia48.png|link=Emilia_Quest]] | | width="24%" align="center" | [[Arquivo:Emilia48.png|link=Emilia_Quest]] | ||
| Linha 487: | Linha 487: | ||
{| class="wikitable" width="48%%" style="float:right" | {| class="wikitable" width="48%%" style="float:right" | ||
|- | |- | ||
! width="24%" align="center" | <b>(30/31) - | ! width="24%" align="center" | <b>(30/31) - On the biggest Kinnow Island, in the lake in the middle of the desert:</b> | ||
|- | |- | ||
| width="24%" align="center" | [[Arquivo:Emilia49.png|link=Emilia_Quest]] | | width="24%" align="center" | [[Arquivo:Emilia49.png|link=Emilia_Quest]] | ||
| Linha 498: | Linha 498: | ||
{| class="wikitable" width="48%%" style="float:left" | {| class="wikitable" width="48%%" style="float:left" | ||
|- | |- | ||
! width="24%" align="center" | <b>(31/31) - | ! width="24%" align="center" | <b>(31/31) - In Golden Island, near the tower northeast of the island:</b> | ||
|- | |- | ||
| width="24%" align="center" | [[Arquivo:Emilia50.png|link=Emilia_Quest]] | | width="24%" align="center" | [[Arquivo:Emilia50.png|link=Emilia_Quest]] | ||
| Linha 507: | Linha 507: | ||
|} | |} | ||
==<b> | ==<b>Final Part</b>== | ||
It's time to face the Pokémon that was causing all the problems to our wourld: | |||
First go to <b>Lavender Cemetery and open the portal using the energized key:</b> | |||
[[Arquivo:Emilia51.png|link=Emilia_Quest]] | [[Arquivo:Emilia51.png|link=Emilia_Quest]] | ||
<span style="color:red">''' | <span style="color:red">'''Note:</span> <b> As soon as you use the key on the portal you'll be immediately teletransported to Dusknoir presence, leave a Pokémon ready to fight.</b> | ||
<table border="1" cellpadding="3" cellspacing="1" class="modernTable" style="padding: 0px; border: 0px; font-size: 10.88px; width: 650px;"> | |||
<table border="1" cellpadding="3" cellspacing="1" class="modernTable" style="padding: 0px; border: 0px; font-size: 10.88px; width: 650px;"> | |||
{| class="wikitable" width="100%" | |||
!''' | {| class="wikitable" width="100%" | ||
|- | !'''Your mission will be to defeat:''' | ||
| align="center" | '''Dusknoir [[Arquivo:477-Dusknoir.png|link=Dusknoir]]''' | |- | ||
| align="center" | '''Dusknoir [[Arquivo:477-Dusknoir.png|link=Dusknoir]]''' | |||
|} | |} | ||
Which posses unique abilitys making it extremly dangerous. | |||
First you'll need to understand how dusknoir defenses work: | |||
<span style="color:red">''' | <span style="color:red">'''First mechanic:</span> It has over 100% defense,therefore attacks will have negative damage, meaning it would heal. It's necessary to break first that defense to deal any damage. | ||
<span style="color:red">''' | <span style="color:red">'''Second mechanic:</span> It has a 75% chance to avoid <span style="color:red">'''ANY NEGATIVE STATUS, including those who make it lose its defense from the first mechanic.</span> | ||
Knowing this, what must be done is: | |||
First you'll have to break Dusknoir defense. The attack that best fullfil this is <span style="color:red">'''Guard Split from Claydol. Attacks with deal damage ignoring the defense will work too, like poison and burn.</span> | |||
<span style="color:red">''' | <span style="color:red">'''Notes:</span> | ||
1- | 1- The breaking defense effect isn't permanent. When it finishes, Dusknoir will regenerate as you attack it, therefore you'll need to repeat the process. | ||
2- The breaking defense effect will vary depending on what attack you used to break the defense. | |||
<b> | 3- <span style="color:red">'''Remember</span>, it still has a 75% of avoiding any of the attacks to break its defense. | ||
After breaking its defense, Dusknoir will be vulnerable to damage y could be attack normally, <span style="color:red">'''it still has a 75% of avoiding any negative status (Silence, miss, etc).</span> | |||
<b> | <b>Good Luck!</b> | ||
After defeating dusknoir, go back with Emilia and tell her you have finished the mission to receive your reward. | |||
<b>Note: After completing the quest you can make a personalized locker, on the daily catch panel, with the unique items you received from the Quest. (Cursed Smile, Luminous Eye Pumpkin, Energized Golden Key)</b> | |||
Edição atual tal como às 17h46min de 13 de janeiro de 2019
Required level: There's not a minimun level.
Recommended level: 80+
Rewards: 2,1KK EXP, 50 Moon Ball, 3 Darkness Stones, 3 Ancient Stones, 1 Cursed Smile, 1 Dusknoir Statue & 1 Shiny Emergency Call.
If you find any mistake or want to add any info, contact a wiki member.
1° Part
To begin it you need to find Emília on a house near Lavender Market .
First Emilia will check your intentions trying to help her, asking: What are you looking for? By answering her “Peace” She’ll tell you that you have come to the right place, but that we need to strive to keep that peace. Then Emilia will tell you that a ghost Pokémon runaway from the Orre región and that’s terryfing the Lavender city. In order to learn more about ghost Pokémon she’ll give you the following mission:
| Catch the following Pokémon: |
|---|
| Haunter |
ATTENTION: When catching haunter make sure the following message appears to continue with the quest.
2° Part
Go back with Emilia, She’ll recognize you as a strong trainer and ask you to defeat some ghost Pokémon and tell her about their weakness and give you the following mission:
| Defeat: |
|---|
| 150 Misdreavus |
| 250 Gengar |
Go back and speak with Emilia telling her about ghost Pokémon and their weakness.
3° Part
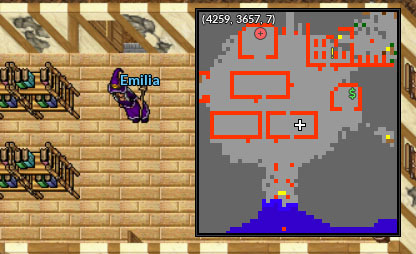
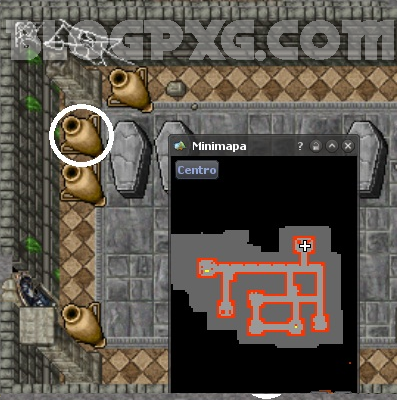
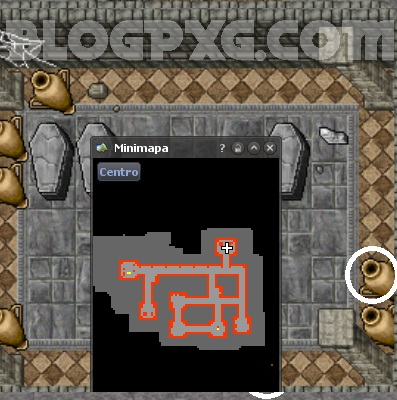
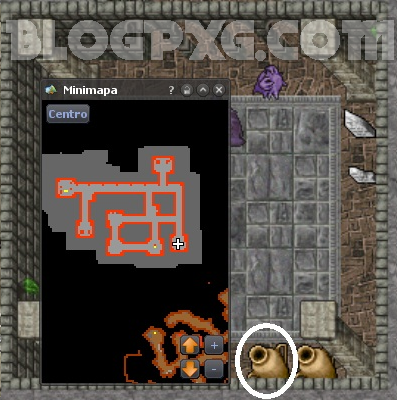
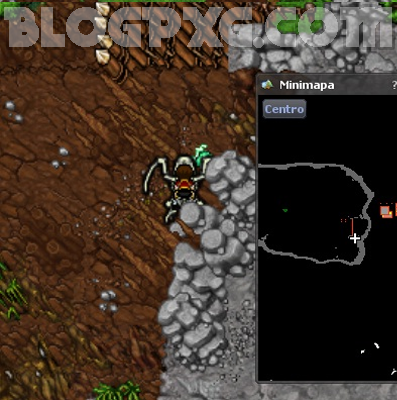
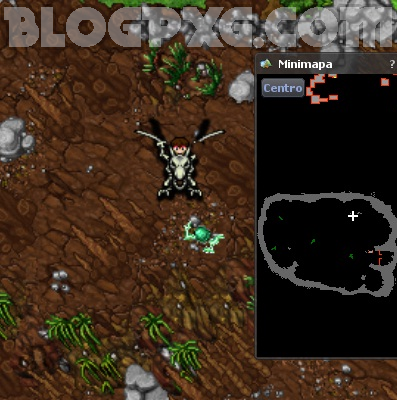
After helping her, Emilia went to Lavender Cemetery with a dark pokémon to explore and there she find out the reason why everything was happening. She saw a Dusknoir (With a different color) entering a portal and then she saw a trio composed by Gengar, Haunter and Gastly close the portal with a peculiar key. Emilia followed the trio to Lost Island underground and saw them breaking the key and hiding its fragments. After the dialog you’ll receive a Luminous Eye Pumpkin to do the following mission.
- Recover the Fragments of the key.
Use the Luminous Eye Pumpkin to find the fragments..
| 1/18 |
|---|
|
| 2/18 |
|---|
|
| 3/18 |
|---|
|
| 4/18 |
|---|
|
| 5/18 |
|---|
|
| 6/18 |
|---|
|
| 7/18 |
|---|
|
| 8/18 |
|---|
|
| 9/18 |
|---|
|
| 10/18 |
|---|
|
| 11/18 |
|---|
|
| 12/18 |
|---|
|
| 13/18 |
|---|
|
| 14/18 |
|---|
|
| 15/18 |
|---|
|
| 16/18 |
|---|
|
| 17/18 |
|---|
|
| 18/18 |
|---|
|
Go back and deliver the fragments to Emilia so she can repair and study the key.
4° Part
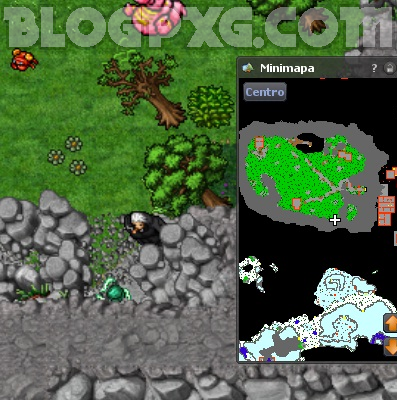
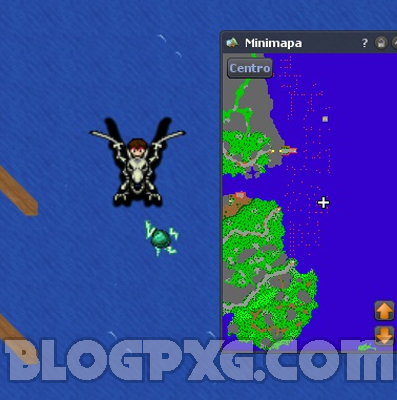
After studying the key, Emilia find out that the key needs plasmatic energy and that the dusknoir is generating that energy in Kanto and the Orange Archipelago. She’ll give you the following mission:
- Energize the key.
Note: There is no order to collect the energys!
Use the key to collect the energys.
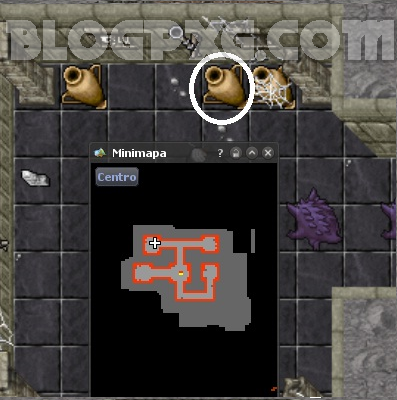
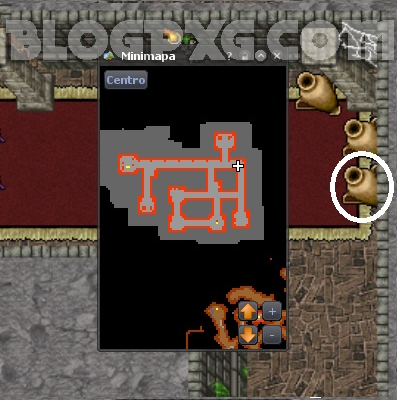
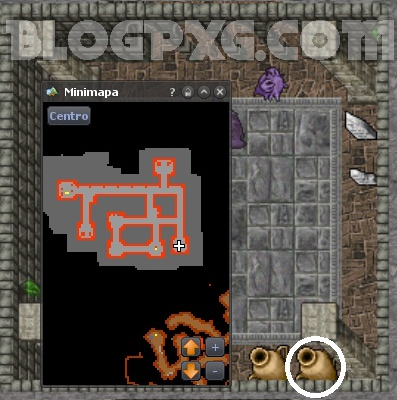
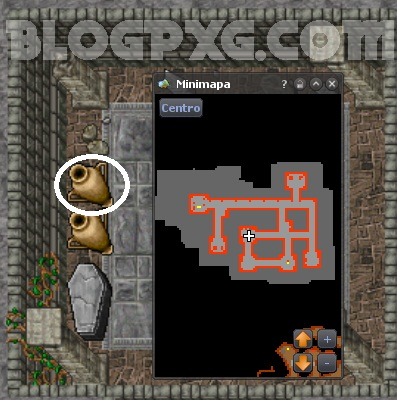
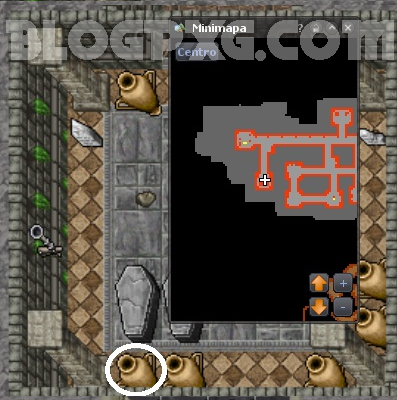
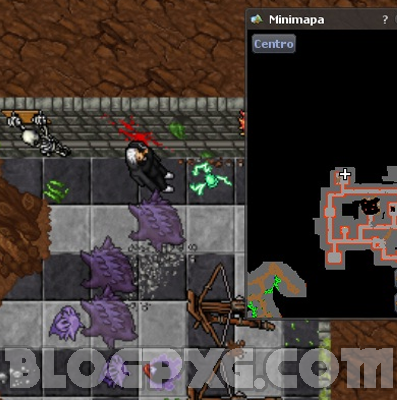
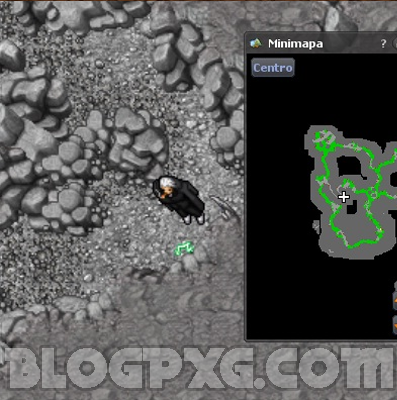
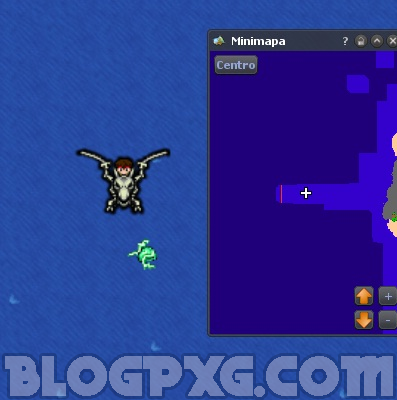
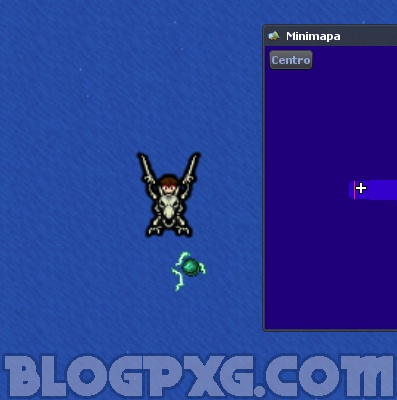
| (1/31) - Wildwind pidgeot respawn: |
|---|
|
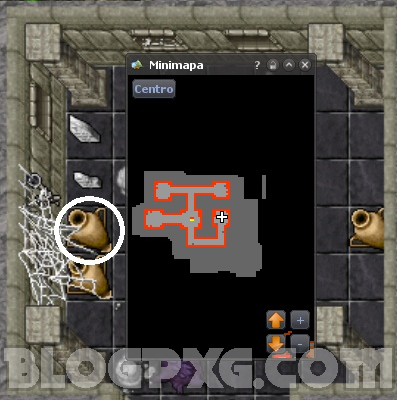
| (2/31) - Wildwind Parasects: |
|---|
|
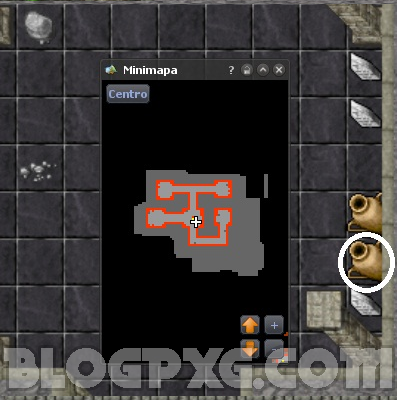
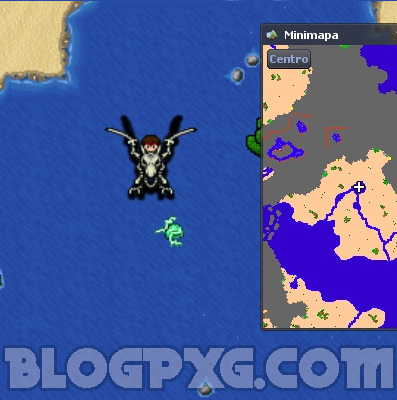
| (3/31) - Island south to Aero: |
|---|
|
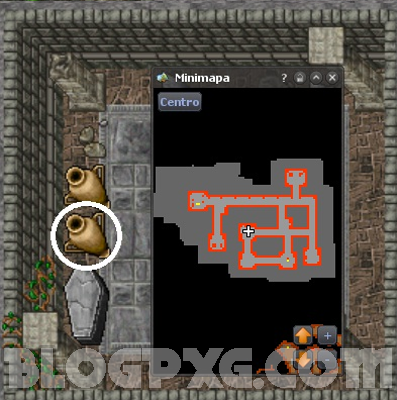
| (4/31) - North of Lightstorm: |
|---|

|
| (5/31) - South of the valley in the middle of the water: |
|---|
|
| (6/31) - On the left side of valley: |
|---|
|
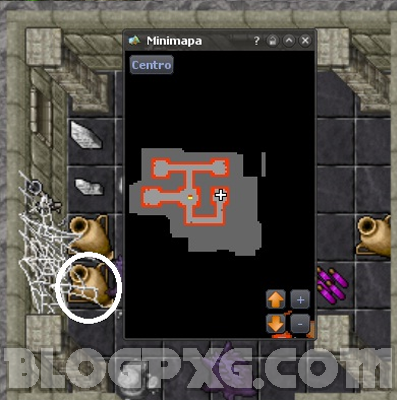
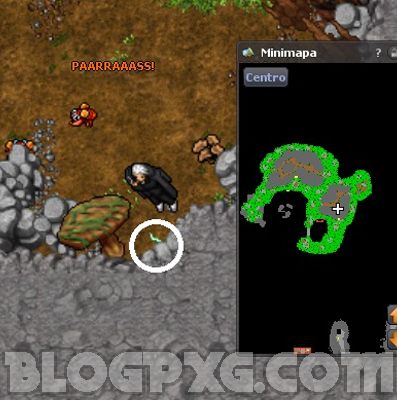
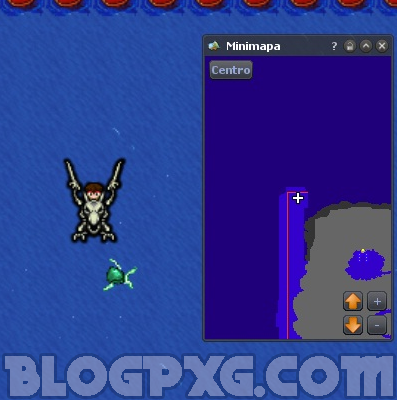
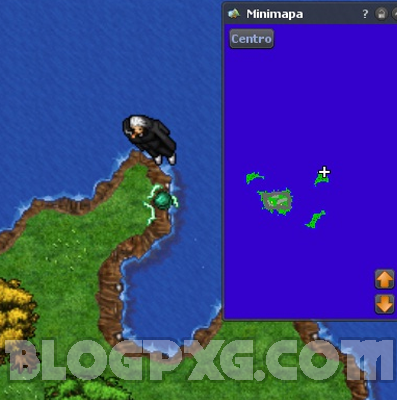
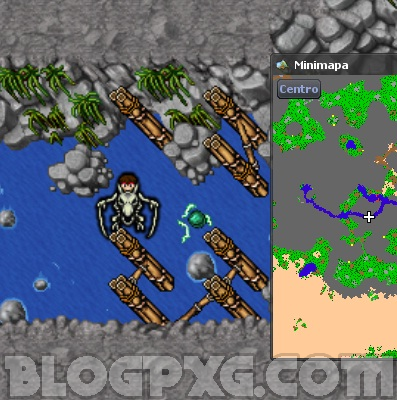
| (7/31) - On the water top left side of Charicific Valley: |
|---|
|
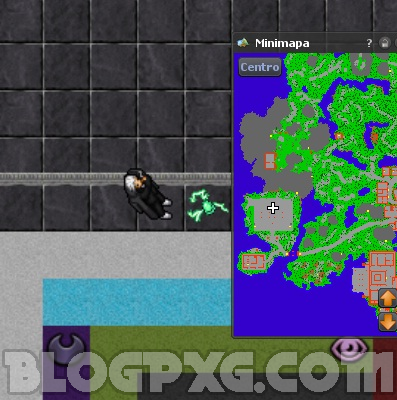
| (8/31) - On top of Coliseum: |
|---|
|
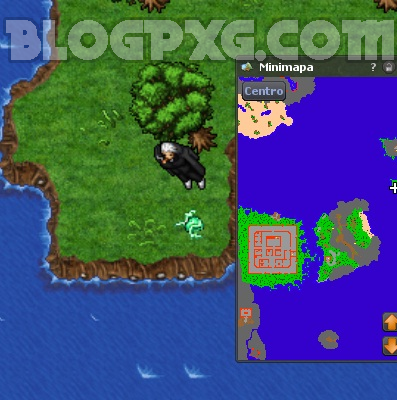
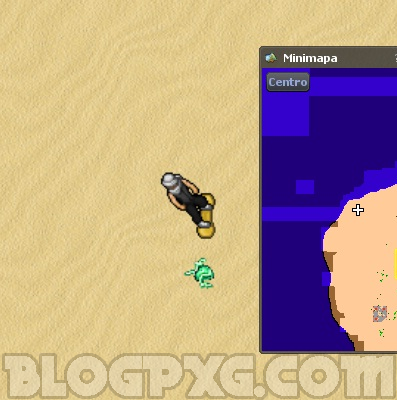
| (9/31) - Desert island: |
|---|

|
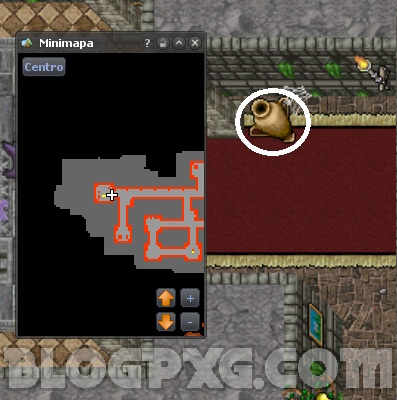
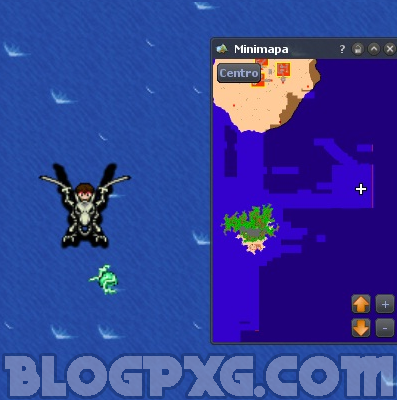
| (10/31) - Right of Lost Island: |
|---|
|
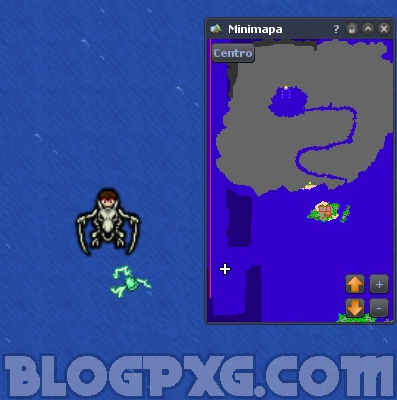
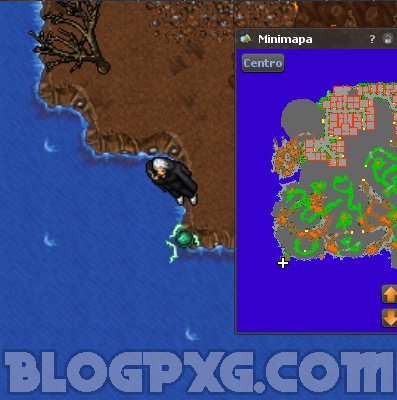
| (11/31) - Southwest in Cinnabar: |
|---|
|
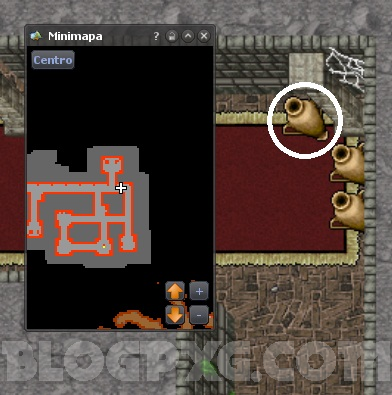
| (12/31) - Saffari 1 (Moutain near saffari entrance): |
|---|
|
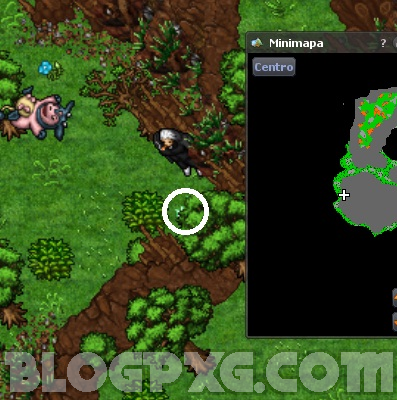
| (13/31) - Saffari 2 (Mountain behind Mr. Mmie houses to the north.): |
|---|
|
| (14/31) - Saffari 3: |
|---|
|
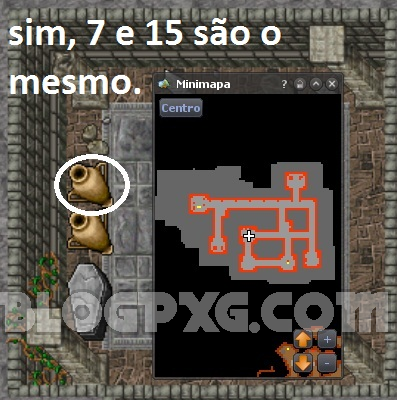
| (15/31) - Diving spot south to the cp at the bridge: |
|---|
|
| (16/31) - Kabutops island near fuchsia: |
|---|
|
| (17/31) - Jynx respawn that has 1 dratini underneath, biggest seafoam island: |
|---|
|
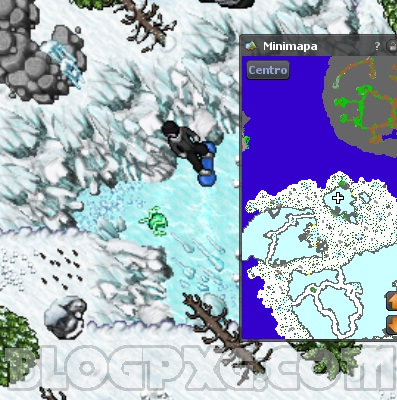
| (18/31) - Seafoam on the way to the ice quest going left after goind down the ladder: |
|---|
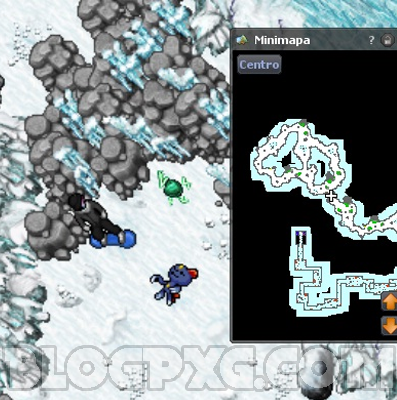
|
| (19/31) - Cleopatra Togekiss Respawn: |
|---|
|
| (20/31) - Shamouti Gengar Respawn: |
|---|
|
| (21/31) - Shamouti Steelix Respawn: |
|---|
|
| (22/31) - Left to Zapdos island 1: |
|---|
|
| (23/31) - Left to Zapdos island 2 (a little bit more to the left): |
|---|
|
| (24/31) - South of Moltres island, near the sea: |
|---|
|
| (25/31) - South of the last island of Seven Grapefruit Islands: |
|---|
|
| (26/31) - Kabuto Island Togekiss Respawn: |
|---|
|
| (27/31) - On the water south of Kabuto Island: |
|---|
|
| (28/31) - Mandarin, underneath the bridge next to Golduck respawn: |
|---|
|
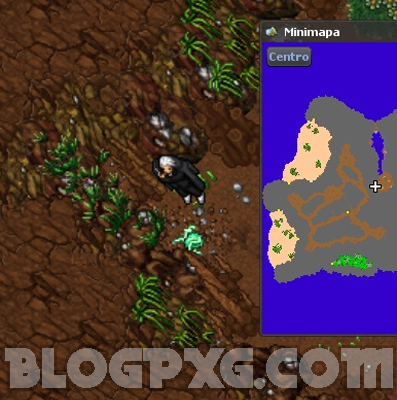
| (29/31) - Mandarin Desert: |
|---|
|
| (30/31) - On the biggest Kinnow Island, in the lake in the middle of the desert: |
|---|
|
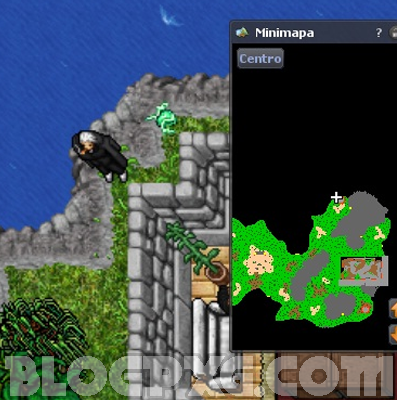
| (31/31) - In Golden Island, near the tower northeast of the island: |
|---|
|
Final Part
It's time to face the Pokémon that was causing all the problems to our wourld:
First go to Lavender Cemetery and open the portal using the energized key:
Note: As soon as you use the key on the portal you'll be immediately teletransported to Dusknoir presence, leave a Pokémon ready to fight.
| Your mission will be to defeat: |
|---|
| Dusknoir |
Which posses unique abilitys making it extremly dangerous.
First you'll need to understand how dusknoir defenses work:
First mechanic: It has over 100% defense,therefore attacks will have negative damage, meaning it would heal. It's necessary to break first that defense to deal any damage.
Second mechanic: It has a 75% chance to avoid ANY NEGATIVE STATUS, including those who make it lose its defense from the first mechanic.
Knowing this, what must be done is:
First you'll have to break Dusknoir defense. The attack that best fullfil this is Guard Split from Claydol. Attacks with deal damage ignoring the defense will work too, like poison and burn.
Notes:
1- The breaking defense effect isn't permanent. When it finishes, Dusknoir will regenerate as you attack it, therefore you'll need to repeat the process.
2- The breaking defense effect will vary depending on what attack you used to break the defense.
3- Remember, it still has a 75% of avoiding any of the attacks to break its defense.
After breaking its defense, Dusknoir will be vulnerable to damage y could be attack normally, it still has a 75% of avoiding any negative status (Silence, miss, etc).
Good Luck!
After defeating dusknoir, go back with Emilia and tell her you have finished the mission to receive your reward.
Note: After completing the quest you can make a personalized locker, on the daily catch panel, with the unique items you received from the Quest. (Cursed Smile, Luminous Eye Pumpkin, Energized Golden Key)