|
|
| (793 revisões intermediárias por 3 usuários não estão sendo mostradas) |
| Linha 1: |
Linha 1: |
| =Configurando o Order= | | = WIP = |
|
| |
|
| O jogador pode conferir o atalho do '''order''' nas configurações de atalho.
| | = Halloween Dungeon Captain Dusknoir = |
| | |
| | <center> [[Arquivo:Banner_Chapeu_Seletor.png|link=]] </center> <br> |
| | |
| | =='''Informações Básicas'''== |
| | |
| | *'''Modalidade:''' Solo <br /> |
| | *'''Nivel necessário:''' 80 (Fácil), 200 (Normal) e 350 (Difícil). <br /> |
| | *'''Elemento:''' [[Arquivo:NeutralICON.png|Neutro|20px|link=Clãs]] Neutro |
| | *'''Tempo limite:''' 10 minutos. <br /> |
| | *'''PokéView: [[Arquivo:semvip.png|link=]] ''' <br> |
| | *'''Quantidade de Inimigos: 0.''' |
| | <center> |
| | {| class="wikitable" width="30%" |
| | |+ align="center" | Limitações e Bloqueios |
| | |- |
| | ! width="1%" style="background-color: #4682B4" | Poções |
| | ! width="1%" style="background-color: #4682B4" | Elixir |
| | ! width="1%" style="background-color: #4682B4" | Penalidade por morte |
| | ! width="1%" style="background-color: #4682B4" | Revive |
| | ! width="1%" style="background-color: #4682B4" | Medicine |
| | ! width="1%" style="background-color: #4682B4" | Berries |
| | |- |
| | | align="center" | [[Arquivo:semvip.png|link=]] |
| | | align="center" | [[Arquivo:semvip.png|link=]] |
| | | align="center" | [[Arquivo:semvip.png|link=]] |
| | | align="center" | [[Arquivo:semvip.png|link=]] |
| | | align="center" | [[Arquivo:semvip.png|link=]] |
| | | align="center" | [[Arquivo:semvip.png|link=]] |
| | |- |
| | |} |
| | </center> |
| | |
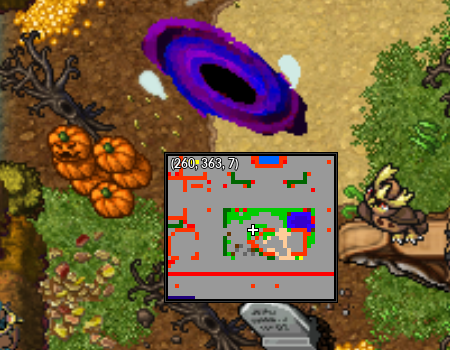
| | == Localização == |
| | |
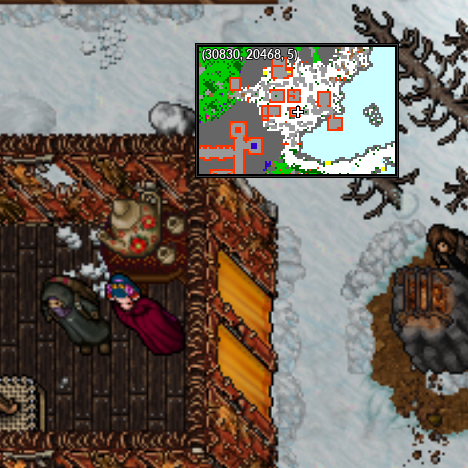
| | Essa dungeon fica localizada no Trade Center, dentro do portal abaixo, após entrar as dungeons estarão na parte superior. <br><br> |
|
| |
|
| <center> | | <center> |
| {| | | [[Arquivo:Loc DG Assombradas 2024.png|link=]] |
| |+Adicione o botão de atalho do order na parte "Ordenar Pokémon" | | </center><br><br> |
| |[[Arquivo:Menuguiaorder3.png|link=]] | | |
| | * As dungeons ativas variam de dia e servidor. <br> |
| | |
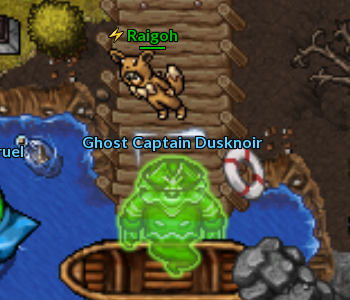
| | == Funcionamento== |
| | |
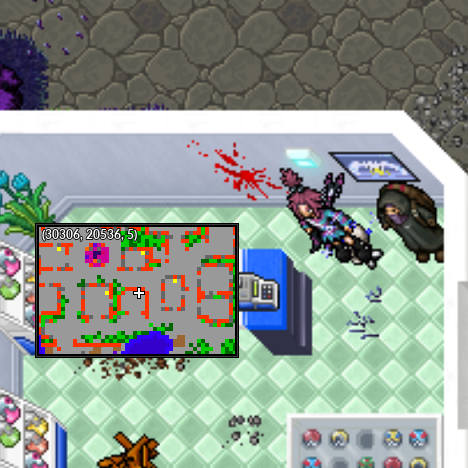
| | Para começar a Dungeon basta ir até o Ghost Captain Dusknoir e escolher a dificuldade. <br> |
| | <center> |
| | {| border="1" style="text-align: center; border-collapse: collapse" |
| | | width="100%" | [[Arquivo:Halloween captain dusknoir dungeon entrada.png|link=]] |
| | |- |
| | |} |
| | </center> |
| | |
| | == Dificuldades == |
| | |
| | <center class="center-tab"><tabber> |
| | |-|Fácil= |
| | <center> |
| | |
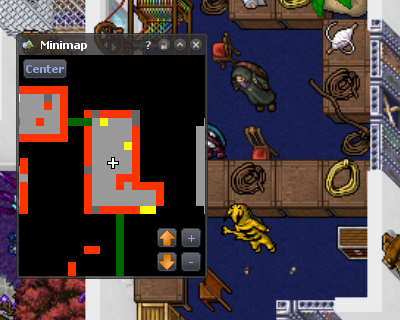
| | [[file:halloween captain dusknoir dungeon minimap andar 3.png|link=]] [[file:halloween captain dusknoir dungeon minimap andar 4.png|link=]] |
| | |
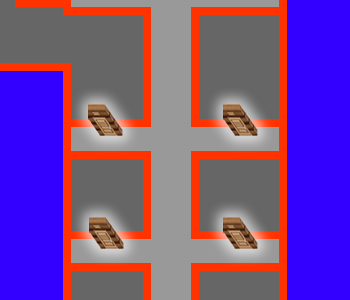
| | Ao entrar na Dungeon, o jogador deve recuperar a toolbox que fica no andar de cima, pra isso, o jogador deve passar pelas cordas e subir a escada do lado direito da Dungeon. |
| | |
| | === Caminho das Cordas === |
| | |
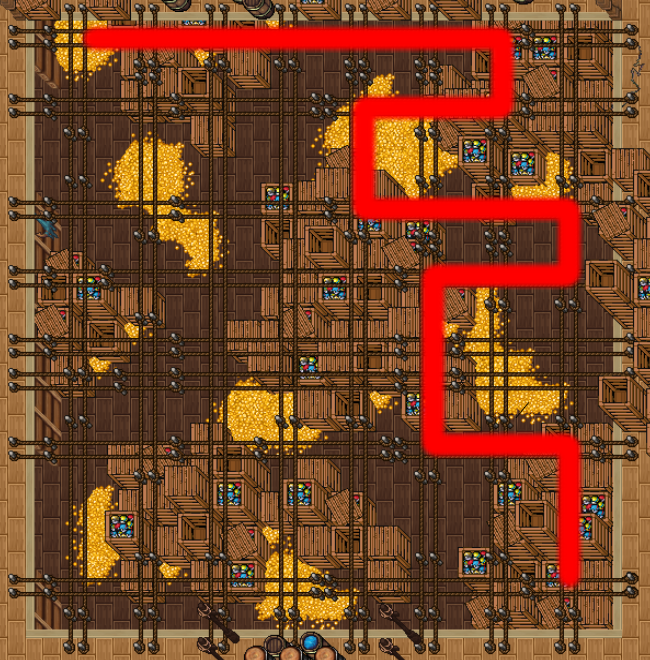
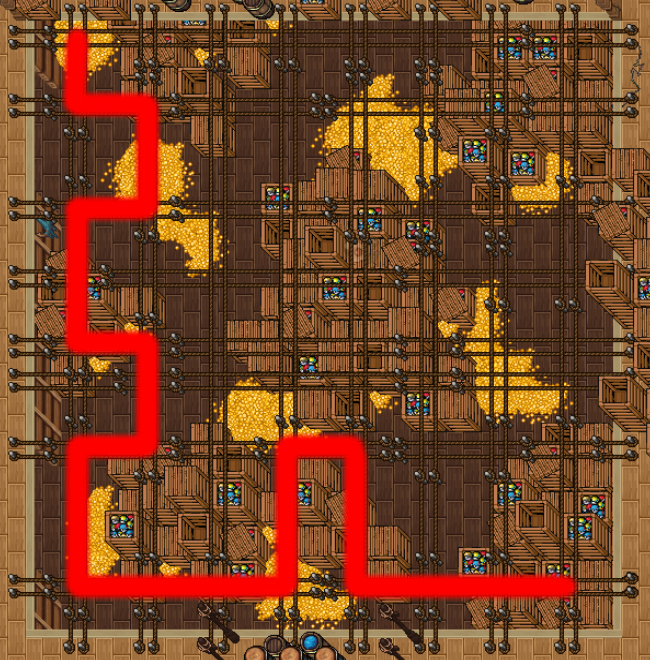
| | O minigame das cordas existem dois caminhos possiveis: |
| | |
| | <center> |
| | {|class="wikitable" style="text-align: center;" |
| | ! A !! B |
| | |- |
| | |[[file:halloween captain dusknoir dungeon minigame a.png|350px|link=]] <br> [[Media:halloween captain dusknoir dungeon minigame a.png|'''Clique para ampliar''']] |
| | |[[file:halloween captain dusknoir dungeon minigame b.png|350px|link=]] <br> [[Media:halloween captain dusknoir dungeon minigame b.png|'''Clique para ampliar''']] |
| | |- |
| |} | | |} |
| </center> | | </center> |
|
| |
|
| <table class="seeMore">
| | Ao concluir, os jogadores devem seguir ao norte e subir as escadas, tomando cuidado com as armadilhas [[file:355-Duskull.png|link=]] '''Duskull''' que, enquanto estão ativas, detectam o movimento do jogador e invocam Duskulls que atacam o jogador diretamente. |
| <tr>
| | |
| <td class="seeMore__image">[[Arquivo:Telekinetic-compass.gif|link=]]</td>
| | [[file:halloween captain dusknoir dungeon trap duskull.gif|link=]] [[file:halloween captain dusknoir dungeon trap duskull ativa.gif|link=]] |
| <td> '''Veja mais: [[Baixando_e_configurando_o_jogo#Teclas_de_Atalho|Configurando atalho]]'''</td>
| | |
| </tr>
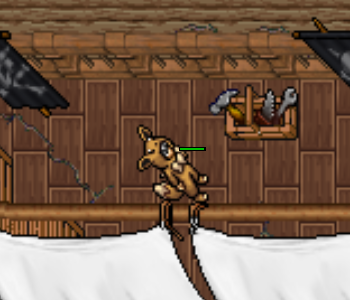
| | Ao subir as escadas, suba novamente para recuperar a Toolbox como na imagem abaixo: |
| </table>
| | |
| | [[file:halloween captain dusknoir dungeon toolbox a.png|link=]] |
| | |
| | Volte até a sala inicial e repare as escadas que estão quebradas à esquerda como na imagem abaixo: |
| | |
| | [[file:halloween captain dusknoir dungeon toolbox b.gif|link=]] |
| | |
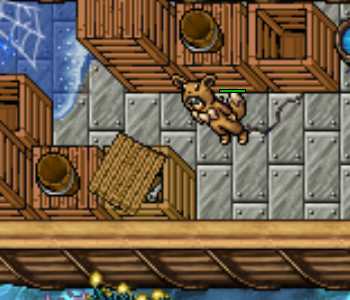
| | Após reparar as escadas, suba e, tomando cuidado com as armadilhas mais uma vez, passe pela ponte de cordas e clique na adriça ao final da ponte para levantar as velas que estão bloqueando a saida do navio. |
| | |
| | [[Arquivo:Halloween captain dusknoir dungeon adriça.gif|link=]] |
| | |
| | Agora basta escapar do navio utilizando o bote que fica logo depois do caminho das cordas como na imagem abaixo: |
| | |
| | [[Arquivo:Halloween captain dusknoir dungeon bote.gif|link=]] |
| | |
| | |
| | </center> |
| | |-|Normal= |
| | <center> |
|
| |
|
| =Habilidades= | | == Primeira Etapa == |
|
| |
|
| As habilidades dos Pokémon podem ser utilizadas através do '''Order''', ou através de atalhos de teclado, como no caso do Teleporte.
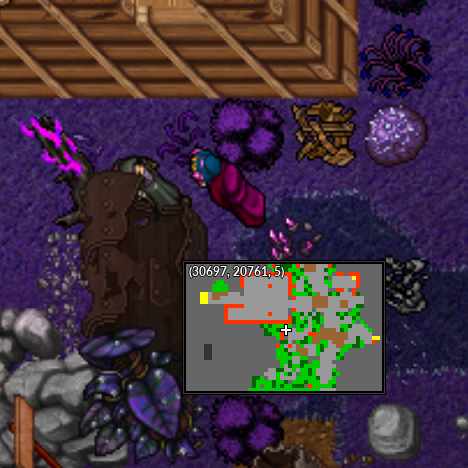
| | [[Arquivo:Halloween captain dusknoir dungeon minimap andar 2.png|link=]] |
| Para saber quais habilidades os seus Pokémon tem, basta usar a [[Arquivo:PokedexIcon.png|link=]] Pokédex '''(Shift+D)'''
| |
|
| |
|
| x
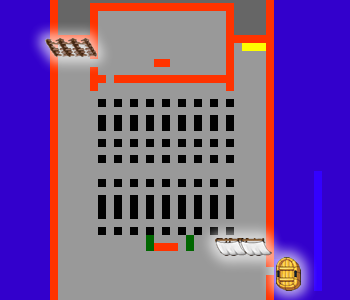
| | Ao entrar na Dungeon, o jogador se encontrará no segundo andar do barco, onde ele deve encontrar a porta que leva pro terceiro andar, para isso, ele deve tomar cuidado com as armadilhas do andar. |
|
| |
|
| <tabber> | | ===Duskull=== |
| Utilidade=
| | |
| {{#tag:tabber|
| | Quando as armadilhas Duskull ativam, o jogadore deve parar de andar até que ele desapareça, caso contrário, um Duskull que ataca o jogador será invocado pra cada passo que o jogador deu enquanto a armadilha estava ativa. |
| Cut=
| | |
| | [[file:halloween captain dusknoir dungeon trap duskull.gif|link=]] [[file:halloween captain dusknoir dungeon trap duskull ativa.gif|link=]] |
| | |
| | ===Buracos=== |
| | |
| | O jogador deve tomar cuidado para não cair no primeiro andar, caso caia, terá que subir utilizando a corda ao norte. |
| | |
| | [[Arquivo:Halloween captain dusknoir dungeon buraco.gif|link=]] |
| | |
| | Ao encontrar a porta correta, o jogador estará no terceiro andar. |
| | |
| | == Segunda Etapa== |
| | |
| | [[Arquivo:Halloween captain dusknoir dungeon minimap andar 3.png|link=]] [[Arquivo:Halloween captain dusknoir dungeon minimap andar 4.png|link=]] |
| | |
| | No terceiro andar, o jogador deve recuperar a toolbox que fica no andar de cima, pra isso, o jogador deve passar pelas cordas e subir a escada do lado direito da Dungeon. |
| | |
| | === Caminho das Cordas === |
| | |
| | O minigame das cordas existem dois caminhos possiveis: |
| | |
| | <center> |
| | {|class="wikitable" style="text-align: center;" |
| | ! A !! B |
| | |- |
| | |[[file:halloween captain dusknoir dungeon minigame a.png|350px|link=]] <br> [[Media:halloween captain dusknoir dungeon minigame a.png|'''Clique para ampliar''']] |
| | |[[file:halloween captain dusknoir dungeon minigame b.png|350px|link=]] <br> [[Media:halloween captain dusknoir dungeon minigame b.png|'''Clique para ampliar''']] |
| | |- |
| | |} |
| | </center> |
| | |
| | Ao concluir, os jogadores devem seguir ao norte e subir as escadas, tomando cuidado com as armadilhas [[file:355-Duskull.png|link=]] '''Duskull''' |
| | |
| | Ao subir as escadas, suba novamente para recuperar a Toolbox como na imagem abaixo: |
| | |
| | [[file:halloween captain dusknoir dungeon toolbox a.png|link=]] |
| | |
| | Volte até a sala inicial e repare as escadas que estão quebradas à esquerda como na imagem abaixo: |
| | |
| | [[file:halloween captain dusknoir dungeon toolbox b.gif|link=]] |
| | |
| | Após reparar as escadas, suba e, tomando cuidado com as armadilhas mais uma vez, passe pela ponte de cordas e clique na adriça ao final da ponte para levantar as velas que estão bloqueando a saida do navio. |
| | |
| | [[Arquivo:Halloween captain dusknoir dungeon adriça.gif|link=]] |
| | |
| | Agora basta escapar do navio utilizando o bote que fica logo depois do caminho das cordas como na imagem abaixo: |
| | |
| | [[Arquivo:Halloween captain dusknoir dungeon bote.gif|link=]] |
| | |
| | |
| | </center> |
| | |-|Dificil= |
| | <center> |
| | |
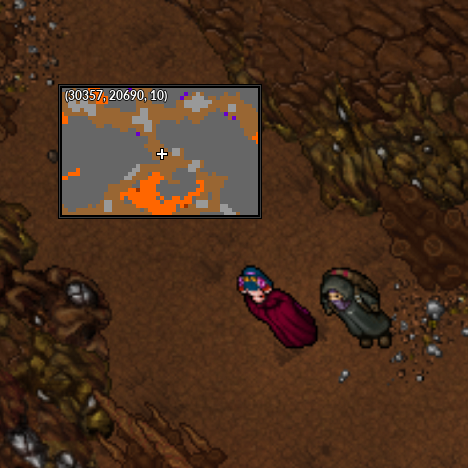
| | == Primeira Etapa == |
| | |
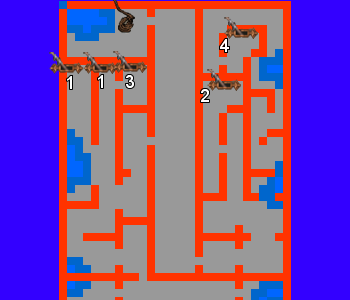
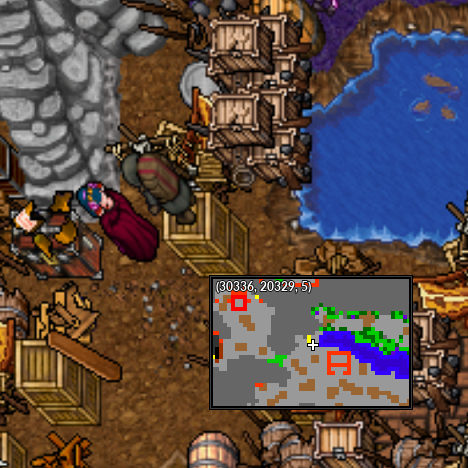
| | [[Arquivo:Halloween captain dusknoir dungeon minimap andar 1.png|link=]] |
| | |
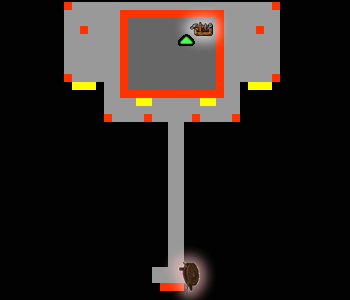
| | Ao entrar na Dungeon, o jogador deve achar a caixa contendo a chave da porta do segundo andar enquanto ativa as '''4''' alavancas em ordem para chegar ao segundo andar. |
| | |
| | ▶Obs: A primeira alavanca pode estar em dois lugares diferentes. |
| | |
| | A caixa pode estar em qualquer lugar do primeiro andar. |
| | |
| | [[Arquivo:Halloween captain dusknoir dungeon caixa.png|link=]] |
| | |
| | ===Barril explosivo=== |
| | |
| | O jogador deve tomar cuidado com os barris espalhados pelo primeiro andar, para liberar o caminho basta faze-los explodir clicando neles como na imagem: |
| | |
| | [[Arquivo:Halloween captain dusknoir dungeon barril a.gif]] [[Arquivo:Halloween captain dusknoir dungeon barril b.gif]] |
| | |
| | Ao encontrar a chave e puxar as 4 alavancas, basta seguir pelo caminho central e subir a corda marcada no mapa. |
| | |
| | No segundo andar o jogador deve utilizar a chave que acabou de pegar na caixa amarela e utilizar na porta como na imagem abaixo: |
| | |
| | [[Arquivo:Halloween captain dusknoir dungeon chave.gif|link=]] |
| | |
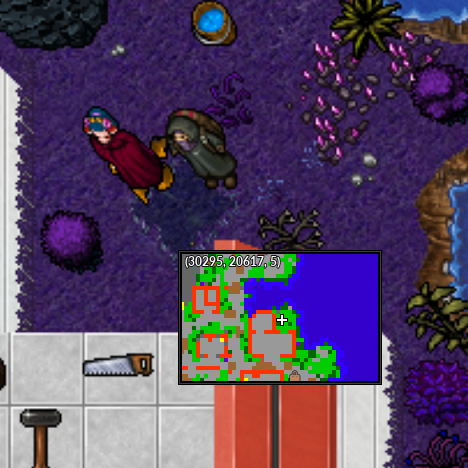
| | == Segunda Etapa == |
| | |
| | [[Arquivo:Halloween captain dusknoir dungeon minimap andar 2.png|link=]] |
| | |
| | Agora, o jogador deve procurar a porta correta que leva para o terceiro andar. A localização das portas está marcada no mapa acima: |
| | |
| | ===Duskull=== |
| | |
| | Quando as armadilhas Duskull ativam, o jogadore deve parar de andar até que ele desapareça, caso contrário, um Duskull que ataca o jogador será invocado pra cada passo que o jogador deu enquanto a armadilha estava ativa. |
|
| |
|
| Utilize o botão '''order''' com um Pokémon que tenha a habilidade '''Cut''' para cortar um arbusto como no exemplo abaixo:
| | [[file:halloween captain dusknoir dungeon trap duskull.gif|link=]] [[file:halloween captain dusknoir dungeon trap duskull ativa.gif|link=]] |
|
| |
|
| [[Arquivo:Cut abilityguide.gif|centro|link=]]
| | ===Buracos=== |
|
| |
|
| {{!}}-{{!}}
| | O jogador deve tomar cuidado para não cair no primeiro andar, caso caia, terá que subir utilizando a corda ao norte. |
| Rock Smash=
| |
| Utilize o botão '''order''' com um Pokémon que tenha a habilidade '''Rock Smash''' para quebrar uma pedra como no exemplo abaixo:
| |
|
| |
|
| [[Arquivo:Rocksmash abilityguide.gif|centro|link=]] | | [[Arquivo:Halloween captain dusknoir dungeon buraco.gif|link=]] |
|
| |
|
| {{!}}-{{!}}
| | Ao encontrar a porta correta, o jogador estará no terceiro andar. |
| Dig=
| |
| Utilize o botão '''order''' com um Pokémon que tenha a habilidade '''Dig''' para cavar um buraco como no exemplo abaixo:
| |
|
| |
|
| [[Arquivo:Dig abilityguide.gif|centro|link=]]
| | == Terceira Etapa == |
|
| |
|
| {{!}}-{{!}}
| | [[Arquivo:Halloween captain dusknoir dungeon minimap andar 3.png|link=]] [[Arquivo:Halloween captain dusknoir dungeon minimap andar 4.png|link=]] |
| Light=
| |
| Utilize o botão '''order''' em um Pokémon que tenha a habilidade '''Light''' para iluminar como no exemplo abaixo:
| |
|
| |
|
| [[Arquivo:Light abilityguide.gif|centro|link=]]
| | No terceiro andar, o jogador deve recuperar a toolbox que fica no andar de cima, pra isso, o jogador deve passar pelas cordas e subir a escada do lado direito da Dungeon. |
|
| |
|
| A habilidade '''Light''' também pode ser usada para revelar segredos:
| | === Caminho das Cordas === |
|
| |
|
| [[Arquivo:Lighthide abilityguide.gif|centro|link=]]
| | O minigame das cordas existem dois caminhos possiveis: |
|
| |
|
| {{!}}-{{!}} | | <center> |
| Headbutt=
| | {|class="wikitable" style="text-align: center;" |
| Utilizando um Pokémon com a habilidade '''Headbutt''', o jogador pode derrubar Pokémon selvagens de arvores, basta clicar o botão '''order''' em cima dela.
| | ! A !! B |
| | |- |
| | |[[file:halloween captain dusknoir dungeon minigame a.png|350px|link=]] <br> [[Media:halloween captain dusknoir dungeon minigame a.png|'''Clique para ampliar''']] |
| | |[[file:halloween captain dusknoir dungeon minigame b.png|350px|link=]] <br> [[Media:halloween captain dusknoir dungeon minigame b.png|'''Clique para ampliar''']] |
| | |- |
| | |} |
| | </center> |
|
| |
|
| [[Arquivo:Headbutt abilityguide.gif|centro|link=]] | | Ao concluir, os jogadores devem seguir ao norte e subir as escadas, tomando cuidado com as armadilhas [[file:355-Duskull.png|link=]] '''Duskull''' |
|
| |
|
| O jogador pode aumentar a quantidade de Pokémon e encontrar Pokémon diferentes através de alguns elixires, como o [[Arquivo:Juggernauts.png|link=]] Juggernaut Elixir e o [[Arquivo:Superior_Juggernaut%27s_Elixir.png|link=]] Superior Juggernaut Elixir.
| | Ao subir as escadas, suba novamente para recuperar a Toolbox como na imagem abaixo: |
|
| |
|
| <table class="seeMore">
| | [[file:halloween captain dusknoir dungeon toolbox a.png|link=]] |
| <tr>
| |
| <td class="seeMore__image">[[Arquivo:Telekinetic-compass.gif|link=]]</td>
| |
| <td> '''Veja mais: [[Headbutt]]'''</td>
| |
| </tr>
| |
| </table>
| |
| {{!}}-{{!}}
| |
| }}
| |
| |-|
| |
| Movimento=
| |
| {{#tag:tabber|
| |
| Ride=
| |
| Utilizando um Pokémon que tenha a habilidade '''Ride''', clicando '''order''' em si, o jogador irá montar em seu Pokémon.
| |
|
| |
|
| [[Arquivo:Ride abilityguide.gif|centro|link=]]
| | Volte até a sala inicial e repare as escadas que estão quebradas à esquerda como na imagem abaixo: |
| <center>Clique o botão order em si para desmontar.</center>
| |
|
| |
|
| <table class="seeMore">
| | [[file:halloween captain dusknoir dungeon toolbox b.gif|link=]] |
| <tr>
| |
| <td class="seeMore__image">[[Arquivo:Telekinetic-compass.gif|link=]]</td>
| |
| <td> '''Veja mais: [[Velocidade - Ride|Velocidade de Montaria]]'''</td>
| |
| </tr>
| |
| </table>
| |
|
| |
|
| {{!}}-{{!}}
| | Após reparar as escadas, suba e, tomando cuidado com as armadilhas mais uma vez, passe pela ponte de cordas e clique na adriça ao final da ponte para levantar as velas que estão bloqueando a saida do navio. |
| Surf=
| |
| Utilizando um Pokémon que tenha a habilidade '''Surf''', clicando o botão '''order''' em uma borda, o Pokémon irá até ela, e o jogador precisa ir em direção ao Pokémon para surfar.
| |
|
| |
|
| [[Arquivo:Surf abilityguide.gif|centro|link=]] | | [[Arquivo:Halloween captain dusknoir dungeon adriça.gif|link=]] |
| <br>
| |
| <center>Clique o botão order em uma borda próxima para desmontar como no exemplo abaixo:</center>
| |
| [[Arquivo:Surfoff abilityguide.gif|centro|link=]]
| |
|
| |
|
| | Agora basta escapar do navio utilizando o bote que fica logo depois do caminho das cordas como na imagem abaixo: |
|
| |
|
| <table class="seeMore">
| | [[Arquivo:Halloween captain dusknoir dungeon bote.gif|link=]] |
| <tr>
| | |
| <td class="seeMore__image">[[Arquivo:Telekinetic-compass.gif|link=]]</td>
| |
| <td> '''Veja mais: [[Velocidade - Surf|Velocidade de Surf]]'''</td>
| |
| </tr>
| |
| </table>
| |
|
| |
|
| {{!}}-{{!}}
| |
| Fly=
| |
| Utilizando um Pokémon que tenha a habilidade '''Fly''' ou '''Levitate''', clicando '''order''' em si, o jogador irá montar em seu Pokémon e poderá usar os comandos de vôo:<br>
| |
| [[Arquivo:fly_abilityguide.gif|centro|link=]]
| |
| <br>
| |
| <center>'''PageUp''' para subir</center>
| |
| [[Arquivo:flyup_abilityguide.gif|centro|link=]]
| |
| <br>
| |
| <center>'''PageDown''' para descer</center>
| |
| [[Arquivo:flydown_abilityguide.gif|centro|link=]]
| |
| <center>Clique o botão order em si para desmontar.</center>
| |
| <br>
| |
|
| |
|
| *O jogador também poderá equipar o Held Item Y-Wing para aumentar a velocidade de vôo do Pokémon.
| | </tabber> |
| | </center> |
|
| |
|
| <table class="seeMore"> | | ==Recompensas== |
| <tr>
| | <center class="center-tab"><tabber> |
| <td class="seeMore__image">[[Arquivo:Telekinetic-compass.gif|link=]]</td>
| | |-|Fácil= |
| <td> '''Veja mais: [[Velocidade - Fly|Velocidade de Voo]]'''</td>
| | <center> |
| </tr>
| | {| class="wikitable" width="25%" |
| </table>
| | |- |
| | ! colspan="2" | Item |
| | ! Raridade |
| | |- |
| | | align="center" | [[Arquivo:Halloween Token 2020.png|link=]] |
| | |align="left" style="border-left-style: hidden; | 20 Halloween Token |
| | | align="center" |Comum |
| | |- |
| | | align="center" | [[Arquivo:Halloween dimensional key.png|link=]] |
| | |align="left" style="border-left-style: hidden; | Halloween Dimensional Key |
| | | align="center" |Comum |
| | |- |
| | | align="center" | [[Arquivo:Ghost_Skull.png|link=]] |
| | |align="left" style="border-left-style: hidden; | Ghost Skull |
| | |align="center" | Comum |
| | |- |
| | | align="center" | [[Arquivo:x.png|link=]] |
| | |align="left" style="border-left-style: hidden; | Hangable Tricorn Hat |
| | |align="center" | Épico |
| | |- |
| | | align="center" | [[Arquivo:Zoroark_bag.png|link=]] |
| | |align="left" style="border-left-style: hidden; | Zoroark Bag |
| | |align="center" | Épico |
| | |- |
| | | align="center" | [[Arquivo:x.png|link=]] |
| | |align="left" style="border-left-style: hidden; | Hangable Ship's Helm |
| | |align="center" | Épico |
| | |- |
| | | align="center" | [[Arquivo:Shiny_Gengar_Emote_Toy.png|link=]] |
| | |align="left" style="border-left-style: hidden; | Shiny Gengar Emote Toy |
| | |align="center" | Épico |
| | |- |
| | | align="center" | [[Arquivo:Gengar_Emote_Toy.png|link=]] |
| | |align="left" style="border-left-style: hidden; | Gengar Emote Toy |
| | |align="center" | Épico |
| | |- |
| | | align="center" | [[Arquivo:Sableye_Emote_Toy.png|link=]] |
| | |align="left" style="border-left-style: hidden; | Sableye Emote Toy |
| | |align="center" | Épico |
| | |- |
| | | align="center" | [[Arquivo:Mismagius_Emote_Toy.png|link=]] |
| | |align="left" style="border-left-style: hidden; | Mismagius Emote Toy |
| | |align="center" | Épico |
| | |- |
| | | align="center" | [[Arquivo:Gengar-locker.png|70px|link=]] |
| | |align="left" style="border-left-style: hidden; | Gengar Locker |
| | |align="center" | Epic |
| | |- |
| | | align="center" | [[Arquivo:Shiny-ariados-locker.png|70px|link=]] |
| | |align="left" style="border-left-style: hidden; | Shiny Ariados Locker |
| | |align="center" | Epic |
| | |- |
| | | align="center" | [[Arquivo:Shiny-gengar-locker.png|70px|link=]] |
| | |align="left" style="border-left-style: hidden; | Shiny Gengar Locker |
| | |align="center" | Lendário |
| | |- |
| | ! colspan="3" | [[Arquivo:Exp_icon.png|30px|link=]] Experiência: 100.000 |
| | |} |
| | </center> |
| | |-|Normal= |
| | <center> |
| | {| class="wikitable" width="25%" |
| | |- |
| | ! colspan="2" | Item |
| | ! Raridade |
| | |- |
| | | align="center" | [[Arquivo:Halloween Token 2020.png|link=]] |
| | |align="left" style="border-left-style: hidden; | 30 Halloween Token |
| | | align="center" |Comum |
| | |- |
| | | align="center" | [[Arquivo:Halloween dimensional key.png|link=]] |
| | |align="left" style="border-left-style: hidden; | Halloween Dimensional Key |
| | | align="center" |Comum |
| | |- |
| | | align="center" | [[Arquivo:Ghost_Skull.png|link=]] |
| | |align="left" style="border-left-style: hidden; | Ghost Skull |
| | |align="center" | Comum |
| | |- |
| | | align="center" | [[Arquivo:x.png|link=]] |
| | |align="left" style="border-left-style: hidden; | Hangable Tricorn Hat |
| | |align="center" | Épico |
| | |- |
| | | align="center" | [[Arquivo:Zoroark_bag.png|link=]] |
| | |align="left" style="border-left-style: hidden; | Zoroark Bag |
| | |align="center" | Épico |
| | |- |
| | | align="center" | [[Arquivo:x.png|link=]] |
| | |align="left" style="border-left-style: hidden; | Hangable Ship's Helm |
| | |align="center" | Épico |
| | |- |
| | | align="center" | [[Arquivo:Shiny_Gengar_Emote_Toy.png|link=]] |
| | |align="left" style="border-left-style: hidden; | Shiny Gengar Emote Toy |
| | |align="center" | Épico |
| | |- |
| | | align="center" | [[Arquivo:Gengar_Emote_Toy.png|link=]] |
| | |align="left" style="border-left-style: hidden; | Gengar Emote Toy |
| | |align="center" | Épico |
| | |- |
| | | align="center" | [[Arquivo:Sableye_Emote_Toy.png|link=]] |
| | |align="left" style="border-left-style: hidden; | Sableye Emote Toy |
| | |align="center" | Épico |
| | |- |
| | | align="center" | [[Arquivo:Mismagius_Emote_Toy.png|link=]] |
| | |align="left" style="border-left-style: hidden; | Mismagius Emote Toy |
| | |align="center" | Épico |
| | |- |
| | | align="center" | [[Arquivo:gengar-locker.png|70px|link=]] |
| | |align="left" style="border-left-style: hidden; | Gengar Locker |
| | |align="center" | Epic |
| | |- |
| | | align="center" | [[Arquivo:Shiny-ariados-locker.png|70px|link=]] |
| | |align="left" style="border-left-style: hidden; | Shiny Ariados Locker |
| | |align="center" | Epic |
| | |- |
| | | align="center" | [[Arquivo:Shiny-gengar-locker.png|70px|link=]] |
| | |align="left" style="border-left-style: hidden; | Shiny Gengar Locker |
| | |align="center" | Lendário |
| | |- |
| | ! colspan="3" | [[Arquivo:Exp_icon.png|30px|link=]] Experiência: 150.000 |
| | |} |
| | </center> |
| | |-|Dificil= |
| | <center> |
| | {| class="wikitable" width="25%" |
| | |- |
| | ! colspan="2" | Item |
| | ! Raridade |
| | |- |
| | | align="center" | [[Arquivo:Halloween Token 2020.png|link=]] |
| | |align="left" style="border-left-style: hidden; | 40 Halloween Token |
| | | align="center" |Comum |
| | |- |
| | | align="center" | [[Arquivo:Halloween dimensional key.png|link=]] |
| | |align="left" style="border-left-style: hidden; | Halloween Dimensional Key |
| | | align="center" |Comum |
| | |- |
| | | align="center" | [[Arquivo:Ghost_Skull.png|link=]] |
| | |align="left" style="border-left-style: hidden; | Ghost Skull |
| | |align="center" | Comum |
| | |- |
| | | align="center" | [[Arquivo:x.png|link=]] |
| | |align="left" style="border-left-style: hidden; | Hangable Tricorn Hat |
| | |align="center" | Épico |
| | |- |
| | | align="center" | [[Arquivo:Zoroark_bag.png|link=]] |
| | |align="left" style="border-left-style: hidden; | Zoroark Bag |
| | |align="center" | Épico |
| | |- |
| | | align="center" | [[Arquivo:x.png|link=]] |
| | |align="left" style="border-left-style: hidden; | Hangable Ship's Helm |
| | |align="center" | Épico |
| | |- |
| | | align="center" | [[Arquivo:Shiny_Gengar_Emote_Toy.png|link=]] |
| | |align="left" style="border-left-style: hidden; | Shiny Gengar Emote Toy |
| | |align="center" | Épico |
| | |- |
| | | align="center" | [[Arquivo:Gengar_Emote_Toy.png|link=]] |
| | |align="left" style="border-left-style: hidden; | Gengar Emote Toy |
| | |align="center" | Épico |
| | |- |
| | | align="center" | [[Arquivo:Sableye_Emote_Toy.png|link=]] |
| | |align="left" style="border-left-style: hidden; | Sableye Emote Toy |
| | |align="center" | Épico |
| | |- |
| | | align="center" | [[Arquivo:Mismagius_Emote_Toy.png|link=]] |
| | |align="left" style="border-left-style: hidden; | Mismagius Emote Toy |
| | |align="center" | Épico |
| | |- |
| | | align="center" | [[Arquivo:gengar-locker.png|70px|link=]] |
| | |align="left" style="border-left-style: hidden; | Gengar Locker |
| | |align="center" | Epic |
| | |- |
| | | align="center" | [[Arquivo:Shiny-ariados-locker.png|70px|link=]] |
| | |align="left" style="border-left-style: hidden; | Shiny Ariados Locker |
| | |align="center" | Epic |
| | |- |
| | | align="center" | [[Arquivo:Shiny-gengar-locker.png|70px|link=]] |
| | |align="left" style="border-left-style: hidden; | Shiny Gengar Locker |
| | |align="center" | Lendário |
| | |- |
| | ! colspan="3" | [[Arquivo:Exp_icon.png|30px|link=]] Experiência: 200.000 |
| | |} |
| | </tabber> |
| | </center> |
|
| |
|
| {{!}}-{{!}}
| | = Halloween Dungeon Kraken = |
| Teleport=
| |
|
| |
|
| Utilizando um Pokémon que tem a habilidade '''Teleport''', o jogador pode se teleportar para cidades, casas ou até mesmo uma base da policia/equipe rocket dependendo de sua escolha na rocket/police quest. Basta digitar o atalho '''h"''' para se teleportar.
| | <center class="center-tab"><tabber> |
| | |-|Habilidade A= |
| | <center> |
|
| |
|
| [[Arquivo:Teleport abilityguide.gif|centro|link=]]
| | a |
| * O Jogador precisa falar com a Nurse Joy de cada cidade para desbloquear o teleporte.
| |
| *O tempo de recarga do Teleporte é de '''30 minutos''', o jogador pode diminuir esse tempo utilizando o held item '''Y-Teleport'''.
| |
|
| |
|
| | </center> |
| | |-|Habilidade B= |
| | <center> |
|
| |
|
| Exemplos:
| | b |
| *h"cerulean
| |
| *h"house (caso o jogador tenha uma house)
| |
| *h"house,jogador (para teleportar até a house de algum jogador no qual esteja convidado)
| |
|
| |
|
| <table class="seeMore"> | | </center> |
| <tr>
| | |-|Habilidade C= |
| <td class="seeMore__image">[[Arquivo:Telekinetic-compass.gif|link=]]</td>
| | <center> |
| <td> '''Veja mais: [[Held_Itens#Utilitários_Y-1|Held Item]]'''</td>
| |
| </tr>
| |
| </table>
| |
| {{!}}-{{!}}
| |
| Headbutt=
| |
| Utilizando um Pokémon com a habilidade '''Headbutt''', o jogador pode derrubar Pokémon selvagens de arvores, basta clicar o botão '''order''' em cima dela.
| |
|
| |
|
| [[Arquivo:Headbutt abilityguide.gif|centro|link=]]
| | c |
|
| |
|
| O jogador pode aumentar a quantidade de Pokémon e encontrar Pokémon diferentes através de alguns elixires, como o [[Arquivo:Juggernauts.png|link=]] Juggernaut Elixir e o [[Arquivo:Superior_Juggernaut%27s_Elixir.png|link=]] Superior Juggernaut Elixir.
| | </center> |
| | |-|Habilidade D= |
| | <center> |
|
| |
|
| <table class="seeMore">
| | D |
| <tr>
| |
| <td class="seeMore__image">[[Arquivo:Telekinetic-compass.gif|link=]]</td>
| |
| <td> '''Veja mais: [[Headbutt]]'''</td>
| |
| </tr>
| |
| </table>
| |
| {{!}}-{{!}}
| |
| }}
| |
| |-|
| |
| Adicionais=
| |
| {{#tag:tabber|
| |
| Blink=
| |
|
| |
|
| Utilize o botão '''order''' com um Pokémon que tenha a habilidade '''Blink''' ou '''Dark Portal''' para teleportar-se como no exemplo abaixo: <br>
| | </center> |
| | |-|Habilidade E= |
| | <center> |
|
| |
|
| [[arquivo:blink_abilityguide.gif|centro|link=]]
| | E |
| *O Blink tem um tempo de recarga base de 15 segundos.
| |
| *O tempo de recarga do Blink pode ser reduzido através do Held Item X-Blink
| |
|
| |
|
| {{!}}-{{!}}
| | </center> |
| Control Minds=
| | |-|Habilidade F= |
| | <center> |
|
| |
|
| Para controlar a mente de um Pokémon, o jogador deve ter um Pokémon com a habilidade Control Minds. Ao clicar com o botão '''order''' em um Pokémon de nivel inferior, o jogador poderá controlar um Pokémon selvagem.
| | F |
|
| |
|
| [[Arquivo:Controlminds abilityguide.gif|centro|link=]]
| | </tabber> |
| | </center> |
|
| |
|
| *A habilidade o tem tempo de recarga de '''180 segundos'''. O jogador pode reduzir o tempo de recarga do '''Control Minds''' utilizando o held item '''Y-Control''' em seu Pokémon.
| |
|
| |
|
| {{!}}-{{!}}
| |
| Transform=
| |
|
| |
|
| Para utilizar a habilidade '''Transform''' basta o jogador clicar o botão order em cima do Pokémon desejado.
| |
|
| |
|
| [[Arquivo:Transform abilityguide.gif|centro|link=]]
| |
| <center>Para destransformar, basta digitar !revert</center>
| |
|
| |
|
| Apenas o [[Arquivo:132-Ditto.png|link=]] Ditto e o [[Arquivo:132-Sh_Ditto.png|link=]] Shiny Ditto tem essa habilidade, para saber mais:
| | <center> [[Arquivo:Merchant_-_Negocia_itens.png|link=]] </center> |
| | Este Merchant é responsável por comprar os itens exclusivos da Nightmare. |
|
| |
|
| <table class="seeMore">
| | Ele possui um padrão e a cada dia da semana aparecerá em uma Resistência diferente, sendo essa localização fixa entre os servidores. |
| <tr>
| |
| <td class="seeMore__image">[[Arquivo:Telekinetic-compass.gif|link=]]</td>
| |
| <td> '''Veja mais: [[Informações Ditto]]'''</td>
| |
| </tr>
| |
| </table>
| |
|
| |
|
| {{!}}-{{!}} | | =Localização= |
| }} | | <tabber> |
| | |-|Domingo= |
| | <center> |
| | {| class="wikitable bg-none border-0" width="40%" style="text-align:center;" |
| | ! Cerulean |
| | |- |
| | | Ao lado do '''[[Nightmare Hugo|NPC Hugo]]''', no segundo andar do prédio a esquerda do Centro Pokémon. <br>[[Arquivo:Merchant_domingo.png|link=]] |
| | |} |
| | </center> |
| | |-|Segunda-feira= |
| | <center> |
| | {| class="wikitable bg-none border-0" width="40%" style="text-align:center;" |
| | ! Pewter |
| | |- |
| | | Entre o acesso do Centro Pokémon e o '''[[Nightmare Mark|NPC Mark]]''', ao norte.<br>[[Arquivo:Merchant_segunda.png|link=]] |
| | |} |
| | </center> |
| | |-|Terça-feira= |
| | <center> |
| | {| class="wikitable bg-none border-0" width="40%" style="text-align:center;" |
| | ! Viridian |
| | |- |
| | | No local do antigo '''[[NPC_Mark_(Itens)| NPC Mark]]''' de Viridian.<br>[[Arquivo:Merchant_terça.png|link=]] |
| | |} |
| | </center> |
| | |-|Quarta-feira= |
| | <center> |
| | {| class="wikitable bg-none border-0" width="40%" style="text-align:center;" |
| | ! Fucshia |
| | |- |
| | | Na saída norte da Resistência, próximo a entrada do esgoto.<br>[[Arquivo:Merchant_quarta.png|link=]] |
| | |} |
| | </center> |
| | |-|Quinta-feira= |
| | <center> |
| | {| class="wikitable bg-none border-0" width="40%" style="text-align:center;" |
| | ! Cinnabar |
| | |- |
| | | Na entrada do respawn de Darkrai Minion no subsolo da Resistência.<br>[[Arquivo:Merchant_quinta.png|link=]] |
| | |} |
| | </center> |
| | |-|Sexta-feira= |
| | <center> |
| | {| class="wikitable bg-none border-0" width="40%" style="text-align:center;" |
| | ! Pallet |
| | |- |
| | | Dentro do Centro Pokémon, na parte esquerda ao norte.<br>[[Arquivo:Merchant_sexta.png|link=]] |
| | |} |
| | </center> |
| | |-|Sábado= |
| | <center> |
| | {| class="wikitable bg-none border-0" width="40%" style="text-align:center;" |
| | ! Lavender |
| | |- |
| | | Em uma casa no sul da cidade, a esquerda do '''[[Nightmare Mark|NPC Mark]]'''.<br>.[[Arquivo:Merchant_sabado.png|link=]] |
| | |} |
| | </center> |
| </tabber> | | </tabber> |
| <br>
| |
|
| |
|
| *Cada Pokémon tem a sua própria velocidade de transporte.
| | =Itens que Compra= |
| *Todas as habilidades de utilidade podem ser adicionadas aos Pokémon através do Held Item correspondente.
| | |
| | <center> |
| | {| class="wikitable bg-none border-0" style="text-align:center;" width="100%" |
| | ! colspan="2" | Item |
| | ! width="10%" | Preço |
| | ! colspan="2" | Item |
| | ! width="10%" | Preço |
| | ! colspan="2" | Item |
| | ! width="10%" | Preço |
| | |- |
| | | [[Arquivo:MetalScraps.png|link=]] |
| | | Metal Scraps |
| | | $2000 |
| | | [[Arquivo:Nightmare Gem.png|link=]] |
| | | Nightmare Gem |
| | | $216 |
| | | [[Arquivo:Compressed Nightmare Gems.png|link=]] |
| | | Compressed Nightmare Gems |
| | | $21600 |
| | |- |
| | | [[Arquivo:Bagworm Green Leaves.png|link=]] |
| | | Bagworm Green Leaves |
| | | $4500 |
| | | [[Arquivo:Virtual Tail.png|link=]] |
| | | Virtual Tail |
| | | $4500 |
| | | [[Arquivo:Royal Mane.png|link=]] |
| | | Royal Mane |
| | | $4500 |
| | |- |
| | | [[Arquivo:Cave Nail.png|link=]] |
| | | Cave Nail |
| | | $4500 |
| | | [[Arquivo:Land Shark Horn.png|link=]] |
| | | Land Shark Horn |
| | | $4500 |
| | | [[Arquivo:Elefish Fin.png|link=]] |
| | | Elefish Fin |
| | | $4500 |
| | |- |
| | | [[Arquivo:Mole Hair.png|link=]] |
| | | Mole Hair |
| | | $4500 |
| | | [[Arquivo:Fire Monkey Hair.png|link=]] |
| | | Fire Monkey Hair |
| | | $4500 |
| | | [[Arquivo:Whiskers Fin.png|link=]] |
| | | Whiskers Fin |
| | | $4500 |
| | |- |
| | | [[Arquivo:Savage Fin.png|link=]] |
| | | Savage Fin |
| | | $4500 |
| | | [[Arquivo:Black Wool Ball.png|link=]] |
| | | Black Wool Ball |
| | | $3500 |
| | | [[Arquivo:Toxic Gosme.png|link=]] |
| | | Toxic Gosme |
| | | $3500 |
| | |- |
| | | [[Arquivo:Virtual Body.png|link=]] |
| | | Virtual Body |
| | | $37500 |
| | | [[Arquivo:Razor Claw.png|link=]] |
| | | Razor Claw |
| | | $37500 |
| | | [[Arquivo:Bagworm Pink Leaves.png|link=]] |
| | | Bagworm Pink Leaves |
| | | $45000 |
| | |- |
| | | [[Arquivo:Bagworm Stone.png|link=]] |
| | | Bagworm Stone |
| | | $45000 |
| | | [[Arquivo:Alolan Electric Rat Tail.png|link=]] |
| | | Alolan Electric Rat Tail |
| | | $45000 |
| | | [[Arquivo:Catfish Tail.png|link=]] |
| | | Catfish Tail |
| | | $45000 |
| | |- |
| | | [[Arquivo:Electric Fish Tail.png|link=]] |
| | | Electric Fish Tail |
| | | $45000 |
| | | [[Arquivo:Black Venom Flute.png|link=]] |
| | | Black Venom Flute |
| | | $53000 |
| | | [[Arquivo:Mount Horn.png|link=]] |
| | | Mount Horn |
| | | $53000 |
| | |- |
| | | [[Arquivo:Mach Nail.png|link=]] |
| | | Mach Nail |
| | | $53000 |
| | | [[Arquivo:Brutal Fin.png|link=Nightmare Merchant|]] |
| | | Brutal Fin |
| | | $31000 |
| | | [[Arquivo:Gear Nose.png|link=]] |
| | | Gear Nose || $31000 |
| | |- |
| | | [[Arquivo:Solid Head.png|link=]] |
| | | Solid Head |
| | | $31000 |
| | | [[Arquivo:Big Boss Hat.png|link=]] |
| | | Big Boss Hat |
| | | $180000 |
| | | [[Arquivo:Gleam Tail.png|link=]] |
| | | Gleam Tail |
| | | $180000 |
| | |- |
| | | [[Arquivo:Blade Horn.png|link=]] |
| | | Blade Horn |
| | | $180000 |
| | | [[Arquivo:Continent Thorn.png|link=]] |
| | | Continent Thorn |
| | | $180000 |
| | | [[Arquivo:Emperor Trident.png|link=]] |
| | | Emperor Trident |
| | | $180000 |
| | |- |
| | | [[Arquivo:Flame Tail.png|link=]] |
| | | Flame Tail |
| | | $180000 |
| | | [[Arquivo:Virtual Head.png|link=]] |
| | | Virtual Head |
| | | $180000 |
| | | [[Arquivo:Giant Tusk.png|link=]] |
| | | Giant Tusk |
| | | $180000 |
| | |- |
| | | [[Arquivo:Catfish Whiskers.png|link=]] |
| | | Catfish Whiskers |
| | | $66500 |
| | | [[Arquivo:Royal Tail.png|link=]] |
| | | Royal Tail |
| | | $66500 |
| | | [[Arquivo:Remains Of Gears.png|link=]] |
| | | Remains Of Gears |
| | | $66500 |
| | |- |
| | | [[Arquivo:Mount Big Horn.png|link=]] |
| | | Mount Big Horn |
| | | $66500 |
| | | [[Arquivo:Mole Big Hair.png|link=]] |
| | | Mole Big Hair |
| | | $66500 |
| | | [[Arquivo:Sun_Piece.png|link=]] |
| | | Sun Piece |
| | | $4500 |
| | |- |
| | | [[Arquivo:Moon_Piece.png|link=]] |
| | | Moon Piece |
| | | $4500 |
| | | [[Arquivo:Corrupted-Horn-Drill.gif|link=]] |
| | | Corrupted Horn Drill |
| | | $4500 |
| | | [[Arquivo:Corrupted-Poisonous-Tail.gif|link=]] |
| | | Corrupted Poisonous Tail |
| | | $8000 |
| | |- |
| | | [[Arquivo:Corrupted-Cow-Tail.gif|link=]] |
| | | Corrupted Cow Tail |
| | | $6000 |
| | | [[Arquivo:Corrupted-Pot-of-Lava.gif|link=]] |
| | | Corrupted Pot Of Lava |
| | | $2500 |
| | | [[Arquivo:Corrupted-Pinsir-Horn.gif|link=]] |
| | | Corrupted Pinsir Horn |
| | | $4500 |
| | |- |
| | | [[Arquivo:Corrupted-Steelix-Tail.gif|link=]] |
| | | Corrupted Steelix Tail |
| | | $8000 |
| | | [[Arquivo:Corrupted-Leaves.gif|link=]] |
| | | Corrupted Leaves |
| | | $2500 |
| | | [[Arquivo:Corrupted-Black-Hull.gif|link=]] |
| | | Corrupted Black Hull |
| | | $8000 |
| | |- |
| | | [[Arquivo:Corrupted-Doll-Star.gif|link=]] |
| | | Corrupted Doll Star |
| | | $4500 |
| | | [[Arquivo:Corrupted-Vines.gif|link=]] |
| | | Corrupted Vines |
| | | $4500 |
| | | [[Arquivo:Corrupted-Miss-Traces.gif|link=]] |
| | | Corrupted Miss Trace |
| | | $8000 |
| | |- |
| | | [[Arquivo:Corrupted-Magnet.gif|link=]] |
| | | Corrupted Magnet |
| | | $2500 |
| | | [[Arquivo:Corrupted-Dragon-Tooth.gif|link=]] |
| | | Corrupted Dragon Tooth |
| | | $2500 |
| | | [[Arquivo:Black Magnet.png|link=]] |
| | | Black Magnet |
| | | $4500 |
| | |- |
| | | [[Arquivo:Sand Pouch.png|link=]] |
| | | Sand Pouch |
| | | $4500 |
| | | [[Arquivo:Corrupted-Belt-of-Champion.gif|link=]] |
| | | Corrupted Champion Belt |
| | | $4500 |
| | | [[Arquivo:Sloth Topknot.png|link=]] |
| | | Sloth Topknot |
| | | $8000 |
| | |- |
| | | [[Arquivo:Pig Ear.png|link=]] |
| | | Pig Ear |
| | | $4500 |
| | | [[Arquivo:Curly Pig Tail.png|link=]] |
| | | Curly Pig Tail |
| | | $8000 |
| | | [[Arquivo:Bee Sting2.png|link=]] |
| | | Bee Sting |
| | | $8000 |
| | |- |
| | | [[Arquivo:Corrupted Pot Of Moss Bug.gif|link=]] |
| | | Corrupted Pot Of Moss Bug |
| | | $4500 |
| | | [[Arquivo:Lovely Topknot.png|link=]] |
| | | Lovely Topknot |
| | | $8000 |
| | | [[Arquivo:Small Bird Beak.png|link=]] |
| | | Small Bird Beak |
| | | $2500 |
| | |- |
| | | [[Arquivo:Magma Hair.png|link=]] |
| | | Magma Hair |
| | | $4500 |
| | | [[Arquivo:Frosty Tail.png|link=]] |
| | | Frosty Tail |
| | | $4500 |
| | | [[Arquivo:Dark_Ear_Shiftry_NW.png|link=]] |
| | | Brown Ear |
| | | $4500 |
| | |- |
| | | [[Arquivo:White Hair.png|link=]] |
| | | White Hair |
| | | $4500 |
| | | [[Arquivo:Bear Arm.png|link=]] |
| | | Bear Arm |
| | | $8000 |
| | | [[Arquivo:Red Spike.png|link=]] |
| | | Red Spike |
| | | $4500 |
| | |- |
| | | [[Arquivo:Corrupted-Ice-Piece.gif|link=]] |
| | | Corrupted Ice Piece |
| | | $8000 |
| | | [[Arquivo:Frosty Hand.png|link=]] |
| | | Frosty Hand |
| | | $4500 |
| | | [[Arquivo:Psychic Mustache.png|link=]] |
| | | Psychic Mustache |
| | | $8000 |
| | |- |
| | | [[Arquivo:Purple Shell.png|link=]] |
| | | Purple Shell |
| | | $8000 |
| | | [[Arquivo:Green Hair.png|link=]] |
| | | Green Hair |
| | | $8000 |
| | | [[Arquivo:Corrupted-Cloud.gif|link=]] |
| | | Corrupted Cloud |
| | | $6000 |
| | |- |
| | | [[Arquivo:Corrupted-Tree-Branch.gif|link=]] |
| | | Corrupted Tree Branch |
| | | $6000 |
|
| |
|
| Para saber mais:
| | | [[Arquivo:Corrupted-Venom-Flute.gif|link=]] |
| <table class="seeMore">
| | | Corrupted Venom Flute |
| <tr>
| | | $6000 |
| <td class="seeMore__image">[[Arquivo:Telekinetic-compass.gif|link=]]</td>
| | | [[Arquivo:Corrupted-Scizor-Claw.gif|link=]] |
| <td> '''Veja mais: [[Held_Itens#Utilitários_Y-1|Held Item]]'''</td>
| | | Corrupted Scizor Claw |
| </tr>
| | | $6000 |
| </table>
| | |- |
| | | [[Arquivo:Corrupted-Lizard-Tail.gif|link=]] |
| | | Corrupted Lizard Tail |
| | | $6000 |
| | | [[Arquivo:Corrupted-Feather.gif|link=]] |
| | | Corrupted Feather |
| | | $6000 |
| | | [[Arquivo:Corrupted-Gem-Star.gif|link=]] |
| | | Corrupted Gem Star |
| | | $6000 |
| | |- |
| | | [[Arquivo:Corrupted-Streak-Tail.gif|link=]] |
| | | Corrupted Streak Tail |
| | | $6000 |
| | | [[Arquivo:Kite Antenna.png|link=]] |
| | | Kite Antenna |
| | | $132 |
| | | [[Arquivo:Black_Lucky_Charm.png]] |
| | | Black Lucky Charm |
| | | $4500 |
| | |- |
| | | [[Arquivo:NW_ore.png]] |
| | | Nightmare Ore |
| | | $8000 |
| | | [[Arquivo:Star_Dust.png]] |
| | | Star Dust |
| | | $10000 |
| | | [[Arquivo:Small_Eagle_Feather.png]] |
| | | Small Eagle Feather |
| | | $2500 |
| | |- |
| | | [[Arquivo:Big_Eagle_Feather.png]] |
| | | Big Eagle Feather |
| | | $6000 |
| | | [[Arquivo:Ice_Crystal.png]] |
| | | Ice Crystal |
| | | $4500 |
| | | [[Arquivo:Big_Ice_Ball.png]] |
| | | Big Ice Ball |
| | | $4500 |
| | |- |
| | | [[Arquivo:Wolf_Tail.png]] |
| | | Wolf Tail |
| | | $3500 |
| | | [[Arquivo:Short_Lycan_Tail.png]] |
| | | Short Lycan Tail |
| | | $6000 |
| | | [[Arquivo:Fluffy_Lycan_Tail.png]] |
| | | Fluffy Lycan Tail |
| | | $6000 |
| | |- |
| | | [[Arquivo:Spiked_Lycan_Tail.png]] |
| | | Spiked Lycan Tail |
| | | $6000 |
| | | [[Arquivo:Petite Leaves.png]] |
| | | Petite Leaves |
| | | $2500 |
| | | [[Arquivo:Flower Hat.png]] |
| | | Flower Hat |
| | | $4500 |
| | |- |
| | | [[Arquivo:Pink_Flower_Hat.png]] |
| | | Pink Flower Hat |
| | | $6000 |
| | | [[Arquivo:Small Shovel.png]] |
| | | Small Shovel |
| | | $130 |
| | | [[Arquivo:Sandy Remains.png]] |
| | | Sandy Remains |
| | | $130 |
| | |- |
| | | [[Arquivo:Galarian_Farfetch%27D_Leek.png]] |
| | | Galarian Farfetch'd Leek |
| | | $300 |
| | | [[Arquivo:Dragon Slime.png]] |
| | | Dragon Slime |
| | | $3500 |
| | | [[Arquivo:Dragon Goo.png]] |
| | | Dragon Goo |
| | | $3500 |
| | |- |
| | | [[Arquivo:Leek lance.png]] |
| | | Leek Lance |
| | | $25000 |
| | | [[Arquivo:Leek shield.png]] |
| | | Leek Shield |
| | | $25000 |
| | | [[Arquivo:Feline Fur.png]] |
| | | Feline Fur |
| | | $4500 |
| | |- |
| | | [[Arquivo:Feline Tail.png]] |
| | | Feline Tail |
| | | $4500 |
| | | [[Arquivo:Metal Trunk.png]] |
| | | Metal Trunk |
| | | $4500 |
| | | [[Arquivo:Ivory Tusk.png]] |
| | | Ivory Tusk |
| | | $4500 |
| | |- |
| | | [[Arquivo:Crystal Shard.png]] |
| | | Crystal Shard |
| | | $4500 |
| | | [[Arquivo:Pink Fins Alomomola.png]] |
| | | Pink Fins |
| | | $4500 |
| | | [[Arquivo:Toxic Thing.png]] |
| | | Toxic Thing |
| | | $4500 |
| | |- |
| | | [[Arquivo:Toxic Mustache.png]] |
| | | Toxic Moustache |
| | | $4500 |
| | | [[Arquivo:VoltWing.png]] |
| | | Volt Wing |
| | | $4500 |
| | | [[Arquivo:Dragon Wings.png]] |
| | | Dragon Wings |
| | | $4500 |
| | |- |
| | | [[Arquivo:Strange Fur.png]] |
| | | Strange Fur |
| | | $4500 |
| | | [[Arquivo:Pink Topknot.png]] |
| | | Pink Topknot |
| | | $4500 |
| | | [[Arquivo:Fluffy Purple Fur.png]] |
| | | Fluffy Purple Fur |
| | | $4500 |
| | |- |
| | | [[Arquivo:Pieces Of Stone.png]] |
| | | Pieces of Stone |
| | | $4500 |
| | | [[Arquivo:Pieces of Rare Stone.png]] |
| | | Pieces of Rare Stone |
| | | $4500 |
| | | [[Arquivo:Rainbow Tail.png]] |
| | | Rainbow Tail |
| | | $4500 |
| | |- |
| | | [[Arquivo:Unicorn Horn.png]] |
| | | Unicorn Horn |
| | | $4500 |
| | | [[Arquivo:Spiky Tail.png]] |
| | | Spiky Tail |
| | | $4500 |
| | | [[Arquivo:Black Spiky Tail.png]] |
| | | Black Spiky Tail |
| | | $6000 |
| | |- |
| | | [[Arquivo:Automaton Seal.png]] |
| | | Automaton Seal |
| | | $4500 |
| | | [[Arquivo:Ancient Wire.png]] |
| | | Ancient Wire |
| | | $4500 |
| | | [[Arquivo:x.png]] |
| | | x |
| | | $x |
| | |- |
| | | [[Arquivo:Skull.png]] |
| | | Aurorus Skull |
| | | $150000 |
| | | [[Arquivo:Skull.png]] |
| | | Rampardos Skull |
| | | $150000 |
| | | [[Arquivo:Skull.png]] |
| | | Tyrantrum Skull |
| | | $150000 |
| | |- |
| | | [[Arquivo:Piece of Bone 1.png]] |
| | | Piece of Bone |
| | | $25000 |
| | | [[Arquivo:Piece of Bone 2.png]] |
| | | Piece of Bone |
| | | $25000 |
| | | [[Arquivo:Piece of Bone 3.png]] |
| | | Piece of Bone |
| | | $25000 |
| | |- |
| | | [[Arquivo:Piece of Bone 4.png]] |
| | | Piece of Bone |
| | | $25000 |
| | | [[Arquivo:Spine 1.png]] |
| | | Spine |
| | | $25000 |
| | | [[Arquivo:Spine 2.png]] |
| | | Spine |
| | | $25000 |
| | |- |
| | | [[Arquivo:Spine 3.png]] |
| | | Spine |
| | | $25000 |
| | | [[Arquivo:Spine 4.png]] |
| | | Spine |
| | | $25000 |
| | | [[Arquivo:Spine 5.png]] |
| | | Spine |
| | | $25000 |
| | |- |
| | | [[Arquivo:Bony Foot 1.png]] |
| | | Bony Foot |
| | | $25000 |
| | | [[Arquivo:Bony Foot 2.png]] |
| | | Bony Foot |
| | | $25000 |
| | | [[Arquivo:Bony Foot 3.png]] |
| | | Bony Foot |
| | | $25000 |
| | |- |
| | | [[Arquivo:Bony Foot 4.png]] |
| | | Bony Foot |
| | | $25000 |
| | | [[Arquivo:Bony Foot 5.png]] |
| | | Bony Foot |
| | | $25000 |
| | | [[Arquivo:Bony Foot 6.png]] |
| | | Bony Foot |
| | | $25000 |
| | |- |
| | | [[Arquivo:Bony Foot 7.png]] |
| | | Bony Foot |
| | | $25000 |
| | | [[Arquivo:Bony Hand 1.png]] |
| | | Bony Hand |
| | | $25000 |
| | | [[Arquivo:Bony Hand 2.png]] |
| | | Bony Hand |
| | | $25000 |
| | |- |
| | | [[Arquivo:Bony Tail 1.png]] |
| | | Bony Tail |
| | | $25000 |
| | | [[Arquivo:Bony Tail 2.png]] |
| | | Bony Tail |
| | | $25000 |
| | | [[Arquivo:Bony Tail 3.png]] |
| | | Bony Tail |
| | | $25000 |
| | |- |
| | | [[Arquivo:Rib 1.png]] |
| | | Rib |
| | | $25000 |
| | | [[Arquivo:Ancient Bracelet.png]] |
| | | Ancient Bracelet |
| | | $10000 |
| | | [[Arquivo:Ancient Idol.png]] |
| | | Ancient Idol |
| | | $10000 |
| | |- |
| | | [[Arquivo:Ancient Key.png]] |
| | | Ancient Key |
| | | $10000 |
| | | [[Arquivo:Ancient Gem.png]] |
| | | Ancient Gem |
| | | $10000 |
| | | [[Arquivo:Ancient Vase.png]] |
| | | Ancient Vase |
| | | $10000 |
| | |- |
| | | [[Arquivo:Ancient Tablet.png]] |
| | | Ancient Tablet |
| | | $10000 |
| | | [[Arquivo:Ancient Vase.png]] |
| | | Ancient Orb |
| | | $10000 |
| | | [[Arquivo:x.png]] |
| | | x |
| | | $x |
| | |} |
| | </center> |


