|
|
| (950 revisões intermediárias por 5 usuários não estão sendo mostradas) |
| Linha 1: |
Linha 1: |
| =Shiny Beldum=
| | Olá, treinadores! |
| == '''Informações Gerais''' ==
| |
|
| |
|
| '''Nome:''' Shiny Beldum<br />
| | De vez em quando, alguns erros podem acontecer com seu client, o que pode impedir você de jogar momentaneamente ou atrapalhar o seu acesso ao jogo. Um problema que os jogadores costumam relatar é a perda da autorização para acessar a conta, o que pode acontecer por alguns motivos. Neste tutorial, ajudaremos você a solucionar este problema. |
| '''Level:''' 40<br />
| |
| '''Elemento:''' Steel / Psychic<br />
| |
| '''Habilidades:''' Rock Smash, Teleport e Headbutt.<br />
| |
| '''Boost:''' Enigma Stone (4)<br />
| |
| '''Materia:''' Ironhard ou Psycraft<br />
| |
| '''Pedra de Evolução:''' Metal Stone e Enigma Stone<br />
| |
|
| |
|
| == '''Evoluções''' ==
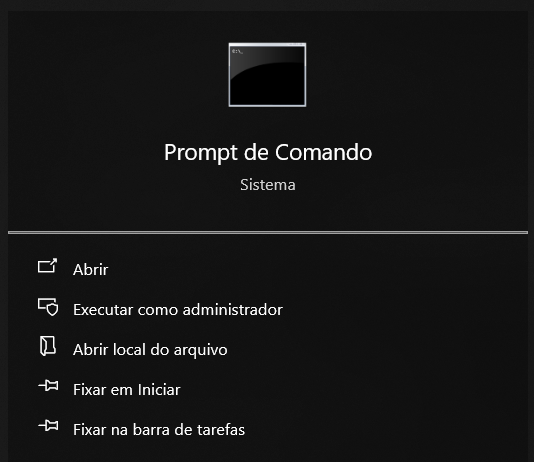
| | Para iniciar, é necessário obter alguns dados da sua rede para que possamos alterar as configurações. A maneira de conseguir essas informações é pesquisando por '''"cmd"''' na barra de pesquisa do seu computador ou procurando pelo '''prompt de comando'''. |
|
| |
|
| '''Shiny Beldum''' precisa de Level 40.
| | <center>[[Arquivo:Prompt_de_comando.png|link=https://wiki.pokexgames.com/images/9/91/Prompt_de_comando.png]] </center> |
| '''Shiny Metang''' precisa de Level 100.
| |
|
| |
|
| == '''Descrição:''' ==
| | Você digitará '''ipconfig''' e as informações da sua rede aparecerão (isso mudará se você estiver no wi-fi ou numa conexão direta). |
| Ele conversa com os outros por pulsos magnéticos. Em um enxame, eles se movem em perfeito uníssono..
| |
|
| |
|
| == '''Movimentos''' == | | <center>[[Arquivo:Cmd_com_info.png|link=https://wiki.pokexgames.com/images/1/1a/Cmd_com_info.png]] </center> |
|
| |
|
| {| border="0" style="border-collapse:collapse"
| | Após fazer isso, anote os endereços que aparecem em: '''Endereço IPv4''', '''Máscara de Sub-Rede''', e o '''Gateway Padrão'''. Utilizaremos estes valores nas etapas adiantes. |
| |- align="center" style="background-color: #E6E6FA;"
| |
| ! rowspan="2" | M1
| |
| | width="10px" |
| |
| | align="left" | Iron Head (20s)
| |
| | width="50px" rowspan="2" |
| |
| | rowspan="2" align="right" | [[Arquivo:Target.png|Target]] [[Arquivo:Damage.png|Damage]]
| |
| | rowspan="2" | [[Arquivo:Steel.png|Steel|link=Ironhard]]
| |
| |- align="center" style="background-color: #E6E6FA;"
| |
| | width="10px" |
| |
| | align="left" | Level 40
| |
|
| |
|
| |- align="center"
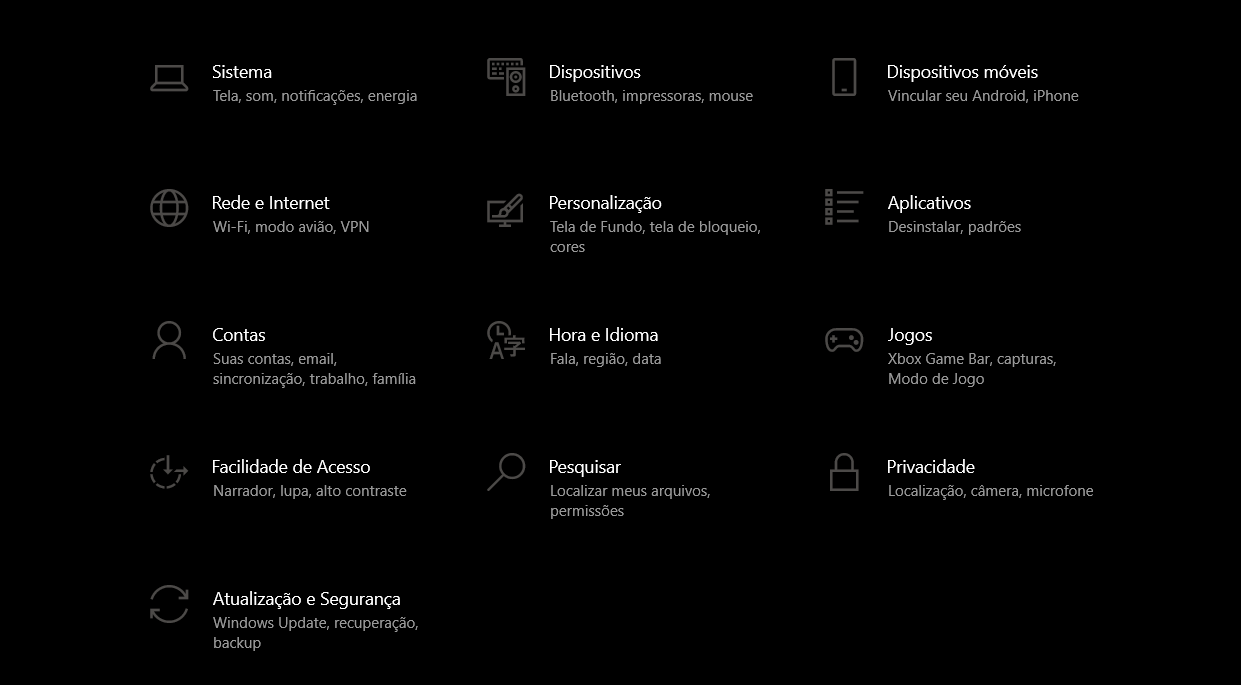
| | Depois de anotar esses valores, vamos redefinir o IP da rede. Para isso, vá em '''Configurações''', depois em '''Rede e Internet'''. |
| ! rowspan="2" | M2
| |
| | width="10px" |
| |
| | align="left" | Psy Pulse (8s)
| |
| | width="50px" rowspan="2" |
| |
| | rowspan="2" align="right" | [[Arquivo:Target.png|Target]] [[Arquivo:Damage.png|Damage]]
| |
| | rowspan="2" | [[Arquivo:Psychic.png|Psychic|link=Psycraft]]
| |
| |- align="center"
| |
| | width="10px" |
| |
| | align="left" | Level 40
| |
|
| |
|
| |- align="center" style="background-color: #E6E6FA;"
| | <center>[[Arquivo:Painel_de_configuracao.png|link=https://wiki.pokexgames.com/images/5/5e/Painel_de_configuracao.png]]</center> |
| ! rowspan="2" | M3
| |
| | width="10px" |
| |
| | align="left" | Hammer Arm (40s)
| |
| | width="50px" rowspan="2" |
| |
| | rowspan="2" align="right" | [[Arquivo:AOE.png|AOE]] [[Arquivo:Damage.png|Damage]] [[Arquivo:Stun.png|Stun]]
| |
| | rowspan="2" | [[Arquivo:Fighting.png|Fighting|link=Gardestrike]]
| |
| |- align="center" style="background-color: #E6E6FA;"
| |
| | width="10px" |
| |
| | align="left" | Level 40
| |
|
| |
|
| |- align="center"
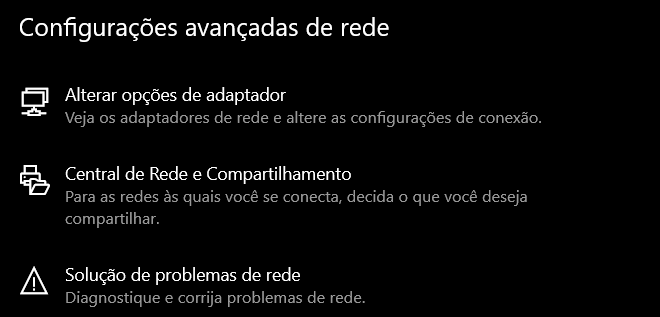
| | Em Configurações avançadas de rede, vá em '''Alterar opções do adaptador'''. |
| ! rowspan="2" | M4
| |
| | width="10px" |
| |
| | align="left" | Psychic (35s)
| |
| | width="50px" rowspan="2" |
| |
| | rowspan="2" align="right" | [[Arquivo:AOE.png|AOE]] [[Arquivo:Damage.png|Damage]]
| |
| | rowspan="2" | [[Arquivo:Psychic.png|Psychic|link=Psycraft]]
| |
| |- align="center"
| |
| | width="10px" |
| |
| | align="left" | Level 40
| |
|
| |
|
| |- align="center" style="background-color: #E6E6FA;"
| | <center>[[Arquivo:Config_avancada_de_rede.png|link=https://wiki.pokexgames.com/images/b/b8/Config_avancada_de_rede.png]]</center> |
| ! rowspan="2" | M5
| |
| | width="10px" |
| |
| | align="left" | Metal Claw (35s)
| |
| | width="50px" rowspan="2" |
| |
| | rowspan="2" align="right" | [[Arquivo:AOE.png|AOE]] [[Arquivo:Damage.png|Damage]] [[Arquivo:Buff.png|Buff]]
| |
| | rowspan="2" | [[Arquivo:Steel.png|Steel|link=Ironhard]]
| |
| |- align="center" style="background-color: #E6E6FA;"
| |
| | width="10px" |
| |
| | align="left" | Level 47
| |
|
| |
|
| |}
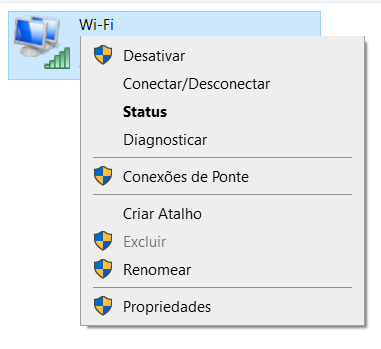
| | Na sua conexão atual, clique em '''Propriedades'''. |
| == '''Efetividades''' ==
| |
|
| |
|
| '''Efetivo:''' Fire, Groud, Ghost e Dark.<br />
| | <center>[[Arquivo:Propriedades_de_rede.png|link=https://wiki.pokexgames.com/images/f/f5/Propriedades_de_rede.png]]</center> |
| '''Normal:''' Water, Electric, Fighting, Bug e Crystal.<br />
| |
| '''Inefetivo:''' Normal, Grass, Ice, Flying, Rock, Dragon, Steel e Fairy.<br />
| |
| '''Muito Inefetivo:''' Psychic.<br />
| |
| '''Nulo:''' Poison.<br />
| |
|
| |
|
| =Shiny Metang=
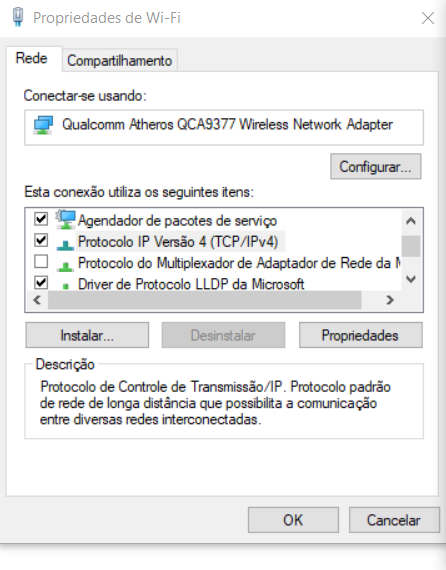
| | Escolha a opção '''Protocolo TCP/IP Versão 4 (TCP/IPv4)''', e clique em '''Propriedades'''. |
| == '''Informações Gerais''' ==
| |
|
| |
|
| '''Nome:''' Shiny Metang<br />
| | <center>[[Arquivo:Propriedade_wifi.png|link=https://wiki.pokexgames.com/images/9/91/Propriedade_wifi.png]]</center> |
| '''Level:''' 100<br />
| |
| '''Elemento:''' Steel / Psychic<br />
| |
| '''Habilidades:''' RS, Teleport, Cut e .<br />
| |
| '''Boost:''' Enigma Stone (2)<br />
| |
| '''Materia:''' Ironhard Superior ou<br />
| |
|
| |
|
| == '''Evoluções''' ==
| | Nas propriedades, ao marcar a opção usar o seguinte endereço de IP, você preencherá '''Máscara de Sub-Rede''' e o '''Gateway Padrão''' com aqueles valores que encontramos anteriormente, mas para o Endereço de IP, os últimos valores deverão ser alterados. Você pode colocar um valor a mais para que possa evitar possíveis conflitos. |
|
| |
|
| '''Shiny Beldum''' precisa de Level 40. | | Selecione também a opção '''Usar os seguintes endereços de servidor DNS'''. Sugerimos que utilizem o DNS do Google. |
| '''Shiny Metang''' precisa de Level 100.
| |
|
| |
|
| == '''Descrição:''' ==
| | Servidor DNS preferencial do Google: 8.8.8.8 |
| É formado pela união de dois Beldum. Seus dois cérebros estão ligados, ampliando seu poder psíquico..
| |
|
| |
|
| == '''Movimentos''' ==
| | Servidor DNS alternativo do Google: 8.8.4.4 |
|
| |
|
| {| border="0" style="border-collapse:collapse"
| | <center>[[Arquivo:Propriedade_protocolo.png|link=https://wiki.pokexgames.com/images/1/11/Propriedade_protocolo.png]]</center> |
| |- align="center" style="background-color: #E6E6FA;"
| |
| ! rowspan="2" | M1
| |
| | width="10px" |
| |
| | align="left" | Iron Head (20s)
| |
| | width="50px" rowspan="2" |
| |
| | rowspan="2" align="right" | [[Arquivo:Target.png|Target]] [[Arquivo:Damage.png|Damage]]
| |
| | rowspan="2" | [[Arquivo:Steel.png|Steel|link=Ironhard]]
| |
| |- align="center" style="background-color: #E6E6FA;"
| |
| | width="10px" |
| |
| | align="left" | Level 100
| |
|
| |
|
| |- align="center"
| | Após preencher todos os campos, clique em Ok nas duas janelas que estão abertas. |
| ! rowspan="2" | M2
| |
| | width="10px" |
| |
| | align="left" | Psy Pulse (12s)
| |
| | width="50px" rowspan="2" |
| |
| | rowspan="2" align="right" | [[Arquivo:Target.png|Target]] [[Arquivo:Damage.png|Damage]]
| |
| | rowspan="2" | [[Arquivo:Psychic.png|Psychic|link=Psycraft]]
| |
| |- align="center"
| |
| | width="10px" |
| |
| | align="left" | Level 100
| |
|
| |
|
| |- align="center" style="background-color: #E6E6FA;"
| | Para verificar se as alterações foram feitas, basta repetir o primeiro passo que irá mostrar os novos valores atribuídos. |
| ! rowspan="2" | M3
| |
| | width="10px" |
| |
| | align="left" | Zen Headbutt (55s)
| |
| | width="50px" rowspan="2" |
| |
| | rowspan="2" align="right" | [[Arquivo:Target.png|Target]] [[Arquivo:Damage.png|Damage]] [[Arquivo:Stun.png|Stun]]
| |
| | rowspan="2" | [[Arquivo:Psychic.png|Psychic|link=Psycraft]]
| |
| |- align="center" style="background-color: #E6E6FA;"
| |
| | width="10px" |
| |
| | align="left" | Level 100
| |
| | |
| |- align="center"
| |
| ! rowspan="2" | M4
| |
| | width="10px" |
| |
| | align="left" | Metal Claw (45s)
| |
| | width="50px" rowspan="2" |
| |
| | rowspan="2" align="right" | [[Arquivo:AOE.png|AOE]] [[Arquivo:Damage.png|Damage]] [[Arquivo:Buff.png|Buff]]
| |
| | rowspan="2" | [[Arquivo:Steel.png|Steel|link=Ironhard]]
| |
| |- align="center"
| |
| | width="10px" |
| |
| | align="left" | Level 107
| |
| | |
| |- align="center" style="background-color: #E6E6FA;"
| |
| ! rowspan="2" | M5
| |
| | width="10px" |
| |
| | align="left" | Psychic (30s)
| |
| | width="50px" rowspan="2" |
| |
| | rowspan="2" align="right" | [[Arquivo:AOE.png|AOE]] [[Arquivo:Damage.png|Damage]]
| |
| | rowspan="2" | [[Arquivo:Psychic.png|Psychic|link=Psycraft]]
| |
| |- align="center" style="background-color: #E6E6FA;"
| |
| | width="10px" |
| |
| | align="left" | Level 100
| |
| | |
| |- align="center"
| |
| ! rowspan="2" | M6
| |
| | width="10px" |
| |
| | align="left" | Psyshock (28s)
| |
| | width="50px" rowspan="2" |
| |
| | rowspan="2" align="right" | [[Arquivo:AOE.png|AOE]] [[Arquivo:Damage.png|Damage]]
| |
| | rowspan="2" | [[Arquivo:Psychic.png|Psychic|link=Psycraft]]
| |
| |- align="center"
| |
| | width="10px" |
| |
| | align="left" | Level 108
| |
| | |
| |- align="center" style="background-color: #E6E6FA;"
| |
| ! rowspan="2" | M7
| |
| | width="10px" |
| |
| | align="left" | Meteor Mash (50s)
| |
| | width="50px" rowspan="2" |
| |
| | rowspan="2" align="right" | [[Arquivo:AOE.png|AOE]] [[Arquivo:Damage.png|Damage]] [[Arquivo:Slow.png|Slow]] [[Arquivo:Nevermiss.png|Nevermiss]]
| |
| | rowspan="2" | [[Arquivo:Steel.png|Steel|link=Ironhard]]
| |
| |- align="center" style="background-color: #E6E6FA;"
| |
| | width="10px" |
| |
| | align="left" | Level 100
| |
| | |
| |- align="center"
| |
| ! rowspan="2" | M8
| |
| | width="10px" |
| |
| | align="left" | Flash Cannon (60s)
| |
| | width="50px" rowspan="2" |
| |
| | rowspan="2" align="right" | [[Arquivo:AOE.png|AOE]] [[Arquivo:Damage.png|Damage]]
| |
| | rowspan="2" | [[Arquivo:Steel.png|Steel|link=Ironhard]]
| |
| |- align="center"
| |
| | width="10px" |
| |
| | align="left" | Level 108
| |
| | |
| |- align="center" style="background-color: #E6E6FA;"
| |
| ! rowspan="2" | M9
| |
| | width="10px" |
| |
| | align="left" | Iron Defense (70s)
| |
| | width="50px" rowspan="2" |
| |
| | rowspan="2" align="right" | [[Arquivo:Self.png|Self]] [[Arquivo:Buff.png|Buff]]
| |
| | rowspan="2" | [[Arquivo:Steel.png|Steel|link=Ironhard]]
| |
| |- align="center" style="background-color: #E6E6FA;"
| |
| | width="10px" |
| |
| | align="left" | Level 104
| |
| | |
| |- align="center"
| |
| ! rowspan="2" | M10
| |
| | width="10px" |
| |
| | align="left" | Miracle Eye (15s)
| |
| | width="50px" rowspan="2" |
| |
| | rowspan="2" align="right" | [[Arquivo:Self.png|Self]] [[Arquivo:Buff.png|Buff]]
| |
| | rowspan="2" | [[Arquivo:Psychic.png|Psychic|link=Psycraft]]
| |
| |- align="center"
| |
| | width="10px" |
| |
| | align="left" | Level 1020
| |
| | |
| |- align="center" style="background-color: #E6E6FA;"
| |
| ! rowspan="2" | M11
| |
| | width="10px" |
| |
| | align="left" | Iron Body (0s)
| |
| | width="50px" rowspan="2" |
| |
| | rowspan="2" align="right" | [[Arquivo:Buff.png|Buff]]
| |
| | rowspan="2" | [[Arquivo:Steel.png|Steel|link=Ironhard]]
| |
| |- align="center" style="background-color: #E6E6FA;"
| |
| | width="10px" |
| |
| | align="left" | Level 0
| |
| | |
| |- align="center"
| |
| ! rowspan="2" | M12
| |
| | width="10px" |
| |
| | align="left" | Clear Body (0s)
| |
| | width="50px" rowspan="2" |
| |
| | rowspan="2" align="right" | [[Arquivo:Buff.png|Buff]]
| |
| | rowspan="2" | [[Arquivo:Steel.png|Steel|link=Ironhard]]
| |
| |- align="center"
| |
| | width="10px" |
| |
| | align="left" | Level 0
| |
| | |
| |}
| |
| == '''Efetividades''' ==
| |
| '''Efetivo:''' Fire, Groud, Ghost e Dark.<br />
| |
| '''Normal:''' Water, Electric, Fighting, Bug e Crystal.<br />
| |
| '''Inefetivo:''' Normal, Grass, Ice, Flying, Rock, Dragon, Steel e Fairy.<br />
| |
| '''Muito Inefetivo:''' Psychic.<br />
| |
| '''Nulo:''' Poison.<br />
| |
Olá, treinadores!
De vez em quando, alguns erros podem acontecer com seu client, o que pode impedir você de jogar momentaneamente ou atrapalhar o seu acesso ao jogo. Um problema que os jogadores costumam relatar é a perda da autorização para acessar a conta, o que pode acontecer por alguns motivos. Neste tutorial, ajudaremos você a solucionar este problema.
Para iniciar, é necessário obter alguns dados da sua rede para que possamos alterar as configurações. A maneira de conseguir essas informações é pesquisando por "cmd" na barra de pesquisa do seu computador ou procurando pelo prompt de comando.
Você digitará ipconfig e as informações da sua rede aparecerão (isso mudará se você estiver no wi-fi ou numa conexão direta).

Após fazer isso, anote os endereços que aparecem em: Endereço IPv4, Máscara de Sub-Rede, e o Gateway Padrão. Utilizaremos estes valores nas etapas adiantes.
Depois de anotar esses valores, vamos redefinir o IP da rede. Para isso, vá em Configurações, depois em Rede e Internet.
Em Configurações avançadas de rede, vá em Alterar opções do adaptador.
Na sua conexão atual, clique em Propriedades.
Escolha a opção Protocolo TCP/IP Versão 4 (TCP/IPv4), e clique em Propriedades.
Nas propriedades, ao marcar a opção usar o seguinte endereço de IP, você preencherá Máscara de Sub-Rede e o Gateway Padrão com aqueles valores que encontramos anteriormente, mas para o Endereço de IP, os últimos valores deverão ser alterados. Você pode colocar um valor a mais para que possa evitar possíveis conflitos.
Selecione também a opção Usar os seguintes endereços de servidor DNS. Sugerimos que utilizem o DNS do Google.
Servidor DNS preferencial do Google: 8.8.8.8
Servidor DNS alternativo do Google: 8.8.4.4
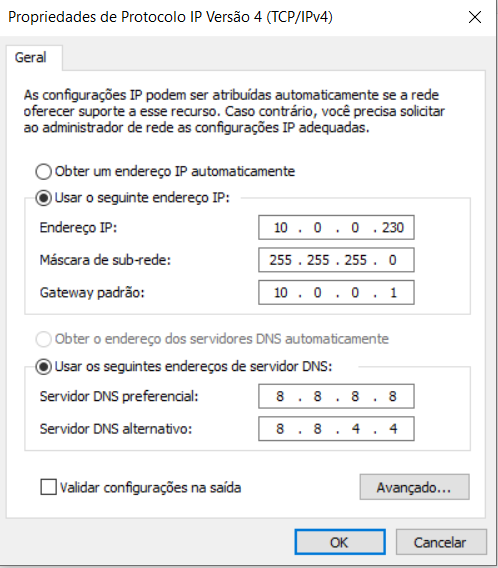
Após preencher todos os campos, clique em Ok nas duas janelas que estão abertas.
Para verificar se as alterações foram feitas, basta repetir o primeiro passo que irá mostrar os novos valores atribuídos.


