|
|
| Linha 1: |
Linha 1: |
| Renee
| | == Primeira Etapa == |
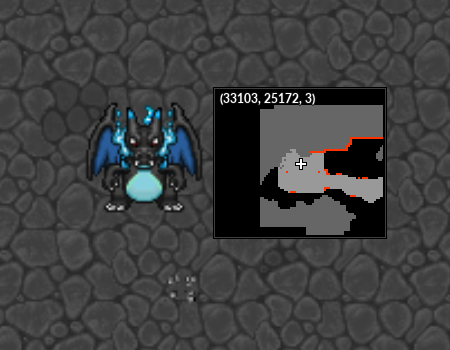
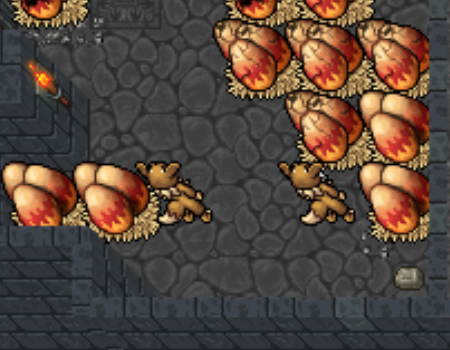
| =teste= | | Ao entrar na dungeon o Charizard X irá aparecer após alguns segundos <br><br> |
|
| |
|
| === Shiny Mega Gengar === | | <center> [[Arquivo:Magma_Maze_Path_CharizardX.png|link=]] </center><br> |
|
| |
|
| O Shiny Mega Gengar conta com diversas mecânicas que serão explicadas separadamente a seguir. Entre elas, estão a possibilidade de se curar na quantidade do dano recebido durante certo tempo, escurecer a tela do jogador, entre outras. <br>
| | Nesta etapa os jogadores devem ignorar o Charizard X e seguir até as chamas pelas pedras na lava, essa etapa só estará concluída quando os 4 jogadores estiverem pisando nas chamas. <br><br> |
| Enquanto o Shiny Mega Gengar estiver vivo dentro da arena, diversas armadilhas em formato de Shadow Ball estarão caindo no chão. Essa armadilha só termina após derrotá-lo. <br>
| |
|
| |
|
| Para entender melhor as habilidades do Shiny Mega Gengar, '''clique na habilidade desejada abaixo:''' <br>
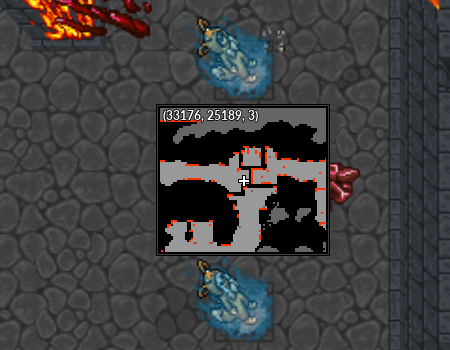
| | <center> [[Arquivo:Magma_Maze_Path_CharizardX_1.png|link=]] </center><br> |
|
| |
| <tabber>
| |
| |-|Shadow Ball=
| |
| O Shiny Mega Gengar lança 3 Shadow Balls no usuário, causando dano. É usado a cada 10 segundos. <br>
| |
| |-|Scary Face=
| |
| É usado a cada 20 segundos, causando o efeito PARALYZE durante 10 segundos. Essa habilidade já é conhecida pelos jogadores, entretanto, é importante tomar bastante cuidado com ela, pois não é possível usar medicines. <br>
| |
| |-|Shadow Storm=
| |
| A cada 25 segundos, o Shiny Mega Gengar invocará uma grande Shadow Ball que atingirá a área de 9 SQM e causará dano na vida do jogador e do Pokémon, caso atingido. É possível desviar andando com o personagem. <br>
| |
| |-|Hex=
| |
|
| |
|
| A cada 40 segundos o Shiny Mega Gengar criará um clone de si, que correrá rapidamente até o jogador. Caso atinja o jogador, causará dano na vida. É possível derrotar esse clone usando alguma habilidade de seu Pokémon, pois a vida do clone é bem baixa. <br>
| | '''Observação:''' O Charizard ficará patrulhando o andar por isso, não demore para chegar ate as chamas. <br> |
|
| |
|
| |-|Nightmare=
| |
|
| |
|
| É usado a cada 50 segundos, escurecendo a tela do jogador e dificultando a visibilidade da arena. <br>
| | == Segunda Etapa == |
|
| |
|
| |-|Shadow Tag=
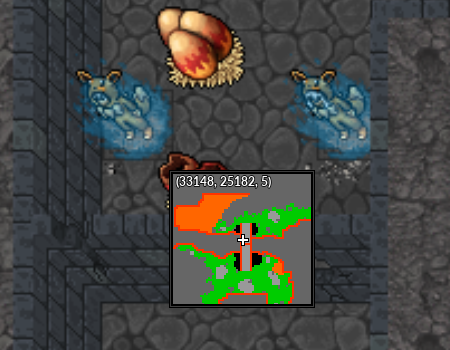
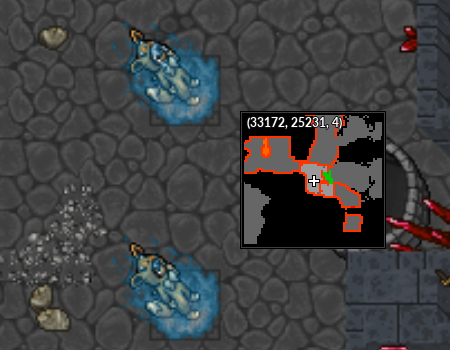
| | Ao serem movidos, os jogadores devem seguir o caminho ao oeste matando todas as criaturas existentes no andar e clicando nos ovos necessários para liberar o caminho. Cada ovo invocará um [[Arquivo:004-Charmander.png|link=Charmander]] '''Charmander''' ou [[Arquivo:004-Shiny_Charmander.png|link=Shiny Charmander]] '''Shiny Charmander''' <br> |
| Usada a cada 60 segundos, força com que o jogador o ataque. É possível ignorar essa habilidade tirando o Pokémon ou saindo da tela. <br>
| | '''Obs:''' Essas criaturas não tomam nenhum tipo de '''STUN''' |
|
| |
|
| </tabber>
| | Após finalizar essa etapa os jogadores devem pisar no fogo e aguardar até que a outra equipe também pise. |
|
| |
|
| === Shiny Mega Alakazam === | | <center> [[Arquivo:Magma Maze Path CharizardX2.png|link=]] </center><br> |
|
| |
|
| O Shiny Mega Alakazam é extremamente forte e, ao mesmo tempo, vulnerável. Possui diversas mecânicas, contando com danos altos e um Restore que cura sua vida completamente, caso não for cancelado. <br>
| | == Terceira Etapa == |
| Enquanto o Shiny Mega Alakazam estiver vivo dentro da arena, diversas armadilhas estarão caindo no chão. Essa armadilha só termina após derrotá-lo.<br>
| |
|
| |
|
| Para entender melhor as habilidades do Shiny Mega Alakazam, '''clique na habilidade desejada abaixo:'''
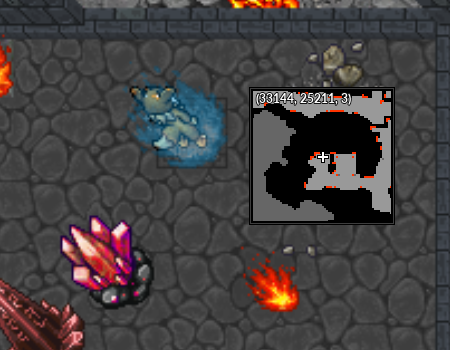
| | Estejam preparados para enfrentar criaturas sumonadas pelos '''Firestone Crystal''' presentes na sala. Cada crystal invocará 3 Pokémon entre eles [[Arquivo:004-Charmander.png|link=Charmander]] '''Charmander''', [[Arquivo:004-Shiny_Charmander.png|link=Shiny Charmander]] '''Shiny Charmander''' e [[Arquivo:005-Charmeleon.png|link=Charmeleon]] '''Charmeleon'''. <br> |
| <tabber>
| | '''Obs:''' Após certo tempo os cristais sumonam as criaturas novamente. |
| |-|Psy Pulse = | |
| É usado a cada 10 segundos, jogando diversos Psy Pulses no local em que o Pokémon do jogador está no momento, causando dano. Basta ficar movendo o Pokémon que não será atingido e evitará todo o dano. <br>
| |
| |-|Psywave =
| |
|
| |
|
| A cada 25 segundos, o Shiny Mega Alakazam usará a habilidade Psywave, causando dano em uma área frontal e empurrando o Pokémon. Essa habilidade também causa dano e empurra o jogador, caso atingido. <br>
| | <br>O Charizard X estará patrulhando todo o caminho, o ideal é que vocês fujam dele até a outra equipe derrotar todos os Pokémon presentes no andar. |
|
| |
|
| |-|Psychic = | | <br>Nessa etapa os jogadores devem aguardar a outra equipe pisar no fogo para ir até os spots destinados localizados na direita. |
| | <center> [[Arquivo:Magma Maze Path CharizardX 3.png|link=]] [[Arquivo:Magma Maze Path CharizardX 4.png|link=]] </center><br> |
|
| |
|
| A cada 37 segundos, o Shiny Mega Alakazam usará a habilidade Psychic. Essa habilidade marca o chão do local onde está o Pokémon do jogador e causa um grande dano, caso seja atingido. Basta mover o Pokémon para evitar o dano. <br>
| | == Quarta Etapa == |
|
| |
|
| |-| Trick = | | Os jogadores devem seguir o caminho ao norte, clicando nos ovos necessários para abrir e continuar o caminho. Cada ovo invocará um [[Arquivo:004-Charmander.png|link=Charmander]] '''Charmander''' ou [[Arquivo:004-Shiny_Charmander.png|link=Shiny Charmander]] '''Shiny Charmander''' <br> |
| | <center> [[Arquivo:Magma Maze Path CharizardX 5.png|link=]] </center><br> |
|
| |
|
| A cada 40 segundos, o Shiny Mega Alakazam usará a habilidade Trick. Essa habilidade marca o chão do local onde está o Pokémon do jogador e causa um grande dano, caso seja atingido. Basta mover o Pokémon para evitar o dano. <br>
| | Após finalizar essa etapa os jogadores devem pisar no fogo e aguardar até que a outra equipe também pise. |
| '''Observação:''' Quando essa habilidade é usada, o Shiny Mega Alakazam recebe um focus para o próximo ataque. <br>
| | <br>Muito cuidado com as armadilhas enquanto esperam. Há uma grande chance de surgir [[Arquivo:006-shCharizard.png|link=Shiny Charizard]] '''Shiny Charizards''' quando a outra equipe concluir o minigame. |
| | | <center> [[Arquivo:Magma Maze Path CharizardX 6.png|link=]] </center><br> |
| |-| Future Sight =
| |
| | |
| Usada a cada 120 segundos, o Shiny Mega Alakazam ficará imóvel e invulnerável por alguns segundos. Após retornar, começa a causar dano de 10% da vida do Pokémon por segundo. Para evitar o dano, o jogador deve sair da tela do Shiny Mega Alakazam. <br>
| |
| | |
| |-| Restore =
| |
| | |
| A cada 160 segundos, o Shiny Mega Alakazam ficará imóvel e invulnerável por alguns segundos. Após retornar, curará todo seu HP. É possível impedir que o Shiny Mega Alakazam se cure, para isso basta utilizar uma habilidade de '''STUN''' no momento em que ele estiver imóvel e invulnerável.
| |
|
| |
| </tabber>
| |
| | |
| === Shiny Mega Aggron ===
| |
| | |
| O Shiny Mega Aggron é bastante resistente possui algumas mecânicas, contando com um período em que retornará o dano recebido, bem como um Sturdy em que ficará muito rápido e imortal por alguns segundos. <br>
| |
| Enquanto o Shiny Mega Aggron estiver vivo dentro da arena, diversas armadilhas estarão caindo no chão. Essa armadilha só termina após derrotá-lo. <br>
| |
| | |
| Para entender melhor as habilidades do Shiny Mega Aggron, '''clique na habilidade desejada abaixo:'''
| |
| <tabber>
| |
| |-| Rock Slide =
| |
| | |
| É usado a cada 12 segundos, três pedras serão arremessadas no jogador, causando dano em uma área 3x3. Caso o jogador esteja sem pokémon, o dano será maior. Essa skill possui um dano muito baixo quando atinge seu Pokémon. <br>
| |
| | |
| |-| Sandstorm =
| |
| | |
| | |
| É usado a cada 22 segundos, diversos pontos em sua arena irão ser marcados e após poucos segundos a habilidade cairá nos locais marcados, causando SLOW durante 6 segundos. Essa skill atinge o jogador e o Pokémon. <br>
| |
| | |
| |-| Metal Burst =
| |
| | |
| É usado a cada 15 segundos. O Shiny Mega Aggron começa a brilhar, ficando imune e retornando todo o dano recebido durante esse período. <br>
| |
| | |
| |-| Heavy Metal =
| |
| | |
| É usado a cada 60 segundos, dando um pulo e causando dano em uma determinada área. É possível ignorar essa habilidade saindo da tela.<br>
| |
| | |
| |-| Meteor Mash =
| |
| | |
| É usado a cada 25 segundos, o Boss lança ondas metálicas em uma área frontal enquanto anda pela mesma direção e no final gera uma explosão ao seu redor que causa dano. Essa skill não ignora paredes, portanto, dependendo da posição em que o Boss estiver, pode ser que alguma parede impeça com que ele continue executando a skill. <br>
| |
| | |
| |-| Sturdy =
| |
|
| |
| Quando o Aggron é derrotado ele recebe o efeito de Sturdy que já é conhecido pelos jogadores. Entretanto, nesta versão, o Aggron recebe velocidade de movimento extremamente aumentada e continua vivo por 25 segundos. Durante o Sturdy, continua sendo possível utilizar STUN e outros controles de grupo para sobreviver. <br>
| |
| </tabber>
| |
|
| |
| === Shiny Mega Manectric ===
| |
| | |
| O Shiny Mega Manectric é bastante veloz e possui algumas mecânicas, contando com altos danos e um campo de força que pode acabar dificultando a vida do jogador. <br>
| |
| Enquanto o Shiny Mega Manectric estiver vivo dentro da arena, diversas armadilhas estarão caindo no chão. Essa armadilha só termina após derrotá-lo. <br>
| |
| | |
| Para entender melhor as habilidades do Shiny Mega Manectric, '''clique na habilidade desejada abaixo:'''
| |
| <tabber>
| |
| |-| Electro Ball =
| |
| | |
| | |
| É usado a cada 25 segundos. O Manectric fica paralisado enquanto canaliza sua energia, jogando uma Electro Ball no alvo logo após a canalização. Basta mover o Pokémon que não será atingido e evitará todo o dano. <br>
| |
| | |
| |-| Wild Charge =
| |
| | |
| É usado a cada 33 segundos. O Manectric se move em direção oposta enquanto canaliza sua energia e após poucos segundos utiliza a habilidade Wild Charge, que já é conhecida pelos jogadores. É necessário tomar cuidado durante essa habilidade, pois pode ser que o Kyogre acabe surfando pela skill e recebendo muito dano. <br>
| |
| | |
| |-| Discharge =
| |
| | |
| É usado a cada 60 segundos. O Manectric canaliza sua energia e desfere a habilidade Discharge em uma enorme área, causando dano médio. É possível desviar se o jogador conseguir sair da área de efeito a tempo. *****<br>
| |
| | |
| |-| Electric Terrain =
| |
| | |
| É usado a cada 80 segundos. Um campo de força é lançado no local em que o Manectric estiver localizado. Durante essa habilidade, o Manectric tem sua força aumentada, assim como seu ataque básico. Caso o Pokémon ou o Jogador saia do campo, receberá o efeito STUN durante 8 segundos, bem como um dano médio ao Pokémon e dano alto ao Jogador. <br>
| |
| | |
| Obs: Caso o Manectric saia da área do campo, a habilidade é cancelada automaticamente. <br>
| |
| | |
| |-| Hyper Beam =
| |
| | |
| É usado a cada 45 segundos. O Manectric canaliza sua energia e após poucos segundos lança a habilidade Hyper Beam, causando dano médio. Diferente do Hyper Beam comum, esta versão possui mais hits. <br>
| |
| | |
| |-| Body Slam =
| |
| | |
| É usado a cada 22 segundos. O Manectric fica paralisado enquanto canaliza sua energia e causa dano em uma área de 3 SQMs à sua frente empurrando o Pokémon para bem longe. É possível desviar desta habilidade movendo seu Titan para fora da área de alcance. <br>
| |
| | |
| |-| Thunder Fang =
| |
| É usado a cada 30 segundos. O Manectric canaliza sua energia e causa dano em uma área à sua frente, aplicando o efeito de STUN por um pequeno período. <br>
| |
| | |
| </tabber>
| |
| | |
| | |
| === Rayquaza ===
| |
| | |
| <tabber>
| |
| |-|Hyper Voice=
| |
| | |
| Rayquaza concentra sua energia e se mantem parado por alguns segundos e solta um grito atinge tanto o jogador quanto o Pokemon e que aplica efeito confusion por X segundos.
| |
| | |
| |-|Air slash=
| |
| | |
| Rayquaza corta o ceu em uma grande area aplicando danos consecutivos de medio hit(?) em cada hit de sua habilidade.
| |
|
| |
| |-|Extreme Speed=
| |
| | |
| Rayquaza corta seu alvo causando um dano medio.
| |
| |-|Hyper Beam=
| |
| | |
| Rayquaza se concentra e dispara uma bola de fogo que atinge todos os sqms ao redor causando x% de dano da vida maxima do alvo.
| |
| |-|Dragon Ascent=
| |
| | |
| Rayquaza pula e comeca a voar em uma velocidade rapida que vai decaindo ao longo do tempo, após alguns segundos aterrisa causando um dano extremamente alto e atinge tanto o jogador quanto o Pokemon aplicando o efeito confusion durante X segundos.
| |
| | |
| |-|Dragon Pulse=
| |
| | |
| Rayquaza dispara 6 esferas, uma de cada vez no jogador que causa um dano baixo porem continuo que podem levar a morte caso o jogador fique parado, essa habilidade tem seu dano aumentado caso o jogador esteja sem Poke'mon .
| |
| | |
| |-|Outrage(Passiva)=
| |
| | |
| Rayquaza ativa sua passiva sempre que chegar a x% e x% de sua vida maxima, a habilidade sera ativada e rayquaza ira se teleportar para o centro da sala e ... durante 10 turnos, essa habilidade causa x% de dano na vida do Pokemon e x% na vida do jogador caso seja atingido.
| |
| Cuidado(?): caso o Rayquaza esteja com a habilidade Hyper Voice ativa no momento que ele for teleportado, a habilidade funcionara normalmente e aplicara o status negativo caso seja atingido.
| |
| </tabber>
| |
| | |
| =teste3=
| |
| <div style="display: flex; justify-content: center; align-items: center; height: 100%;">
| |
| <table class="seeMore" style="width: 14rem; text-align: center; margin: 0 1rem;">
| |
| <tr>
| |
| <td class="seeMore__image">[[Arquivo:245-Suicune.png|link=Suicune]] '''Boss Battle: Suicune''' </td>
| |
| </tr>
| |
| </table>
| |
| <table class="seeMore" style="width: 14rem; text-align: center; margin: 0 1rem;">
| |
| <tr>
| |
| <td class="seeMore__image">[[Arquivo:244-Entei.png|link=Entei]] '''Boss Battle: Entei''' </td>
| |
| </tr>
| |
| </table>
| |
| <table class="seeMore" style="width: 14rem; text-align: center; margin: 0 1rem;">
| |
| <tr>
| |
| <td class="seeMore__image">[[Arquivo:243-Raikou.png|link=Raikou]] '''Boss Battle: Raikou''' </td>
| |
| </tr>
| |
| </table>
| |
| </div>
| |
| | |
| =NW=
| |
| | |
| == '''Introdução''' ==
| |
| | |
| Abaixo está listado todos os NPC's de tasks da Nightmare World, divididos de acordo com sua localização. Caso queira encontrar uma Task específica, utilize CTRL + F para localizá-la com maior facilidade.
| |
| <tabber>
| |
| |-|Cerulean=
| |
| <center>
| |
| [[Arquivo:CeruleanResistenceTasks.jpg|link=]]
| |
| </center>
| |
| | |
| <center>
| |
| {| class="wikitable" width="60%"
| |
| !align="left" width="18%" style="color:#ffffff; background-color: #660099"|Nº e NPC
| |
| !align="left" width="32%" style="color:#ffffff; background-color: #660099"|Objetivo
| |
| !align="left" width="14%" style="color:#ffffff; background-color: #660099"|Requisitos
| |
| !align="left" width="20%" style="color:#ffffff; background-color: #660099"|Recompensa
| |
| |-
| |
| | '''1.''' NPC Yami
| |
| |<!-- Objetivo -->
| |
| '''Coletar:'''<br>
| |
| 6x Plant Essences que estão na Cosmic Island. <br>
| |
| [[Arquivo:Task_Yami_NW.jpg|link=]]
| |
| |<!-- Requisitos -->
| |
| '''Level:''' 300 <br>
| |
| '''NW Level:''' 0
| |
| |<!-- Recompensas -->
| |
| [[Arquivo:Exp icon.png|30px|link=]] 650.000 <br>
| |
| [[Arquivo:Exp icon nw.png|30px|link=]] 5.500 <br>
| |
| |-
| |
| | '''2.''' NPC Kendrick
| |
| |<!-- Objetivo -->
| |
| '''Derrotar:'''<br>
| |
| 100 [[arquivo:050-AlolanDiglett.png|link=]] Alolan Diglett, 100 [[arquivo:052-AlolanMeowth.png|link=]] Alolan Meowth e 100 [[arquivo:088-AlolanGrimer.png|link=]] Alolan Grimer
| |
| |<!-- Requisitos -->
| |
| '''Level:''' 300<br>
| |
| '''NW Level:''' 2
| |
| |<!-- Recompensas -->
| |
| [[Arquivo:Exp icon.png|30px|link=]] 3.513.600 <br>
| |
| [[Arquivo:Exp icon nw.png|30px|link=]] 27.000 <br>
| |
| [[Arquivo:Cyan Nightmare Gem.png|link=Nightmare_Tasks]] 25 Cyan Nightmare Gem
| |
| |-
| |
| | '''3.''' NPC Diomedes
| |
| |<!-- Objetivo -->
| |
| '''Derrotar:'''<br>
| |
| 80 [[arquivo:325-Spoink.png|link=]] Nightmare Spoink
| |
| |<!-- Requisitos -->
| |
| '''Level:''' 300<br>
| |
| '''NW Level:''' 2
| |
| |<!-- Recompensas -->
| |
| [[Arquivo:Exp icon.png|30px|link=]] 878.400 <br>
| |
| [[Arquivo:Exp icon nw.png|30px|link=]] 7.000 <br>
| |
| [[Arquivo:Cyan Nightmare Gem.png|link=Nightmare_Tasks]] 7 Cyan Nightmare Gem
| |
| |-
| |
| | '''4.''' NPC Reginald
| |
| |<!-- Objetivo -->
| |
| '''Derrotar:'''<br>
| |
| 160 [[arquivo:231-Phanpy.png|link=]] Nightmare Phanpy
| |
| |<!-- Requisitos -->
| |
| '''Level:''' 300<br>
| |
| '''NW Level:''' 2
| |
| |<!-- Recompensas -->
| |
| [[Arquivo:Exp icon.png|30px|link=]] 1.756.800 <br>
| |
| [[Arquivo:Exp icon nw.png|30px|link=]] 11.000 <br>
| |
| [[Arquivo:Cyan Nightmare Gem.png|link=Nightmare_Tasks]] 11 Cyan Nightmare Gem
| |
| |-
| |
| | '''5.''' NPC Lyle
| |
| |<!-- Objetivo -->
| |
| '''Derrotar:'''<br>
| |
| 20 [[arquivo:015M.png|link=]] Mega Beedrill e 300 [[arquivo:015-Beedrill.png|link=]] Nightmare Beedrill
| |
| |<!-- Requisitos -->
| |
| '''Level:''' 300<br>
| |
| '''NW Level:''' 2
| |
| |<!-- Recompensas -->
| |
| [[Arquivo:Exp icon.png|30px|link=]] 3.294.000 <br>
| |
| [[Arquivo:Exp icon nw.png|30px|link=]] 22.000 <br>
| |
| [[Arquivo:Cyan Nightmare Gem.png|link=Nightmare_Tasks]] 22 Cyan Nightmare Gem
| |
| |-
| |
| | '''6.''' NPC Rael
| |
| |<!-- Objetivo -->
| |
| '''Derrotar:'''<br>
| |
| 300 [[arquivo:413-WormadamPlantCloak.png|link=]] Wormadam (Grass), 30 [[arquivo:413-WormadamGround.png|link=]] Wormadam (Ground) e <br> 30 [[arquivo:413-WormadamSteel.png|link=]] Wormadam (Steel)
| |
| |<!-- Requisitos -->
| |
| '''Level:''' 400 <br>
| |
| '''NW Level:''' 50
| |
| |<!-- Recompensas -->
| |
| [[Arquivo:Exp icon.png|30px|link=]] 3.000.000 <br>
| |
| [[Arquivo:Exp icon nw.png|30px|link=]] 60.000 <br>
| |
| [[Arquivo:Black Nightmare Gem.png|link=Nightmare_Tasks]] 2 Black Nightmare Gem
| |
| |}
| |
| </center>
| |
| | |
| |-|Wildwind Island e Cosmic Island=
| |
| <center>
| |
| [[Arquivo:WildwindECosmicTasks.jpg|link=]]
| |
| </center>
| |
| | |
| <center>
| |
| {| class="wikitable" width="60%"
| |
| !align="left" width="18%" style="color:#ffffff; background-color: #660099"|Nº e NPC
| |
| !align="left" width="32%" style="color:#ffffff; background-color: #660099"|Objetivo
| |
| !align="left" width="14%" style="color:#ffffff; background-color: #660099"|Requisitos
| |
| !align="left" width="20%" style="color:#ffffff; background-color: #660099"|Recompensa
| |
| |-
| |
| |-
| |
| | '''7.''' NPC Michael
| |
| |<!-- Objetivo -->
| |
| '''Derrotar:'''<br>
| |
| 140 [[arquivo:458-Mantyke%281%29.png|link=]] Mantyke
| |
| |<!-- Requisitos -->
| |
| '''Level:''' 300<br>
| |
| '''NW Level:''' 2
| |
| |<!-- Recompensas -->
| |
| [[Arquivo:Exp icon.png|30px|link=]] 1.647.000 <br>
| |
| [[Arquivo:Exp icon nw.png|30px|link=]] 12.000 <br>
| |
| [[Arquivo:Cyan Nightmare Gem.png|link=Nightmare_Tasks]] 12 Cyan Nightmare Gem
| |
| |-
| |
| | '''8.''' NPC Phelps
| |
| |<!-- Objetivo -->
| |
| '''Derrotar:'''<br>
| |
| 300 [[arquivo:226-Mantine.png|link=]] Mantine
| |
| |<!-- Requisitos -->
| |
| '''Level:''' 400 <br>
| |
| '''NW Level:''' 50
| |
| |<!-- Recompensas -->
| |
| [[Arquivo:Exp icon.png|30px|link=]] 2.000.000 <br>
| |
| [[Arquivo:Exp icon nw.png|30px|link=]] 40.000 <br>
| |
| [[Arquivo:Black Nightmare Gem.png|link=Nightmare_Tasks]] 2 Black Nightmare Gem
| |
| |-
| |
| | '''9.''' NPC Atem
| |
| |<!-- Objetivo -->
| |
| '''Derrotar:'''<br>
| |
| 250 [[arquivo:337-Lunatone.png|link=]] Lunatone, 250 [[arquivo:338-Solrock.png|link=]] Solrock<br>
| |
| '''Entregar:'''<br>
| |
| 100 [[Arquivo:Sun Piece.png|link=]] Sun piece e 100 [[Arquivo:Moon Piece.png|link=]] Moon piece<br>
| |
| |<!-- Requisitos -->
| |
| '''Level:''' 300 <br>
| |
| '''NW Level:''' 0
| |
| |<!-- Recompensas -->
| |
| [[Arquivo:Exp icon.png|30px|link=]] 5.270.400 <br>
| |
| [[Arquivo:Exp icon nw.png|30px|link=]] 36.000 <br>
| |
| [[Arquivo:Cyan Nightmare Gem.png|link=Nightmare_Tasks]] 20 Cyan Nightmare Gem <br>
| |
| [[arquivo:Compressed_Nightmare_Gem.png|link=Nightmare_Tasks]] 50 Compressed Nightmare Gem
| |
| |}
| |
| </center>
| |
| |-|Pewter=
| |
| <center>
| |
| [[Arquivo:PewterResistenceTasks.jpg|link=]]
| |
| </center>
| |
| | |
| <center>
| |
| {| class="wikitable" width="60%"
| |
| !align="left" width="18%" style="color:#ffffff; background-color: #660099"|Nº e NPC
| |
| !align="left" width="32%" style="color:#ffffff; background-color: #660099"|Objetivo
| |
| !align="left" width="14%" style="color:#ffffff; background-color: #660099"|Requisitos
| |
| !align="left" width="20%" style="color:#ffffff; background-color: #660099"|Recompensa
| |
| |-
| |
| | '''1.''' NPC Bella
| |
| |<!-- Objetivo -->
| |
| '''Derrotar:'''<br>
| |
| 80 Small Sentinels e 10 Sentinels
| |
| |<!-- Requisitos -->
| |
| '''Level:''' 300<br>
| |
| '''NW Level:''' 2
| |
| |<!-- Recompensas -->
| |
| [[Arquivo:Exp icon.png|30px|link=]] 1.098.000 <br>
| |
| [[Arquivo:Exp icon nw.png|30px|link=]] 9.000 <br>
| |
| [[Arquivo:Cyan Nightmare Gem.png|link=Nightmare_Tasks]] 9 Cyan Nightmare Gem
| |
| |-
| |
| | '''2.''' NPC Nicholas
| |
| |<!-- Objetivo -->
| |
| '''Derrotar:'''<br>
| |
| 220 [[arquivo:083-Farfetch-D.png|link=]] Nightmare Farfetch'd
| |
| |<!-- Requisitos -->
| |
| '''Level:''' 300<br>
| |
| '''NW Level:''' 2
| |
| |<!-- Recompensas -->
| |
| [[Arquivo:Exp icon.png|30px|link=]] 2.196.000 <br>
| |
| [[Arquivo:Exp icon nw.png|30px|link=]] 12.000 <br>
| |
| [[Arquivo:Cyan Nightmare Gem.png|link=Nightmare_Tasks]] 12 Cyan Nightmare Gem
| |
| |-
| |
| | '''3.''' NPC Frank
| |
| |<!-- Objetivo -->
| |
| '''Derrotar:'''<br>
| |
| 300 [[arquivo:601-Klinklang.png|link=]] Klinklang
| |
| |<!-- Requisitos -->
| |
| '''Level:''' 400 <br>
| |
| '''NW Level:''' 50
| |
| |<!-- Recompensas -->
| |
| [[Arquivo:Exp icon.png|30px|link=]] 2.000.000 <br>
| |
| [[Arquivo:Exp icon nw.png|30px|link=]] 40.000 <br>
| |
| [[Arquivo:Black Nightmare Gem.png|link=Nightmare_Tasks]] 2 Black Nightmare Gem
| |
| |-
| |
| | '''4.''' NPC Geoffrey
| |
| |<!-- Objetivo -->
| |
| '''Derrotar:'''<br>
| |
| 100 [[arquivo:599-Klink.png|link=]] Klink e 40 [[arquivo:600-Klang.png|link=]] Klang
| |
| |<!-- Requisitos -->
| |
| '''Level:''' 300<br>
| |
| '''NW Level:''' 2
| |
| |<!-- Recompensas -->
| |
| [[Arquivo:Exp icon.png|30px|link=]] 1.647.000 <br>
| |
| [[Arquivo:Exp icon nw.png|30px|link=]] 12.000 <br>
| |
| [[Arquivo:Cyan Nightmare Gem.png|link=Nightmare_Tasks]] 12 Cyan Nightmare Gem
| |
| |-
| |
| | '''5.''' NPC Serenity <br> (Respawn de Magnezone)
| |
| |<!-- Objetivo -->
| |
| '''Parte 1:'''<br>
| |
| Coletar os itens: Central Processing Unit, Blueprints, Gears, Toolbox e Apricorn <br>
| |
| [[Arquivo:SerenityItens.jpg|link=]] <br>
| |
| Aguarde 2 minutos e converse novamente com o Npc. <br>
| |
| '''Parte 2:'''<br>
| |
| Coletar as partes da Nightmare Ball. <br>
| |
| [[Arquivo:Nwball.jpg|link=]]<br>
| |
| Aguarde 5 minutos e converse novamente para receber sua recompensa. <br>
| |
| |<!-- Requisitos -->
| |
| '''Level:''' 400 <br>
| |
| '''NW Level:''' 0
| |
| |<!-- Recompensas -->
| |
| [[Arquivo:Exp icon.png|30px|link=]] 800.000 <br>
| |
| [[Arquivo:Exp icon nw.png|30px|link=]] 15.000 <br>
| |
| [[Arquivo:Nightmare_Ball.png|link=]] 50 Nightmare Ball
| |
| |-
| |
| | '''6.''' NPC Derek
| |
| |<!-- Objetivo -->
| |
| '''Derrotar:'''<br>
| |
| 150 [[arquivo:154-Meganium.png|link=]] Mecha Meganium e 150 [[arquivo:003-Venusaur.png|link=]] Mecha Venusaur
| |
| |<!-- Requisitos -->
| |
| '''Level:''' 400 <br>
| |
| '''NW Level:''' 50
| |
| |<!-- Recompensas -->
| |
| [[Arquivo:Exp icon.png|30px|link=]] 2.000.000 <br>
| |
| [[Arquivo:Exp icon nw.png|30px|link=]] 60.000 <br>
| |
| [[Arquivo:Black Nightmare Gem.png|link=Nightmare_Tasks]] 3 Black Nightmare Gem
| |
| |-
| |
| | '''7.''' NPC Fideliz
| |
| |<!-- Objetivo -->
| |
| '''Derrotar:'''<br>
| |
| 150 [[arquivo:160-Feraligatr.png|link=]] Mecha Feraligatr e 150 [[arquivo:0009-Blastoise.png|link=]] Mecha Blastoise
| |
| |<!-- Requisitos -->
| |
| '''Level:''' 400 <br>
| |
| '''NW Level:''' 50
| |
| |<!-- Recompensas -->
| |
| [[Arquivo:Exp icon.png|30px|link=]] 2.000.000 <br> | |
| [[Arquivo:Exp icon nw.png|30px|link=]] 60.000 <br>
| |
| [[Arquivo:Black Nightmare Gem.png|link=Nightmare_Tasks]] 3 Black Nightmare Gem
| |
| |-
| |
| | '''8.''' NPC Jesant
| |
| |<!-- Objetivo -->
| |
| '''Derrotar:'''<br>
| |
| 150 [[arquivo:157-Typhlosion.png|link=]] Mecha Typhlosion e 150 [[arquivo:006-Charizard.png|link=]] Mecha Charizard
| |
| |<!-- Requisitos -->
| |
| '''Level:''' 400 <br>
| |
| '''NW Level:''' 50
| |
| |<!-- Recompensas -->
| |
| [[Arquivo:Exp icon.png|30px|link=]] 2.000.000 <br>
| |
| [[Arquivo:Exp icon nw.png|30px|link=]] 60.000 <br>
| |
| [[Arquivo:Black Nightmare Gem.png|link=Nightmare_Tasks]] 3 Black Nightmare Gem
| |
| |-
| |
| | '''9.''' NPC Lukas
| |
| |<!-- Objetivo -->
| |
| '''Derrotar:'''<br>
| |
| 80 [[arquivo:318-Carvanha.png|link=]] Carvanha
| |
| |<!-- Requisitos -->
| |
| '''Level:''' 300<br>
| |
| '''NW Level:''' 2
| |
| |<!-- Recompensas -->
| |
| [[Arquivo:Exp icon.png|30px|link=]] 878.400 <br>
| |
| [[Arquivo:Exp icon nw.png|30px|link=]] 7.000 <br>
| |
| [[Arquivo:Cyan Nightmare Gem.png|link=Nightmare_Tasks]] 7 Cyan Nightmare Gem
| |
| |-
| |
| | '''10.''' NPC Joseh
| |
| |<!-- Objetivo -->
| |
| '''Derrotar:'''<br>
| |
| 80 [[arquivo:339.png|link=]] Barboach
| |
| |<!-- Requisitos -->
| |
| '''Level:''' 300<br> | |
| '''NW Level:''' 2
| |
| |<!-- Recompensas -->
| |
| [[Arquivo:Exp icon.png|30px|link=]] 878.400 <br>
| |
| [[Arquivo:Exp icon nw.png|30px|link=]] 7.000 <br>
| |
| [[Arquivo:Cyan Nightmare Gem.png|link=Nightmare_Tasks]] 7 Cyan Nightmare Gem
| |
| |}
| |
| </center>
| |
| |-|Pallet=
| |
| | |
| <center>
| |
| [[Arquivo:PalletECinnabarNwTasks.jpg|link=]]
| |
| </center>
| |
| | |
| <center>
| |
| {| class="wikitable" width="60%"
| |
| !align="left" width="18%" style="color:#ffffff; background-color: #660099"|Nº e NPC
| |
| !align="left" width="32%" style="color:#ffffff; background-color: #660099"|Objetivo
| |
| !align="left" width="14%" style="color:#ffffff; background-color: #660099"|Requisitos
| |
| !align="left" width="20%" style="color:#ffffff; background-color: #660099"|Recompensa
| |
| |-
| |
| | '''1.''' NPC Dekah
| |
| |<!-- Objetivo -->
| |
| '''Derrotar:'''<br>
| |
| 150 [[arquivo:475-Gallade.png|link=]] Gallade, 150 [[arquivo:430-Honchkrow.png|link=]] Honchkrow, 150 [[arquivo:395-Empoleon.png|link=]] Empoleon, 150 [[arquivo:392-Infernape.png|link=]] Infernape, 150 [[arquivo:389-Torterra.png|link=]] Torterra e 150 [[arquivo:405-Luxray.png|link=]] Luxray
| |
| |<!-- Requisitos -->
| |
| '''Level:''' 400 <br>
| |
| '''NW Level:''' 50
| |
| |<!-- Recompensas -->
| |
| [[Arquivo:Exp icon.png|30px|link=]] 7.000.000 <br>
| |
| [[Arquivo:Exp icon nw.png|30px|link=]] 130.000 <br>
| |
| [[Arquivo:Black Nightmare Gem.png|link=Nightmare_Tasks]] 3 Black Nightmare Gem
| |
| |-
| |
| | '''2.''' NPC Matias
| |
| |<!-- Objetivo -->
| |
| '''Derrotar:'''<br>
| |
| 160 [[arquivo:353-Shuppet.png|link=]] Nightmare Shuppets
| |
| |<!-- Requisitos -->
| |
| '''Level:''' 300<br>
| |
| '''NW Level:''' 2
| |
| |<!-- Recompensas -->
| |
| [[Arquivo:Exp icon.png|30px|link=]] 1.756.800<br>
| |
| [[Arquivo:Exp icon nw.png|30px|link=]] 11.000 <br>
| |
| [[Arquivo:Cyan Nightmare Gem.png|link=Nightmare_Tasks]] 11 Cyan Nightmare Gem
| |
| |-
| |
| | '''3.''' NPC Anny
| |
| |<!-- Objetivo -->
| |
| '''Derrotar:'''<br>
| |
| 200 [[arquivo:491-Darkrai.png|link=]] Darkrai Minion
| |
| |<!-- Requisitos -->
| |
| '''Level:''' 300<br>
| |
| '''NW Level:''' 2
| |
| |<!-- Recompensas -->
| |
| [[Arquivo:Exp icon.png|30px|link=]] 2.196.000<br>
| |
| [[Arquivo:Exp icon nw.png|30px|link=]] 18.000 <br>
| |
| [[Arquivo:Cyan Nightmare Gem.png|link=Nightmare_Tasks]] 18 Cyan Nightmare Gem
| |
| |-
| |
| | '''4.''' NPC Carl
| |
| |<!-- Objetivo -->
| |
| '''Derrotar:'''<br>
| |
| 150 [[arquivo:319-Sharpedo.png|link=]] Sharpedo
| |
| |<!-- Requisitos -->
| |
| '''Level:''' 400 <br>
| |
| '''NW Level:''' 50
| |
| |<!-- Recompensas -->
| |
| [[Arquivo:Exp icon.png|30px|link=]] 1.000.000 <br>
| |
| [[Arquivo:Exp icon nw.png|30px|link=]] 20.000 <br>
| |
| [[Arquivo:Black Nightmare Gem.png|link=Nightmare_Tasks]] 1 Black Nightmare Gem
| |
| |-
| |
| | '''5.''' NPC Brashear
| |
| |<!-- Objetivo -->
| |
| '''Derrotar:'''<br>
| |
| 150 [[arquivo:340-Whiscash.png|link=]] Whiscash
| |
| |<!-- Requisitos -->
| |
| '''Level:''' 400 <br>
| |
| '''NW Level:''' 50
| |
| |<!-- Recompensas -->
| |
| [[Arquivo:Exp icon.png|30px|link=]] 1.000.000 <br>
| |
| [[Arquivo:Exp icon nw.png|30px|link=]] 20.000 <br>
| |
| [[Arquivo:Black Nightmare Gem.png|link=Nightmare_Tasks]] 1 Black Nightmare Gem
| |
| |-
| |
| | '''6.''' NPC Wilson
| |
| |<!-- Objetivo -->
| |
| '''Derrotar:'''<br>
| |
| 60 [[arquivo:240-Magby.png|link=]] Magby e 40 [[arquivo:513-Pansear.png|link=]] Pansear
| |
| |<!-- Requisitos -->
| |
| '''Level:''' 300<br>
| |
| '''NW Level:''' 2
| |
| |<!-- Recompensas -->
| |
| [[Arquivo:Exp icon.png|30px|link=]] 1.098.000 <br>
| |
| [[Arquivo:Exp icon nw.png|30px|link=]] 9.000 <br>
| |
| [[Arquivo:Cyan Nightmare Gem.png|link=Nightmare_Tasks]] 9 Cyan Nightmare Gem
| |
| |-
| |
| | '''7.''' NPC Malone
| |
| |<!-- Objetivo -->
| |
| '''Derrotar:'''<br>
| |
| 150 [[arquivo:668-Pyroar_Female.png|link=]] Pyroar Female
| |
| |<!-- Requisitos -->
| |
| '''Level:''' 400 <br>
| |
| '''NW Level:''' 50
| |
| |<!-- Recompensas -->
| |
| [[Arquivo:Exp icon.png|30px|link=]] 1.000.000 <br>
| |
| [[Arquivo:Exp icon nw.png|30px|link=]] 20.000 <br>
| |
| [[Arquivo:Black Nightmare Gem.png|link=Nightmare_Tasks]] 1 Black Nightmare Gem
| |
| |-
| |
| | '''8.''' NPC Donl
| |
| |<!-- Objetivo -->
| |
| '''Derrotar:'''<br>
| |
| 200 [[arquivo:514-Simisear%281%29.png|link=]] Simisear
| |
| |<!-- Requisitos -->
| |
| '''Level:''' 400 <br>
| |
| '''NW Level:''' 50
| |
| |<!-- Recompensas -->
| |
| [[Arquivo:Exp icon.png|30px|link=]] 1.500.000 <br>
| |
| [[Arquivo:Exp icon nw.png|30px|link=]] 30.000 <br>
| |
| [[Arquivo:Black Nightmare Gem.png|link=Nightmare_Tasks]] 2 Black Nightmare Gem
| |
| |-
| |
| | '''9.''' NPC Theobald
| |
| |<!-- Objetivo -->
| |
| '''Derrotar:'''<br>
| |
| 330 [[arquivo:053-AlolanPersian.png|link=]] Alolan Persian e 330 [[arquivo:089-AlolanMuk.png|link=]] Alolan Muk
| |
| |<!-- Requisitos -->
| |
| '''Level:''' 400 <br>
| |
| '''NW Level:''' 50
| |
| |<!-- Recompensas -->
| |
| [[Arquivo:Exp icon.png|30px|link=]] 4.400.000 <br>
| |
| [[Arquivo:Exp icon nw.png|30px|link=]] 70.000 <br>
| |
| [[Arquivo:Black Nightmare Gem.png|link=Nightmare_Tasks]] 3 Black Nightmare Gem
| |
| |-
| |
| | '''10.''' NPC Tobby
| |
| |<!-- Objetivo -->
| |
| '''Derrotar:'''<br>
| |
| 50 [[arquivo:088-Grimer.png|link=]] Nightmare Grimer
| |
| |<!-- Requisitos -->
| |
| '''Level:''' 300<br>
| |
| '''NW Level:''' 2
| |
| |<!-- Recompensas -->
| |
| [[Arquivo:Exp icon.png|30px|link=]] 549.000 <br>
| |
| [[Arquivo:Exp icon nw.png|30px|link=]] 5.000 <br>
| |
| [[Arquivo:Cyan Nightmare Gem.png|link=Nightmare_Tasks]] 5 Cyan Nightmare Gem
| |
| |}
| |
| </center>
| |
| |-|Fuchsia=
| |
| <center>
| |
| [[Arquivo:FuchsiaResistenceTasks.jpg|link=]]
| |
| </center>
| |
| | |
| <center>
| |
| {| class="wikitable" width="60%"
| |
| !align="left" width="18%" style="color:#ffffff; background-color: #660099"|Nº e NPC
| |
| !align="left" width="32%" style="color:#ffffff; background-color: #660099"|Objetivo
| |
| !align="left" width="14%" style="color:#ffffff; background-color: #660099"|Requisitos
| |
| !align="left" width="20%" style="color:#ffffff; background-color: #660099"|Recompensa
| |
| |-
| |
| | '''1.''' NPC Hofs
| |
| |<!-- Objetivo -->
| |
| '''Derrotar:'''<br>
| |
| 180 [[arquivo:604-Eelektross.png|link=]] Eelektross, 300 [[arquivo:603-Eelektrik.png|link=]] Eelektrik e 300 [[arquivo:602-Tynamo.png|link=]] Tynamo
| |
| |<!-- Requisitos -->
| |
| '''Level:''' 400 <br>
| |
| '''NW Level:''' 50 <br>
| |
| '''Possuir Mecha'''
| |
| |<!-- Recompensas -->
| |
| [[Arquivo:Exp icon.png|30px|link=]] 1.400.000 <br>
| |
| [[Arquivo:Exp icon nw.png|30px|link=]] 30.000 <br>
| |
| [[Arquivo:Black Nightmare Gem.png|link=Nightmare_Tasks]] 2 Black Nightmare Gem
| |
| |-
| |
| | '''2.''' NPC Celeste
| |
| |<!-- Objetivo -->
| |
| '''Derrotar:'''<br>
| |
| 40 Small Sentinels e 5 Sentinels
| |
| |<!-- Requisitos -->
| |
| '''Level:''' 300<br>
| |
| '''NW Level:''' 2
| |
| |<!-- Recompensas -->
| |
| [[Arquivo:Exp icon.png|30px|link=]] 549.000 <br>
| |
| [[Arquivo:Exp icon nw.png|30px|link=]] 4.500 <br>
| |
| [[Arquivo:Cyan Nightmare Gem.png|link=Nightmare_Tasks]] 4 Cyan Nightmare Gem
| |
| |-
| |
| | '''3.''' NPC Lassy
| |
| |<!-- Objetivo -->
| |
| '''Derrotar:'''<br>
| |
| 80 [[arquivo:288-Vigoroth.png|link=]] Nightmare Vigoroth e 80 [[arquivo:667-Litleo.png|link=]] Litleo
| |
| |<!-- Requisitos -->
| |
| '''Level:''' 300<br>
| |
| '''NW Level:''' 2
| |
| |<!-- Recompensas -->
| |
| [[Arquivo:Exp icon.png|30px|link=]] 1.756.800 <br>
| |
| [[Arquivo:Exp icon nw.png|30px|link=]] 11.000 <br>
| |
| [[Arquivo:Cyan Nightmare Gem.png|link=Nightmare_Tasks]] 11 Cyan Nightmare Gem
| |
| |-
| |
| | '''4.''' NPC Brandon
| |
| |<!-- Objetivo -->
| |
| '''Derrotar:'''<br>
| |
| 20 [[arquivo:602-Tynamo.png|link=]] Tynamos e 50 [[arquivo:603-Eelektrik.png|link=]] Eelektriks
| |
| |<!-- Requisitos -->
| |
| '''Level:''' 300<br>
| |
| '''NW Level:''' 2
| |
| |<!-- Recompensas -->
| |
| [[Arquivo:Exp icon.png|30px|link=]] 768.600 <br>
| |
| [[Arquivo:Exp icon nw.png|30px|link=]] 5.000 <br>
| |
| [[Arquivo:Cyan Nightmare Gem.png|link=Nightmare_Tasks]] 5 Cyan Nightmare Gem
| |
| |-
| |
| | '''5.''' NPC Waldo
| |
| |<!-- Objetivo -->
| |
| '''Derrotar:'''<br>
| |
| 300 [[arquivo:239-Elekid.png|link=]] Elekids
| |
| |<!-- Requisitos -->
| |
| '''Level:''' 300<br>
| |
| '''NW Level:''' 2
| |
| |<!-- Recompensas -->
| |
| [[Arquivo:Exp icon.png|30px|link=]] 2.635.200 <br>
| |
| [[Arquivo:Exp icon nw.png|30px|link=]] 18.000 <br>
| |
| [[Arquivo:Cyan Nightmare Gem.png|link=Nightmare_Tasks]] 18 Cyan Nightmare Gem
| |
| |-
| |
| | '''6.''' NPC Oona
| |
| |<!-- Objetivo -->
| |
| '''Derrotar:'''<br>
| |
| 300 [[arquivo:409-Rampardos%281%29.png|link=]] Rampardos
| |
| |<!-- Requisitos -->
| |
| '''Level:''' 400 <br>
| |
| '''NW Level:''' 50
| |
| |<!-- Recompensas -->
| |
| [[Arquivo:Exp icon.png|30px|link=]] 2.000.000 <br>
| |
| [[Arquivo:Exp icon nw.png|30px|link=]] 40.000 <br>
| |
| [[Arquivo:Black Nightmare Gem.png|link=Nightmare_Tasks]] 2 Black Nightmare Gem
| |
| |-
| |
| | '''7.''' NPC Alexis
| |
| |<!-- Objetivo -->
| |
| '''Derrotar:'''<br>
| |
| 300 [[arquivo:408-Cranidos.png|link=]] Cranidos
| |
| |<!-- Requisitos -->
| |
| '''Level:''' 300<br>
| |
| '''NW Level:''' 2
| |
| |<!-- Recompensas -->
| |
| [[Arquivo:Exp icon.png|30px|link=]] 2.635.200 <br>
| |
| [[Arquivo:Exp icon nw.png|30px|link=]] 18.000 <br>
| |
| [[Arquivo:Cyan Nightmare Gem.png|link=Nightmare_Tasks]] 18 Cyan Nightmare Gem
| |
| |}
| |
| </center>
| |
| |-|Seafoam Island=
| |
| <center>
| |
| [[Arquivo:SeafoamEIsolatedTasks.jpg|link=]]
| |
| </center>
| |
| | |
| <center>
| |
| {| class="wikitable" width="60%"
| |
| !align="left" width="18%" style="color:#ffffff; background-color: #660099"|Nº e NPC
| |
| !align="left" width="32%" style="color:#ffffff; background-color: #660099"|Objetivo
| |
| !align="left" width="14%" style="color:#ffffff; background-color: #660099"|Requisitos
| |
| !align="left" width="20%" style="color:#ffffff; background-color: #660099"|Recompensa
| |
| |-
| |
| | '''8.''' NPC Afonso
| |
| |<!-- Objetivo -->
| |
| '''Derrotar:'''<br>
| |
| 450 [[arquivo:673-Gogoat.png|link=]] Gogoat
| |
| |<!-- Requisitos -->
| |
| '''Level:''' 400 <br>
| |
| '''NW Level:''' 50
| |
| |<!-- Recompensas -->
| |
| [[Arquivo:Exp icon.png|30px|link=]] 3.000.000 <br>
| |
| [[Arquivo:Exp icon nw.png|30px|link=]] 60.000 <br>
| |
| [[Arquivo:Black Nightmare Gem.png|link=Nightmare_Tasks]] 2 Black Nightmare Gem
| |
| |-
| |
| | '''9.''' NPC Beckett
| |
| |<!-- Objetivo -->
| |
| '''Derrotar:'''<br>
| |
| 50 [[arquivo:070-Weepinbell.png|link=]] Nightmare Weepinbell e 50 [[arquivo:274-Nuzleaf.png|link=]] Nightmare Nuzleaf
| |
| |<!-- Requisitos -->
| |
| '''Level:''' 300<br>
| |
| '''NW Level:''' 2
| |
| |<!-- Recompensas -->
| |
| [[Arquivo:Exp icon.png|30px|link=]] 1.098.000 <br>
| |
| [[Arquivo:Exp icon nw.png|30px|link=]] 9.000 <br>
| |
| [[Arquivo:Cyan Nightmare Gem.png|link=Nightmare_Tasks]] 9 Cyan Nightmare Gem
| |
| |-
| |
| | '''10.''' NPC Dale
| |
| |<!-- Objetivo -->
| |
| '''Derrotar:'''<br>
| |
| 80 [[arquivo:672-Skiddo.png|link=]] Skiddo
| |
| |<!-- Requisitos -->
| |
| '''Level:''' 300<br>
| |
| '''NW Level:''' 2
| |
| |<!-- Recompensas -->
| |
| [[Arquivo:Exp icon.png|30px|link=]] 878.400 <br>
| |
| [[Arquivo:Exp icon nw.png|30px|link=]] 7.000 <br>
| |
| [[Arquivo:Cyan Nightmare Gem.png|link=Nightmare_Tasks]] 7 Cyan Nightmare Gem
| |
| |-
| |
| | '''11.''' NPC Dillon
| |
| |<!-- Objetivo -->
| |
| '''Derrotar:'''<br>
| |
| 120 [[arquivo:280-Ralts.png|link=]] Nightmare Ralts e 20 [[arquivo:281-Kirlia.png|link=]] Nightmare Kirlia.
| |
| |<!-- Requisitos -->
| |
| '''Level:''' 300<br>
| |
| '''NW Level:''' 2
| |
| |<!-- Recompensas -->
| |
| [[Arquivo:Exp icon.png|30px|link=]] 1.647.000 <br>
| |
| [[Arquivo:Exp icon nw.png|30px|link=]] 13.000 <br>
| |
| [[Arquivo:Cyan Nightmare Gem.png|link=Nightmare_Tasks]] 13 Cyan Nightmare Gem
| |
| |-
| |
| | '''12.''' NPC Nikolaj
| |
| |<!-- Objetivo -->
| |
| '''Derrotar:'''<br>
| |
| 300 [[arquivo:026-AlolanRaichu.png|link=]]Alolan Raichu
| |
| |<!-- Requisitos -->
| |
| '''Level:''' 400 <br>
| |
| '''NW Level:''' 50
| |
| |<!-- Recompensas -->
| |
| [[Arquivo:Exp icon.png|30px|link=]] 2.000.000 <br>
| |
| [[Arquivo:Exp icon nw.png|30px|link=]] 40.000 <br>
| |
| [[Arquivo:Black Nightmare Gem.png|link=Nightmare_Tasks]] 2 Black Nightmare Gem
| |
| |}
| |
| </center>
| |
| |-|Lavender=
| |
| <center>
| |
| [[Arquivo:LavenderResistenceTasks.jpg|link=]]
| |
| </center>
| |
| | |
| <center>
| |
| {| class="wikitable" width="60%"
| |
| !align="left" width="18%" style="color:#ffffff; background-color: #660099"|Nº e NPC
| |
| !align="left" width="32%" style="color:#ffffff; background-color: #660099"|Objetivo
| |
| !align="left" width="14%" style="color:#ffffff; background-color: #660099"|Requisitos
| |
| !align="left" width="20%" style="color:#ffffff; background-color: #660099"|Recompensa
| |
| |-
| |
| | '''1.''' NPC Karl
| |
| |<!-- Objetivo -->
| |
| '''Derrotar:'''<br>
| |
| 300 [[arquivo:067-Machoke.png|link=]] Nightmare Machoke e 15 [[arquivo:Shiny_Machoke1.png|link=]] Shiny Machoke
| |
| |<!-- Requisitos -->
| |
| '''Level:''' 300<br> | |
| '''NW Level:''' 2
| |
| |<!-- Recompensas -->
| |
| [[Arquivo:Exp icon.png|30px|link=]] 3.154.000 <br>
| |
| [[Arquivo:Exp icon nw.png|30px|link=]] 21.000 <br>
| |
| [[Arquivo:Cyan Nightmare Gem.png|link=Nightmare_Tasks]] 21 Cyan Nightmare Gem
| |
| |-
| |
| | '''2.''' NPC Wimhof
| |
| |<!-- Objetivo -->
| |
| '''Derrotar:'''<br>
| |
| 300 [[arquivo:461-Weavile.png|link=]] Weavile
| |
| |<!-- Requisitos -->
| |
| '''Level:''' 400 <br>
| |
| '''NW Level:''' 50
| |
| |<!-- Recompensas -->
| |
| [[Arquivo:Exp icon.png|30px|link=]] 2.000.000 <br>
| |
| [[Arquivo:Exp icon nw.png|30px|link=]] 40.000 <br>
| |
| [[Arquivo:Black Nightmare Gem.png|link=Nightmare_Tasks]] 2 Black Nightmare Gem
| |
| |-
| |
| | '''3.''' NPC Jon
| |
| |<!-- Objetivo -->
| |
| '''Derrotar:'''<br>
| |
| 150 [[arquivo:445-Garchomp%281%29.png|link=]] Garchomp
| |
| |<!-- Requisitos -->
| |
| '''Level:''' 400 <br>
| |
| '''NW Level:''' 50
| |
| |<!-- Recompensas -->
| |
| [[Arquivo:Exp icon.png|30px|link=]] 1.000.000 <br>
| |
| [[Arquivo:Exp icon nw.png|30px|link=]] 20.000 <br>
| |
| [[Arquivo:Black Nightmare Gem.png|link=Nightmare_Tasks]] 1 Black Nightmare Gem
| |
| |-
| |
| | '''4.''' NPC Bradford
| |
| |<!-- Objetivo -->
| |
| '''Derrotar:'''<br>
| |
| 25 [[arquivo:148-Dragonair.png|link=]] Dragonair, 25 [[arquivo:444-Gabite.png|link=]] Gabite e 25 [[arquivo:372-Shelgon.png|link=]] Shelgon
| |
| |<!-- Requisitos -->
| |
| '''Level:''' 300<br>
| |
| '''NW Level:''' 2
| |
| |<!-- Recompensas -->
| |
| [[Arquivo:Exp icon.png|30px|link=]] 878.400 <br>
| |
| [[Arquivo:Exp icon nw.png|30px|link=]] 6.000 <br>
| |
| [[Arquivo:Cyan Nightmare Gem.png|link=Nightmare_Tasks]] 6 Cyan Nightmare Gem
| |
| |-
| |
| | '''5.''' NPC Russel
| |
| |<!-- Objetivo -->
| |
| '''Derrotar:'''<br>
| |
| 55 [[arquivo:371-Bagon.png|link=]] Bagon, 55 [[arquivo:443-Gible.png|link=]] Gibles e 55 [[arquivo:147-Dratini.png|link=]] Dratinis
| |
| |<!-- Requisitos -->
| |
| '''Level:''' 300<br>
| |
| '''NW Level:''' 2
| |
| |<!-- Recompensas -->
| |
| [[Arquivo:Exp icon.png|30px|link=]] 1.826.800 <br>
| |
| [[Arquivo:Exp icon nw.png|30px|link=]] 11.000 <br>
| |
| [[Arquivo:Cyan Nightmare Gem.png|link=Nightmare_Tasks]] 11 Cyan Nightmare Gem
| |
| |-
| |
| | '''6.''' NPC Kyle
| |
| |<!-- Objetivo -->
| |
| '''Derrotar:'''<br>
| |
| 200 [[arquivo:361-Snorut.png|link=]] Snorunt
| |
| |<!-- Requisitos -->
| |
| '''Level:''' 300<br>
| |
| '''NW Level:''' 2
| |
| |<!-- Recompensas -->
| |
| [[Arquivo:Exp icon.png|30px|link=]] 2.196.800 <br>
| |
| [[Arquivo:Exp icon nw.png|30px|link=]] 12.000 <br>
| |
| [[Arquivo:Cyan Nightmare Gem.png|link=Nightmare_Tasks]] 12 Cyan Nightmare Gem
| |
| |-
| |
| | '''7.''' NPC Joshua
| |
| |<!-- Objetivo -->
| |
| '''Derrotar:'''<br>
| |
| 50 [[arquivo:215-Sneasel.png|link=]] Nightmare Sneasel
| |
| |<!-- Requisitos -->
| |
| '''Level:''' 300<br>
| |
| '''NW Level:''' 2
| |
| |<!-- Recompensas -->
| |
| [[Arquivo:Exp icon.png|30px|link=]] 549.000 <br>
| |
| [[Arquivo:Exp icon nw.png|30px|link=]] 5.000 <br>
| |
| [[Arquivo:Cyan Nightmare Gem.png|link=Nightmare_Tasks]] 5 Cyan Nightmare Gem
| |
| |-
| |
| | '''8.''' NPC Leonard
| |
| |<!-- Objetivo -->
| |
| '''Derrotar:'''<br>
| |
| 160 [[arquivo:091-Cloyster.png|link=]] Nightmare Cloyster
| |
| |<!-- Requisitos -->
| |
| '''Level:''' 300<br>
| |
| '''NW Level:''' 2
| |
| |<!-- Recompensas -->
| |
| [[Arquivo:Exp icon.png|30px|link=]] 1.756.800 <br>
| |
| [[Arquivo:Exp icon nw.png|30px|link=]] 11.000 <br>
| |
| [[Arquivo:Cyan Nightmare Gem.png|link=Nightmare_Tasks]] 11 Cyan Nightmare Gem
| |
| |}
| |
| </center>
| |
| |-|Nightmare Grandmaster=
| |
| <center>
| |
| [[Arquivo:Granmaster1.jpg]][[Arquivo:Granmaster2.jpg]][[Arquivo:Granmaster3.jpg]]
| |
| </center>
| |
| | |
| <center>
| |
| {| class="wikitable" width="60%"
| |
| !align="left" width="18%" style="color:#ffffff; background-color: #660099"|Nº e NPC
| |
| !align="left" width="32%" style="color:#ffffff; background-color: #660099"|Objetivo
| |
| !align="left" width="14%" style="color:#ffffff; background-color: #660099"|Requisitos
| |
| !align="left" width="20%" style="color:#ffffff; background-color: #660099"|Recompensa
| |
| |-
| |
| | '''1.''' Malefic Grandmaster
| |
| |<!-- Objetivo -->
| |
| '''Derrotar:'''<br>
| |
| 100 [[arquivo:354-Banette.png|link=]] Nightmare Banette, 100 [[arquivo:200-Misdreavus.png|link=]] Nightmare Misdreavus, 100 [[arquivo:430-Honchkrow.png|link=]] Nightmare Wizard Honchkrow, <br> 100 [[arquivo:089-Muk.png|link=]] Nightmare Muk, 100 [[arquivo:336-Seviper.png|link=]] Nightmare Seviper e <br> 40 [[arquivo:110-Weezing.png|link=]] Nightmare Weezing.
| |
| |<!-- Requisitos -->
| |
| '''Level Mínimo :''' 400 <br>
| |
| '''NW Level:''' 30
| |
| |<!-- Recompensas -->
| |
| [[Arquivo:Exp icon.png|30px|link=]] 4.000.000 <br>
| |
| [[Arquivo:Exp icon nw.png|30px|link=]] 40.000 <br>
| |
| [[Arquivo:Cyan Nightmare Gem.png|link=Nightmare_Tasks]] 50 Cyan Nightmare Gem
| |
| |-
| |
| | '''2.''' Seavell Grandmaster
| |
| |<!-- Objetivo -->
| |
| '''Derrotar:'''<br>
| |
| 30 [[arquivo:460-Abomasnow.png|link=]] Nightmare Abomasnow, 30 [[arquivo:459-Snover.png|link=]] Nightmare Snover, <br>180 [[arquivo:362-Glalie.png|link=]] Nightmare Glalie, 180 [[arquivo:221-Piloswine.png|link=]] Nightmare Piloswine e <br> 180 [[arquivo:395-Empoleon.png|link=]] Nightmare Empoleon.
| |
| |<!-- Requisitos -->
| |
| '''Level Mínimo :''' 400 <br>
| |
| '''NW Level:''' 30
| |
| |<!-- Recompensas -->
| |
| [[Arquivo:Exp icon.png|30px|link=]] 4.000.000 <br>
| |
| [[Arquivo:Exp icon nw.png|30px|link=]] 40.000 <br>
| |
| [[Arquivo:Cyan Nightmare Gem.png|link=Nightmare_Tasks]] 50 Cyan Nightmare Gem
| |
| |-
| |
| | '''3.''' Raibolt Grandmaster
| |
| |<!-- Objetivo -->
| |
| '''Derrotar:'''<br>
| |
| 200 [[arquivo:310-Manectric.png|link=]] Nightmare Manectric, 200 [[arquivo:026-Raichu.png|link=]] Nightmare Raichu e 200 [[arquivo:405-Luxray.png|link=]] Nightmare Luxray.
| |
| |<!-- Requisitos -->
| |
| '''Level Mínimo :''' 400 <br>
| |
| '''NW Level:''' 30
| |
| |<!-- Recompensas -->
| |
| [[Arquivo:Exp icon.png|30px|link=]] 4.000.000 <br>
| |
| [[Arquivo:Exp icon nw.png|30px|link=]] 40.000 <br>
| |
| [[Arquivo:Cyan Nightmare Gem.png|link=Nightmare_Tasks]] 50 Cyan Nightmare Gem
| |
| |-
| |
| | '''4.''' Naturia Grandmaster
| |
| |<!-- Objetivo -->
| |
| '''Derrotar:'''<br>
| |
| 100 [[arquivo:389-Torterra.png|link=]] Nightmare Torterra, 100 [[arquivo:103-Exeggutor.png|link=]] Nightmare Exeggutor, 100 [[arquivo:275-Shiftry.png|link=]] Nightmare Shiftry, 100 [[arquivo:114-Tangela.png|link=]] Nightmare Tangela, <br> 160 [[arquivo:127-Pinsir.png|link=]] Nightmare Pinsir e 40 [[arquivo:Scizor.png|link=]] Nightmare Scizor.
| |
| |<!-- Requisitos -->
| |
| '''Level Mínimo :''' 400 <br>
| |
| '''NW Level:''' 30
| |
| |<!-- Recompensas -->
| |
| [[Arquivo:Exp icon.png|30px|link=]] 4.000.000 <br>
| |
| [[Arquivo:Exp icon nw.png|30px|link=]] 40.000 <br>
| |
| [[Arquivo:Cyan Nightmare Gem.png|link=Nightmare_Tasks]] 50 Cyan Nightmare Gem
| |
| |-
| |
| | '''5.''' Psycraft Grandmaster
| |
| |<!-- Objetivo -->
| |
| '''Derrotar:'''<br>
| |
| 60 [[arquivo:121-Starmie.png|link=]] Nightmare Starmie, 90 [[arquivo:282-Gardevoir.png|link=]] Nightmare Gardevoir, <br> 90 [[arquivo:176-Togetic.png|link=]] Nightmare Togetic, 90 [[arquivo:065-Alakazam.png|link=]] Nightmare Alakazam, <br> 90 [[arquivo:475-Gallade.png|link=]] Nightmare Gallade, 90 [[arquivo:326-Grumpig.png|link=]] Nightmare Grumpig e <br> 90 [[arquivo:468-Togekiss.png|link=]] Nightmare Togekiss.
| |
| |<!-- Requisitos -->
| |
| '''Level Mínimo :''' 400 <br>
| |
| '''NW Level:''' 30
| |
| |<!-- Recompensas -->
| |
| [[Arquivo:Exp icon.png|30px|link=]] 4.000.000 <br>
| |
| [[Arquivo:Exp icon nw.png|30px|link=]] 40.000 <br>
| |
| [[Arquivo:Cyan Nightmare Gem.png|link=Nightmare_Tasks]] 50 Cyan Nightmare Gem
| |
| |-
| |
| | '''6.''' Gardestrike Grandmaster
| |
| |<!-- Objetivo -->
| |
| '''Derrotar:'''<br>
| |
| 100 [[arquivo:392-Infernape.png|link=]] Nightmare Infernape, 100 [[arquivo:217-Ursaring.png|link=]] Nightmare Ursaring, 100 [[arquivo:241-Miltank.png|link=]] Nightmare Miltank, 10 [[arquivo:233-Porygon2.png|link=]] Nightmare Porygon2, <br> 90 [[arquivo:137-Porygon.png|link=]] Nightmare Porygon e 100 [[arquivo:068-Machamp.png|link=]] Nightmare Machamp.
| |
| |<!-- Requisitos -->
| |
| '''Level Mínimo :''' 400 <br>
| |
| '''NW Level:''' 30
| |
| |<!-- Recompensas -->
| |
| [[Arquivo:Exp icon.png|30px|link=]] 4.000.000 <br>
| |
| [[Arquivo:Exp icon nw.png|30px|link=]] 40.000 <br>
| |
| [[Arquivo:Cyan Nightmare Gem.png|link=Nightmare_Tasks]] 50 Cyan Nightmare Gem
| |
| |-
| |
| | '''7.''' Volcanic Grandmaster
| |
| |<!-- Objetivo -->
| |
| '''Derrotar:'''<br>
| |
| 200 [[arquivo:038-Ninetales.png|link=]] Nightmare Ninetales, 200 [[arquivo:324-Torkoal.png|link=]] Nightmare Torkoal e 200 [[arquivo:229-Houndoom.png|link=]] Nightmare Houndoom.
| |
| |<!-- Requisitos -->
| |
| '''Level Mínimo :''' 400 <br>
| |
| '''NW Level:''' 30
| |
| |<!-- Recompensas -->
| |
| [[Arquivo:Exp icon.png|30px|link=]] 4.000.000 <br>
| |
| [[Arquivo:Exp icon nw.png|30px|link=]] 40.000 <br>
| |
| [[Arquivo:Cyan Nightmare Gem.png|link=Nightmare_Tasks]] 50 Cyan Nightmare Gem
| |
| |-
| |
| | '''8.''' Orebound Grandmaster
| |
| |<!-- Objetivo -->
| |
| '''Derrotar:'''<br>
| |
| 180 [[arquivo:185-Sudowoodo.png|link=]] Nightmare Sudowoodo, 180 [[arquivo:112-Rhydon.png|link=]] Nightmare Rhydon, 180 [[arquivo:248-Tyranitar.png|link=]] Nightmare Tyranitar e 60 [[arquivo:208-Steelix.png|link=]] Nightmare Steelix.
| |
| |<!-- Requisitos -->
| |
| '''Level Mínimo :''' 400 <br>
| |
| '''NW Level:''' 30
| |
| |<!-- Recompensas -->
| |
| [[Arquivo:Exp icon.png|30px|link=]] 4.000.000 <br>
| |
| [[Arquivo:Exp icon nw.png|30px|link=]] 40.000 <br>
| |
| [[Arquivo:Cyan Nightmare Gem.png|link=Nightmare_Tasks]] 50 Cyan Nightmare Gem
| |
| |-
| |
| | '''9.''' Ironhard Grandmaster
| |
| |<!-- Objetivo -->
| |
| '''Derrotar:'''<br>
| |
| 300 [[arquivo:462-Magnezone.png|link=]] Nightmare Magnezone.
| |
| |<!-- Requisitos -->
| |
| '''Level Mínimo :''' 400 <br>
| |
| '''NW Level:''' 30
| |
| |<!-- Recompensas -->
| |
| [[Arquivo:Exp icon.png|30px|link=]] 4.000.000 <br>
| |
| [[Arquivo:Exp icon nw.png|30px|link=]] 40.000 <br>
| |
| [[Arquivo:Cyan Nightmare Gem.png|link=Nightmare_Tasks]] 50 Cyan Nightmare Gem
| |
| |-
| |
| | '''10.''' Wingeon Grandmaster
| |
| |<!-- Objetivo -->
| |
| '''Derrotar:'''<br>
| |
| 200 [[arquivo:334-Altaria.png|link=]] Nightmare Altaria, 150 [[arquivo:149-Dragonite.png|link=]] Nightmare Dragonite e 250 [[arquivo:018-Pidgeot.png|link=]] Nightmare Pidgeot.
| |
| |<!-- Requisitos -->
| |
| '''Level Mínimo :''' 400 <br>
| |
| '''NW Level:''' 30
| |
| |<!-- Recompensas -->
| |
| [[Arquivo:Exp icon.png|30px|link=]] 4.000.000 <br>
| |
| [[Arquivo:Exp icon nw.png|30px|link=]] 40.000 <br>
| |
| [[Arquivo:Cyan Nightmare Gem.png|link=Nightmare_Tasks]] 50 Cyan Nightmare Gem
| |
| |}
| |
| </center>
| |
| |-|Hoenn=
| |
| <center>
| |
| [[Arquivo:HoennTasks.jpg|link=]]
| |
| </center>
| |
| | |
| <center>
| |
| {| class="wikitable" width="60%"
| |
| !align="left" width="18%" style="color:#ffffff; background-color: #660099"|Nº e NPC
| |
| !align="left" width="32%" style="color:#ffffff; background-color: #660099"|Objetivo
| |
| !align="left" width="14%" style="color:#ffffff; background-color: #660099"|Requisitos
| |
| !align="left" width="20%" style="color:#ffffff; background-color: #660099"|Recompensa
| |
| |-
| |
| | '''1.''' NPC Kidd
| |
| |<!-- Objetivo -->
| |
| '''Derrotar:'''<br>
| |
| 200 [[arquivo:284_Masquerain_sp.png|link=]] Nightmare Masquerain
| |
| |<!-- Requisitos -->
| |
| '''Level:''' 430 <br>
| |
| '''NW Level:''' 45
| |
| |<!-- Recompensas -->
| |
| [[Arquivo:Exp icon.png|30px|link=]] 3.000.000 <br>
| |
| [[Arquivo:Exp icon nw.png|30px|link=]] 30.000 <br>
| |
| [[Arquivo:Beast_Ball.png|link=Pokébolas]] 3 Beast Ball
| |
| |-
| |
| | '''2.''' NPC Edward
| |
| |<!-- Objetivo -->
| |
| '''Derrotar:'''<br>
| |
| 200 [[arquivo:264_Linoone_sp.png|link=]] Nightmare Linoone
| |
| |<!-- Requisitos -->
| |
| '''Level:''' 430 <br>
| |
| '''NW Level:''' 45
| |
| |<!-- Recompensas -->
| |
| [[Arquivo:Exp icon.png|30px|link=]] 3.000.000 <br>
| |
| [[Arquivo:Exp icon nw.png|30px|link=]] 30.000 <br>
| |
| [[Arquivo:Beast_Ball.png|link=Pokébolas]] 3 Beast Ball
| |
| |-
| |
| | '''3.''' NPC Drake
| |
| |<!-- Objetivo -->
| |
| '''Derrotar:'''<br>
| |
| 100 [[arquivo:267-Beautifly.png|link=]] Nightmare Beautifly e 100 [[arquivo:269_Dustox_sp.png|link=]] Nightmare Dustox
| |
| |<!-- Requisitos -->
| |
| '''Level:''' 430 <br>
| |
| '''NW Level:''' 45
| |
| |<!-- Recompensas -->
| |
| [[Arquivo:Exp icon.png|30px|link=]] 4.000.000 <br>
| |
| [[Arquivo:Exp icon nw.png|30px|link=]] 40.000 <br>
| |
| [[Arquivo:Beast_Ball.png|link=Pokébolas]] 3 Beast Ball
| |
| |}
| |
| </center>
| |
| </tabber>
| |
| | |
| <center>
| |
| {| class="wikitable" width="35%"
| |
| |- align="center"
| |
| !align="center" width="1%" colspan="2" style="background-color: #660099" |<span style="color:white">'''Legenda'''</span>
| |
| |- align="center"
| |
| | [[Arquivo:Exp icon.png|30px|link=]] || Experiência
| |
| |-align="center"
| |
| | [[Arquivo:Exp icon nw.png|30px|link=]] || Experiência Nightmare
| |
| |-align="center"
| |
| | [[Arquivo:Compressed Nightmare Gem.png|link=]] || Compressed Nightmare Gem
| |
| |-align="center"
| |
| | [[Arquivo:Black Nightmare Gem.png|link=]] || Black Nightmare Gem
| |
| |-align="center"
| |
| | [[Arquivo:Cyan Nightmare Gem.png|link=]] || Cyan Nightmare Gem
| |
| |-align="center"
| |
| | [[Arquivo:Beast_Ball.png|link=]] || Beast Ball
| |
| |-align="center"
| |
| | [[Arquivo:Nightmare_Ball.png|link=]] || Nightmare Ball
| |
| |}
| |
| </center>
| |
| | |
| Observações: <br>
| |
| * As Nightmare Balls e Beast Balls '''NÃO''' são itens únicos.
| |
| * Todas as Gemas são itens únicos.
| |
| | |
| = Entei =
| |
| | |
| == Introducao ==
| |
| Introdução
| |
| | |
| Efetividade
| |
| | |
| Pokémon bons
| |
| | |
| Mecânicas
| |
| | |
| Rewards
| |
| Entei eh um dos tres caes lendarios que protegem a Outland, jogadores experientes podem enfrenta-lo.
| |
| | |
| == Efetividade ==
| |
| | |
| O Entei possui tipo Fire, entao sofre dano efetivo para Water, Rock e Ground.
| |
| | |
| === Pokemon Recomendados ===
| |
| | |
| Tanks Recomendados
| |
| {| class="wikitable"
| |
| |-
| |
| ! Pokémon
| |
| |-
| |
| | [[Arquivo:0009-Blastoise.png.png|link=Blastoise]] <br> Blastoise
| |
| |-
| |
| | [[Arquivo:095-BigOnix.png|link=Big Onix]] <br> Big Onix
| |
| |-
| |
| | [[Arquivo:149-Dragonite.png|link=Dragonite]] <br> Dragonite
| |
| |-
| |
| | [[Arquivo:326-ShinyGrumpig.png|link=Shiny Grumpig]] <br> Shiny Grumpig
| |
| |-
| |
| | [[Arquivo:668-Pyroar_Female.png|link=Pyroar Female]] <br> Pyroar Female
| |
| |}
| |
| <br>
| |
| Damage Recomendados
| |
| {| class="wikitable"
| |
| |-
| |
| ! Pokémon
| |
| |-
| |
| | [[Arquivo:028-Shiny_Sandslash.png|link=Shiny_Sandslash]] <br> Shiny Sandslash
| |
| |-
| |
| | [[Arquivo:Shiny_golduck.png|link=Shiny_Golduck]] <br> Shiny Golduck
| |
| |-
| |
| | [[Arquivo:073-Sh_Tentacruel.png|link=Shiny_Tentacruel]] <br> Shiny Tentacruel
| |
| |-
| |
| | [[Arquivo:076-AlolanGolem.png|link=Alolan_Golem]] <br> Alolan Golem
| |
| |-
| |
| | [[Arquivo:105-Sh_Marowak.png|link=Shiny_Marowak]] <br> Shiny Marowak
| |
| |-
| |
| | [[Arquivo:130-RedGyarados.png|link=Red_Gyarados]] <br> Red Gyarados
| |
| |-
| |
| | [[Arquivo:171-shLanturn.png|link=Shiny_Lanturn]] <br> Shiny Lanturn
| |
| |-
| |
| | [[Arquivo:Shiny_Sudowoodo.png|link=Golden_Sudowoodo]] <br> Golden Sudowoodo
| |
| |-
| |
| | [[Arquivo:230-Kingdra.png|link=Kingdra]] <br> Kingdra
| |
| |-
| |
| | [[Arquivo:247-Sh_Pupitar.png|link=Shiny Pupitar]] <br> Shiny Pupitar
| |
| |-
| |
| | [[Arquivo:248-Tyranitar.png|link=Tyranitar]] <br> Tyranitar
| |
| |-
| |
| | [[Arquivo:248-MegaTyranitar.png|link=Mega_Tyranitar]] <br> Mega Tyranitar
| |
| |-
| |
| | [[Arquivo:389-Shiny_Torterra.png|link=Shiny_Torterra]] <br> Shiny Torterra
| |
| |}
| |
| <br>
| |
| Support Recomendado
| |
| {| class="wikitable"
| |
| |-
| |
| ! Pokémon
| |
| |-
| |
| | [[Arquivo:201-UnownLegion.png|link=Unown_Legion]] <br> Unown Legion
| |
| |}
| |
| | |
| == Habilidades ==
| |
| | |
| <center>
| |
| <tabber>
| |
| |-|Roar =
| |
| | |
| É usado a cada 30 segundos caso o Entei esteja com menos de 49% de sua vida máxima. Entei rugira e entao bolas de fogo cairao do ceu, caso atinja o jogador a habilidade causa 10% de dano da vida maxima.<br>
| |
| | |
| {{#widget:Video|url={{filepath:Roar_Entei.mp4}}|}}
| |
| | |
| |-|Ember =
| |
| | |
| É usado a cada 6 segundos. Entei joga uma bola de fogo de dano baixo em seu alvo atual.<br>
| |
| | |
| {{#widget:Video|url={{filepath:Ember_Entei.mp4}}|}}
| |
| | |
| |-|Fire Ball=
| |
| | |
| É usado a cada 9 segundos. O Entei carrega sua energia e dispara bolas de fogo em todos os jogadores proximo, exceto seu alvo atual as bolas de fogo ficarao marcadas na posicional inicial do jogador e causam dano medio em uma pequena area. É possivel desviar dessa habilidade.<br>
| |
| | |
| {{#widget:Video|url={{filepath:Fire_Ball_Entei.mp4}}|}}
| |
| | |
| |-|Incinerate=
| |
| | |
| É usado a cada 8 segundos. Entei ira escolher um alvo proximo, exceto seu alvo atual e disparara a habilidade que causa 18% de dano da vida maxima.<br>
| |
| | |
| {{#widget:Video|url={{filepath:Incinerate_Entei.mp4}}|}}
| |
| | |
| |-|Sacred Fire=
| |
| | |
| É usado a cada 29 segundos. Entei carrega sua energia por 1.7 segundos e dispara uma enorme bola de fogo em sua posicao atual que causa um dano medio constante e slow por 11 segundos, enquanto Entei estiver usando essa habilidade ele nao pode se mover e nem usar outras habilidades. Após usar a habilidade Entei troca seu alvo. <br>
| |
| | |
| {{#widget:Video|url={{filepath:Sacred_Fire_Entei.mp4}}|}}
| |
| | |
| |-|Flame Wheel=
| |
| | |
| É usado a cada 29 segundos. Entei carrega sua energia por 1 segundo e entao criara uma roda de fogo que atinge todos os jogadores em torno de si e avancara rapidamente. Jogadores atingidos por essa habilidade perderao 40% de sua vida maxima. Enquanto Entei estiver usando essa habilidade ele nao pode se mover e nem usar outras habilidades. <br>
| |
| | |
| {{#widget:Video|url={{filepath:Flame_Wheel_Entei.mp4}}|}}
| |
| | |
| |-|Flame Circle=
| |
| | |
| É usado a cada 15 segundos. Entei causa dano medio progressivamente em uma pequena area em sua volta. <br>
| |
| | |
| {{#widget:Video|url={{filepath:Flame_Circle_Entei.mp4}}|}}
| |
| | |
| |-|Inferno=
| |
| | |
| É usado a cada 26 segundos. Entei carrega energia por 2,2 segundos e entao causara um dano medio em posicoes aleatorias. <br>
| |
| | |
| {{#widget:Video|url={{filepath:Inferno_Entei.mp4}}|}}
| |
| | |
| |-|Magma Storm=
| |
| | |
| É usado a cada 45 segundos caso o Entei esteja com menos de X% de sua vida máxima. Entei puxara todos os inimigos proximos e em seguida criara enormes rajadas de fogo que causam um dano muito alto. Eh possivel desviar dessa habilidade. Enquanto Entei estiver usando essa habilidade ele nao pode se mover e nem usar outras habilidades. <br>
| |
| | |
| {{#widget:Video|url={{filepath:Magma_Storm_Entei.mp4}}|}}
| |
| | |
| |-|Eruption=
| |
| É usado a cada 43 segundos caso o Entei esteja com menos de X% de sua vida máxima. Entei puxara todos os inimigos proximos e entao ira criar uma enorme explosao que avancara progressivamente e causara um dano muito alto. Eh possivel desviar dessa habilidade. Enquanto Entei estiver usando essa habilidade ele nao pode se mover e nem usar outras habilidades. <br>
| |
| | |
| {{#widget:Video|url={{filepath:Eruption_Entei.mp4}}|}}
| |
| | |
| |-|Extreme Speed=
| |
|
| |
| É usado a cada 5 segundos. Entei avancara rapidamente causando 45% da vida maxima como dano em seu alvo atual, Entei só usara essa habilidade caso seu alvo esteja a mais de 4SQMs dele.<br>
| |
| | |
| {{#widget:Video|url={{filepath:Extreme_Speed_Entei.mp4}}|}}
| |
| </tabber>
| |
| | |
| </center>
| |
| | |
| == Recompensas ==
| |
| <tabber>
| |
| |-|Facil=
| |
| <center>
| |
| <b>
| |
| {| class="wikitable"
| |
| |-
| |
| ! colspan="2" | Item
| |
| ! Raridade
| |
| |-
| |
| | [[Arquivo:Entei_Loot_Bag.png|link=]]
| |
| | style="border-left-style: hidden; | Entei Loot Bag (Easy)
| |
| | Comum
| |
| |-
| |
| | [[Arquivo:Flame-Essence.gif|link=]]
| |
| | style="border-left-style: hidden; | Flame Essence
| |
| | Épico
| |
| |-
| |
| | [[Arquivo:Entei_Legendary_sewing_thread.png|link=]]
| |
| | style="border-left-style: hidden; | Entei Legendary Sewing Thread
| |
| | Lendário
| |
| |-
| |
| | [[Arquivo:Entei_TV-Cam.gif|link=]]
| |
| | style="border-left-style: hidden; | Entei TV Camera
| |
| | Lendário
| |
| |-
| |
| | [[Arquivo:Entei_Backpack.gif|link=]]
| |
| | style="border-left-style: hidden; | Entei Backpack
| |
| | Lendário
| |
| |-
| |
| | [[Arquivo:Entei-amulet.png|link=]]
| |
| | style="border-left-style: hidden; | Entei Amulet
| |
| | Lendário
| |
| |-
| |
| ! colspan="3" | [[Arquivo:Exp_icon.png|30px|link=]] Experiencia: 1.500.000
| |
| |} <br>
| |
| </b>
| |
| </center>
| |
| Dentro da Entei Loot Bag (Easy) eh possível obter os seguintes itens:<br>
| |
| <center>
| |
| <b>
| |
| {| class="wikitable"
| |
| |-
| |
| ! colspan="4" | [[Arquivo:Entei_Loot_Bag.png|link=]] Entei Loot Bag (Easy)
| |
| |-
| |
| ! colspan="2" | Item
| |
| ! Quantidade
| |
| ! Raridade
| |
| |-
| |
| | [[Arquivo:Entei's_Legendary_Fur.png|link=]]
| |
| | style="border-left-style: hidden; | Entei Legendary Fur
| |
| | 2 à 4
| |
| | Comum
| |
| |-
| |
| | [[Arquivo:Rough_Gemstone.png|link=]]
| |
| | style="border-left-style: hidden; | Rough Gemstone
| |
| | 4 à 6
| |
| | Comum
| |
| |-
| |
| | [[Arquivo:Fire-stone.gif|link=]]
| |
| | style="border-left-style: hidden; | Fire Stone
| |
| | 4 à 6
| |
| | Comum
| |
| |-
| |
| | [[Arquivo:Crystal-stone.gif|link=]]
| |
| | style="border-left-style: hidden; | Crystal Stone
| |
| | 1
| |
| | Raro
| |
| |-
| |
| | [[Arquivo:Ancient-stone.gif|link=]]
| |
| | style="border-left-style: hidden; | Ancient Stone
| |
| | 1
| |
| | Raro
| |
| |-
| |
| | [[Arquivo:Volcanic_Urn.png|link=]]
| |
| | style="border-left-style: hidden; | Volcanic Urn
| |
| | 1
| |
| | Raro
| |
| |-
| |
| |}
| |
| </center>
| |
| </b>
| |
| | |
| |-|Normal=
| |
| <center>
| |
| <b>
| |
| {| class="wikitable"
| |
| |-
| |
| ! colspan="2" | Item
| |
| ! Raridade
| |
| |-
| |
| | [[Arquivo:Entei_Loot_Bag.png|link=]]
| |
| | style="border-left-style: hidden; | Entei Loot Bag
| |
| | Comum
| |
| |-
| |
| | [[Arquivo:Flame-Essence.gif|link=]]
| |
| | style="border-left-style: hidden; | Flame Essence
| |
| | Raro
| |
| |-
| |
| | [[Arquivo:Entei_Legendary_sewing_thread.png|link=]]
| |
| | style="border-left-style: hidden; | Entei Legendary Sewing Thread
| |
| | Épico
| |
| |-
| |
| | [[Arquivo:Entei_TV-Cam.gif|link=]]
| |
| | style="border-left-style: hidden; | Entei TV Camera
| |
| | Lendário
| |
| |-
| |
| | [[Arquivo:Entei_Backpack.gif|link=]]
| |
| | style="border-left-style: hidden; | Entei Backpack
| |
| | Lendário
| |
| |-
| |
| | [[Arquivo:Entei-amulet.png|link=]]
| |
| | style="border-left-style: hidden; | Entei Amulet
| |
| | Lendário
| |
| |-
| |
| ! colspan="3" | [[Arquivo:Exp_icon.png|30px|link=]] Experiencia: 1.500.000
| |
| |}
| |
| | |
| </b>
| |
| </center>
| |
| Dentro da Entei Loot Bag (Medio) eh possível obter os seguintes itens:<br>
| |
| <center>
| |
| <b>
| |
| {| class="wikitable"
| |
| |-
| |
| ! colspan="4" | [[Arquivo:Entei_Loot_Bag.png|link=]] Entei Loot Bag (Medio)
| |
| |-
| |
| ! colspan="2" | Item
| |
| ! Quantidade
| |
| ! Raridade
| |
| |-
| |
| | [[Arquivo:Entei's_Legendary_Fur.png|link=]]
| |
| | style="border-left-style: hidden; | Entei Legendary Fur
| |
| | 6 à 10
| |
| | Comum
| |
| |-
| |
| | [[Arquivo:Rough_Gemstone.png|link=]]
| |
| | style="border-left-style: hidden; | Rough Gemstone
| |
| | 8 à 12
| |
| | Comum
| |
| |-
| |
| | [[Arquivo:Fire-stone.gif|link=]]
| |
| | style="border-left-style: hidden; | Fire Stone
| |
| | 8 à 12
| |
| | Comum
| |
| |-
| |
| | [[Arquivo:Crystal-stone.gif|link=]]
| |
| | style="border-left-style: hidden; | Crystal Stone
| |
| | 1
| |
| | Raro
| |
| |-
| |
| | [[Arquivo:Ancient-stone.gif|link=]]
| |
| | style="border-left-style: hidden; | Ancient Stone
| |
| | 1
| |
| | Raro
| |
| |-
| |
| | [[Arquivo:Volcanic_Urn.png|link=]]
| |
| | style="border-left-style: hidden; | Volcanic Urn
| |
| | 1
| |
| | Raro
| |
| |-
| |
| |}
| |
| </center>
| |
| </b> | |
| |-|Dificil=
| |
| <center>
| |
| <b>
| |
| {| class="wikitable"
| |
| |-
| |
| ! colspan="2" | Item
| |
| ! Raridade
| |
| |-
| |
| | [[Arquivo:Entei_Loot_Bag.png|link=]]
| |
| | style="border-left-style: hidden; | Entei Loot Bag
| |
| | Comum
| |
| |-
| |
| | [[Arquivo:Flame-Essence.gif|link=]]
| |
| | style="border-left-style: hidden; | Flame Essence
| |
| | Raro
| |
| |-
| |
| | [[Arquivo:Yellow-Star-Piece.gif|link=]]
| |
| | style="border-left-style: hidden; | Yellow Star Piece
| |
| | Raro
| |
| |-
| |
| | [[Arquivo:Green-Star-Piece.gif|link=]]
| |
| | style="border-left-style: hidden; | Green Star Piece
| |
| | Raro
| |
| |-
| |
| | [[Arquivo:Red-Star-Piece.gif|link=]]
| |
| | style="border-left-style: hidden; | Red Star Piece
| |
| | Raro
| |
| |-
| |
| | [[Arquivo:Entei_Legendary_sewing_thread.png|link=]]
| |
| | style="border-left-style: hidden; | Entei Legendary Sewing Thread
| |
| | Épico
| |
| |-
| |
| | [[Arquivo:Entei_TV-Cam.gif|link=]]
| |
| | style="border-left-style: hidden; | Entei TV Camera
| |
| | Lendário
| |
| |-
| |
| | [[Arquivo:Entei_Backpack.gif|link=]]
| |
| | style="border-left-style: hidden; | Entei Backpack
| |
| | Lendário
| |
| |-
| |
| | [[Arquivo:Entei-amulet.png|link=]]
| |
| | style="border-left-style: hidden; | Entei Amulet
| |
| | Lendário
| |
| |-
| |
| ! colspan="3" | [[Arquivo:Exp_icon.png|30px|link=]] Experiencia: 2.500.000
| |
| |}
| |
| | |
| </b>
| |
| </center>
| |
| Dentro da Entei Loot Bag (Difícil) eh possível obter os seguintes itens:<br>
| |
| <center>
| |
| <b>
| |
| {| class="wikitable"
| |
| |-
| |
| ! colspan="4" | [[Arquivo:Entei_Loot_Bag.png|link=]] Entei Loot Bag (Difícil)
| |
| |-
| |
| ! colspan="2" | Item
| |
| ! Quantidade
| |
| ! Raridade
| |
| |-
| |
| | [[Arquivo:Entei's_Legendary_Fur.png|link=]]
| |
| | style="border-left-style: hidden; | Entei Legendary Fur
| |
| | 11 à 15
| |
| | Comum
| |
| |-
| |
| | [[Arquivo:Rough_Gemstone.png|link=]]
| |
| | style="border-left-style: hidden; | Rough Gemstone
| |
| | 14 à 18
| |
| | Comum
| |
| |-
| |
| | [[Arquivo:Fire-stone.gif|link=]]
| |
| | style="border-left-style: hidden; | Fire Stone
| |
| | 14 à 18
| |
| | Comum
| |
| |-
| |
| | [[Arquivo:Crystal-stone.gif|link=]]
| |
| | style="border-left-style: hidden; | Crystal Stone
| |
| | 1 à 2
| |
| | Comum
| |
| |-
| |
| | [[Arquivo:Ancient-stone.gif|link=]]
| |
| | style="border-left-style: hidden; | Ancient Stone
| |
| | 1 à 2
| |
| | Comum
| |
| |-
| |
| | [[Arquivo:Volcanic_Urn.png|link=]]
| |
| | style="border-left-style: hidden; | Volcanic Urn
| |
| | 1
| |
| | Raro
| |
| |-
| |
| |}
| |
| </center>
| |
| </tabber>
| |