
| (724 revisões intermediárias por 5 usuários não estão sendo mostradas) | |||
| Linha 1: | Linha 1: | ||
=<b>SEGREDOS DO KIN</b>= | |||
===TABBERS CHEST'S QUEST=== | |||
<tabber> | |||
= | |-|KANTO= | ||
<center class=hover-minimize>[[arquivo:Bannerpalletquest.png|link=Pallet_Cave_Quest]] [[arquivo:bannerpewterquest.png|link=Pewter_Quest]] </center></br> | |||
<center class=hover-minimize>[[arquivo:Bannerpokeballquest.png|link=Pokéball_Quest]] [[arquivo:bannerceruleanquest.png|link=Cerulean_Quest]]</center></br> | |||
<center class=hover-minimize>[[arquivo:Bannerrocktunelquest.png|link=Rock_Tunnel_Quest]] [[arquivo:Bannerdesertquestkanto.png|link=Desert_Island_Quest]]</center></br> | |||
<center class=hover-minimize>[[arquivo:Bannerseafoamquest.png|link=Seafoam Island Quest]]</center></br> | |||
|-|JOHTO= | |||
|-|ORRE= | |||
|-|NIGHTMARE WORLD= | |||
</tabber> | |||
== | ==='''Early Game'''=== | ||
Clique nas imagens para acessar o spoiler das quests. | |||
<CENTER> | |||
[[Arquivo:Banner_early_game11.jpg|link=Segredos do Mapa - Early Game]]<br> | |||
<span style="color:red">'''Local:'''</span> Pewter, Viridian e Pallet <br> | |||
<span style="color:red">'''Nível Mínimo'''</span> 8 <br> | |||
<span style="color:red">'''Habilidades Necessárias:'''</span> Dig e Cut <br> | |||
<center> | |||
{| class="wikitable" width="15%" | |||
|- | |||
! colspan="2" | Itens | |||
! Quantidade | |||
|- | |||
| align="center" | [[Arquivo:Poke-ball(1).png|link=Pokébolas]] | |||
|align="left" style="border-left-style: hidden; | <center> Poké Ball</center> | |||
| align="center" | 30 | |||
|- | |||
| align="center" | [[Arquivo:Great-ball(1).png|link=Pokébolas]] | |||
|align="left" style="border-left-style: hidden; | <center> Great Ball</center> | |||
| align="center" | 8 | |||
|- | |||
| align="center" | [[Arquivo: SmallPotion.png|link=Poções]] | |||
|align="left" style="border-left-style: hidden; | <center> Small Potion</center> | |||
| align="center" | 8 | |||
|- | |||
| align="center" | [[Arquivo:Great Poiton.png|link=Poções]] | |||
|align="left" style="border-left-style: hidden; | <center> Great Potion</center> | |||
| align="center" | 25 | |||
|- | |||
| align="center" | [[Arquivo:Revive.png|link=Poções]] | |||
|align="left" style="border-left-style: hidden; | <center> Revive</center> | |||
| align="center" | 3 | |||
|- | |||
| align="center" | [[Arquivo:Medicine.png|link=Poções]] | |||
|align="left" style="border-left-style: hidden; | <center> Medicine</center> | |||
| align="center" | 20 | |||
|- | |||
| align="center" | [[Arquivo:Sushiii.png|link=Comidas]] | |||
|align="left" style="border-left-style: hidden; | <center> Sushi</center> | |||
| align="center" | 5 | |||
|- | |||
| align="center" | [[Arquivo:RubyMark.png|link=Itens_de_Loot]] | |||
|align="left" style="border-left-style: hidden; | <center> Ruby</center> | |||
| align="center" | 2 | |||
|- | |||
| align="center" | [[Arquivo:Oldbackpack 7.png|link=Mochilas]] | |||
|align="left" style="border-left-style: hidden; | <center> Old Backpack</center> | |||
| align="center" | 1 | |||
|} </center> | |||
{| border="1" style="text-align: center; border-collapse: collapse" | |||
| width="85%" | 30 Empty Poké Balls | |||
| width="15%" | [[Arquivo:Poke-ball%281%29.png|link=Pokébolas]] | |||
|- | |||
| 8 Empty Great Balls | |||
| [[Arquivo:Great-ball(1).png|link=Pokébolas]] | |||
|- | |||
| 8 Small Potions | |||
| [[Arquivo:SmallPotion.png|link=Poções]] | |||
|- | |||
| 25 Great Potions | |||
| [[Arquivo:Great_Poiton.png|link=Poções]] | |||
|- | |||
| 3 Revives | |||
| [[Arquivo:Revive.png|link=Poções]] | |||
|- | |||
| 20 Medicines | |||
| [[Arquivo:Medicine.png|link=Poções]] | |||
|- | |||
| 5 Sushis | |||
| [[Arquivo:Sushiii.png|link=Comidas]] | |||
|- | |||
| 2 Rubys | |||
| [[Arquivo:RubyMark.png|link=Drop de Itens]] | |||
|- | |||
| 1 Old Backpack | |||
| [[Arquivo:Oldbackpack 7.png|link=Mochilas#Bags_de_Dimensional_Zone_.28Giant_Onix.29]] | |||
|} | |||
==='''Chests Quests'''=== | |||
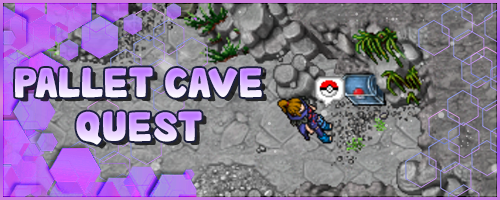
[[Arquivo:Banner pallet quest11.jpg|link=Pallet Cave Quest]]<br> | |||
<span style="color:red">'''Local:'''</span> Caverna ao norte de Pallet <br> | |||
<span style="color:red">'''Nível Mínimo'''</span> - <br> | |||
<span style="color:red">'''Recompensas:'''</span> <br> | |||
{| border="1" style="text-align: center; border-collapse: collapse" | |||
| width="85%" | 10 Small Potions | |||
| width="15%" | [[Arquivo:Small_Poiton.png|link=Poções]] | |||
|- | |||
| 5 Empty Great Balls | |||
| [[Arquivo:Great-ball(1).png|link=Pokébolas]] | |||
|- | |||
| 3 Empty Super Balls | |||
| [[Arquivo:Super-ball(1).png|link=Pokébolas]] | |||
|} | |||
[[Arquivo:Banner_cerulean_questt11.jpg|link=Pokéball Quest]]<br> | |||
<span style="color:red">'''Local:'''</span> Praia de Cerulean <br> | |||
<span style="color:red">'''Nível Mínimo'''</span> 15 <br> | |||
<span style="color:red">'''Habilidades Necessárias:'''</span> Rock Smash <br> | |||
<span style="color:red">'''Recompensas:'''</span> <br> | |||
{| border="1" style="text-align: center; border-collapse: collapse" | |||
| width="85%" | 10 Empty Poké Balls | |||
| width="15%" | [[Arquivo:Poke-ball%281%29.png|link=Pokébolas]] | |||
|- | |||
| 5 Empty Great Balls | |||
| [[Arquivo:Great-ball(1).png|link=Pokébolas]] | |||
|- | |||
| 2 Empty Super Balls | |||
| [[Arquivo:Super-ball(1).png|link=Pokébolas]] | |||
|- | |||
| 1 Empty Ultra Ball | |||
| [[Arquivo:Ultra-ball(1).png|link=Pokébolas]] | |||
|} | |||
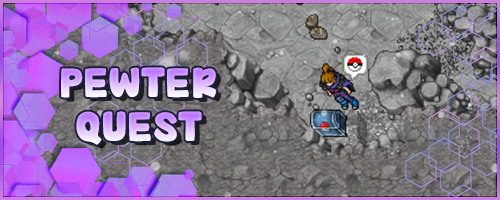
[[Arquivo:Banner_pewter_questt11.jpg|link=Pewter Quest]]<br> | |||
<span style="color:red">'''Local:'''</span> Montanha ao nordeste de Pewter <br> | |||
<span style="color:red">'''Nível Mínimo'''</span> 25 <br> | |||
<span style="color:red">'''Habilidades Necessárias:'''</span> Rock Smash e Fly (ou Surf) <br> | |||
<span style="color:red">'''Recompensas:'''</span> <br> | |||
{| border="1" style="text-align: center; border-collapse: collapse" | |||
| width="85%" | 5.000 Dollars | |||
| width="15%" | [[Arquivo:Hundred Dollars.png|link=Drop de Itens]] | |||
|- | |||
| 100 Empty Poké Balls | |||
| [[Arquivo:Poke-ball(1).png|link=Pokébolas]] | |||
|- | |||
| 25 Empty Super Balls | |||
| [[Arquivo:Great-ball(1).png|link=Pokébolas]] | |||
|} | |||
[[Arquivo:Banner_cerulean_quest11.jpg|link=Cerulean Quest]] <br> | |||
<span style="color:red">'''Local:'''</span> Pântano de Cerulean <br> | |||
<span style="color:red">'''Nível Mínimo'''</span> 30 <br> | |||
<span style="color:red">'''Habilidades Necessárias:'''</span> Rock Smash e Cut (ou Fly) <br> | |||
<span style="color:red">'''Recompensas:'''</span> <br> | |||
{| border="1" style="text-align: center; border-collapse: collapse" | |||
| width="85%" | 8.000 Dollars | |||
| width="15%" | [[Arquivo:Hundred Dollars.png|link=Drop de Itens]] | |||
|- | |||
| 50 Empty Great Balls | |||
| [[Arquivo:Great-ball(1).png|link=Pokébolas]] | |||
|- | |||
| 20 Empty Super Balls | |||
| [[Arquivo:Super-ball(1).png|link=Pokébolas]] | |||
|- | |||
| 1 Venom Flute | |||
| [[Arquivo: Venom Flute.png|link=NPC Hugh (Itens)]] | |||
|} | |||
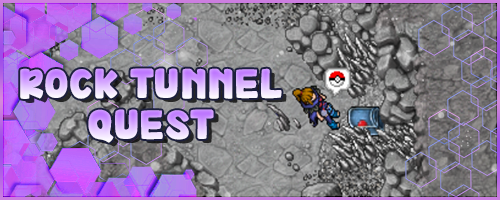
[[Arquivo:Banner_rock_tunnel11.jpg|link=Rock Tunnel Quest]]<br> | |||
<span style="color:red">'''Local:'''</span> Rock Tunnel <br> | |||
<span style="color:red">'''Nível Mínimo'''</span> 35 <br> | |||
<span style="color:red">'''Habilidades Necessárias:'''</span> Rock Smash <br> | |||
<span style="color:red">'''Recompensas:'''</span> <br> | |||
{| border="1" style="text-align: center; border-collapse: collapse" | |||
| width="85%" | 10.000 Dollars | |||
| width="15%" | [[Arquivo:Hundred Dollars.png|link=Drop de Itens]] | |||
|- | |||
| 100 Empty Great Balls | |||
| [[Arquivo:Great-ball(1).png|link=Pokébolas]] | |||
|- | |||
| 50 Empty Super Balls | |||
| [[Arquivo:Super-ball(1).png|link=Pokébolas]] | |||
|} | |||
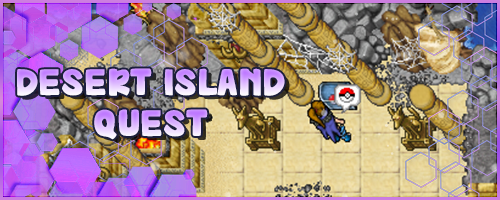
[[Arquivo:Banner_desert_quest11.jpg|link=Desert Island Quest]]<br> | |||
<span style="color:red">'''Local:'''</span> Desert Island <br> | |||
<span style="color:red">'''Nível Mínimo'''</span> 40 <br> | |||
<span style="color:red">'''Habilidades Necessárias:'''</span> Dig e Fly (ou Surf) <br> | |||
<span style="color:red">'''Recompensas:'''</span> <br> | |||
{| border="1" style="text-align: center; border-collapse: collapse" | |||
| width="85%" | 15.000 Dollars | |||
| width="15%" | [[Arquivo:Hundred Dollars.png|link=Drop de Itens]] | |||
|- | |||
| 100 Empty Great Balls | |||
| [[Arquivo:Great-ball(1).png|link=Pokébolas]] | |||
|- | |||
| 50 Empty Super Balls | |||
| [[Arquivo:Super-ball(1).png|link=Pokébolas]] | |||
|- | |||
| 20 Empty Ultra Balls | |||
| [[Arquivo:Ultra-ball(1).png|link=Pokébolas]] | |||
|} | |||
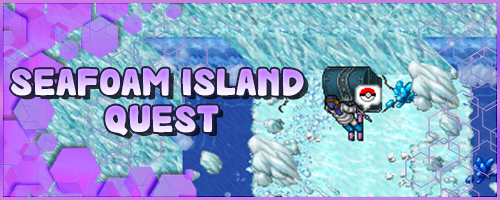
[[Arquivo:Banner_ice_quest11.jpg|link=Seafoam Island Quest]]<br> | |||
<span style="color:red">'''Local:'''</span> Seafoam Islands <br> | |||
<span style="color:red">'''Nível Mínimo'''</span> 40 <br> | |||
<span style="color:red">'''Habilidades Necessárias:'''</span> Fly (ou Surf) <br> | |||
<span style="color:red">'''Recompensas:'''</span> <br> | |||
{| border="1" style="text-align: center; border-collapse: collapse" | |||
| width="85%" | 15.000 Dollars | |||
| width="15%" | [[Arquivo:Hundred Dollars.png|link=Drop de Itens]] | |||
|- | |||
| 100 Empty Great Balls | |||
| [[Arquivo:Great-ball(1).png|link=Pokébolas]] | |||
|- | |||
| 50 Empty Super Balls | |||
| [[Arquivo:Super-ball(1).png|link=Pokébolas]] | |||
|- | |||
| 20 Empty Ultra Balls | |||
| [[Arquivo:Ultra-ball(1).png|link=Pokébolas]] | |||
|} | |||
[[Arquivo:Banner_leek_quest11.jpg|link=Leek Island Quest]]<br> | |||
<span style="color:red">'''Local:'''</span> Subterrâneo de Leek Island <br> | |||
<span style="color:red">'''Nível Mínimo'''</span> 40 <br> | |||
<span style="color:red">'''Habilidades Necessárias:'''</span> Cut e Fly (ou Surf) <br> | |||
<span style="color:red">'''Recompensas:'''</span> <br> | |||
{| border="1" style="text-align: center; border-collapse: collapse" | |||
| width="85%" | 100 Super Balls | |||
| width="15%" | [[Arquivo:Super-ball(1).png|link=Pokébolas]] | |||
|- | |||
| 1 Feather Stone | |||
| [[Arquivo:Feather1.png|link=Pedras_de_Evolução]] | |||
|} | |||
[[Arquivo:Banner_tangelo_quest111.jpg|link=Tangelo Island Quest]]<br> | |||
<span style="color:red">'''Local:'''</span> Tangelo Island <br> | |||
<span style="color:red">'''Nível Mínimo'''</span> 40 <br> | |||
<span style="color:red">'''Habilidades Necessárias:'''</span> Fly e Surf <br> | |||
<span style="color:red">'''Recompensas:'''</span> <br> | |||
{| border="1" style="text-align: center; border-collapse: collapse" | |||
| width="85%" | 50 Empty Ultra Balls | |||
| width="15%" | [[Arquivo:Ultra-ball(1).png|link=Pokébolas]] | |||
|- | |||
| 1 Punch Stone | |||
| [[Arquivo:3mDejdt.png|link=Pedras de Evolução]] | |||
|} | |||
[[Arquivo:Banner jungle quest111.jpg|link=Jungle Island Quest]]<br> | |||
<span style="color:red">'''Local:'''</span> Jungle Island <br> | |||
<span style="color:red">'''Nível Mínimo'''</span> 50 <br> | |||
<span style="color:red">'''Habilidades Necessárias:'''</span> Fly (ou Surf) <br> | |||
<span style="color:red">'''Recompensas:'''</span> <br> | |||
{| border="1" style="text-align: center; border-collapse: collapse" | |||
| width="85%" | 60 Empty Ultra Balls | |||
| width="15%" | [[Arquivo:Ultra-ball(1).png|link=Pokébolas]] | |||
|- | |||
| 1 Venom Stone | |||
| [[Arquivo:Venom-stone.gif|link=Pedras de Evolução]] | |||
|- | |||
| 1 Leaf Stone | |||
| [[Arquivo:Leaf-stone.gif|link=Pedras de Evolução]] | |||
|} | |||
[[Arquivo:Banner_shamouti_quest11.jpg|link=Shamouti Island Quest]]<br> | |||
<span style="color:red">'''Local:'''</span> Subterrâneo de Shamouti <br> | |||
<span style="color:red">'''Nível Mínimo'''</span> 60 <br> | |||
<span style="color:red">'''Habilidades Necessárias:'''</span> Fly (ou Surf) <br> | |||
<span style="color:red">'''Recompensas:'''</span> <br> | |||
{| border="1" style="text-align: center; border-collapse: collapse" | |||
| width="85%" | 5.000 Dollars | |||
| width="15%" | [[Arquivo:Hundred Dollars.png|link=Drop de Itens]] | |||
|- | |||
| 40 Revives | |||
| [[Arquivo:Revive.png|link=Poções]] | |||
|- | |||
| 1 Venom Stone | |||
| [[Arquivo:Venom-stone.gif|link=Pedras de Evolução]] | |||
|- | |||
| 1 Cocoon Stone | |||
| [[Arquivo:Cocoon stone.gif|link=Pedras de Evolução]] | |||
|} | |||
[[Arquivo:Banner_butwal_questt11.jpg|link=Butwal Island Quest]]<br> | |||
<span style="color:red">'''Local:'''</span> Cavernas de Butwal Island <br> | |||
<span style="color:red">'''Nível Mínimo'''</span> 60 <br> | |||
<span style="color:red">'''Habilidades Necessárias:'''</span> Fly (ou Surf) <br> | |||
<span style="color:red">'''Recompensas:'''</span> <br> | |||
{| border="1" style="text-align: center; border-collapse: collapse" | |||
| width="85%" | 8.000 Dollars | |||
| width="15%" | [[Arquivo:Hundred Dollars.png|link=Drop de Itens]] | |||
|- | |||
| 30 Revives | |||
| [[Arquivo:Revive.png|link=Poções]] | |||
|- | |||
| 1 Leaf Stone | |||
| [[Arquivo:Leaf-stone.gif|link=Pedras de Evolução]] | |||
|- | |||
| 1 Cocoon Stone | |||
| [[Arquivo:Cocoon stone.gif|link=Pedras de Evolução]] | |||
|} | |||
[[Arquivo:Banner_butwal_quest1111.jpg|link=Butwal Island Quest 2]]<br> | |||
<span style="color:red">'''Local:'''</span> Mar embaixo de Butwal Island <br> | |||
<span style="color:red">'''Nível Mínimo'''</span> 60 <br> | |||
<span style="color:red">'''Habilidades Necessárias:'''</span> Cut e Fly (ou Surf) <br> | |||
<span style="color:red">'''Recompensas:'''</span> <br> | |||
{| border="1" style="text-align: center; border-collapse: collapse" | |||
| width="85%" | 5.000 Dollars | |||
| width="15%" | [[Arquivo:Hundred Dollars.png|link=Drop de Itens]] | |||
|- | |||
| 40 Revives | |||
| [[Arquivo:Revive.png|link=Poções]] | |||
|- | |||
| 1 Thunder Stone | |||
| [[Arquivo:Thunder-stone.gif|link=Pedras de Evolução]] | |||
|- | |||
| 1 Water Stone | |||
| [[Arquivo:Water-stone.gif|link=Pedras de Evolução]] | |||
|} | |||
[[Arquivo:Magma_island_test.png|link=Magma Island Quest]]<br> | |||
<span style="color:red">'''Local:'''</span> Cavernas de Magma Island <br> | |||
<span style="color:red">'''Nível Mínimo'''</span> 60 <br> | |||
<span style="color:red">'''Habilidades Necessárias:'''</span> Fly (ou Surf) <br> | |||
<span style="color:red">'''Recompensas:'''</span> <br> | |||
{| border="1" style="text-align: center; border-collapse: collapse" | |||
| width="85%" | 8.000 Dollars | |||
| width="15%" | [[Arquivo:Hundred Dollars.png|link=Drop de Itens]] | |||
|- | |||
| 100 Hyper Potions | |||
| [[Arquivo:Hyper_Poiton.png|link=Poções]] | |||
|- | |||
| 1 Darkness Stone | |||
| [[Arquivo:HrnVNwK.png|link=Pedras de Evolução]] | |||
|- | |||
| 1 Fire Stone | |||
| [[Arquivo:Fire-stone.gif|link=Pedras de Evolução]] | |||
|} | |||
[[Arquivo:Banner_cleopatra_quest11.jpg|link=Cleopatra Island Quest]]<br> | |||
<span style="color:red">'''Local:'''</span> Cavernas de Cleopatra Island <br> | |||
<span style="color:red">'''Nível Mínimo'''</span> 60 <br> | |||
<span style="color:red">'''Habilidades Necessárias:'''</span> Fly (ou Surf) <br> | |||
<span style="color:red">'''Recompensas:'''</span> <br> | |||
{| border="1" style="text-align: center; border-collapse: collapse" | |||
| width="85%" | 80 Empty Ultra Balls | |||
| width="15%" | [[Arquivo:Ultra-ball(1).png|link=Pokébolas]] | |||
|- | |||
| 2 Steelix Tails | |||
| [[Arquivo: Steelix Tail.png|link=Drop_de_Itens]] | |||
|- | |||
| 1 Earth Stone | |||
| [[Arquivo:Earth-stone.gif|link=Pedras de Evolução]] | |||
|- | |||
| 1 Feather Stone | |||
| [[Arquivo:Feather1.png|link=Pedras de Evolução]] | |||
|} | |||
[[Arquivo:Banner_kinnow_quest11.jpg|link=Kinnow Island Quest]]<br> | |||
<span style="color:red">'''Local:'''</span> Mar embaixo de Kinnow Islands <br> | |||
<span style="color:red">'''Nível Mínimo'''</span> 60 <br> | |||
<span style="color:red">'''Habilidades Necessárias:'''</span> Fly e Surf <br> | |||
<span style="color:red">'''Recompensas:'''</span> <br> | |||
{| border="1" style="text-align: center; border-collapse: collapse" | |||
| width="85%" | 50 Revives | |||
| width="15%" | [[Arquivo:Revive.png|link=Poções]] | |||
|- | |||
| 2 Gyarados Tail | |||
| [[Arquivo: Gyarados Tail.png|link= Drop de Itens]] | |||
|- | |||
| 1 Thunder Stone | |||
| [[Arquivo:Thunder-stone.gif|link=Pedras de Evolução]] | |||
|- | |||
| 1 Water Stone | |||
| [[Arquivo:Water-stone.gif|link=Pedras de Evolução]] | |||
|} | |||
[[Arquivo:Banner_fairchild_quest11.jpg|link=Fairchild Island Quest]]<br> | |||
<span style="color:red">'''Local:'''</span> Subterrâneo de Fairchild Island <br> | |||
<span style="color:red">'''Nível Mínimo'''</span> 60 <br> | |||
<span style="color:red">'''Habilidades Necessárias:'''</span> Fly (ou Surf) <br> | |||
<span style="color:red">'''Recompensas:'''</span> <br> | |||
{| border="1" style="text-align: center; border-collapse: collapse" | |||
| width="85%" | 100 Ultra Balls | |||
| width="15%" | [[Arquivo:Ultra-ball(1).png|link=Pokébolas]] | |||
|- | |||
| 2 Earth Stones | |||
| [[Arquivo: Earth-stone.gif|link=]] | |||
|} | |||
[[Arquivo:Banner_petalgroove_quest11.jpg|link=Petalgroove Island_Quest]]<br> | |||
<span style="color:red">'''Local:'''</span> Subsolo de Petalgroove Island <br> | |||
<span style="color:red">'''Nível Mínimo'''</span> 60 <br> | |||
<span style="color:red">'''Habilidades Necessárias:'''</span> Fly <br> | |||
<span style="color:red">'''Recompensas:'''</span> <br> | |||
{| border="1" style="text-align: center; border-collapse: collapse" | |||
| width="85%" | 60 Ultra Balls | |||
| width="15%" | [[Arquivo:Ultra-ball(1).png|link=Pokébolas]] | |||
|- | |||
| 1 Heart Stone | |||
| [[Arquivo:Heart-stone.gif|link=Pedras_de_Evolução]] | |||
|} | |||
[[Arquivo:Banner_tangelo_quest11.jpg|link=Tangelo Island Quest 2]]<br> | |||
<span style="color:red">'''Local:'''</span> Tangelo Island <br> | |||
<span style="color:red">'''Nível Mínimo'''</span> 100 <br> | |||
<span style="color:red">'''Habilidades Necessárias:'''</span> Fly ou Surf e Rock Smash <br> | |||
<span style="color:red">'''Recompensas:'''</span> <br> | |||
{| border="1" style="text-align: center; border-collapse: collapse" | |||
| width="85%" | 50 Empty Ultra Balls | |||
| width="15%" | [[Arquivo:Ultra-ball(1).png|link=Pokébolas]] | |||
|- | |||
| 2 PokéPark Tickets | |||
| [[Arquivo:PokePark_Ticket.png|link=Diamond Shop]] | |||
|} | |||
==='''Orre Chests'''=== | |||
[[Arquivo:Banner_orre_bau1.jpg|link=Segredos do Mapa - Orre Chests]]<br> | |||
<span style="color:red">'''Local:'''</span> Phenac, Agate e Gateon Port <br> | |||
<span style="color:red">'''Nível Mínimo'''</span> 150 <br> | |||
<span style="color:red">'''Habilidades Necessárias:'''</span> Rock Smash e Fly (ou Surf) <br> | |||
<span style="color:red">'''Recompensas:'''</span> <br> | |||
{| border="1" style="text-align: center; border-collapse: collapse" | |||
| width="85%" | 1200 Empty Ultra Balls | |||
| width="15%" | [[Arquivo:Ultra-ball(1).png|link=Pokébolas]] | |||
|- | |||
| 350 Ultimate Potions | |||
| [[Arquivo:Ultimate_Potion.png|link=Poções]] | |||
|- | |||
| 100 Restore Potions | |||
| [[Arquivo:Restore_Potion.png|link=Poções]] | |||
|- | |||
| 650 Max Revives | |||
| [[Arquivo:Max_revive.png|link=Poções]] | |||
|- | |||
| 1 Mewburguer | |||
| [[Arquivo:Mewburguer.png|link=Comidas]] | |||
|- | |||
| 3 Lum Berries | |||
| [[Arquivo:Berrie 23.png|link=Berries]] | |||
|- | |||
| 3 Sitrus Berries | |||
| [[Arquivo:Berrie 24.png|link=Berries]] | |||
|- | |||
| 1 XP Boost | |||
| [[Arquivo:Xp-boost.png|link=Itens Especiais#Outros]] | |||
|- | |||
| 8 Minor XP Boosts | |||
| [[Arquivo:Minor-xp-boost.png|link=Itens Especiais#Outros]] | |||
|- | |||
| 5 Minor Fortune Totem | |||
| [[Arquivo:Minor-fortune-totem-7.png|link=Itens Especiais#Outros]] | |||
|- | |||
| 30 Swordsman's Elixirs | |||
| [[Arquivo:Swordsmans.png|link=Elixir]] | |||
|- | |||
| 30 Defense Elixirs | |||
| [[Arquivo:Defensee.png|link=Elixir]] | |||
|- | |||
| 30 Running Elixirs | |||
| [[Arquivo:Running.png|link=Elixir]] | |||
|- | |||
| 8 Wiseman Elixirs | |||
| [[Arquivo:Wiseman.png|link=Elixir]] | |||
|- | |||
| 7 Healing Elixirs | |||
| [[Arquivo:Healing.png|link=Elixir]] | |||
|- | |||
| 6 Bounty Elixirs | |||
| [[Arquivo:Bounty.png|link=Elixir]] | |||
|- | |||
| 4 Fortune Elixirs | |||
| [[Arquivo:Fortune.png|link=Elixir]] | |||
|- | |||
| 10 Energy Drinks | |||
| [[Arquivo:Energy-drink.png]] | |||
|} | |||
==='''Nightmare Chests'''=== | |||
[[Arquivo:Banner_nightmare_bau1.jpg|link=Nightmare_Chests]] <br> | |||
<span style="color:red">'''Local:'''</span> Todo o Mapa de Nightmare World <br> | |||
<span style="color:red">'''Níveis Mínimos'''</span> Level 300, NW Level 15 <br> | |||
<span style="color:red">'''Habilidades Necessárias:'''</span> Mecha Fly<br> | |||
<span style="color:red">'''Recompensas:'''</span> | |||
{| border="1" style="text-align: center; border-collapse: collapse" | |||
| width="85%" | 1.160 Small Nightmare Potions | |||
| width="15%" | [[Arquivo:Small_Nightmare_Potion.gif|link=Poções]] | |||
|- | |||
| 610 Medium Nightmare Potions | |||
| [[Arquivo:Medium-Nightmare-Potion2.gif|link=Poções]] | |||
|- | |||
| 24 Shield Nightmare Potions | |||
| [[Arquivo:Shield_Nightmare_Potion.png|link=Poções]] | |||
|- | |||
| 81 Nightmare Revives | |||
| [[Arquivo:Nightmare_Revive.png|link=Poções]] | |||
|- | |||
| 50 Empty Sora Balls | |||
| [[Arquivo:Sora-ball.png|link=Pokébolas]] | |||
|- | |||
| 50 Empty Net Balls | |||
| [[Arquivo:Net-ball.png|link=Pokébolas]] | |||
|- | |||
| 80 Empty Tinker Balls | |||
| [[Arquivo:Tinker-ball.png|link=Pokébolas]] | |||
|- | |||
| 200 Empty Janguru Balls | |||
| [[Arquivo:Janguru-ball.png|link=Pokébolas]] | |||
|- | |||
| 130 Empty Nightmare Balls | |||
| [[Arquivo:Nightmare_Ball.png|link=Pokébolas]] | |||
|- | |||
| 5 Empty Beast Balls | |||
| [[Arquivo:Beast_Ball.png|link=Pokébolas]] | |||
|- | |||
| 1 Metal Stone | |||
| [[Arquivo:MetalStone.png|link=Pedras de Evolução]] | |||
|- | |||
| 1 Crystal Stone | |||
| [[Arquivo:Crystal-stone.gif|link=Pedras de Evolução]] | |||
|- | |||
| 1 Ancient Stone | |||
| [[Arquivo:Ancient-stone.gif|link=Pedras de Evolução]] | |||
|- | |||
| 3 Passho Berries | |||
| [[Arquivo:Berrie 1.png|link=Berries]] | |||
|- | |||
| 3 Chesto Berries | |||
| [[Arquivo:Berrie 21.png|link=Berries]] | |||
|- | |||
| 3 Babiri Berries | |||
| [[Arquivo:Berrie 8.png|link=Berries]] | |||
|- | |||
| 3 Shuca Berries | |||
| [[Arquivo:Berrie 7.png|link=Berries]] | |||
|- | |||
| 5 Tanga Berries | |||
| [[Arquivo:Berrie 4.png|link=Berries]] | |||
|- | |||
| 5 Occa Berries | |||
| [[Arquivo:Berrie 16.png|link=Berries]] | |||
|- | |||
| 5 Colbur Berries | |||
| [[Arquivo:Berrie 5.png|link=Berries]] | |||
|- | |||
| 13 Rindo Berries | |||
| [[Arquivo:Berrie 6.png|link=Berries]] | |||
|- | |||
| 2 Aspear Berries | |||
| [[Arquivo:Berrie 18.png|link=Berries]] | |||
|- | |||
| 3 Charti Berries | |||
| [[Arquivo:Berrie 2.png|link=Berries]] | |||
|- | |||
| 6 Lum Berries | |||
| [[Arquivo:Berrie 23.png|link=Berries]] | |||
|- | |||
| 10 Sitrus Berries | |||
| [[Arquivo:Berrie 24.png|link=Berries]] | |||
|- | |||
| 3 Azure Shard | |||
| [[Arquivo:Azure Shard.png|link=Pedras de Evolução#Shards]] | |||
|- | |||
| 2 Cerise Shards | |||
| [[Arquivo:Cerise Shard.png|link=Pedras de Evolução#Shards]] | |||
|- | |||
| 2 Indigo Shards | |||
| [[Arquivo:Indigo Shard.png|link=Pedras de Evolução#Shards]] | |||
|- | |||
| 1 Shell Shard | |||
| [[Arquivo: Shell Shard.png|link=Pedras de Evolução#Shards]] | |||
|- | |||
| 1 Harlequin Shard | |||
| [[Arquivo:Harlequin Shard.png|link=Pedras de Evolução#Shards]] | |||
|- | |||
| 1 Damson Shard | |||
| [[Arquivo:Damson Shard.png|link=Pedras de Evolução#Shards]] | |||
|- | |||
| 1 Kermes Shard | |||
| [[Arquivo:Kermes Shard.png|link=Pedras de Evolução#Shards]] | |||
|- | |||
| 3 Knowledge Elixir | |||
| [[Arquivo:Knowledge.png|link=Elixir]] | |||
|- | |||
| 2 Minor Fortune Totems | |||
| [[Arquivo:Minor-fortune-totem-7.png|link=Itens Especiais#Outros]] | |||
|- | |||
| 1 Big Fortune Totem | |||
| [[Arquivo:Big-fortune-totem4.png|link=Itens Especiais#Outros]] | |||
|- | |||
| 1 X-Unknown (Tier:3) | |||
| [[Arquivo:X-unknown-tier-3.png]] | |||
|- | |||
| 3 Y-Ghost (Tier:3) | |||
| [[Arquivo:Ghost.png|link=Held Itens]] | |||
|- | |||
| 10 Magician Tokens | |||
| [[File:Magiciantoken.png|link=Tokens]] | |||
|- | |||
| 10 Shoyu Tentacles | |||
| [[Arquivo:Shoyu tentacles.png|link=Comidas]] | |||
|- | |||
| 3 Gengar Amulets | |||
| [[Arquivo:Gengar_Amulet.png|link=Itens Especiais]] | |||
|- | |||
| 1 Shiny Gengar Amulet | |||
| [[Arquivo:Shiny_Gengar_Amulet.png|link=Itens Especiais]] | |||
|- | |||
| 2 Great Special Lure | |||
| [[Arquivo:Great_Special_Lure.png|link=]] | |||
|- | |||
| 20 Golden Fishs | |||
| [[Arquivo:Golden Fish.gif|link=]] | |||
|- | |||
| 60 Fuel Tanks | |||
| [[Arquivo:Fuel-tank.png]] | |||
|- | |||
| 1 Pikachu Picture | |||
| [[Arquivo:Pikachu-picture.png]] | |||
|- | |||
| 1 Mamoswine Toy | |||
| [[Arquivo:Mamoswine-toy.png]] | |||
|- | |||
| 1 Ancient Scroll | |||
| [[Arquivo:Ancient-scroll.png]] | |||
|- | |||
| 3 Black Nightmare Gems | |||
| [[Arquivo:Black Nightmare Gem.png|link=Nightmare_Tasks]] | |||
|}</center> | |||
=<b>BAÚ CERULEAN</b>= | |||
[[Arquivo:PT-BR.png|link=Pokéball Quest]] [[Arquivo:EN.png|link=Pokéball Quest (EN)]] | |||
== | <center>[[Arquivo:Bannerpokeballquest.png|link=]]</center> | ||
<!--T:1--> | |||
<span style="color:red">'''Nível Mínimo:</span> 15 | |||
<!--T:2--> | |||
<span style="color:red">'''Habilidades Necessárias:</span> Rock Smash | |||
<!--T:3--> | |||
<span style="color:red">'''Recompensa:</span> 10 Empty Poké Balls, 5 Empty Great Balls, 2 Empty Super Balls e 1 Empty Ultra Ball | |||
<!--T:4--> | |||
<b>Caso encontre algum erro ou queira acrescentar alguma informação, entre em contato com [[Nossa Equipe|um dos membros da wiki.]]</b></br> | |||
==<b>Recuperando as Pokébolas</b>== | |||
Para começar a quest, vá até Cerulean e siga em direção à praia, localizada ao norte da cidade. | |||
<center> | <center> | ||
{| class="wikitable | {| class="wikitable" style="text-align:center" | ||
|- | |- | ||
| | | '''Trajeto ''' <br> [[Arquivo:Mapa CQ 1.png|350px|link=]] <br> <br></br> | ||
| '''Entrada da Caverna''' <br> [[Arquivo:Baucerulean1.png|350px|link=]] <br> '''Coordenadas <br> (4040, 3426, 7) ''' | |||
|- | |- | ||
| | |} | ||
| | </center> | ||
A partir desse ponto, o jogador deverá acessar a caverna à esquerda e se preparar para enfrentar os seguintes Pokémon pelo caminho: [[Arquivo:041-Zubat.png|link=Zubat]] Zubat, [[Arquivo:042-Golbat.png|link=Golbat]] Golbat e [[Arquivo:074-Geodude.png|link=Geodude]] Geodude. | |||
Seguindo o caminho indicado, tomando o devido cuidado, o jogador encontrará algumas pedras que o impedirá de seguir o trajeto, essas que precisarão ser quebradas por algum Pokémon que possua a habilidade <b> Rock Smash </b>. </br> | |||
<center> | |||
{|class="wikitable" style="text-align:center" | |||
|- | |||
! <b>Trajeto</b> !! <b>Utilizando Rock Smash</b> | |||
|- | |||
| [[Arquivo:Mapa CQ 2.png|350px|link=]] || [[Arquivo:Rocksmashgif1.gif|350px|link=]] | |||
|- | |||
! colspan="2" | <b>Escada 1º Andar</b> | |||
|- | |||
| colspan="2" align="center"| [[Arquivo:Baucerulean2.png|350px|link=]] <br> '''Coordenadas <br> (4041, 3452, 7) ''' | |||
|} | |||
</center> | |||
Subindo as escadas no final do trajeto, encontrará um novo corredor. Passe por ele derrotando os Pokémon pelo caminho e, novamente, suba as escadas. | |||
<center> | |||
{| class="wikitable" style="text-align:center" | |||
|- | |||
| '''Trajeto ''' <br> [[Arquivo:Mapa CQ 3.png|350px|link=]] <br> <br></br> | |||
| '''Escada 2º Andar''' <br> [[Arquivo:Baucerulean3.png|350px|link=]] <br> '''Coordenadas <br> (4031, 3425, 6) ''' | |||
|- | |- | ||
|} | |} | ||
</center> | </center> | ||
O jogador deve descer até o final da montanha e então, encontrará o baú. Lembre-se de que não é possível resgatar a recompensa se houver algum Pokémon por perto, então derrote todos. | |||
<center> | |||
< | {| class="wikitable" style="text-align:center" | ||
|- | |||
| '''Trajeto ''' <br> [[Arquivo:Mapa CQ 4.png|350px|link=]] <br> <br></br> | |||
| '''Escada 2º Andar''' <br> [[Arquivo:Baucerulean4.png|350px|link=]] <br> '''Coordenadas <br> (4036, 3450, 5) ''' | |||
|- | |||
|} | |||
</center> | |||
Ao abrir o baú, receberá os seguintes itens: | |||
<center>[[Arquivo: | <center> | ||
{| class="wikitable" width="15%" | |||
|- | |||
! colspan="2" | Itens | |||
! Quantidade | |||
|- | |||
| align="center" | [[Arquivo:Poke-ball(1).png|link=Pokébolas]] | |||
|align="left" style="border-left-style: hidden; | <center> Poké ball</center> | |||
| align="center" | 10 | |||
|- | |||
| align="center" | [[Arquivo:Great-ball(1).png|link=Pokébolas]] | |||
|align="left" style="border-left-style: hidden; | <center> Great Ball</center> | |||
| align="center" | 5 | |||
|- | |||
| align="center" | [[Arquivo:Super-ball(1).png|link=Pokébolas]] | |||
|align="left" style="border-left-style: hidden; | <center> Super Ball</center> | |||
| align="center" | 2 | |||
|- | |||
| align="center" | [[Arquivo:Ultra-ball(1).png|link=Pokébolas]] | |||
|align="left" style="border-left-style: hidden; | <center> Ultra Ball</center> | |||
| align="center" | 1 | |||
|} </center> | |||
Ao receber sua recompensa, o jogador deve retornar por todo o caminho com muito cuidado. | |||
=<b>BAÚ PEWTER </b>= | |||
[[Arquivo:PT-BR.png|link=Pewter Quest]] [[Arquivo:EN.png|link=Pewter Quest (EN)]] | |||
<center> [[Arquivo:Bannerpewterquest.png|link=]] </center> | |||
<!--T:1--> | |||
<span style="color:red">'''Nível Mínimo:</span> 25 | |||
< | <!--T:2--> | ||
<span style="color:red">'''Habilidades Necessárias:</span> Nenhuma | |||
<!--T:3--> | |||
</ | <span style="color:red">'''Recompensa:</span> 5.000 dollars, 100 Empty Poké Balls e 25 Empty Great Balls | ||
<!--T:4--> | |||
< | <b>Caso encontre algum erro ou queira acrescentar alguma informação, entre em contato com [[Nossa Equipe|um dos membros da wiki.]]</b></br> | ||
==<b>Resgatando os Itens</b>== | |||
Para iniciar esta missão, vá até a cidade de Pewter, como mostrado a seguir: | |||
<center>[[Arquivo: | <center>[[Arquivo:Baupewter1.png|link=]]</center> | ||
Siga em direção ao norte do Centro Pokémon e encontrará uma escada que levará ao Museu da cidade. Subindo a escada o jogador terá que atravessar por dentro da caverna que se encontra a oeste do Museu. | |||
<center> | |||
{|class="wikitable" style="text-align:center" | |||
|- | |||
! <b>Trajeto</b> !! <b>Escada</b> | |||
|- | |||
| [[Arquivo:Mapapewterquest11.png|350px|link=]]<br><br></br> || [[Arquivo:Escadabaupewter1.png|350px|link=]] <br> '''Coordenadas <br> (3701, 3467, 7) ''' | |||
|- | |||
! colspan="2" | <b>Trajeto andar superior</b> | |||
|- | |||
| colspan="2" align="center"| [[Arquivo:Mapapewterquest22.png|350px|link=]] <br> | |||
|} | |||
</center> | |||
Descendo a escada ao final da caverna, basta o jogador seguir para o leste que encontrará a entrada para a caverna da quest. | |||
<center> | <center> | ||
{| class="wikitable | {|class="wikitable" style="text-align:center" | ||
|- | |- | ||
! <b>Trajeto</b> !! <b>Entrada da Caverna</b> | |||
|- | |- | ||
| | | [[Arquivo:Mapapewterquest33.png|350px|link=]]<br><br></br> || [[Arquivo:baupewter3.png|350px|link=]] <br> '''Coordenadas <br> (3690, 3436, 7) ''' | ||
| | |||
| | |||
| | |||
|- | |- | ||
| | |} | ||
| | </center> | ||
| | <b>Observação:</b> Há outras formas de chegar até a entrada da caverna da quest, mas será necessário que o jogador possua um Pokémon que tenha a habilidade <b>[[Habilidades#Fly-1|Fly]]</b> ou <b>[[Habilidades#Surf-1|Surf]]</b>. | ||
A partir daqui, esteja preparado para enfrentar uma enorme variedade de Pokémon pelo caminho. Eles estarão prontos para proteger o baú, portanto, tenha cuidado! O jogador irá encontrar: [[Arquivo:028-Sandslash.png|link=Sandslash]] Sandslash, [[Arquivo:074-Geodude.png|link=Geodude]] Geodude, [[Arquivo:075-Graveler.png|link=Graveler]] Graveler, [[Arquivo:076-Golem.png|link=Golem]] Golem, [[Arquivo:095-Onix.png|link=Onix]] Onix, [[Arquivo:111-Rhyhorn.png|link=Rhyhorn]] Rhyhorn e [[Arquivo:112-Rhydon.png|link=Rhydon]] Rhydon. | |||
Siga o caminho demonstrado no mapa abaixo derrotando todos os Pokémon pelo caminho. Ao final da montanha, encontrará o baú com as recompensas. | |||
| | <center> | ||
| | {|class="wikitable" style="text-align:center" | ||
| | |- | ||
| <b>Trajeto</b> <br> [[Arquivo:Mapa PQ 2.png|350px|link=]] <br><br></br> | |||
| <b>Baú</b> <br> [[Arquivo:Baupewter22.png|350px|link=]] <br> '''Coordenadas <br> (3664, 3570, 7) ''' | |||
|- | |- | ||
|} | |} | ||
</center> | </center> | ||
Ao abrir o baú, o jogador receberá os itens: | |||
<center> | |||
{| class="wikitable" width="15%" | |||
|- | |||
! colspan="2" | Itens | |||
! Quantidade | |||
|- | |||
| align="center" | [[Arquivo:Hundred Dollars.png|link=Drop de Itens]] | |||
|align="left" style="border-left-style: hidden; | <center> Hundred Dollars</center> | |||
| align="center" | 50 (5k) | |||
|- | |||
| align="center" | [[Arquivo:Poke-ball(1).png|link=Pokébolas]] | |||
|align="left" style="border-left-style: hidden; | <center> Poké Ball</center> | |||
| align="center" | 100 | |||
|- | |||
| align="center" | [[Arquivo:Great-ball(1).png|link=Pokébolas]] | |||
|align="left" style="border-left-style: hidden; | <center> Great Ball</center> | |||
| align="center" | 25 | |||
|} </center> | |||
Ao receber sua recompensa, o jogador será automaticamente teleportado para o centro Pokémon da cidade de Pewter. | |||
=<b>CERULEAN QUEST</b>= | |||
[[Arquivo:PT-BR.png|link=Cerulean Quest]] [[Arquivo:EN.png|link=Cerulean Quest (EN)]] | |||
= | <center> [[Arquivo:Bannerceruleanquest.png|link=]] </center> | ||
<!--T:1--> | |||
<span style="color:red">'''Nível Mínimo:</span> 30 | |||
<!--T:2--> | |||
<span style="color:red">'''Habilidades Necessárias:</span> Rock Smash e Cut (ou Fly) | |||
< | <!--T:3--> | ||
<span style="color:red">'''Recompensa:</span> 8.000 dollars, 50 Empty Great Balls, 20 Empty Super Balls e 1 Venom Flute | |||
<!--T:4--> | |||
<b>Caso encontre algum erro ou queira acrescentar alguma informação, entre em contato com [[Nossa Equipe|um dos membros da wiki.]]</b></br> | |||
==<b>Explorando o Pântano</b>== | |||
Para começar, vá até Cerulean e siga em direção ao Cerulean Swamp, um pântano localizado à esquerda da cidade. | |||
</ | <center> [[Arquivo:Mapa CQ2 01.png|link=]] </center> | ||
O jogador deve estar preparado para enfrentar vários Pokémon do tipo venenoso durante toda a missão. São eles: [[Arquivo:023-Ekans.png|link=Ekans]] Ekans, [[Arquivo:024-Arbok.png|link=Arbok]] Arbok, [[Arquivo:041-Zubat.png|link=Zubat]] Zubat, [[Arquivo:042-Golbat.png|link=Golbat]] Golbat, [[Arquivo:046-Paras.png|link=Paras]] Paras, [[Arquivo:047-Parasect.png|link=Parasect]] Parasect, [[Arquivo:109-Koffing.png|link=Koffing]] Koffing e [[Arquivo:110-Weezing.png|link=Weezing]] Weezing. | |||
< | Durante este trajeto, o jogador encontrará um bloqueio no caminho e necessitará de um Pokémon com a Habilidade <b>[[Habilidades#Rock_Smash-0|Rock Smash]]</b> ou <b>[[Habilidades#Cut-0|Cut]]</b>. Caso prefira, poderá cortar este caminho utilizando Fly até o local final, indicado no mapa acima. Ao entrar na cabana, clique no bueiro para acessar o subsolo e continuar a missão. | ||
<center> | |||
{| class="wikitable" style="text-align:center" | |||
|- | |||
| '''1ª Parada ''' <br> [[Arquivo:Ceruquest1.png|350px|link=]] <br> '''Coordenadas <br> (3964, 3545, 7) ''' | |||
| '''2ª Parada''' <br> [[Arquivo:Ceruquest2.png|350px|link=]] <br> '''Coordenadas <br> (3939, 3502, 7) ''' | |||
|- | |||
|} | |||
</center> | |||
Pegue o caminho à direita e siga até o final, onde encontrará algumas escadas. | |||
<center> | |||
{| class="wikitable" style="text-align:center" | |||
|- | |||
| '''Trajeto ''' <br> [[Arquivo:Mapa CQ2 02.png|350px|link=]] <br>'''Seguir ao<br> Leste'''</br> | |||
| '''Escada''' <br> [[Arquivo:Ceruquest3.png|350px|link=]] <br> '''Coordenadas <br> (3963, 3497, 8) ''' | |||
|- | |||
|} | |||
</center> | |||
Após descer as escadas, siga o caminho indicado ao leste com muito cuidado. O jogador encontrará vários Pokémon pelo caminho protegendo o baú. | |||
<center> | <center> | ||
{| class="wikitable" style="text-align:center" | |||
{| class="wikitable" | |- | ||
| '''Trajeto ''' <br> [[Arquivo:Mapa CQ2 03.png|350px|link=]] <br> '''Continuar<br> ao Leste'''</br> | |||
| '''Escada''' <br> [[Arquivo:Bauceruquest.png|350px|link=]] <br> '''Coordenadas <br> (4043, 3496, 9) ''' | |||
|- | |- | ||
|} | |||
</center> | |||
Ao abrir o baú, o jogador receberá as seguintes recompensas: | |||
<center> | |||
{| class="wikitable" width="15%" | |||
|- | |- | ||
! | ! colspan="2" | Itens | ||
! | ! Quantidade | ||
|- | |- | ||
| | | align="center" | [[Arquivo:Hundred Dollars.png|link=Drop de Itens]] | ||
| align="center" | | |align="left" style="border-left-style: hidden; | <center> Hundred Dollar</center> | ||
| align="center" | 80 (8K) | |||
|- | |- | ||
| | | align="center" | [[Arquivo:Great-ball(1).png|link=Pokébolas]] | ||
| align="center" | | |align="left" style="border-left-style: hidden; | <center> Great Ball</center> | ||
| align="center" | 50 | |||
|- | |- | ||
| | | align="center" | [[Arquivo:Super-ball(1).png|link=Pokébolas]] | ||
| align="center" | | |align="left" style="border-left-style: hidden; | <center> Super Ball</center> | ||
| align="center" | 20 | |||
|- | |- | ||
| | | align="center" | [[Arquivo: Venom Flute.png|link=NPC Hugh (Itens)]] | ||
|align="left" style="border-left-style: hidden; | <center> Venom Flute</center> | |||
| align="center" | 1 | |||
|} </center> | |||
Ao receber sua recompensa, o jogador será automaticamente teleportado para a sua cidade natal. | |||
=<b>ROCK TUNNEL QUEST</b>= | |||
<center>[[arquivo:bannerrocktunelquest.png|link=]]</center> | |||
<!--T:1--> | |||
<span style="color:red">'''Nível Mínimo:</span> 35 | |||
<span style="color:red">'''Habilidade Necessária:</span> Rock Smash | |||
<!--T:2--> | |||
<span style="color:red">'''Recompensa:</span> 100 Empty Great Balls, 50 Empty Super Balls e 100 Hundred Dollars (10K). | |||
<!--T:3--> | |||
<b>Caso encontre algum erro ou queira acrescentar alguma informação, entre em contato com [[Nossa Equipe|um dos membros da wiki.]]</b></br> | |||
==<b>Explorando o Rock Tunnel</b>== | |||
Para iniciar a quest, vá até a cidade de Lavender, como mostrado na imagem: | |||
<center> [[Arquivo:Partidarocktunnel1.png|link=]] </center> | |||
Pegue o caminho à direita do Centro Pokémon em direção ao norte e siga até encontrar algumas pedras obstruindo o caminho, nessa parte será necessário utilizar um Pokémon com a habilidade [[Habilidades#Rock_Smash-0|<b>Rock Smash</b>]]. Após a liberação do caminho, o jogador deve continuar ao nordeste. Nessa área terá alguns [[Arquivo:046-Paras.png|link=Paras]] Paras, mas fique tranquilo, eles são pacíficos. Ao chegar no final do caminho, suba as escadas. | |||
<center> | |||
{| class="wikitable" style="text-align:center" | |||
|- | |- | ||
| | | '''Trajeto ''' <br> [[Arquivo:RT_Caminho_01_r.jpg|350px|link=]] <br> <br></br> | ||
| | | '''Escada''' <br> [[Arquivo:Escadarocktunnel1.png|350px|link=]] <br> '''Coordenadas <br> (4285, 3585, 7) ''' | ||
|- | |- | ||
| | |} | ||
</center> | |||
O jogador deve continuar subindo, neste caminho encontrará alguns [[Arquivo:066-Machop.png|link=Machop]] Machop e [[Arquivo:067-Machoke.png|link=Machoke]] Machoke. Novamente, suba a escada no final. | |||
<center> | <center> | ||
{| class="wikitable" | {| class="wikitable" style="text-align:center" | ||
|- | |- | ||
| '''Trajeto ''' <br> [[Arquivo:RT_Caminho_02_r.jpg|350px|link=]] <br> <br></br> | |||
| '''Escada''' <br> [[Arquivo:Escadarocktunnel2.png|350px|link=]] <br> '''Coordenadas <br> (4284, 3516, 6) ''' | |||
|- | |||
|} | |||
</center> | |||
A partir deste caminho aparecerão vários Pokémon do tipo pedra e terra. Dentre eles estão: [[Arquivo:074-Geodude.png|link=Geodude]] Geodude, [[Arquivo:075-Graveler.png|link=Graveler]] Graveler, [[Arquivo:076-Golem.png|link=Golem]] Golem, [[Arquivo:095-Onix.png|link=Onix]] Onix, [[Arquivo:111-Rhyhorn.png|link=Rhyhorn]] Rhyhorn e [[Arquivo:112-Rhydon.png|link=Rhydon]] Rhydon. | |||
Para ir até o baú, faça o caminho indicado: | |||
<center> | |||
{| class="wikitable" style="text-align:center" | |||
|- | |- | ||
| '''Trajeto ''' <br> [[Arquivo:Maparocktunnel11.png|350px|link=]] <br> <br></br> | |||
| '''Baú''' <br> [[Arquivo:Baurocktunnel1.png|350px|link=]] <br> '''Coordenadas <br> (4274, 3478, 5) ''' | |||
|- | |- | ||
| | |} | ||
| | </center> | ||
Seguindo o caminho indicado o jogador deverá ficar atento, pois em um momento deste trajeto haverá muitos Pokémon juntos protegendo o baú de recompensas, portanto, siga em frente com muito cuidado! | |||
Após derrotar todos os Pokémon, clique no baú e receberá as seguintes recompensas: | |||
<center> | |||
{| class="wikitable" width="15%" | |||
|- | |- | ||
! colspan="2" | Itens | |||
! Quantidade | |||
|- | |- | ||
| | | align="center" | [[Arquivo:Hundred Dollars.png|link=Drop de Itens]] | ||
| align="center" | | |align="left" style="border-left-style: hidden; | <center> Hundred Dollar</center> | ||
| align="center" | 100 (10K) | |||
|- | |- | ||
| | | align="center" | [[Arquivo:Great-ball(1).png|link=Pokébolas]] | ||
| align="center" | | |align="left" style="border-left-style: hidden; | <center> Great Ball</center> | ||
| align="center" | 100 | |||
|- | |- | ||
| | | align="center" | [[Arquivo:Super-ball(1).png|link=Pokébolas]] | ||
| align=" | |align="left" style="border-left-style: hidden; | <center> Super Ball</center> | ||
| align="center" | 50 | |||
</center> | |} </center> | ||
</ | |||
Assim que receber as recompensas será teletransportado automaticamente para o Centro Pokémon de Lavender. | |||
=<b>DESERT QUEST KANTO</b>= | |||
<center> [[Arquivo:Bannerdesertquestkanto.png|link=]] </center> | |||
< | <!--T:1--> | ||
<span style="color:red">'''Nível Mínimo:</span> 40 | |||
<!--T:2--> | |||
<span style="color:red">'''Habilidades Necessárias:</span> Dig e Surf (ou Fly) | |||
<!--T:3--> | |||
<span style="color:red">'''Recompensa:</span> 150 Hundred Dollars (15K), 100 Empty Great Balls, 50 Empty Super Balls e 20 Empty Ultra Balls | |||
< | <!--T:4--> | ||
<b>Caso encontre algum erro ou queira acrescentar alguma informação, entre em contato com [[Nossa Equipe|um dos membros da wiki.]]</b></br> | |||
==<b>Explorando o Deserto</b>== | |||
Para começar, vá até Desert Island, uma ilha desértica localizada à leste da cidade de Lavender. Lembre-se de levar um Pokémon com a habilidade Dig, pois será necessária durante o trajeto. | |||
= | <center> [[Arquivo:Mapadesertquest11.png|link=]] </center> | ||
Chegando na ilha, dirija-se à entrada da pirâmide mostrada na imagem acima. A partir deste caminho, encontrará muitos Pokémon do elemento psíquico, são eles: [[Arquivo:063-Abra.png|link=Abra]] Abra, [[Arquivo:064-Kadabra.png|link=Kadabra]] Kadabra, [[Arquivo:065-Alakazam.png|link=Alakazam]] Alakazam, [[Arquivo:096-Drowzee.png|link=Drowzee]] Drowzee e [[Arquivo:097-Hypno.png|link=Hypno]] Hypno. | |||
<center>[[Arquivo: | Ao entrar na pirâmide, certifique-se de estar carregando um Pokémon com a habilidade <b>[[Habilidades#Dig-0|Dig]]</b> e siga o caminho indicado nas imagens a seguir: | ||
<center> | |||
{| class="wikitable" style="text-align:center" | |||
|- | |||
| '''Trajeto ''' <br> [[Arquivo:Mapa DIQ 2.png|350px|link=]] <br> <br></br> | |||
| '''1ª Cavação''' <br> [[Arquivo:Cdesertquest1.png|350px|link=]] <br> '''Coordenadas <br> (4649, 3679, 7) ''' | |||
|- | |- | ||
|} | |} | ||
</center> | </center> | ||
=== | <center> | ||
{| class="wikitable" style="text-align:center" | |||
|- | |||
| '''Trajeto ''' <br> [[Arquivo:Mapa DIQ 3.png|350px|link=]] <br> <br></br> | |||
| '''2ª Cavação''' <br> [[Arquivo:Cdesertquest2.png|350px|link=]] <br> '''Coordenadas <br> (4625, 3688, 8) ''' | |||
|- | |||
|} | |||
</center> | |||
Continue avançando com cautela, quanto mais descer, mais Pokémon estarão pelo caminho para proteger o baú. | |||
<center> | <center> | ||
[[Arquivo: | {| class="wikitable" style="text-align:center" | ||
|- | |||
| '''Trajeto ''' <br> [[Arquivo:Mapa DIQ 4.png|350px|link=]] <br> <br></br> | |||
| '''1ª Escada''' <br> [[Arquivo:Cdesertquest3.png|350px|link=]] <br> '''Coordenadas <br> (4625, 3713, 9) ''' | |||
|- | |||
|} | |||
</center> | |||
{| class="wikitable" | <center> | ||
{| class="wikitable" style="text-align:center" | |||
|- | |||
| '''Trajeto ''' <br> [[Arquivo:Mapa DIQ 5.png|350px|link=]] <br> <br></br> | |||
| '''2ª Escada''' <br> [[Arquivo:Cdesertquest4.png|350px|link=]] <br> '''Coordenadas <br> (4628, 3681, 10) ''' | |||
|- | |- | ||
|} | |} | ||
</center> | </center> | ||
=== | <center> | ||
{| class="wikitable" style="text-align:center" | |||
|- | |||
| '''Trajeto ''' <br> [[Arquivo:Mapa DIQ 6.png|350px|link=]] <br> <br></br> | |||
| '''3ª Escada''' <br> [[Arquivo:Cdesertquest5.png|350px|link=]] <br> '''Coordenadas <br> (4628, 3673, 9) ''' | |||
|- | |||
|} | |||
</center> | |||
Neste momento o jogador já se aproxima do baú de recompensas. É hora de se preparar para enfrentar uma grande quantidade de Pokémon, portanto, tenha cuidado. | |||
<center> | <center> | ||
[[Arquivo: | {| class="wikitable" style="text-align:center" | ||
|- | |||
| '''Trajeto ''' <br> [[Arquivo:Mapa DIQ 7.png|350px|link=]] <br> <br></br> | |||
| '''4ª Escada''' <br> [[Arquivo:Cdesertquest6.png|350px|link=]] <br> '''Coordenadas <br> (4629, 3663, 10) ''' | |||
|- | |||
|} | |||
</center> | |||
{| class="wikitable" | <center> | ||
{| class="wikitable" style="text-align:center" | |||
|- | |||
| '''Trajeto ''' <br> [[Arquivo:Mapa DIQ 8.png|350px|link=]] <br> <br></br> | |||
| '''Baú''' <br> [[Arquivo:Baudesertquest.png|350px|link=]] <br> '''Coordenadas <br> (4629, 3651, 11) ''' | |||
|- | |- | ||
|} | |} | ||
</center> | </center> | ||
=== | Ao encontrar e abrir o baú, o jogador receberá os seguintes itens: | ||
<center> | |||
{| class="wikitable" width="15%" | |||
|- | |||
! colspan="2" | Itens | |||
! Quantidade | |||
|- | |||
| align="center" | [[Arquivo:Hundred Dollars.png|link=Drop de Itens]] | |||
|align="left" style="border-left-style: hidden; | <center> Hundred Dollar</center> | |||
| align="center" | 150 (15K) | |||
|- | |||
| align="center" | [[Arquivo:Great-ball(1).png|link=Pokébolas]] | |||
|align="left" style="border-left-style: hidden; | <center> Great Ball</center> | |||
| align="center" | 100 | |||
|- | |||
| align="center" | [[Arquivo:Super-ball(1).png|link=Pokébolas]] | |||
|align="left" style="border-left-style: hidden; | <center> Super Ball</center> | |||
| align="center" | 50 | |||
|- | |||
| align="center" | [[Arquivo:Ultra-ball(1).png|link=Pokébolas]] | |||
|align="left" style="border-left-style: hidden; | <center> Ultra Ball</center> | |||
| align="center" | 20 | |||
|} </center> | |||
Ao receber sua recompensa, o jogador será automaticamente teleportado para o centro Pokémon de sua cidade Natal. | |||
=<b>Seafoam Island Quest</b>= | |||
<center> [[Arquivo:Bannerseafoamquest.png|link=]] </center> | |||
<!--T:1--> | |||
<span style="color:red">'''Nível Mínimo:</span> 40 | |||
<!--T:2--> | |||
<span style="color:red">'''Habilidades Necessárias:</span> Surf (ou Fly) | |||
<!--T:3--> | |||
<span style="color:red">'''Recompensa:</span> 150 Hundred dollars (15K), 100 Empty Great Balls, 50 Empty Super Balls e 20 Empty Ultra Balls | |||
<!--T:4--> | |||
<b>Caso encontre algum erro ou queira acrescentar alguma informação, entre em contato com [[Nossa Equipe|um dos membros da wiki.]]</b></br> | |||
==<b>Explorando a Ilha de neve</b>== | |||
Para iniciar a missão, vá até Seafoam Island, uma ilha localizada a sudoeste da cidade de Fuchsia. | |||
<center> | <center> | ||
[[Arquivo: | <table class="seeMore"> | ||
<tr> | |||
<td class="seeMore__image">[[Arquivo:Telekinetic-compass.gif|link=]]</td> | |||
<td> '''Veja mais: [[NPC_Skier_(Outfits)|NPC Skier (Outfits)]]''' </td> | |||
</tr> | |||
</table> | |||
</center> <br> | |||
{| class="wikitable" | |||
<center> [[Arquivo:Mapa SIQ 1.png|link=]] </center> | |||
Ao chegar na ilha, siga o caminho demonstrado na imagem a seguir e, em seguida, desça as escadas. | |||
<center> | |||
{| class="wikitable" style="text-align:center" | |||
|- | |||
| '''Trajeto ''' <br> [[Arquivo:Mapa SIQ 2.png|350px|link=]] <br> <br></br> | |||
| '''Escada''' <br> [[Arquivo:Cseafoamquest1.png|350px|link=]] <br> '''Coordenadas <br> (4006, 4114, 7) ''' | |||
|- | |- | ||
|} | |} | ||
</center> | </center> | ||
== | A partir daqui, o jogador irá encontrar os seguintes Pokémon pelo trajeto: [[Arquivo:086-Seel.png|link=Seel]] Seel, [[Arquivo:087-Dewgong.png|link=Dewgong]] Dewgong, [[Arquivo:090-Shellder.png|link=Shellder]] Shellder, [[Arquivo:091-Cloyster.png|link=Cloyster]] Cloyster, [[Arquivo:124-Jynx.png|link=Jynx]] Jynx, [[Arquivo:131-Lapras.png|link=Lapras]] Lapras e [[Arquivo:362-Glalie.png|link=Glalie]] Glalie. | ||
=== | |||
Percorra todo o longo caminho de gelo com bastante cuidado, pois irá encontrar uma grande quantidade de Pokémon enquanto procura pelo baú. | |||
<center> [[Arquivo:Cseafoamquest22.png|link=]] </center> | |||
Ao chegar no final do trajeto, encontrará o baú e poderá resgatar suas recompensas. | |||
<center> [[Arquivo:Bauseafoamquest.png|link=]] </center> | |||
O jogador receberá os seguintes itens: | |||
<center> | <center> | ||
[[Arquivo: | {| class="wikitable" width="15%" | ||
|- | |||
! colspan="2" | Itens | |||
! Quantidade | |||
|- | |||
| align="center" | [[Arquivo:Hundred Dollars.png|link=Drop de Itens]] | |||
|align="left" style="border-left-style: hidden; | <center> <b>Hundred Dollar</b></center> | |||
| align="center" | 150 (15K) | |||
|- | |||
| align="center" | [[Arquivo:Great-ball(1).png|link=Pokébolas]] | |||
|align="left" style="border-left-style: hidden; | <center> <b>Great Ball</b></center> | |||
| align="center" | 100 | |||
|- | |||
| align="center" | [[Arquivo:Super-ball(1).png|link=Pokébolas]] | |||
|align="left" style="border-left-style: hidden; | <center> <b>Super Ball</b></center> | |||
| align="center" | 50 | |||
|- | |||
| align="center" | [[Arquivo:Ultra-ball(1).png|link=Pokébolas]] | |||
|align="left" style="border-left-style: hidden; | <center> <b>Ultra Ball</b></center> | |||
| align="center" | 20 | |||
|} </center> | |||
Ao receber sua recompensa, será automaticamente teleportado para o centro Pokémon de sua cidade Natal. | |||
=RASCUNHO= | |||
='''Interface de Personalização da Poké Bola'''= | |||
A interface de Personalização da Poké Bola é uma janela que permite que o jogador gerencie os cosméticos disponíveis em um Pokémon entre as opções de Addons, Auras, Cápsulas e Pinturas. Também possuindo os sistema de Troca de Nome do Pokémon e alternância entre os '''[[Held Inativo|Helds Inativos]]'''. | |||
<br> | |||
Para abrir a interface, basta utilizar o atalho '''Ctrl+Botão Direito/Esquerdo do Mouse no Pokémon''', assim como informado na imagem abaixo. | |||
<br> | |||
<center>[[Arquivo:Abrindopainelp1.png|link=]] </center><br> | |||
Assim que selecionada a opção, será aberto essa janela: | |||
=='''Addons'''== | |||
Cosmético para deixar seu Pokémon dentro da moda. Podem ser obtidos através da '''[[Diamond Shop]]''', Eventos e fabricado por Profissões. Podendo ser visualizado quando o Pokémon estiver solto. | |||
<center>[[arquivo:Paineladdons12.png|link=]]</center> | |||
==='''Legenda'''=== | |||
# Opções de Cosméticos do Pokémon | |||
# Todos os Addons que o Pokémon possui, mesmo aqueles que ainda não foram habilitados. | |||
# Favoritar uma combinação de cores e deixar mais prático para colocar ao Pokémon quando quiser. | |||
# Total de páginas do cosmético disponíveis e também quantos estão desbloqueados para uso no Pokémon. | |||
# Paleta de cores. | |||
# Sistema para alteração/remoção do nome do Pokémon. | |||
# Pré-visualização do Pokémon com/sem Addon. | |||
# Sistema de alteração dos '''[[Held Inativo|Helds Inativos]]''' | |||
<br> | |||
'''Observações:''' | |||
* A Paleta de cores só funciona para alguns Addons. Essa possibilidade pode ser testada pelo jogador na interface. | |||
* Apesar de mostrar todos os Addons disponíveis para o Pokémon, nem todos podem ser adquiridos, alguns apenas via comércio com outros jogadores que o possuam. | |||
* Addons com o ícone [[arquivo:Marketicon.png|link=]] estão disponíveis para compra na '''[[Diamond Shop]]'''. | |||
<br> | |||
<center><span class="mw-customtoggle-PPPB"><font size="2"> '''>>> Clique aqui para ver na prática <<<''' </font> </span><br></center> | |||
<center><div class="mw-collapsible mw-collapsed" id="mw-customcollapsible-PPPB"> | |||
{| | |||
|[[Arquivo:Paineladdons1gif.gif|link=]] | |||
|- | |- | ||
|} | |} | ||
</center> | </center> | ||
=== | <br> | ||
Após selecionar o efeito desejado, basta clicar no botão de confirmação na interface de customização. | |||
=='''Auras e Partículas'''== | |||
Cosméticos destinados aos Pokémon que são no mínimo +50 ou que estejam na Premier Ball. Pode ser visto quando ele estiver solto. | |||
<center>[[arquivo:Painelauras12.png|link=]]</center> | |||
==='''Legenda'''=== | |||
# Gerenciamento das Auras tradicionais e Auras de Urnas habilitadas no Pokémon. | |||
# Gerenciamento das Partículas habilitadas no Pokémon. | |||
<br> | |||
Após realizar qualquer alteração, clicar em '''Confirmar''' para aplicar e salvar. </br></br> | |||
<center><span class="mw-customtoggle-PPPB"><font size="2"> '''>>> Clique aqui para ver na prática <<<''' </font> </span><br></center> | |||
<center><div class="mw-collapsible mw-collapsed" id="mw-customcollapsible-PPPB"> | |||
{| | |||
|[[Arquivo:Painelauras1gif.gif|link=]] | |||
|- | |||
|} | |||
</center></br> | |||
'''Observações:''' | |||
* Para realizar a troca de Particle Aura, é necessário que o Pokémon esteja equipado com uma Particle Aura ou esteja na Premier Ball; | |||
* Os Efeitos de Aura anteriormente concedidos pela NPC Shurya agora estão disponíveis na janela de customização de forma gratuita, com o requisito de que o Pokémon possua boost pelo menos +50. Outros tipos de auras ainda requerem o uso de seus respectivos itens, como as Urns; | |||
* Não é possível combinar Auras e Partículas, ou seja, só é possível deixar ativo uma versão por vez no Pokémon. | |||
''' | ==='''Auras e Particles Disponíveis'''=== | ||
<tabber> | |||
|-|Auras Comuns= | |||
{{#tag:tabber| | |||
Aura Tradicional= | |||
<center> | |||
<table border="0" cellpadding="3" cellspacing="1" class="modernTable" style="padding: 0px; border: 0px; font-size: 10.88px; width: 650px;"> | |||
<tr> | |||
<td style="text-align: center; width: 15px;">[[Arquivo:Purple aura.gif|link=NPC_Shurya_(Nome/Aura)#Auras_Tradicionais_.28NPC_Shurya.29]]<br />'''Purple Aura'''</td> | |||
<td style="text-align: center; width: 15px;">[[Arquivo:Blue aura.gif|link=NPC_Shurya_(Nome/Aura)#Auras_Tradicionais_.28NPC_Shurya.29]]<br />'''Blue Aura'''</td> | |||
<td style="text-align: center; width: 15px;">[[Arquivo:Gray aura.gif |link=NPC_Shurya_(Nome/Aura)#Auras_Tradicionais_.28NPC_Shurya.29]]<br />'''Gray Aura'''</td> | |||
</tr> | |||
</table> | |||
</center> | |||
<center> | |||
<table border="0" cellpadding="3" cellspacing="1" class="modernTable" style="padding: 0px; border: 0px; font-size: 10.88px; width: 650px;"> | |||
<tr> | |||
<td style="text-align: center; width: 15px;">[[Arquivo:Green aura.gif|link=NPC_Shurya_(Nome/Aura)#Auras_Tradicionais_.28NPC_Shurya.29]]<br />'''Green Aura'''</td> | |||
<td style="text-align: center; width: 15px;">[[Arquivo:Orange aura.gif|link=NPC_Shurya_(Nome/Aura)#Auras_Tradicionais_.28NPC_Shurya.29]]<br />'''Orange Aura'''</td> | |||
<td style="text-align: center; width: 15px;">[[Arquivo:Red aura.gif|link=NPC_Shurya_(Nome/Aura)#Auras_Tradicionais_.28NPC_Shurya.29]]<br />'''Red Aura'''</td> | |||
</tr> | |||
</table> | |||
</center> | |||
<center> | |||
<table border="0" cellpadding="3" cellspacing="1" class="modernTable" style="padding: 0px; border: 0px; font-size: 10.88px; width: 650px;"> | |||
<tr> | |||
<td style="text-align: center; width: 15px;">[[Arquivo:White aura.gif|link=NPC_Shurya_(Nome/Aura)#Auras_Tradicionais_.28NPC_Shurya.29]]<br />'''White Aura'''</td> | |||
<td style="text-align: center; width: 15px;">[[Arquivo:Yellow aura.gif|link=NPC_Shurya_(Nome/Aura)#Auras_Tradicionais_.28NPC_Shurya.29]]<br />'''Yellow Aura'''</td> | |||
<td style="text-align: center; width: 15px;">[[Arquivo:Yellow cyan aura.gif |link=NPC_Shurya_(Nome/Aura)#Auras_Tradicionais_.28NPC_Shurya.29]]<br />'''Yellow & Cyan Aura'''</td> | |||
</tr> | |||
</table> | |||
</center> | |||
{{!}}-{{!}} | |||
Urnas= | |||
<br /> | |||
<center> | |||
<table border="0" cellpadding="3" cellspacing="1" class="modernTable" style="padding: 0px; border: 0px; font-size: 10.88px; width: 650px;"> | |||
<tr> | |||
<td style="text-align: center; width: 15px;">[[Arquivo:Raibolturn.gif|link=NPC_Shurya_(Nome/Aura)#Auras_das_Urn]]<br />'''Raibolt Urn'''</td> | |||
<td style="text-align: center; width: 15px;">[[Arquivo:Oreboundurn.gif|link=NPC_Shurya_(Nome/Aura)#Auras_das_Urn]]<br />'''Orebound Urn'''</td> | |||
<td style="text-align: center; width: 15px;">[[Arquivo:Gardestrikeurn.gif|link=NPC_Shurya_(Nome/Aura)#Auras_das_Urn]]<br />'''Gardestrike Urn'''</td> | |||
</tr> | |||
</table> | |||
</center> | |||
<center> | |||
<table border="0" cellpadding="3" cellspacing="1" class="modernTable" style="padding: 0px; border: 0px; font-size: 10.88px; width: 650px;"> | |||
<tr> | |||
<td style="text-align: center; width: 15px;">[[Arquivo:Maleficurn.gif|link=NPC_Shurya_(Nome/Aura)#Auras_das_Urn]]<br />'''Malefic Urn'''</td> | |||
<td style="text-align: center; width: 15px;">[[Arquivo:Psyurn.gif|link=NPC_Shurya_(Nome/Aura)#Auras_das_Urn]]<br />'''Psycraft Urn'''</td> | |||
<td style="text-align: center; width: 15px;">[[Arquivo:Wingeonurn.gif|link=NPC_Shurya_(Nome/Aura)#Auras_das_Urn]]<br />'''Wingeon Urn'''</td> | |||
</tr> | |||
</table> | |||
</center> | |||
<center> | |||
<table border="0" cellpadding="3" cellspacing="1" class="modernTable" style="padding: 0px; border: 0px; font-size: 10.88px; width: 650px;"> | |||
<tr> | |||
<td style="text-align: center; width: 15px;">[[Arquivo:Seavellurn.gif|link=NPC_Shurya_(Nome/Aura)#Auras_das_Urn]]<br />'''Seavell Urn'''</td> | |||
<td style="text-align: center; width: 15px;">[[Arquivo:Volcanicurn.gif|link=NPC_Shurya_(Nome/Aura)#Auras_das_Urn]]<br />'''Volcanic Urn'''</td> | |||
<td style="text-align: center; width: 15px;">[[Arquivo:Naturiaurn.gif |link=NPC_Shurya_(Nome/Aura)#Auras_das_Urn]]<br />'''Naturia Urn'''</td> | |||
</tr> | |||
</table> | |||
</center> | |||
<center> | |||
<table border="0" cellpadding="3" cellspacing="1" class="modernTable" style="padding: 0px; border: 0px; font-size: 10.88px; width: 650px;"> | |||
<tr> | |||
<td style="text-align: center; width: 15px;">[[Arquivo:Ironhard_urn.gif|link=NPC_Shurya_(Nome/Aura)#Auras_das_Urn]]<br />'''Ironhard Urn'''</td> | |||
<td style="text-align: center; width: 15px;">[[Arquivo:Seavurn2.gif|link=NPC_Shurya_(Nome/Aura)#Auras_das_Urn_2]]<br />'''Seavell Urn 2'''</td> | |||
<td style="text-align: center; width: 15px;">[[Arquivo:Volcurn2.gif|link=NPC_Shurya_(Nome/Aura)#Auras_das_Urn_2]]<br />'''Volcanic Urn 2'''</td> | |||
</tr> | |||
</table> | |||
</center> | |||
<center> | <center> | ||
{| class=" | <table border="0" cellpadding="3" cellspacing="1" class="modernTable" style="padding: 0px; border: 0px; font-size: 10.88px; width: 650px;"> | ||
<tr> | |||
<td style="text-align: center; width: 15px;">[[Arquivo:Natuurn2.gif|link=NPC_Shurya_(Nome/Aura)#Auras_das_Urn_2]]<br />'''Naturia Urn 2'''</td> | |||
<td style="text-align: center; width: 15px;">[[Arquivo:MaleficUrn2.gif|link=NPC_Shurya_(Nome/Aura)#Auras_das_Urn_2]]<br />'''Malefic Urn 2'''</td> | |||
</tr> | |||
</table> | |||
</center> | |||
'''• As urnas Seavell, Volcanic e Naturia 2 podem ser adquiridas através de quests.'''<br> | |||
'''• A urna Malefic 2 podem ser adquiridas através da dungeon semanal "A maldição de Lavender".''' | |||
<table class="seeMore"> | |||
<tr> | |||
<td class="seeMore__image">[[Arquivo:Telekinetic-compass.gif|link=]]</td> | |||
<td> '''Veja mais: [[Stacy Quest]], [[Ditto's Mystery Quest]]'''</td> | |||
</tr> | |||
</table> | |||
}} | |||
|-|Particle Aura= | |||
{{#tag:tabber| | |||
Smoke Aura= | |||
<center> | |||
<table border="0" cellpadding="3" cellspacing="1" class="modernTable" style="padding: 0px; border: 0px; font-size: 10.88px; width: 650px;"> | |||
<tr> | |||
<td style="text-align: center; width: 15px;">[[Arquivo:Smoke purple.gif|link=NPC_Shurya_(Nome/Aura)#Smoke_Aura]]<br />'''Purple Smoke Aura'''</td> | |||
<td style="text-align: center; width: 15px;">[[Arquivo:Smoke blue.gif|link=NPC_Shurya_(Nome/Aura)#Smoke_Aura]]<br />'''Blue Smoke Aura'''</td> | |||
<td style="text-align: center; width: 15px;">[[Arquivo:Smoke gray.gif|link=NPC_Shurya_(Nome/Aura)#Smoke_Aura]]<br />'''Gray Smoke Aura'''</td> | |||
<td style="text-align: center; width: 15px;">[[Arquivo:Smoke red.gif|link=NPC_Shurya_(Nome/Aura)#Smoke_Aura]]<br />'''Red Smoke Aura'''</td> | |||
</tr> | |||
</table> | |||
</center> | |||
<center> | |||
<table border="0" cellpadding="3" cellspacing="1" class="modernTable" style="padding: 0px; border: 0px; font-size: 10.88px; width: 650px;"> | |||
<tr> | |||
<td style="text-align: center; width: 15px;">[[Arquivo:Smoke white.gif |link=NPC_Shurya_(Nome/Aura)#Smoke_Aura]]<br />'''White Smoke Aura'''</td> | |||
<td style="text-align: center; width: 15px;">[[Arquivo:Smoke green.gif|link=NPC_Shurya_(Nome/Aura)#Smoke_Aura]]<br />'''Green Smoke Aura'''</td> | |||
<td style="text-align: center; width: 15px;">[[Arquivo:Smoke yellow.gif|link=NPC_Shurya_(Nome/Aura)#Smoke_Aura]]<br />'''Yellow Smoke Aura'''</td> | |||
</tr> | |||
</table> | |||
</center> | |||
{{!}}-{{!}} | |||
Heart Aura= | |||
<center> | |||
<table border="0" cellpadding="3" cellspacing="1" class="modernTable" style="padding: 0px; border: 0px; font-size: 10.88px; width: 650px;"> | |||
<tr> | |||
<td style="text-align: center; width: 15px;">[[Arquivo:Heart pink.gif|link=NPC_Shurya_(Nome/Aura)#Heart_Aura]]<br />'''Pink Heart Aura'''</td> | |||
<td style="text-align: center; width: 15px;">[[Arquivo:Heart red.gif|link=NPC_Shurya_(Nome/Aura)#Heart_Aura]]<br />'''Red Heart Aura'''</td> | |||
</tr> | |||
</table> | |||
{{!}}-{{!}} | |||
Star Aura= | |||
<center> | |||
<table border="0" cellpadding="3" cellspacing="1" class="modernTable" style="padding: 0px; border: 0px; font-size: 10.88px; width: 650px;"> | |||
<tr> | |||
<td style="text-align: center; width: 15px;">[[Arquivo:Star_blue_green.gif|link=NPC_Shurya_(Nome/Aura)#Star_Aura]]<br />'''Blue & Green Star Aura'''</td> | |||
<td style="text-align: center; width: 15px;">[[Arquivo:Star_blue_white.gif|link=NPC_Shurya_(Nome/Aura)#Star_Aura]]<br />'''Blue & White Star Aura'''</td> | |||
<td style="text-align: center; width: 15px;">[[Arquivo:Star_yellow.gif|link=NPC_Shurya_(Nome/Aura)#Star_Aura]]<br />'''Yellow Star Aura'''</td> | |||
</tr> | |||
</table> | |||
</center> | |||
{{!}}-{{!}} | |||
Skull Aura= | |||
<center> | |||
<table border="0" cellpadding="3" cellspacing="1" class="modernTable" style="padding: 0px; border: 0px; font-size: 10.88px; width: 650px;"> | |||
<td style="text-align: center; width: 15px;">[[Arquivo:Skull purple.gif|link=NPC_Shurya_(Nome/Aura)#Skull_Aura]]<br />'''Purple Skull Aura'''</td> | |||
<td style="text-align: center; width: 15px;">[[Arquivo:Skull green.gif|link=NPC_Shurya_(Nome/Aura)#Skull_Aura]]<br />'''Green Skull Aura'''</td> | |||
<td style="text-align: center; width: 15px;">[[Arquivo:Skull white.gif|link=NPC_Shurya_(Nome/Aura)#Skull_Aura]]<br />'''White Skull Aura'''</td> | |||
<tr> | |||
</tr> | |||
</table> | |||
</center> | |||
{{!}}-{{!}} | |||
Pulse Aura= | |||
=== <font size='3'> <center>Pulse Aura</center></font> === | |||
<center> | |||
<table border="0" cellpadding="3" cellspacing="1" class="modernTable" style="padding: 0px; border: 0px; font-size: 10.88px; width: 650px;"> | |||
<tr> | |||
<td style="text-align: center; width: 15px;">[[Arquivo:Pulse black.gif|link=NPC_Shurya_(Nome/Aura)#Pulse_Aura]]<br />'''Black Pulse Aura'''</td> | |||
<td style="text-align: center; width: 15px;">[[Arquivo:Pulse blue.gif|link=NPC_Shurya_(Nome/Aura)#Pulse_Aura]]<br />'''Blue Pulse Aura'''</td> | |||
<td style="text-align: center; width: 15px;">[[Arquivo:Pulse cyan.gif|link=NPC_Shurya_(Nome/Aura)#Pulse_Aura]]<br />'''Cyan Pulse Aura'''</td> | |||
<td style="text-align: center; width: 15px;">[[Arquivo:Pulse green.gif|link=NPC_Shurya_(Nome/Aura)#Pulse_Aura]]<br />'''Green Pulse Aura'''</td> | |||
</tr> | |||
</table> | |||
</center> | |||
<center> | |||
<table border="0" cellpadding="3" cellspacing="1" class="modernTable" style="padding: 0px; border: 0px; font-size: 10.88px; width: 650px;"> | |||
<tr> | |||
<td style="text-align: center; width: 15px;">[[Arquivo:Pulse light blue.gif|link=NPC_Shurya_(Nome/Aura)#Pulse_Aura]]<br />'''Light Blue Pulse Aura'''</td> | |||
<td style="text-align: center; width: 15px;">[[Arquivo:Pulse orange.gif|link=NPC_Shurya_(Nome/Aura)#Pulse_Aura]]<br />'''Orange Pulse Aura'''</td> | |||
<td style="text-align: center; width: 15px;">[[Arquivo:Pulse pink.gif|link=NPC_Shurya_(Nome/Aura)#Pulse_Aura]]<br />'''Pink Pulse Aura'''</td> | |||
<td style="text-align: center; width: 15px;">[[Arquivo:Pulse purple.gif|link=NPC_Shurya_(Nome/Aura)#Pulse_Aura]]<br />'''Purple Pulse Aura'''</td> | |||
</tr> | |||
</table> | |||
</center> | |||
<center> | |||
<table border="0" cellpadding="3" cellspacing="1" class="modernTable" style="padding: 0px; border: 0px; font-size: 10.88px; width: 650px;"> | |||
<tr> | |||
<td style="text-align: center; width: 15px;">[[Arquivo:Pulse red.gif|link=NPC_Shurya_(Nome/Aura)#Pulse_Aura]]<br />'''Red Pulse Aura'''</td> | |||
<td style="text-align: center; width: 15px;">[[Arquivo:Pulse_white.gif|link=NPC_Shurya_(Nome/Aura)#Pulse_Aura]]<br />'''White Pulse Aura'''</td> | |||
<td style="text-align: center; width: 15px;">[[Arquivo:Pulse_yellow.gif|link=NPC_Shurya_(Nome/Aura)#Pulse_Aura]]<br />'''Yellow Pulse Aura'''</td> | |||
</tr> | |||
</table> | |||
</center> | |||
}} | |||
|-|Premier Aura= | |||
<center> | |||
<table border="0" cellpadding="3" cellspacing="1" class="modernTable" style="padding: 0px; border: 0px; font-size: 10.88px; width: 650px;"> | |||
<tr> | |||
<td style="text-align: center; width: 15px;">[[Arquivo:Black_e_Red_Premier_Aura.gif|link=NPC_Shurya_(Nome/Aura)#Pulse_Aura]]<br />'''Black/Red Premier Aura'''</td> | |||
<td style="text-align: center; width: 15px;">[[Arquivo:Black_e_White_Premier_Aura.gif|link=NPC_Shurya_(Nome/Aura)#Pulse_Aura]]<br />'''Black/White Premier Aura'''</td> | |||
<td style="text-align: center; width: 15px;">[[Arquivo:Black_e_Yellow_Premier_Aura.gif|link=NPC_Shurya_(Nome/Aura)#Pulse_Aura]]<br />'''Black/Yellow Premier Aura'''</td> | |||
<td style="text-align: center; width: 15px;">[[Arquivo:Blue_e_Green_Premier_Aura.gif|link=NPC_Shurya_(Nome/Aura)#Pulse_Aura]]<br />'''Blue/Green Premier Aura'''</td> | |||
</tr> | |||
</table> | |||
</center> | |||
<center> | |||
<table border="0" cellpadding="3" cellspacing="1" class="modernTable" style="padding: 0px; border: 0px; font-size: 10.88px; width: 650px;"> | |||
<tr> | |||
<td style="text-align: center; width: 15px;">[[Arquivo:Pink_e_Purple_Premier_Aura.gif|link=NPC_Shurya_(Nome/Aura)#Pulse_Aura]]<br />'''Pink/Purple Premier Aura'''</td> | |||
<td style="text-align: center; width: 15px;">[[Arquivo:Premier_Aura.gif|link=NPC_Shurya_(Nome/Aura)#Pulse_Aura]]<br />'''Rainbow Premier Aura'''</td> | |||
<td style="text-align: center; width: 15px;">[[Arquivo:Red_e_Yellow_Premier_Aura.gif|link=NPC_Shurya_(Nome/Aura)#Pulse_Aura]]<br />'''Red/Yellow Premier Aura'''</td> | |||
<td style="text-align: center; width: 15px;">[[Arquivo:White_e_Green_Premier_Aura.gif|link=NPC_Shurya_(Nome/Aura)#Pulse_Aura]]<br />'''White/Green Premier Aura'''</td> | |||
</tr> | |||
</table> | |||
</center> | |||
<center> | |||
<table border="0" cellpadding="3" cellspacing="1" class="modernTable" style="padding: 0px; border: 0px; font-size: 10.88px; width: 650px;"> | |||
<tr> | |||
<td style="text-align: center; width: 15px;">[[Arquivo:White_e_Pink_Premier_Aura.gif|link=NPC_Shurya_(Nome/Aura)#Pulse_Aura]]<br />'''White/Pink Premier Aura'''</td> | |||
<td style="text-align: center; width: 15px;">[[Arquivo:Yellow_e_Green_Premier_Aura.gif|link=NPC_Shurya_(Nome/Aura)#Pulse_Aura]]<br />'''Yellow/Green Premier Aura'''</td> | |||
</tr> | |||
</table> | |||
</center> | |||
</tabber> | |||
=='''Cápsulas'''== | |||
Cosmético para quando o Pokémon for solto ou recolhido. </br> | |||
<center>[[arquivo:Painelcapsulas1.png|link=]]</center> </br></br> | |||
Algumas de suas versões assim como suas formas de obtenção podem ser vistas na página de '''[[Ball Capsule|Cápsulas]] | |||
''' </br></br> | |||
Após realizar qualquer alteração, clicar em Confirmar para aplicar e salvar.</br></br> | |||
<center><span class="mw-customtoggle-PPPB"><font size="2"> '''>>> Clique aqui para ver na prática <<<''' </font> </span><br></center> | |||
<center><div class="mw-collapsible mw-collapsed" id="mw-customcollapsible-PPPB"> | |||
{| | |||
|[[Arquivo:Painelcapsulas1gif.gif|link=]] | |||
|- | |||
|} | |||
</center></br> | |||
=='''Pinturas'''== | |||
Cosmético para quando o Pokémon for solto ou recolhido. | |||
<center>[[arquivo:Painelpinturas12.png|link=]]</center> | |||
==='''Legenda'''=== | |||
# Variedades das versões do cosmético disponíveis no jogo. | |||
# Item(s) necessário(s) para habilitar o cosmético ao Pokémon. </br></br> | |||
'''Observação:''' Possuindo os itens necessários para desbloquear alguma das versões em mãos, basta clicar em Desbloquear que será habilitado para uso. </br></br> | |||
Após feita qualquer modificação no painel, clique em Confirmar para ser aplicado e salvo. | |||
<center><span class="mw-customtoggle-PPPB"><font size="2"> '''>>> Clique aqui para ver na prática <<<''' </font> </span><br></center> | |||
<center><div class="mw-collapsible mw-collapsed" id="mw-customcollapsible-PPPB"> | |||
{| | |||
|[[Arquivo:Painelpinturas1.gif|link=]] | |||
|- | |||
|} | |||
</center> | |||
=='''Troca de nome do Pokémon'''== | |||
Para realizar a troca do nome do Pokémon, é necessário que ele tenha pelo menos boost +5. O jogador deve abrir a interface de personalização e, na parte superior direita, terá as opções de edição. | |||
<center>[[Arquivo:Trocanickpoke.png|link=]]</center> | |||
==='''Legenda'''=== | |||
# '''Lápis''' - Troca do nome do Pokémon. | |||
# '''Borracha''' - Limpa o nome do Pokémon, assim voltando ao nome base. </br></br> | |||
'''Observações:''' | |||
*A Primeira troca de nome é gratuita. No entanto, para alterar o nome de um Pokémon que já teve ele trocado uma vez, é necessário pagar 1 Diamond. | |||
*Antes de escolher qualquer nome, é importante verificar se ele não infringe nenhuma das regras internas da PokeXGames. Consulte as regras [https://support.pokexgames.com/#/rules aqui]]. | |||
*Toda primeira letra dos nomes que possuam mais de uma palavra, terão a letra maiúscula. (Ex: Tico E Teco) | |||
Após feita qualquer modificação no painel, clique em Confirmar para ser aplicado e salvo. </br></br> | |||
<center><span class="mw-customtoggle-PPPB"><font size="2"> '''>>> Clique aqui para ver na prática <<<''' </font> </span><br></center> | |||
<center><div class="mw-collapsible mw-collapsed" id="mw-customcollapsible-PPPB"> | |||
{| | |||
|[[Arquivo:Paineltrocadenomepoke.gif|link=]] | |||
|- | |- | ||
|} | |} | ||
</center> | </center> | ||
= | ='''DEX TMs'''= | ||
=='''ARIADOS'''== | |||
<center>[[Arquivo:Shiny_ariados_2.gif|link=Shiny Ariados]]</center> | |||
== '''Informações Gerais''' == | |||
'''Nome:''' Shiny Ariados<br /> | |||
'''Level:''' 100<br /> | |||
'''Elemento:''' Bug<br /> | |||
'''Habilidades:''' Light, Cut and Dig<br /> | |||
'''Boost:''' Cocoon Stone (2)<br /> | |||
'''Materia:''' Naturia Mastered. | |||
== '''Evoluções''' == | |||
'''Shiny Ariados''' precisa de Level 100.<br /> | |||
== '''Descrição:''' == | |||
Este é um Ariados com uma mutação rara. É muito mais forte que o normal. Sua cor é púrpura, pois quase todo o veneno que deveria ter foi para sua carapaça. | |||
== '''Movimentos''' == | |||
{| border="0" style="border-collapse:collapse" | |||
|- align="center" style="background-color: #E6E6FA;" | |||
! rowspan="2" | M1 | |||
| width="10px" | | |||
| align="left" | Sticky Web (25s) | |||
| width="50px" rowspan="2" | | |||
| rowspan="2" align="right" | [[Arquivo:Target.png|Target]] [[Arquivo:Stun.png|Stun]] | |||
| rowspan="2" | [[Arquivo:Bug.png|Bug|link=Naturia]] | |||
|- align="center" style="background-color: #E6E6FA;" | |||
| width="10px" | | |||
| align="left" | Level 525 | |||
|- align="center" | |||
! rowspan="2" | M2 | |||
| width="10px" | | |||
| align="left" | Bug Bite (10s) | |||
| width="50px" rowspan="2" | | |||
| rowspan="2" align="right" | [[Arquivo:Target.png|Target]] [[Arquivo:Damage.png|Damage]] | |||
| rowspan="2" | [[Arquivo:Bug.png|Bug|link=Naturia]] | |||
|- align="center" | |||
| width="10px" | | |||
| align="left" | Level 525 | |||
|- align="center" style="background-color: #E6E6FA;" | |||
! rowspan="2" | M3 | |||
| width="10px" | | |||
| align="left" | Poison Sting (20s) | |||
| width="50px" rowspan="2" | | |||
| rowspan="2" align="right" | [[Arquivo:Target.png|Target]] [[Arquivo:Damage.png|Damage]] [[Arquivo:PoisonStatus.png|Poison]] | |||
| rowspan="2" | [[Arquivo:Poison1.png|Poison|link=Malefic]] | |||
|- align="center" style="background-color: #E6E6FA;" | |||
| width="10px" | | |||
| align="left" | Level 525 | |||
|- align="center" | |||
! rowspan="2" | M4 | |||
| width="10px" | | |||
| align="left" | Fury Swipes (20s) | |||
| width="50px" rowspan="2" | | |||
| rowspan="2" align="right" | [[Arquivo:Target.png|Target]] [[Arquivo:Damage.png|Damage]] | |||
| rowspan="2" | [[Arquivo:Normal1.png|Normal|link=Gardestrike]] | |||
|- align="center" | |||
| width="10px" | | |||
| align="left" | Level 525 | |||
|- align="center" style="background-color: #E6E6FA;" | |||
! rowspan="2" | M5 | |||
| width="10px" | | |||
| align="left" | X-Scissor (50s) | |||
| width="50px" rowspan="2" | | |||
| rowspan="2" align="right" | [[Arquivo:AOE.png|AOE]] [[Arquivo:Damage.png|Damage]] | |||
| rowspan="2" | [[Arquivo:Bug.png|Bug|link=Naturia]] | |||
|- align="center" style="background-color: #E6E6FA;" | |||
| width="10px" | | |||
| align="left" | Level 525 | |||
|- align="center" | |||
! rowspan="2" | M6 | |||
| width="10px" | | |||
| align="left" | Pin Missile (25s) | |||
| width="50px" rowspan="2" | | |||
| rowspan="2" align="right" | [[Arquivo:AOE.png|AOE]] [[Arquivo:Damage.png|Damage]] | |||
| rowspan="2" | [[Arquivo:Bug.png|Bug|link=Naturia]] | |||
|- align="center" | |||
| width="10px" | | |||
| align="left" | Level 525 | |||
|- align="center" style="background-color: #E6E6FA;" | |||
! rowspan="2" | M7 | |||
| width="10px" | | |||
| align="left" | Bug Buzz (50s) | |||
| width="50px" rowspan="2" | | |||
| rowspan="2" align="right" | [[Arquivo:AOE.png|AOE]] [[Arquivo:Damage.png|Damage]] | |||
| rowspan="2" | [[Arquivo:Bug.png|Bug|link=Naturia]] | |||
|- align="center" style="background-color: #E6E6FA;" | |||
| width="10px" | | |||
| align="left" | Level 525 | |||
|- align="center" | |||
! rowspan="2" | M8 | |||
| width="10px" | | |||
| align="left" | Spider Web (40s) | |||
| width="50px" rowspan="2" | | |||
| rowspan="2" align="right" | [[Arquivo:AOE.png|AOE]] [[Arquivo:Damage.png|Damage]] [[Arquivo:Stun.png|Stun]] | |||
| rowspan="2" | [[Arquivo:Bug.png|Bug|link=Naturia]] | |||
|- align="center" | |||
| width="10px" | | |||
| align="left" | Level 525 | |||
|- align="center" style="background-color: #E6E6FA;" | |||
! rowspan="2" | M9 | |||
| width="10px" | | |||
| align="left" | Sword Dance (50s) | |||
| width="50px" rowspan="2" | | |||
| rowspan="2" align="right" | [[Arquivo:Self.png|Self]] [[Arquivo:Buff.png|Buff]] | |||
| rowspan="2" | [[Arquivo:Normal1.png|Normal|link=Gardestrike]] | |||
|- align="center" style="background-color: #E6E6FA;" | |||
| width="10px" | | |||
| align="left" | Level 525 | |||
|} | |||
== '''Efetividades''' == | |||
'''Muito Efetivo:''' Fire, Flying and Rock.<br /> | |||
'''Normal:''' Normal, Water, Electric, Ice, Poison, Psychic, Bug, Ghost, Dragon, Steel, Dark, Crystal and Fairy.<br /> | |||
'''Muito Inefetivo:''' Grass, Fighting and Ground.<br /> | |||
== '''Outras Versões''' == | |||
{| class="wikitable" | |||
|- style="vertical-align:top; text-align=center;" | |||
| style="width:50px; text-align:center;" | <b>[[Arquivo:168-Ariados.png|link=Ariados]]</b> | |||
| style="width:150px; text-align:center;" | <b>'''[[Ariados]]'''</b> | |||
|- | |||
| style="width:50px; text-align:center;" | <b>[[Arquivo:Sh ariados.png|link=Shiny Ariados]]</b> | |||
| style="width:150px; text-align:center;" | <b>'''[[Shiny Ariados]]'''</b> | |||
|} | |||
=='''DODRIO'''== | |||
<center>[[Arquivo:Shinydodrio.gif|link=Shiny Dodrio]]</center> | |||
== '''Informações Gerais''' == | |||
'''Nome:''' Shiny Dodrio<br /> | |||
'''Level:''' 100<br /> | |||
'''Elemento:''' Flying<br /> | |||
'''Habilidades:''' Ride and Headbutt.<br /> | |||
'''Boost:''' Feather Stone (2)<br /> | |||
'''Materia:''' Wingeon Mastered | |||
== '''Evoluções''' == | |||
'''Shiny Dodrio''' precisa de Level 100.<br /> | |||
== '''Descrição:''' == | |||
Este Dodrio exclusivo usa seus três cérebros para executar planos complexos. Enquanto duas cabeças dormem, diz-se que uma cabeça permanece acordada. | |||
== '''Movimentos''' == | |||
{| border="0" style="border-collapse:collapse" | |||
|- align="center" style="background-color: #E6E6FA;" | |||
! rowspan="2" | M1 | |||
| width="10px" | | |||
| align="left" | Peck (12s) | |||
| width="50px" rowspan="2" | | |||
| rowspan="2" align="right" | [[Arquivo:Target.png|Target]] [[Arquivo:Damage.png|Damage]] | |||
| rowspan="2" | [[Arquivo:Flying.png|Flying|link=Wingeon]] | |||
|- align="center" style="background-color: #E6E6FA;" | |||
| width="10px" | | |||
| align="left" | Level 525 | |||
|- align="center" | |||
! rowspan="2" | M2 | |||
| width="10px" | | |||
| align="left" | Pluck (15s) | |||
| width="50px" rowspan="2" | | |||
| rowspan="2" align="right" | [[Arquivo:Target.png|Target]] [[Arquivo:Damage.png|Damage]] | |||
| rowspan="2" | [[Arquivo:Flying.png|Flying|link=Wingeon]] | |||
|- align="center" | |||
| width="10px" | | |||
| align="left" | Level 525 | |||
|- align="center" style="background-color: #E6E6FA;" | |||
! rowspan="2" | M3 | |||
| width="10px" | | |||
| align="left" | Swift (15s) | |||
| width="50px" rowspan="2" | | |||
| rowspan="2" align="right" | [[Arquivo:Target.png|Target]] [[Arquivo:Damage.png|Damage]] | |||
| rowspan="2" | [[Arquivo:Normal1.png|Normal|link=Gardestrike]] | |||
|- align="center" style="background-color: #E6E6FA;" | |||
| width="10px" | | |||
| align="left" | Level 525 | |||
|- align="center" | |||
! rowspan="2" | M4 | |||
| width="10px" | | |||
| align="left" | Tri-Attack (30s) | |||
| width="50px" rowspan="2" | | |||
| rowspan="2" align="right" | [[Arquivo:Target.png|Target]] [[Arquivo:Damage.png|Damage]] | |||
| rowspan="2" | [[Arquivo:Normal1.png|Normal|link=Gardestrike]] | |||
|- align="center" | |||
| width="10px" | | |||
| align="left" | Level 525 | |||
|- align="center" style="background-color: #E6E6FA;" | |||
! rowspan="2" | M5 | |||
| width="10px" | | |||
| align="left" | Brave Bird (40s) | |||
| width="50px" rowspan="2" | | |||
| rowspan="2" align="right" | [[Arquivo:AOE.png|AOE]] [[Arquivo:Damage.png|Damage]] [[Arquivo:Stun.png|Stun]] [[Arquivo:Buff.png|Buff]] | |||
| rowspan="2" | [[Arquivo:Flying.png|Flying|link=Wingeon]] | |||
|- align="center" style="background-color: #E6E6FA;" | |||
| width="10px" | | |||
| align="left" | Level 525 | |||
|- align="center" | |||
! rowspan="2" | M6 | |||
| width="10px" | | |||
| align="left" | Drill Peck (40s) | |||
| width="50px" rowspan="2" | | |||
| rowspan="2" align="right" | [[Arquivo:AOE.png|AOE]] [[Arquivo:Damage.png|Damage]] | |||
| rowspan="2" | [[Arquivo:Flying.png|Flying|link=Wingeon]] | |||
|- align="center" | |||
| width="10px" | | |||
| align="left" | Level 525 | |||
|- align="center" style="background-color: #E6E6FA;" | |||
! rowspan="2" | M7 | |||
| width="10px" | | |||
| align="left" | Sky Attack (50s) | |||
| width="50px" rowspan="2" | | |||
| rowspan="2" align="right" | [[Arquivo:AOE.png|AOE]] [[Arquivo:Damage.png|Damage]] | |||
| rowspan="2" | [[Arquivo:Flying.png|Flying|link=Wingeon]] | |||
|- align="center" style="background-color: #E6E6FA;" | |||
| width="10px" | | |||
| align="left" | Level 525 | |||
|- align="center" | |||
! rowspan="2" | M8 | |||
| width="10px" | | |||
| align="left" | Stampede (50s) | |||
| width="50px" rowspan="2" | | |||
| rowspan="2" align="right" | [[Arquivo:AOE.png|AOE]] [[Arquivo:Damage.png|Damage]] | |||
| rowspan="2" | [[Arquivo:Flying.png|Flying|link=Wingeon]] | |||
|- align="center" | |||
| width="10px" | | |||
| align="left" | Level 525 | |||
|- align="center" style="background-color: #E6E6FA;" | |||
! rowspan="2" | M9 | |||
| width="10px" | | |||
| align="left" | Sword Dance (50s) | |||
| width="50px" rowspan="2" | | |||
| rowspan="2" align="right" | [[Arquivo:Self.png|Self]] [[Arquivo:Buff.png|Buff]] | |||
| rowspan="2" | [[Arquivo:Normal1.png|Normal|link=Gardestrike]] | |||
|- align="center" style="background-color: #E6E6FA;" | |||
| width="10px" | | |||
| align="left" | Level 525 | |||
|} | |||
== '''Efetividades''' == | |||
'''Muito Efetivo:''' Electric, Ice and Rock.<br /> | |||
'''Normal:''' Normal, Fire, Water, Poison, Flying, Psychic, Ghost, Dragon, Steel, Dark, Crystal and Fairy.<br /> | |||
'''Muito Inefetivo:''' Grass, Fighting and Bug.<br /> | |||
'''Nulo:''' Ground.<br /> | |||
== '''Outras Versões''' == | |||
{| class="wikitable" | |||
|- style="vertical-align:top; text-align=center;" | |||
| style="width:50px; text-align:center;" | <b>[[Arquivo:085-Dodrio.png|link=Dodrio]]</b> | |||
| style="width:150px; text-align:center;" | <b>'''[[Dodrio]]'''</b> | |||
|- | |||
| style="width:50px; text-align:center;" | <b>[[Arquivo:085-shDodrio.png|link=Shiny Dodrio]]</b> | |||
| style="width:150px; text-align:center;" | <b>'''[[Shiny Dodrio]]'''</b> | |||
|} | |||
=='''MAGNETON'''== | |||
<center>[[Arquivo:shimagneton.gif|link=Shiny Magneton]]</center> | |||
== '''Informações Gerais''' == | |||
'''Nome:''' Shiny Magneton<br /> | |||
'''Level:''' 100<br /> | |||
'''Elemento:''' Electric / Steel<br /> | |||
'''Habilidades:''' Light.<br /> | |||
'''Boost:''' Thunder Stone (2)<br /> | |||
'''Materia:''' Raibolt Mastered ou Ironhard Mastered | |||
== '''Evoluções''' == | |||
'''Shiny Magneton''' precisa de Level 100.<br /> | |||
== '''Descrição:''' == | |||
Três magnemitas brilhantes e gigantes estão ligadas por uma forte força magnética. Dores de ouvido ocorrerão, caso você chuegue muito perto. | |||
== '''Movimentos''' == | |||
{| border="0" style="border-collapse:collapse" | |||
|- align="center" style="background-color: #E6E6FA;" | |||
! rowspan="2" | M1 | |||
| width="10px" | | |||
| align="left" | Spark (15s) | |||
| width="50px" rowspan="2" | | |||
| rowspan="2" align="right" | [[Arquivo:Target.png|Target]] [[Arquivo:Damage.png|Damage]] | |||
| rowspan="2" | [[Arquivo:Electric.png|Electric|link=Raibolt]] | |||
|- align="center" style="background-color: #E6E6FA;" | |||
| width="10px" | | |||
| align="left" | Level 525 | |||
|- align="center" | |||
! rowspan="2" | M2 | |||
| width="10px" | | |||
| align="left" | Thunder Shock (18s) | |||
| width="50px" rowspan="2" | | |||
| rowspan="2" align="right" | [[Arquivo:Target.png|Target]] [[Arquivo:Damage.png|Damage]] | |||
| rowspan="2" | [[Arquivo:Electric.png|Electric|link=Raibolt]] | |||
|- align="center" | |||
| width="10px" | | |||
| align="left" | Level 525 | |||
|- align="center" style="background-color: #E6E6FA;" | |||
! rowspan="2" | M3 | |||
| width="10px" | | |||
| align="left" | Scrap Throw (15s) | |||
| width="50px" rowspan="2" | | |||
| rowspan="2" align="right" | [[Arquivo:Target.png|Target]] [[Arquivo:Damage.png|Damage]] | |||
| rowspan="2" | [[Arquivo:Steel.png|Steel|link=Ironhard]] | |||
|- align="center" style="background-color: #E6E6FA;" | |||
| width="10px" | | |||
| align="left" | Level 525 | |||
|- align="center" | |||
! rowspan="2" | M4 | |||
| width="10px" | | |||
| align="left" | Tri-Attack (30s) | |||
| width="50px" rowspan="2" | | |||
| rowspan="2" align="right" | [[Arquivo:Target.png|Target]] [[Arquivo:Damage.png|Damage]] | |||
| rowspan="2" | [[Arquivo:Normal1.png|Normal|link=Gardestrike]] | |||
|- align="center" | |||
| width="10px" | | |||
| align="left" | Level 525 | |||
|- align="center" style="background-color: #E6E6FA;" | |||
! rowspan="2" | M5 | |||
| width="10px" | | |||
| align="left" | Metal Sound (40s) | |||
| width="50px" rowspan="2" | | |||
| rowspan="2" align="right" | [[Arquivo:AOE.png|AOE]] [[Arquivo:Damage.png|Damage]] [[Arquivo:Silence.png|Silence]] | |||
| rowspan="2" | [[Arquivo:Steel.png|Steel|link=Ironhard]] | |||
|- align="center" style="background-color: #E6E6FA;" | |||
| width="10px" | | |||
| align="left" | Level 525 | |||
|- align="center" | |||
! rowspan="2" | M6 | |||
| width="10px" | | |||
| align="left" | Flash Cannon (40s) | |||
| width="50px" rowspan="2" | | |||
| rowspan="2" align="right" | [[Arquivo:AOE.png|AOE]] [[Arquivo:Damage.png|Damage]] | |||
| rowspan="2" | [[Arquivo:Steel.png|Steel|link=Ironhard]] | |||
|- align="center" | |||
| width="10px" | | |||
| align="left" | Level 525 | |||
|- align="center" style="background-color: #E6E6FA;" | |||
! rowspan="2" | M7 | |||
| width="10px" | | |||
| align="left" | Heavy Metal (50s) | |||
| width="50px" rowspan="2" | | |||
| rowspan="2" align="right" | [[Arquivo:AOE.png|AOE]] [[Arquivo:Damage.png|Damage]] | |||
| rowspan="2" | [[Arquivo:Steel.png|Steel|link=Ironhard]] | |||
|- align="center" style="background-color: #E6E6FA;" | |||
| width="10px" | | |||
| align="left" | Level 525 | |||
|- align="center" | |||
! rowspan="2" | M8 | |||
| width="10px" | | |||
| align="left" | Magnet Bomb (50s) | |||
| width="50px" rowspan="2" | | |||
| rowspan="2" align="right" | [[Arquivo:AOE.png|AOE]] [[Arquivo:Damage.png|Damage]] | |||
| rowspan="2" | [[Arquivo:Steel.png|Steel|link=Ironhard]] | |||
|- align="center" | |||
| width="10px" | | |||
| align="left" | Level 525 | |||
|- align="center" style="background-color: #E6E6FA;" | |||
! rowspan="2" | M9 | |||
| width="10px" | | |||
| align="left" | Gravity (40s) | |||
| width="50px" rowspan="2" | | |||
| rowspan="2" align="right" | [[Arquivo:AOE.png|AOE]] [[Arquivo:Damage.png|Damage]] [[arquivo:STUCK.png|Stuck]] | |||
| rowspan="2" | [[Arquivo:NeutralICON.png|Neutral|link=Clãs]] | |||
|- align="center" style="background-color: #E6E6FA;" | |||
| width="10px" | | |||
| align="left" | Level 525 | |||
|- align="center" | |||
! rowspan="2" | P | |||
| width="10px" | | |||
| align="left" | Tri-Vision | |||
| width="50px" rowspan="2" | | |||
| rowspan="2" align="right" | [[Arquivo:Passive.png|Passive]] [[Arquivo:Buff.png|Buff]] | |||
| rowspan="2" | [[Arquivo:NeutralICON.png|Neutral|link=Clãs]] | |||
|- align="center" | |||
| width="10px" | | |||
| align="left" | Level 525 | |||
|} | |||
== '''Efetividades''' == | |||
'''Muito Efetivo:''' Ground.<br /> | |||
'''Efetivo:''' Fire and Fighting.<br /> | |||
'''Normal:''' Water, Ghost, Dark and Crystal.<br /> | |||
'''Inefetivo:''' Normal, Grass, Electric, Ice, Psychic, Bug, Rock, Dragon and Fairy.<br /> | |||
'''Muito Inefetivo:''' Flying and Steel.<br /> | |||
'''Nulo:''' Poison.<br /> | |||
== '''Outras Versões''' == | |||
{| class="wikitable" | |||
|- style="vertical-align:top; text-align=center;" | |||
| style="width:50px; text-align:center;" | <b>[[Arquivo:082-Magneton.png|link=Magneton]]</b> | |||
| style="width:150px; text-align:center;" | <b>'''[[Magneton]]'''</b> | |||
|- style="vertical-align:top; text-align=center;" | |||
| style="width:50px; text-align:center;" | <b>[[Arquivo:082-Sh Magneton.png|link=Shiny Magneton]]</b> | |||
| style="width:150px; text-align:center;" | <b>'''[[Shiny Magneton]]'''</b> | |||
|} | |||
=='''POLITOED'''== | |||
<center>[[Arquivo:ShiPolitoed.gif|link=Shiny Politoed]]</center> | |||
== '''Informações Gerais''' == | |||
'''Nome:''' Shiny Politoed<br /> | |||
'''Level:''' 100<br /> | |||
'''Elemento:''' Water<br /> | |||
'''Habilidades:''' Surf and Headbutt.<br /> | |||
'''Boost:''' Water Stone (2).<br /> | |||
'''Materia:''' Seavell Mastered. | |||
== '''Evoluções''' == | |||
'''Shiny Politoed''' precisa de Level 100.<br /> | |||
== '''Descrição:''' == | |||
Encontramos esse raro Politoed em mar aberto, os cabelos encaracolados na cabeça de Politoeds são uma prova de seu status de rei. Dizem que quanto mais longo e enrolado o cabelo, mais respeito esse Pokémon ganha de seus pares. | |||
== '''Movimentos''' == | |||
{| border="0" style="border-collapse:collapse" | |||
|- align="center" style="background-color: #E6E6FA;" | |||
! rowspan="2" | M1 | |||
| width="10px" | | |||
| align="left" | Mud Shot (18s) | |||
| width="50px" rowspan="2" | | |||
| rowspan="2" align="right" | [[Arquivo:Target.png|Target]] [[Arquivo:Damage.png|Damage]] [[Arquivo:Blind.png|Blind]] | |||
| rowspan="2" | [[Arquivo:Ground.png|Ground|link=Orebound]] | |||
|- align="center" style="background-color: #E6E6FA;" | |||
| width="10px" | | |||
| align="left" | Level 525 | |||
|- align="center" | |||
! rowspan="2" | M2 | |||
| width="10px" | | |||
| align="left" | Bubble (12s) | |||
| width="50px" rowspan="2" | | |||
| rowspan="2" align="right" | [[Arquivo:Target.png|Target]] [[Arquivo:Damage.png|Damage]] | |||
| rowspan="2" | [[Arquivo:Water.png|Water|link=Seavell]] | |||
|- align="center" | |||
| width="10px" | | |||
| align="left" | Level 525 | |||
|- align="center" style="background-color: #E6E6FA;" | |||
! rowspan="2" | M3 | |||
| width="10px" | | |||
| align="left" | Bubble Beam (20s) | |||
| width="50px" rowspan="2" | | |||
| rowspan="2" align="right" | [[Arquivo:Target.png|Target]] [[Arquivo:Damage.png|Damage]] | |||
| rowspan="2" | [[Arquivo:Water.png|Water|link=Seavell]] | |||
|- align="center" style="background-color: #E6E6FA;" | |||
| width="10px" | | |||
| align="left" | Level 525 | |||
|- align="center" | |||
! rowspan="2" | M4 | |||
| width="10px" | | |||
| align="left" | Tongue Grap (40s) | |||
| width="50px" rowspan="2" | | |||
| rowspan="2" align="right" | [[Arquivo:AOE.png|AOE]] [[Arquivo:Damage.png|Damage]] [[Arquivo:Stun.png|Stun]] | |||
| rowspan="2" | [[Arquivo:Water.png|Water|link=Seavell]] | |||
|- align="center" | |||
| width="10px" | | |||
| align="left" | Level 525 | |||
|- align="center" style="background-color: #E6E6FA;" | |||
! rowspan="2" | M5 | |||
| width="10px" | | |||
| align="left" | Whirlpool (40s) | |||
| width="50px" rowspan="2" | | |||
| rowspan="2" align="right" | [[Arquivo:AOE.png|AOE]] [[Arquivo:Damage.png|Damage]] | |||
| rowspan="2" | [[Arquivo:Water.png|Water|link=Seavell]] | |||
|- align="center" style="background-color: #E6E6FA;" | |||
| width="10px" | | |||
| align="left" | Level 525 | |||
|- align="center" | |||
! rowspan="2" | M6 | |||
| width="10px" | | |||
| align="left" | Surf (50s) | |||
| width="50px" rowspan="2" | | |||
| rowspan="2" align="right" | [[Arquivo:AOE.png|AOE]] [[Arquivo:Damage.png|Damage]] | |||
| rowspan="2" | [[Arquivo:Water.png|Water|link=Seavell]] | |||
|- align="center" | |||
| width="10px" | | |||
| align="left" | Level 525 | |||
|- align="center" style="background-color: #E6E6FA;" | |||
! rowspan="2" | M7 | |||
| width="10px" | | |||
| align="left" | Hydro Pump (50s) | |||
| width="50px" rowspan="2" | | |||
| rowspan="2" align="right" | [[Arquivo:AOE.png|AOE]] [[Arquivo:Damage.png|Damage]] | |||
| rowspan="2" | [[Arquivo:Water.png|Water|link=Seavell]] | |||
|- align="center" style="background-color: #E6E6FA;" | |||
| width="10px" | | |||
| align="left" | Level 525 | |||
|- align="center" | |||
! rowspan="2" | M8 | |||
| width="10px" | | |||
| align="left" | Rain Dance (40s) | |||
| width="50px" rowspan="2" | | |||
| rowspan="2" align="right" | [[Arquivo:AOE.png|AOE]] [[Arquivo:Buff.png|Buff]] [[Arquivo:Nevermiss.png|Nevermiss]] | |||
| rowspan="2" | [[Arquivo:Water.png|Water|link=Seavell]] | |||
|- align="center" | |||
| width="10px" | | |||
| align="left" | Level 525 | |||
|} | |||
== '''Efetividades''' == | |||
'''Muito Efetivo:''' Grass and Electric.<br /> | |||
'''Normal:''' Normal, Fighting, Poison, Ground, Flying, Psychic, Bug, Rock, Ghost, Dragon, Dark, Crystal and Fairy.<br /> | |||
'''Muito Inefetivo:''' Fire, Water, Ice and Steel.<br /> | |||
== '''Outras Versões''' == | |||
{| class="wikitable" | |||
|- style="vertical-align:top; text-align=center;" | |||
| style="width:50px; text-align:center;" | <b>[[Arquivo:186-Politoed.png|link=Politoed]]</b> | |||
| style="width:150px; text-align:center;" | <b>'''[[Politoed]]'''</b> | |||
|- style="vertical-align:top; text-align=center;" | |||
| style="width:50px; text-align:center;" | <b>[[Arquivo:186-shPolitoed.png|link=Shiny Politoed]]</b> | |||
| style="width:150px; text-align:center;" | <b>'''[[Shiny Politoed]]'''</b> | |||
|} | |||
=='''RHYDON'''== | |||
<center>[[Arquivo:ShiRhydon.gif|link=Shiny Rhydon]]</center> | |||
== '''Informações Gerais''' == | |||
'''Nome:''' Shiny Rhydon<br /> | |||
'''Level:''' 100<br /> | |||
'''Elemento:''' Ground<br /> | |||
'''Habilidades:''' Dig, Rock Smash and Headbutt.<br /> | |||
'''Boost:''' Earth Stone (2)<br /> | |||
'''Materia:''' Orebound Mastered | |||
== '''Evoluções''' == | |||
'''Shiny Rhydon''' precisa de Level 100.<br /> | |||
== '''Descrição:''' == | |||
Um Rhydon dourado e brilhante, anda sobre as patas traseiras. Mostra sinais de inteligência. Sua pele semelhante a uma armadura repele lava derretida. | |||
== '''Movimentos''' == | |||
{| border="0" style="border-collapse:collapse" | |||
|- align="center" style="background-color: #E6E6FA;" | |||
! rowspan="2" | M1 | |||
| width="10px" | | |||
| align="left" | Horn Attack (15s) | |||
| width="50px" rowspan="2" | | |||
| rowspan="2" align="right" | [[Arquivo:Target.png|Target]] [[Arquivo:Damage.png|Damage]] | |||
| rowspan="2" | [[Arquivo:Normal1.png|Normal|link=Gardestrike]] | |||
|- align="center" style="background-color: #E6E6FA;" | |||
| width="10px" | | |||
| align="left" | Level 525 | |||
|- align="center" | |||
! rowspan="2" | M2 | |||
| width="10px" | | |||
| align="left" | Horn Drill (30s) | |||
| width="50px" rowspan="2" | | |||
| rowspan="2" align="right" | [[Arquivo:Target.png|Target]] [[Arquivo:Damage.png|Damage]] | |||
| rowspan="2" | [[Arquivo:Normal1.png|Normal|link=Gardestrike]] | |||
|- align="center" | |||
| width="10px" | | |||
| align="left" | Level 525 | |||
|- align="center" style="background-color: #E6E6FA;" | |||
! rowspan="2" | M3 | |||
| width="10px" | | |||
| align="left" | Horn Burst (12s) | |||
| width="50px" rowspan="2" | | |||
| rowspan="2" align="right" | [[Arquivo:Target.png|Target]] [[Arquivo:Damage.png|Damage]] | |||
| rowspan="2" | [[Arquivo:Ground.png|Ground|link=Orebound]] | |||
|- align="center" style="background-color: #E6E6FA;" | |||
| width="10px" | | |||
| align="left" | Level 525 | |||
|- align="center" | |||
! rowspan="2" | M4 | |||
| width="10px" | | |||
| align="left" | Earth Power (40s) | |||
| width="50px" rowspan="2" | | |||
| rowspan="2" align="right" | [[Arquivo:AOE.png|AOE]] [[Arquivo:Damage.png|Damage]] | |||
| rowspan="2" | [[Arquivo:Ground.png|Ground|link=Orebound]] | |||
|- align="center" | |||
| width="10px" | | |||
| align="left" | Level 525 | |||
|- align="center" style="background-color: #E6E6FA;" | |||
! rowspan="2" | M5 | |||
| width="10px" | | |||
| align="left" | Ground Collapse (40s) | |||
| width="50px" rowspan="2" | | |||
| rowspan="2" align="right" | [[Arquivo:AOE.png|AOE]] [[Arquivo:Damage.png|Damage]] [[Arquivo:Stun.png|Stun]] | |||
| rowspan="2" | [[Arquivo:Ground.png|Ground|link=Orebound]] | |||
|- align="center" style="background-color: #E6E6FA;" | |||
| width="10px" | | |||
| align="left" | Level 525 | |||
|- align="center" | |||
! rowspan="2" | M6 | |||
| width="10px" | | |||
| align="left" | Bulldoze (40s) | |||
| width="50px" rowspan="2" | | |||
| rowspan="2" align="right" | [[Arquivo:AOE.png|AOE]] [[Arquivo:Damage.png|Damage]] | |||
| rowspan="2" | [[Arquivo:Ground.png|Ground|link=Orebound]] | |||
|- align="center" | |||
| width="10px" | | |||
| align="left" | Level 525 | |||
|- align="center" style="background-color: #E6E6FA;" | |||
! rowspan="2" | M7 | |||
| width="10px" | | |||
| align="left" | Fissure (50s) | |||
| width="50px" rowspan="2" | | |||
| rowspan="2" align="right" | [[Arquivo:AOE.png|AOE]] [[Arquivo:Damage.png|Damage]] | |||
| rowspan="2" | [[Arquivo:Ground.png|Ground|link=Orebound]] | |||
|- align="center" style="background-color: #E6E6FA;" | |||
| width="10px" | | |||
| align="left" | Level 525 | |||
|- align="center" | |||
! rowspan="2" | M8 | |||
| width="10px" | | |||
| align="left" | Magnitude (50s) | |||
| width="50px" rowspan="2" | | |||
| rowspan="2" align="right" | [[Arquivo:AOE.png|AOE]] [[Arquivo:Damage.png|Damage]] [[Arquivo:Paralyze.png|Paralyze]] [[Arquivo:Debuff.png|Debuff]] [[Arquivo:Buff.png|Buff]] | |||
| rowspan="2" | [[Arquivo:Ground.png|Ground|link=Orebound]] | |||
|- align="center" | |||
| width="10px" | | |||
| align="left" | Level 525 | |||
|} | |||
== '''Efetividades''' == | |||
'''Muito Efetivo:''' Water, Grass and Ice.<br /> | |||
'''Normal:''' Normal, Fire, Fighting, Ground, Flying, Psychic, Bug, Ghost, Dragon, Steel, Dark, Crystal and Fairy.<br /> | |||
'''Muito Inefetivo:''' Poison and Rock.<br /> | |||
'''Nulo:''' Electric.<br /> | |||
== '''Outras Versões''' == | |||
{| class="wikitable" | |||
|- style="vertical-align:top; text-align=center;" | |||
| style="width:50px; text-align:center;" | <b>[[Arquivo:112-Rhydon.png|link=Rhydon]]</b> | |||
| style="width:150px; text-align:center;" | <b>'''[[Rhydon]]'''</b> | |||
|- style="vertical-align:top; text-align=center;" | |||
| style="width:50px; text-align:center;" | <b>[[Arquivo:Shinyrh.png|link=Shiny Rhydon]]</b> | |||
| style="width:150px; text-align:center;" | <b>'''[[Shiny Rhydon]]'''</b> | |||
|} | |||
=='''KANGASKHAN'''== | |||
< | |||
<center>[[Arquivo:MegaKangaskhan.gif|link=Mega Kangaskhan]]</center> | |||
== '''Informações Gerais''' == | |||
'''Nome:''' Mega Kangaskhan<br /> | |||
'''Level:''' 100<br /> | |||
'''Elemento:''' Normal<br /> | |||
'''Habilidades:''' Cut, Dig, Rock Smash and Headbutt.<br /> | |||
'''Mega Stone:''' Kangaskhanite<br><br> | |||
<b>Este Pokémon é EXCLUSIVO do clã Gardestrike em batalhas PvP</b>. | |||
== '''Evoluções''' == | |||
'''Kangaskhan''' precisa de Level 100.<br /> | |||
'''Mega Kangaskhan''' precisa de Level 100. | |||
== '''Descrição:''' == | |||
Cria seu filhote na bolsa da barriga. Ele permite que o bebê brinque apenas quando sentir-se seguro. | |||
== '''Movimentos''' == | |||
{| border="0" style="border-collapse:collapse" | |||
|- align="center" style="background-color: #E6E6FA;" | |||
! rowspan="2" | M1 | |||
| width="10px" | | |||
| align="left" | Mega Punch (25s) | |||
| width="50px" rowspan="2" | | |||
| rowspan="2" align="right" | [[Arquivo:Target.png|Target]] [[Arquivo:Damage.png|Damage]] | |||
| rowspan="2" | [[Arquivo:Fighting.png|Fighting|link=Gardestrike]] | |||
|- align="center" style="background-color: #E6E6FA;" | |||
| width="10px" | | |||
| align="left" | Level 525 | |||
|- align="center" | |||
! rowspan="2" | M2 | |||
| width="10px" | | |||
| align="left" | Low Kick (10s) | |||
| width="50px" rowspan="2" | | |||
| rowspan="2" align="right" | [[Arquivo:Target.png|Target]] [[Arquivo:Damage.png|Damage]] | |||
| rowspan="2" | [[Arquivo:Fighting.png|Fighting|link=Gardestrike]] | |||
|- align="center" | |||
| width="10px" | | |||
| align="left" | Level 525 | |||
|- align="center" style="background-color: #E6E6FA;" | |||
! rowspan="2" | M3 | |||
| width="10px" | | |||
| align="left" | Drain Punch (25s) | |||
| width="50px" rowspan="2" | | |||
| rowspan="2" align="right" | [[Arquivo:Target.png|Target]] [[Arquivo:Damage.png|Damage]] [[Arquivo:Lifesteal.png|Lifesteal]] [[Arquivo:Nevermiss.png|Nevermiss]] | |||
| rowspan="2" | [[Arquivo:Fighting.png|Fighting|link=Gardestrike]] | |||
|- align="center" style="background-color: #E6E6FA;" | |||
| width="10px" | | |||
| align="left" | Level 525 | |||
|- align="center" | |||
! rowspan="2" | M4 | |||
| width="10px" | | |||
| align="left" | Comet Punch (35s) | |||
| width="50px" rowspan="2" | | |||
| rowspan="2" align="right" | [[Arquivo:Target.png|Target]] [[Arquivo:Damage.png|Damage]] [[Arquivo:Nevermiss.png|Nevermiss]] | |||
| rowspan="2" | [[Arquivo:Normal1.png|Normal|link=Gardestrike]] | |||
|- align="center" | |||
| width="10px" | | |||
| align="left" | Level 525 | |||
|- align="center" style="background-color: #E6E6FA;" | |||
! rowspan="2" | M5 | |||
| width="10px" | | |||
| align="left" | Fake Out (40s) | |||
| width="50px" rowspan="2" | | |||
| rowspan="2" align="right" | [[Arquivo:AOE.png|AOE]] [[Arquivo:Damage.png|Damage]] [[arquivo:STUCK.png|Stuck]] | |||
| rowspan="2" | [[Arquivo:Normal1.png|Normal|link=Gardestrike]] | |||
|- align="center" style="background-color: #E6E6FA;" | |||
| width="10px" | | |||
| align="left" | Level 525 | |||
|- align="center" | |||
! rowspan="2" | M6 | |||
| width="10px" | | |||
| align="left" | Hammer Arm (40s) | |||
| width="50px" rowspan="2" | | |||
| rowspan="2" align="right" | [[Arquivo:AOE.png|AOE]] [[Arquivo:Damage.png|Damage]] [[Arquivo:Stun.png|Stun]] | |||
| rowspan="2" | [[Arquivo:Fighting.png|Fighting|link=Gardestrike]] | |||
|- align="center" | |||
| width="10px" | | |||
| align="left" | Level 525 | |||
|- align="center" style="background-color: #E6E6FA;" | |||
! rowspan="2" | M7 | |||
| width="10px" | | |||
| align="left" | Power-Up Punch (40s) | |||
| width="50px" rowspan="2" | | |||
| rowspan="2" align="right" | [[Arquivo:AOE.png|AOE]] [[Arquivo:Damage.png|Damage]] | |||
| rowspan="2" | [[Arquivo:Fighting.png|Fighting|link=Gardestrike]] | |||
|- align="center" style="background-color: #E6E6FA;" | |||
| width="10px" | | |||
| align="left" | Level 525 | |||
|- align="center" | |||
! rowspan="2" | M8 | |||
| width="10px" | | |||
| align="left" | Focus Blast (50s) | |||
| width="50px" rowspan="2" | | |||
| rowspan="2" align="right" | [[Arquivo:AOE.png|AOE]] [[Arquivo:Damage.png|Damage]] | |||
| rowspan="2" | [[Arquivo:Fighting.png|Fighting|link=Gardestrike]] | |||
|- align="center" | |||
| width="10px" | | |||
| align="left" | Level 525 | |||
|- align="center" style="background-color: #E6E6FA;" | |||
! rowspan="2" | M9 | |||
| width="10px" | | |||
| align="left" | Reversal (50s) | |||
| width="50px" rowspan="2" | | |||
| rowspan="2" align="right" | [[Arquivo:AOE.png|AOE]] [[Arquivo:Damage.png|Damage]] | |||
| rowspan="2" | [[Arquivo:Fighting.png|Fighting|link=Gardestrike]] | |||
|- align="center" style="background-color: #E6E6FA;" | |||
| width="10px" | | |||
| align="left" | Level 525 | |||
|- align="center" | |||
! rowspan="2" | P | |||
| width="10px" | | |||
| align="left" | Parental Bond | |||
| width="50px" rowspan="2" | | |||
| rowspan="2" align="right" | [[Arquivo:Passive.png|Passive]] [[Arquivo:Buff.png|Buff]] | |||
| rowspan="2" | [[Arquivo:Normal1.png|Normal|link=Gardestrike]] | |||
|- align="center" | |||
| width="10px" | | |||
| align="left" | Level 525 | |||
|} | |||
== '''Efetividades''' == | |||
'''Muito Efetivo:''' Fighting.<br /> | |||
'''Normal:''' Normal, Fire, Water, Grass, Electric, Ice, Poison, Ground, Flying, Psychic, Bug, Rock, Dragon, Steel, Dark, Crystal and Fairy.<br /> | |||
'''Nulo:''' Ghost.<br /> | |||
== '''Outras Versões''' == | |||
{| class="wikitable" | |||
|- style="vertical-align:top; text-align=center;" | |||
| style="width:50px; text-align:center;" | <b>[[Arquivo:115-Kangaskhan.png|link=Kangaskhan]]</b> | |||
| style="width:150px; text-align:center;" | <b>'''[[Kangaskhan]]'''</b> | |||
|} | |||
=='''DUSKNOIR'''== | |||
<center>[[Arquivo:477 - Dusknoir.gif|link=Dusknoir]]</center> | |||
== '''Informações Gerais''' == | |||
'''Nome:''' Dusknoir<br /> | |||
'''Level:''' 100<br /> | |||
'''Elemento:''' Ghost<br /> | |||
'''Habilidades:''' Light and Control Mind.<br /> | |||
'''Boost:''' Mystic Star (10)<br /> | |||
'''Materia:''' Malefic Mastered. | |||
== '''Evoluções''' == | |||
'''Duskull''' precisa de Level 40.<br /> | |||
'''Dusclops''' precisa de Level 100.<br /> | |||
'''Dusknoir''' precisa de Level 100. | |||
== '''Descrição:''' == | |||
A antena em sua cabeça captura ondas de rádio do mundo dos espíritos que o comandam a levar as pessoas para lá. | |||
== '''Movimentos''' == | |||
{| border="0" style="border-collapse:collapse" | |||
|- align="center" style="background-color: #E6E6FA;" | |||
! rowspan="2" | M1 | |||
| width="10px" | | |||
| align="left" | Dark Pulse (15s) | |||
| width="50px" rowspan="2" | | |||
| rowspan="2" align="right" | [[Arquivo:Target.png|Target]] [[Arquivo:Damage.png|Damage]] | |||
| rowspan="2" | [[Arquivo:Dark1.png|Dark|link=Malefic]] | |||
|- align="center" style="background-color: #E6E6FA;" | |||
| width="10px" | | |||
| align="left" | Level 525 | |||
|- align="center" | |||
! rowspan="2" | M2 | |||
| width="10px" | | |||
| align="left" | Shadow Ball (12s) | |||
| width="50px" rowspan="2" | | |||
| rowspan="2" align="right" | [[Arquivo:Target.png|Target]] [[Arquivo:Damage.png|Damage]] | |||
| rowspan="2" | [[Arquivo:Ghost1.png|Ghost|link=Malefic]] | |||
|- align="center" | |||
| width="10px" | | |||
| align="left" | Level 525 | |||
|- align="center" style="background-color: #E6E6FA;" | |||
! rowspan="2" | M3 | |||
| width="10px" | | |||
| align="left" | Shadow Punch (25s) | |||
| width="50px" rowspan="2" | | |||
| rowspan="2" align="right" | [[Arquivo:Target.png|Target]] [[Arquivo:Damage.png|Damage]] | |||
| rowspan="2" | [[Arquivo:Ghost1.png|Ghost|link=Malefic]] | |||
|- align="center" style="background-color: #E6E6FA;" | |||
| width="10px" | | |||
| align="left" | Level 525 | |||
|- align="center" | |||
! rowspan="2" | M4 | |||
| width="10px" | | |||
| align="left" | Astonish (40s) | |||
| width="50px" rowspan="2" | | |||
| rowspan="2" align="right" | [[Arquivo:AOE.png|AOE]] [[Arquivo:Damage.png|Damage]] | |||
| rowspan="2" | [[Arquivo:Ghost1.png|Ghost|link=Malefic]] | |||
|- align="center" | |||
| width="10px" | | |||
| align="left" | Level 525 | |||
|- align="center" style="background-color: #E6E6FA;" | |||
! rowspan="2" | M5 | |||
| width="10px" | | |||
| align="left" | Shadow Sneak (40s) | |||
| width="50px" rowspan="2" | | |||
| rowspan="2" align="right" | [[Arquivo:AOE.png|AOE]] [[Arquivo:Damage.png|Damage]] [[Arquivo:Buff.png|Buff]] [[Arquivo:Slow.png|Slow]] | |||
| rowspan="2" | [[Arquivo:Ghost1.png|Ghost|link=Malefic]] | |||
|- align="center" style="background-color: #E6E6FA;" | |||
| width="10px" | | |||
| align="left" | Level 525 | |||
|- align="center" | |||
! rowspan="2" | M6 | |||
| width="10px" | | |||
| align="left" | Hex (40s) | |||
| width="50px" rowspan="2" | | |||
| rowspan="2" align="right" | [[Arquivo:Self.png|Self]] [[Arquivo:Buff.png|Buff]] [[Arquivo:Nevermiss.png|Nevermiss]] | |||
| rowspan="2" | [[Arquivo:Ghost1.png|Ghost|link=Malefic]] | |||
|- align="center" | |||
| width="10px" | | |||
| align="left" | Level 525 | |||
|- align="center" style="background-color: #E6E6FA;" | |||
! rowspan="2" | M7 | |||
| width="10px" | | |||
| align="left" | Shadow Cannon (40s) | |||
| width="50px" rowspan="2" | | |||
| rowspan="2" align="right" | [[Arquivo:AOE.png|AOE]] [[Arquivo:Damage.png|Damage]] | |||
| rowspan="2" | [[Arquivo:Ghost1.png|Ghost|link=Malefic]] | |||
|- align="center" style="background-color: #E6E6FA;" | |||
| width="10px" | | |||
| align="left" | Level 525 | |||
|- align="center" | |||
! rowspan="2" | M8 | |||
| width="10px" | | |||
| align="left" | Shadow Blast (50s) | |||
| width="50px" rowspan="2" | | |||
| rowspan="2" align="right" | [[Arquivo:AOE.png|AOE]] [[Arquivo:Damage.png|Damage]] | |||
| rowspan="2" | [[Arquivo:Ghost1.png|Ghost|link=Malefic]] | |||
|- align="center" | |||
| width="10px" | | |||
| align="left" | Level 525 | |||
|- align="center" style="background-color: #E6E6FA;" | |||
! rowspan="2" | M9 | |||
| width="10px" | | |||
| align="left" | Spectral Fist (40s) | |||
| width="50px" rowspan="2" | | |||
| rowspan="2" align="right" | [[Arquivo:AOE.png|AOE]] [[Arquivo:Damage.png|Damage]] [[Arquivo:Stun.png|Stun]] | |||
| rowspan="2" | [[Arquivo:Ghost1.png|Ghost|link=Malefic]] | |||
|- align="center" style="background-color: #E6E6FA;" | |||
| width="10px" | | |||
| align="left" | Level 525 | |||
|- align="center" | |- align="center" | ||
!align=" | ! rowspan="2" | P | ||
| width="10px" | | |||
| align="left" | Spirit Bomb | |||
| width="50px" rowspan="2" | | |||
| rowspan="2" align="right" | [[Arquivo:Debuff.png|Debuff]] [[Arquivo:Damage.png|Damage]] | |||
| rowspan="2" | [[Arquivo:Ghost1.png|Ghost|link=Malefic]] | |||
|- align="center" | |- align="center" | ||
| | | width="10px" | | ||
| | | align="left" | Level 525 | ||
|} | |||
== '''Efetividades''' == | |||
| | |||
| | '''Muito Efetivo:''' Ghost and Dark.<br /> | ||
'''Normal:''' Fire, Water, Grass, Electric, Ice, Ground, Flying, Psychic, Rock, Dragon, Steel, Crystal and Fairy.<br /> | |||
| | '''Muito Inefetivo:''' Poison and Bug.<br /> | ||
'''Nulo:''' Normal and Fighting.<br /> | |||
== '''Outras Versões''' == | |||
{| class="wikitable" | |||
|- style="vertical-align:top; text-align=center;" | |||
| style="width:50px; text-align:center;" | <b>[[Arquivo:477-Dusknoir.png|link=Dusknoir]]</b> | |||
| style="width:150px; text-align:center;" | <b>'''[[Dusknoir]]'''</b> | |||
|} | |} | ||
''' | =='''MAGMORTAR'''== | ||
<center>[[Arquivo:467 - Magmortar.gif|link=Magmortar]]</center> | |||
== '''Informações Gerais''' == | |||
'''Nome:''' Magmortar<br /> | |||
'''Level:''' 100<br /> | |||
'''Elemento:''' Fire<br /> | |||
'''Habilidades:''' Light, Rock Smash and Headbutt.<br /> | |||
'''Boost:''' Mystic Star (10)<br /> | |||
'''Materia''': Volcanic Mastered. | |||
== '''Evoluções''' == | |||
'''Magby''' precisa de Level 30.<br /> | |||
'''Magmar''' precisa de Level 100.<br /> | |||
'''Magmortar''' precisa de Level 100. | |||
== '''Descrição:''' == | |||
Ele lança bolas de fogo de mais de 3.600 graus Fahrenheit de seus braços. Sua respiração também queima e chia. | |||
== '''Movimentos''' == | |||
{| border="0" style="border-collapse:collapse" | |||
|- align="center" style="background-color: #E6E6FA;" | |||
! rowspan="2" | M1 | |||
| width="10px" | | |||
| align="left" | Volcano Shot (22s) | |||
| width="50px" rowspan="2" | | |||
| rowspan="2" align="right" | [[Arquivo:Target.png|Target]] [[Arquivo:Damage.png|Damage]] [[Arquivo:Slow.png|Slow]] | |||
| rowspan="2" | [[Arquivo:Fire.png|Fire|link=Volcanic]] | |||
|- align="center" style="background-color: #E6E6FA;" | |||
| width="10px" | | |||
| align="left" | Level 525 | |||
|- align="center" | |||
! rowspan="2" | M2 | |||
| width="10px" | | |||
| align="left" | Ember (15s) | |||
| width="50px" rowspan="2" | | |||
| rowspan="2" align="right" | [[Arquivo:Target.png|Target]] [[Arquivo:Damage.png|Damage]] | |||
| rowspan="2" | [[Arquivo:Fire.png|Fire|link=Volcanic]] | |||
|- align="center" | |||
| width="10px" | | |||
| align="left" | Level 525 | |||
|- align="center" style="background-color: #E6E6FA;" | |||
! rowspan="2" | M3 | |||
| width="10px" | | |||
| align="left" | Fire Punch (25s) | |||
| width="50px" rowspan="2" | | |||
| rowspan="2" align="right" | [[Arquivo:Target.png|Target]] [[Arquivo:Damage.png|Damage]] | |||
| rowspan="2" | [[Arquivo:Fire.png|Fire|link=Volcanic]] | |||
|- align="center" style="background-color: #E6E6FA;" | |||
| width="10px" | | |||
| align="left" | Level 525 | |||
|- align="center" | |||
! rowspan="2" | M4 | |||
| width="10px" | | |||
| align="left" | Flamethrower (15s) | |||
| width="50px" rowspan="2" | | |||
| rowspan="2" align="right" | [[Arquivo:AOE.png|AOE]] [[Arquivo:Damage.png|Damage]] [[Arquivo:Burn.png|Burn]] | |||
| rowspan="2" | [[Arquivo:Fire.png|Fire|link=Volcanic]] | |||
|- align="center" | |||
| width="10px" | | |||
| align="left" | Level 525 | |||
|- align="center" style="background-color: #E6E6FA;" | |||
! rowspan="2" | M5 | |||
| width="10px" | | |||
| align="left" | Smokescreen (40s) | |||
| width="50px" rowspan="2" | | |||
| rowspan="2" align="right" | [[Arquivo:AOE.png|AOE]] [[Arquivo:Blind.png|Blind]] | |||
| rowspan="2" | [[Arquivo:Normal1.png|Normal|link=Gardestrike]] | |||
|- align="center" style="background-color: #E6E6FA;" | |||
| width="10px" | | |||
| align="left" | Level 525 | |||
|- align="center" | |||
! rowspan="2" | M6 | |||
| width="10px" | | |||
| align="left" | Flame Burst (40s) | |||
| width="50px" rowspan="2" | | |||
| rowspan="2" align="right" | [[Arquivo:AOE.png|AOE]] [[Arquivo:Damage.png|Damage]] | |||
| rowspan="2" | [[Arquivo:Fire.png|Fire|link=Volcanic]] | |||
|- align="center" | |||
| width="10px" | | |||
| align="left" | Level 525 | |||
|- align="center" style="background-color: #E6E6FA;" | |||
! rowspan="2" | M7 | |||
| width="10px" | | |||
| align="left" | Fire Blast (40s) | |||
| width="50px" rowspan="2" | | |||
| rowspan="2" align="right" | [[Arquivo:AOE.png|AOE]] [[Arquivo:Damage.png|Damage]] [[Arquivo:Burn.png|Burn]] | |||
| rowspan="2" | [[Arquivo:Fire.png|Fire|link=Volcanic]] | |||
|- align="center" style="background-color: #E6E6FA;" | |||
| width="10px" | | |||
| align="left" | Level 525 | |||
|- align="center" | |||
! rowspan="2" | M8 | |||
| width="10px" | | |||
| align="left" | Magma Fist (50s) | |||
| width="50px" rowspan="2" | | |||
| rowspan="2" align="right" | [[Arquivo:AOE.png|AOE]] [[Arquivo:Damage.png|Damage]] [[Arquivo:Burn.png|Burn]] [[Arquivo:Slow.png|Slow]] [[Arquivo:Nevermiss.png|Nevermiss]] [[Arquivo:NeverBoost.png|Neverboost]] | |||
| rowspan="2" | [[Arquivo:Fire.png|Fire|link=Volcanic]] | |||
|- align="center" | |||
| width="10px" | | |||
| align="left" | Level 525 | |||
|- align="center" style="background-color: #E6E6FA;" | |||
! rowspan="2" | P | |||
| width="10px" | | |||
| align="left" | Flame Body | |||
| width="50px" rowspan="2" | | |||
| rowspan="2" align="right" | [[Arquivo:Passive.png|Passive]] [[Arquivo:AOE.png|AOE]] [[Arquivo:Damage.png|Damage]] [[Arquivo:Burn.png|Burn]] | |||
| rowspan="2" | [[Arquivo:Fire.png|Fire|link=Volcanic]] | |||
|- align="center" style="background-color: #E6E6FA;" | |||
| width="10px" | | |||
| align="left" | Level 525 | |||
|- align="center" | |- align="center" | ||
!align=" | ! rowspan="2" | P | ||
| width="10px" | | |||
| align="left" | Double Cannon | |||
| width="50px" rowspan="2" | | |||
| rowspan="2" align="right" | [[Arquivo:Passive.png|Passive]] [[Arquivo:Buff.png|Buff]] | |||
| rowspan="2" | [[Arquivo:Fire.png|Fire|link=Volcanic]] | |||
|- align="center" | |- align="center" | ||
| | | width="10px" | | ||
| | | align="left" | Level 525 | ||
| | |||
|} | |||
== '''Efetividades''' == | |||
| | |||
| | '''Muito Efetivo:''' Water, Ground and Rock.<br /> | ||
| | '''Normal:''' Normal, Electric, Fighting, Poison, Flying, Psychic, Ghost, Dragon, Dark and Crystal.<br /> | ||
'''Muito Inefetivo:''' Fire, Grass, Ice, Bug, Steel and Fairy.<br /> | |||
== '''Outras Versões''' == | |||
{| class="wikitable" | |||
|- style="vertical-align:top; text-align=center;" | |||
| style="width:50px; text-align:center;" | <b>[[Arquivo:467-Magmortar.png|link=Magmortar]]</b> | |||
| style="width:150px; text-align:center;" | <b>'''[[Magmortar]]'''</b> | |||
|} | |} | ||
< | =='''ELECTIVIRE'''== | ||
<center>[[Arquivo:466 - Electivire.gif|link=Electivire]]</center> | |||
== '''Informações Gerais''' == | |||
'''Nome:''' Electivire<br /> | |||
'''Level:''' 100<br /> | |||
'''Elemento:''' Electric<br /> | |||
'''Habilidades:''' Rock Smash, Dig, Light and Headbutt.<br /> | |||
'''Boost:''' Mystic Star (10)<br /> | |||
'''Materia''': Raibolt Mastered. | |||
== '''Evoluções''' == | |||
'''Elekid''' precisa de Level 30.<br /> | |||
'''Electabuzz''' precisa de Level 100.<br /> | |||
'''Electivire''' precisa de Level 100. | |||
== '''Descrição:''' == | |||
À medida que sua carga elétrica aumenta, faíscas azuis começam a estalar entre seus chifres. | |||
== '''Movimentos''' == | |||
{| border="0" style="border-collapse:collapse" | |||
|- align="center" style="background-color: #E6E6FA;" | |||
! rowspan="2" | M1 | |||
| width="10px" | | |||
| align="left" | Charge (40s) | |||
| width="50px" rowspan="2" | | |||
| rowspan="2" align="right" | [[Arquivo:Self.png|Self]] [[Arquivo:Buff.png|Buff]] | |||
| rowspan="2" | [[Arquivo:Electric.png|Electric|link=Raibolt]] | |||
|- align="center" style="background-color: #E6E6FA;" | |||
| width="10px" | | |||
| align="left" | Level 525 | |||
|- align="center" | |||
! rowspan="2" | M2 | |||
| width="10px" | | |||
| align="left" | Swift (15s) | |||
| width="50px" rowspan="2" | | |||
| rowspan="2" align="right" | [[Arquivo:Target.png|Target]] [[Arquivo:Damage.png|Damage]] | |||
| rowspan="2" | [[Arquivo:Normal1.png|Normal|link=Gardestrike]] | |||
|- align="center" | |||
| width="10px" | | |||
| align="left" | Level 525 | |||
|- align="center" style="background-color: #E6E6FA;" | |||
! rowspan="2" | M3 | |||
| width="10px" | | |||
| align="left" | Thunder Punch (20s) | |||
| width="50px" rowspan="2" | | |||
| rowspan="2" align="right" | [[Arquivo:Target.png|Target]] [[Arquivo:Damage.png|Damage]] | |||
| rowspan="2" | [[Arquivo:Electric.png|Electric|link=Raibolt]] | |||
|- align="center" style="background-color: #E6E6FA;" | |||
| width="10px" | | |||
| align="left" | Level 525 | |||
|- align="center" | |||
! rowspan="2" | M4 | |||
| width="10px" | | |||
| align="left" | Thunder Shock (12s) | |||
| width="50px" rowspan="2" | | |||
| rowspan="2" align="right" | [[Arquivo:Target.png|Target]] [[Arquivo:Damage.png|Damage]] | |||
| rowspan="2" | [[Arquivo:Electric.png|Electric|link=Raibolt]] | |||
|- align="center" | |||
| width="10px" | | |||
| align="left" | Level 525 | |||
|- align="center" style="background-color: #E6E6FA;" | |||
! rowspan="2" | M5 | |||
| width="10px" | | |||
| align="left" | Thunderbolt (25s) | |||
| width="50px" rowspan="2" | | |||
| rowspan="2" align="right" | [[Arquivo:Target.png|Target]] [[Arquivo:Damage.png|Damage]] | |||
| rowspan="2" | [[Arquivo:Electric.png|Electric|link=Raibolt]] | |||
|- align="center" style="background-color: #E6E6FA;" | |||
| width="10px" | | |||
| align="left" | Level 525 | |||
|- align="center" | |||
! rowspan="2" | M6 | |||
| width="10px" | | |||
| align="left" | Lightning Axe (40s) | |||
| width="50px" rowspan="2" | | |||
| rowspan="2" align="right" | [[Arquivo:AOE.png|AOE]] [[Arquivo:Damage.png|Damage]] [[Arquivo:Stun.png|Stun]] [[Arquivo:NeverBoost.png|Neverboost]] | |||
| rowspan="2" | [[Arquivo:Electric.png|Electric|link=Raibolt]] | |||
|- align="center" | |||
| width="10px" | | |||
| align="left" | Level 525 | |||
|- align="center" style="background-color: #E6E6FA;" | |||
! rowspan="2" | M7 | |||
| width="10px" | | |||
| align="left" | Focus Blast (40s) | |||
| width="50px" rowspan="2" | | |||
| rowspan="2" align="right" | [[Arquivo:AOE.png|AOE]] [[Arquivo:Damage.png|Damage]] | |||
| rowspan="2" | [[Arquivo:Fighting.png|Fighting|link=Gardestrike]] | |||
|- align="center" style="background-color: #E6E6FA;" | |||
| width="10px" | | |||
| align="left" | Level 525 | |||
|- align="center" | |- align="center" | ||
!align=" | ! rowspan="2" | M8 | ||
| width="10px" | | |||
| align="left" | Discharge (50s) | |||
| width="50px" rowspan="2" | | |||
| rowspan="2" align="right" | [[Arquivo:AOE.png|AOE]] [[Arquivo:Damage.png|Damage]] | |||
| rowspan="2" | [[Arquivo:Electric.png|Electric|link=Raibolt]] | |||
|- align="center" | |- align="center" | ||
| | | width="10px" | | ||
| | | align="left" | Level 525 | ||
| | |||
| | |- align="center" style="background-color: #E6E6FA;" | ||
| | ! rowspan="2" | M9 | ||
| | | width="10px" | | ||
| | | align="left" | Reversal (50s) | ||
| | | width="50px" rowspan="2" | | ||
| | | rowspan="2" align="right" | [[Arquivo:AOE.png|AOE]] [[Arquivo:Damage.png|Damage]] | ||
| | | rowspan="2" | [[Arquivo:Fighting.png|Fighting|link=Gardestrike]] | ||
|- align="center" style="background-color: #E6E6FA;" | |||
| width="10px" | | |||
| align="left" | Level 525 | |||
|- align="center" | |- align="center" | ||
! rowspan="2" | P | |||
| | | width="10px" | | ||
| | | align="left" | Motor Drive | ||
| | | width="50px" rowspan="2" | | ||
| | | rowspan="2" align="right" | [[Arquivo:Passive.png|Passive]] [[Arquivo:Damage.png|Damage]] | ||
| | | rowspan="2" | [[Arquivo:Electric.png|Electric|link=Raibolt]] | ||
| | |||
| | |||
| | |||
|- align="center" | |- align="center" | ||
| | | width="10px" | | ||
| | | align="left" | Level 525 | ||
| | |||
|- align="center" style="background-color: #E6E6FA;" | |||
! rowspan="2" | P | |||
| width="10px" | | |||
| align="left" | Magnet Rise | |||
| width="50px" rowspan="2" | | |||
| rowspan="2" align="right" | [[Arquivo:Passive.png|Passive]] [[Arquivo:Buff.png|Buff]] | |||
| rowspan="2" | [[Arquivo:Electric.png|Electric|link=Raibolt]] | |||
|- align="center" style="background-color: #E6E6FA;" | |||
| width="10px" | | |||
| align="left" | Level 525 | |||
|} | |||
== '''Efetividades''' == | |||
'''Muito Efetivo:''' Ground.<br /> | |||
'''Normal:''' Normal, Fire, Water, Grass, Ice, Fighting, Poison, Psychic, Bug, Rock, Ghost, Dragon, Dark, Crystal and Fairy.<br /> | |||
'''Muito Inefetivo:''' Electric, Flying and Steel.<br /> | |||
== '''Outras Versões''' == | |||
{| class="wikitable" | |||
|- style="vertical-align:top; text-align=center;" | |||
| style="width:50px; text-align:center;" | <b>[[Arquivo:466-Electivire.png|link=Electivire]]</b> | |||
| style="width:150px; text-align:center;" | <b>'''[[Electivire]]'''</b> | |||
|} | |} | ||
''' | =='''GRANBULL'''== | ||
<center>[[Arquivo:Shiny granbull gif.gif|link=Shiny Granbull]]</center> | |||
== '''Informações Gerais''' == | |||
'''Nome:''' Shiny Granbull<br /> | |||
'''Level:''' 100<br /> | |||
'''Elemento:''' Fairy<br /> | |||
'''Habilidades:''' Headbutt, Dig and Rock Smash.<br /> | |||
'''Boost:''' Heart Stone (2)<br /> | |||
'''Materia:''' Psycraft Mastered. | |||
== '''Evoluções''' == | |||
'''Granbull''' precisa de Level 100.<br /> | |||
== '''Descrição:''' == | |||
Na verdade, é tímido e facilmente assustado. Se atacado, ele avança para afastar seu atacante. | |||
. | |||
== '''Movimentos''' == | |||
{| border="0" style="border-collapse:collapse" | |||
|- align="center" style="background-color: #E6E6FA;" | |||
! rowspan="2" | M1 | |||
| width="10px" | | |||
| align="left" | Super Fang (12s) | |||
| width="50px" rowspan="2" | | |||
| rowspan="2" align="right" | [[Arquivo:Target.png|Target]] [[Arquivo:Damage.png|Damage]] | |||
| rowspan="2" | [[Arquivo:Fairy.png|Fairy|link=Psycraft]] | |||
|- align="center" style="background-color: #E6E6FA;" | |||
| width="10px" | | |||
| align="left" | Level 525 | |||
|- align="center" | |||
! rowspan="2" | M2 | |||
| width="10px" | | |||
| align="left" | Dazzling Gleam (8s) | |||
| width="50px" rowspan="2" | | |||
| rowspan="2" align="right" | [[Arquivo:Target.png|Target]] [[Arquivo:Damage.png|Damage]] | |||
| rowspan="2" | [[Arquivo:Fairy.png|Fairy|link=Psycraft]] | |||
|- align="center" | |||
| width="10px" | | |||
| align="left" | Level 525 | |||
|- align="center" style="background-color: #E6E6FA;" | |||
! rowspan="2" | M3 | |||
| width="10px" | | |||
| align="left" | Take Down (20s) | |||
| width="50px" rowspan="2" | | |||
| rowspan="2" align="right" | [[Arquivo:AOE.png|AOE]] [[Arquivo:Damage.png|Damage]] | |||
| rowspan="2" | [[Arquivo:Fairy.png|Fairy|link=Psycraft]] | |||
|- align="center" style="background-color: #E6E6FA;" | |||
| width="10px" | | |||
| align="left" | Level 525 | |||
|- align="center" | |||
! rowspan="2" | M4 | |||
| width="10px" | | |||
| align="left" | Roar (40s) | |||
| width="50px" rowspan="2" | | |||
| rowspan="2" align="right" | [[Arquivo:AOE.png|AOE]] [[Arquivo:Damage.png|Damage]] | |||
| rowspan="2" | [[Arquivo:Fairy.png|Fairy|link=Psycraft]] | |||
|- align="center" | |||
| width="10px" | | |||
| align="left" | Level 525 | |||
|- align="center" style="background-color: #E6E6FA;" | |||
! rowspan="2" | M5 | |||
| width="10px" | | |||
| align="left" | Secret Power (40s) | |||
| width="50px" rowspan="2" | | |||
| rowspan="2" align="right" | [[Arquivo:AOE.png|AOE]] [[Arquivo:Damage.png|Damage]] | |||
| rowspan="2" | [[Arquivo:Fairy.png|Fairy|link=Psycraft]] | |||
|- align="center" style="background-color: #E6E6FA;" | |||
| width="10px" | | |||
| align="left" | Level 525 | |||
|- align="center" | |||
! rowspan="2" | M6 | |||
| width="10px" | | |||
| align="left" | Scary Face (40s) | |||
| width="50px" rowspan="2" | | |||
| rowspan="2" align="right" | [[Arquivo:AOE.png|AOE]] [[Arquivo:Paralyze.png|Paralyze]] | |||
| rowspan="2" | [[Arquivo:Fairy.png|Fairy|link=Psycraft]] | |||
|- align="center" | |||
| width="10px" | | |||
| align="left" | Level 525 | |||
|- align="center" style="background-color: #E6E6FA;" | |||
! rowspan="2" | M7 | |||
| width="10px" | | |||
| align="left" | War Dog (40s) | |||
| width="50px" rowspan="2" | | |||
| rowspan="2" align="right" | [[Arquivo:Self.png|Self]] [[Arquivo:Buff.png|Buff]] | |||
| rowspan="2" | [[Arquivo:Normal1.png|Normal|link=Gardestrike]] | |||
|- align="center" style="background-color: #E6E6FA;" | |||
| width="10px" | | |||
| align="left" | Level 525 | |||
|- align="center" | |||
! rowspan="2" | M8 | |||
| width="10px" | | |||
| align="left" | Protect (40s) | |||
| width="50px" rowspan="2" | | |||
| rowspan="2" align="right" | [[Arquivo:Self.png|Self]] [[Arquivo:Buff.png|Buff]] | |||
| rowspan="2" | [[Arquivo:Fairy.png|Fairy|link=Psycraft]] | |||
|- align="center" | |||
| width="10px" | | |||
| align="left" | Level 525 | |||
|- align="center" style="background-color: #E6E6FA;" | |||
! rowspan="2" | P | |||
| width="10px" | | |||
| align="left" | Pixilate | |||
| width="50px" rowspan="2" | | |||
| rowspan="2" align="right" | [[Arquivo:Passive.png|Passive]] [[Arquivo:Buff.png|Buff]] | |||
| rowspan="2" | [[Arquivo:Fairy.png|Fairy|link=Psycraft]] | |||
|- align="center" style="background-color: #E6E6FA;" | |||
| width="10px" | | |||
| align="left" | Level 525 | |||
|- align="center" | |- align="center" | ||
| | ! rowspan="2" | P | ||
| | | width="10px" | | ||
| | | align="left" | Protector | ||
| | | width="50px" rowspan="2" | | ||
| rowspan="2" align="right" | [[Arquivo:Passive.png|Passive]] [[Arquivo:Buff.png|Buff]] | |||
| | | rowspan="2" | [[Arquivo:Normal1.png|Normal|link=Gardestrike]] | ||
| | |||
| | |||
|- align="center" | |- align="center" | ||
| | | width="10px" | | ||
| align="left" | Level 525 | |||
| | |- align="center" style="background-color: #E6E6FA;" | ||
| | ! rowspan="2" | P | ||
| | | width="10px" | | ||
| | | align="left" | Natural Leader | ||
| | | width="50px" rowspan="2" | | ||
| | | rowspan="2" align="right" | [[Arquivo:Passive.png|Passive]] [[Arquivo:AOE.png|AOE]] [[Arquivo:Buff.png|Buff]] | ||
| rowspan="2" | [[Arquivo:Normal1.png|Normal|link=Gardestrike]] | |||
|- align="center" style="background-color: #E6E6FA;" | |||
| width="10px" | | |||
| align="left" | Level 525 | |||
|} | |||
== '''Efetividades''' == | |||
'''Muito Efetivo:''' Poison and Steel.<br /> | |||
'''Normal:''' Normal, Fire, Water, Grass, Electric, Ice, Ground, Flying, Psychic, Rock, Ghost, Crystal and Fairy.<br /> | |||
'''Muito Inefetivo:''' Fighting, Bug and Dark.<br /> | |||
'''Nulo:''' Dragon.<br /> | |||
== '''Outras Versões''' == | |||
{| class="wikitable" | |||
|- style="vertical-align:top; text-align=center;" | |||
| style="width:50px; text-align:center;" | <b>[[Arquivo:210-Granbull.png|link=Granbull]]</b> | |||
| style="width:150px; text-align:center;" | <b>'''[[Granbull]]'''</b> | |||
|- style="vertical-align:top; text-align=center;" | |||
| style="width:50px; text-align:center;" | <b>[[Arquivo:shiny granbull.png|link=Shiny Granbull]]</b> | |||
| style="width:150px; text-align:center;" | <b>'''[[Shiny Granbull]]'''</b> | |||
|} | |} | ||
''' | =='''BLASTOISE'''== | ||
<center>[[Arquivo:Shiblastoise.gif|link=Shiny Blastoise]]</center> | |||
== '''Informações Gerais''' == | |||
'''Nome:''' Shiny Blastoise<br /> | |||
'''Level:''' 100<br /> | |||
'''Elemento:''' Water<br /> | |||
'''Habilidades:''' Dig, Rock Smash, Surf and Headbutt.<br /> | |||
'''Boost:''' Water Stone (2)<br /> | |||
'''Materia:''' Seavell Mastered | |||
== '''Evoluções''' == | |||
'''Blastoise''' precisa de Level 100.<br /> | |||
'''Shiny Blastoise''' precisa de Level 100.<br /> | |||
== '''Descrição:''' == | |||
Um Blastoise antigo, muito difícil de ser encontrado. Os jatos d'água que jorra dos canhões de foguetes em sua concha podem perfurar aço espesso. | |||
== '''Movimentos''' == | |||
{| border="0" style="border-collapse:collapse" | |||
|- align="center" style="background-color: #E6E6FA;" | |||
! rowspan="2" | M1 | |||
| width="10px" | | |||
| align="left" | Bubble (8s) | |||
| width="50px" rowspan="2" | | |||
| rowspan="2" align="right" | [[Arquivo:Target.png|Target]] [[Arquivo:Damage.png|Damage]] | |||
| rowspan="2" | [[Arquivo:Water.png|Water|link=Seavell]] | |||
|- align="center" style="background-color: #E6E6FA;" | |||
| width="10px" | | |||
| align="left" | Level 525 | |||
|- align="center" | |||
! rowspan="2" | M2 | |||
| width="10px" | | |||
| align="left" | Bubble Beam (18s) | |||
| width="50px" rowspan="2" | | |||
| rowspan="2" align="right" | [[Arquivo:Target.png|Target]] [[Arquivo:Damage.png|Damage]] | |||
| rowspan="2" | [[Arquivo:Water.png|Water|link=Seavell]] | |||
|- align="center" | |||
| width="10px" | | |||
| align="left" | Level 525 | |||
|- align="center" style="background-color: #E6E6FA;" | |||
! rowspan="2" | M3 | |||
| width="10px" | | |||
| align="left" | Water Pulse (40s) | |||
| width="50px" rowspan="2" | | |||
| rowspan="2" align="right" | [[Arquivo:AOE.png|AOE]] [[Arquivo:Damage.png|Damage]] | |||
| rowspan="2" | [[Arquivo:Water.png|Water|link=Seavell]] | |||
|- align="center" style="background-color: #E6E6FA;" | |||
| width="10px" | | |||
| align="left" | Level 525 | |||
|- align="center" | |||
! rowspan="2" | M4 | |||
| width="10px" | | |||
| align="left" | Hydro Cannon (20s) | |||
| width="50px" rowspan="2" | | |||
| rowspan="2" align="right" | [[Arquivo:AOE.png|AOE]] [[Arquivo:Damage.png|Damage]] | |||
| rowspan="2" | [[Arquivo:Water.png|Water|link=Seavell]] | |||
|- align="center" | |||
| width="10px" | | |||
| align="left" | Level 525 | |||
|- align="center" style="background-color: #E6E6FA;" | |||
! rowspan="2" | M5 | |||
| width="10px" | | |||
| align="left" | Hydro Pump (40s) | |||
| width="50px" rowspan="2" | | |||
| rowspan="2" align="right" | [[Arquivo:AOE.png|AOE]] [[Arquivo:Damage.png|Damage]] | |||
| rowspan="2" | [[Arquivo:Water.png|Water|link=Seavell]] | |||
|- align="center" style="background-color: #E6E6FA;" | |||
| width="10px" | | |||
| align="left" | Level 525 | |||
|- align="center" | |- align="center" | ||
| | ! rowspan="2" | M6 | ||
| | | width="10px" | | ||
| align="left" | Skull Bash (40s) | |||
| | | width="50px" rowspan="2" | | ||
| | | rowspan="2" align="right" | [[Arquivo:AOE.png|AOE]] [[Arquivo:Damage.png|Damage]] [[Arquivo:Paralyze.png|Paralyze]] | ||
| | | rowspan="2" | [[Arquivo:Water.png|Water|link=Seavell]] | ||
| | |- align="center" | ||
| | | width="10px" | | ||
| align="left" | Level 525 | |||
| | |||
| | |- align="center" style="background-color: #E6E6FA;" | ||
! rowspan="2" | M7 | |||
| width="10px" | | |||
| align="left" | Withdraw (40s) | |||
| width="50px" rowspan="2" | | |||
| rowspan="2" align="right" | [[Arquivo:Self.png|Self]] [[Arquivo:Buff.png|Buff]] [[Arquivo:Debuff.png|Debuff]] [[Arquivo:Nevermiss.png|Nevermiss]] | |||
| rowspan="2" | [[Arquivo:Water.png|Water|link=Seavell]] | |||
|- align="center" style="background-color: #E6E6FA;" | |||
| width="10px" | | |||
| align="left" | Level 525 | |||
|- align="center" | |- align="center" | ||
| | ! rowspan="2" | M8 | ||
| | | width="10px" | | ||
| | | align="left" | Ancient Armor (40s) | ||
| | | width="50px" rowspan="2" | | ||
| | | rowspan="2" align="right" | [[Arquivo:Self.png|Self]] [[Arquivo:Buff.png|Buff]] | ||
| rowspan="2" | [[Arquivo:Normal1.png|Normal|link=Gardestrike]] | |||
|- align="center" | |- align="center" | ||
| | | width="10px" | | ||
| align="left" | Level 525 | |||
| | |||
|- align="center" style="background-color: #E6E6FA;" | |||
! rowspan="2" | P | |||
| width="10px" | | |||
| align="left" | Natural Leader | |||
| width="50px" rowspan="2" | | |||
| rowspan="2" align="right" | [[Arquivo:Passive.png|Passive]] [[Arquivo:AOE.png|AOE]] [[Arquivo:Buff.png|Buff]] | |||
| rowspan="2" | [[Arquivo:Normal1.png|Normal|link=Gardestrike]] | |||
|- align="center" style="background-color: #E6E6FA;" | |||
| width="10px" | | |||
| align="left" | Level 525 | |||
|- align="center" | |- align="center" | ||
!align=" | ! rowspan="2" | P | ||
| width="10px" | | |||
| align="left" | Protector | |||
| width="50px" rowspan="2" | | |||
| rowspan="2" align="right" | [[Arquivo:Passive.png|Passive]] [[Arquivo:Buff.png|Buff]] | |||
| rowspan="2" | [[Arquivo:Normal1.png|Normal|link=Gardestrike]] | |||
|- align="center" | |- align="center" | ||
| | | width="10px" | | ||
| align="left" | Level 525 | |||
| | |||
| | |||
|} | |} | ||
''' | == '''Efetividades''' == | ||
</ | '''Muito Efetivo:''' Grass and Electric.<br /> | ||
'''Normal:''' Normal, Fighting, Poison, Ground, Flying, Psychic, Bug, Rock, Ghost, Dragon, Dark, Crystal and Fairy.<br /> | |||
'''Muito Inefetivo:''' Fire, Water, Ice and Steel.<br /> | |||
== '''Outras Versões''' == | |||
{| class="wikitable" | |||
|- style="vertical-align:top; text-align=center;" | |||
| style="width:50px; text-align:center;" | <b>[[Arquivo:0009-Blastoise.png|link=Blastoise]]</b> | |||
| style="width:150px; text-align:center;" | <b>'''[[Blastoise]]'''</b> | |||
|- style="vertical-align:top; text-align=center;" | |||
| style="width:50px; text-align:center;" | <b>[[Arquivo:SshBlastoise.png|link=Shiny Blastoise]]</b> | |||
| style="width:150px; text-align:center;" | <b>'''[[Shiny Blastoise]]'''</b> | |||
|- style="vertical-align:top; text-align=center;" | |||
| style="width:50px; text-align:center;" | <b>[[Arquivo:MegaBlastoise.png|link=Mega Blastoise]]</b> | |||
| style="width:150px; text-align:center;" | <b>'''[[Mega Blastoise]]'''</b> | |||
|- style="vertical-align:top; text-align=center;" | |||
| style="width:50px; text-align:center;" | <b>[[Arquivo:Shinymegatoise.png|link=Shiny Mega Blastoise]]</b> | |||
| style="width:150px; text-align:center;" | <b>'''[[Shiny Mega Blastoise]]'''</b> | |||
|} | |||
Clique nas imagens para acessar o spoiler das quests.
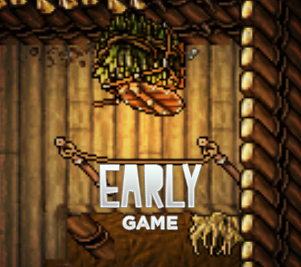
Local: Pewter, Viridian e Pallet
Nível Mínimo 8
Habilidades Necessárias: Dig e Cut
| Itens | Quantidade | |
|---|---|---|
| 30 | ||
| 8 | ||
| 8 | ||
| 25 | ||
| 3 | ||
| 20 | ||
| 5 | ||
| 2 | ||
| 1 | ||
| 30 Empty Poké Balls | |
| 8 Empty Great Balls | |
| 8 Small Potions | |
| 25 Great Potions | |
| 3 Revives | |
| 20 Medicines | |
| 5 Sushis | |
| 2 Rubys | |
| 1 Old Backpack |
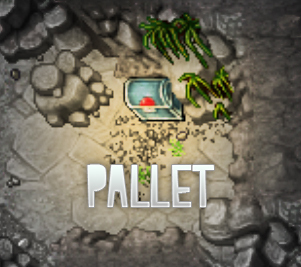
Local: Caverna ao norte de Pallet
Nível Mínimo -
Recompensas:
| 10 Small Potions | |
| 5 Empty Great Balls | |
| 3 Empty Super Balls |
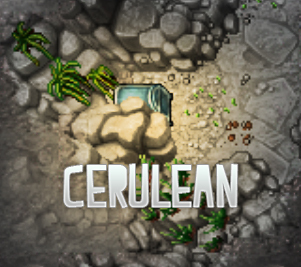
Local: Praia de Cerulean
Nível Mínimo 15
Habilidades Necessárias: Rock Smash
Recompensas:
| 10 Empty Poké Balls | |
| 5 Empty Great Balls | |
| 2 Empty Super Balls | |
| 1 Empty Ultra Ball |
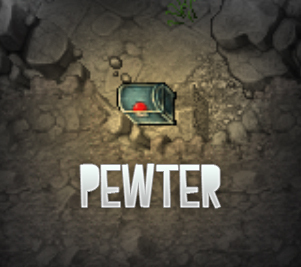
Local: Montanha ao nordeste de Pewter
Nível Mínimo 25
Habilidades Necessárias: Rock Smash e Fly (ou Surf)
Recompensas:
| 5.000 Dollars | |
| 100 Empty Poké Balls | |
| 25 Empty Super Balls |
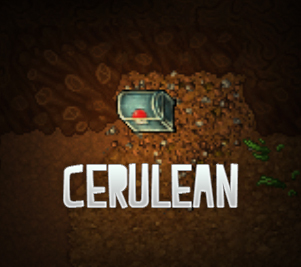
Local: Pântano de Cerulean
Nível Mínimo 30
Habilidades Necessárias: Rock Smash e Cut (ou Fly)
Recompensas:
| 8.000 Dollars | |
| 50 Empty Great Balls | |
| 20 Empty Super Balls | |
| 1 Venom Flute |

Local: Rock Tunnel
Nível Mínimo 35
Habilidades Necessárias: Rock Smash
Recompensas:
| 10.000 Dollars | |
| 100 Empty Great Balls | |
| 50 Empty Super Balls |
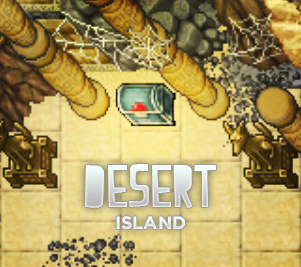
Local: Desert Island
Nível Mínimo 40
Habilidades Necessárias: Dig e Fly (ou Surf)
Recompensas:
| 15.000 Dollars | |
| 100 Empty Great Balls | |
| 50 Empty Super Balls | |
| 20 Empty Ultra Balls |
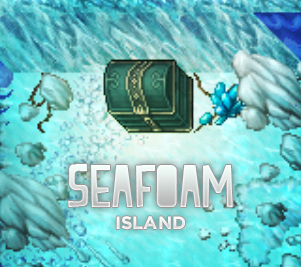
Local: Seafoam Islands
Nível Mínimo 40
Habilidades Necessárias: Fly (ou Surf)
Recompensas:
| 15.000 Dollars | |
| 100 Empty Great Balls | |
| 50 Empty Super Balls | |
| 20 Empty Ultra Balls |

Local: Subterrâneo de Leek Island
Nível Mínimo 40
Habilidades Necessárias: Cut e Fly (ou Surf)
Recompensas:
| 100 Super Balls | |
| 1 Feather Stone |

Local: Tangelo Island
Nível Mínimo 40
Habilidades Necessárias: Fly e Surf
Recompensas:
| 50 Empty Ultra Balls | |
| 1 Punch Stone |
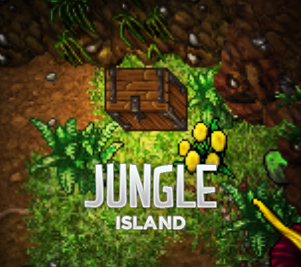
Local: Jungle Island
Nível Mínimo 50
Habilidades Necessárias: Fly (ou Surf)
Recompensas:
| 60 Empty Ultra Balls | |
| 1 Venom Stone | |
| 1 Leaf Stone |
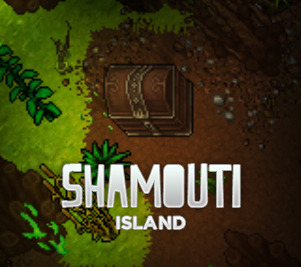
Local: Subterrâneo de Shamouti
Nível Mínimo 60
Habilidades Necessárias: Fly (ou Surf)
Recompensas:
| 5.000 Dollars | |
| 40 Revives | |
| 1 Venom Stone | |
| 1 Cocoon Stone |
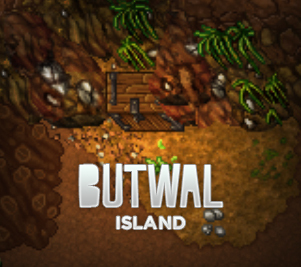
Local: Cavernas de Butwal Island
Nível Mínimo 60
Habilidades Necessárias: Fly (ou Surf)
Recompensas:
| 8.000 Dollars | |
| 30 Revives | |
| 1 Leaf Stone | |
| 1 Cocoon Stone |
Local: Mar embaixo de Butwal Island
Nível Mínimo 60
Habilidades Necessárias: Cut e Fly (ou Surf)
Recompensas:
| 5.000 Dollars | |
| 40 Revives | |
| 1 Thunder Stone | |
| 1 Water Stone |
Local: Cavernas de Magma Island
Nível Mínimo 60
Habilidades Necessárias: Fly (ou Surf)
Recompensas:
| 8.000 Dollars | |
| 100 Hyper Potions | |
| 1 Darkness Stone | |
| 1 Fire Stone |
Local: Cavernas de Cleopatra Island
Nível Mínimo 60
Habilidades Necessárias: Fly (ou Surf)
Recompensas:
| 80 Empty Ultra Balls | |
| 2 Steelix Tails | |
| 1 Earth Stone | |
| 1 Feather Stone |
Local: Mar embaixo de Kinnow Islands
Nível Mínimo 60
Habilidades Necessárias: Fly e Surf
Recompensas:
| 50 Revives | |
| 2 Gyarados Tail | |
| 1 Thunder Stone | |
| 1 Water Stone |
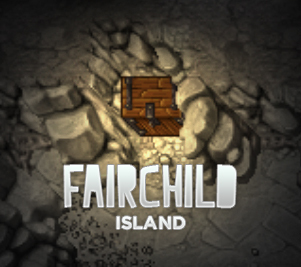
Local: Subterrâneo de Fairchild Island
Nível Mínimo 60
Habilidades Necessárias: Fly (ou Surf)
Recompensas:
| 100 Ultra Balls | |
| 2 Earth Stones |

Local: Subsolo de Petalgroove Island
Nível Mínimo 60
Habilidades Necessárias: Fly
Recompensas:
| 60 Ultra Balls | |
| 1 Heart Stone |

Local: Tangelo Island
Nível Mínimo 100
Habilidades Necessárias: Fly ou Surf e Rock Smash
Recompensas:
| 50 Empty Ultra Balls | |
| 2 PokéPark Tickets |

Local: Phenac, Agate e Gateon Port
Nível Mínimo 150
Habilidades Necessárias: Rock Smash e Fly (ou Surf)
Recompensas:
| 1200 Empty Ultra Balls | |
| 350 Ultimate Potions | |
| 100 Restore Potions | |
| 650 Max Revives | |
| 1 Mewburguer | |
| 3 Lum Berries | |
| 3 Sitrus Berries | |
| 1 XP Boost | |
| 8 Minor XP Boosts | |
| 5 Minor Fortune Totem | |
| 30 Swordsman's Elixirs | |
| 30 Defense Elixirs | |
| 30 Running Elixirs | |
| 8 Wiseman Elixirs | |
| 7 Healing Elixirs | |
| 6 Bounty Elixirs | |
| 4 Fortune Elixirs | |
| 10 Energy Drinks |
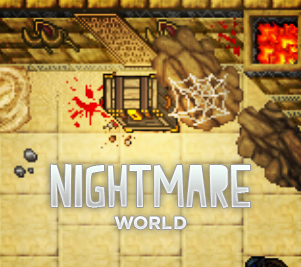
Local: Todo o Mapa de Nightmare World
Níveis Mínimos Level 300, NW Level 15
Habilidades Necessárias: Mecha Fly
Recompensas:
| 1.160 Small Nightmare Potions | |
| 610 Medium Nightmare Potions | |
| 24 Shield Nightmare Potions | |
| 81 Nightmare Revives | |
| 50 Empty Sora Balls | |
| 50 Empty Net Balls | |
| 80 Empty Tinker Balls | |
| 200 Empty Janguru Balls | |
| 130 Empty Nightmare Balls | |
| 5 Empty Beast Balls | |
| 1 Metal Stone | |
| 1 Crystal Stone | |
| 1 Ancient Stone | |
| 3 Passho Berries | |
| 3 Chesto Berries | |
| 3 Babiri Berries | |
| 3 Shuca Berries | |
| 5 Tanga Berries | |
| 5 Occa Berries | |
| 5 Colbur Berries | |
| 13 Rindo Berries | |
| 2 Aspear Berries | |
| 3 Charti Berries | |
| 6 Lum Berries | |
| 10 Sitrus Berries | |
| 3 Azure Shard | |
| 2 Cerise Shards | |
| 2 Indigo Shards | |
| 1 Shell Shard | |
| 1 Harlequin Shard | |
| 1 Damson Shard | |
| 1 Kermes Shard | |
| 3 Knowledge Elixir | |
| 2 Minor Fortune Totems | |
| 1 Big Fortune Totem | |
| 1 X-Unknown (Tier:3) | |
| 3 Y-Ghost (Tier:3) | |
| 10 Magician Tokens | |
| 10 Shoyu Tentacles | |
| 3 Gengar Amulets | |
| 1 Shiny Gengar Amulet | |
| 2 Great Special Lure | |
| 20 Golden Fishs | |
| 60 Fuel Tanks | |
| 1 Pikachu Picture | |
| 1 Mamoswine Toy | |
| 1 Ancient Scroll | |
| 3 Black Nightmare Gems |
![]()
![]()
Nível Mínimo: 15
Habilidades Necessárias: Rock Smash
Recompensa: 10 Empty Poké Balls, 5 Empty Great Balls, 2 Empty Super Balls e 1 Empty Ultra Ball
Caso encontre algum erro ou queira acrescentar alguma informação, entre em contato com um dos membros da wiki.
Para começar a quest, vá até Cerulean e siga em direção à praia, localizada ao norte da cidade.
Trajeto 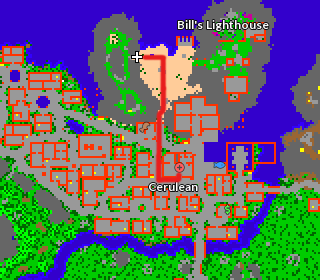 |
Entrada da Caverna 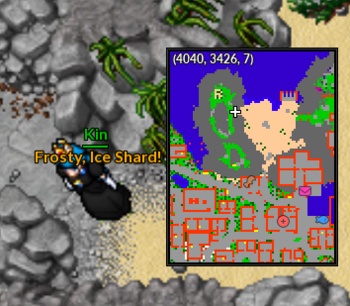 Coordenadas (4040, 3426, 7) |
A partir desse ponto, o jogador deverá acessar a caverna à esquerda e se preparar para enfrentar os seguintes Pokémon pelo caminho: ![]() Zubat,
Zubat, ![]() Golbat e
Golbat e ![]() Geodude.
Geodude.
Seguindo o caminho indicado, tomando o devido cuidado, o jogador encontrará algumas pedras que o impedirá de seguir o trajeto, essas que precisarão ser quebradas por algum Pokémon que possua a habilidade Rock Smash .
| Trajeto | Utilizando Rock Smash |
|---|---|
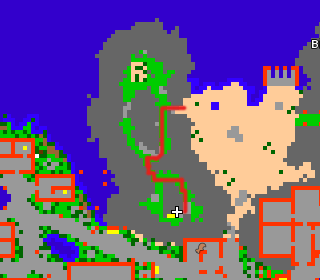 |
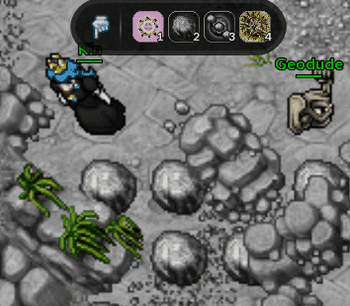
|
| Escada 1º Andar | |
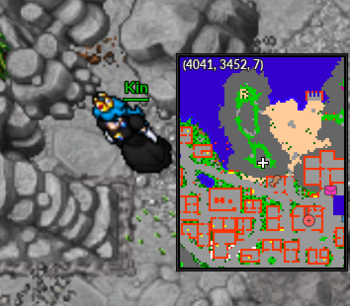 Coordenadas (4041, 3452, 7) | |
Subindo as escadas no final do trajeto, encontrará um novo corredor. Passe por ele derrotando os Pokémon pelo caminho e, novamente, suba as escadas.
Trajeto 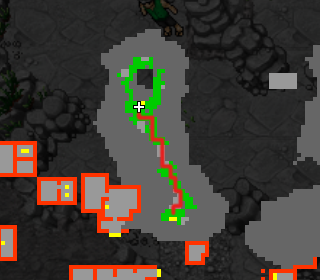 |
Escada 2º Andar  Coordenadas (4031, 3425, 6) |
O jogador deve descer até o final da montanha e então, encontrará o baú. Lembre-se de que não é possível resgatar a recompensa se houver algum Pokémon por perto, então derrote todos.
Trajeto  |
Escada 2º Andar 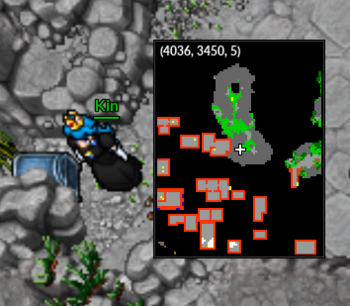 Coordenadas (4036, 3450, 5) |
Ao abrir o baú, receberá os seguintes itens:
| Itens | Quantidade | |
|---|---|---|
| 10 | ||
| 5 | ||
| 2 | ||
| 1 | ||
Ao receber sua recompensa, o jogador deve retornar por todo o caminho com muito cuidado.
![]()
![]()
Nível Mínimo: 25
Habilidades Necessárias: Nenhuma
Recompensa: 5.000 dollars, 100 Empty Poké Balls e 25 Empty Great Balls
Caso encontre algum erro ou queira acrescentar alguma informação, entre em contato com um dos membros da wiki.
Para iniciar esta missão, vá até a cidade de Pewter, como mostrado a seguir:

Siga em direção ao norte do Centro Pokémon e encontrará uma escada que levará ao Museu da cidade. Subindo a escada o jogador terá que atravessar por dentro da caverna que se encontra a oeste do Museu.
| Trajeto | Escada |
|---|---|
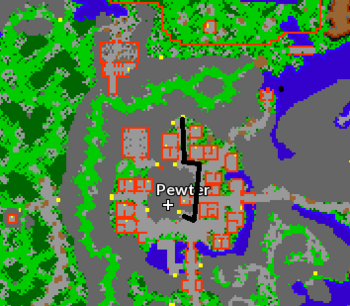 |
 Coordenadas (3701, 3467, 7) |
| Trajeto andar superior | |
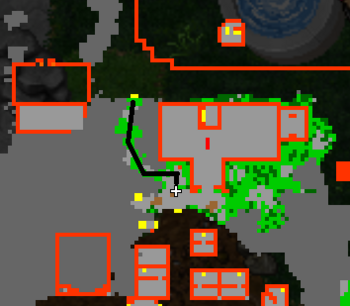 | |
Descendo a escada ao final da caverna, basta o jogador seguir para o leste que encontrará a entrada para a caverna da quest.
| Trajeto | Entrada da Caverna |
|---|---|
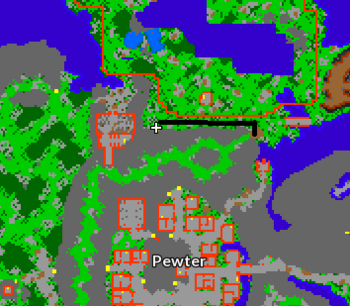 |
 Coordenadas (3690, 3436, 7) |
Observação: Há outras formas de chegar até a entrada da caverna da quest, mas será necessário que o jogador possua um Pokémon que tenha a habilidade Fly ou Surf.
A partir daqui, esteja preparado para enfrentar uma enorme variedade de Pokémon pelo caminho. Eles estarão prontos para proteger o baú, portanto, tenha cuidado! O jogador irá encontrar: ![]() Sandslash,
Sandslash, ![]() Geodude,
Geodude, ![]() Graveler,
Graveler, ![]() Golem,
Golem, ![]() Onix,
Onix, ![]() Rhyhorn e
Rhyhorn e ![]() Rhydon.
Rhydon.
Siga o caminho demonstrado no mapa abaixo derrotando todos os Pokémon pelo caminho. Ao final da montanha, encontrará o baú com as recompensas.
Trajeto  |
Baú  Coordenadas (3664, 3570, 7) |
Ao abrir o baú, o jogador receberá os itens:
| Itens | Quantidade | |
|---|---|---|
| 50 (5k) | ||
| 100 | ||
| 25 | ||
Ao receber sua recompensa, o jogador será automaticamente teleportado para o centro Pokémon da cidade de Pewter.
![]()
![]()
Nível Mínimo: 30
Habilidades Necessárias: Rock Smash e Cut (ou Fly)
Recompensa: 8.000 dollars, 50 Empty Great Balls, 20 Empty Super Balls e 1 Venom Flute
Caso encontre algum erro ou queira acrescentar alguma informação, entre em contato com um dos membros da wiki.
Para começar, vá até Cerulean e siga em direção ao Cerulean Swamp, um pântano localizado à esquerda da cidade.
O jogador deve estar preparado para enfrentar vários Pokémon do tipo venenoso durante toda a missão. São eles: ![]() Ekans,
Ekans, ![]() Arbok,
Arbok, ![]() Zubat,
Zubat, ![]() Golbat,
Golbat, ![]() Paras,
Paras, ![]() Parasect,
Parasect, ![]() Koffing e
Koffing e ![]() Weezing.
Weezing.
Durante este trajeto, o jogador encontrará um bloqueio no caminho e necessitará de um Pokémon com a Habilidade Rock Smash ou Cut. Caso prefira, poderá cortar este caminho utilizando Fly até o local final, indicado no mapa acima. Ao entrar na cabana, clique no bueiro para acessar o subsolo e continuar a missão.
1ª Parada 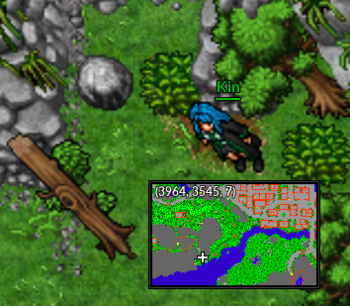 Coordenadas (3964, 3545, 7) |
2ª Parada 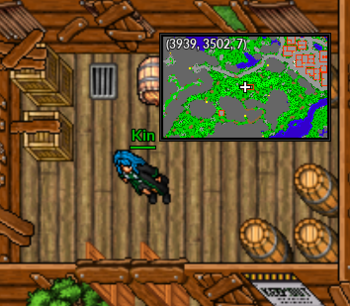 Coordenadas (3939, 3502, 7) |
Pegue o caminho à direita e siga até o final, onde encontrará algumas escadas.
Trajeto 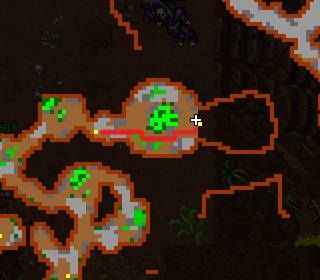 Seguir ao Leste |
Escada 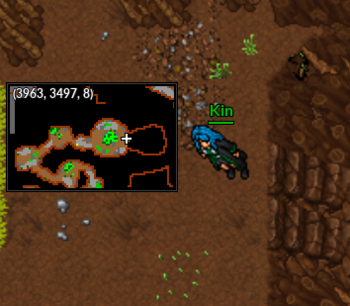 Coordenadas (3963, 3497, 8) |
Após descer as escadas, siga o caminho indicado ao leste com muito cuidado. O jogador encontrará vários Pokémon pelo caminho protegendo o baú.
Trajeto 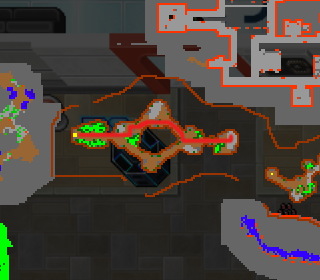 Continuar ao Leste |
Escada 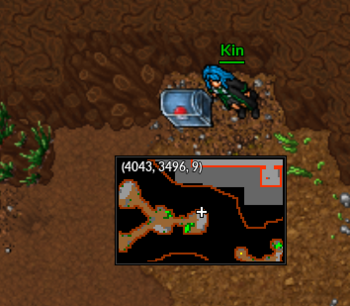 Coordenadas (4043, 3496, 9) |
Ao abrir o baú, o jogador receberá as seguintes recompensas:
| Itens | Quantidade | |
|---|---|---|
| 80 (8K) | ||
| 50 | ||
| 20 | ||
| 1 | ||
Ao receber sua recompensa, o jogador será automaticamente teleportado para a sua cidade natal.
Nível Mínimo: 35
Habilidade Necessária: Rock Smash
Recompensa: 100 Empty Great Balls, 50 Empty Super Balls e 100 Hundred Dollars (10K).
Caso encontre algum erro ou queira acrescentar alguma informação, entre em contato com um dos membros da wiki.
Para iniciar a quest, vá até a cidade de Lavender, como mostrado na imagem:
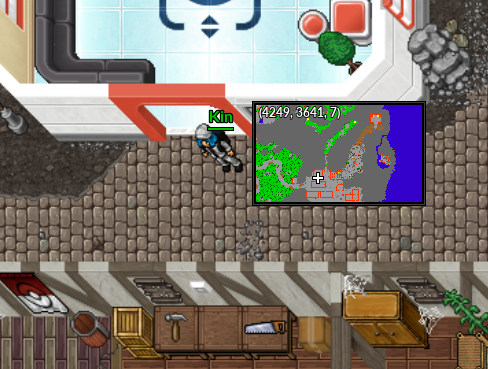
Pegue o caminho à direita do Centro Pokémon em direção ao norte e siga até encontrar algumas pedras obstruindo o caminho, nessa parte será necessário utilizar um Pokémon com a habilidade Rock Smash. Após a liberação do caminho, o jogador deve continuar ao nordeste. Nessa área terá alguns ![]() Paras, mas fique tranquilo, eles são pacíficos. Ao chegar no final do caminho, suba as escadas.
Paras, mas fique tranquilo, eles são pacíficos. Ao chegar no final do caminho, suba as escadas.
Trajeto  |
Escada 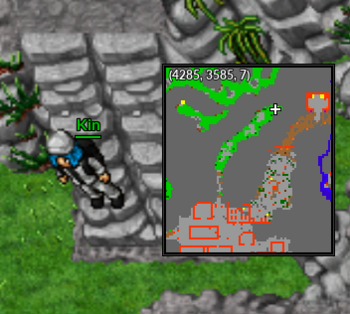 Coordenadas (4285, 3585, 7) |
O jogador deve continuar subindo, neste caminho encontrará alguns ![]() Machop e
Machop e ![]() Machoke. Novamente, suba a escada no final.
Machoke. Novamente, suba a escada no final.
Trajeto 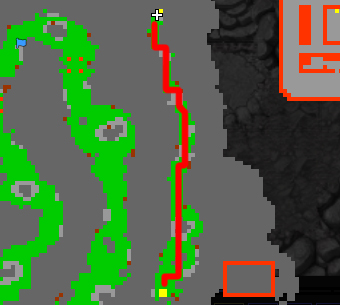 |
Escada 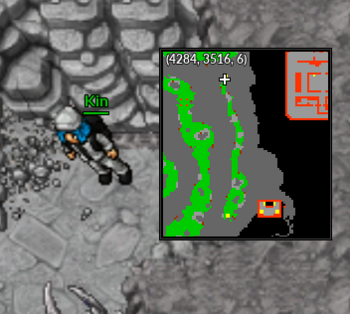 Coordenadas (4284, 3516, 6) |
A partir deste caminho aparecerão vários Pokémon do tipo pedra e terra. Dentre eles estão: ![]() Geodude,
Geodude, ![]() Graveler,
Graveler, ![]() Golem,
Golem, ![]() Onix,
Onix, ![]() Rhyhorn e
Rhyhorn e ![]() Rhydon.
Rhydon.
Para ir até o baú, faça o caminho indicado:
Trajeto 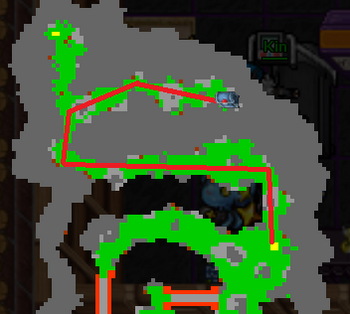 |
Baú 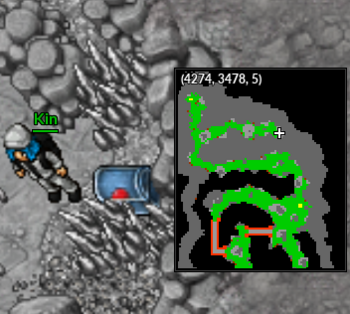 Coordenadas (4274, 3478, 5) |
Seguindo o caminho indicado o jogador deverá ficar atento, pois em um momento deste trajeto haverá muitos Pokémon juntos protegendo o baú de recompensas, portanto, siga em frente com muito cuidado!
Após derrotar todos os Pokémon, clique no baú e receberá as seguintes recompensas:
| Itens | Quantidade | |
|---|---|---|
| 100 (10K) | ||
| 100 | ||
| 50 | ||
Assim que receber as recompensas será teletransportado automaticamente para o Centro Pokémon de Lavender.
Nível Mínimo: 40
Habilidades Necessárias: Dig e Surf (ou Fly)
Recompensa: 150 Hundred Dollars (15K), 100 Empty Great Balls, 50 Empty Super Balls e 20 Empty Ultra Balls
Caso encontre algum erro ou queira acrescentar alguma informação, entre em contato com um dos membros da wiki.
Para começar, vá até Desert Island, uma ilha desértica localizada à leste da cidade de Lavender. Lembre-se de levar um Pokémon com a habilidade Dig, pois será necessária durante o trajeto.
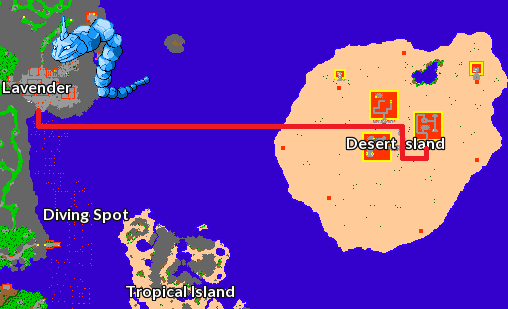
Chegando na ilha, dirija-se à entrada da pirâmide mostrada na imagem acima. A partir deste caminho, encontrará muitos Pokémon do elemento psíquico, são eles: ![]() Abra,
Abra, ![]() Kadabra,
Kadabra, ![]() Alakazam,
Alakazam, ![]() Drowzee e
Drowzee e ![]() Hypno.
Hypno.
Ao entrar na pirâmide, certifique-se de estar carregando um Pokémon com a habilidade Dig e siga o caminho indicado nas imagens a seguir:
Trajeto 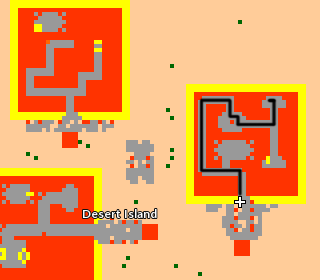 |
1ª Cavação 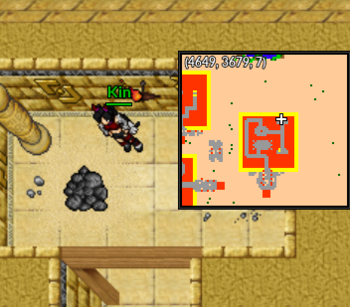 Coordenadas (4649, 3679, 7) |
Trajeto 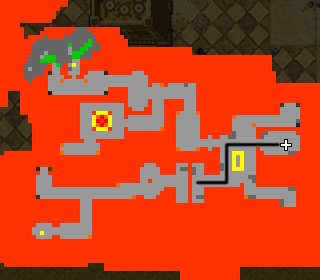 |
2ª Cavação 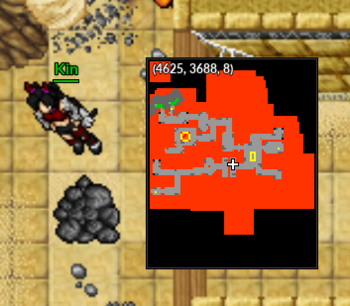 Coordenadas (4625, 3688, 8) |
Continue avançando com cautela, quanto mais descer, mais Pokémon estarão pelo caminho para proteger o baú.
Trajeto 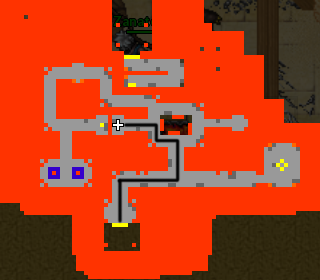 |
1ª Escada 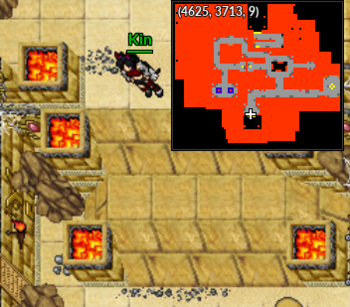 Coordenadas (4625, 3713, 9) |
Trajeto 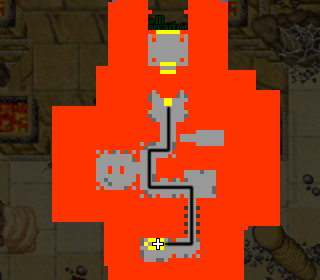 |
2ª Escada 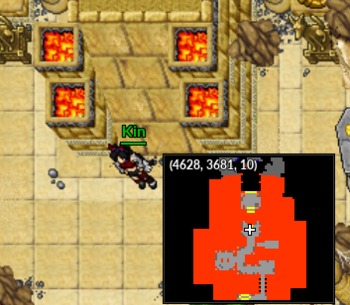 Coordenadas (4628, 3681, 10) |
Trajeto 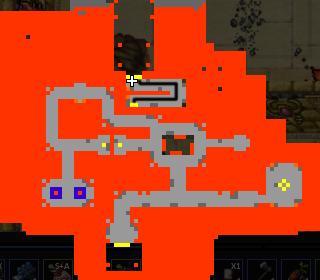 |
3ª Escada 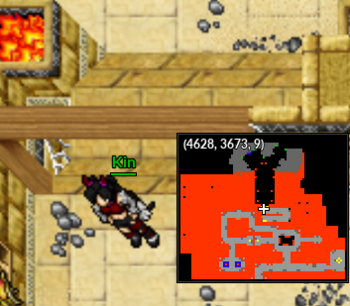 Coordenadas (4628, 3673, 9) |
Neste momento o jogador já se aproxima do baú de recompensas. É hora de se preparar para enfrentar uma grande quantidade de Pokémon, portanto, tenha cuidado.
Trajeto 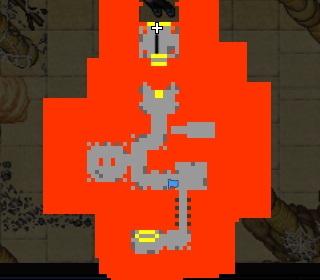 |
4ª Escada 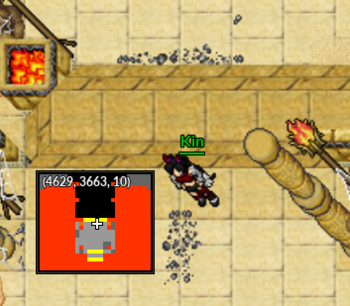 Coordenadas (4629, 3663, 10) |
Trajeto  |
Baú 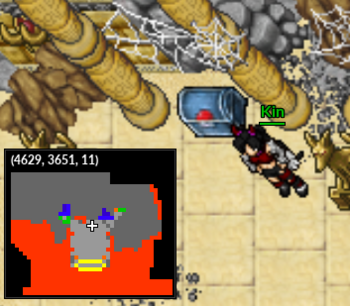 Coordenadas (4629, 3651, 11) |
Ao encontrar e abrir o baú, o jogador receberá os seguintes itens:
| Itens | Quantidade | |
|---|---|---|
| 150 (15K) | ||
| 100 | ||
| 50 | ||
| 20 | ||
Ao receber sua recompensa, o jogador será automaticamente teleportado para o centro Pokémon de sua cidade Natal.
Nível Mínimo: 40
Habilidades Necessárias: Surf (ou Fly)
Recompensa: 150 Hundred dollars (15K), 100 Empty Great Balls, 50 Empty Super Balls e 20 Empty Ultra Balls
Caso encontre algum erro ou queira acrescentar alguma informação, entre em contato com um dos membros da wiki.
Para iniciar a missão, vá até Seafoam Island, uma ilha localizada a sudoeste da cidade de Fuchsia.
| Veja mais: NPC Skier (Outfits) |
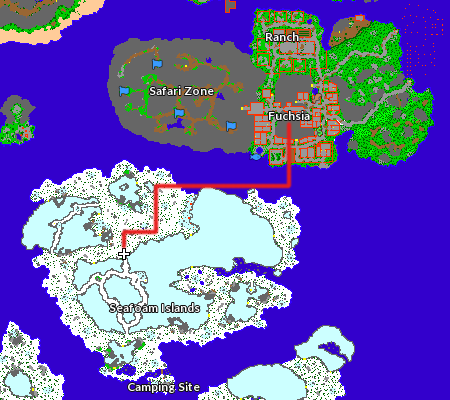
Ao chegar na ilha, siga o caminho demonstrado na imagem a seguir e, em seguida, desça as escadas.
Trajeto  |
Escada 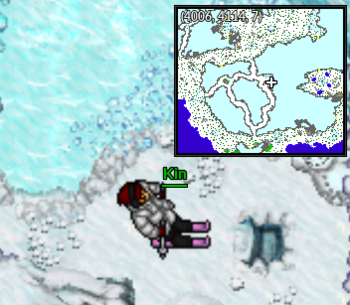 Coordenadas (4006, 4114, 7) |
A partir daqui, o jogador irá encontrar os seguintes Pokémon pelo trajeto: ![]() Seel,
Seel, ![]() Dewgong,
Dewgong, ![]() Shellder,
Shellder, ![]() Cloyster,
Cloyster, ![]() Jynx,
Jynx, ![]() Lapras e
Lapras e ![]() Glalie.
Glalie.
Percorra todo o longo caminho de gelo com bastante cuidado, pois irá encontrar uma grande quantidade de Pokémon enquanto procura pelo baú.
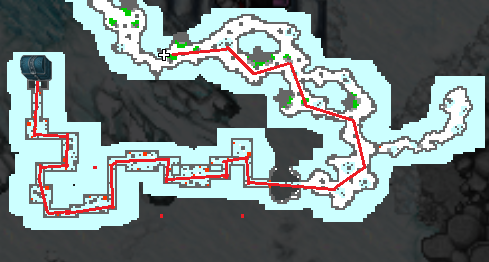
Ao chegar no final do trajeto, encontrará o baú e poderá resgatar suas recompensas.
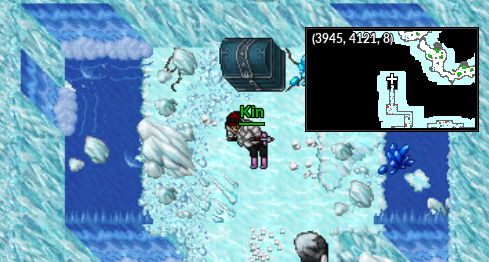
O jogador receberá os seguintes itens:
| Itens | Quantidade | |
|---|---|---|
| 150 (15K) | ||
| 100 | ||
| 50 | ||
| 20 | ||
Ao receber sua recompensa, será automaticamente teleportado para o centro Pokémon de sua cidade Natal.
A interface de Personalização da Poké Bola é uma janela que permite que o jogador gerencie os cosméticos disponíveis em um Pokémon entre as opções de Addons, Auras, Cápsulas e Pinturas. Também possuindo os sistema de Troca de Nome do Pokémon e alternância entre os Helds Inativos.
Para abrir a interface, basta utilizar o atalho Ctrl+Botão Direito/Esquerdo do Mouse no Pokémon, assim como informado na imagem abaixo.

Assim que selecionada a opção, será aberto essa janela:
Cosmético para deixar seu Pokémon dentro da moda. Podem ser obtidos através da Diamond Shop, Eventos e fabricado por Profissões. Podendo ser visualizado quando o Pokémon estiver solto.
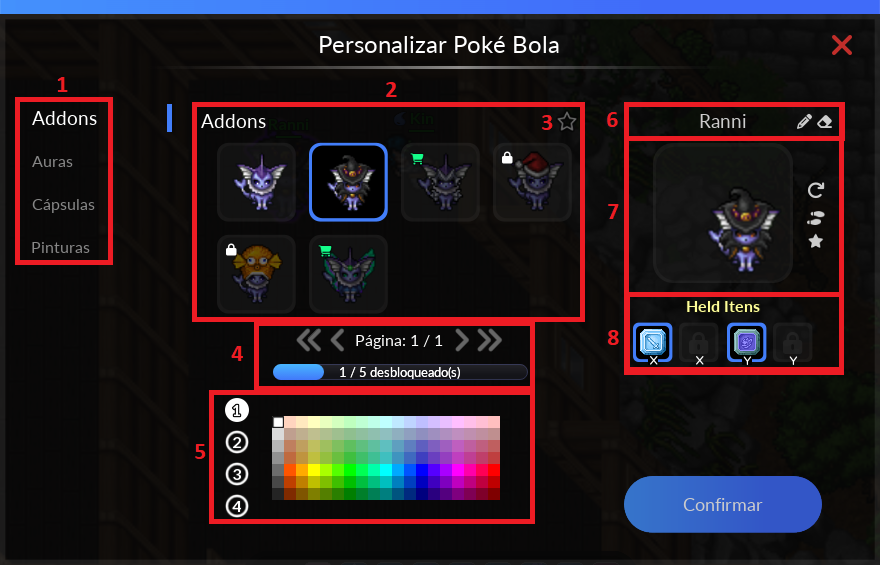
Observações:
|
Após selecionar o efeito desejado, basta clicar no botão de confirmação na interface de customização.
Cosméticos destinados aos Pokémon que são no mínimo +50 ou que estejam na Premier Ball. Pode ser visto quando ele estiver solto.
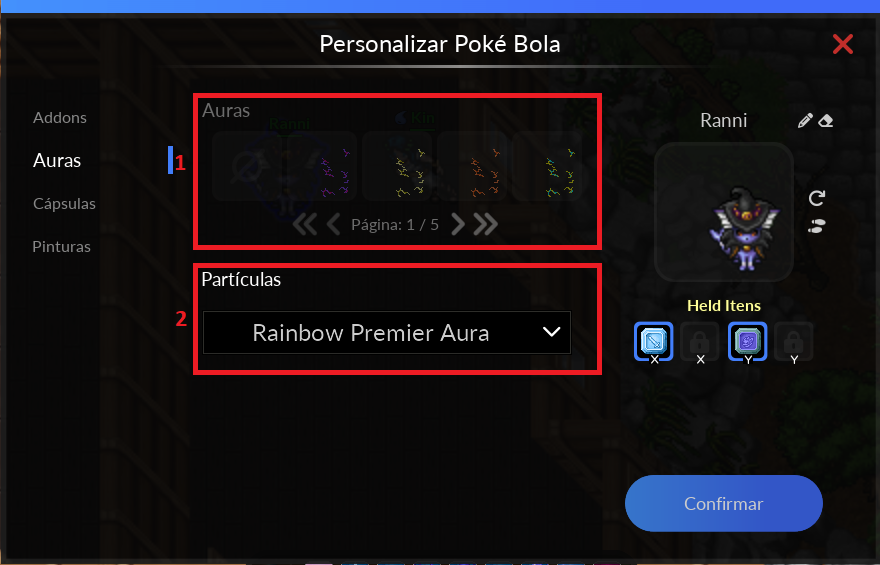
Após realizar qualquer alteração, clicar em Confirmar para aplicar e salvar.
|
Observações:
 Purple Aura |
 Blue Aura |
 Gray Aura |
 Green Aura |
 Orange Aura |
 Red Aura |
 White Aura |
 Yellow Aura |
 Yellow & Cyan Aura |
 Raibolt Urn |
 Orebound Urn |
 Gardestrike Urn |
 Malefic Urn |
 Psycraft Urn |
 Wingeon Urn |
 Seavell Urn |
 Volcanic Urn |
 Naturia Urn |
 Ironhard Urn |
 Seavell Urn 2 |
 Volcanic Urn 2 |
 Naturia Urn 2 |
 Malefic Urn 2 |
• As urnas Seavell, Volcanic e Naturia 2 podem ser adquiridas através de quests.
• A urna Malefic 2 podem ser adquiridas através da dungeon semanal "A maldição de Lavender".
| Veja mais: Stacy Quest, Ditto's Mystery Quest |
 Purple Smoke Aura |
 Blue Smoke Aura |
 Gray Smoke Aura |
 Red Smoke Aura |
 White Smoke Aura |
 Green Smoke Aura |
 Yellow Smoke Aura |
 Pink Heart Aura |
 Red Heart Aura |
 Blue & Green Star Aura |
 Blue & White Star Aura |
 Yellow Star Aura |
 Purple Skull Aura |
 Green Skull Aura |
 White Skull Aura |
 Black Pulse Aura |
 Blue Pulse Aura |
 Cyan Pulse Aura |
 Green Pulse Aura |
 Light Blue Pulse Aura |
 Orange Pulse Aura |
 Pink Pulse Aura |
 Purple Pulse Aura |
 Red Pulse Aura |
 White Pulse Aura |
 Yellow Pulse Aura |
 Black/Red Premier Aura |
 Black/White Premier Aura |
 Black/Yellow Premier Aura |
 Blue/Green Premier Aura |
 Pink/Purple Premier Aura |
 Rainbow Premier Aura |
 Red/Yellow Premier Aura |
 White/Green Premier Aura |
 White/Pink Premier Aura |
 Yellow/Green Premier Aura |
Cosmético para quando o Pokémon for solto ou recolhido.
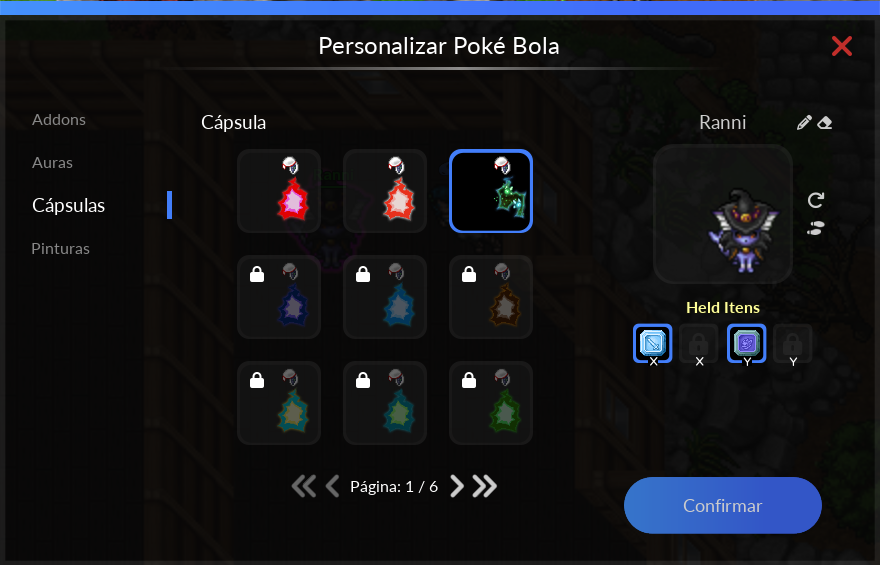
Algumas de suas versões assim como suas formas de obtenção podem ser vistas na página de Cápsulas
Após realizar qualquer alteração, clicar em Confirmar para aplicar e salvar.
|
Cosmético para quando o Pokémon for solto ou recolhido.
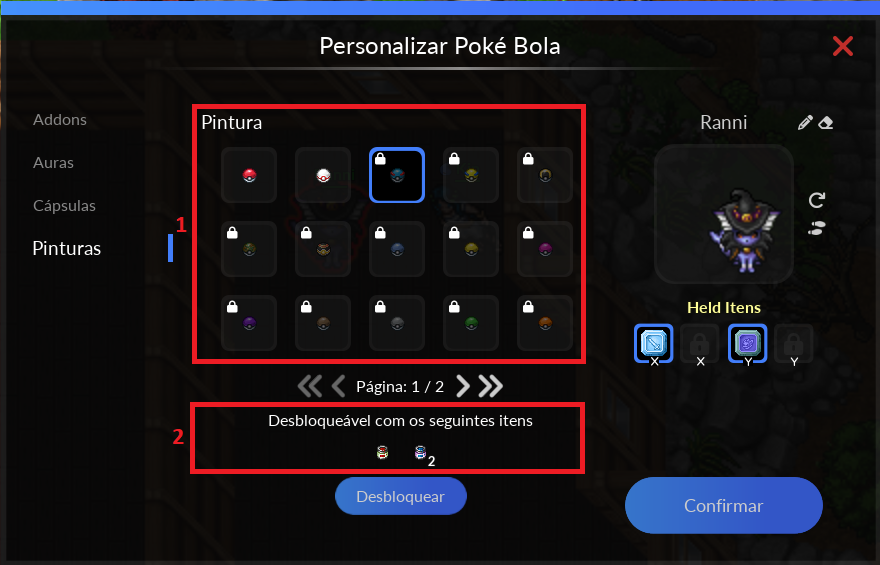
Observação: Possuindo os itens necessários para desbloquear alguma das versões em mãos, basta clicar em Desbloquear que será habilitado para uso.
Após feita qualquer modificação no painel, clique em Confirmar para ser aplicado e salvo.

|
Para realizar a troca do nome do Pokémon, é necessário que ele tenha pelo menos boost +5. O jogador deve abrir a interface de personalização e, na parte superior direita, terá as opções de edição.
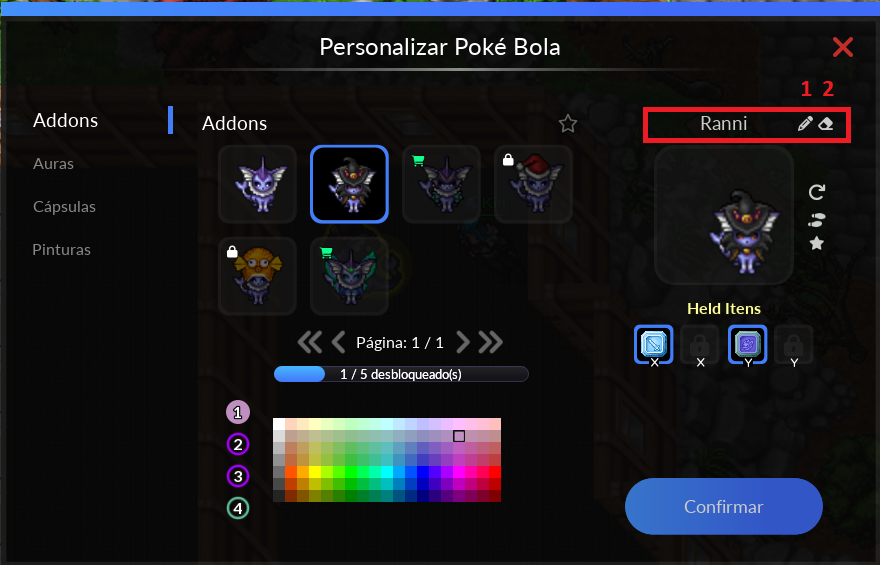
Observações:
Após feita qualquer modificação no painel, clique em Confirmar para ser aplicado e salvo.
|

Nome: Shiny Ariados
Level: 100
Elemento: Bug
Habilidades: Light, Cut and Dig
Boost: Cocoon Stone (2)
Materia: Naturia Mastered.
Shiny Ariados precisa de Level 100.
Este é um Ariados com uma mutação rara. É muito mais forte que o normal. Sua cor é púrpura, pois quase todo o veneno que deveria ter foi para sua carapaça.
| M1 | Sticky Web (25s) | ||||
|---|---|---|---|---|---|
| Level 525 | |||||
| M2 | Bug Bite (10s) | ||||
| Level 525 | |||||
| M3 | Poison Sting (20s) | ||||
| Level 525 | |||||
| M4 | Fury Swipes (20s) | ||||
| Level 525 | |||||
| M5 | X-Scissor (50s) | ||||
| Level 525 | |||||
| M6 | Pin Missile (25s) | ||||
| Level 525 | |||||
| M7 | Bug Buzz (50s) | ||||
| Level 525 | |||||
| M8 | Spider Web (40s) | ||||
| Level 525 | |||||
| M9 | Sword Dance (50s) | ||||
| Level 525 |
Muito Efetivo: Fire, Flying and Rock.
Normal: Normal, Water, Electric, Ice, Poison, Psychic, Bug, Ghost, Dragon, Steel, Dark, Crystal and Fairy.
Muito Inefetivo: Grass, Fighting and Ground.
| Ariados | |
| Shiny Ariados |
Nome: Shiny Dodrio
Level: 100
Elemento: Flying
Habilidades: Ride and Headbutt.
Boost: Feather Stone (2)
Materia: Wingeon Mastered
Shiny Dodrio precisa de Level 100.
Este Dodrio exclusivo usa seus três cérebros para executar planos complexos. Enquanto duas cabeças dormem, diz-se que uma cabeça permanece acordada.
| M1 | Peck (12s) | ||||
|---|---|---|---|---|---|
| Level 525 | |||||
| M2 | Pluck (15s) | ||||
| Level 525 | |||||
| M3 | Swift (15s) | ||||
| Level 525 | |||||
| M4 | Tri-Attack (30s) | ||||
| Level 525 | |||||
| M5 | Brave Bird (40s) | ||||
| Level 525 | |||||
| M6 | Drill Peck (40s) | ||||
| Level 525 | |||||
| M7 | Sky Attack (50s) | ||||
| Level 525 | |||||
| M8 | Stampede (50s) | ||||
| Level 525 | |||||
| M9 | Sword Dance (50s) | ||||
| Level 525 |
Muito Efetivo: Electric, Ice and Rock.
Normal: Normal, Fire, Water, Poison, Flying, Psychic, Ghost, Dragon, Steel, Dark, Crystal and Fairy.
Muito Inefetivo: Grass, Fighting and Bug.
Nulo: Ground.
| Dodrio | |
| Shiny Dodrio |

Nome: Shiny Magneton
Level: 100
Elemento: Electric / Steel
Habilidades: Light.
Boost: Thunder Stone (2)
Materia: Raibolt Mastered ou Ironhard Mastered
Shiny Magneton precisa de Level 100.
Três magnemitas brilhantes e gigantes estão ligadas por uma forte força magnética. Dores de ouvido ocorrerão, caso você chuegue muito perto.
| M1 | Spark (15s) | ||||
|---|---|---|---|---|---|
| Level 525 | |||||
| M2 | Thunder Shock (18s) | ||||
| Level 525 | |||||
| M3 | Scrap Throw (15s) | ||||
| Level 525 | |||||
| M4 | Tri-Attack (30s) | ||||
| Level 525 | |||||
| M5 | Metal Sound (40s) | ||||
| Level 525 | |||||
| M6 | Flash Cannon (40s) | ||||
| Level 525 | |||||
| M7 | Heavy Metal (50s) | ||||
| Level 525 | |||||
| M8 | Magnet Bomb (50s) | ||||
| Level 525 | |||||
| M9 | Gravity (40s) | ||||
| Level 525 | |||||
| P | Tri-Vision | ||||
| Level 525 |
Muito Efetivo: Ground.
Efetivo: Fire and Fighting.
Normal: Water, Ghost, Dark and Crystal.
Inefetivo: Normal, Grass, Electric, Ice, Psychic, Bug, Rock, Dragon and Fairy.
Muito Inefetivo: Flying and Steel.
Nulo: Poison.
| Magneton | |
| Shiny Magneton |

Nome: Shiny Politoed
Level: 100
Elemento: Water
Habilidades: Surf and Headbutt.
Boost: Water Stone (2).
Materia: Seavell Mastered.
Shiny Politoed precisa de Level 100.
Encontramos esse raro Politoed em mar aberto, os cabelos encaracolados na cabeça de Politoeds são uma prova de seu status de rei. Dizem que quanto mais longo e enrolado o cabelo, mais respeito esse Pokémon ganha de seus pares.
| M1 | Mud Shot (18s) | ||||
|---|---|---|---|---|---|
| Level 525 | |||||
| M2 | Bubble (12s) | ||||
| Level 525 | |||||
| M3 | Bubble Beam (20s) | ||||
| Level 525 | |||||
| M4 | Tongue Grap (40s) | ||||
| Level 525 | |||||
| M5 | Whirlpool (40s) | ||||
| Level 525 | |||||
| M6 | Surf (50s) | ||||
| Level 525 | |||||
| M7 | Hydro Pump (50s) | ||||
| Level 525 | |||||
| M8 | Rain Dance (40s) | ||||
| Level 525 |
Muito Efetivo: Grass and Electric.
Normal: Normal, Fighting, Poison, Ground, Flying, Psychic, Bug, Rock, Ghost, Dragon, Dark, Crystal and Fairy.
Muito Inefetivo: Fire, Water, Ice and Steel.
| Politoed | |
| Shiny Politoed |

Nome: Shiny Rhydon
Level: 100
Elemento: Ground
Habilidades: Dig, Rock Smash and Headbutt.
Boost: Earth Stone (2)
Materia: Orebound Mastered
Shiny Rhydon precisa de Level 100.
Um Rhydon dourado e brilhante, anda sobre as patas traseiras. Mostra sinais de inteligência. Sua pele semelhante a uma armadura repele lava derretida.
| M1 | Horn Attack (15s) | ||||
|---|---|---|---|---|---|
| Level 525 | |||||
| M2 | Horn Drill (30s) | ||||
| Level 525 | |||||
| M3 | Horn Burst (12s) | ||||
| Level 525 | |||||
| M4 | Earth Power (40s) | ||||
| Level 525 | |||||
| M5 | Ground Collapse (40s) | ||||
| Level 525 | |||||
| M6 | Bulldoze (40s) | ||||
| Level 525 | |||||
| M7 | Fissure (50s) | ||||
| Level 525 | |||||
| M8 | Magnitude (50s) | ||||
| Level 525 |
Muito Efetivo: Water, Grass and Ice.
Normal: Normal, Fire, Fighting, Ground, Flying, Psychic, Bug, Ghost, Dragon, Steel, Dark, Crystal and Fairy.
Muito Inefetivo: Poison and Rock.
Nulo: Electric.
| Rhydon | |
| Shiny Rhydon |
Nome: Mega Kangaskhan
Level: 100
Elemento: Normal
Habilidades: Cut, Dig, Rock Smash and Headbutt.
Mega Stone: Kangaskhanite
Este Pokémon é EXCLUSIVO do clã Gardestrike em batalhas PvP.
Kangaskhan precisa de Level 100.
Mega Kangaskhan precisa de Level 100.
Cria seu filhote na bolsa da barriga. Ele permite que o bebê brinque apenas quando sentir-se seguro.
| M1 | Mega Punch (25s) | ||||
|---|---|---|---|---|---|
| Level 525 | |||||
| M2 | Low Kick (10s) | ||||
| Level 525 | |||||
| M3 | Drain Punch (25s) | ||||
| Level 525 | |||||
| M4 | Comet Punch (35s) | ||||
| Level 525 | |||||
| M5 | Fake Out (40s) | ||||
| Level 525 | |||||
| M6 | Hammer Arm (40s) | ||||
| Level 525 | |||||
| M7 | Power-Up Punch (40s) | ||||
| Level 525 | |||||
| M8 | Focus Blast (50s) | ||||
| Level 525 | |||||
| M9 | Reversal (50s) | ||||
| Level 525 | |||||
| P | Parental Bond | ||||
| Level 525 |
Muito Efetivo: Fighting.
Normal: Normal, Fire, Water, Grass, Electric, Ice, Poison, Ground, Flying, Psychic, Bug, Rock, Dragon, Steel, Dark, Crystal and Fairy.
Nulo: Ghost.
| Kangaskhan |
Nome: Dusknoir
Level: 100
Elemento: Ghost
Habilidades: Light and Control Mind.
Boost: Mystic Star (10)
Materia: Malefic Mastered.
Duskull precisa de Level 40.
Dusclops precisa de Level 100.
Dusknoir precisa de Level 100.
A antena em sua cabeça captura ondas de rádio do mundo dos espíritos que o comandam a levar as pessoas para lá.
| M1 | Dark Pulse (15s) | ||||
|---|---|---|---|---|---|
| Level 525 | |||||
| M2 | Shadow Ball (12s) | ||||
| Level 525 | |||||
| M3 | Shadow Punch (25s) | ||||
| Level 525 | |||||
| M4 | Astonish (40s) | ||||
| Level 525 | |||||
| M5 | Shadow Sneak (40s) | ||||
| Level 525 | |||||
| M6 | Hex (40s) | ||||
| Level 525 | |||||
| M7 | Shadow Cannon (40s) | ||||
| Level 525 | |||||
| M8 | Shadow Blast (50s) | ||||
| Level 525 | |||||
| M9 | Spectral Fist (40s) | ||||
| Level 525 | |||||
| P | Spirit Bomb | ||||
| Level 525 |
Muito Efetivo: Ghost and Dark.
Normal: Fire, Water, Grass, Electric, Ice, Ground, Flying, Psychic, Rock, Dragon, Steel, Crystal and Fairy.
Muito Inefetivo: Poison and Bug.
Nulo: Normal and Fighting.
| Dusknoir |
Nome: Magmortar
Level: 100
Elemento: Fire
Habilidades: Light, Rock Smash and Headbutt.
Boost: Mystic Star (10)
Materia: Volcanic Mastered.
Magby precisa de Level 30.
Magmar precisa de Level 100.
Magmortar precisa de Level 100.
Ele lança bolas de fogo de mais de 3.600 graus Fahrenheit de seus braços. Sua respiração também queima e chia.
| M1 | Volcano Shot (22s) | ||||
|---|---|---|---|---|---|
| Level 525 | |||||
| M2 | Ember (15s) | ||||
| Level 525 | |||||
| M3 | Fire Punch (25s) | ||||
| Level 525 | |||||
| M4 | Flamethrower (15s) | ||||
| Level 525 | |||||
| M5 | Smokescreen (40s) | ||||
| Level 525 | |||||
| M6 | Flame Burst (40s) | ||||
| Level 525 | |||||
| M7 | Fire Blast (40s) | ||||
| Level 525 | |||||
| M8 | Magma Fist (50s) | ||||
| Level 525 | |||||
| P | Flame Body | ||||
| Level 525 | |||||
| P | Double Cannon | ||||
| Level 525 |
Muito Efetivo: Water, Ground and Rock.
Normal: Normal, Electric, Fighting, Poison, Flying, Psychic, Ghost, Dragon, Dark and Crystal.
Muito Inefetivo: Fire, Grass, Ice, Bug, Steel and Fairy.
| Magmortar |

Nome: Electivire
Level: 100
Elemento: Electric
Habilidades: Rock Smash, Dig, Light and Headbutt.
Boost: Mystic Star (10)
Materia: Raibolt Mastered.
Elekid precisa de Level 30.
Electabuzz precisa de Level 100.
Electivire precisa de Level 100.
À medida que sua carga elétrica aumenta, faíscas azuis começam a estalar entre seus chifres.
| M1 | Charge (40s) | ||||
|---|---|---|---|---|---|
| Level 525 | |||||
| M2 | Swift (15s) | ||||
| Level 525 | |||||
| M3 | Thunder Punch (20s) | ||||
| Level 525 | |||||
| M4 | Thunder Shock (12s) | ||||
| Level 525 | |||||
| M5 | Thunderbolt (25s) | ||||
| Level 525 | |||||
| M6 | Lightning Axe (40s) | ||||
| Level 525 | |||||
| M7 | Focus Blast (40s) | ||||
| Level 525 | |||||
| M8 | Discharge (50s) | ||||
| Level 525 | |||||
| M9 | Reversal (50s) | ||||
| Level 525 | |||||
| P | Motor Drive | ||||
| Level 525 | |||||
| P | Magnet Rise | ||||
| Level 525 |
Muito Efetivo: Ground.
Normal: Normal, Fire, Water, Grass, Ice, Fighting, Poison, Psychic, Bug, Rock, Ghost, Dragon, Dark, Crystal and Fairy.
Muito Inefetivo: Electric, Flying and Steel.
| Electivire |

Nome: Shiny Granbull
Level: 100
Elemento: Fairy
Habilidades: Headbutt, Dig and Rock Smash.
Boost: Heart Stone (2)
Materia: Psycraft Mastered.
Granbull precisa de Level 100.
Na verdade, é tímido e facilmente assustado. Se atacado, ele avança para afastar seu atacante. .
| M1 | Super Fang (12s) | ||||
|---|---|---|---|---|---|
| Level 525 | |||||
| M2 | Dazzling Gleam (8s) | ||||
| Level 525 | |||||
| M3 | Take Down (20s) | ||||
| Level 525 | |||||
| M4 | Roar (40s) | ||||
| Level 525 | |||||
| M5 | Secret Power (40s) | ||||
| Level 525 | |||||
| M6 | Scary Face (40s) | ||||
| Level 525 | |||||
| M7 | War Dog (40s) | ||||
| Level 525 | |||||
| M8 | Protect (40s) | ||||
| Level 525 | |||||
| P | Pixilate | ||||
| Level 525 | |||||
| P | Protector | ||||
| Level 525 | |||||
| P | Natural Leader | ||||
| Level 525 |
Muito Efetivo: Poison and Steel.
Normal: Normal, Fire, Water, Grass, Electric, Ice, Ground, Flying, Psychic, Rock, Ghost, Crystal and Fairy.
Muito Inefetivo: Fighting, Bug and Dark.
Nulo: Dragon.
| Granbull | |
| Shiny Granbull |

Nome: Shiny Blastoise
Level: 100
Elemento: Water
Habilidades: Dig, Rock Smash, Surf and Headbutt.
Boost: Water Stone (2)
Materia: Seavell Mastered
Blastoise precisa de Level 100.
Shiny Blastoise precisa de Level 100.
Um Blastoise antigo, muito difícil de ser encontrado. Os jatos d'água que jorra dos canhões de foguetes em sua concha podem perfurar aço espesso.
| M1 | Bubble (8s) | ||||
|---|---|---|---|---|---|
| Level 525 | |||||
| M2 | Bubble Beam (18s) | ||||
| Level 525 | |||||
| M3 | Water Pulse (40s) | ||||
| Level 525 | |||||
| M4 | Hydro Cannon (20s) | ||||
| Level 525 | |||||
| M5 | Hydro Pump (40s) | ||||
| Level 525 | |||||
| M6 | Skull Bash (40s) | ||||
| Level 525 | |||||
| M7 | Withdraw (40s) | ||||
| Level 525 | |||||
| M8 | Ancient Armor (40s) | ||||
| Level 525 | |||||
| P | Natural Leader | ||||
| Level 525 | |||||
| P | Protector | ||||
| Level 525 |
Muito Efetivo: Grass and Electric.
Normal: Normal, Fighting, Poison, Ground, Flying, Psychic, Bug, Rock, Ghost, Dragon, Dark, Crystal and Fairy.
Muito Inefetivo: Fire, Water, Ice and Steel.
| Blastoise | |
| Shiny Blastoise | |
| Mega Blastoise | |
| Shiny Mega Blastoise |