|
|
| Linha 1: |
Linha 1: |
| Renee
| | == Primeira Etapa == |
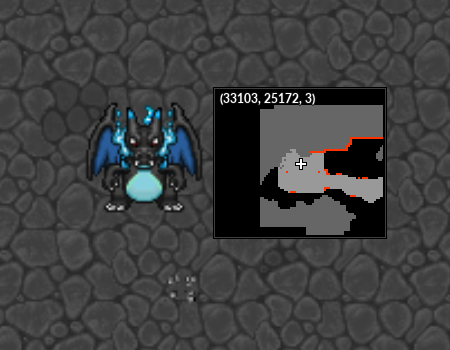
| | Ao entrar na dungeon o Charizard X irá aparecer após alguns segundos <br><br> |
|
| |
|
| = Outland = | | <center> [[Arquivo:Magma_Maze_Path_CharizardX.png|link=]] </center><br> |
|
| |
|
| == Introducao ==
| | Nesta etapa os jogadores devem ignorar o Charizard X e seguir até as chamas pelas pedras na lava, essa etapa só estará concluída quando os 4 jogadores estiverem pisando nas chamas. <br><br> |
| -
| |
|
| |
|
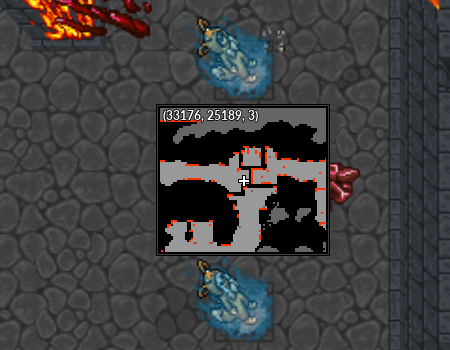
| == Historia == | | <center> [[Arquivo:Magma_Maze_Path_CharizardX_1.png|link=]] </center><br> |
| -
| |
| == Como entrar ==
| |
|
| |
|
| '''Informações Importantes:''' <br> | | '''Observação:''' O Charizard ficará patrulhando o andar por isso, não demore para chegar ate as chamas. <br> |
|
| |
|
| * A Outland é destinado para jogadores de nível 150 ou superior, e é necessário ser VIP para acessar este local. <br>
| |
| * É recomendado que os jogadores façam a [[Welcome To The Outland Quest]], mesmo nela indica os caminhos para chegar até a Outland que é dividida em 3 regiões: North, East e South.<br>
| |
| === Pokémon por Outland ===
| |
| <center>
| |
| {|class="wikitable" width="25%"
| |
| ! colspan="5" style="background-color: #9d1a64" | <span style="color: white">'''Outland North'''</span>
| |
| |-
| |
| ! align="center" colspan="2" | Pokémon
| |
| ! align="center" colspan="2" | Elemento
| |
| |-
| |
| | align="center" width="10%" |[[Arquivo:0009-Blastoise.png|link=Blastoise]]
| |
| | align="center" width="10%" |[[Blastoise]]
| |
| | align="center" width="10%" | [[Arquivo:Water.png|link=Seavell]]
| |
| | align="center" width="10%" | Water
| |
| |-
| |
| | align="center" width="10%" |[[Arquivo:160-Feraligatr.png|link=Feraligatr]]
| |
| | align="center" width="10%" |[[Feraligatr]]
| |
| | align="center" width="10%" | [[Arquivo:Water.png|link=Seavell]]
| |
| | align="center" width="10%" | Water
| |
| |-
| |
| | align="center" width="10%" | [[Arquivo:130-Gyarados.png|link=Gyarados]]
| |
| | align="center" width="10%" | [[Gyarados]]
| |
| | align="center" width="10%" | [[Arquivo:Water.png|link=Seavell]] [[Arquivo:Flying.png|link=Wingeon]]
| |
| | align="center" width="10%" | Water/Flying
| |
| |-
| |
| | align="center" width="10%" | [[Arquivo:226-Mantine.png|link=Mantine]]
| |
| | align="center" width="10%" | [[Mantine]]
| |
| | align="center" width="10%" | [[Arquivo:Water.png|link=Seavell]] [[Arquivo:Flying.png|link=Wingeon]]
| |
| | align="center" width="10%" | Water/Flying
| |
| |-
| |
| | align="center" width="10%" | [[Arquivo:003-Venusaur.png|link=Venusaur]]
| |
| | align="center" width="10%" | [[Venusaur]]
| |
| | align="center" width="10%" | [[Arquivo:Grass.png|link=Naturia]] [[Arquivo:Poison1.png|link=Malefic]]
| |
| | align="center" width="10%" | Grass/Poison
| |
| |-
| |
| | align="center" width="10%" |[[Arquivo:154-Meganium.png|link=Meganium]]
| |
| | align="center" width="10%" |[[Meganium]]
| |
| | align="center" width="10%" | [[Arquivo:Grass.png|link=Naturia]]
| |
| | align="center" width="10%" | Grass
| |
| |-
| |
| | align="center" width="10%" |[[Arquivo:123-Scyther.png|link=Scyther]]
| |
| | align="center" width="10%" |[[Scyther]]
| |
| | align="center" | [[Arquivo:Bug.png|link=Naturia]] [[Arquivo:Flying.png|link=Wingeon]]
| |
| | align="center" width="10%" | Bug/Flying
| |
| |-
| |
| | align="center" width="10%" |[[Arquivo:214-Heracross.png|link=Heracross]]
| |
| | align="center" width="10%" |[[Heracross]]
| |
| | align="center" | [[Arquivo:Bug.png|link=Naturia]] [[Arquivo:Fighting.png|link=Gardestrike]]
| |
| | align="center" width="10%" | Bug/Fighting
| |
| |-
| |
| | align="center" width="10%" |[[Arquivo:203-Girafarig.png|link=Girafarig]]
| |
| | align="center" width="10%" |[[Girafarig]]
| |
| | align="center" | [[Arquivo:Psychic.png|link=Psycraft]] [[Arquivo:Normal1.png|link=Gardestrike]]
| |
| | align="center" width="10%" | Psychic/Normal
| |
| |-
| |
| | align="center" width="10%" |[[Arquivo:097-Hypno.png|link=Hypno]]
| |
| | align="center" width="10%" |[[Hypno]]
| |
| | align="center" | [[Arquivo:Psychic.png|link=Psycraft]]
| |
| | align="center" width="10%" | Psychic
| |
| |-
| |
| | align="center" width="10%" |[[Arquivo:178-Xatu.png|link=Xatu]]
| |
| | align="center" width="10%" |[[Xatu]]
| |
| | align="center" | [[Arquivo:Psychic.png|link=Psycraft]] [[Arquivo:Flying.png|link=Wingeon]]
| |
| | align="center" width="10%" | Psychic/Flying
| |
| |}
| |
|
| |
|
| {|class="wikitable" width="25%"
| | == Segunda Etapa == |
| ! colspan="4" style="background-color: #9d1a64" | <span style="color: white">'''Outland East'''</span>
| |
| |-
| |
| ! align="center" colspan="2" | Pokémon
| |
| ! align="center" colspan="2" | Elemento
| |
| |-
| |
| | align="center" width="10%" |[[Arquivo:198-Murkrow.png|link=Murkrow]]
| |
| | align="center" width="10%" |[[Murkrow]]
| |
| | align="center" width="10%" | [[Arquivo:Dark1.png|link=Malefic]] [[Arquivo:Flying.png|link=Wingeon]]
| |
| | align="center" width="10%" |Dark/Flying
| |
| |-
| |
| | align="center" width="10%" |[[Arquivo:034-Nidoking.png|link=Nidoking]]
| |
| | align="center" width="10%" |[[Nidoking]]
| |
| | align="center" | [[Arquivo:Poison1.png|link=Malefic]] [[Arquivo:Ground.png|link=Orebound]]
| |
| | align="center" width="10%" |Poison/Ground
| |
| |-
| |
| | align="center" width="10%" |[[Arquivo:031-Nidoqueen.png|link=Nidoqueen]]
| |
| | align="center" width="10%" |[[Nidoqueen]]
| |
| | align="center" | [[Arquivo:Poison1.png|link=Malefic]] [[Arquivo:Ground.png|link=Orebound]]
| |
| | align="center" width="10%" |Poison/Ground
| |
| |-
| |
| | align="center" width="10%" |[[Arquivo:094-Gengar.png|link=Gengar]]
| |
| | align="center" width="10%" |[[Gengar]]
| |
| | align="center" | [[Arquivo:Poison1.png|link=Malefic]] [[Arquivo:Ghost1.png|link=Malefic]]
| |
| | align="center" width="10%" |Poison/Ghost
| |
| |-
| |
| | align="center" width="10%" |[[Arquivo:200-Misdreavus.png|link=Misdreavus]]
| |
| | align="center" width="10%" |[[Misdreavus]]
| |
| | align="center" | [[Arquivo:Ghost1.png|link=Malefic]]
| |
| | align="center" width="10%" |Ghost
| |
| |-
| |
| | align="center" width="10%" |[[Arquivo:059-Arcanine.png|link=Arcanine]]
| |
| | align="center" width="10%" |[[Arcanine]]
| |
| | align="center" | [[Arquivo:Fire.png|link=Volcanic]]
| |
| | align="center" width="10%" |Fire
| |
| |-
| |
| | align="center" width="10%" |[[Arquivo:126-Magmar.png|link=Magmar]]
| |
| | align="center" width="10%" |[[Magmar]]
| |
| | align="center" | [[Arquivo:Fire.png|link=Volcanic]]
| |
| | align="center" width="10%" |Fire
| |
| |-
| |
| | align="center" width="10%" |[[Arquivo:076-Golem.png|link=Golem]]
| |
| | align="center" width="10%" |[[Golem]]
| |
| | align="center" | [[Arquivo:Rock.png|link=Orebound]]
| |
| | align="center" width="10%" |Rock
| |
| |-
| |
| | align="center" width="10%" |[[Arquivo:112-Rhydon.png|link=Rhydon]]
| |
| | align="center" width="10%" |[[Rhydon]]
| |
| | align="center" | [[Arquivo:Ground.png|link=Orebound]] [[Arquivo:Rock.png|link=Orebound]]
| |
| | align="center" width="10%" |Ground/Rock
| |
| |-
| |
| | align="center" width="10%" |[[Arquivo:208-Steelix.png|link=Steelix]]
| |
| | align="center" width="10%" |[[Steelix]]
| |
| | align="center" | [[Arquivo:Ground.png|link=Orebound]] [[Arquivo:Steel.png|link=Ironhard]]
| |
| | align="center" width="10%" |Ground/Steel
| |
| |-
| |
| | align="center" width="10%" |[[Arquivo:247-Pupitar.png|link=Pupitar]]
| |
| | align="center" width="10%" |[[Pupitar]]
| |
| | align="center" | [[Arquivo:Ground.png|link=Orebound]] [[Arquivo:Rock.png|link=Orebound]]
| |
| | align="center" width="10%" |Ground/Rock
| |
| |-
| |
| | align="center" width="10%" |[[Arquivo:106-HitmonleeNormal.png|link=Hitmonlee]]
| |
| | align="center" width="10%" |[[Hitmonlee]]
| |
| | align="center" | [[Arquivo:Fighting.png|link=Gardestrike]]
| |
| | align="center" width="10%" |Lutador
| |
| |-
| |
| | align="center" width="10%" |[[Arquivo:237-HitmontopNormal.png|link=Hitmontop]]
| |
| | align="center" width="10%" |[[Hitmontop]]
| |
| | align="center" | [[Arquivo:Fighting.png|link=Gardestrike]]
| |
| | align="center" width="10%" |Lutador
| |
| |-
| |
| | align="center" width="10%" |[[Arquivo:107-HitmonchanNormal.png|link=Hitmonchan]]
| |
| | align="center" width="10%" |[[Hitmonchan]]
| |
| | align="center" | [[Arquivo:Fighting.png|link=Gardestrike]]
| |
| | align="center" width="10%" |Lutador
| |
| |}
| |
|
| |
|
| {|class="wikitable" width="25%"
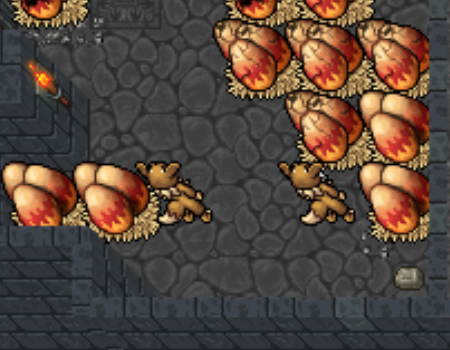
| | Ao serem movidos, os jogadores devem seguir o caminho ao oeste matando todas as criaturas existentes no andar e clicando nos ovos necessários para liberar o caminho. Cada ovo invocará um [[Arquivo:004-Charmander.png|link=Charmander]] '''Charmander''' ou [[Arquivo:004-Shiny_Charmander.png|link=Shiny Charmander]] '''Shiny Charmander''' <br> |
| ! colspan="4" style="background-color: #9d1a64" | <span style="color: white">'''Outland South'''</span>
| | '''Obs:''' Essas criaturas não tomam nenhum tipo de '''STUN''' |
| |-
| |
| ! align="center" colspan="2" | Pokémon
| |
| ! align="center" colspan="2" | Elemento
| |
| |-
| |
| | align="center" width="10%" |[[Arquivo:006-Charizard.png|link=Charizard]]
| |
| | align="center" width="10%" |[[Charizard]]
| |
| | align="center" width="10%" | [[Arquivo:Fire.png|link=Volcanic]] [[Arquivo:Flying.png|link=Wingeon]]
| |
| | align="center" width="10%" |Fire/Flying
| |
| |-
| |
| | align="center" width="10%" |[[Arquivo:157-Typhlosion.png|link=Typhlosion]]
| |
| | align="center" width="10%" |[[Typhlosion]]
| |
| | align="center" | [[Arquivo:Fire.png|link=Volcanic]]
| |
| | align="center" width="10%" |Fire
| |
| |-
| |
| | align="center" width="10%" |[[Arquivo:241-Miltank.png|link=Miltank]]
| |
| | align="center" width="10%" |[[Miltank]]
| |
| | align="center" | [[Arquivo:Normal1.png|link=Gardestrike]]
| |
| | align="center" width="10%" |Normal
| |
| |-
| |
| | align="center" width="10%" |[[Arquivo:036-Clefable.png|link=Clefable]]
| |
| | align="center" width="10%" |[[Clefable]]
| |
| | align="center" | [[Arquivo:Fairy.png|link=Psycraft]]
| |
| | align="center" width="10%" |Fairy
| |
| |-
| |
| | align="center" width="10%" |[[Arquivo:040-Wigglytuff.png|link=Wigglytuff]]
| |
| | align="center" width="10%" |[[Wigglytuff]]
| |
| | align="center" | [[Arquivo:Normal1.png|link=Gardestrike]] [[Arquivo:Fairy.png|link=Psycraft]]
| |
| | align="center" width="10%" |Normal/Fairy
| |
| |-
| |
| | align="center" width="10%" |[[Arquivo:210-Granbull.png|link=Granbull]]
| |
| | align="center" width="10%" |[[Granbull]]
| |
| | align="center" | [[Arquivo:Fairy.png|link=Psycraft]]
| |
| | align="center" width="10%" |Fairy
| |
| |-
| |
| | align="center" width="10%" | [[Arquivo:169-Crobat.png|link=Crobat]]
| |
| | align="center" width="10%" | [[Crobat]]
| |
| | align="center" | [[Arquivo:Poison1.png|link=Malefic]] [[Arquivo:Flying.png|link=Wingeon]]
| |
| | align="center" width="10%" |Poison/Flying
| |
| |-
| |
| | align="center" width="10%" |[[Arquivo:164-Noctowl.png|link=Noctowl]]
| |
| | align="center" width="10%" |[[Noctowl]]
| |
| | align="center" | [[Arquivo:Normal1.png|link=Gardestrike]] [[Arquivo:Flying.png|link=Wingeon]]
| |
| | align="center" width="10%" |Normal/Flying
| |
| |-
| |
| | align="center" width="10%" |[[Arquivo:018-Pidgeot.png|link=Pidgeot]]
| |
| | align="center" width="10%" |[[Pidgeot]]
| |
| | align="center" | [[Arquivo:Normal1.png|link=Gardestrike]] [[Arquivo:Flying.png|link=Wingeon]]
| |
| | align="center" width="10%" |Normal/Flying
| |
| |-
| |
| | align="center" width="10%" |[[Arquivo:227-Skarmory.png|link=Skarmory]]
| |
| | align="center" width="10%" |[[Skarmory]]
| |
| | align="center" | [[Arquivo:Steel.png|link=Ironhard]] [[Arquivo:Flying.png|link=Wingeon]]
| |
| | align="center" width="10%" |Steel/Flying
| |
| |-
| |
| | align="center" width="10%" |[[Arquivo:148-Dragonair.png|link=Dragonair]]
| |
| | align="center" width="10%" |[[Dragonair]]
| |
| | align="center" | [[Arquivo:Dragon.png|link=Wingeon]]
| |
| | align="center" width="10%" |Dragon
| |
| |-
| |
| | align="center" width="10%" |[[Arquivo:124-Jynx.png|link=Jynx]]
| |
| | align="center" width="10%" |[[Jynx]]
| |
| | align="center" | [[Arquivo:Psychic.png|link=Psycraft]] [[Arquivo:Ice.png|link=Seavell]]
| |
| | align="center" width="10%" |Psychic/Ice
| |
| |-
| |
| | align="center" width="10%" |[[Arquivo:221-Piloswine.png|link=Piloswine]]
| |
| | align="center" width="10%" |[[Piloswine]]
| |
| | align="center" | [[Arquivo:Ground.png|link=Orebound]] [[Arquivo:Ice.png|link=Seavell]]
| |
| | align="center" width="10%" |Ground/Ice
| |
| |-
| |
| | align="center" width="10%" |[[Arquivo:091-Cloyster.png|link=Cloyster]]
| |
| | align="center" width="10%" |[[Cloyster]]
| |
| | align="center" | [[Arquivo:Water.png|link=Seavell]] [[Arquivo:Ice.png|link=Seavell]]
| |
| | align="center" width="10%" |Water/Ice
| |
| |-
| |
| | align="center" width="10%" |[[Arquivo:087-Dewgong.png|link=Dewgong]]
| |
| | align="center" width="10%" |[[Dewgong]]
| |
| | align="center" | [[Arquivo:Water.png|link=Seavell]] [[Arquivo:Ice.png|link=Seavell]]
| |
| | align="center" width="10%" |Water/Ice
| |
| |-
| |
| | align="center" width="10%" |[[Arquivo:232-Donphan.png|link=Donphan]]
| |
| | align="center" width="10%" |[[Donphan]]
| |
| | align="center" | [[Arquivo:Ground.png|link=Orebound]]
| |
| | align="center" width="10%" |Ground
| |
| |-
| |
| | align="center" width="10%" |[[Arquivo:028-Sandslash.png|link=Sandslash]]
| |
| | align="center" width="10%" |[[Sandslash]]
| |
| | align="center" | [[Arquivo:Ground.png|link=Orebound]]
| |
| | align="center" width="10%" |Ground
| |
| |-
| |
| | align="center" width="10%" |[[Arquivo:105-Marowak.png|link=Marowak]]
| |
| | align="center" width="10%" |[[Marowak]]
| |
| | align="center" | [[Arquivo:Ground.png|link=Orebound]]
| |
| | align="center" width="10%" |Ground
| |
| |-
| |
| | align="center" width="10%" |[[Arquivo:181-Ampharos.png|link=Ampharos]]
| |
| | align="center" width="10%" |[[Ampharos]]
| |
| | align="center" | [[Arquivo:Electric.png|link=Raibolt]]
| |
| | align="center" width="10%" |Electric
| |
| |-
| |
| | align="center" width="10%" |[[Arquivo:125-Electabuzz.png|link=Electabuzz]]
| |
| | align="center" width="10%" |[[Electabuzz]]
| |
| | align="center" | [[Arquivo:Electric.png|link=Raibolt]]
| |
| | align="center" width="10%" |Electric
| |
| |-
| |
| | align="center" width="10%" |[[Arquivo:026-Raichu.png|link=Raichu]]
| |
| | align="center" width="10%" |[[Raichu]]
| |
| | align="center" | [[Arquivo:Electric.png|link=Raibolt]]
| |
| | align="center" width="10%" |Electric
| |
| |}
| |
| </center>
| |
|
| |
|
| === Quests ===
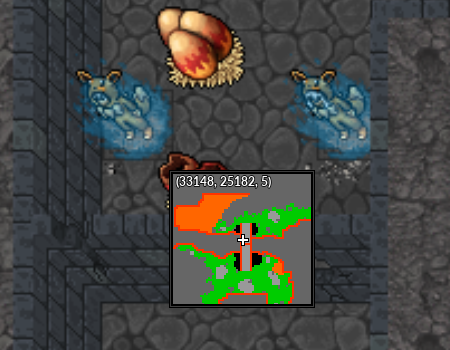
| | Após finalizar essa etapa os jogadores devem pisar no fogo e aguardar até que a outra equipe também pise. |
|
| |
|
| Dentro da Outland existem algumas quests e estão listadas abaixo:
| | <center> [[Arquivo:Magma Maze Path CharizardX2.png|link=]] </center><br> |
| <center>
| |
| {| class="wikitable sortable"
| |
| |- style="vertical-align:top;"
| |
| ! colspan="5" style="background-color: #9d1a64" | <span style="color: white">'''Quests'''</span>
| |
| |-
| |
| ! scope="col" style="width:200px; text-align:center;" | <b>Nome</b>
| |
| ! scope="col" style="width:200px; text-align:center;" | <b>Level</b>
| |
| ! scope="col" style="width:500px; text-align:center;" | <b>Recompensa</b>
| |
| |-
| |
| | style="width:200px; text-align:center;" | [[Welcome To The Outland Quest]]
| |
| | style="width:200px; text-align:center;" | 150
| |
| | style="width:500px; text-align:center;" | 250 Revives, 300k de experiência.
| |
| |- | |
| | style="width:200px; text-align:center;" | [[Outland Elders Quest]]
| |
| | style="width:200px; text-align:center;" | 150
| |
| | style="width:500px; text-align:center;" | 12KK Experiência e Teleport para o altar dos Cães Lendários.
| |
| |-
| |
| | style="width:200px; text-align:center;" | [[Outland Rescue Quest]]
| |
| | style="width:200px; text-align:center;" | 150
| |
| | style="width:500px; text-align:center;" | 2kk de experiência, stones e cash correspondentes ao clã do jogador.
| |
| |-
| |
| |-
| |
| | style="width:200px; text-align:center;" | [[Outland Main]]
| |
| | style="width:200px; text-align:center;" | 150
| |
| | style="width:500px; text-align:center;" | 22KK EXP, 900K Cash, 2 Halloween box, 2 Movies and cartoon box, Algumas Stones e Outfit máximo do clã.
| |
| |}
| |
| </center> | |
| === Tasks ===
| |
|
| |
|
| Dentro da Outland existem algumas tasks e estão listadas abaixo:
| | == Terceira Etapa == |
|
| |
|
| <center>
| | Estejam preparados para enfrentar criaturas sumonadas pelos '''Firestone Crystal''' presentes na sala. Cada crystal invocará 3 Pokémon entre eles [[Arquivo:004-Charmander.png|link=Charmander]] '''Charmander''', [[Arquivo:004-Shiny_Charmander.png|link=Shiny Charmander]] '''Shiny Charmander''' e [[Arquivo:005-Charmeleon.png|link=Charmeleon]] '''Charmeleon'''. <br> |
| {| class="wikitable sortable" width="100%"
| | '''Obs:''' Após certo tempo os cristais sumonam as criaturas novamente. |
| ! colspan="5" style="background-color: #9d1a64" | <span style="color: white">'''Tasks'''</span>
| |
| |-
| |
| !align="left" width="15%" |Nº e NPC
| |
| !align="left" width="35%" |Localização
| |
| !align="left" width="30%" |Objetivo
| |
| !align="left" width="20%" |Recompensa
| |
| |-
| |
| | 1. NPC Mikey
| |
| | Outland East, em frente ao NPC Mark.
| |
| | '''1ª Parte'''<br> Falar com o NPC Mikey <br>'''2ª Parte'''<br>Falar com o NPC Joey, entrada do respaw de murkrow (2899, 3005, 6) <br>'''3ª Parte'''<br>Coletar Loot do Pirate Murkrow para obter um [[Arquivo:Gold_Pendant.png]] Gold Pendant <br>'''4ª Parte'''<br> Falar novamente com o NPC Joey<br>'''5ª Parte'''<br> Falar com o NPC Mikey
| |
| | 300k EXP e [[Arquivo:Pokemon_Tales_Vol_2_Before_The_Murkrow_Fly.png]] Pokémon Tales Vol. 2: Before The Murkrow Fly.
| |
| |-
| |
| | 2. NPC Silva
| |
| | Outland East, entrada da Outland de Lutador.
| |
| | '''Derrotar:''' 500 Pokémon do tipo lutador na Ouland (Hitmontop, Hitmonlee e Hitmonchan).
| |
| | 1.094.000 de experiência.
| |
| |-
| |
| |}
| |
|
| |
|
| </center> | | <br>O Charizard X estará patrulhando todo o caminho, o ideal é que vocês fujam dele até a outra equipe derrotar todos os Pokémon presentes no andar. |
|
| |
|
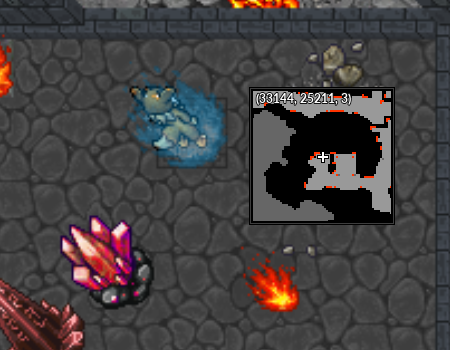
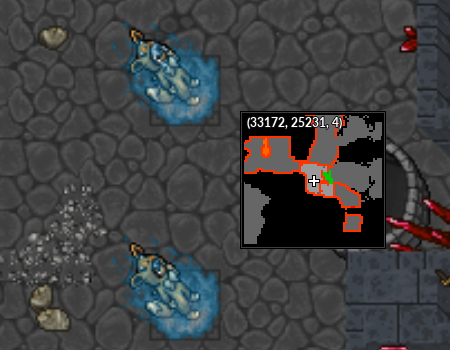
| === Shiny Mega Manectric === | | <br>Nessa etapa os jogadores devem aguardar a outra equipe pisar no fogo para ir até os spots destinados localizados na direita. |
| | <center> [[Arquivo:Magma Maze Path CharizardX 3.png|link=]] [[Arquivo:Magma Maze Path CharizardX 4.png|link=]] </center><br> |
|
| |
|
| * <span class="mw-customtoggle-ElectroBall"> ''' Electro Ball ''' </span>
| | == Quarta Etapa == |
| <div class="mw-collapsible mw-collapsed" id="mw-customcollapsible-ElectroBall">
| |
|
| |
|
| É usado a cada 25 segundos. O Manectric fica paralisado enquanto canaliza sua energia, jogando uma Electro Ball no alvo logo após a canalização. Basta mover o Pokémon que não será atingido e evitará todo o dano. <br>
| | Os jogadores devem seguir o caminho ao norte, clicando nos ovos necessários para abrir e continuar o caminho. Cada ovo invocará um [[Arquivo:004-Charmander.png|link=Charmander]] '''Charmander''' ou [[Arquivo:004-Shiny_Charmander.png|link=Shiny Charmander]] '''Shiny Charmander''' <br> |
| | <center> [[Arquivo:Magma Maze Path CharizardX 5.png|link=]] </center><br> |
|
| |
|
| | | Após finalizar essa etapa os jogadores devem pisar no fogo e aguardar até que a outra equipe também pise. |
| AQUI VAI O GIF
| | <br>Muito cuidado com as armadilhas enquanto esperam. Há uma grande chance de surgir [[Arquivo:006-shCharizard.png|link=Shiny Charizard]] '''Shiny Charizards''' quando a outra equipe concluir o minigame. |
| </div>
| | <center> [[Arquivo:Magma Maze Path CharizardX 6.png|link=]] </center><br> |
| * <span class="mw-customtoggle-WildCharge"> ''' Wild Charge ''' </span>
| |
| <div class="mw-collapsible mw-collapsed" id="mw-customcollapsible-WildCharge">
| |
| | |
| É usado a cada 33 segundos. O Manectric se move em direção oposta enquanto canaliza sua energia e após poucos segundos utiliza a habilidade Wild Charge, que já é conhecida pelos jogadores. É necessário tomar cuidado durante essa habilidade, pois pode ser que o Kyogre acabe surfando pela skill e recebendo muito dano. <br>
| |
| | |
| AQUI VAI O GIF
| |
| </div>
| |
| * <span class="mw-customtoggle-Discharge"> ''' Discharge ''' </span>
| |
| <div class="mw-collapsible mw-collapsed" id="mw-customcollapsible-Discharge">
| |
| | |
| É usado a cada 60 segundos. O Manectric canaliza sua energia e desfere a habilidade Discharge em uma enorme área, causando dano médio. É possível desviar se o jogador conseguir sair da área de efeito a tempo. *****<br>
| |
| | |
| AQUI VAI O GIF
| |
| </div>
| |
| | |
| * <span class="mw-customtoggle-ElectricTerrain"> ''' Electric Terrain ''' </span>
| |
| <div class="mw-collapsible mw-collapsed" id="mw-customcollapsible-ElectricTerrain">
| |
| | |
| É usado a cada 80 segundos. Um campo de força é lançado no local em que o Manectric estiver localizado. Durante essa habilidade, o Manectric tem sua força aumentada, assim como seu ataque básico. Caso o Pokémon ou o Jogador saia do campo, receberá o efeito STUN durante 8 segundos, bem como um dano médio ao Pokémon e dano alto ao Jogador. <br>
| |
| | |
| Obs: Caso o Manectric saia da área do campo, a habilidade é cancelada automaticamente. <br>
| |
| | |
| AQUI VAI O GIF
| |
| </div>
| |
| | |
| * <span class="mw-customtoggle-HyperBeam"> ''' Hyper Beam ''' </span>
| |
| <div class="mw-collapsible mw-collapsed" id="mw-customcollapsible-HyperBeam">
| |
| | |
| É usado a cada 45 segundos. O Manectric canaliza sua energia e após poucos segundos lança a habilidade Hyper Beam, causando dano médio. Diferente do Hyper Beam comum, esta versão possui mais hits. <br>
| |
| | |
| AQUI VAI O GIF
| |
| </div>
| |
| | |
| * <span class="mw-customtoggle-BodySlam"> ''' Body Slam ''' </span>
| |
| <div class="mw-collapsible mw-collapsed" id="mw-customcollapsible-BodySlam">
| |
| | |
| É usado a cada 22 segundos. O Manectric fica paralisado enquanto canaliza sua energia e causa dano em uma área de 3 SQMs à sua frente empurrando o Pokémon para bem longe. É possível desviar desta habilidade movendo seu Titan para fora da área de alcance. <br>
| |
| | |
| AQUI VAI O GIF
| |
| </div>
| |
| | |
| * <span class="mw-customtoggle-ThunderFang"> ''' Thunder Fang ''' </span>
| |
| <div class="mw-collapsible mw-collapsed" id="mw-customcollapsible-ThunderFang">
| |
| | |
| É usado a cada 30 segundos. O Manectric canaliza sua energia e causa dano em uma área à sua frente, aplicando o efeito de STUN por um pequeno período. <br>
| |
| | |
| AQUI VAI O GIF
| |
| </div>
| |
| | |
| === Shiny Mega Aggron ===
| |
| | |
| * <span class="mw-customtoggle-RockSlide"> ''' Rock Slide ''' </span>
| |
| <div class="mw-collapsible mw-collapsed" id="mw-customcollapsible-RockSlide">
| |
| | |
| É usado a cada 12 segundos, três pedras serão arremessadas no jogador, causando dano em uma área 3x3. Caso o jogador esteja sem pokémon, o dano será maior. Essa skill possui um dano muito baixo quando atinge seu Pokémon. <br>
| |
| | |
| | |
| AQUI VAI O GIF
| |
| </div>
| |
| | |
| * <span class="mw-customtoggle-Sandstorm"> ''' Sandstorm ''' </span>
| |
| <div class="mw-collapsible mw-collapsed" id="mw-customcollapsible-Sandstorm">
| |
| | |
| É usado a cada 22 segundos, diversos pontos em sua arena irão ser marcados e após poucos segundos a habilidade cairá nos locais marcados, causando SLOW durante 6 segundos. Essa skill atinge o jogador e o Pokémon. <br>
| |
| | |
| | |
| AQUI VAI O GIF
| |
| </div>
| |
| | |
| * <span class="mw-customtoggle-MetalBurst"> ''' Metal Burst ''' </span>
| |
| <div class="mw-collapsible mw-collapsed" id="mw-customcollapsible-MetalBurst">
| |
| | |
| É usado a cada 15 segundos. O Shiny Mega Aggron começa a brilhar, ficando imune e retornando todo o dano recebido durante esse período. <br>
| |
| | |
| | |
| AQUI VAI O GIF
| |
| </div>
| |
| | |
| * <span class="mw-customtoggle-HeavyMetal"> ''' Heavy Metal ''' </span>
| |
| <div class="mw-collapsible mw-collapsed" id="mw-customcollapsible-HeavyMetal">
| |
| | |
| É usado a cada 60 segundos, dando um pulo e causando dano em uma determinada área. É possível ignorar essa habilidade saindo da tela.<br>
| |
| | |
| AQUI VAI O GIF
| |
| </div>
| |
| | |
| * <span class="mw-customtoggle-MeteorMash"> ''' Meteor Mash ''' </span>
| |
| <div class="mw-collapsible mw-collapsed" id="mw-customcollapsible-MeteorMash">
| |
| | |
| É usado a cada 25 segundos, o Boss lança ondas metálicas em uma área frontal enquanto anda pela mesma direção e no final gera uma explosão ao seu redor que causa dano. Essa skill não ignora paredes, portanto, dependendo da posição em que o Boss estiver, pode ser que alguma parede impeça com que ele continue executando a skill. <br>
| |
| | |
| AQUI VAI O GIF
| |
| </div>
| |
| | |
| * <span class="mw-customtoggle-Sturdy"> ''' Sturdy ''' </span>
| |
| <div class="mw-collapsible mw-collapsed" id="mw-customcollapsible-Sturdy">
| |
| | |
| Quando o Aggron é derrotado ele recebe o efeito de Sturdy que já é conhecido pelos jogadores. Entretanto, nesta versão, o Aggron recebe velocidade de movimento extremamente aumentada e continua vivo por 25 segundos. Durante o Sturdy, continua sendo possível utilizar STUN e outros controles de grupo para sobreviver. <br>
| |
| | |
| AQUI VAI O GIF
| |
| </div>
| |
| | |
| === koga ===
| |
| <center>
| |
| {| class="wikitable" width="30%"
| |
| ! scope="col" width="10%" align="center" style="background-color: #9d1a64; padding: 5px;" | <span style="color: white">'''Experiência'''</span>
| |
| ! scope="col" width="10%" align="center" style="background-color: #9d1a64; padding: 5px;" | <span style="color: white">'''Exp. Nightmare'''</span>
| |
| |- align="center"
| |
| | style="font-weight: bold; ; padding: 5px;" | 15kk de Exp.
| |
| <!--T:28-->
| |
| | style="font-weight: bold; ; padding: 5px;" | 200k NW Exp.
| |
| <!--T:29-->
| |
| |}
| |
| {| class="wikitable" width="40%"
| |
| ! scope="col" width="10%" align="center" style="background-color: #9d1a64; padding: 5px;" | <span style="color: white">'''Nightmare Opal'''</span>
| |
| ! scope="col" width="12%" align="center" style="background-color: #9d1a64; padding: 5px;" | <span style="color: white">'''Materia Box (contém 20 superior e 20 mastered materia do seu clã)'''</span>
| |
| ! scope="col" width="10%" align="center" style="background-color: #9d1a64; padding: 5px;" | <span style="color: white">'''Held X-Upgrade (Tier:7)'''</span>
| |
| |- align="center
| |
| | style="padding: 5px;" | [[Arquivo:Nightmare-opal.png|link=Koga Quest]]
| |
| | style="padding: 5px;" | [[Arquivo:Materia_Box.gif|center|link=Koga Quest]]
| |
| | style="padding: 5px;" | [[Arquivo:X-upgrade-tier-7.gif|link=Koga Quest]]
| |
| |}
| |
| </center>
| |
| | |
| =fly=
| |
| {| class="wikitable sortable" width="21%"
| |
| ! colspan="4" | Velocidades de Fly
| |
| |-
| |
| ! align="center" colspan="3" class="unsortable" | Pokémon e Nº Dex
| |
| ! align="center" | Velocidade
| |
| | |
| |-
| |
| | width="1%" align="center" | [[Arquivo:006-Charizard.png|link=Charizard]]
| |
| | width="1%" align="center" | 006
| |
| | width="11%" align="center" | [[Charizard]]
| |
| | width="1%" align="center" | 500
| |
| |-
| |
| | width="1%" align="center" | [[Arquivo:006-shCharizard.png|link=Shiny Charizard]]
| |
| | width="1%" align="center" | 006
| |
| | width="11%" align="center" | [[Shiny Charizard]]
| |
| | width="1%" align="center" | 600
| |
| |-
| |
| | width="1%" align="center" | [[Arquivo:012-Sh Butterfree.png|link=Shiny Butterfree]]
| |
| | width="1%" align="center" | 012
| |
| | width="11%" align="center" | [[Shiny Butterfree]]
| |
| | width="1%" align="center" | 600
| |
| |-
| |
| | width="1%" align="center" | [[Arquivo:018-Pidgeot.png|link=Pidgeot]]
| |
| | width="1%" align="center" | 018
| |
| | width="11%" align="center" | [[Pidgeot]]
| |
| | width="1%" align="center" | 500
| |
| |-
| |
| | width="1%" align="center" | [[Arquivo:018-shPidgeot.png|link=Shiny Pidgeot]]
| |
| | width="1%" align="center" | 018
| |
| | width="11%" align="center" | [[Shiny Pidgeot]]
| |
| | width="1%" align="center" | 600
| |
| |-
| |
| | width="1%" align="center" | [[Arquivo:022-Fearow.png|link=Fearow]]
| |
| | width="1%" align="center" | 022
| |
| | width="11%" align="center" | [[Fearow]]
| |
| | width="1%" align="center" | 400
| |
| |-
| |
| | width="1%" align="center" | [[Arquivo:Shinyfea.png|link=Shiny Fearow]]
| |
| | width="1%" align="center" | 022
| |
| | width="11%" align="center" | [[Shiny Fearow]]
| |
| | width="1%" align="center" | 500
| |
| |-
| |
| | width="1%" align="center" | [[Arquivo:026-Raichu.png|link=Raichu]]
| |
| | width="1%" align="center" | 026
| |
| | width="11%" align="center" | [[Raichu]] <span style="color:red"> * </span>
| |
| | width="1%" align="center" | 500
| |
| |-
| |
| | width="1%" align="center" | [[Arquivo:026-Sh Raichu.png|link=Shiny Raichu]]
| |
| | width="1%" align="center" | 026
| |
| | width="11%" align="center" | [[Shiny Raichu]] <span style="color:red"> * </span>
| |
| | width="1%" align="center" | 600
| |
| |-
| |
| | width="1%" align="center" | [[Arquivo:049-Venomoth.png|link=Venomoth]]
| |
| | width="1%" align="center" | 049
| |
| | width="11%" align="center" | [[Venomoth]]
| |
| | width="1%" align="center" | 400
| |
| |-
| |
| | width="1%" align="center" | [[Arquivo:049-Sh Venomoth.png|link=Shiny Venomoth]]
| |
| | width="1%" align="center" | 049
| |
| | width="11%" align="center" | [[Shiny Venomoth]]
| |
| | width="1%" align="center" | 600
| |
| |-
| |
| | width="1%" align="center" | [[Arquivo:083-Farfetch-D.png|link=Farfetch'D]]
| |
| | width="1%" align="center" | 083
| |
| | width="11%" align="center" | [[Farfetch'D]]
| |
| | width="1%" align="center" | 400
| |
| |-
| |
| | width="1%" align="center" | [[Arquivo:083-shFarfetch-D.png|link=Elite Farfetch'D]]
| |
| | width="1%" align="center" | 083
| |
| | width="11%" align="center" | [[Elite Farfetch'D]]
| |
| | width="1%" align="center" | 600
| |
| |-
| |
| | width="1%" align="center" | [[Arquivo:094-Gengar.png|link=Gengar]]
| |
| | width="1%" align="center" | 094
| |
| | width="11%" align="center" | [[Gengar]]
| |
| | width="1%" align="center" | 500
| |
| |-
| |
| | width="1%" align="center" | [[Arquivo:Sgengar.png|link=Shiny Gengar]]
| |
| | width="1%" align="center" | 094
| |
| | width="11%" align="center" | [[Shiny Gengar]]
| |
| | width="1%" align="center" | 600
| |
| |-
| |
| | width="1%" align="center" | [[Arquivo:137-Porygon.png|link=Porygon]]
| |
| | width="1%" align="center" | 137
| |
| | width="11%" align="center" | [[Porygon]]
| |
| | width="1%" align="center" | 400
| |
| |-
| |
| | width="1%" align="center" | [[Arquivo:142-Aerodactyl.png|link=Aerodactyl]]
| |
| | width="1%" align="center" | 142
| |
| | width="11%" align="center" | [[Aerodactyl]]
| |
| | width="1%" align="center" | 600
| |
| |-
| |
| | width="1%" align="center" | [[Arquivo:148-Dragonair.png|link=Dragonair]]
| |
| | width="1%" align="center" | 148
| |
| | width="11%" align="center" | [[Dragonair]]
| |
| | width="1%" align="center" | 400
| |
| |-
| |
| | width="1%" align="center" | [[Arquivo:148-Sh Dragonair.png|link=Shiny Dragonair]]
| |
| | width="1%" align="center" | 148
| |
| | width="11%" align="center" | [[Shiny Dragonair]]
| |
| | width="1%" align="center" | 600
| |
| |-
| |
| | width="1%" align="center" | [[Arquivo:149-Dragonite.png|link=Dragonite]]
| |
| | width="1%" align="center" | 149
| |
| | width="11%" align="center" | [[Dragonite]]
| |
| | width="1%" align="center" | 500
| |
| |-
| |
| | width="1%" align="center" | [[Arquivo:164-Noctowl.png|link=Noctowl]]
| |
| | width="1%" align="center" | 164
| |
| | width="11%" align="center" | [[Noctowl]]
| |
| | width="1%" align="center" | 400
| |
| |-
| |
| | width="1%" align="center" | [[Arquivo:164-Sh Noctowl.png|link=Shiny Noctowl]]
| |
| | width="1%" align="center" | 164
| |
| | width="11%" align="center" | [[Shiny Noctowl]]
| |
| | width="1%" align="center" | 600
| |
| |-
| |
| | width="1%" align="center" | [[Arquivo:169-Crobat.png|link=Crobat]]
| |
| | width="1%" align="center" | 169
| |
| | width="11%" align="center" | [[Crobat]]
| |
| | width="1%" align="center" | 500
| |
| |-
| |
| | width="1%" align="center" | [[Arquivo:169-Sh Crobat.png|link=Shiny Crobat]]
| |
| | width="1%" align="center" | 169
| |
| | width="11%" align="center" | [[Shiny Crobat]]
| |
| | width="1%" align="center" | 600
| |
| |-
| |
| | width="1%" align="center" | [[Arquivo:178-Xatu.png|link=Xatu]]
| |
| | width="1%" align="center" | 178
| |
| | width="11%" align="center" | [[Xatu]]
| |
| | width="1%" align="center" | 500
| |
| |-
| |
| | width="1%" align="center" | [[Arquivo:178-shXatu.png|link=Shiny Xatu]]
| |
| | width="1%" align="center" | 178
| |
| | width="11%" align="center" | [[Shiny Xatu]]
| |
| | width="1%" align="center" | 600
| |
| |-
| |
| | width="1%" align="center" | [[Arquivo:214-Heracross.png|link=Heracross]]
| |
| | width="1%" align="center" | 214
| |
| | width="11%" align="center" | [[Heracross]]
| |
| | width="1%" align="center" | 500
| |
| |-
| |
| | width="1%" align="center" | [[Arquivo:225-Delibird.png|link=Delibird]]
| |
| | width="1%" align="center" | 225
| |
| | width="11%" align="center" | [[Delibird]]
| |
| | width="1%" align="center" | 400
| |
| |-
| |
| | width="1%" align="center" | [[Arquivo:225-Sh_Delibird.png|link=Shiny Delibird]]
| |
| | width="1%" align="center" | 225
| |
| | width="11%" align="center" | [[Shiny Delibird]]
| |
| | width="1%" align="center" | 600
| |
| |-
| |
| | width="1%" align="center" | [[Arquivo:227-Skarmory.png|link=Skarmory]]
| |
| | width="1%" align="center" | 227
| |
| | width="11%" align="center" | [[Skarmory]]
| |
| | width="1%" align="center" | 500
| |
| |-
| |
| | width="1%" align="center" | [[Arquivo:233-Porygon2.png|link=Porygon2]]
| |
| | width="1%" align="center" | 233
| |
| | width="11%" align="center" | [[Porygon2]]
| |
| | width="1%" align="center" | 500
| |
| |-
| |
| | width="1%" align="center" | [[Arquivo:277-Swellow.png|link=Swellow]]
| |
| | width="1%" align="center" | 277
| |
| | width="11%" align="center" | [[Swellow]]
| |
| | width="1%" align="center" | 500
| |
| |-
| |
| | width="1%" align="center" | [[Arquivo:279-Pelipper.png|link=Pelipper]]
| |
| | width="1%" align="center" | 279
| |
| | width="11%" align="center" | [[Pelipper]]
| |
| | width="1%" align="center" | 500
| |
| |-
| |
| | width="1%" align="center" | [[Arquivo:330-Flygon.png|link=Flygon]]
| |
| | width="1%" align="center" | 330
| |
| | width="11%" align="center" | [[Flygon]]
| |
| | width="1%" align="center" | 500
| |
| |-
| |
| | width="1%" align="center" | [[Arquivo:334-Altaria.png|link=Altaria]]
| |
| | width="1%" align="center" | 334
| |
| | width="11%" align="center" | [[Altaria]]
| |
| | width="1%" align="center" | 500
| |
| |-
| |
| | width="1%" align="center" | [[Arquivo:357-Tropius.png|link=Tropius]]
| |
| | width="1%" align="center" | 357
| |
| | width="11%" align="center" | [[Tropius]]
| |
| | width="1%" align="center" | 500
| |
| |-
| |
| | width="1%" align="center" | [[Arquivo:373-Salamence.png|link=Salamence]]
| |
| | width="1%" align="center" | 373
| |
| | width="11%" align="center" | [[Salamence]]
| |
| | width="1%" align="center" | 600
| |
| |-
| |
| | width="1%" align="center" | [[Arquivo:398-Staraptor.png|link=Staraptor]]
| |
| | width="1%" align="center" | 398
| |
| | width="11%" align="center" | [[Staraptor]]
| |
| | width="1%" align="center" | 500
| |
| |-
| |
| | width="1%" align="center" | [[Arquivo:430-Honchkrow.png|link=Honchkrow]]
| |
| | width="1%" align="center" | 430
| |
| | width="11%" align="center" | [[Honchkrow]]
| |
| | width="1%" align="center" | 500
| |
| |-
| |
| | width="1%" align="center" | [[Arquivo:430-Shiny Honchkrow.png|link=Shiny Honchkrow]]
| |
| | width="1%" align="center" | 430
| |
| | width="11%" align="center" | [[Shiny Honchkrow]]
| |
| | width="1%" align="center" | 600
| |
| |-
| |
| | width="1%" align="center" | [[Arquivo:445-Garchomp.png|link=Garchomp]]
| |
| | width="1%" align="center" | 445
| |
| | width="11%" align="center" | [[Garchomp]]
| |
| | width="1%" align="center" | 500
| |
| |-
| |
| | width="1%" align="center" | [[Arquivo:462-Magnezone.png|link=Magnezone]]
| |
| | width="1%" align="center" | 462
| |
| | width="11%" align="center" | [[Magnezone]]
| |
| | width="1%" align="center" | 600
| |
| |-
| |
| | width="1%" align="center" | [[Arquivo:462-Shiny Magnezone.png|link=Shiny Magnezone]]
| |
| | width="1%" align="center" | 462
| |
| | width="11%" align="center" | [[Shiny Magnezone]]
| |
| | width="1%" align="center" | 600
| |
| |-
| |
| | width="1%" align="center" | [[Arquivo:468-Togekiss.png|link=Togekiss]]
| |
| | width="1%" align="center" | 468
| |
| | width="11%" align="center" | [[Togekiss]]
| |
| | width="1%" align="center" | 500
| |
| |-
| |
| | width="1%" align="center" | [[Arquivo:474.png|link=Porygon-Z]]
| |
| | width="1%" align="center" | 474
| |
| | width="11%" align="center" | [[Porygon-Z]]
| |
| | width="1%" align="center" | 600
| |
| |-
| |
| | width="1%" align="center" | [[Arquivo:567-Archeops.png|link=Archeops]]
| |
| | width="1%" align="center" | 567
| |
| | width="11%" align="center" | [[Archeops]]
| |
| | width="1%" align="center" | 500
| |
| |-
| |
| | width="1%" align="center" | [[Arquivo:623-Shiny_Golurk.png|link=Shiny Golurk]]
| |
| | width="1%" align="center" | 623
| |
| | width="11%" align="center" | [[Shiny Golurk]]
| |
| | width="1%" align="center" | 600
| |
| |-
| |
| | width="1%" align="center" | [[Arquivo:637-Volcarona.png|link=Volcarona]]
| |
| | width="1%" align="center" | 637
| |
| | width="11%" align="center" | [[Volcarona]]
| |
| | width="1%" align="center" | 500
| |
| |-
| |
| | width="1%" align="center" | [[Arquivo:663-Talonflame.png|link=Talonflame]]
| |
| | width="1%" align="center" | 663
| |
| | width="11%" align="center" | [[Talonflame]]
| |
| | width="1%" align="center" | 500
| |
| |-
| |
| |}
| |
| | |
| =Mini game da Profissão=
| |
| | |
| Enquanto algumas coletas ocorrem de formas normais, em outros momentos os jogadores precisam completar o desafio que será disponibilizado para completar a coleta (o desafio é relativamente simples e não tomará muito tempo). Para completar o desafio o jogador deverá apertar a tecla '''espaço''' quando a barra azul estiver próxima da seta e então como resultado, após completar o desafio com sucesso, os recursos que o jogador recebe serão aumentados em três vezes para compensar o tempo gasto para resolvê-lo.
| |
| | |
| | |
| | |
| | |
| == ''' Lixo na Praia''' ==
| |
| | |
| | |
| Va até o lado direito da ilha, e fale com a '''Npc Faith''', ela explicará que devido ao número de turistas ter crescido, a quantidade de sujeira também aumentou.
| |
| | |
| | |
| <center>[[Arquivo:Valencia1.png|link=Valencia Quest]]</center> | |
| | |
| | |
| Então ela pedirá sua ajuda para limpar a praia, você deverá coletar alguns sacos de lixo espalhados ao redor da praia, colete-os e volte até ela.
| |
| <center>
| |
| {| border="1" style="text-align: center; border-collapse: collapse"
| |
| | width="100%" | [[Arquivo:ValenciaQuest_LocLixos.png|400px|link=]]
| |
| |}
| |
| </center>
| |
| | |
| Caso tenha dúvidas, clique no [[Arquivo:lixo.png|link=]] lixo para conferir individualmente a posição de cada lixo.
| |
| | |
| <span class="mw-customtoggle-Lixos"> [[Arquivo:lixo.png|link=]] Localização dos lixos
| |
| <div class="mw-collapsible mw-collapsed" id="mw-customcollapsible-Lixos">
| |
| <center>
| |
| {| class="wikitable" width="1%"
| |
| ! style="background-color: #03BB85" | <span style="color:white">Primeiro</span>
| |
| | width="1%" style="border-top-style: hidden; border-width: 1px; border-bottom-style: hidden; border-width: 1px" |
| |
| ! style="background-color: #03BB85" | <span style="color:white">Segundo</span>
| |
| |- align="center"
| |
| | [[Arquivo:ValenciaQuest_Loc1.png|link=Valencia Quest]]
| |
| | width="1%" style="border-top-style: hidden; border-width: 1px; border-bottom-style: hidden; border-width: 1px" |
| |
| | [[Arquivo:ValenciaQuest_Loc2.png|link=Valencia Quest]]
| |
| |-
| |
| | height="30px" style="border-left-style: hidden; border-width: 1px; border-right-style: hidden; border-width: 1px" |
| |
| |-
| |
| ! style="background-color: #03BB85" | <span style="color:white">Terceiro</span>
| |
| | width="1%" style="border-top-style: hidden; border-width: 1px; border-bottom-style: hidden; border-width: 1px" |
| |
| ! style="background-color: #03BB85" | <span style="color:white">Quarto</span>
| |
| |- align="center"
| |
| | [[Arquivo:ValenciaQuest_Loc3.png|link=Valencia Quest]]
| |
| | width="1%" style="border-top-style: hidden; border-width: 1px; border-bottom-style: hidden; border-width: 1px" |
| |
| | [[Arquivo:ValenciaQuest_Loc4.png|link=Valencia Quest]]
| |
| |-
| |
| | height="30px" style="border-left-style: hidden; border-width: 1px; border-right-style: hidden; border-width: 1px" |
| |
| |-
| |
| ! style="background-color: #03BB85" | <span style="color:white">Quinto</span>
| |
| | width="1%" style="border-top-style: hidden; border-width: 1px; border-bottom-style: hidden; border-width: 1px" |
| |
| ! style="background-color: #03BB85" | <span style="color:white">Sexto</span>
| |
| |- align="center"
| |
| | [[Arquivo:ValenciaQuest_Loc5.png|link=Valencia Quest]]
| |
| | width="4%" style="border-top-style: hidden; border-width: 1px; border-bottom-style: hidden; border-width: 1px" |
| |
| | [[Arquivo:ValenciaQuest_Loc6.png|link=Valencia Quest]]
| |
| |-
| |
| | height="30px" style="border-left-style: hidden; border-width: 1px; border-right-style: hidden; border-width: 1px" |
| |
| |-
| |
| ! style="background-color: #03BB85" | <span style="color:white">Sétimo</span>
| |
| | width="1%" style="border-top-style: hidden; border-width: 1px; border-bottom-style: hidden; border-width: 1px" |
| |
| ! style="background-color: #03BB85" | <span style="color:white">Oitavo</span>
| |
| |- align="center"
| |
| | [[Arquivo:ValenciaQuest_Loc7.png|link=Valencia Quest]]
| |
| | width="1%" style="border-top-style: hidden; border-width: 1px; border-bottom-style: hidden; border-width: 1px" |
| |
| | [[Arquivo:ValenciaQuest_Loc8.png|link=Valencia Quest]]
| |
| |-
| |
| | height="30px" style="border-left-style: hidden; border-width: 1px; border-right-style: hidden; border-width: 1px" |
| |
| |-
| |
| ! style="background-color: #03BB85" | <span style="color:white">Nono</span>
| |
| | width="1%" style="border-top-style: hidden; border-width: 1px; border-bottom-style: hidden; border-width: 1px" |
| |
| ! style="background-color: #03BB85" | <span style="color:white">Décimo</span>
| |
| |- align="center"
| |
| | [[Arquivo:ValenciaQuest_Loc9.png|link=Valencia Quest]]
| |
| | width="1%" style="border-top-style: hidden; border-width: 1px; border-bottom-style: hidden; border-width: 1px" |
| |
| | [[Arquivo:ValenciaQuest_Loc10.png|link=Valencia Quest]]
| |
| |-
| |
| </center>
| |
| |}
| |
| | |
| </div><br>
| |