| Item | Custo | |
|---|---|---|
| Shark Costume (Alolan Persian) | 1500 Anniversary Token | |
| Pool Party Costume (Beartic) | 1500 Anniversary Token | |
| Summer Outfit (Solrock) | 1500 Anniversary Token | |
| Tourist Costume (Shiny Beedrill) | 1500 Anniversary Token | |
| Pool Party Costume (Lanturn) | 1500 Anniversary Token | |
| Summer Costume (Machamp) | 1500 Anniversary Token | |
| Summer Costume (Gardevoir) | 1500 Anniversary Token | |
| Summer Costume (Shiny Lucario) | 2500 Anniversary Token | |
| Summer Costume (Shiny Vileplume) | 2500 Anniversary Token | |
| Summer Costume (Shiny Vaporeon) | 2500 Anniversary Token | |
| Summer Costume (Shiny Nidoking) | 2500 Anniversary Token | |
| Summer Costume (Shiny Golem) | 2500 Anniversary Token | |
| Summer Costume (Shiny Hypno) | 2500 Anniversary Token | |
| Summer Costume (Shiny Jolteon) | 2500 Anniversary Token | |
| Summer Costume (Shiny Flareon) | 2500 Anniversary Token | |
| Summer Costume (Shiny Fearow) | 2500 Anniversary Token | |
| Summer Costume (Elite Hitmontop) | 2500 Anniversary Token | |
| Tourist Hat (Shiny Beautifly) | 1500 Anniversary Token | |
| Beach Kit (Mega Slowbro) | 1500 Anniversary Token | |
| Pool Flat (Shiny Klinklang) | 1500 Anniversary Token | |
| Beach Glasses (Pyroar Female) | 1500 Anniversary Token | |
| Jet Ski (Sharpedo) | 1500 Anniversary Token | |
| Shark Disguise (Whiscash) | 1500 Anniversary Token | |
| Tourist Costume (Infernape) | 1500 Anniversary Token | |
| Hawaiian Costume (Claydol) | 1500 Anniversary Token | |
| Life Jacket (Gogoat) | 1500 Anniversary Token | |
| Beachy Costume (Light Ball Pikachu) | 1500 Anniversary Token | |
| Beach Shorts (Exeggutor) | 1500 Anniversary Token | |
| Surfboard Costume (Alolan Raichu) | 1500 Anniversary Token | |
| Tourist Kit (Pelipper) | 1500 Anniversary Token | |
Predefinição:Teste14: mudanças entre as edições
Ir para navegação
Ir para pesquisar
| Linha 1: | Linha 1: | ||
=rene= | |||
==Pedras Comuns== | |||
As Pedras de Evolução tem várias funções dentro do jogo, seja para boostar seu Pokémon, para fazer dinheiro comercializando-as ou realizando Task com as mesmas.<br> | |||
Elas podem ser adquiridas das seguintes formas:<br> | |||
* Derrotando Pokémons pelo mapa. | |||
* Derrotando NPCs. | |||
* Finalizando '''[[Quests]]''' e '''[[Tasks]]''' | |||
* Recompensa dos baús da '''[[Dimensional Zone]]'''. | |||
* Comprando-nas de jogadores. | |||
<center> | |||
{|class="wikitable" width="50%" style= "text-align:center" | |||
! colspan="3" style="background-color: #9d1a64" | '''Pedras de Evolução''' | |||
|- | |||
! colspan="2" width="25%" style="border-right-style: hidden;" | Nome | |||
! Descrição | |||
|- | |||
| style="border-right-style: hidden;" |[[Arquivo:Ancient-stone.gif|link=Ancient Stone]] || [[Ancient Stone]] | |||
| Essa pedra é utilizada para '''evoluir''' e '''boostar''' alguns Pokémon '''raros'''. | |||
|- | |||
| style="border-right-style: hidden;" |[[Arquivo:Metal Stone.gif|link=Metal Stone]] || [[Metal Stone]] | |||
| Essa pedra é utilizada para '''evoluir''' e '''boostar''' Pokémon do tipo [[Arquivo:steel.png|link=Pedras de Evolução]] '''Metal'''. | |||
|- | |||
| style="border-right-style: hidden;" |[[Arquivo:Crystal Stone.gif|link=Crystal Stone]] || [[Crystal Stone]] | |||
| Essa pedra é utilizada para '''evoluir''' e '''boostar''' Pokémon do tipo [[Arquivo:dragon.png|link=Pedras de Evolução]] '''Dragon''' e [[Arquivo:Fairy.png|link=Pedras de Evolução]] '''Fairy'''. | |||
|- | |||
|style="border-right-style: hidden;" | [[Arquivo:Enigma Stone.gif|link=Enigma Stone]] || [[Enigma Stone]] | |||
| Essa pedra é utilizada para '''evoluir''' e '''boostar''' Pokémon do tipo [[Arquivo:psychic.png|link=Pedras de Evolução]] '''Psychic'''. | |||
= | |- | ||
| style="border-right-style: hidden;" |[[Arquivo:Punch Stone.gif|link=Punch Stone]] || [[Punch Stone]] | |||
| Essa pedra é utilizada para '''evoluir''' e '''boostar''' Pokémon do tipo [[Arquivo:fighting.png|link=Pedras de Evolução]] '''Fight'''. | |||
|- | |||
|style="border-right-style: hidden;" | [[Arquivo:Ice Stone.gif|link=Ice Stone]] || [[Ice Stone]] | |||
| Essa pedra é utilizada para '''evoluir''' e '''boostar''' Pokémon do tipo [[Arquivo:ice.png|link=Pedras de Evolução]] '''Ice'''. | |||
|- | |||
|style="border-right-style: hidden;" | [[Arquivo:Fire Stone.gif|link=Fire Stone]] || [[Fire Stone]] | |||
| Essa pedra é utilizada para '''evoluir''' e '''boostar''' Pokémon do tipo [[Arquivo:fire.png|link=Pedras de Evolução]] '''Fire'''. | |||
|- | |||
|style="border-right-style: hidden;" | [[Arquivo:Rock Stone.gif|link=Rock Stone]] || [[Rock Stone]] | |||
| Essa pedra é utilizada para evoluir e boostar Pokémon do tipo [[Arquivo:rock.png|link=Pedras de Evolução]] '''Rock'''. | |||
|- | |||
|style="border-right-style: hidden;" | [[Arquivo:Earth Stone.gif|link=Earth Stone]] || [[Earth Stone]] | |||
| Essa pedra é utilizada para evoluir e boostar Pokémon do tipo [[Arquivo:ground.png|link=Pedras de Evolução]] '''Earth'''. | |||
|- | |||
|style="border-right-style: hidden;" | [[Arquivo:Venom Stone.gif|link=Venom Stone]] || [[Venom Stone]] | |||
| Essa pedra é utilizada para evoluir e boostar Pokémon do tipo [[Arquivo:poison1.png|link=Pedras de Evolução]] '''Poison'''. | |||
|- | |||
|style="border-right-style: hidden;" | [[Arquivo:Thunder Stone.gif|link=Thunder Stone]] || [[Thunder Stone]] | |||
| Essa pedra é utilizada para evoluir e boostar Pokémon do tipo [[Arquivo:electric.png|link=Pedras de Evolução]] '''Electric'''. | |||
|- | |- | ||
| | |style="border-right-style: hidden;" | [[Arquivo:Water Stone.gif|link=Water Stone]] || [[Water Stone]] | ||
| Essa pedra é utilizada para evoluir e boostar Pokémon do tipo [[Arquivo:water.png|link=Pedras de Evolução]] '''Water'''. | |||
|- | |- | ||
|style="border-right-style: hidden;" | [[Arquivo:Cocoon Stone.gif|link=Cocoon Stone]] || [[Cocoon Stone]] | |||
| style="border- | | Essa pedra é utilizada para evoluir e boostar Pokémon do tipo [[Arquivo:bug.png|link=Pedras de Evolução]] '''Bug'''. | ||
| [[Arquivo: | |||
| | |||
| [[Arquivo: | |||
|- | |- | ||
| | |style="border-right-style: hidden;" | [[Arquivo:Leaf Stone.gif|link=Leaf Stone]] || [[Leaf Stone]] | ||
| Essa pedra é utilizada para evoluir e boostar Pokémon do tipo [[Arquivo:grass.png|link=Pedras de Evolução]] '''Grass'''. | |||
|- | |- | ||
|style="border-right-style: hidden;" | [[Arquivo:Feather Stone.gif|link=Feather Stone]] || [[Feather Stone]] | |||
| style="border- | | Essa pedra é utilizada para evoluir e boostar Pokémon do tipo [[Arquivo:flying.png|link=Pedras de Evolução]] '''Flying'''. | ||
| [[Arquivo: | |||
| | |||
| [[Arquivo: | |||
|- | |- | ||
| | |style="border-right-style: hidden;" | [[Arquivo:Heart Stone.gif|link=Heart Stone]] || [[Heart Stone]] | ||
| Essa pedra é utilizada para evoluir e boostar Pokémon do tipo [[Arquivo:normal1.png|link=Pedras de Evolução]] '''Normal''' e [[Arquivo:Fairy.png|link=Pedras de Evolução]] '''Fairy'''. | |||
|- | |- | ||
|style="border-right-style: hidden;" | [[Arquivo:Darkness Stone.gif|link=Darkness Stone]] || [[Darkness Stone]] | |||
| Essa pedra é utilizada para evoluir e boostar Pokémon do tipo [[Arquivo:ghost1.png|link=Pedras de Evolução]] '''Ghost''' e [[Arquivo:Dark1.png|link=Pedras de Evolução]] '''Dark'''. | |||
| | |||
| [[Arquivo: | |||
|- | |- | ||
| | |style="border-right-style: hidden;" | [[Arquivo:Shiny1.png|link=Shiny Stone]] || [[Shiny Stone]] | ||
| É usada para evoluir o Pokémon [[Arquivo:176-Togetic.png|link=Togetic]] '''Togetic''' para [[Arquivo:468-Togekiss.png|link=Togekiss]] '''Togekiss''' | |||
|- | |||
|style="border-right-style: hidden;" | [[Arquivo:Dawn1.png|link=Dawn Stone]] || [[Dawn Stone]] | |||
| É usada para evoluir o Pokémon [[Arquivo:361-Snorut.png|link=Snorunt]] '''Snorunt''' para [[Arquivo:478-Froslass.png|link=Froslass]] '''Froslass''' | |||
|- | |||
|style="border-right-style: hidden;" | [[Arquivo:Sun_Stone.png|link=Sun Stone]] || [[Sun Stone]] | |||
| É usada para evoluir o Pokémon [[Arquivo:315-Roselia.png|link=Roselia]] '''Roselia''' para [[Arquivo:407-Roserade.png|link=Roserade]] '''Roserade''' | |||
|- | |||
|style="border-right-style: hidden;" | [[Arquivo:Sinnoh_Stone.png|link=Sinnoh Stone]] || [[Sinnoh Stone]] | |||
| Essa pedra é utilizada para '''evoluir''' alguns Pokémon da região de Sinnoh. | |||
|} | |||
</center> | |||
==Pedras da Dimensional Zone== | |||
Os Pokémon da Dimensional Zone não podem ser evoluídos pelas pedras normais, por isso eles tem as suas pedras de evolução próprias dessa dimensão. | |||
<center> | <center> | ||
{| class="wikitable" width=" | {|class="wikitable" width="50%" style= "text-align:center" | ||
|- | |- | ||
! colspan="2" width="25%" | Nome | |||
! Descrição | |||
|- | |- | ||
| | |style="border-right-style: hidden;" | [[Arquivo:Dimensional.png|link=Dimensional Stone]] || [[Dimensional Stone]] | ||
| | | Essa pedra é utilizada para '''boostar''' e '''evoluir''' alguns dos pokémon da '''[[Dimensional Zone]]'''. | ||
| | |||
| | |||
|- | |- | ||
|style="border-right-style: hidden;" | [[Arquivo:Mirror.png|link=Mirror Stone]] || [[Mirror Stone]] | |||
| Essa pedra é utilizada para '''boostar''' e '''evoluir''' alguns dos pokémon da '''[[Dimensional Zone]]'''. | |||
|} | |} | ||
</center> | </center> | ||
Os | ==Shards== | ||
Os Shards servem para evoluir pokemons exclusivos da Nightmare World e na fabricação de matérias para os boosts a partir do +50 até o +70. || Você pode consultar como dropar cada shard através [[Drop_de_Itens#Shards_-_Nightmare_World|desse link]]. | |||
<center> | <center> | ||
{| class="wikitable" width=" | {|class="wikitable" width="50%" style= "text-align:center" | ||
|- | |- | ||
! colspan="2" width="25%"| Nome | |||
! Descrição | |||
|- | |- | ||
| style="border-right-style: hidden;" |[[Arquivo:Cerise Shard.png|link=Cerise Shard]] || [[Cerise Shard]] | |||
| Shard do clã Psycraft. | |||
|- | |- | ||
| | | style="border-right-style: hidden;" |[[Arquivo:Kermes Shard.png|link=Kermes Shard]] || [[Kermes Shard]] | ||
| Shard do clã Gardestrike. | |||
|- | |- | ||
|style="border-right-style: hidden;" | [[Arquivo:Harlequin Shard.png|link=Harlequin Shard]] || [[Harlequin Shard]] | |||
| Shard do clã Naturia. | |||
|- | |- | ||
| | |style="border-right-style: hidden;" | [[Arquivo:Slate Shard.png|link=Slate Shard]] || [[Slate Shard]] | ||
| Shard do clã Ironhard. | |||
|- | |- | ||
|style="border-right-style: hidden;" | [[Arquivo:Indigo Shard.png|link=Indigo Shard]] || [[Indigo Shard]] | |||
| Shard do clã Orebound. | |||
|- | |- | ||
| | |style="border-right-style: hidden;" | [[Arquivo: Sunflower Shard.png|link=Sunflower Shard]] || [[Sunflower Shard]] | ||
| Shard do clã Raibolt. | |||
|- | |- | ||
|style="border-right-style: hidden;" | [[Arquivo:Damson Shard.png|link=Damson Shard]] || [[Damson Shard]] | |||
| Shard do clã Malefic. | |||
|- | |- | ||
| | |style="border-right-style: hidden;" | [[Arquivo:Scarlet Shard.png|link=Scarlet Shard]] || [[Scarlet Shard]] | ||
| Shard do clã Volcanic. | |||
|- | |- | ||
| style="border-right-style: hidden;" |[[Arquivo:Azure Shard.png|link=Azure Shard]] || [[Azure Shard]] | |||
| Shard do clã Seavell. | |||
|- | |- | ||
| style="border-right-style: hidden;" |[[Arquivo: Shell Shard.png|link=Shell Shard]] || [[Shell Shard]] | |||
| Shard do clã Wingeon. | |||
|} | |} | ||
</center> | </center> | ||
== | ==Itens Evolutivos== | ||
Existem alguns Pokémon que não evoluem com nenhuma das pedras citadas anteriormente, a sua evolução é somente através de um item especial. Esses itens não possuem um valor de venda para NPC, pois são extremamente raros de conseguir. | |||
<center> | <center> | ||
{| class="wikitable" width=" | {|class="wikitable" width="50%" style= "text-align:center" | ||
|- | |||
! colspan="2" width="25%"| Nome | |||
! Descrição | |||
! Quantia Para Evolução | |||
|- | |- | ||
| | | style="border-right-style: hidden;" |[[Arquivo:Data_Ufo.png|link=Data Ufo]] || [[Data Ufo]] | ||
| | | Um misterioso dispositivo preenchido com todos os tipos de dados. Isso permite um certo tipo de pokemon evoluir. <br> É usado para evoluir o Pokémon [[Arquivo:082-Magneton.png|link=Magneton]] '''Magneton''' para [[Arquivo:462-Magnezone.png|link=Magnezone]] '''Magnezone'''. | ||
| 10 | |||
|- | |- | ||
|style="border-right-style: hidden;" | [[Arquivo:Bloody_Wing.png|link=Bloody Wing]] || [[Bloody Wing]] | |||
| Uma asa super afiada com um brilho sutil. Isso permite algumas espécies de Pokémon evoluir. <br> É usado para evoluir o Pokémon [[Arquivo:372-Shelgon.png|link=Shelgon]] '''Shelgon''' para [[Arquivo:373-Salamence.png|link=Salamence]] '''Salamence'''. | |||
| 10 | |||
|- | |- | ||
| | | style="border-right-style: hidden;" |[[Arquivo:Electirizer.png|link=Electirizer]] || [[Electirizer]] | ||
| | | Uma caixa cheia de uma grande quantidade de energia elétrica. Este item permite uma determinada espécie de pokemon evoluir. <br> É usado para evoluir o Pokémon [[Arquivo:125-Electabuzz.png|link=Electabuzz]] '''Electabuzz''' para [[Arquivo:466-Electivire.png|link=Electivire]] '''Electivire'''. | ||
| 10 | |||
|- | |- | ||
|style="border-right-style: hidden;" | [[Arquivo:Gaia_Tentacle.png|link=Gaia Tentacle]] || [[Gaia Tentacle]] | |||
| Uma misteriosa substancia cheia de um poder da natureza. Este item permite uma determinada espécie de Pokémon evoluir.<br> É usado para evoluir o Pokémon [[Arquivo:114-Tangela.png|link=Tangela]] '''Tangela''' para [[Arquivo:Tang.png|link=Tangrowth]] '''Tangrowth'''. | |||
| 10 | |||
|- | |- | ||
| | |style="border-right-style: hidden;" | [[Arquivo:Magmarizer.png|link=Magmarizer]] || [[Magmarizer]] | ||
| | | Uma caixa cheia de uma grande energia magma. Este item permite uma determinada espécie de pokémon evoluir.<br> É usado para evoluir o Pokémon [[Arquivo:126-Magmar.png|link=Magmar]] '''Magmar''' para [[Arquivo:467-Magmortar.png|link=Magmortar]] '''Magmortar'''. | ||
| 10 | |||
|- | |- | ||
|style="border-right-style: hidden;" | [[Arquivo:Metal_Coat.png|link=Metal Coat]] || [[Metal Coat]] | |||
| Uma misteriosa substância cheia de um metal especial. Este item permite uma certa espécie de pokemon evoluir.<br> É usado para evoluir o Pokémon [[Arquivo:375-Metang.png|link=Metang]] '''Metang''' para [[Arquivo:376-Metagross.png|link=Metagross]] '''Metagross'''. | |||
| 10 | |||
|- | |- | ||
| | |style="border-right-style: hidden;" | [[Arquivo:Power_Banana.png|link=Power Banana]] || [[Power Banana]] | ||
| | | Aumenta o poder dos macacos com a Banana Power. Esse item permite uma determinada espécie de pokemon evoluir.<br> É usado para evoluir o Pokémon [[Arquivo:288-Vigoroth.png|link=Vigoroth]] '''Vigoroth''' para [[Arquivo:289-Slaking.png|link=Slaking]] '''Slaking'''. | ||
| 10 | |||
|- | |- | ||
|style="border-right-style: hidden;" | [[Arquivo:Prism_scale.png|link=Prism Scale]] || [[Prism Scale]] | |||
| Uma escama misteriosa que faz certas espécies de Pokémon evoluírem. Ela brilha com as cores do arco-íris.<br> É usado para evoluir o Pokémon [[Arquivo:349-Feebas.png|link=Feebas]] '''Feebas''' para [[Arquivo:350-Milotic.png|link=Milotic]] '''Milotic'''. | |||
| 10 | |||
|- | |- | ||
| | |style="border-right-style: hidden;" | [[Arquivo:Protector.png|link=Protector]] || [[Protector]] | ||
| | | Uma peça pesada e resistente que pode ser usada como equipamento de proteção. Faz certas espécies de Pokémon evoluírem.<br> É usado para evoluir o Pokémon [[Arquivo:112-Rhydon.png|link=Rhydon]] '''Rhydon''' para [[Arquivo:464-Rhyperior.png|link=Rhyperior]] '''Rhyperior'''. | ||
| 10 | |||
|- | |- | ||
| style="border-right-style: hidden;" |[[Arquivo:Reapher_Cloth.png|link=Reaper Cloth]] || [[Reaper Cloth]] | |||
| Uma estranha capa possuída por uma forte e assustadora energia espiritual. Este item permite um certo tipo de Pokémon evoluir.<br> É usado para evoluir o Pokémon [[Arquivo:356-Dusclops.png|link=Dusclops]] '''Dusclops''' para [[Arquivo:477-Dusknoir.png|link=Dusknoir]] '''Dusknoir'''. | |||
| 10 | |||
|- | |- | ||
| | | style="border-right-style: hidden;" |[[Arquivo:Kicking_CD.png|link=Kicking CD]] || [[Kicking CD]] | ||
| | | Você vê um Kicking CD. <br> É usado para evoluir o Pokémon [[Arquivo:236-Tyrogue.png|link=Tyrogue]] '''Tyrogue''' para [[Arquivo:106-HitmonleeNormal.png|link=Hitmonlee]] '''Hitmonlee'''. | ||
| 1 | |||
|- | |- | ||
|style="border-right-style: hidden;" | [[Arquivo:Punching_CD.png|link=Punching CD]] || [[Punching CD]] | |||
| Você vê um Punching CD. <br> É usado para evoluir o Pokémon [[Arquivo:236-Tyrogue.png|link=Tyrogue]] '''Tyrogue''' para [[Arquivo:107-HitmonchanNormal.png|link=Hitmonchan]] '''Hitmonchan'''. | |||
| 1 | |||
|- | |- | ||
| | |style="border-right-style: hidden;" | [[Arquivo:Spinning_CD.png|link=Spinning CD]] || [[Spinning CD]] | ||
| | | Você vê um Spinning CD. <br> É usado para evoluir o Pokémon [[Arquivo:236-Tyrogue.png|link=Tyrogue]] '''Tyrogue''' para [[Arquivo:237-HitmontopNormal.png|link=Hitmontop]] '''Hitmontop'''. | ||
| 1 | |||
|- | |- | ||
|style="border-right-style: hidden;" | [[Arquivo:Eviolite.png|link=Eviolite]] || [[Eviolite]] | |||
| Uma pedra peculiar que pode fazer um Pokémon bebê evoluir à sua forma adulta. | |||
| 1 | |||
|} | |} | ||
</center> | </center> | ||
==Pedras Exclusivas para Boost== | |||
Existem também 3 stones que a sua única função é boostar alguns tipos de Pokémon. Algumas podem ser vendidas para o [[NPC Flint (Stones)]]. | |||
{| class="wikitable" width=" | <center> | ||
{|class="wikitable" width="50%" style= "text-align:center" | |||
|- | |- | ||
! colspan="2" width="25%"| Item | |||
! Descrição | |||
|- | |- | ||
| | |style="border-right-style: hidden;" | [[Arquivo:GUc8LUi.png|link=]] || [[Mystic Star]] | ||
| | | Essa stone é utilizada para '''boostar''' alguns tipos de Pokémon. | ||
|- | |- | ||
|style="border-right-style: hidden;" | [[Arquivo:Boost1.png|link=]] || [[Boost Stone]] | |||
| Essa stone é utilizada para '''boostar''' a maioria dos Pokémon. | |||
|- | |- | ||
| | | style="border-right-style: hidden;" |[[Arquivo:Powered-boost-stone.gif|link=]] || [[Powered Boost Stone]] | ||
| | | Uma stone que pode substituir qualquer Materia acima do boost +50. | ||
| | |} | ||
</center> | |||
==Rough Gemstones== | |||
É uma pedra bruta obtida em diversas quests e conteúdos, é possível troca-la com a [[NPC Yolanda]] por algumas pedras comuns. | |||
<center> | |||
{|class="wikitable" width="50%" style= "text-align:center" | |||
|- | |- | ||
! colspan="2"width="25%"| Item | |||
! | Descrição | |||
|- | |- | ||
| | |style="border-right-style: hidden;" | [[Arquivo:Rough_Gemstone.png|link=Rough Gemstone]] || [[Rough Gemstone]] | ||
| Essa pedra é utilizada como moeda para trocas por pedras comuns. | |||
| | |||
|} | |} | ||
</center> | </center> | ||
== Como Vender e Comprar Stones == | |||
Existem três meios de '''vender''' Stone (Pedra de evolução): | |||
* Você pode vender todas as Stones que não são adquiridas pela Dimensional Zone no [[NPC Flint (Stones)]] | |||
* Você pode vender as Stones adquiridas pela Dimensional Zone no [[NPC Aureo (Dimensional Zone)]] | |||
* Você pode vendê-las no Market para outros players. | |||
Ademais, temos apenas um meio para se '''comprar''' Stone: | |||
* Você pode compra-las de players no Market. | |||
= Crafts de Aniversário = | |||
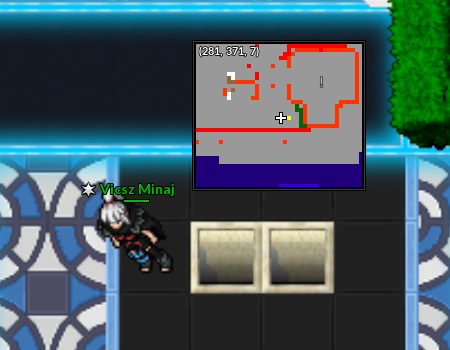
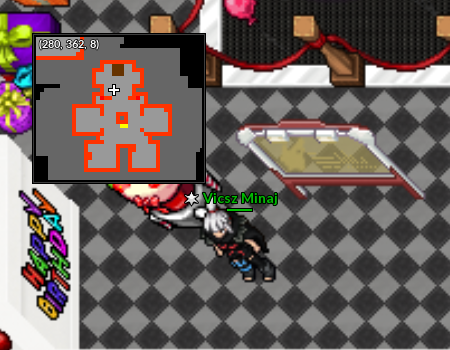
A Anniversary Workshop fica localizada no Trade Center. Há uma entrada ao sul do Trade Center para o local onde ficam todas as Workshops de Eventos. Ao chegar, basta ir para o norte e encontrará a Anniversary Workshop. <br> | |||
<center> [[Arquivo:Entrada_Workshops_de_Eventos.png|link=]] [[Arquivo:Localização Workshop de Aniversário.png|link=]] </center><br> | |||
{| class="wikitable" width=" | <tabber> | ||
|-|Addons= | |||
! width=" | |||
! width=" | <center> | ||
{|class="wikitable" width ="50%" style="text-align:center" | |||
! width="2%" colspan ="2" |Item | |||
! width="2%" |Custo | |||
|- | |- | ||
|[[File:Shark Costume (Alolan Persian).png|link=]] | |||
| | | Shark Costume (Alolan Persian) | ||
| | | [[Arquivo:Anniversary_Token.png|link=]] <br> 1500 Anniversary Token | ||
|- | |- | ||
|[[File:Pool Party Costume (Beartic).png|link=]] | |||
| Pool Party Costume (Beartic) | |||
| [[Arquivo:Anniversary_Token.png|link=]] <br> 1500 Anniversary Token | |||
|- | |- | ||
|[[File:Summer Outfit (Solrock).png|link=]] | |||
| | | Summer Outfit (Solrock) | ||
| | | [[Arquivo:Anniversary_Token.png|link=]] <br> 1500 Anniversary Token | ||
|- | |- | ||
|[[File:Tourist Costume (Shiny Beedrill).png|link=]] | |||
| Tourist Costume (Shiny Beedrill) | |||
| [[Arquivo:Anniversary_Token.png|link=]] <br> 1500 Anniversary Token | |||
|- | |- | ||
|[[File:Pool Party Costume (Lanturn).png|link=]] | |||
| | | Pool Party Costume (Lanturn) | ||
| | | [[Arquivo:Anniversary_Token.png|link=]] <br> 1500 Anniversary Token | ||
|- | |- | ||
|[[File:Summer Costume (Machamp).png|link=]] | |||
| Summer Costume (Machamp) | |||
| [[Arquivo:Anniversary_Token.png|link=]] <br> 1500 Anniversary Token | |||
|- | |- | ||
|[[File:Summer Costume (Gardevoir).png|link=]] | |||
| | | Summer Costume (Gardevoir) | ||
| | | [[Arquivo:Anniversary_Token.png|link=]] <br> 1500 Anniversary Token | ||
|- | |- | ||
|[[File:Summer Costume (Shiny Lucario).png|link=]] | |||
| Summer Costume (Shiny Lucario) | |||
| [[Arquivo:Anniversary_Token.png|link=]] <br> 2500 Anniversary Token | |||
|- | |- | ||
|[[File:Summer Costume (Shiny Vileplume).png|link=]] | |||
| | | Summer Costume (Shiny Vileplume) | ||
| | | [[Arquivo:Anniversary_Token.png|link=]] <br> 2500 Anniversary Token | ||
|- | |- | ||
|[[File:Summer Costume (Shiny Vaporeon).png|link=]] | |||
| Summer Costume (Shiny Vaporeon) | |||
| [[Arquivo:Anniversary_Token.png|link=]] <br> 2500 Anniversary Token | |||
|- | |- | ||
|[[File:Summer Costume (Shiny Nidoking).png|link=]] | |||
| | | Summer Costume (Shiny Nidoking) | ||
| | | [[Arquivo:Anniversary_Token.png|link=]] <br> 2500 Anniversary Token | ||
|- | |- | ||
|[[File:Summer Costume (Shiny Golem).png|link=]] | |||
| Summer Costume (Shiny Golem) | |||
| [[Arquivo:Anniversary_Token.png|link=]] <br> 2500 Anniversary Token | |||
|- | |- | ||
|[[File:Summer Costume (Shiny Hypno).png|link=]] | |||
| | | Summer Costume (Shiny Hypno) | ||
| | | [[Arquivo:Anniversary_Token.png|link=]] <br> 2500 Anniversary Token | ||
|- | |- | ||
|[[File:Summer Costume (Shiny Jolteon).png|link=]] | |||
| Summer Costume (Shiny Jolteon) | |||
| [[Arquivo:Anniversary_Token.png|link=]] <br> 2500 Anniversary Token | |||
|- | |- | ||
|[[File:Summer Costume (Shiny Flareon).png|link=]] | |||
| | | Summer Costume (Shiny Flareon) | ||
| | | [[Arquivo:Anniversary_Token.png|link=]] <br> 2500 Anniversary Token | ||
|- | |- | ||
|[[File:Summer Costume (Shiny Fearow).png|link=]] | |||
| Summer Costume (Shiny Fearow) | |||
| [[Arquivo:Anniversary_Token.png|link=]] <br> 2500 Anniversary Token | |||
|- | |- | ||
|[[File:Summer Costume (Elite Hitmontop).png|link=]] | |||
| | | Summer Costume (Elite Hitmontop) | ||
| | | [[Arquivo:Anniversary_Token.png|link=]] <br> 2500 Anniversary Token | ||
|- | |- | ||
|[[File:Tourist Hat (Shiny Beautifly).png|link=]] | |||
| Tourist Hat (Shiny Beautifly) | |||
| [[Arquivo:Anniversary_Token.png|link=]] <br> 1500 Anniversary Token | |||
|- | |- | ||
|[[File:Beach Kit (Mega Slowbro).png|link=]] | |||
| | | Beach Kit (Mega Slowbro) | ||
| | | [[Arquivo:Anniversary_Token.png|link=]] <br> 1500 Anniversary Token | ||
|- | |- | ||
|[[File:Pool Flat (Shiny Klinklang).png|link=]] | |||
| Pool Flat (Shiny Klinklang) | |||
| [[Arquivo:Anniversary_Token.png|link=]] <br> 1500 Anniversary Token | |||
|- | |- | ||
|[[File:Beach Glasses (Pyroar Female).png|link=]] | |||
| | | Beach Glasses (Pyroar Female) | ||
| | | [[Arquivo:Anniversary_Token.png|link=]] <br> 1500 Anniversary Token | ||
|- | |- | ||
|[[File:Jet Ski (Sharpedo).png|link=]] | |||
| Jet Ski (Sharpedo) | |||
| [[Arquivo:Anniversary_Token.png|link=]] <br> 1500 Anniversary Token | |||
|- | |- | ||
|[[File:Shark Disguise (Whiscash).png|link=]] | |||
| | | Shark Disguise (Whiscash) | ||
| | | [[Arquivo:Anniversary_Token.png|link=]] <br> 1500 Anniversary Token | ||
|- | |- | ||
|[[File:Tourist Costume (Infernape).png|link=]] | |||
| Tourist Costume (Infernape) | |||
| [[Arquivo:Anniversary_Token.png|link=]] <br> 1500 Anniversary Token | |||
|- | |- | ||
|[[File:Hawaiian Costume (Claydol).png|link=]] | |||
| | | Hawaiian Costume (Claydol) | ||
| | | [[Arquivo:Anniversary_Token.png|link=]] <br> 1500 Anniversary Token | ||
|- | |- | ||
|[[File:Life Jacket (Gogoat).png|link=]] | |||
| Life Jacket (Gogoat) | |||
| [[Arquivo:Anniversary_Token.png|link=]] <br> 1500 Anniversary Token | |||
|- | |- | ||
|[[File:Beachy Costume (Light Ball Pikachu).png|link=]] | |||
| | | Beachy Costume (Light Ball Pikachu) | ||
| | | [[Arquivo:Anniversary_Token.png|link=]] <br> 1500 Anniversary Token | ||
|- | |- | ||
|[[File:Beach Shorts (Exeggutor).png|link=]] | |||
| Beach Shorts (Exeggutor) | |||
| [[Arquivo:Anniversary_Token.png|link=]] <br> 1500 Anniversary Token | |||
|- | |- | ||
| | |[[File:Surfboard Costume (Alolan Raichu).png|link=]] | ||
| Surfboard Costume (Alolan Raichu) | |||
| [[Arquivo:Anniversary_Token.png|link=]] <br> 1500 Anniversary Token | |||
| | |||
| | |||
|- | |- | ||
|[[File:Tourist Kit (Pelipper).png|link=]] | |||
| Tourist Kit (Pelipper) | |||
| [[Arquivo:Anniversary_Token.png|link=]] <br> 1500 Anniversary Token | |||
|} | |} | ||
</center> | </center> | ||
= | |-|Diversos= | ||
<center> | <center> | ||
{| class="wikitable" width=" | {|class="wikitable" width ="50%" style="text-align:center" | ||
! width="2%" colspan ="2" |Item | |||
! width=" | ! width="2%" |Custo | ||
! width=" | |||
|- | |- | ||
| | | [[Arquivo:Cake Camera.png|link=Câmeras]] | ||
|Global Tournament Bag | |||
| [[Arquivo:Anniversary_Token.png|link=]] <br> 2000 Anniversary Token | |||
| | |||
| | |||
|- | |- | ||
|} | |} | ||
</center> | </center> | ||
</tabber> | |||
Edição atual tal como às 16h08min de 19 de novembro de 2024
rene
Pedras Comuns
As Pedras de Evolução tem várias funções dentro do jogo, seja para boostar seu Pokémon, para fazer dinheiro comercializando-as ou realizando Task com as mesmas.
Elas podem ser adquiridas das seguintes formas:
- Derrotando Pokémons pelo mapa.
- Derrotando NPCs.
- Finalizando Quests e Tasks
- Recompensa dos baús da Dimensional Zone.
- Comprando-nas de jogadores.
| Pedras de Evolução | ||
|---|---|---|
| Descrição | ||
| Ancient Stone | Essa pedra é utilizada para evoluir e boostar alguns Pokémon raros. | |
| Metal Stone | Essa pedra é utilizada para evoluir e boostar Pokémon do tipo | |
| Crystal Stone | Essa pedra é utilizada para evoluir e boostar Pokémon do tipo | |
| Enigma Stone | Essa pedra é utilizada para evoluir e boostar Pokémon do tipo | |
| Punch Stone | Essa pedra é utilizada para evoluir e boostar Pokémon do tipo | |
| Ice Stone | Essa pedra é utilizada para evoluir e boostar Pokémon do tipo | |
| Fire Stone | Essa pedra é utilizada para evoluir e boostar Pokémon do tipo | |
| Rock Stone | Essa pedra é utilizada para evoluir e boostar Pokémon do tipo | |
| Earth Stone | Essa pedra é utilizada para evoluir e boostar Pokémon do tipo | |
| Venom Stone | Essa pedra é utilizada para evoluir e boostar Pokémon do tipo | |
| Thunder Stone | Essa pedra é utilizada para evoluir e boostar Pokémon do tipo | |
| Water Stone | Essa pedra é utilizada para evoluir e boostar Pokémon do tipo | |
| Cocoon Stone | Essa pedra é utilizada para evoluir e boostar Pokémon do tipo | |
| Leaf Stone | Essa pedra é utilizada para evoluir e boostar Pokémon do tipo | |
| Feather Stone | Essa pedra é utilizada para evoluir e boostar Pokémon do tipo | |
| Heart Stone | Essa pedra é utilizada para evoluir e boostar Pokémon do tipo | |
| Darkness Stone | Essa pedra é utilizada para evoluir e boostar Pokémon do tipo | |
| Shiny Stone | É usada para evoluir o Pokémon | |
| Dawn Stone | É usada para evoluir o Pokémon | |
| Sun Stone | É usada para evoluir o Pokémon | |
| Sinnoh Stone | Essa pedra é utilizada para evoluir alguns Pokémon da região de Sinnoh. | |
Pedras da Dimensional Zone
Os Pokémon da Dimensional Zone não podem ser evoluídos pelas pedras normais, por isso eles tem as suas pedras de evolução próprias dessa dimensão.
| Nome | Descrição | |
|---|---|---|
| Dimensional Stone | Essa pedra é utilizada para boostar e evoluir alguns dos pokémon da Dimensional Zone. | |
| Mirror Stone | Essa pedra é utilizada para boostar e evoluir alguns dos pokémon da Dimensional Zone. | |
Shards
Os Shards servem para evoluir pokemons exclusivos da Nightmare World e na fabricação de matérias para os boosts a partir do +50 até o +70. || Você pode consultar como dropar cada shard através desse link.
| Nome | Descrição | |
|---|---|---|
| Cerise Shard | Shard do clã Psycraft. | |
| Kermes Shard | Shard do clã Gardestrike. | |
| Harlequin Shard | Shard do clã Naturia. | |
| Slate Shard | Shard do clã Ironhard. | |
| Indigo Shard | Shard do clã Orebound. | |
| Sunflower Shard | Shard do clã Raibolt. | |
| Damson Shard | Shard do clã Malefic. | |
| Scarlet Shard | Shard do clã Volcanic. | |
| Azure Shard | Shard do clã Seavell. | |
| Shell Shard | Shard do clã Wingeon. | |
Itens Evolutivos
Existem alguns Pokémon que não evoluem com nenhuma das pedras citadas anteriormente, a sua evolução é somente através de um item especial. Esses itens não possuem um valor de venda para NPC, pois são extremamente raros de conseguir.
| Nome | Descrição | Quantia Para Evolução | |
|---|---|---|---|
| Data Ufo | Um misterioso dispositivo preenchido com todos os tipos de dados. Isso permite um certo tipo de pokemon evoluir. É usado para evoluir o Pokémon |
10 | |
| Bloody Wing | Uma asa super afiada com um brilho sutil. Isso permite algumas espécies de Pokémon evoluir. É usado para evoluir o Pokémon |
10 | |
| Electirizer | Uma caixa cheia de uma grande quantidade de energia elétrica. Este item permite uma determinada espécie de pokemon evoluir. É usado para evoluir o Pokémon |
10 | |
| Gaia Tentacle | Uma misteriosa substancia cheia de um poder da natureza. Este item permite uma determinada espécie de Pokémon evoluir. É usado para evoluir o Pokémon |
10 | |
| Magmarizer | Uma caixa cheia de uma grande energia magma. Este item permite uma determinada espécie de pokémon evoluir. É usado para evoluir o Pokémon |
10 | |
| Metal Coat | Uma misteriosa substância cheia de um metal especial. Este item permite uma certa espécie de pokemon evoluir. É usado para evoluir o Pokémon |
10 | |
| Power Banana | Aumenta o poder dos macacos com a Banana Power. Esse item permite uma determinada espécie de pokemon evoluir. É usado para evoluir o Pokémon |
10 | |
| Prism Scale | Uma escama misteriosa que faz certas espécies de Pokémon evoluírem. Ela brilha com as cores do arco-íris. É usado para evoluir o Pokémon |
10 | |
| Protector | Uma peça pesada e resistente que pode ser usada como equipamento de proteção. Faz certas espécies de Pokémon evoluírem. É usado para evoluir o Pokémon |
10 | |
| Reaper Cloth | Uma estranha capa possuída por uma forte e assustadora energia espiritual. Este item permite um certo tipo de Pokémon evoluir. É usado para evoluir o Pokémon |
10 | |
| Kicking CD | Você vê um Kicking CD. É usado para evoluir o Pokémon |
1 | |
| Punching CD | Você vê um Punching CD. É usado para evoluir o Pokémon |
1 | |
| Spinning CD | Você vê um Spinning CD. É usado para evoluir o Pokémon |
1 | |
| Eviolite | Uma pedra peculiar que pode fazer um Pokémon bebê evoluir à sua forma adulta. | 1 | |
Pedras Exclusivas para Boost
Existem também 3 stones que a sua única função é boostar alguns tipos de Pokémon. Algumas podem ser vendidas para o NPC Flint (Stones).
| Item | Descrição | |
|---|---|---|
| Mystic Star | Essa stone é utilizada para boostar alguns tipos de Pokémon. | |
| Boost Stone | Essa stone é utilizada para boostar a maioria dos Pokémon. | |
| Powered Boost Stone | Uma stone que pode substituir qualquer Materia acima do boost +50. | |
Rough Gemstones
É uma pedra bruta obtida em diversas quests e conteúdos, é possível troca-la com a NPC Yolanda por algumas pedras comuns.
| Item | Descrição | |
|---|---|---|
| Rough Gemstone | Essa pedra é utilizada como moeda para trocas por pedras comuns. | |
Como Vender e Comprar Stones
Existem três meios de vender Stone (Pedra de evolução):
- Você pode vender todas as Stones que não são adquiridas pela Dimensional Zone no NPC Flint (Stones)
- Você pode vender as Stones adquiridas pela Dimensional Zone no NPC Aureo (Dimensional Zone)
- Você pode vendê-las no Market para outros players.
Ademais, temos apenas um meio para se comprar Stone:
- Você pode compra-las de players no Market.
Crafts de Aniversário
A Anniversary Workshop fica localizada no Trade Center. Há uma entrada ao sul do Trade Center para o local onde ficam todas as Workshops de Eventos. Ao chegar, basta ir para o norte e encontrará a Anniversary Workshop.
| Item | Custo | |
|---|---|---|
| Global Tournament Bag | 2000 Anniversary Token | |