DZ Probopass: mudanças entre as edições
(Renomeando imagem: Berrie 23.png → Lum Berry.webp) |
|||
| (5 revisões intermediárias por 4 usuários não estão sendo mostradas) | |||
| Linha 1: | Linha 1: | ||
= | <center>[[Arquivo:Banner DZ Probopass.png|link=]]<br></center> | ||
</center> | |||
== Informações Importantes== | |||
'''Grupo:''' 3 Jogadores. | |||
<br>'''Experiência recompensada:''' 150k (Beginner), 190k (Talented), 250k (Intermediate), 300k (Advanced) e 350k (Expert). | |||
<br>'''Revives:''' É possível utilizar até 8 Revives. | |||
<br>'''Tempo limite:''' 1 hora. | |||
<center> | |||
</center> | |||
== Inimigos== | |||
'''Quantidade''':66. | |||
<center> | <center> | ||
{|class="wikitable" width="30%" style= "text-align:center" | |||
|- | |||
! colspan="2" width="50%" | Pokémon | |||
! Elemento | |||
|- | |||
|style="border-right-style: hidden;" | [[Arquivo:299-Nosepass.png|link=Nosepass]] || [[Nosepass]] | |||
| [[Arquivo:Rock.png|link=]] '''Rock''' | |||
|- | |||
|style="border-right-style: hidden;" | [[Arquivo:476-Probopass.png|link=Probopass]] || [[Probopass]] | |||
| [[Arquivo:Rock.png|link=]] '''Rock''' [[Arquivo:Steel.png|link=]] '''Steel''' | |||
|- | |||
|style="border-right-style: hidden;" | [[Arquivo:185-Sudowoodo.png|link=Sudowoodo]] || [[Sudowoodo]] | |||
| [[Arquivo:Rock.png|link=]] '''Rock''' | |||
|- | |||
|style="border-right-style: hidden;" | [[Arquivo:305-Lairon.png|link=Lairon]] || [[Lairon]] | |||
| [[Arquivo:Rock.png|link=]] '''Rock''' [[Arquivo:Steel.png|link=]] '''Steel''' | |||
|- | |||
|style="border-right-style: hidden;" | [[Arquivo:306-Aggron.png|link=Aggron]] || [[Aggron]] | |||
| [[Arquivo:Rock.png|link=]] '''Rock''' [[Arquivo:Steel.png|link=]] '''Steel''' | |||
|-' | |||
|style="border-right-style: hidden;" | [[Arquivo:476-Probopass.png|link=Probopass]] || '''Probopass (Boss)''' | |||
| [[Arquivo:Rock.png|link=]] '''Rock''' [[Arquivo:Steel.png|link=]] '''Steel''' | |||
|-' | |||
'' | |||
|- | |||
|} | |||
</center> | </center> | ||
== < | == Possíveis Capturas == | ||
<center> | |||
{|class="wikitable" width="30%" style= "text-align:center" | |||
|- | |||
! colspan="2" width="50%" | Pokémon | |||
! Pokébolas Indicadas | |||
|- | |||
</ | |style="border-right-style: hidden;" | [[Arquivo:299-Nosepass.png|link=Nosepass]] || [[Nosepass]] | ||
< | | [[Arquivo:Ultra-ball(1).png|link=Pokébolas]] [[Arquivo:Dusk-ball.png|link=Pokébolas]] [[Arquivo:Heavy-ball.png|link=Pokébolas]] [[Arquivo:Premier-ball(1).png|link=Pokébolas]] | ||
< | |- | ||
< | |style="border-right-style: hidden;" | [[Arquivo:476-Probopass.png|link=Probopass]] || [[Probopass]] | ||
</ | | [[Arquivo:Ultra-ball(1).png|link=Pokébolas]] [[Arquivo:Dusk-ball.png|link=Pokébolas]] [[Arquivo:Tinker-ball.png|link=Pokébolas]] [[Arquivo:Heavy-ball.png|link=Pokébolas]] [[Arquivo:Premier-ball(1).png|link=Pokébolas]] | ||
|- | |||
|style="border-right-style: hidden;" | [[Arquivo:185-Sudowoodo.png|link=Sudowoodo]] || [[Sudowoodo]] | |||
| [[Arquivo:Ultra-ball(1).png|link=Pokébolas]] [[Arquivo:Dusk-ball.png|link=Pokébolas]] [[Arquivo:Premier-ball(1).png|link=Pokébolas]] | |||
|- | |||
< | </center> | ||
|} | |||
</center> | |||
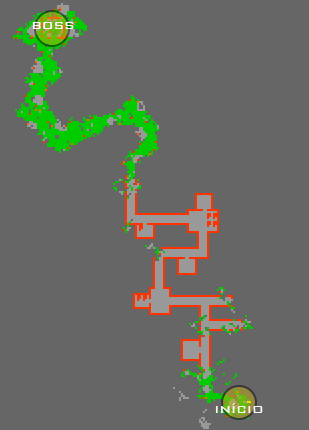
== Mapa == | |||
<center><br />[[Arquivo:Mapa DZ Probopass.png|link=DZ Probopass]] | |||
</center> | |||
== Dicas == | |||
<center> | |||
</center> | |||
*O Boss Probopass não toma nenhum tipo de stun, cuidado. | |||
* As criaturas nessa dungeon infligem status negativos como '''PARALYZE''' e '''STUN''', o ideal é carregar consigo bastante [[Arquivo:Medicine.png|link=Poções]] '''Medicine''' ou utilizar uma [[Arquivo:Lum Berry.webp|link=Berries]] '''Lum Berry'''. | |||
</center> | |||
*O Dano dessa dungeon é predominantemente [[Arquivo:Rock.png|link=Efetividades]] '''Rock''' mas também há alguns danos [[Arquivo:Electric.png|link=Efetividades]] '''Electric''' e [[Arquivo:Steel.png|link=Efetividades]] '''Steel''', por isso, [[Arquivo:Berrie_2.png|link=Berries]] '''Charti Berry''', [[Arquivo:Berrie_14.png|link=Berries]] '''Wacan Berry''' e [[Arquivo:Berrie_8.png|link=Berries]] '''Babiri Berry''' serão de grande ajuda. | |||
* Os Pokémon com ataques dos tipos [[Arquivo:Ground.png|link=Efetividades]] Ground e [[Arquivo:Fighting.png|link=Efetividades]] Fighting são a melhor opção para essa Dimensional Zone. | |||
<br>'''Observação:''' É possível conferir as habilidades dos Pokémon utilizando a [[Arquivo:PokedexIcon.png|link=]] '''Pokédex'''. | |||
== | == Possíveis Prêmios dos báus == | ||
<center> | |||
< | {| class="wikitable" width="30%" style= "text-align:center" | ||
|- | |||
! Item | |||
|- | |||
| [[Arquivo:Mirror.png|link=Pedras de Evolução]] Mirror Stone (1 - ??) | |||
|- | |||
| [[Arquivo:Emeralds.png|link=]] Emerald (1 - ??) | |||
|- | |||
| [[Arquivo:Topaz1.png|link=]] Topaz (1 - ??) | |||
|- | |||
| [[Arquivo:Sapphires.png|link=]] Sapphire (1-??) | |||
|- | |||
| [[Arquivo:GoldenKey.png|link=]] Golden Dimensional Key (1) | |||
|- | |||
| [[Arquivo:Scrolls.gif|link=]] Scroll of Knowledge<br> (Ninja Sudowoodo) | |||
|- | |||
| [[Arquivo:Scrolls.gif|link=]] Scroll of Knowledge<br> (Malfunctioning Bronzong) | |||
|- | |||
| [[Arquivo:Scrolls.gif|link=]] Scroll of Knowledge<br> (Trainer Sudowoodo) | |||
|- | |||
| [[Arquivo:Scrolls.gif|link=]] Scroll of Knowledge<br> (Black Metal Skarmory) | |||
|- | |||
| [[Arquivo:UnpackedToy.png|link=]] Unpacked Toy (Ultra Raro) | |||
|} | |||
Edição atual tal como às 00h20min de 13 de junho de 2026

Informações Importantes
Grupo: 3 Jogadores.
Experiência recompensada: 150k (Beginner), 190k (Talented), 250k (Intermediate), 300k (Advanced) e 350k (Expert).
Revives: É possível utilizar até 8 Revives.
Tempo limite: 1 hora.
Inimigos
Quantidade:66.
| Pokémon | Elemento | |
|---|---|---|
| Nosepass | ||
| Probopass | ||
| Sudowoodo | ||
| Lairon | ||
| Aggron | ||
| Probopass (Boss) | ||
Possíveis Capturas
| Pokémon | Pokébolas Indicadas | |
|---|---|---|
| Nosepass | ||
| Probopass | ||
| Sudowoodo | ||
Mapa
Dicas
- O Boss Probopass não toma nenhum tipo de stun, cuidado.
- As criaturas nessa dungeon infligem status negativos como PARALYZE e STUN, o ideal é carregar consigo bastante
 Medicine ou utilizar uma
  Lum Berry.
- O Dano dessa dungeon é predominantemente
 Rock mas também há alguns danos
  Electric e
  Steel, por isso,
  Charti Berry,
  Wacan Berry e
  Babiri Berry serão de grande ajuda.
 - Os Pokémon com ataques dos tipos
 Ground e
  Fighting são a melhor opção para essa Dimensional Zone.
Observação: É possível conferir as habilidades dos Pokémon utilizando a ![]() Pokédex.
Pokédex.
Possíveis Prêmios dos báus
| Item |
|---|
(Ninja Sudowoodo) |
(Malfunctioning Bronzong) |
(Trainer Sudowoodo) |
(Black Metal Skarmory) |