| Número | Localização | Requisito | Recompensa | Mapa |
|---|---|---|---|---|
| 1 | NW Level: 15 |
 | ||
| 2 | NW Level: 15 |
 | ||
| 3 | NW Level: 15 |
 | ||
| 4 | NW Level: 15 |
 | ||
| 5 | NW Level: 15 |
 | ||
| 6 | NW Level: 15 |
 | ||
| 7 | NW Level: 15 |
 | ||
| 8 | NW Level: 35 |
 | ||
| 9 | NW Level: 35 |
 | ||
| 10 | NW Level: 35 |
 | ||
| 11 | Observação: Necessário ter Mecha Fly liberado. |
NW Level: 50 |
|
 |
| 12 | NW Level: 50 |
 |
Nightmare Chests: mudanças entre as edições
Ir para navegação
Ir para pesquisar
Ao terminar todos os baús anteriores, o jogador deverá conversar com o NPC Hubble localizado em Cinnabar.
Hubble afirmará que sabe a localização do último baú. Porém, só entregará a informação para alguém que esteja ajudando as resistências.
Então, ele pedirá 300 Nightmare Token como prova de sua ajuda às resistências. Após entregá-las, ele o designará ao último baú.
| (10 revisões intermediárias por 6 usuários não estão sendo mostradas) | |||
| Linha 15: | Linha 15: | ||
! width="1%" | Número | ! width="1%" | Número | ||
! width="25%" | Localização | ! width="25%" | Localização | ||
! width="10%" | | ! width="10%" | Requisito | ||
! width="35%" | Recompensa | ! width="35%" | Recompensa | ||
! width="10%" | Mapa | ! width="10%" | Mapa | ||
| Linha 66: | Linha 66: | ||
|- | |- | ||
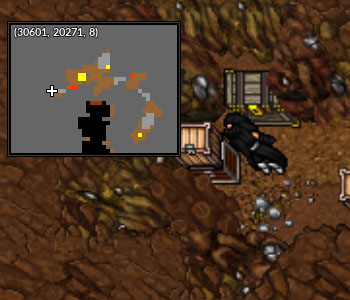
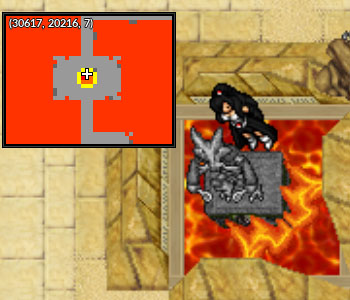
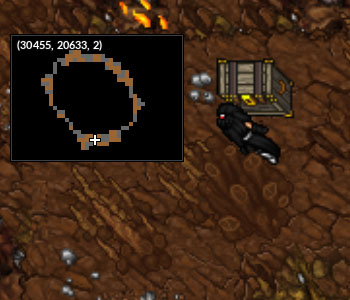
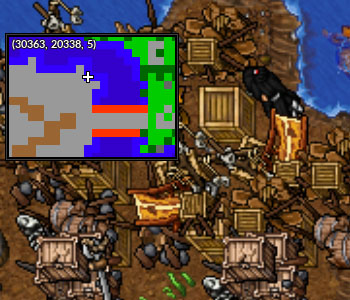
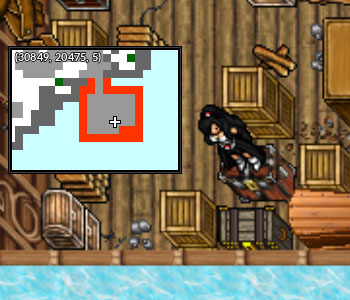
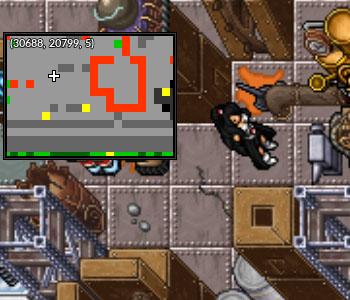
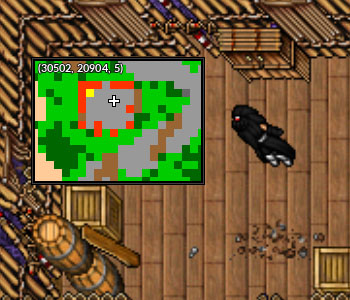
| align="center" | 7 | | align="center" | 7 | ||
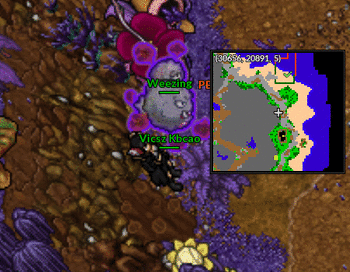
| <center>Respawn de | | <center>Respawn de Silicobra</center> | ||
| <center>'''Level:''' 300 <br> | | <center>'''Level:''' 300 <br> | ||
'''NW Level:''' 15</center> | '''NW Level:''' 15</center> | ||
| <center>[[Arquivo:Small_Nightmare_Potion.gif|link=Poções]] 90 Small Nightmare Potions <br> | | <center>[[Arquivo:Small_Nightmare_Potion.gif|link=Poções]] 90 Small Nightmare Potions <br> | ||
[[Arquivo:Berrie 7.png|link=Berries]] 3 Shuca Berries </center> | [[Arquivo:Berrie 7.png|link=Berries]] 3 Shuca Berries </center> | ||
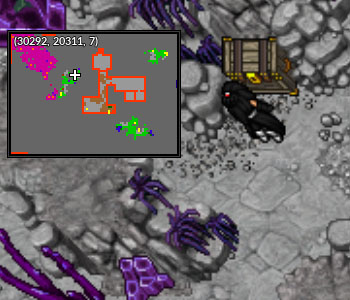
| <center>[[Arquivo: | | <center>[[Arquivo:Silicobra_Chest.png|350px|link=]]</center> | ||
|- | |- | ||
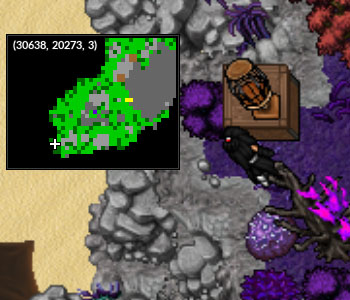
| align="center" | 8 | | align="center" | 8 | ||
| Linha 92: | Linha 92: | ||
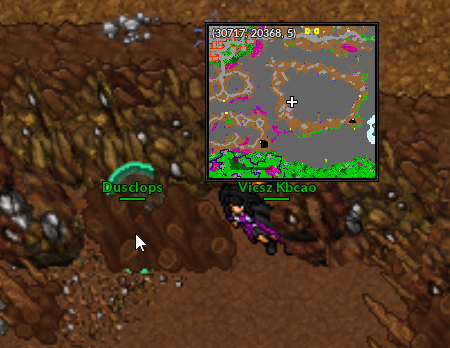
| <center>Respawn de Wormadam</center> | | <center>Respawn de Wormadam</center> | ||
| <center>'''Level:''' 300 <br> | | <center>'''Level:''' 300 <br> | ||
'''NW Level: | '''NW Level:''' 35 <br> | ||
'''Necessário Rock Smash e Cut'''</center> | '''Necessário Rock Smash e Cut'''</center> | ||
| <center>[[Arquivo:Berrie 4.png|link=Berries]] 5 Tanga Berries <br> | | <center>[[Arquivo:Berrie 4.png|link=Berries]] 5 Tanga Berries <br> | ||
| Linha 99: | Linha 99: | ||
|- | |- | ||
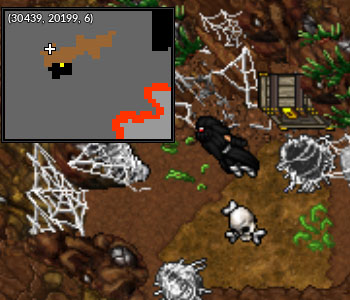
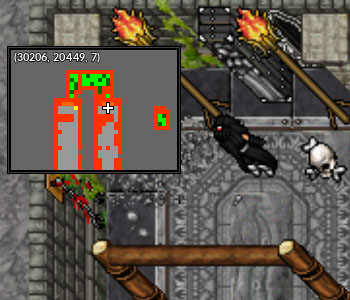
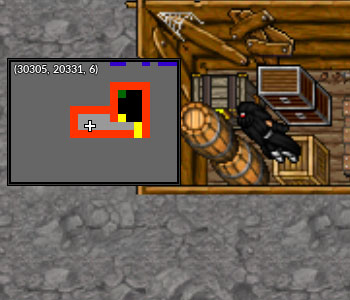
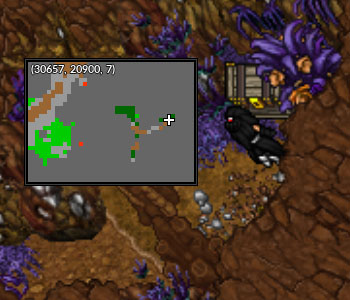
| align="center" | 11 | | align="center" | 11 | ||
| <center>Leader Alakazam | | <center>Leader Alakazam <br> | ||
'''Observação:''' Necessário ter Mecha Fly liberado</center> | '''Observação:''' Necessário ter Mecha Fly liberado. <br> | ||
É preciso utilizar a habilidade '''light''' para acessar a alavanca e abrir o portão.</center> | |||
| <center>'''Level:''' 300 <br> | | <center>'''Level:''' 300 <br> | ||
'''NW Level:''' 50</center> | '''NW Level:''' 50</center> | ||
| Linha 109: | Linha 110: | ||
|- | |- | ||
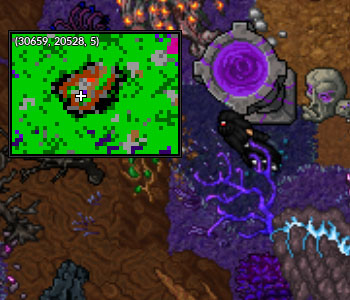
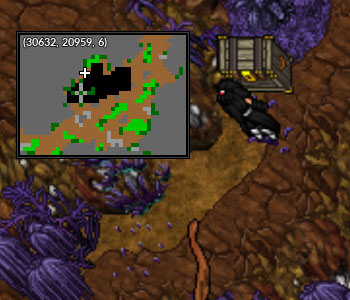
| align="center" | 12 | | align="center" | 12 | ||
| <center>Respawn de | | <center>Respawn de Sandaconda</center> | ||
| <center>'''Level:''' 300<br> | | <center>'''Level:''' 300<br> | ||
'''NW Level:''' 50</center> | '''NW Level:''' 50</center> | ||
| <center>[[File:Magiciantoken.png|link=Tokens]] 2 Magician Tokens<br> | | <center>[[File:Magiciantoken.png|link=Tokens]] 2 Magician Tokens<br> | ||
[[Arquivo:Indigo Shard.png|link=Pedras de Evolução#Shards]] 2 Indigo Shards</center> | [[Arquivo:Indigo Shard.png|link=Pedras de Evolução#Shards]] 2 Indigo Shards</center> | ||
| <center>[[Arquivo: | | <center>[[Arquivo:Sandaconda_Chest.png|350px|link=]]</center> | ||
|} | |} | ||
|-|Cinnabar= | |-|Cinnabar= | ||
| Linha 121: | Linha 122: | ||
! width="1%" | Número | ! width="1%" | Número | ||
! width="25%" | Localização | ! width="25%" | Localização | ||
! width="10%" | | ! width="10%" | Requisito | ||
! width="35%" | Recompensa | ! width="35%" | Recompensa | ||
! width="10%" | Mapa | ! width="10%" | Mapa | ||
| Linha 170: | Linha 171: | ||
! width="1%" | Número | ! width="1%" | Número | ||
! width="25%" | Localização | ! width="25%" | Localização | ||
! width="10%" | | ! width="10%" | Requisito | ||
! width="35%" | Recompensa | ! width="35%" | Recompensa | ||
! width="10%" | Mapa | ! width="10%" | Mapa | ||
| Linha 202: | Linha 203: | ||
! width="1%" | Número | ! width="1%" | Número | ||
! width="25%" | Localização | ! width="25%" | Localização | ||
! width="10%" | | ! width="10%" | Requisito | ||
! width="35%" | Recompensa | ! width="35%" | Recompensa | ||
! width="10%" | Mapa | ! width="10%" | Mapa | ||
| Linha 271: | Linha 272: | ||
! width="1%" | Número | ! width="1%" | Número | ||
! width="25%" | Localização | ! width="25%" | Localização | ||
! width="10%" | | ! width="10%" | Requisito | ||
! width="35%" | Recompensa | ! width="35%" | Recompensa | ||
! width="10%" | Mapa | ! width="10%" | Mapa | ||
| Linha 326: | Linha 327: | ||
! width="1%" | Número | ! width="1%" | Número | ||
! width="25%" | Localização | ! width="25%" | Localização | ||
! width="10%" | | ! width="10%" | Requisito | ||
! width="35%" | Recompensa | ! width="35%" | Recompensa | ||
! width="10%" | Mapa | ! width="10%" | Mapa | ||
| Linha 391: | Linha 392: | ||
! width="1%" | Número | ! width="1%" | Número | ||
! width="25%" | Localização | ! width="25%" | Localização | ||
! width="10%" | | ! width="10%" | Requisito | ||
! width="35%" | Recompensa | ! width="35%" | Recompensa | ||
! width="10%" | Mapa | ! width="10%" | Mapa | ||
| Linha 416: | Linha 417: | ||
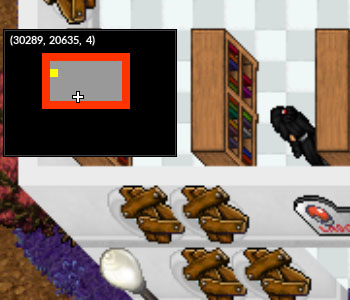
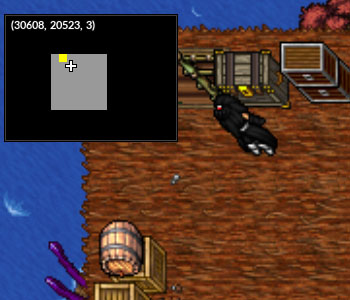
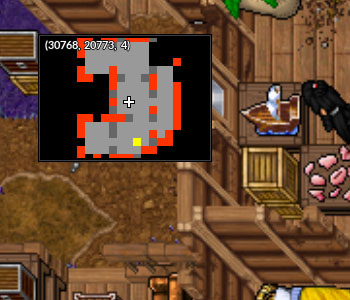
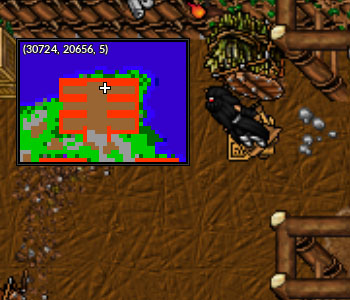
| <center>'''Level:''' 300<br> | | <center>'''Level:''' 300<br> | ||
'''NW Level:''' 15</center> | '''NW Level:''' 15</center> | ||
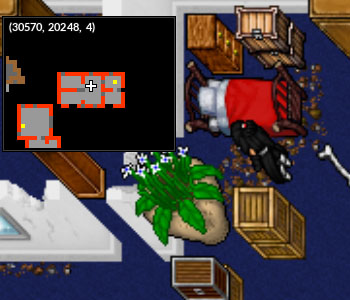
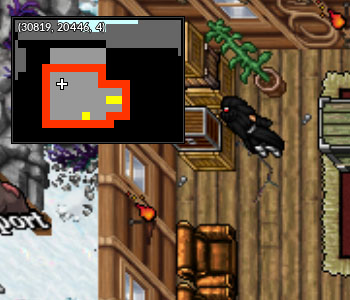
| <center> | | <center>[[Arquivo:Nightmare_Ball.png|link=Pokébolas]] 15 Empty Nightmare Balls </center> | ||
| <center>[[Arquivo:Na_lixeira_a_direita_do_Mark_da_Resistência_de_Fuchsia.jpg|350px|link=]]</center> | | <center>[[Arquivo:Na_lixeira_a_direita_do_Mark_da_Resistência_de_Fuchsia.jpg|350px|link=]]</center> | ||
|- | |- | ||
| Linha 518: | Linha 519: | ||
! width="3%" | Número | ! width="3%" | Número | ||
! width="20%" | Localização | ! width="20%" | Localização | ||
! width="10%" | | ! width="10%" | Requisito | ||
! width="20%" | Recompensa | ! width="20%" | Recompensa | ||
! width="10%" | Mapa | ! width="10%" | Mapa | ||
| Linha 543: | Linha 544: | ||
</span> | </span> | ||
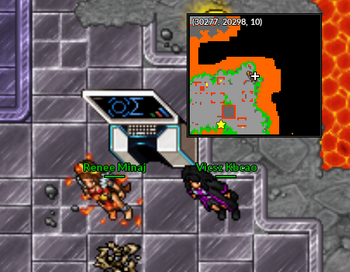
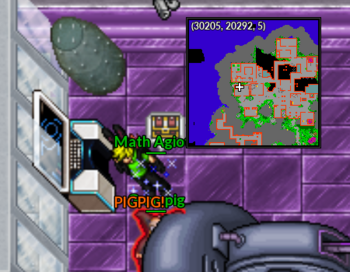
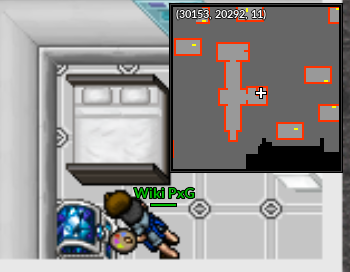
Para receber as recompensas, o jogador deverá clicar no Monitor indicado abaixo, que em alguns casos, estarão dentro de salas com portas bloqueadas no qual '''apenas hackers podem abri-las'''. | Para receber as recompensas, o jogador deverá clicar no Monitor indicado abaixo, que em alguns casos, estarão dentro de salas com portas bloqueadas no qual '''apenas hackers podem abri-las'''.<br> | ||
'''Importante:''' Todos os baús desta lista são para NW Level 60. <br> | |||
<center> | <center> | ||
{| class=wikitable width=15% | {| class=wikitable width=15% | ||
| Linha 557: | Linha 560: | ||
! width="1%" | Número | ! width="1%" | Número | ||
! width="25%" | Localização | ! width="25%" | Localização | ||
! width="10%" | | ! width="10%" | Requisito | ||
! width="35%" | Recompensa | ! width="35%" | Recompensa | ||
! width="10%" | Mapa | ! width="10%" | Mapa | ||
| Linha 685: | Linha 688: | ||
|- | |- | ||
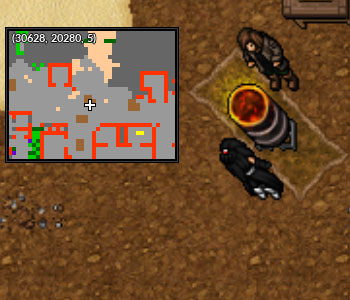
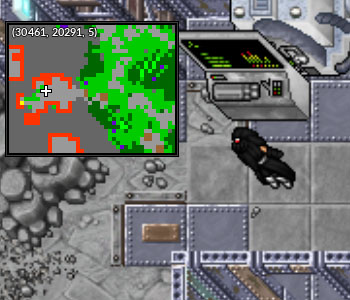
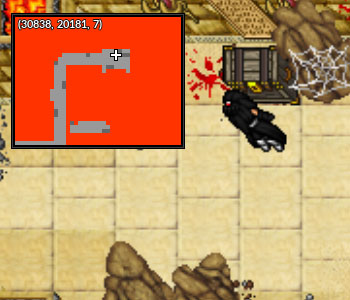
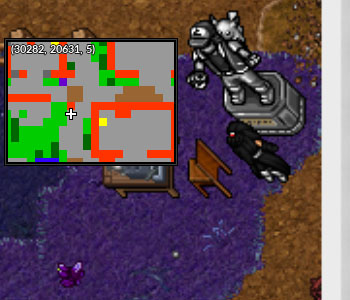
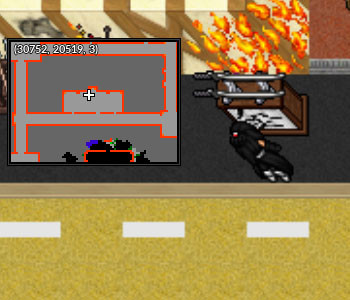
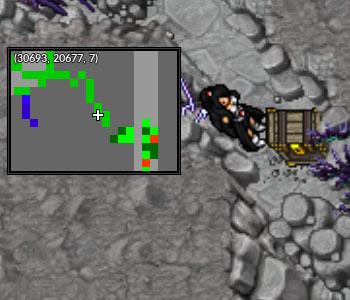
| align="center" | 9 | | align="center" | 9 | ||
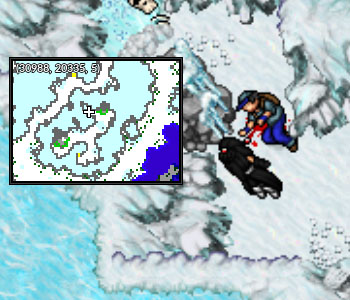
| <center>No respawn de | | <center>No respawn de Sandaconda</center> | ||
| <center>'''Level:''' 300 <br> | | <center>'''Level:''' 300 <br> | ||
'''Necessário:''' Hacker e Light | '''Necessário:''' Hacker e Light | ||
| Linha 700: | Linha 703: | ||
|- | |- | ||
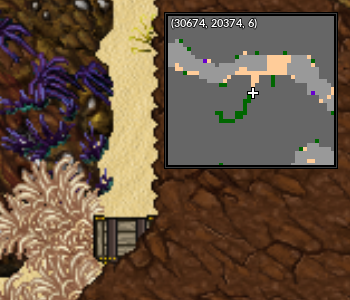
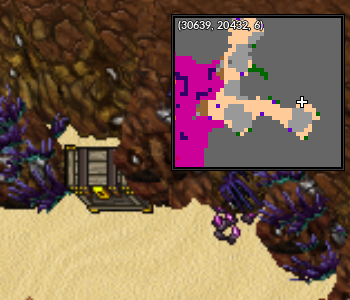
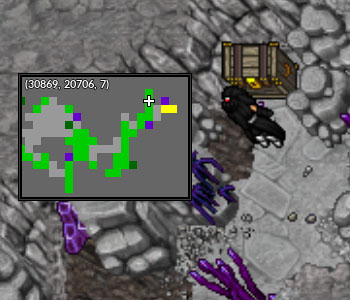
| align="center" | 10 | | align="center" | 10 | ||
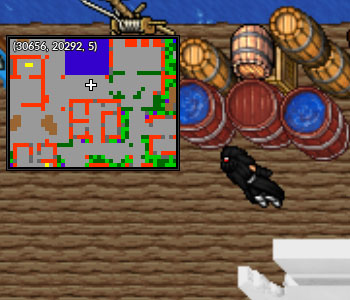
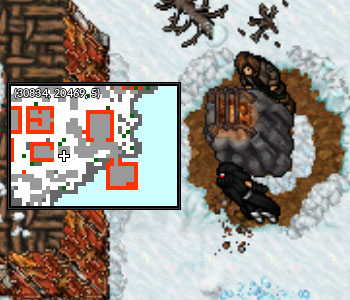
| <center>Dentro da Sarkies | | <center>Dentro da Sarkies'Fortress</center> | ||
| <center>'''Level:''' 300 <br> | | <center>'''Level:''' 300 <br> | ||
| <center>[[Arquivo:Ultimate_Nightmare_Potion.gif|link=]] 15 Ultimate Nightmare Potions<br> | | <center>[[Arquivo:Ultimate_Nightmare_Potion.gif|link=]] 15 Ultimate Nightmare Potions<br> | ||
| Linha 724: | Linha 727: | ||
! width="1%" | Número | ! width="1%" | Número | ||
! width="25%" | Localização | ! width="25%" | Localização | ||
! width="10%" | | ! width="10%" | Requisito | ||
! width="35%" | Recompensa | ! width="35%" | Recompensa | ||
! width="10%" | Mapa | ! width="10%" | Mapa | ||
| Linha 741: | Linha 744: | ||
<tr> | <tr> | ||
<td class="seeMore__image">[[Arquivo:Telekinetic-compass.gif|link=]]</td> | <td class="seeMore__image">[[Arquivo:Telekinetic-compass.gif|link=]]</td> | ||
<td> '''Veja | <td> '''Veja Mais:''' [[Technical Machine (TM)#Como fazer uma Coleção de TM|'''Liberando o acesso do Baú''']]. </td> | ||
</tr> | </tr> | ||
</table> | </table> | ||
Edição atual tal como às 02h04min de 5 de março de 2025
Nível Mínimo: Level 300, NW Level 15
Habilidades Necessárias: Mecha Fly
Caso encontre algum erro ou queira acrescentar alguma informação, entre em contato com um dos membros da wiki.
NPC Hubble
| Número | Localização | Requisito | Recompensa | Mapa |
|---|---|---|---|---|
| 1 | NW Level: 15 |
 | ||
| 2 | NW Level: 15 |
 | ||
| 3 | NW Level: 15 |
 | ||
| 4 | NW Level: 35 |
 | ||
| 5 | Vulcão localizado na ilha Observação: Necessário ter Mecha Fly liberado |
NW Level: 35 |
 |
| Número | Localização | Requisito | Recompensa | Mapa |
|---|---|---|---|---|
| 1 | NW Level: 35 |
 | ||
| 2 | NW Level: 15 |
 | ||
| 3 | NW Level: 15 |
 |
| Número | Localização | Requisito | Recompensa | Mapa |
|---|---|---|---|---|
| 1 | NW Level: 15 |
 | ||
| 2 | NW Level: 15 |
 | ||
| 3 | NW Level: 15 |
|
 | |
| 4 | NW Level: 15 |
 | ||
| 5 | NW Level: 35 |
|
 | |
| 6 | NW Level: 35 |
 | ||
| 7 | Observação: Necessário ter Mecha Fly liberado |
NW Level: 35 |
|
 |
| Número | Localização | Requisito | Recompensa | Mapa |
|---|---|---|---|---|
| 1 | NW Level: 15 |
 | ||
| 2 | NW Level: 15 |
 | ||
| 3 | NW Level: 15 |
 | ||
| 4 | NW Level: 35 |
|
 | |
| 5 | NW Level: 35 |
 | ||
| 6 | NW Level: 50 |
 |
| Número | Localização | Requisito | Recompensa | Mapa |
|---|---|---|---|---|
| 1 | NW Level: 15 |
 | ||
| 2 | NW Level: 15 |
 | ||
| 3 | NW Level: 35 |
|
 | |
| 4 | NW Level: 15 |
 | ||
| 5 | NW Level: 15 |
 | ||
| 6 | NW Level: 15 |
 | ||
| 7 | NW Level: 35 |
 |
| Número | Localização | Requisito | Recompensa | Mapa |
|---|---|---|---|---|
| 1 | NW Level: 15 |
 | ||
| 2 | NW Level: 15 |
|
 | |
| 3 | NW Level: 15 |
 | ||
| 4 | NW Level: 15 |
 | ||
| 5 | NW Level: 15 |
 | ||
| 6 | NW Level: 15 |
 | ||
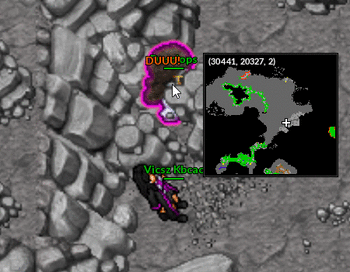
| 7 | Casa ao oeste da ilha |
NW Level: 35 |
 | |
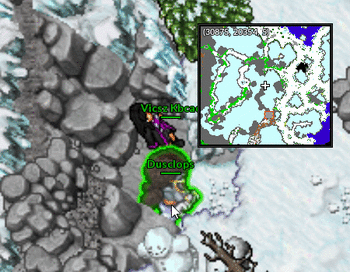
| 8 | Respawn de Tangela, Lilligant e Shiftry |
NW Level: 35 |
 | |
| 9 | Respawn de Skiddo |
NW Level: 35 |
 | |
| 10 | Respawn de Skiddo |
NW Level: 35 |
 | |
| 11 | NW Level: 35 |
 | ||
| 12 | Observação: Use "With" no Balde e depois no personagem |
NW Level: 35 |
 | |
| 13 | NW Level: 35 |
 | ||
| 14 | Observação: Necessário ter Mecha Fly liberado |
NW Level: 50 |
|
 |
Hubble afirmará que sabe a localização do último baú. Porém, só entregará a informação para alguém que esteja ajudando as resistências.
Então, ele pedirá
| Número | Localização | Requisito | Recompensa | Mapa |
|---|---|---|---|---|
| 1 | Laboratório abandonado dentro da Valley |
NW Level: 50 |
|
 |
Após abrir o baú, retorne para Cinnabar e converse com Hubble novamente para receber seu Citizen Nightmare Outfit, 1 Big Fortune Totem ![]() e 100 Fuel Tanks
e 100 Fuel Tanks ![]() .
.
Novos Baús
Nível Mínimo: NW Level 60.
Habilidades Necessárias: Mecha Fly e Light.
Para receber as recompensas, o jogador deverá clicar no Monitor indicado abaixo, que em alguns casos, estarão dentro de salas com portas bloqueadas no qual apenas hackers podem abri-las.
Importante: Todos os baús desta lista são para NW Level 60.
| Monitor |
|---|
|
| Número | Localização | Requisito | Recompensa | Mapa |
|---|---|---|---|---|
| 1 |
|
 | ||
| 2 | Necessário: Mecha Fly, Hacker e Light |
|
 | |
| 3 | Necessário: Mecha Fly, Hacker e Light |
|
 | |
| 4 | Necessário: Hacker e Light |
|
 | |
| 5 | Necessário: Mecha Fly, Hacker e Light |
|
 | |
| 6 | Necessário: Hacker e Light |
|
 | |
| 7 | Necessário: Mecha Fly, Hacker e Light |
|
 | |
| 8 | Necessário: Hacker e Light |
|
 | |
| 9 | Necessário: Hacker e Light |
|
 | |
| 10 |
|
 |
Baú do Ultra Lab
Nível Mínimo: Level 600
Requisitos: Ter concluído a Sarkies Quest
| Número | Localização | Requisito | Recompensa | Mapa |
|---|---|---|---|---|
| 1 | NW Level: 75 |
 |
| Veja Mais: Liberando o acesso do Baú. |