|
|
| (340 revisões intermediárias por 3 usuários não estão sendo mostradas) |
| Linha 1: |
Linha 1: |
| =Bergmite= | | =À Procura de Bunnelby= |
| == '''Informações Gerais''' == | | <center>[[Arquivo:Banner bunnelby.jpg|link=À procura de Bunnelby]]<br></center> |
|
| |
|
| '''Nome:''' Bergmite<br />
| |
| '''Level:''' 50<br />
| |
| '''Elemento:''' Ice<br />
| |
| '''Habilidades:''' nenhuma.<br />
| |
| '''Boost:''' Ice Stone (7)<br />
| |
| '''Materia:''' Seavell<br />
| |
| '''Pedra de Evolução:''' Ice Stone (2x)<br />
| |
|
| |
|
| == '''Evoluções''' ==
| |
|
| |
|
| '''Bergmite''' precisa de Level 50.<br> | | <span style="color:red">'''Nível necessário:</span> 100 |
| '''Avalugg''' precisa de Level 100.
| |
|
| |
|
| == '''Descrição:''' == | | <span style="color:red">'''Recompensa:</span> 1.55KK EXP |
| Sua metade superior é envolta em um pedaço de gelo ligeiramente transparente e azul claro..
| |
|
| |
|
| == '''Movimentos''' ==
| | <b>Caso encontre algum erro ou queira acrescentar alguma informação, entre em contato com [[Nossa Equipe|um dos membros da wiki.]]</b> <br> |
|
| |
|
| {| border="0" style="border-collapse:collapse"
| | ==1ª parte: Procurando a Yume Ball== |
| |- align="center" style="background-color: #E6E6FA;"
| | Para iniciar a quest o jogador deve se dirigir até '''Old Village''', no sul da ilha de Mandarin, e conversar com a '''NPC Jasmine''' e o '''NPC Jason'''. |
| ! rowspan="2" | M1
| |
| | width="10px" |
| |
| | align="left" | Slash (10s)
| |
| | width="50px" rowspan="2" |
| |
| | rowspan="2" align="right" | [[Arquivo:Target.png|Target]] [[Arquivo:Damage.png|Damage]]
| |
| | rowspan="2" | [[Arquivo:Normal1.png|Normal|link=Gardestrike]]
| |
| |- align="center" style="background-color: #E6E6FA;"
| |
| | width="10px" |
| |
| | align="left" | Level 50
| |
|
| |
|
| |- align="center"
| | <center>[[Arquivo:Localização_NPCs_Jasmine_e_Jason.png|link=]]</center> |
| ! rowspan="2" | M2
| |
| | width="10px" |
| |
| | align="left" | Ice Punch (15s)
| |
| | width="50px" rowspan="2" |
| |
| | rowspan="2" align="right" | [[Arquivo:Target.png|Target]] [[Arquivo:Damage.png|Damage]] [[Arquivo:Slow.png|Slow]]
| |
| | rowspan="2" | [[Arquivo:Ice.png|Ice|link=Seavell]]
| |
| |- align="center"
| |
| | width="10px" |
| |
| | align="left" | Level 50
| |
|
| |
|
| |- align="center" style="background-color: #E6E6FA;"
| | Jason irá explicar que sua esposa está muito brava com ele porque ele perdeu seu novo Pokémon Bunnelby, da região de Kalos, numa visita ao farol do Bill em Cerulean. Jason conta que acredita ter perdido a Yume Ball que contém o Bunnelby entre Vermilion e Cerulean, e pede para o jogador procurá-la. |
| ! rowspan="2" | M3
| |
| | width="10px" |
| |
| | align="left" | Icicle Crash (15s)
| |
| | width="50px" rowspan="2" |
| |
| | rowspan="2" align="right" | [[Arquivo:Target.png|Target]] [[Arquivo:Damage.png|Damage]]
| |
| | rowspan="2" | [[Arquivo:Ice.png|Ice|link=Seavell]]
| |
| |- align="center" style="background-color: #E6E6FA;"
| |
| | width="10px" |
| |
| | align="left" | Level 50
| |
|
| |
|
| |- align="center"
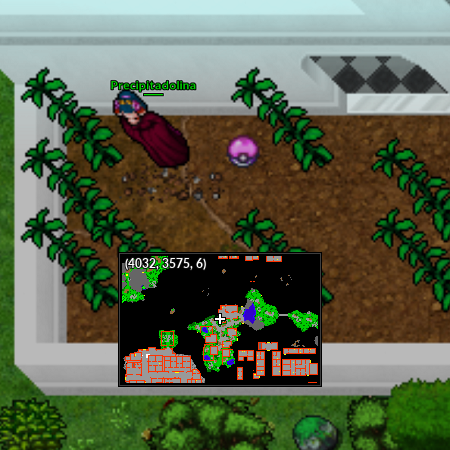
| | A Yume Ball está num jardim de uma casa ao norte de Saffron. Basta clicar nela para que ela apareça no inventário. |
| ! rowspan="2" | M4
| |
| | width="10px" |
| |
| | align="left" | Powder Snow (40s)
| |
| | width="50px" rowspan="2" |
| |
| | rowspan="2" align="right" | [[Arquivo:AOE.png|AOE]] [[Arquivo:Damage.png|Damage]] [[Arquivo:Slow.png|Slow]]
| |
| | rowspan="2" | [[Arquivo:Ice.png|Ice|link=Seavell]]
| |
| |- align="center"
| |
| | width="10px" |
| |
| | align="left" | Level 50
| |
|
| |
|
| |- align="center" style="background-color: #E6E6FA;"
| | <center>[[Arquivo:Localização_Yume_Ball.png|link=]]</center> |
| ! rowspan="2" | M5
| |
| | width="10px" |
| |
| | align="left" | Avalanche (32s)
| |
| | width="50px" rowspan="2" |
| |
| | rowspan="2" align="right" | [[Arquivo:Damage.png|Damage]] [[Arquivo:Knockback.png|Knockback]]
| |
| | rowspan="2" | [[Arquivo:Ice.png|Ice|link=Seavell]]
| |
| |- align="center" style="background-color: #E6E6FA;"
| |
| | width="10px" |
| |
| | align="left" | Level 50
| |
|
| |
|
| |- align="center"
| | Após encontrar a Yume Ball, o jogador deve retornar com ela para Jason, que o recompensará com '''100K de experiência'''. |
| ! rowspan="2" | M6
| |
| | width="10px" |
| |
| | align="left" | Blizzard (70s)
| |
| | width="50px" rowspan="2" |
| |
| | rowspan="2" align="right" | [[Arquivo:AOE.png|AOE]] [[Arquivo:Damage.png|Damage]] [[Arquivo:Slow.png|Slow]]
| |
| | rowspan="2" | [[Arquivo:Ice.png|Ice|link=Seavell]]
| |
| |- align="center"
| |
| | width="10px" |
| |
| | align="left" | Level 56
| |
|
| |
|
| |}
| | ==2ª parte: Investigando o paradeiro de Bunnelby== |
| == '''Efetividades''' ==
| | ===Albert=== |
| | | Quando o jogador entregar a Yume Ball para Jason, ele perceberá que está vazia. Depois disso, Jason pede para que o jogador investigue nos Centros Pokémon próximos para encontrar alguma notícia sobre o Bunnelby de Jasmine. <br> |
| '''Super Efetivo:''' Fire, Fighting, Rock and Steel.<br />
| | Nesse momento, o jogador deve se dirigir ao Centro Pokémon de Saffron e conversar com o '''NPC Albert'''. |
| '''Normal:''' Normal, Water, Grass, Electric, Poison, Ground, Flying, Psychic, Bug, Ghost, Dragon, Dark, Crystal and Fairy.<br />
| |
| '''Muito Inefetivo:''' Ice.<br />
| |
| | |
| =Avalugg=
| |
| == '''Informações Gerais''' ==
| |
| | |
| '''Nome:''' Avalugg<br />
| |
| '''Level:''' 100<br />
| |
| '''Elemento:''' Ice<br />
| |
| '''Habilidades:''' Dig e Rock Smash.<br />
| |
| '''Boost:''' Ice Stone (2)<br />
| |
| '''Materia:''' Seavell Superior<br />
| |
| | |
| == '''Evoluções''' ==
| |
| | |
| '''Bergmite''' precisa de Level 50.<br>
| |
| '''Avalugg''' precisa de Level 100.
| |
| | |
| == '''Descrição:''' ==
| |
| Avalugg é um Pokémon gigantesco coberto quase que inteiramente por gelo semitransparente..
| |
| | |
| == '''Movimentos''' ==
| |
| | |
| ===Movimentos PVP===
| |
| {| border="0" style="border-collapse:collapse"
| |
| |- align="center" style="background-color: #E6E6FA;"
| |
| ! rowspan="2" | M1
| |
| | width="10px" |
| |
| | align="left" | Tackle (15s)
| |
| | width="50px" rowspan="2" |
| |
| | rowspan="2" align="right" | [[Arquivo:Target.png|Target]] [[Arquivo:Damage.png|Damage]]
| |
| | rowspan="2" | [[Arquivo:Normal1.png|Normal|link=Gardestrike]]
| |
| |- align="center" style="background-color: #E6E6FA;"
| |
| | width="10px" |
| |
| | align="left" | Level 100
| |
| | |
| |- align="center"
| |
| ! rowspan="2" | M2
| |
| | width="10px" |
| |
| | align="left" | Ice Shard (10s)
| |
| | width="50px" rowspan="2" |
| |
| | rowspan="2" align="right" | [[Arquivo:Target.png|Target]] [[Arquivo:Damage.png|Damage]]
| |
| | rowspan="2" | [[Arquivo:Ice.png|Ice|link=Seavell]]
| |
| |- align="center"
| |
| | width="10px" |
| |
| | align="left" | Level 100
| |
| | |
| |- align="center" style="background-color: #E6E6FA;"
| |
| ! rowspan="2" | M3
| |
| | width="10px" |
| |
| | align="left" | Icicle Spear (25s)
| |
| | width="50px" rowspan="2" |
| |
| | rowspan="2" align="right" | [[Arquivo:Target.png|Target]] [[Arquivo:Damage.png|Damage]]
| |
| | rowspan="2" | [[Arquivo:Ice.png|Ice|link=Seavell]]
| |
| |- align="center" style="background-color: #E6E6FA;"
| |
| | width="10px" |
| |
| | align="left" | Level 100
| |
| | |
| |- align="center"
| |
| ! rowspan="2" | M4
| |
| | width="10px" |
| |
| | align="left" | Ice Fang (25s)
| |
| | width="50px" rowspan="2" |
| |
| | rowspan="2" align="right" | [[Arquivo:Target.png|Target]] [[Arquivo:Damage.png|Damage]] [[Arquivo:Slow.png|Slow]]
| |
| | rowspan="2" | [[Arquivo:Ice.png|Ice|link=Seavell]]
| |
| |- align="center"
| |
| | width="10px" |
| |
| | align="left" | Level 100
| |
| | |
| |- align="center" style="background-color: #E6E6FA;"
| |
| ! rowspan="2" | M5
| |
| | width="10px" |
| |
| | align="left" | Powder Snow (40s)
| |
| | width="50px" rowspan="2" |
| |
| | rowspan="2" align="right" | [[Arquivo:AOE.png|AOE]] [[Arquivo:Damage.png|Damage]] [[Arquivo:Slow.png|Slow]]
| |
| | rowspan="2" | [[Arquivo:Ice.png|Ice|link=Seavell]]
| |
| |- align="center" style="background-color: #E6E6FA;"
| |
| | width="10px" |
| |
| | align="left" | Level 100
| |
| | |
| |- align="center"
| |
| ! rowspan="2" | M6
| |
| | width="10px" |
| |
| | align="left" | Blizzard (60s)
| |
| | width="50px" rowspan="2" |
| |
| | rowspan="2" align="right" | [[Arquivo:AOE.png|AOE]] [[Arquivo:Damage.png|Damage]] [[Arquivo:Slow.png|Slow]]
| |
| | rowspan="2" | [[Arquivo:Ice.png|Ice|link=Seavell]]
| |
| |- align="center"
| |
| | width="10px" |
| |
| | align="left" | Level 106
| |
| | |
| |- align="center" style="background-color: #E6E6FA;"
| |
| ! rowspan="2" | M7
| |
| | width="10px" |
| |
| | align="left" | Gyro Ball (40s)
| |
| | width="50px" rowspan="2" |
| |
| | rowspan="2" align="right" | [[Arquivo:AOE.png|AOE]] [[Arquivo:Damage.png|Damage]] [[Arquivo:Paralyze.png|Paralyze]]
| |
| | rowspan="2" | [[Arquivo:Steel.png|Steel|link=Ironhard]]
| |
| |- align="center" style="background-color: #E6E6FA;"
| |
| | width="10px" |
| |
| | align="left" | Level 108
| |
| | |
| |- align="center"
| |
| ! rowspan="2" | M8
| |
| | width="10px" |
| |
| | align="left" | Iron Defense (60s)
| |
| | width="50px" rowspan="2" |
| |
| | rowspan="2" align="right" | [[Arquivo:Self.png|Self]] [[Arquivo:Buff.png|Buff]]
| |
| | rowspan="2" | [[Arquivo:Steel.png|Steel|link=Ironhard]]
| |
| |- align="center"
| |
| | width="10px" |
| |
| | align="left" | Level 100
| |
| | |
| |- align="center" style="background-color: #E6E6FA;"
| |
| ! rowspan="2" | M9
| |
| | width="10px" |
| |
| | align="left" | Harden (50s)
| |
| | width="50px" rowspan="2" |
| |
| | rowspan="2" align="right" | [[Arquivo:Self.png|Self]] [[Arquivo:Buff.png|Buff]]
| |
| | rowspan="2" | [[Arquivo:Normal1.png|Normal|link=Gardestrike]]
| |
| |- align="center" style="background-color: #E6E6FA;"
| |
| | width="10px" |
| |
| | align="left" | Level 100
| |
| | |
| |- align="center"
| |
| ! rowspan="2" | P
| |
| | width="10px" |
| |
| | align="left" | Protector
| |
| | width="50px" rowspan="2" |
| |
| | rowspan="2" align="right" | [[Arquivo:Buff.png|Buff]] [[Arquivo:Passive.png|Passive]]
| |
| | rowspan="2" | [[Arquivo:Normal1.png|Normal|link=Gardestrike]]
| |
| |- align="center"
| |
| | width="10px" |
| |
| | align="left" | Level 100
| |
| | |
| |- align="center" style="background-color: #E6E6FA;"
| |
| ! rowspan="2" | P
| |
| | width="10px" |
| |
| | align="left" | Own Tempo
| |
| | width="50px" rowspan="2" |
| |
| | rowspan="2" align="right" | [[Arquivo:Buff.png|Buff]] [[Arquivo:Passive.png|Passive]]
| |
| | rowspan="2" | [[Arquivo:Normal1.png|Normal|link=Gardestrike]]
| |
| |- align="center" style="background-color: #E6E6FA;"
| |
| | width="10px" |
| |
| | align="left" | Level 100
| |
| | |
| |}
| |
| | |
| | |
| ===Movimentos PVE===
| |
| {| border="0" style="border-collapse:collapse"
| |
| |- align="center" style="background-color: #E6E6FA;"
| |
| ! rowspan="2" | M1
| |
| | width="10px" |
| |
| | align="left" | Tackle (15s)
| |
| | width="50px" rowspan="2" |
| |
| | rowspan="2" align="right" | [[Arquivo:Target.png|Target]] [[Arquivo:Damage.png|Damage]]
| |
| | rowspan="2" | [[Arquivo:Normal1.png|Normal|link=Gardestrike]]
| |
| |- align="center" style="background-color: #E6E6FA;"
| |
| | width="10px" |
| |
| | align="left" | Level 100
| |
| | |
| |- align="center"
| |
| ! rowspan="2" | M2
| |
| | width="10px" |
| |
| | align="left" | Ice Shard (8s)
| |
| | width="50px" rowspan="2" |
| |
| | rowspan="2" align="right" | [[Arquivo:Target.png|Target]] [[Arquivo:Damage.png|Damage]]
| |
| | rowspan="2" | [[Arquivo:Ice.png|Ice|link=Seavell]]
| |
| |- align="center"
| |
| | width="10px" |
| |
| | align="left" | Level 100
| |
| | |
| |- align="center" style="background-color: #E6E6FA;"
| |
| ! rowspan="2" | M3
| |
| | width="10px" |
| |
| | align="left" | Icicle Spear (25s)
| |
| | width="50px" rowspan="2" |
| |
| | rowspan="2" align="right" | [[Arquivo:Target.png|Target]] [[Arquivo:Damage.png|Damage]]
| |
| | rowspan="2" | [[Arquivo:Ice.png|Ice|link=Seavell]]
| |
| |- align="center" style="background-color: #E6E6FA;"
| |
| | width="10px" |
| |
| | align="left" | Level 100
| |
| | |
| |- align="center"
| |
| ! rowspan="2" | M4
| |
| | width="10px" |
| |
| | align="left" | Ice Fang (25s)
| |
| | width="50px" rowspan="2" |
| |
| | rowspan="2" align="right" | [[Arquivo:Target.png|Target]] [[Arquivo:Damage.png|Damage]] [[Arquivo:Slow.png|Slow]]
| |
| | rowspan="2" | [[Arquivo:Ice.png|Ice|link=Seavell]]
| |
| |- align="center"
| |
| | width="10px" |
| |
| | align="left" | Level 100
| |
| | |
| |- align="center" style="background-color: #E6E6FA;"
| |
| ! rowspan="2" | M5
| |
| | width="10px" |
| |
| | align="left" | Powder Snow (40s)
| |
| | width="50px" rowspan="2" |
| |
| | rowspan="2" align="right" | [[Arquivo:AOE.png|AOE]] [[Arquivo:Damage.png|Damage]] [[Arquivo:Slow.png|Slow]]
| |
| | rowspan="2" | [[Arquivo:Ice.png|Ice|link=Seavell]]
| |
| |- align="center" style="background-color: #E6E6FA;"
| |
| | width="10px" |
| |
| | align="left" | Level 100
| |
| | |
| |- align="center"
| |
| ! rowspan="2" | M6
| |
| | width="10px" |
| |
| | align="left" | Blizzard (50s)
| |
| | width="50px" rowspan="2" |
| |
| | rowspan="2" align="right" | [[Arquivo:AOE.png|AOE]] [[Arquivo:Damage.png|Damage]] [[Arquivo:Slow.png|Slow]]
| |
| | rowspan="2" | [[Arquivo:Ice.png|Ice|link=Seavell]]
| |
| |- align="center"
| |
| | width="10px" |
| |
| | align="left" | Level 106
| |
| | |
| |- align="center" style="background-color: #E6E6FA;"
| |
| ! rowspan="2" | M7
| |
| | width="10px" |
| |
| | align="left" | Gyro Ball (40s)
| |
| | width="50px" rowspan="2" |
| |
| | rowspan="2" align="right" | [[Arquivo:AOE.png|AOE]] [[Arquivo:Damage.png|Damage]] [[Arquivo:Paralyze.png|Paralyze]]
| |
| | rowspan="2" | [[Arquivo:Steel.png|Steel|link=Ironhard]]
| |
| |- align="center" style="background-color: #E6E6FA;"
| |
| | width="10px" |
| |
| | align="left" | Level 108
| |
| | |
| |- align="center"
| |
| ! rowspan="2" | M8
| |
| | width="10px" |
| |
| | align="left" | Iron Defense (40s)
| |
| | width="50px" rowspan="2" |
| |
| | rowspan="2" align="right" | [[Arquivo:Self.png|Self]] [[Arquivo:Buff.png|Buff]]
| |
| | rowspan="2" | [[Arquivo:Steel.png|Steel|link=Ironhard]]
| |
| |- align="center"
| |
| | width="10px" |
| |
| | align="left" | Level 100
| |
| | |
| |- align="center" style="background-color: #E6E6FA;"
| |
| ! rowspan="2" | M9
| |
| | width="10px" |
| |
| | align="left" | Harden (40s)
| |
| | width="50px" rowspan="2" |
| |
| | rowspan="2" align="right" | [[Arquivo:Self.png|Self]] [[Arquivo:Buff.png|Buff]]
| |
| | rowspan="2" | [[Arquivo:Normal1.png|Normal|link=Gardestrike]]
| |
| |- align="center" style="background-color: #E6E6FA;"
| |
| | width="10px" |
| |
| | align="left" | Level 100
| |
| | |
| |- align="center"
| |
| ! rowspan="2" | P
| |
| | width="10px" |
| |
| | align="left" | Protector
| |
| | width="50px" rowspan="2" |
| |
| | rowspan="2" align="right" | [[Arquivo:Buff.png|Buff]] [[Arquivo:Passive.png|Passive]]
| |
| | rowspan="2" | [[Arquivo:Normal1.png|Normal|link=Gardestrike]]
| |
| |- align="center"
| |
| | width="10px" |
| |
| | align="left" | Level 100
| |
| | |
| |- align="center" style="background-color: #E6E6FA;"
| |
| ! rowspan="2" | P
| |
| | width="10px" |
| |
| | align="left" | Own Tempo
| |
| | width="50px" rowspan="2" |
| |
| | rowspan="2" align="right" | [[Arquivo:Buff.png|Buff]] [[Arquivo:Passive.png|Passive]]
| |
| | rowspan="2" | [[Arquivo:Normal1.png|Normal|link=Gardestrike]]
| |
| |- align="center" style="background-color: #E6E6FA;"
| |
| | width="10px" |
| |
| | align="left" | Level 100
| |
| | |
| |}
| |
| | |
| == '''Efetividades''' ==
| |
| | |
| '''Super Efetivo:''' Fire, Fighting, Rock and Steel.<br />
| |
| '''Normal:''' Normal, Water, Grass, Electric, Poison, Ground, Flying, Psychic, Bug, Ghost, Dragon, Dark, Crystal and Fairy.<br />
| |
| '''Muito Inefetivo:''' Ice.<br /> | |
| | |
| | |
| | |
| =Hippowdon=
| |
| | |
| ===Moveset PVP===
| |
| {| border="0" style="border-collapse:collapse"
| |
| |- align="center" style="background-color: #E6E6FA;"
| |
| ! rowspan="2" | M1
| |
| | width="10px" |
| |
| | align="left" | Ice Fang (25s)
| |
| | width="50px" rowspan="2" |
| |
| | rowspan="2" align="right" | [[Arquivo:Target.png|Target]] [[Arquivo:Damage.png|Damage]] [[Arquivo:Slow.png|Slow]]
| |
| | rowspan="2" | [[Arquivo:Ice.png|Ice|link=Seavell]]
| |
| |- align="center" style="background-color: #E6E6FA;"
| |
| | width="10px" |
| |
| | align="left" | Level 100
| |
| | |
| |- align="center"
| |
| ! rowspan="2" | M2
| |
| | width="10px" |
| |
| | align="left" | Stomping Tantrum (15s)
| |
| | width="50px" rowspan="2" |
| |
| | rowspan="2" align="right" | [[Arquivo:AOE.png|AOE]] [[Arquivo:Damage.png|Damage]]
| |
| | rowspan="2" | [[Arquivo:Ground.png|Ground|link=Orebound]]
| |
| |- align="center"
| |
| | width="10px" |
| |
| | align="left" | Level 100
| |
| | |
| |- align="center" style="background-color: #E6E6FA;"
| |
| ! rowspan="2" | M3
| |
| | width="10px" |
| |
| | align="left" | Sand Tomb (40s)
| |
| | width="50px" rowspan="2" |
| |
| | rowspan="2" align="right" | [[Arquivo:AOE.png|AOE]] [[Arquivo:Damage.png|Damage]] [[Arquivo:Stun.png|Stun]]
| |
| | rowspan="2" | [[Arquivo:Ground.png|Ground|link=Orebound]]
| |
| |- align="center" style="background-color: #E6E6FA;"
| |
| | width="10px" |
| |
| | align="left" | Level 102
| |
| | |
| |- align="center"
| |
| ! rowspan="2" | M4
| |
| | width="10px" |
| |
| | align="left" | Dig (40s)
| |
| | width="50px" rowspan="2" |
| |
| | rowspan="2" align="right" | [[Arquivo:AOE.png|AOE]] [[Arquivo:Damage.png|Damage]] [[Arquivo:Buff.png|Buff]] [[Arquivo:Slow.png|Slow]] [[Arquivo:Debuff.png|Debuff]]
| |
| | rowspan="2" | [[Arquivo:Ground.png|Ground|link=Orebound]]
| |
| |- align="center"
| |
| | width="10px" |
| |
| | align="left" | Level 102
| |
| | |
| |- align="center" style="background-color: #E6E6FA;"
| |
| ! rowspan="2" | M5
| |
| | width="10px" |
| |
| | align="left" | '''Sand Field (30s)'''
| |
| | width="50px" rowspan="2" |
| |
| | rowspan="2" align="right" | [[Arquivo:AOE.png|AOE]] [[Arquivo:Damage.png|Damage]] [[Arquivo:Nevermiss.png|Nevermiss]]
| |
| | rowspan="2" | [[Arquivo:Ground.png|Ground|link=Orebound]]
| |
| |- align="center" style="background-color: #E6E6FA;"
| |
| | width="10px" |
| |
| | align="left" | Level 110
| |
| | |
| |- align="center"
| |
| ! rowspan="2" | M6
| |
| | width="10px" |
| |
| | align="left" | '''Fissure (60s)'''
| |
| | width="50px" rowspan="2" |
| |
| | rowspan="2" align="right" | [[Arquivo:AOE.png|AOE]] [[Arquivo:Damage.png|Damage]]
| |
| | rowspan="2" | [[Arquivo:Ground.png|Ground|link=Orebound]]
| |
| |- align="center"
| |
| | width="10px" |
| |
| | align="left" | Level 110
| |
|
| |
|
| |- align="center" style="background-color: #E6E6FA;"
| | <center>[[Arquivo:Localização_NPC_Albert.png|link=]]</center> |
| ! rowspan="2" | M7
| |
| | width="10px" |
| |
| | align="left" | '''Earthquake (60s)'''
| |
| | width="50px" rowspan="2" |
| |
| | rowspan="2" align="right" | [[Arquivo:AOE.png|AOE]] [[Arquivo:Damage.png|Damage]]
| |
| | rowspan="2" | [[Arquivo:Ground.png|Ground|link=Orebound]]
| |
| |- align="center" style="background-color: #E6E6FA;"
| |
| | width="10px" |
| |
| | align="left" | Level 107
| |
|
| |
|
| |- align="center"
| | Albert contará que viu uma treinadora dias atrás com um Bunnelby que não a obedecia, mas vai pedir ajuda para contar para onde ela foi. Albert pede que o jogador o traga os seguintes itens: |
| ! rowspan="2" | M8
| |
| | width="10px" |
| |
| | align="left" | '''Slack Off (100s)'''
| |
| | width="50px" rowspan="2" |
| |
| | rowspan="2" align="right" | [[Arquivo:Self.png|Self]] [[Arquivo:HealingStatus.png|Healing]]
| |
| | rowspan="2" | [[Arquivo:Normal1.png|Normal|link=Gardestrike]]
| |
| |- align="center"
| |
| | width="10px" |
| |
| | align="left" | Level 105
| |
|
| |
|
| |- align="center" style="background-color: #E6E6FA;"
| | <center> |
| ! rowspan="2" | M9
| |
| | width="10px" |
| |
| | align="left" | '''Sandstorm (60s)'''
| |
| | width="50px" rowspan="2" |
| |
| | rowspan="2" align="right" | [[Arquivo:AOE.png|AOE]] [[Arquivo:Buff.png|Buff]] [[Arquivo:Blind.png|Blind]] [[Arquivo:Slow.png|Slow]]
| |
| | rowspan="2" | [[Arquivo:Rock.png|Rock|link=Orebound]]
| |
| |- align="center" style="background-color: #E6E6FA;"
| |
| | width="10px" |
| |
| | align="left" | Level 100
| |
| | |
| |- align="center"
| |
| ! rowspan="2" | P
| |
| | width="10px" |
| |
| | align="left" | Sand Force
| |
| | width="50px" rowspan="2" |
| |
| | rowspan="2" align="right" | [[Arquivo:Buff.png|Buff]]
| |
| | rowspan="2" | [[Arquivo:Ground.png|Ground|link=Orebound]]
| |
| |- align="center"
| |
| | width="10px" |
| |
| | align="left" | Level 100
| |
| | |
| |- align="center" style="background-color: #E6E6FA;"
| |
| ! rowspan="2" | P
| |
| | width="10px" |
| |
| | align="left" | Sandstream
| |
| | width="50px" rowspan="2" |
| |
| | rowspan="2" align="right" | [[Arquivo:Buff.png|Buff]]
| |
| | rowspan="2" | [[Arquivo:Ground.png|Ground|link=Orebound]]
| |
| |- align="center" style="background-color: #E6E6FA;"
| |
| | width="10px" |
| |
| | align="left" | Level 100
| |
|
| |
|
| | {| class="wikitable" width="20%" |
| | | align="center"| [[Arquivo:Psp.png|link=]] |
| | | align="center"| '''1 PSP''' |
| | |- |
| | | align="center"| [[Arquivo:Gameboycolor.png|link=]] |
| | | align="center"| '''1 Game Boy Color''' |
| |} | | |} |
| | </center> |
|
| |
|
| ===Moveset PVE===
| | Ao entregá-los, o jogador receberá '''50K de experiência''', e Albert irá contar que viu a treinadora se encontrando com o '''NPC Mr. Jones'''. |
| {| border="0" style="border-collapse:collapse"
| |
| |- align="center" style="background-color: #E6E6FA;"
| |
| ! rowspan="2" | M1
| |
| | width="10px" |
| |
| | align="left" | Ice Fang (25s)
| |
| | width="50px" rowspan="2" |
| |
| | rowspan="2" align="right" | [[Arquivo:Target.png|Target]] [[Arquivo:Damage.png|Damage]] [[Arquivo:Slow.png|Slow]]
| |
| | rowspan="2" | [[Arquivo:Ice.png|Ice|link=Seavell]]
| |
| |- align="center" style="background-color: #E6E6FA;"
| |
| | width="10px" |
| |
| | align="left" | Level 100
| |
|
| |
|
| |- align="center"
| | ===Mr. Jones=== |
| ! rowspan="2" | M2
| |
| | width="10px" |
| |
| | align="left" | Stomping Tantrum (15s)
| |
| | width="50px" rowspan="2" |
| |
| | rowspan="2" align="right" | [[Arquivo:AOE.png|AOE]] [[Arquivo:Damage.png|Damage]]
| |
| | rowspan="2" | [[Arquivo:Ground.png|Ground|link=Orebound]]
| |
| |- align="center"
| |
| | width="10px" |
| |
| | align="left" | Level 100
| |
|
| |
|
| |- align="center" style="background-color: #E6E6FA;"
| | Mr. Jones se encontra no noderste de Pewter, na saída da cidade. |
| ! rowspan="2" | M3
| |
| | width="10px" |
| |
| | align="left" | Sand Tomb (40s)
| |
| | width="50px" rowspan="2" |
| |
| | rowspan="2" align="right" | [[Arquivo:AOE.png|AOE]] [[Arquivo:Damage.png|Damage]] [[Arquivo:Stun.png|Stun]]
| |
| | rowspan="2" | [[Arquivo:Ground.png|Ground|link=Orebound]]
| |
| |- align="center" style="background-color: #E6E6FA;"
| |
| | width="10px" |
| |
| | align="left" | Level 102
| |
|
| |
|
| |- align="center"
| | <center>[[Arquivo:Pronta_Localização_NPC_Mr._Jones.png|link]]</center> |
| ! rowspan="2" | M4
| |
| | width="10px" |
| |
| | align="left" | Dig (40s)
| |
| | width="50px" rowspan="2" |
| |
| | rowspan="2" align="right" | [[Arquivo:AOE.png|AOE]] [[Arquivo:Damage.png|Damage]] [[Arquivo:Buff.png|Buff]] [[Arquivo:Slow.png|Slow]] [[Arquivo:Debuff.png|Debuff]]
| |
| | rowspan="2" | [[Arquivo:Ground.png|Ground|link=Orebound]]
| |
| |- align="center"
| |
| | width="10px" |
| |
| | align="left" | Level 102
| |
|
| |
|
| |- align="center" style="background-color: #E6E6FA;"
| | Ele conta que viu a treinadora, e o Bunnelby dela tinha sido forçado a entrar em sua Pokébola e por isso não a obedecia. Mr. Jones pede ajuda do jogador pedindo os seguintes itens para contar para onde a treinadora foi: |
| ! rowspan="2" | M5
| |
| | width="10px" |
| |
| | align="left" | '''Sand Field (40s)'''
| |
| | width="50px" rowspan="2" |
| |
| | rowspan="2" align="right" | [[Arquivo:AOE.png|AOE]] [[Arquivo:Damage.png|Damage]] [[Arquivo:Nevermiss.png|Nevermiss]]
| |
| | rowspan="2" | [[Arquivo:Ground.png|Ground|link=Orebound]]
| |
| |- align="center" style="background-color: #E6E6FA;"
| |
| | width="10px" |
| |
| | align="left" | Level 110
| |
|
| |
|
| |- align="center"
| | <center> |
| ! rowspan="2" | M6
| |
| | width="10px" |
| |
| | align="left" | '''Fissure (50s)'''
| |
| | width="50px" rowspan="2" |
| |
| | rowspan="2" align="right" | [[Arquivo:AOE.png|AOE]] [[Arquivo:Damage.png|Damage]]
| |
| | rowspan="2" | [[Arquivo:Ground.png|Ground|link=Orebound]]
| |
| |- align="center"
| |
| | width="10px" |
| |
| | align="left" | Level 110
| |
| | |
| |- align="center" style="background-color: #E6E6FA;"
| |
| ! rowspan="2" | M7
| |
| | width="10px" |
| |
| | align="left" | '''Earthquake (50s)'''
| |
| | width="50px" rowspan="2" |
| |
| | rowspan="2" align="right" | [[Arquivo:AOE.png|AOE]] [[Arquivo:Damage.png|Damage]]
| |
| | rowspan="2" | [[Arquivo:Ground.png|Ground|link=Orebound]]
| |
| |- align="center" style="background-color: #E6E6FA;"
| |
| | width="10px" |
| |
| | align="left" | Level 107
| |
| | |
| |- align="center"
| |
| ! rowspan="2" | M8
| |
| | width="10px" |
| |
| | align="left" | '''Slack Off (60s)'''
| |
| | width="50px" rowspan="2" |
| |
| | rowspan="2" align="right" | [[Arquivo:Self.png|Self]] [[Arquivo:HealingStatus.png|Healing]]
| |
| | rowspan="2" | [[Arquivo:Normal1.png|Normal|link=Gardestrike]]
| |
| |- align="center"
| |
| | width="10px" |
| |
| | align="left" | Level 105
| |
| | |
| |- align="center" style="background-color: #E6E6FA;"
| |
| ! rowspan="2" | M9
| |
| | width="10px" |
| |
| | align="left" | '''Sandstorm (50s)'''
| |
| | width="50px" rowspan="2" |
| |
| | rowspan="2" align="right" | [[Arquivo:AOE.png|AOE]] [[Arquivo:Buff.png|Buff]] [[Arquivo:Blind.png|Blind]] [[Arquivo:Slow.png|Slow]]
| |
| | rowspan="2" | [[Arquivo:Rock.png|Rock|link=Orebound]]
| |
| |- align="center" style="background-color: #E6E6FA;"
| |
| | width="10px" |
| |
| | align="left" | Level 100
| |
| | |
| |- align="center"
| |
| ! rowspan="2" | P
| |
| | width="10px" |
| |
| | align="left" | Sand Force
| |
| | width="50px" rowspan="2" |
| |
| | rowspan="2" align="right" | [[Arquivo:Buff.png|Buff]]
| |
| | rowspan="2" | [[Arquivo:Ground.png|Ground|link=Orebound]]
| |
| |- align="center"
| |
| | width="10px" |
| |
| | align="left" | Level 100
| |
| | |
| |- align="center" style="background-color: #E6E6FA;"
| |
| ! rowspan="2" | P
| |
| | width="10px" |
| |
| | align="left" | Sandstream
| |
| | width="50px" rowspan="2" |
| |
| | rowspan="2" align="right" | [[Arquivo:Buff.png|Buff]]
| |
| | rowspan="2" | [[Arquivo:Ground.png|Ground|link=Orebound]]
| |
| |- align="center" style="background-color: #E6E6FA;"
| |
| | width="10px" |
| |
| | align="left" | Level 100
| |
|
| |
|
| | {| class="wikitable" width="20%" |
| | | align="center"|[[Arquivo:Rock-stone.gif|link=Pedras de Evolução]] |
| | | align="center"|''' 1 Rock Stone ''' |
| | |- |
| | | align="center"|[[Arquivo: Onix Tail.png |link=]] |
| | | align="center"|'''4 Onix Tail''' |
| | |- |
| | | align="center"|[[Arquivo:Mushroom1.png|link=]] |
| | | align="center"|'''5 Mushroom''' |
| |} | | |} |
| | </center> |
|
| |
|
| | Ele agradece o jogador concedendo '''100K de experiência''' e conta que como ele não a ajudou a treinadora, chamada Cindy, ela provavelmente foi para onde mora, em Cinnabar. |
|
| |
|
| =Hippowdon Female= | | ===Cindy=== |
| == '''Informações Gerais''' == | |
| | |
| '''Nome:''' Hippowdon Female<br />
| |
| '''Level:''' 100<br />
| |
| '''Elemento:''' Ground<br />
| |
| '''Habilidades:''' Dig, Rock Smash, Rid.<br />
| |
| '''Boost:''' Mirror Stone (3)<br />
| |
| '''Materia:''' Orebound Superior<br />
| |
| | |
| == '''Evoluções''' ==
| |
|
| |
|
| '''Hippopotas''' precisa de Level 30.
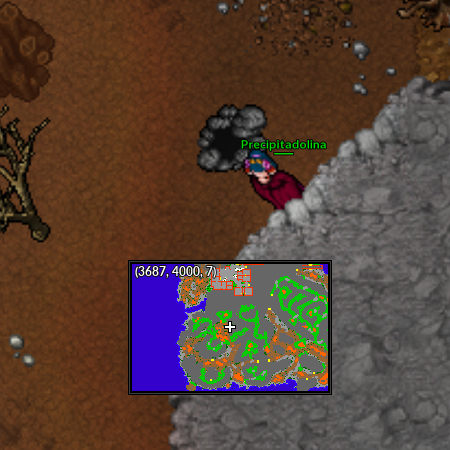
| | Para encontrá-la, o jogador deve descer neste buraco no sul de Cinnabar e em seguida seguir à direita e ao sul. |
| '''Hippowdon''' precisa de Level 100.
| |
|
| |
|
| == '''Descrição:''' ==
| | <center>[[Arquivo:Localização_Buraco_NPC_Cindy.png|link=]]</center> |
| Ele explode areia armazenada internamente nos portos de seu corpo para criar um imenso twister para o ataque..
| |
|
| |
|
| == '''Movimentos''' ==
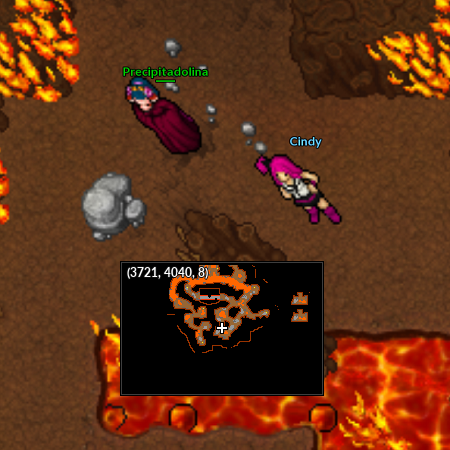
| | Cindy está no subsolo de Cinnabar, no respawn de Charmander e Charmeleon. |
|
| |
|
| ===Movimentos PVP=== | | <center>[[Arquivo:Localização_NPC_Cindy.png|link=]]</center> |
|
| |
|
| {| border="0" style="border-collapse:collapse"
| | Ao encontrá-la, ela se recusa a devolver o Bunnelby mas aceita participar de um duelo. Se ela perder, devolverá o Pokémon. |
| |- align="center" style="background-color: #E6E6FA;"
| |
| ! rowspan="2" | M1
| |
| | width="10px" |
| |
| | align="left" | Fire Fang (25s)
| |
| | width="50px" rowspan="2" |
| |
| | rowspan="2" align="right" | [[Arquivo:Target.png|Target]] [[Arquivo:Damage.png|Damage]] [[Arquivo:Burn.png|Burn]]
| |
| | rowspan="2" | [[Arquivo:Fire.png|Fire|link=Volcanic]]
| |
| |- align="center" style="background-color: #E6E6FA;"
| |
| | width="10px" |
| |
| | align="left" | Level 100
| |
|
| |
|
| |- align="center"
| | O jogador terá 2 minutos para derrotá-la. Cindy utilizará os seguintes Pokémon: |
| ! rowspan="2" | M2
| |
| | width="10px" |
| |
| | align="left" | Mud Sludge (10s)
| |
| | width="50px" rowspan="2" |
| |
| | rowspan="2" align="right" | [[Arquivo:Target.png|Target]] [[Arquivo:Damage.png|Damage]]
| |
| | rowspan="2" | [[Arquivo:Ground.png|Ground|link=Orebound]]
| |
| |- align="center"
| |
| | width="10px" |
| |
| | align="left" | Level 100
| |
| | |
| |- align="center" style="background-color: #E6E6FA;"
| |
| ! rowspan="2" | M3
| |
| | width="10px" |
| |
| | align="left" | Stone Edge (25s)
| |
| | width="50px" rowspan="2" |
| |
| | rowspan="2" align="right" | [[Arquivo:Target.png|Target]] [[Arquivo:Damage.png|Damage]]
| |
| | rowspan="2" | [[Arquivo:Ground.png|Ground|link=Orebound]]
| |
| |- align="center" style="background-color: #E6E6FA;"
| |
| | width="10px" |
| |
| | align="left" | Level 100
| |
| | |
| |- align="center"
| |
| ! rowspan="2" | M4
| |
| | width="10px" |
| |
| | align="left" | Earth Power (40s)
| |
| | width="50px" rowspan="2" |
| |
| | rowspan="2" align="right" | [[Arquivo:AOE.png|AOE]]
| |
| | rowspan="2" | [[Arquivo:Ground.png|Ground|link=Orebound]]
| |
| |- align="center"
| |
| | width="10px" |
| |
| | align="left" | Level 100
| |
| | |
| |- align="center" style="background-color: #E6E6FA;"
| |
| ! rowspan="2" | M5
| |
| | width="10px" |
| |
| | align="left" | '''Sand Field (50s)'''
| |
| | width="50px" rowspan="2" |
| |
| | rowspan="2" align="right" | [[Arquivo:AOE.png|AOE]] [[Arquivo:Damage.png|Damage]] [[Arquivo:Nevermiss.png|Nevermiss]]
| |
| | rowspan="2" | [[Arquivo:Ground.png|Ground|link=Orebound]]
| |
| |- align="center" style="background-color: #E6E6FA;"
| |
| | width="10px" |
| |
| | align="left" | Level 110
| |
| | |
| |- align="center"
| |
| ! rowspan="2" | M6
| |
| | width="10px" |
| |
| | align="left" | '''Fissure (60s)'''
| |
| | width="50px" rowspan="2" |
| |
| | rowspan="2" align="right" | [[Arquivo:AOE.png|AOE]] [[Arquivo:Damage.png|Damage]]
| |
| | rowspan="2" | [[Arquivo:Ground.png|Ground|link=Orebound]]
| |
| |- align="center"
| |
| | width="10px" |
| |
| | align="left" | Level 110
| |
| | |
| |- align="center" style="background-color: #E6E6FA;"
| |
| ! rowspan="2" | M7
| |
| | width="10px" |
| |
| | align="left" | '''Earthquake (60s)'''
| |
| | width="50px" rowspan="2" |
| |
| | rowspan="2" align="right" | [[Arquivo:AOE.png|AOE]] [[Arquivo:Damage.png|Damage]] [[Arquivo:Slow.png|Slow]]
| |
| | rowspan="2" | [[Arquivo:Ground.png|Ground|link=Orebound]]
| |
| |- align="center" style="background-color: #E6E6FA;"
| |
| | width="10px" |
| |
| | align="left" | Level 107
| |
| | |
| |- align="center"
| |
| ! rowspan="2" | M8
| |
| | width="10px" |
| |
| | align="left" | '''Sandstorm (60s)'''
| |
| | width="50px" rowspan="2" |
| |
| | rowspan="2" align="right" | [[Arquivo:AOE.png|AOE]] [[Arquivo:Buff.png|Buff]] [[Arquivo:Blind.png|Blind]] [[Arquivo:Slow.png|Slow]]
| |
| | rowspan="2" | [[Arquivo:Ground.png|Ground|link=Orebound]]
| |
| |- align="center"
| |
| | width="10px" |
| |
| | align="left" | Level 100
| |
| | |
| |- align="center" style="background-color: #E6E6FA;"
| |
| ! rowspan="2" | P
| |
| | width="10px" |
| |
| | align="left" | Sand Force
| |
| | width="50px" rowspan="2" |
| |
| | rowspan="2" align="right" | [[Arquivo:Buff.png|Buff]] [[Arquivo:Passive.png|Passive]]
| |
| | rowspan="2" | [[Arquivo:Ground.png|Ground|link=Orebound]]
| |
| |- align="center" style="background-color: #E6E6FA;"
| |
| | width="10px" |
| |
| | align="left" | Level 100
| |
|
| |
|
| | <center> |
| | {| class="wikitable" width="20%" |
| | !colspan="2"|'''NPC Cindy''' |
| | |- |
| | | align="center"|[[Arquivo:659-Bunnelby.png|link=Bunnelby]] |
| | | align="center"|[[Bunnelby]] |
| | |- |
| | | align="center"|[[Arquivo:006-Charizard.png|link=Charizard]] |
| | | align="center"|[[Charizard]] |
| | |- |
| | | align="center"|[[Arquivo:286-Breloom.png|link=Breloom]] |
| | | align="center"|[[Breloom]] |
| | |- |
| | | align="center"|[[Arquivo:108-Lickitung.png|link=Lickitung]] |
| | | align="center"|[[Lickitung]] |
| | |- |
| | | align="center"|[[Arquivo:121-Starmie.png|link=Starmie]] |
| | | align="center"|[[Starmie]] |
| | |- |
| | | align="center"|[[Arquivo:281-Kirlia.png|link=Kirlia]] |
| | | align="center"|[[Kirlia]] |
| |} | | |} |
|
| |
|
| ===Movimentos PVE===
| | </center> |
| | |
| {| border="0" style="border-collapse:collapse"
| |
| |- align="center" style="background-color: #E6E6FA;"
| |
| ! rowspan="2" | M1
| |
| | width="10px" |
| |
| | align="left" | Fire Fang (25s)
| |
| | width="50px" rowspan="2" |
| |
| | rowspan="2" align="right" | [[Arquivo:Target.png|Target]] [[Arquivo:Damage.png|Damage]] [[Arquivo:Burn.png|Burn]]
| |
| | rowspan="2" | [[Arquivo:Fire.png|Fire|link=Volcanic]]
| |
| |- align="center" style="background-color: #E6E6FA;"
| |
| | width="10px" |
| |
| | align="left" | Level 100
| |
| | |
| |- align="center"
| |
| ! rowspan="2" | M2
| |
| | width="10px" |
| |
| | align="left" | Mud Sludge (10s)
| |
| | width="50px" rowspan="2" |
| |
| | rowspan="2" align="right" | [[Arquivo:Target.png|Target]] [[Arquivo:Damage.png|Damage]]
| |
| | rowspan="2" | [[Arquivo:Ground.png|Ground|link=Orebound]]
| |
| |- align="center"
| |
| | width="10px" |
| |
| | align="left" | Level 100
| |
|
| |
|
| |- align="center" style="background-color: #E6E6FA;"
| | ==3ª Parte: Final== |
| ! rowspan="2" | M3
| |
| | width="10px" |
| |
| | align="left" | Stone Edge (25s)
| |
| | width="50px" rowspan="2" |
| |
| | rowspan="2" align="right" | [[Arquivo:Target.png|Target]] [[Arquivo:Damage.png|Damage]]
| |
| | rowspan="2" | [[Arquivo:Ground.png|Ground|link=Orebound]]
| |
| |- align="center" style="background-color: #E6E6FA;"
| |
| | width="10px" |
| |
| | align="left" | Level 100
| |
| | |
| |- align="center"
| |
| ! rowspan="2" | M4
| |
| | width="10px" |
| |
| | align="left" | Earth Power (40s)
| |
| | width="50px" rowspan="2" |
| |
| | rowspan="2" align="right" | [[Arquivo:AOE.png|AOE]]
| |
| | rowspan="2" | [[Arquivo:Ground.png|Ground|link=Orebound]]
| |
| |- align="center"
| |
| | width="10px" |
| |
| | align="left" | Level 100
| |
| | |
| |- align="center" style="background-color: #E6E6FA;"
| |
| ! rowspan="2" | M5
| |
| | width="10px" |
| |
| | align="left" | '''Sand Field (40s)'''
| |
| | width="50px" rowspan="2" |
| |
| | rowspan="2" align="right" | [[Arquivo:AOE.png|AOE]] [[Arquivo:Damage.png|Damage]] [[Arquivo:Nevermiss.png|Nevermiss]]
| |
| | rowspan="2" | [[Arquivo:Ground.png|Ground|link=Orebound]]
| |
| |- align="center" style="background-color: #E6E6FA;"
| |
| | width="10px" |
| |
| | align="left" | Level 110
| |
| | |
| |- align="center"
| |
| ! rowspan="2" | M6
| |
| | width="10px" |
| |
| | align="left" | '''Fissure (50s)'''
| |
| | width="50px" rowspan="2" |
| |
| | rowspan="2" align="right" | [[Arquivo:AOE.png|AOE]] [[Arquivo:Damage.png|Damage]]
| |
| | rowspan="2" | [[Arquivo:Ground.png|Ground|link=Orebound]]
| |
| |- align="center"
| |
| | width="10px" |
| |
| | align="left" | Level 110
| |
| | |
| |- align="center" style="background-color: #E6E6FA;"
| |
| ! rowspan="2" | M7
| |
| | width="10px" |
| |
| | align="left" | '''Earthquake (50s)'''
| |
| | width="50px" rowspan="2" |
| |
| | rowspan="2" align="right" | [[Arquivo:AOE.png|AOE]] [[Arquivo:Damage.png|Damage]] [[Arquivo:Slow.png|Slow]]
| |
| | rowspan="2" | [[Arquivo:Ground.png|Ground|link=Orebound]]
| |
| |- align="center" style="background-color: #E6E6FA;"
| |
| | width="10px" |
| |
| | align="left" | Level 107
| |
| | |
| |- align="center"
| |
| ! rowspan="2" | M8
| |
| | width="10px" |
| |
| | align="left" | '''Sandstorm (50s)'''
| |
| | width="50px" rowspan="2" |
| |
| | rowspan="2" align="right" | [[Arquivo:AOE.png|AOE]] [[Arquivo:Buff.png|Buff]] [[Arquivo:Blind.png|Blind]] [[Arquivo:Slow.png|Slow]]
| |
| | rowspan="2" | [[Arquivo:Ground.png|Ground|link=Orebound]]
| |
| |- align="center"
| |
| | width="10px" |
| |
| | align="left" | Level 100
| |
| | |
| |- align="center" style="background-color: #E6E6FA;"
| |
| ! rowspan="2" | P
| |
| | width="10px" |
| |
| | align="left" | Sand Force
| |
| | width="50px" rowspan="2" |
| |
| | rowspan="2" align="right" | [[Arquivo:Buff.png|Buff]] [[Arquivo:Passive.png|Passive]]
| |
| | rowspan="2" | [[Arquivo:Ground.png|Ground|link=Orebound]]
| |
| |- align="center" style="background-color: #E6E6FA;"
| |
| | width="10px" |
| |
| | align="left" | Level 100
| |
| | |
| |}
| |
|
| |
|
| == '''Efetividades''' ==
| | Após derrotá-la e conseguir o Bunnelby de volta, o jogador deve encontrar Jason novamente para entregar o Pokémon, o NPC o recompensará com '''300K de experiência''' e pedirá que entregue a Yume Ball para Jasmine. |
| | Ao conversar com Jasmine, ela recompensará com '''500K de experiência''', e continuando a conversa, com mais '''500K de experiência'''. |
|
| |
|
| '''Muito Efetivo:''' Water, Grass and Ice.<br />
| | =Correção Emilia Quest= |
| '''Normal:''' Normal, Fire, Fighting, Ground, Flying, Psychic, Bug, Ghost, Dragon, Steel, Dark, Crystal and Fairy.<br />
| |
| '''Muito Inefetivo:''' Poison and Rock.<br />
| |
| '''Nulo:''' Electric.<br />
| |