Shiny Empoleon: mudanças entre as edições
Ir para navegação
Ir para pesquisar
| (Uma revisão intermediária pelo mesmo usuário não está sendo mostrada) | |||
| Linha 26: | Linha 26: | ||
! rowspan="2" | M1 | ! rowspan="2" | M1 | ||
| width="10px" | | | width="10px" | | ||
| align="left" | Scrap Throw ( | | align="left" | Scrap Throw (15s) | ||
| width="50px" rowspan="2" | | | width="50px" rowspan="2" | | ||
| rowspan="2" align="right" | [[Arquivo:Target.png|Target]] [[Arquivo:Damage.png|Damage]] | | rowspan="2" align="right" | [[Arquivo:Target.png|Target]] [[Arquivo:Damage.png|Damage]] | ||
| Linha 37: | Linha 37: | ||
! rowspan="2" | M2 | ! rowspan="2" | M2 | ||
| width="10px" | | | width="10px" | | ||
| align="left" | Bubble | | align="left" | Bubble (10s) | ||
| width="50px" rowspan="2" | | | width="50px" rowspan="2" | | ||
| rowspan="2" align="right" | [[Arquivo:Target.png|Target]] [[Arquivo:Damage.png|Damage]] | | rowspan="2" align="right" | [[Arquivo:Target.png|Target]] [[Arquivo:Damage.png|Damage]] | ||
| Linha 48: | Linha 48: | ||
! rowspan="2" | M3 | ! rowspan="2" | M3 | ||
| width="10px" | | | width="10px" | | ||
| align="left" | | | align="left" | Bubble Beam (22s) | ||
| width="50px" rowspan="2" | | | width="50px" rowspan="2" | | ||
| rowspan="2" align="right" | [[Arquivo: | | rowspan="2" align="right" | [[Arquivo:Target.png|Target]] [[Arquivo:Damage.png|Damage]] | ||
| rowspan="2" | [[Arquivo: | | rowspan="2" | [[Arquivo:Water.png|Water|link=Seavell]] | ||
|- align="center" style="background-color: #E6E6FA;" | |- align="center" style="background-color: #E6E6FA;" | ||
| width="10px" | | | width="10px" | | ||
| Linha 70: | Linha 70: | ||
! rowspan="2" | M5 | ! rowspan="2" | M5 | ||
| width="10px" | | | width="10px" | | ||
| align="left" | | | align="left" | Metal Claw (30s) | ||
| width="50px" rowspan="2" | | | width="50px" rowspan="2" | | ||
| rowspan="2" align="right" | | | rowspan="2" align="right" | [[Arquivo:AOE.png|AOE]] [[Arquivo:Damage.png|Damage]] [[Arquivo:Buff.png|Buff]] | ||
| rowspan="2" | [[Arquivo: | | rowspan="2" | [[Arquivo:Steel.png|Steel|link=Ironhard]] | ||
|- align="center" style="background-color: #E6E6FA;" | |- align="center" style="background-color: #E6E6FA;" | ||
| width="10px" | | | width="10px" | | ||
| Linha 81: | Linha 81: | ||
! rowspan="2" | M6 | ! rowspan="2" | M6 | ||
| width="10px" | | | width="10px" | | ||
| align="left" | | | align="left" | Liquidation (30s) | ||
| width="50px" rowspan="2" | | | width="50px" rowspan="2" | | ||
| rowspan="2" align="right" | [[Arquivo:AOE.png|AOE]] [[Arquivo:Damage.png|Damage]] | | rowspan="2" align="right" | [[Arquivo:Target.png|Target]] [[Arquivo:AOE.png|AOE]] [[Arquivo:Damage.png|Damage]] [[Arquivo:Slow.png|Slow]] [[Arquivo:NeverBoost.png|NeverBoost]] | ||
| rowspan="2" | [[Arquivo:Water.png|Water|link=Seavell]] | | rowspan="2" | [[Arquivo:Water.png|Water|link=Seavell]] | ||
|- align="center" | |- align="center" | ||
| Linha 103: | Linha 103: | ||
! rowspan="2" | M8 | ! rowspan="2" | M8 | ||
| width="10px" | | | width="10px" | | ||
| align="left" | | | align="left" | Hydro Cannon (40s) | ||
| width="50px" rowspan="2" | | | width="50px" rowspan="2" | | ||
| rowspan="2" align="right" |[[Arquivo:AOE.png|AOE]] | | rowspan="2" align="right" | [[Arquivo:AOE.png|AOE]] [[Arquivo:Damage.png|Damage]] | ||
| rowspan="2" | [[Arquivo:Water.png|Water|link=Seavell]] | | rowspan="2" | [[Arquivo:Water.png|Water|link=Seavell]] | ||
|- align="center" | |- align="center" | ||
| Linha 112: | Linha 112: | ||
|- align="center" style="background-color: #E6E6FA;" | |- align="center" style="background-color: #E6E6FA;" | ||
! rowspan="2" | | ! rowspan="2" | M9 | ||
| width="10px" | | | width="10px" | | ||
| align="left" | | | align="left" | Surf (65s) | ||
| width="50px" rowspan="2" | | | width="50px" rowspan="2" | | ||
| rowspan="2" align="right" | [[Arquivo: | | rowspan="2" align="right" | [[Arquivo:AOE.png|AOE]] [[Arquivo:Damage.png|Damage]] | ||
| rowspan="2" | [[Arquivo:Water.png|Water|link=Seavell]] | | rowspan="2" | [[Arquivo:Water.png|Water|link=Seavell]] | ||
|- align="center" style="background-color: #E6E6FA;" | |- align="center" style="background-color: #E6E6FA;" | ||
| Linha 122: | Linha 122: | ||
| align="left" | | | align="left" | | ||
|- align="center" | |||
! rowspan="2" | P | |||
| width="10px" | | |||
| align="left" | Water Sport | |||
| width="50px" rowspan="2" | | |||
| rowspan="2" align="right" | [[Arquivo:Passive.png|Passive]] [[Arquivo:Buff.png|Buff]] | |||
| rowspan="2" | [[Arquivo:Water.png|Water|link=Seavell]] | |||
|- align="center" | |||
| width="10px" | | |||
| align="left" | Level 100 | |||
|} | |} | ||
| Linha 130: | Linha 141: | ||
! rowspan="2" | M1 | ! rowspan="2" | M1 | ||
| width="10px" | | | width="10px" | | ||
| align="left" | Scrap Throw (8s) | | align="left" | '''Scrap Throw (8s)''' | ||
| width="50px" rowspan="2" | | | width="50px" rowspan="2" | | ||
| rowspan="2" align="right" | [[Arquivo:Target.png|Target]] [[Arquivo:Damage.png|Damage]] | | rowspan="2" align="right" | [[Arquivo:Target.png|Target]] [[Arquivo:Damage.png|Damage]] | ||
| Linha 141: | Linha 152: | ||
! rowspan="2" | M2 | ! rowspan="2" | M2 | ||
| width="10px" | | | width="10px" | | ||
| align="left" | '''Bubble | | align="left" | '''Bubble (8s)''' | ||
| width="50px" rowspan="2" | | | width="50px" rowspan="2" | | ||
| rowspan="2" align="right" | [[Arquivo:Target.png|Target]] [[Arquivo:Damage.png|Damage]] | | rowspan="2" align="right" | [[Arquivo:Target.png|Target]] [[Arquivo:Damage.png|Damage]] | ||
| Linha 152: | Linha 163: | ||
! rowspan="2" | M3 | ! rowspan="2" | M3 | ||
| width="10px" | | | width="10px" | | ||
| align="left" | ''' | | align="left" | '''Bubble Beam (15s)''' | ||
| width="50px" rowspan="2" | | | width="50px" rowspan="2" | | ||
| rowspan="2" align="right" | [[Arquivo: | | rowspan="2" align="right" | [[Arquivo:Target.png|Target]] [[Arquivo:Damage.png|Damage]] | ||
| rowspan="2" | [[Arquivo: | | rowspan="2" | [[Arquivo:Water.png|Water|link=Seavell]] | ||
|- align="center" style="background-color: #E6E6FA;" | |- align="center" style="background-color: #E6E6FA;" | ||
| width="10px" | | | width="10px" | | ||
| Linha 174: | Linha 185: | ||
! rowspan="2" | M5 | ! rowspan="2" | M5 | ||
| width="10px" | | | width="10px" | | ||
| align="left" | ''' | | align="left" | '''Metal Claw (50s)''' | ||
| width="50px" rowspan="2" | | | width="50px" rowspan="2" | | ||
| rowspan="2" align="right" | | | rowspan="2" align="right" | [[Arquivo:AOE.png|AOE]] [[Arquivo:Damage.png|Damage]] [[Arquivo:Buff.png|Buff]] | ||
| rowspan="2" | [[Arquivo: | | rowspan="2" | [[Arquivo:Steel.png|Steel|link=Ironhard]] | ||
|- align="center" style="background-color: #E6E6FA;" | |- align="center" style="background-color: #E6E6FA;" | ||
| width="10px" | | | width="10px" | | ||
| Linha 185: | Linha 196: | ||
! rowspan="2" | M6 | ! rowspan="2" | M6 | ||
| width="10px" | | | width="10px" | | ||
| align="left" | | | align="left" | '''Liquidation (22s)''' | ||
| width="50px" rowspan="2" | | | width="50px" rowspan="2" | | ||
| rowspan="2" align="right" | [[Arquivo:AOE.png|AOE]] [[Arquivo:Damage.png|Damage]] | | rowspan="2" align="right" | [[Arquivo:Target.png|Target]] [[Arquivo:AOE.png|AOE]] [[Arquivo:Damage.png|Damage]] [[Arquivo:Slow.png|Slow]] [[Arquivo:NeverBoost.png|NeverBoost]] | ||
| rowspan="2" | [[Arquivo:Water.png|Water|link=Seavell]] | | rowspan="2" | [[Arquivo:Water.png|Water|link=Seavell]] | ||
|- align="center" | |- align="center" | ||
| Linha 207: | Linha 218: | ||
! rowspan="2" | M8 | ! rowspan="2" | M8 | ||
| width="10px" | | | width="10px" | | ||
| align="left" | | | align="left" | Hydro Cannon (40s) | ||
| width="50px" rowspan="2" | | | width="50px" rowspan="2" | | ||
| rowspan="2" align="right" |[[Arquivo:AOE.png|AOE]] | | rowspan="2" align="right" | [[Arquivo:AOE.png|AOE]] [[Arquivo:Damage.png|Damage]] | ||
| rowspan="2" | [[Arquivo:Water.png|Water|link=Seavell]] | | rowspan="2" | [[Arquivo:Water.png|Water|link=Seavell]] | ||
|- align="center" | |- align="center" | ||
| Linha 216: | Linha 227: | ||
|- align="center" style="background-color: #E6E6FA;" | |- align="center" style="background-color: #E6E6FA;" | ||
! rowspan="2" | | ! rowspan="2" | M9 | ||
| width="10px" | | | width="10px" | | ||
| align="left" | | | align="left" | '''Surf (50s)''' | ||
| width="50px" rowspan="2" | | | width="50px" rowspan="2" | | ||
| rowspan="2" align="right" | [[Arquivo: | | rowspan="2" align="right" | [[Arquivo:AOE.png|AOE]] [[Arquivo:Damage.png|Damage]] | ||
| rowspan="2" | [[Arquivo:Water.png|Water|link=Seavell]] | | rowspan="2" | [[Arquivo:Water.png|Water|link=Seavell]] | ||
|- align="center" style="background-color: #E6E6FA;" | |- align="center" style="background-color: #E6E6FA;" | ||
| Linha 226: | Linha 237: | ||
| align="left" | | | align="left" | | ||
|- align="center" | |||
! rowspan="2" | P | |||
| width="10px" | | |||
| align="left" | Water Sport | |||
| width="50px" rowspan="2" | | |||
| rowspan="2" align="right" | [[Arquivo:Passive.png|Passive]] [[Arquivo:Buff.png|Buff]] | |||
| rowspan="2" | [[Arquivo:Water.png|Water|link=Seavell]] | |||
|- align="center" | |||
| width="10px" | | |||
| align="left" | Level 100 | |||
|} | |} | ||
Edição das 16h25min de 1 de junho de 2025
Informações Gerais
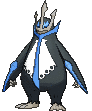
Nome: Shiny Empoleon
Level: 100
Elemento: Water/Steel
Habilidades: Dig, Rock Smash, Cut, Surf e Headbutt.
Boost: Water stone (2)
Materia: Seavell Mastered ou Ironhard Mastered.
Este Pokémon é EXCLUSIVO dos clãs Seavell e Ironhard em batalhas PvP.
Evoluções
Empoleon precisa de Level 100.
Descrição:
Os três chifres que estendem-se do bico atestam seu poder. O líder tem os maiores chifres..
Movimentos
Movimentos PvP
| M1 | Scrap Throw (15s) | ||||
|---|---|---|---|---|---|
| Level 100 | |||||
| M2 | Bubble (10s) | ||||
| Level 100 | |||||
| M3 | Bubble Beam (22s) | ||||
| Level 100 | |||||
| M4 | Water Pulse (25s) | ||||
| Level 100 | |||||
| M5 | Metal Claw (30s) | ||||
| Level 100 | |||||
| M6 | Liquidation (30s) | ||||
| Level 100 | |||||
| M7 | Flash Cannon (40s) | ||||
| Level 100 | |||||
| M8 | Hydro Cannon (40s) | ||||
| Level 100 | |||||
| M9 | Surf (65s) | ||||
| P | Water Sport | ||||
| Level 100 |
Movimentos PvE
| M1 | Scrap Throw (8s) | ||||
|---|---|---|---|---|---|
| Level 100 | |||||
| M2 | Bubble (8s) | ||||
| Level 100 | |||||
| M3 | Bubble Beam (15s) | ||||
| Level 100 | |||||
| M4 | Water Pulse (20s) | ||||
| Level 100 | |||||
| M5 | Metal Claw (50s) | ||||
| Level 100 | |||||
| M6 | Liquidation (22s) | ||||
| Level 100 | |||||
| M7 | Flash Cannon (40s) | ||||
| Level 100 | |||||
| M8 | Hydro Cannon (40s) | ||||
| Level 100 | |||||
| M9 | Surf (50s) | ||||
| P | Water Sport | ||||
| Level 100 |
Efetividades
Efetivo: Electric, fighting and ground.
Normal: Fire, grass, ghost, dark and crystal.
Inefetivo: Normal, water, flying, psychic, bug, rock, dragon and fairy.
Muito Inefetivo: Ice and steel.
Nulo: Poison.
Outras Versões
| Empoleon |