|
|
| Linha 1: |
Linha 1: |
| Renee
| | =Nightmare Brotherhood= |
| <center>[[Arquivo:Banner tower.jpg|link=Embedded Tower]]<br></center>
| |
|
| |
|
| | <center> [[Arquivo:Banner_Nightmare-Brotherhood.png|link=]] </center> <br> |
|
| |
|
|
| | *<p><font color="Purple">''' Nível Necessário:'''</font> 400 </p> |
| <span style="color:red">'''Nível Necessário:</span> - <br> | |
| <span style="color:red">'''Nível Recomendado:</span> 150+ <br>
| |
| <span style="color:red">'''Recompensa:</span> - (imagem do painel de recompensas da torre)
| |
|
| |
|
| <b>Caso encontre algum erro ou queira acrescentar alguma informação,</b> <span style="color:red">'''entre em contato com um dos membros da wiki.</span> | | *<p><font color="Purple">''' Recompensa:''' </font> Variable EXP, Variable EXP NW, X-Upgrade (Tier: 7), Held Ticket (Tier: 7), X-Upgrade (Tier: 8), Powered Boost Stones. </p> |
|
| |
|
| |
|
| | <p><b>Caso encontre algum erro ou queira acrescentar alguma informação,</b> '''entre em contato com [[Nossa Equipe|um dos membros da wiki.]]'''</p> |
|
| |
|
| ==<b>Como conseguir acesso a Embedded Tower?</b>== <!--T:4--> | | ==Introdução== |
|
| |
|
| |
|
| Primeiramente você deve ir até Phenac e falar com o Professor Syncamore. Ele dirá que está fazendo uma pesquisa na torre e que não conseguiu avançar por causa da existência de Pokémon com uma força maior que o normal. Em seguida, ele conta que o último pesquisador que entrou na torre se machucou ao sair e que não havia mais ninguém para enviar. Ele irá propor um acordo oferecendo uma premiação caso você consiga ajudá-lo.
| | Não são apenas os Pokémon que sofrem com os efeitos do '''Darkrai'''. |
|
| |
|
|
| | Aos poucos, cada uma das resistências começaram a divulgar relatos de pessoas agindo de forma estranha, em alguns casos sendo '''agressivas''' e destruindo tudo por perto. Comparando as informações recebidas, chegaram a conclusão de que as pessoas possuídas eram justamente as que tinham saído das resistências para realizar alguma tarefa em campo aberto. Essas pessoas acabaram sendo '''corrompidas''', e tudo que conseguem ver são pesadelos. Justamente por isso elas agem como servas de '''Darkrai''', e são agressivas com quem chega perto. |
| <center>[[Arquivo:Syncamore12.jpg|link=Embedded_Tower]]</center>
| |
|
| |
|
|
| | Com receio dessas pessoas contagiarem outras e acabar criando uma epidemia, os líderes das resistências decidiram neutralizar os treinadores que estivessem sob esse efeito. Pra organizar uma equipe preparada para essa ação, Vital Hook resolveu reativar a antiga '''Brotherhood''' que manteve durante anos. Só que agora o foco é encontrar e derrotar '''duelistas corrompidos''' antes que eles causem problemas. |
| *Após isso, o Professor irá pedir para que você fale com um de seus pesquisadores que está no deserto ao leste de Phenac, fazendo pesquisas. O nome dele é Barry e ele irá te ajudar a entrar na torre.
| |
|
| |
|
|
| | ==Iniciando a Quest== |
| <center>[[Arquivo:Barry.png|link=Embedded_Tower]]</center>
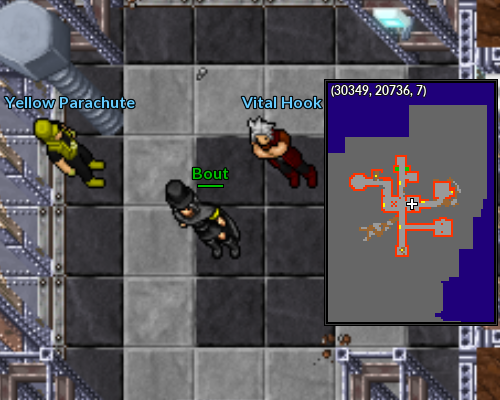
| | Para ingressar na Brotherhood é preciso ir até a resistência de Cinnabar na '''Nightmare World''', e falar com o '''Vital Hook''', que fica ao lado do '''Yellow Parachute''', como mostra na imagem abaixo: |
|
| |
|
| | <center>[[Arquivo:Local VitalHook.png|link=]]</center> |
|
| |
|
|
| | Ele contará que alguns treinadores saíram das resistências e não voltaram, foi descoberto que esses treinadores foram corrompidos por '''Darkrai''', sua missão será derrotá-los para que não causem problemas às resistências. |
| *Barry pedirá que você encontre a sua mochila que poderá estar em um destes locais:
| |
|
| |
|
| <center>
| | ==Aceitando um Contrato== |
| {| class="wikitable" width="60%"
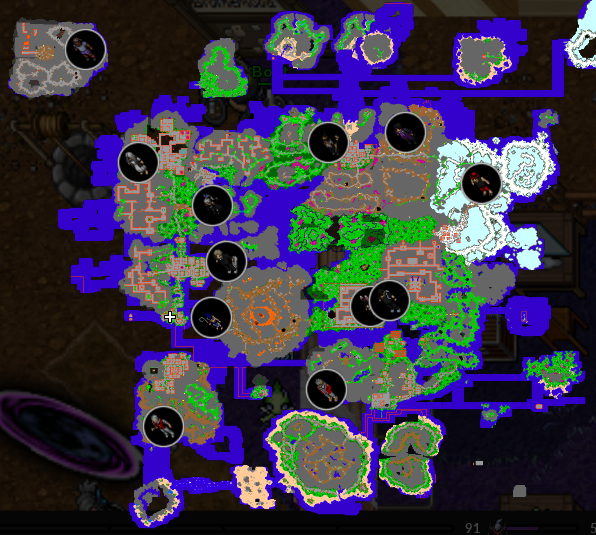
| | Em cada Resistência da Nightmare World, existe um quadro responsável por informar a localização de todos NPCs ativos no momento, ao clicar no quadro será aberto o mapa mostrando os 12 NPCs que estão ativos no momento.<br> |
| ! width="31%" style="background-color: #483D8B" | <span style="color:white">Possíveis locais onde a bag pode aparecer ou já foi encontrada:</span>
| | |
| | width="3%" style="border-top-style: hidden; border-width: 1px; border-bottom-style: hidden; border-width: 1px" |
| | <center>[[Arquivo:Quadro_bh.png|link=]]</center> |
| ! width="32%" style="background-color: #483D8B" | <span style="color:white">Possíveis locais onde a bag pode aparecer ou já foi encontrada:</span>
| | |
| |- align="center"
| | <span style="color: red;">'''Observações:'''</span> |
| | [[Arquivo:Possivel 1.png|link=Embedded Tower]]
| | * Há 48 possíveis localizações de NPCs pelo mapa da Nightmare World. |
| | width="4%" style="border-top-style: hidden; border-width: 1px; border-bottom-style: hidden; border-width: 1px" |
| | * Há um total de 24 Localizações de NPC ativos simultaneamente. |
| | [[Arquivo:Possivel 2.png|link=Embedded Tower]]
| | * Apenas 12 dessas localizações ativas aparecem para o jogador, sendo dividido em dois "grupos" de jogadores os 24 NPCs. |
| |-
| | * É possível encontrar até 4 NPCs nas proximidades de cada resistência. |
| | height="30px" style="border-left-style: hidden; border-width: 1px; border-right-style: hidden; border-width: 1px" |
| | * Só é possível derrotar até 2 NPCs por resistência. |
| |-
| | * O limite diário de NPCs derrotados é 6. |
| ! style="background-color: #483D8B" | <span style="color:white">Possíveis locais onde a bag pode aparecer ou já foi encontrada:</span>
| | |
| | style="border-top-style: hidden; border-width: 1px; border-bottom-style: hidden; border-width: 1px" |
| | |
| ! style="background-color: #483D8B" | <span style="color:white">Possíveis locais onde a bag pode aparecer ou já foi encontrada:</span>
| | |
| |- align="center"
| | <center>[[Arquivo:Mapa NPCs BH.png|link=]]</center> |
| | [[Arquivo:Possivel 3.png|link=Embedded Tower]]
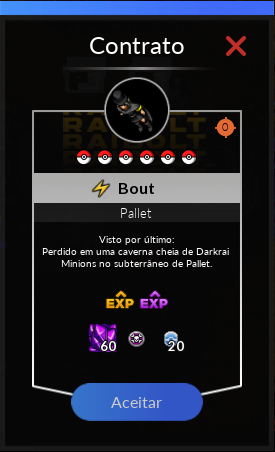
| | Ao selecionar um dos NPCs, será aberto uma janela informando as seguintes informações: |
| | width="4%" style="border-top-style: hidden; border-width: 1px; border-bottom-style: hidden; border-width: 1px" |
| |
| | [[Arquivo:Possivel 4.png|link=Embedded Tower]]
| |
| |-
| |
| | height="30px" style="border-left-style: hidden; border-width: 1px; border-right-style: hidden; border-width: 1px" |
| |
| |-
| |
| ! style="background-color: #483D8B" | <span style="color:white">Possíveis locais onde a bag pode aparecer ou já foi encontrada:</span>
| |
| | style="border-top-style: hidden; border-width: 1px; border-bottom-style: hidden; border-width: 1px" |
| |
| ! style="background-color: #483D8B" | <span style="color:white">Possíveis locais onde a bag pode aparecer ou já foi encontrada:</span>
| |
| |- align="center"
| |
| | [[Arquivo:Possivel 5.png|link=Embedded Tower]]
| |
| | width="4%" style="border-top-style: hidden; border-width: 1px; border-bottom-style: hidden; border-width: 1px" |
| |
| | [[Arquivo:Possivel 6.png|link=Embedded Tower]]
| |
| |-
| |
| | height="30px" style="border-left-style: hidden; border-width: 1px; border-right-style: hidden; border-width: 1px" |
| |
| |-
| |
| ! style="background-color: #483D8B" | <span style="color:white">Possíveis locais onde a bag pode aparecer ou já foi encontrada:</span>
| |
| | style="border-top-style: hidden; border-width: 1px; border-bottom-style: hidden; border-width: 1px" |
| |
| ! style="background-color: #483D8B" | <span style="color:white">Possíveis locais onde a bag pode aparecer ou já foi encontrada:</span>
| |
| |- align="center"
| |
| | [[Arquivo:Possivel 7.png|link=Embedded Tower]]
| |
| | width="4%" style="border-top-style: hidden; border-width: 1px; border-bottom-style: hidden; border-width: 1px" |
| |
| | [[Arquivo:Possivel 8.png|link=Embedded Tower]]
| |
| |-
| |
| |}
| |
|
| |
|
| </center>
| | * A recompensa que o jogador receberá ao derrotá-lo; |
|
| | * O local em que o NPC foi visto por último (você pode usar esta informação para saber a localização precisa do NPC); |
| *Depois disto, retorne ao Berry para entregar a sua mochila e ele lhe entregará o Sky Pillar emblem: | | * O clan do NPC; |
| | * A quantidade de pokémon que ainda estão vivos do NPC; |
| | * A quantidade de pessoas que tem esse contrato ativo; |
|
| |
|
|
| | Para aceitar um contrato, basta clicar em "aceitar" como mostra na imagem abaixo: <br> |
| <center>[[Arquivo:Sky Pillar emblem1.png|link=Embedded_Tower]]</center>
| |
|
| |
|
| | <center>[[Arquivo:Contrato Brotherhood.png|link=]]</center><br> |
|
| |
|
| *Conversando com o NPC Professor Sycamore, ele irá continuar a história da Embedded Tower e liberando-a, assim como pedir para que você recupere alguns fragmentos do artefato de cada um dos andares da Tower.
| | Ao aceitar um contrato pode ocorrer dele estar em um andar diferente do qual o jogador está, no mapa será informado da seguinte forma:<br> |
|
| |
|
| ==<b>Funcionamento Geral da Embbeded Tower</b>== <!--T:26-->
| |
| A Tower é um conteúdo semanal, sendo possível realizar a qualquer momento durante toda semana, resetando sempre toda '''Segunda Feira ás 07:40'''. o sistema possui 15 tentativas semanais, sendo consumidas ao entrar porém o numero de tentativas consumidas pela tower varia de acordo com os andares, em caso de falha na torre o sistema devolve algumas tentativas variando conforme tabela abaixo:
| |
|
| |
| <center> | | <center> |
| {| class="wikitable" width="31%" | | {| width="30%" |
| ! width="4%" style="background-color: #483D8B" | <span style="color:white">Andar</span> | | ! [[Arquivo:Andar Acima.gif|link=]] |
| ! width="7%" style="background-color: #483D8B" | <span style="color:white">Tentativas Necessárias</span>
| | ! [[Arquivo:Andar Baixo BH.gif|link=]] |
| ! width="7%" style="background-color: #483D8B" | <span style="color:white">Tentativas Devolvidas</span> | |
| |-
| |
| | align="center" | '''1° ao 5º Andar'''
| |
| | align="center" | '''2 Tentativas''' | |
| | align="center" | '''1 Tentativa'''
| |
| |-
| |
| | align="center" | '''6º Andar'''
| |
| | align="center" | '''6 Tentativas'''
| |
| | align="center" | '''4 Tentativas'''
| |
| |-
| |
| | align="center" | '''7º Andar'''
| |
| | align="center" | '''8 Tentativas'''
| |
| | align="center" | '''6 Tentativas'''
| |
| |- | | |- |
| | | align="center" |Andar acima |
| | | align="center" |Andar abaixo |
| |} | | |} |
| </center> | | </center> |
|
| |
|
| Os andares possuem uma experiência variada e uma pontuação fixa sendo os Tower Points ('''[[Arquivo:Tower Points.png|29px|link=]]''') do 1° ao 5º Andar e Wish Points ('''[[Arquivo:Wish_Points.png|22px|link=]]''') no 6º Andar e 7º Andar.
| | <tabber> |
| | |-|NPC Normal= |
| | |
| | Os NPCs normais sempre serão os players do Top 100 do servidor.<br> |
| | A outfit usada pelos NPCs será a última Outfit utilizada pelo respectivo treinador.<br> |
|
| |
|
| | <center>'''Esses NPCs sempre utilizarão pokémon aleatórios de acordo com essa lista:'''</center> |
| <center> | | <center> |
| {| class="wikitable" width="41%" | | {| class="wikitable" width="50%" |
| ! width="4%" style="background-color: #483D8B" | <span style="color:white">Andar</span> | | ! width="1%" style="background-color: #660099" | Clã |
| ! width="8%" style="background-color: #483D8B" | <span style="color:white">Experiência Obtida [[Arquivo:XP Normal.png|26px|link=]]</span>
| | ! width="9%" style="background-color: #660099" | Pokémon usados |
| ! width="7%" style="background-color: #483D8B" | <span style="color:white"> Pontos </span> | |
| |-
| |
| | align="center" | '''1° Andar'''
| |
| | align="center" | ''' Nivel 1 ao 424 150.000 de XP '''<br> '''Nivel 425 ao 449 37.500 de XP '''<br> '''Nivel 450 ao 600 18.750 de XP '''
| |
| | align="center" | '''[[Arquivo:Tower Points.png|29px|link=]]'''<br> '''40 Tower Points '''
| |
| |-
| |
| | align="center" | '''2° Andar'''
| |
| | align="center" | '''Nivel 1 ao 424 200.000 de XP '''<br> '''Nivel 425 ao 449 50.000 de XP '''<br> '''Nivel 450 ao 600 25.000 de XP '''
| |
| | align="center" | '''[[Arquivo:Tower Points.png|29px|link=]]'''<br> '''80 Tower Points '''
| |
| |-
| |
| | align="center" | '''3° Andar'''
| |
| | align="center" | '''Nivel 1 ao 424 250.000 de XP '''<br> '''Nivel 425 ao 449 62.500 de XP '''<br> '''Nivel 450 ao 600 31.250 de XP '''
| |
| | align="center" | '''[[Arquivo:Tower Points.png|29px|link=]]'''<br> '''120 Tower Points '''
| |
| |- | | |- |
| | | align="center" | [[Arquivo:Ironhard1.png|link=]] |
| | | align="center" |[[Arquivo:395-Empoleon.png|link=Empoleon]] [[Arquivo:208-Steelix.png|link=Steelix]] [[Arquivo:212-MegaScizor.png|link=Mega Scizor]] [[Arquivo:227-Skarmory.png|link=Skarmory]] [[Arquivo:303-Mawile.png|link=Mawile]] [[Arquivo:376-Metagross.png|link=Metagross]] [[Arquivo:411-Bastiodon.png|link=Bastiodon]] [[Arquivo:437-Bronzong.png|link=Bronzong]] [[Arquivo:095-CrystalOnix.png|link=Crystal Onix]] [[Arquivo:462-Magnezone.png|link=Magnezone]] |
| |- | | |- |
| | align="center" | '''4° Andar''' | | | align="center" |[[Arquivo:Gardestrike1.png|link=]] |
| | align="center" | '''Nivel 1 ao 424 300.000 de XP '''<br> '''Nivel 425 ao 449 75.000 de XP '''<br> '''Nivel 450 ao 600 37.500 de XP ''' | | | align="center" |[[Arquivo:062-Poliwrath.png|link=Poliwrath]] [[Arquivo:068-Sh_Machamp.png|link=Shiny Machamp]] [[Arquivo:128-shTauros.png|link=Shiny Tauros]] [[Arquivo:040-Wigglytuff.png|link=Wigglytuff]] [[Arquivo:143-Snorlax.png|link=Snorlax]] [[Arquivo:203-Girafarig.png|link=Girafarig]] [[Arquivo:Heracross.png|link=Heracross]] [[Arquivo:217-Ursaring.png|link=Ursaring]] [[Arquivo:257-MegaBlaziken.png|link=Mega Blaziken]] [[Arquivo:286-Breloom.png|link=Breloom]] [[Arquivo:289-Slaking.png|link=Slaking]] [[Arquivo:297-Hariyama.png|link=Hariyama]] [[Arquivo:308-Medicham.png|link=Medicham]] [[Arquivo:660-Diggersby.png|link=Diggersby]] |
| | align="center" | '''[[Arquivo:Tower Points.png|29px|link=]]'''<br> '''160 Tower Points ''' | |
| |- | | |- |
| | | align="center" |[[Arquivo:Malefi1c.png|link=]] |
| | | align="center" |[[Arquivo:Sgengar.png|link=Shiny Gengar]] [[Arquivo:169-Sh Crobat.png|link=Shiny Crobat]] [[Arquivo:248-Tyranitar.png|link=Tyranitar]] [[Arquivo:429-Mismagius.png|link=Mismagius]] [[Arquivo:275-Shiftry.png|link=Shiftry]] [[Arquivo:359-MegaAbsol.png|link=Mega Absol]] [[Arquivo:342-Crawdaunt.png|link=Crawdaunt]] [[Arquivo:262-Mightyena.png|link=Mightyena]] [[Arquivo:454-Toxicroak.png|link=Toxicroak]] [[Arquivo:477-Dusknoir.png|link=Dusknoir]] |
| |- | | |- |
| | align="center" | '''5° Andar''' | | | align="center" |[[Arquivo:Naturia1.png|link=]] |
| | align="center" | '''Nivel 1 ao 424 600.000 de XP '''<br> '''Nivel 425 ao 449 150.000 de XP '''<br> '''Nivel 450 ao 600 75.000 de XP ''' | | | align="center" |[[Arquivo:Pinsir.png|link=Pinsir]] [[Arquivo:Sh_venu.png|link=Shiny Venusaur]] [[Arquivo:Exeggutor.png|link=Exeggutor]] [[Arquivo:Sh_tangela.png|link=Shiny Tangela]] [[Arquivo:Scyther.png|link=Scyther]] [[Arquivo:212-MegaScizor.png|link=Mega Scizor]] [[Arquivo:402.ShinyKricketune.png|link=Shiny Kricketune]] [[Arquivo:275-Shiftry.png|link=Shiftry]] [[Arquivo:Tang.png|link=Tangrowth]] [[Arquivo:Abomas.png|link=Abomasnow]] |
| | align="center" | '''[[Arquivo:Tower Points.png|29px|link=]]'''<br> '''500 Tower Points ''' <br> '''300 Tower Points ''' | |
| |- | | |- |
| | | align="center" |[[Arquivo:Orebound1.png|link=]] |
| | | align="center" |[[Arquivo:105-Sh_Marowak.png|link=Shiny Marowak]] [[Arquivo:208-Steelix.png|link=Steelix]] [[Arquivo:219-Magcargo.png|link=Magcargo]] [[Arquivo:142-Aerodactyl.png|link=Aerodactyl]] [[Arquivo:260-Swampert.png|link=Swampert]] [[Arquivo:248-Tyranitar.png|link=Tyranitar]] [[Arquivo:346-Cradily.png|link=Cradily]] [[Arquivo:348-Armaldo.png|link=Armaldo]] [[Arquivo:464-Rhyperior.png|link=Rhyperior]] [[Arquivo:Shinygol.png|link=Shiny Golem]] |
| |- | | |- |
| | align="center" | '''6° Andar''' | | | align="center" |[[Arquivo:Psycraft1.png|link=]] |
| | align="center" | '''Nivel 450 ao 600 1.000.000 de XP ''' | | | align="center" |[[Arquivo:065-shAlakazam.png|link=Shiny Alakazam]] [[Arquivo:700-Sh Sylveon.png|link=Shiny Sylveon]] [[Arquivo:103-Exeggutor.png|link=Exeggutor]] [[Arquivo:124-shJynx.png|link=Shiny Jynx]] [[Arquivo:184-Shiny-Azumarill.png|link=Shiny Azumarill]] [[Arquivo:203-Girafarig.png|link=Girafarig]] [[Arquivo:282-MegaGardevoir.png|link=Mega Gardevoir]] [[Arquivo:308-Medicham.png|link=Medicham]] [[Arquivo:437-Bronzong.png|link=Bronzong]] [[Arquivo:468-Togekiss.png|link=Togekiss]] |
| | align="center" | '''[[Arquivo:Wish_Points.png|22px|link=]]''' <br> '''50 Wish Points ''' | |
| |- | | |- |
| | | align="center" |[[Arquivo:Raibol1t.png|link=]] |
| | | align="center" |[[Arquivo:026-Sh_Raichu.png|link=Shiny Raichu]] [[Arquivo:026-AlolanRaichu.png|link=Alolan Raichu]] [[Arquivo:125-Sh_Electabuzz.png|link=Shiny Electabuzz]] [[Arquivo:171-Lanturn.png|link=Lanturn]] [[Arquivo:181-MegaAmpharos.png|link=Mega Ampharos]] [[Arquivo:462-Magnezone.png|link=Magnezone]] [[Arquivo:466-Electivire.png|link=Electivire]] [[Arquivo:479-Rotom.png|link=Rotom]] [[Arquivo:523-Zebstrika.png|link=Zebstrika]] [[Arquivo:587-Emolga.png|link=Emolga]] [[Arquivo:596-Galvantula.png|link=Galvantula]] |
| |- | | |- |
| | align="center" | '''7° Andar''' | | | align="center" |[[Arquivo:Seave1ll.png|link=]] |
| | align="center" | '''Nivel 525 ao 600 6.000.000 de XP ''' | | | align="center" |[[Arquivo:SshBlastoise.png|link=Shiny Blastoise]] [[Arquivo:478-Froslass.png|link=Froslass]] [[Arquivo:JYNX.png|link=Jynx]] [[Arquivo:130-Gyarados.png|link=Gyarados]] [[Arquivo:473-Mamoswine.png|link=Mamoswine]] [[Arquivo:160-shFeraligatr.png|link=Shiny Feraligatr]] [[Arquivo:226-Mantine.png|link=Mantine]] [[Arquivo:Ludicolo.png|link=Ludicolo]] [[Arquivo:350-Milotic.png|link=Milotic]] [[Arquivo:362-Glalie.png|link=Glalie]] |
| | align="center" | '''[[Arquivo:Wish_Points.png|22px|link=]]''' <br> '''150 Wish Points ''' | |
| |- | | |- |
| | | align="center" |[[Arquivo:Volcanic1.png|link=]] |
| | | align="center" |[[Arquivo:668-Pyroar_Female.png|link=Pyroar_Female]] [[Arquivo:006-shCharizard.png|link=Shiny Charizard]] [[Arquivo:038-Ninetales.png|link=Ninetales]] [[Arquivo:059-Arcanine.png|link=Arcanine]] [[Arquivo:609-Chandelure.png|link=Chandelure]] [[Arquivo:157-Sh Typhlosion.png|link=Shiny Typhlosion]] [[Arquivo:Megahoundoom.png|link=Mega Houndoom]] [[Arquivo:257-Blaziken.png|link=Blaziken]] [[Arquivo:323-Camerupt.png|link=Camerupt]] [[Arquivo:467-Magmortar.png|link=Magmortar]] |
| |- | | |- |
| | | align="center" |[[Arquivo:Wingeon1.png|link=]] |
| | | align="center" |[[Arquivo:018-shPidgeot.png|link=Shiny Pidgeot]] [[Arquivo:130-Gyarados.png|link=Gyarados]] [[Arquivo:148-Sh_Dragonair.png|link=Shiny Dragonair]] [[Arquivo:149-Dragonite.png|link=Dragonite]] [[Arquivo:169-Crobat.png|link=Crobat]] [[Arquivo:227-Skarmory.png|link=Skarmory]] [[Arquivo:330-Flygon.png|link=Flygon]] [[Arquivo:334-Altaria.png|link=Altaria]] [[Arquivo:373-Salamence.png|link=Salamence]] [[Arquivo:472-Gliscor.png|link=Gliscor]] |
| |} | | |} |
| </center> | | </center> |
|
| |
|
| == <b>Tower Points e Wish Points</b>==
| | Recompensas individuais para cada NPC derrotado: |
| Tower Points ('''[[Arquivo:Tower Points.png|29px|link=]]''') são usados para Liberar os Andares e para resgastes através do mural, o desbloqueio dos andares varia de acordo com cada andar.
| | |
| <center> | | <center> |
| {| class="wikitable" width="25%" | | {| class="wikitable" width="50%" |
| ! width="3%" style="background-color: #483D8B" | <span style="color:white">Item</span> | | !Level |
| ! width="3%" style="background-color: #483D8B" | <span style="color:white">Pontos Necessários</span> | | !Recompensa |
| | |
| |-
| |
| | align="center" | '''[[Arquivo:Shinysalamence.png|Shiny Salamence|link=]] ''' <br>'''1º Andar'''</br>
| |
| | align="center" | '''Liberado'''
| |
| |-
| |
| |-
| |
| | align="center" | '''[[Arquivo:Shinymagmortar.png|Shiny Magmortar|link=]]''' '''2º Andar'''
| |
| | align="center" | '''Liberado'''
| |
| |-
| |
| |-
| |
| | align="center" | '''[[Arquivo:Shinyelectivire.png|Shiny Electivire|link=]]''' '''3º Andar'''
| |
| | align="center" | '''Liberado'''
| |
| |-
| |
| |-
| |
| | align="center" | '''[[Arquivo:Shinyscizor.png|Shiny Scizor|link=]]''' '''4º Andar'''
| |
| | align="center" | '''Liberado'''
| |
| |-
| |
| |-
| |
| | align="center" | '''[[Arquivo:Regis.png|Regigigas, Regirock, Registeel e Regice|link=]]''' <br>'''5º Andar'''</br>
| |
| | align="center" | '''300 Tower Points'''
| |
| |-
| |
| |-
| |
| | align="center" | '''[[Arquivo:Groudon_e_Kyogre.png|Groudon e Kyogre|link=]]''' '''6º Andar'''
| |
| | align="center" | '''600 Tower Points'''
| |
| |- | | |- |
| | |align="center" |400-424 |
| | |align="center" |[[Arquivo:Exp icon.png|30px|link=]] 400.000 <br> [[Arquivo:Exp icon nw.png|30px|link=]] 900 <br> [[Arquivo:Nightmare_Token.png|link=]] 1 Nightmare Token <br> [[Arquivo:Mighttoken.png|link=]] 20 Might Tokens <br> [[Arquivo:Nightmare_Gem.png|link=]] 60 Nightmare Gems |
| |- | | |- |
| | align="center" | '''[[Arquivo:Rayquaza.png|Rayquaza|link=]]''' '''7º Andar''' | | |align="center" |425-499 |
| | align="center" | '''1200 Tower Points''' | | |align="center" |[[Arquivo:Exp icon.png|30px|link=]] 200.000 <br> [[Arquivo:Exp icon nw.png|30px|link=]] 900 <br> [[Arquivo:Nightmare_Token.png|link=]] 1 Nightmare Token <br> [[Arquivo:Mighttoken.png|link=]] 20 Might Tokens <br> [[Arquivo:Nightmare_Gem.png|link=]] 60 Nightmare Gems |
| |- | | |- |
| | |align="center" |500+ |
| | |align="center" |[[Arquivo:Exp icon.png|30px|link=]] 100.000 <br> [[Arquivo:Exp icon nw.png|30px|link=]] 900 <br> [[Arquivo:Nightmare_Token.png|link=]] 1 Nightmare Token <br> [[Arquivo:Mighttoken.png|link=]] 20 Might Tokens <br> [[Arquivo:Nightmare_Gem.png|link=]] 60 Nightmare Gems |
| |} | | |} |
| </center> | | </center> |
| As recompensas da torre diferente de outros conteúdos, não te limitam a finalizar todos os andares para resgatar sua recompensa, exceto no 6° e 7° andar, no qual é necessário ter finalizado o 7° andar pelo menos uma vez para ter acesso as recompensas.
| |
|
| |
|
| <center><b>Possiveis Resgates com Tower Points</b> | | |-|NPC Lendário= |
| | |
| | |
| | Os NPCs lendários também possuem um clã específico, porém utilizam sempre os mesmos pokémon, que são os que estão listados abaixo:<br><br> |
| | <span style="color: red;">'''Observação:'''</span> os contratos lendários são diferenciados dos comuns pela cor amarela. No minimapa, eles possuem um contorno amarelo ao redor do NPC, e na interface de contrato é possível ver grandes detalhes em amarelo. |
|
| |
|
| {| class="wikitable" width="30%" | | <center> |
| ! width="3%" style="background-color: #483D8B" | <span style="color:white">Item</span> | | {| class="wikitable" width="50%" |
| ! width="3%" style="background-color: #483D8B" | <span style="color:white">Pontos Necessários</span> | | ! width="1%" style="background-color: #660099" | NPC |
| ! width="1%" style="background-color: #483D8B" | <span style="color:white">Possível Vender</span> | | ! width="1%" style="background-color: #660099" | Nome |
| | ! width="1%" style="background-color: #660099" | Clã |
| | ! width="9%" style="background-color: #660099" | Pokémon usado |
| |- | | |- |
| | | align="center" |[[Arquivo:Bugsy_2.png|Bugsy|link=]] |
| | | align="center" | Bugsy |
| | | align="center" |[[Arquivo:Naturia1.png|link=]] |
| | | align="center" |[[Arquivo:123-Sh_Scyther.png|link=Shiny Scyther]][[Arquivo:012-Sh_Butterfree.png|link=Shiny Butterfree]][[Arquivo:015-Sh_Beedrill.png|link=Shiny Beedrill]][[Arquivo:Scizor.png|link=Scizor]][[Arquivo:213-Sh_Shuckle.png|link=Shiny Shuckle]][[Arquivo:127-Sh_Pinsir.png|link=Shiny Pinsir]] |
| |- | | |- |
| | align="center" | [[Arquivo:GUc8LUi.png|Mystic Star|link=]] '''Mystic Star''' | | | align="center" |[[Arquivo:Whitney.png|Whitney|link=]] |
| | align="center" | '''300 Pontos''' | | | align="center" | Whitney |
| | align="center" | '''[[Arquivo:Comvip.png|link=]]''' | | | align="center" |[[Arquivo:Gardestrike1.png|link=]] |
| | | align="center" |[[Arquivo:463-Lickilicky.png|link=Lickilicky]] [[Arquivo:203-Girafarig.png|link=Girafarig]] [[Arquivo:036-Clefable.png|link=Clefable]] [[Arquivo:241-Miltank.png|link=Miltank]] [[Arquivo:Shiny_miltank.png|link=Shiny Miltank]] [[Arquivo:217-Ursaring.png|link=Ursaring]] |
| |- | | |- |
| | | align="center" |[[Arquivo:Clair.png|Clair|link=]] |
| | | align="center" | Clair |
| | | align="center" |[[Arquivo:Wingeon1.png|link=]] |
| | | align="center" |[[Arquivo:148-Sh_Dragonair.png|link=Shiny Dragonair]] [[Arquivo:230-Kingdra.png|link=Kingdra]] [[Arquivo:130-RedGyarados.png|link=Shiny Gyarados]] [[Arquivo:006-shCharizard.png|link=Shiny Charizard]] [[Arquivo:149-Dragonite.png|link=Dragonite]] [[Arquivo:445-Garchomp.png|link=Garchomp]] |
| |- | | |- |
| | align="center" |[[Arquivo:Teleport_Tower.png|30px|link=]] ''' Teleport Tower ''' | | | align="center" |[[Arquivo:Brawly.png|Brawly|link=]] |
| | align="center" | '''1000 Pontos''' | | | align="center" | Brawly |
| | align="center" | '''[[Arquivo:Semvip.png|link=]]''' | | | align="center" |[[Arquivo:Gardestrike1.png|link=]] |
| | | align="center" |[[Arquivo:068-Sh_Machamp.png|link=Shiny Machamp]] [[Arquivo:297-Hariyama.png|link=Hariyama]] [[Arquivo:308-Medicham.png|link=Medicham]] [[Arquivo:237-EliteHitmontop.png|link=Elite Hitmontop]] [[Arquivo:107-Hitmonchan.png|link=Elite Hitmonchan]] [[Arquivo:Elite_Hitmonlee.png|link=Elite Hitmonlee]] |
| |- | | |- |
| | | align="center" |[[Arquivo:Norman.png|Norman|link=]] |
| | | align="center" | Norman |
| | | align="center" |[[Arquivo:Gardestrike1.png|link=]] |
| | | align="center" |[[Arquivo:289-Slaking.png|link=Slaking]] [[Arquivo:113-Chansey.png|link=Chansey]] [[Arquivo:115-Kangaskhan.png|link=Kangaskhan]] [[Arquivo:242-Blissey.png|link=Blissey]] [[Arquivo:128-shTauros.png|link=Shiny Tauros]] [[Arquivo:335-Zangoose.png|link=Zangoose]] |
| | |- |
| | | align="center" |[[Arquivo:Ritchie.png|Ritchie|link=]] |
| | | align="center" | Ritchie |
| | | align="center" |[[Arquivo:Raibol1t.png|link=]] |
| | | align="center" |[[Arquivo:026-Sh_Raichu.png|link=Shiny Raichu]] [[Arquivo:006-shCharizard.png|link=Shiny Charizard]] [[Arquivo:247-Sh_Pupitar.png|link=Shiny Pupitar]] [[Arquivo:277-Swellow.png|link=Swellow]] [[Arquivo:Shinyfea.png|link=Shiny Fearow]] [[Arquivo:073-Sh_Tentacruel.png|link=Shiny Tentacruel]] |
| |- | | |- |
| | align="center" | [[Arquivo:Flying_License.png|Flying License|link=]]'''Flying License''' | | | align="center" |[[Arquivo:Jon_snow.png|Jon Snow|link=]] |
| | align="center" | '''1500 Pontos''' | | | align="center" | Jon Snow |
| | align="center" | '''[[Arquivo:Semvip.png|link=]]''' | | | align="center" |[[Arquivo:Wingeon1.png|link=]] |
| | | align="center" |[[Arquivo:059-Sh_Arcanine.png|link=Shiny Arcanine]] [[Arquivo:262-Mightyena.png|link=Mightyena]] [[Arquivo:006-shCharizard.png|link=Shiny Charizard]] [[Arquivo:149-Dragonite.png|link=Dragonite]] [[Arquivo:461.png|link=Weavile]] [[Arquivo:038-Sh_Ninetales.png|link=Shiny Ninetales]] |
| |- | | |- |
| | | align="center" |[[Arquivo:Daenerys.png|Daenerys|link=]] |
| | | align="center" | Daenerys |
| | | align="center" |[[Arquivo:Wingeon1.png|link=]] |
| | | align="center" |[[Arquivo:445-Garchomp.png|link=Garchomp]] [[Arquivo:373-Salamence.png|link=Salamence]] [[Arquivo:149-Dragonite.png|link=Dragonite]] [[Arquivo:148-Sh_Dragonair.png|link=Shiny Dragonair]][[Arquivo:006-shCharizard.png|link=Shiny Charizard]] [[Arquivo:006-MegaCharizardX.png|link=Mega Charizard X]] |
| |- | | |- |
| | align="center" | [[Arquivo:Smeargle_Reset.png|Smeargle Reset|link=]] ''' Smeargle Reset ''' | | | align="center" |[[Arquivo:Cynthia.png|Cynthia|link=]] |
| | align="center" | '''1500 Pontos''' | | | align="center" | Cynthia |
| | align="center" | '''[[Arquivo:Comvip.png|link=]]''' | | | align="center" |[[Arquivo:Wingeon1.png|link=]] |
| | | align="center" |[[Arquivo:471-Sh_Glaceon.png|link=Shiny Glaceon]] [[Arquivo:448-MegaLucario.png|link=Mega Lucario]] [[Arquivo:350-Milotic.png|link=Milotic]] [[Arquivo:445-Garchomp.png|link=Garchomp]] [[Arquivo:468-Togekiss.png|link=Togekiss]] [[Arquivo:604-Shiny_Eelektross.png|Shiny Eelektross|link=Raibolt]] |
| |- | | |- |
| | | align="center" |[[Arquivo:Steven.png|Steven|link=]] |
| | | align="center" | Steven |
| | | align="center" |[[Arquivo:Ironhard1.png|link=]] |
| | | align="center" |[[Arquivo:376-Metagross.png|link=Metagross]] [[Arquivo:Megametagross.png|link=Mega Metagross]] [[Arquivo:530-Excadrill.png|link=Excadrill]] [[Arquivo:344-Claydol.png|link=Claydol]] [[Arquivo:227-Skarmory.png|link=Skarmory]] [[Arquivo:306-MegaAggron.png|link=Mega Aggron]] |
| |- | | |- |
| | align="center" | [[Arquivo:Shiny_ditto_memory.png|Shiny Ditto Memory|link=]] ''' Shiny Ditto Memory ''' | | | align="center" |[[Arquivo:NPC Ramos.png|link=]] |
| | align="center" | '''3000 Pontos''' | | | align="center" | Ramos |
| | align="center" | '''[[Arquivo:Comvip.png|link=]]''' | | | align="center" |[[Arquivo:Naturia1.png]] |
| | | align="center" |[[Arquivo:673-Gogoat.png|link=Gogoat]] [[Arquivo:103-AlolanExeggutor.png|link=Alolan Exeggutor]] [[Arquivo:673-Shiny Gogoat.png|link=Shiny Gogoat]] [[Arquivo:189-Jumpluff.png|link=Jumpluff]] [[Arquivo:071-Shiny_Victreebel.png|link=]] [[Arquivo:Shinyvil.png|link=Shiny Vileplume]] |
| |- | | |- |
| | | align="center" | [[Arquivo:NPC Roxie.png|link=]] |
| | | align="center" | Roxie |
| | | align="center" |[[arquivo:Malefi1c.png|link=]] |
| | | align="center" |[[Arquivo:169-Sh Crobat.png|link=Shiny Crobat]] [[arquivo:452-Drapion.png|link=Drapion]] [[Arquivo:454-Toxicroak.png|link=Toxicroak]] [[Arquivo:849-Toxtricity.png|link=Toxtricity]] [[Arquivo:Shiny Weezing.png|link=Shiny Weezing]] [[Arquivo:569-Garbodor.png|link=Garbodor]] |
| |- | | |- |
| | align="center" | [[Arquivo:Embedded-Tower2.gif|Embedded Box|link=]] ''' Embedded Box ''' | | | align="center" | [[Arquivo:NPC Forrest.png|link=]] |
| | align="center" | '''18000 Pontos''' | | | align="center" | Forrest |
| | align="center" | '''[[Arquivo:Comvip.png|link=]]''' | | | align="center" | [[arquivo:Orebound1.png|link=]] |
| | | align="center" | [[Arquivo:464-Rhyperior.png|link=Rhyperior]] [[Arquivo:208-Steelix.png|link=Steelix]] [[Arquivo:Shinygol.png|link=Shiny Golem]] [[Arquivo:169-Sh Crobat.png|link=Shiny Crobat]] [[Arquivo:Shinyrh.png|link=Shiny Rhydon]] [[Arquivo:095-CrystalOnix.png|link=Crystal Onix]] |
| |- | | |- |
| | | align="center" | [[Arquivo:NPC Juan.png|link=]] |
| | | align="center" | Juan |
| | | align="center" | [[arquivo:Seave1ll.png|link=]] |
| | | align="center" | [[Arquivo:230-Kingdra.png|link=Kingdra]] [[Arquivo:365-Walrein.png|link=Walrein]] [[Arquivo:340-Whiscash.png|link=Whiscash]] [[Arquivo:186-shPolitoed.png|link=Shiny Politoed]] [[Arquivo:342-Crawdaunt.png|link=Crawdaunt]] [[Arquivo:350-Milotic.png|link=Milotic]] |
| |- | | |- |
| | | align="center" | [[Arquivo:NPC May.png|link=]] |
| | | align="center" | May |
| | | align="center" | [[arquivo:psycraft1.png|link=]] |
| | | align="center" | [[Arquivo:257-Blaziken.png|link=Blaziken]] [[Arquivo:531-MegaAudino.png|link=Mega Audino]] [[Arquivo:334-MegaAltaria.png|link=Mega Altaria]] [[Arquivo:344-Claydol.png|link=Claydol]] [[Arquivo:267-Shiny_Beautifly.png|link=Shiny_Beautifly]] [[Arquivo:471-Glaceon.png|link=Glaceon]] |
| |- | | |- |
| | align="center" | [[Arquivo:Tyranitarite.png|Tyranitarite|link=]] ''' Tyranitarite ''' | | | align="center" | [[Arquivo:NPC Brendan.png|link=]] |
| | align="center" | '''18000 Pontos''' | | | align="center" | Brendan |
| | align="center" | '''[[Arquivo:Comvip.png|link=]]''' | | | align="center" | [[arquivo:Volcanic1.png|link=]] |
| | | align="center" | [[Arquivo:254-Sceptile.png|link=Sceptile]] [[Arquivo:219-Sh Magcargo.png|link=Shiny Magcargo]] [[Arquivo:323-MegaCamerupt.png|link=Mega Camerupt]] [[Arquivo:324-Torkoal.png|link=Torkoal]] [[Arquivo:306-Aggron.png|link=Aggron]] [[Arquivo:277-Swellow.png|link=Swellow]] |
| | |} |
| | </center> |
| | |
| | Recompensas individuais para cada NPC Lendario derrotado: |
| | |
| | <center> |
| | {| class="wikitable" width="50%" |
| | !Level |
| | !Recompensa |
| |- | | |- |
| | |align="center" |400-424 |
| | |align="center" |[[Arquivo:Exp icon.png|30px|link=]] 800.000 <br> [[Arquivo:Exp icon nw.png|30px|link=]] 2.500 <br> [[Arquivo:Nightmare_Token.png|link=]] 5 Nightmare Token <br> [[Arquivo:Conquerortoken.png|link=]] 25 Conqueror Tokens <br> [[Arquivo:Cyan Nightmare Gem.png|link=]] 1 Nightmare Gems |
| |- | | |- |
| | align="center" | [[Arquivo:Venusaurite.png|Venusaurite|link=]] ''' Venusaurite ''' | | |align="center" |425-499 |
| | align="center" | '''18000 Pontos''' | | |align="center" |[[Arquivo:Exp icon.png|30px|link=]] 400.000 <br> [[Arquivo:Exp icon nw.png|30px|link=]] 2.500 <br> [[Arquivo:Nightmare_Token.png|link=]] 5 Nightmare Token <br> [[Arquivo:Conquerortoken.png|link=]] 25 Conqueror Tokens <br> [[Arquivo:Cyan Nightmare Gem.png|link=]] 1 Nightmare Gems |
| | align="center" | '''[[Arquivo:Comvip.png|link=]]''' | |
| |- | | |- |
| | |align="center" |500+ |
| | |align="center" |[[Arquivo:Exp icon.png|30px|link=]] 200.000 <br> [[Arquivo:Exp icon nw.png|30px|link=]] 2.500 <br> [[Arquivo:Nightmare_Token.png|link=]] 5 Nightmare Token <br> [[Arquivo:Conquerortoken.png|link=]] 25 Conqueror Tokens <br> [[Arquivo:Cyan Nightmare Gem.png|link=]] 1 Nightmare Gems |
| | |} |
| | </center> |
| | |
| | </tabber> |
| | ==Recompensas== |
| | |
| | <center> |
| | {| class="wikitable" width="80%" |
| | ! width="2%" style="background-color: #660099" | Quantidade de NPCs derrotados |
| | ! width="8%" style="background-color: #660099" | Recompensa |
| |- | | |- |
| | align="center" | [[Arquivo:Blastoisinite.png|Blastoisinite|link=]] ''' Blastoisinite ''' | | | align="center" | 400 |
| | align="center" | '''18000 Pontos''' | | | align="center" |[[Arquivo:X-Upgrade.gif|35px|link=]] X-Upgrade (Tier: 7), 6kk de experiência e 60k experiência Nightmare. |
| | align="center" | '''[[Arquivo:Comvip.png|link=]]'''
| |
| |- | | |- |
| | | align="center" | 800 |
| | | align="center" |[[Arquivo:Held_Item_Ticket_T7.png|link=]] Held item Ticket (Tier: 7) e [[Arquivo:Fightertokens.png|link=]] 10 Fighter Tokens, 7kk de experiência e 70k experiência Nightmare. |
| |- | | |- |
| | align="center" | [[Arquivo:Charizardite_Y.png|Charizardite Y|link=]] ''' Charizardite Y ''' | | | align="center" | 1200 |
| | align="center" | '''18000 Pontos''' | | | align="center" |[[Arquivo:X-Upgrade.gif|35px|link=]] X-Upgrade (Tier: 7), 8kk de experiência e 80k experiência Nightmare. |
| | align="center" | '''[[Arquivo:Comvip.png|link=]]'''
| |
| |- | | |- |
| | | align="center" | 1600 |
| | | align="center" |[[Arquivo:Held_Item_Ticket_T7.png|link=]] Held item Ticket (Tier: 7) e [[Arquivo:Fightertokens.png|link=]] 10 Fighter Tokens, 9kk de experiência e 90k experiência Nightmare. |
| |- | | |- |
| | align="center" | [[Arquivo:Charizardite_X.png|Charizardite X|link=]] ''' Charizardite X ''' | | | align="center" | 2000 |
| | align="center" | '''18000 Pontos''' | | | align="center" |[[Arquivo:X-Upgrade.gif|35px|link=]] X-Upgrade (Tier: 7), 10kk de experiência e 100k experiência Nightmare. |
| | align="center" | '''[[Arquivo:Comvip.png|link=]]'''
| |
| |-
| |
| |-
| |
| | align="center" | [[Arquivo:Alakazite.png|Alakazite|link=]] '''Alakazite'''
| |
| | align="center" | '''18000 Pontos'''
| |
| | align="center" | '''[[Arquivo:Comvip.png|link=]]'''
| |
| |-
| |
| |-
| |
| | align="center" | [[Arquivo:Ampharosite.png|Ampharosite|link=]] '''Ampharosite'''
| |
| | align="center" | '''18000 Pontos'''
| |
| | align="center" | '''[[Arquivo:Comvip.png|link=]]'''
| |
| |-
| |
| |-
| |
| | align="center" | [[Arquivo:Gengarite.png|Gengarite|link=]] '''Gengarite'''
| |
| | align="center" | '''18000 Pontos'''
| |
| | align="center" | '''[[Arquivo:Comvip.png|link=]]'''
| |
| |-
| |
| |-
| |
| | align="center" | [[Arquivo:Mawilite.png|Mawilite|link=]] '''Mawilite'''
| |
| | align="center" | '''18000 Pontos'''
| |
| | align="center" | '''[[Arquivo:Comvip.png|link=]]'''
| |
| |-
| |
| |-
| |
| | align="center" | [[Arquivo:Kangaskhanite.png|Kangaskhanite|link=]] '''Kangaskhanite'''
| |
| | align="center" | '''18000 Pontos'''
| |
| | align="center" | '''[[Arquivo:Comvip.png|link=]]'''
| |
| |- | | |- |
| | | align="center" | 2400 |
| | | align="center" |[[Arquivo:Held_Item_Ticket_T7.png|link=]] Held item Ticket (Tier: 7) e [[Arquivo:Fightertokens.png|link=]] 10 Fighter Tokens, 10kk de experiência e 100k experiência Nightmare. |
| |} | | |} |
| </center> | | </center> |
| | '''Obs.:''' Lembrando que a quantidade irá somar, portanto elas não são independentes. Ex: ao derrotar os 400, para 800 terá que derrotar mais 400 e não mais 800. |
| | |
| | ===Duelo com Vital Hook=== |
|
| |
|
| | Além destas recompensas, ao alcançar o marco de '''3000''' contratos derrotados, o jogador poderá desafiar o lendário treinador '''Vital Hook''' para um duelo. <br> Ele utilizará '''[[Arquivo:430-Shiny Honchkrow.png|link=Shiny_Honchkrow]] [[Shiny Honchkrow]], [[Arquivo:681-Aegislash.png|link=Aegislash]] [[Aegislash]], [[Arquivo:553-Krookodile.png|link=Krookodile]] [[Krookodile]], [[Arquivo:248-MegaTyranitar.png|link=Mega_Tyranitar]] [[Mega Tyranitar]], [[Arquivo:442-spiritomb.png|link=Spiritomb]] [[Spiritomb]]''' e '''[[Arquivo:389-Shiny_Torterra.png|link=Shiny_Torterra]] [[Shiny Torterra]]'''. |
|
| |
|
| <center><b>Possiveis Resgates com Wish Points</b>
| |
|
| |
|
| {| class="wikitable" width="30%" | | Vencer o duelo contra o '''Vital Hook''' concederá as seguintes recompensas:<br> |
| ! width="3%" style="background-color: #483D8B" | <span style="color:white">Item</span> | | <center> |
| ! width="3%" style="background-color: #483D8B" | <span style="color:white">Pontos Necessários</span> | | {| class="wikitable" width="80%" |
| ! width="1%" style="background-color: #483D8B" | <span style="color:white">Possível Vender</span>
| | ! Quantidade de NPCs derrotados |
| | ! Recompensa |
| |- | | |- |
| | | align="center" | 3000 |
| | | align="center" |[[Arquivo:X-Upgrade-Tier-8.gif|28px|link=]] X-Upgrade (Tier: 8) e [[Arquivo:Powered-boost-stone.gif|link=]] 10 Powered Boost Stone, [[Arquivo:exp icon.png|30px|link=]] 10kk de experiência e [[Arquivo:exp icon nw.png|30px|link=]] 100k experiência Nightmare. |
| | |} |
| | </center> |
| | |
| | =pot= |
| | <!--T:1--> |
| | <center> |
| | {| class="wikitable" width="45%" align="center" |
| | ! width="1%" style="background-color: #9d1a64" | Ícone |
| | ! width="3%" style="background-color: #9d1a64" | Nome |
| | ! width="2%" style="background-color: #9d1a64" | Onde adquirir |
| | ! width="1%" style="background-color: #9d1a64" | Preço |
| |- | | |- |
| | align="center" | [[Arquivo:Timer_essence.png|Timer Essence|link=]] '''Timer Essence''' | | |+Medicine |
| | align="center" | '''10 Pontos'''
| | |align="center" | [[Arquivo:Medicine.png|link=]] |
| | align="center" | '''[[Arquivo:Semvip.png|link=]]''' | | | align="center" | '''Medicine''' |
| |-
| | | align="center" | [[NPC_Mark_(Itens)|NPC Mark]] |
| |-
| | | align="center" | 2 dollar |
| | align="center" |[[Arquivo:Timer_Ball_schematics.png|Timer Ball Schematics|link=]] '''Timer Ball Schematics''' | |
| | align="center" | '''10 Pontos'''
| |
| | align="center" | '''[[Arquivo:Semvip.png|link=]]''' | |
| |-
| |
| |- | | |- |
| | align="center" | [[Arquivo:Groudon.png|Groudon|link=]] '''Troca do Titã Lendário para Groudon''' | | | align="center" colspan="4"| Este item cura seu pokémon de todos os status negativos. |
| | align="center" | '''10 Pontos'''
| |
| | align="center" | '''[[Arquivo:Semvip.png|link=]]'''
| |
| |- | | |- |
| | {| class="wikitable" width="45%" align="center" |
| | ! width="1%" style="background-color: #9d1a64" | Ícone |
| | ! width="3%" style="background-color: #9d1a64" | Nome |
| | ! width="2%" style="background-color: #9d1a64" | Onde adquirir |
| | ! width="1%" style="background-color: #9d1a64" | Preço |
| | |+ Revives |
| |- | | |- |
| | align="center" | [[Arquivo:Kyogre.png|Kyogre|link=]] '''Troca do Titã Lendário para Kyogre''' | | | align="center" | [[Arquivo:Revive.png|link=]] |
| | align="center" | '''10 Pontos''' | | | align="center" | '''Revive''' |
| | align="center" | '''[[Arquivo:Semvip.png|link=]]''' | | | align="center" | [[NPC_Mark_(Itens)|NPC Mark]] |
| | | align="center" | 250 dollar |
| |- | | |- |
| | | align="center" colspan="4"| Utilizado para reviver um pokémon derrotado. Lembrando que há um limite de level para poder usá-lo, que é até o level '''199-'''. |
| |- | | |- |
| | align="center" | [[Arquivo:Alpha_Antidote.png|Alpha Antidote|link=]]'''Alpha Antidote''' | | | align="center" | [[Arquivo:Max_revive.png|link=]] |
| | align="center" | '''10 Pontos''' | | | align="center" | '''Max Revive''' |
| | align="center" | '''[[Arquivo:Semvip.png|link=]]''' | | | align="center" | [[NPC_Mark_(Itens)|NPC Mark]] |
| | | align="center" | 350 dollar |
| |- | | |- |
| | | align="center" colspan="4"| Utilizado para reviver um pokémon derrotado. Recomendado para jogadores level '''200+'''. |
| |- | | |- |
| | align="center" | [[Arquivo:Omega_Antidote.png|Omega Antidote|link=]]'''Omega Antidote''' | | | align="center" | [[Arquivo:Nightmare_Revive.png|link=]] |
| | align="center" | '''50 Pontos''' | | | align="center" | '''Nightmare Revive''' |
| | align="center" | '''[[Arquivo:Semvip.png|link=]]''' | | | align="center" | [[Nightmare_Mark|Nightmare Mark]] <br> [[Nightmare Merchant|Nightmare Merchant]] |
| | | align="center" | 11000 dollar <br>10000 dollar |
| |- | | |- |
| | | align="center" colspan="4"| Utilizado para reviver um pokémon derrotado. Utilizado somente dentro do Nightmare World.<br> Tempo de Recarga: 5 minutos |
| |- | | |- |
| | align="center" | [[Arquivo:Lorekeeper_Logo.png|Lorekeeper Logo|link=]]'''Lorekeeper Taunt''' | | | align="center" | [[Arquivo:Superior_Nightmare_Revive.png|link=]] |
| | align="center" | '''300 Pontos''' | | | align="center" | '''Superior Nightmare Revive''' |
| | align="center" | '''[[Arquivo:Semvip.png|link=]]''' | | | align="center" | [[Craft_Profissões_-_Professor#Rank_S|Workshop - Rank S de Professor]] |
| | | align="center" | - |
| |- | | |- |
| | | align="center" colspan="4"| Utilizado para reviver um pokémon derrotado. Utilizado somente dentro do Nightmare World.<br> Tempo de Recarga: 4 minutos |
| |- | | |- |
| | align="center" | [[Arquivo:Wish_Box.gif|Wish Box|link=]]'''Wish Box''' | | {| class="wikitable" width="45%" align="center" |
| | align="center" | '''3000 Pontos''' | | ! width="1%" style="background-color: #9d1a64" | Ícone |
| | align="center" | '''[[Arquivo:Comvip.png|link=]]''' | | ! width="3%" style="background-color: #9d1a64" | Nome |
| | ! width="2%" style="background-color: #9d1a64" | Onde adquirir |
| | ! width="1%" style="background-color: #9d1a64" | Preço |
| | |+ Poções Normais |
| | | align="center" | [[Arquivo:Small_Poiton.png|link=]] |
| | | align="center" | '''Small Potion''' |
| | | align="center" | [[NPC_Mark_(Itens)|NPC Mark]] |
| | | align="center" | 5 dollar |
| |- | | |- |
| | | align="center" colspan="4"| Recupera 60 pontos de vida do seu pokémon por segundo. A duração máxima é de 10 segundos. Nível recomendado: 1. |
| |- | | |- |
| | align="center" | [[Arquivo:445-MegaGarchomp.png|Mega Garchomp|link=]] ''' Mega Garchomp''' | | | align="center" | [[Arquivo:Great_Poiton.png|link=]] |
| | align="center" | '''3000 Pontos''' | | | align="center" | '''Great Potion''' |
| | align="center" | '''[[Arquivo:Comvip.png|link=]]''' | | | align="center" | [[NPC_Mark_(Itens)|NPC Mark]] |
| | | align="center" | 10 dollar |
| |- | | |- |
| | | align="center" colspan="4"| Recupera 150 pontos de vida do seu pokémon por segundo. A duração máxima é de 10 segundos. Nível recomendado: 15. |
| |- | | |- |
| | align="center" | [[Arquivo:130-Megagyarados.png|Mega Gyarados|link=]] ''' Mega Gyarados''' | | | align="center" | [[Arquivo:Ultra_potion.png|link=]] |
| | align="center" | '''3000 Pontos''' | | | align="center" | '''Ultra Potion''' |
| | align="center" | '''[[Arquivo:Comvip.png|link=]]''' | | | align="center" | [[NPC_Mark_(Itens)|NPC Mark]] |
| | | align="center" | 22 dollar |
| |- | | |- |
| | | align="center" colspan="4"| Recupera 400 pontos de vida do seu pokémon por segundo. A duração máxima é de 10 segundos. Nível recomendado: 40. |
| |- | | |- |
| | align="center" | [[Arquivo:478-ShinyFroslass.png|Shiny Froslass|link=]] ''' Shiny Froslass''' | | | align="center" | [[Arquivo:Hyper_Poiton.png|link=]] |
| | align="center" | '''3000 Pontos''' | | | align="center" | '''Hyper Potion''' |
| | align="center" | '''[[Arquivo:Comvip.png|link=]]''' | | | align="center" | [[NPC_Mark_(Itens)|NPC Mark]] |
| | | align="center" | 55 dollar |
| |- | | |- |
| | | align="center" colspan="4"| Recupera 1.000 pontos de vida do seu pokémon por segundo. A duração máxima é de 10 segundos. Nível recomendado: 60. |
| |- | | |- |
| | align="center" | [[Arquivo:479-ShinyRotomMow.png|Shiny Rotom Mow|link=]] ''' Shiny Rotom Mow ''' | | | align="center" | [[Arquivo:Ultimate_Potion.png|link=]] |
| | align="center" | '''3000 Pontos''' | | | align="center" | '''Ultimate Potion''' |
| | align="center" | '''[[Arquivo:Comvip.png|link=]]''' | | | align="center" | [[NPC_Mark_(Itens)|NPC Mark]] |
| | | align="center" | 135 dollar |
| |- | | |- |
| | | align="center" colspan="4"| Recupera 3.000 pontos de vida do seu pokémon por segundo. A duração máxima é de 10 segundos. Nível recomendado: 100. |
| |- | | |- |
| | align="center" | [[Arquivo:531-MegaAudino.png|Mega Audino|link=]] ''' Mega Audino ''' | | | align="center" | [[Arquivo:Restore_Potion.png|link=]] |
| | align="center" | '''3000 Pontos''' | | | align="center" | '''Restore Potion''' |
| | align="center" | '''[[Arquivo:Comvip.png|link=]]''' | | | align="center" | [[Craft Profissões|Workshop - Rank A de Professor]] |
| | | align="center" | - |
| |- | | |- |
| | | align="center" colspan="4"| Recupera 5.000 pontos de vida do seu pokémon por segundo. A duração máxima é de 10 segundos. Nível mínimo: 200. |
| |- | | |- |
| | align="center" | [[Arquivo:623-Shiny_Golurk.png|Shiny Golurk|link=]] '''Shiny Golurk''' | | {| class="wikitable" width="45%" align="center" |
| | align="center" | '''3000 Pontos''' | | ! width="1%" style="background-color: #9d1a64" | Ícone |
| | align="center" | '''[[Arquivo:Comvip.png|link=]]''' | | ! width="3%" style="background-color: #9d1a64" | Nome |
| | ! width="2%" style="background-color: #9d1a64" | Onde adquirir |
| | ! width="1%" style="background-color: #9d1a64" | Preço |
| | |+ Poções da Nightmare |
| | | align="center" | [[Arquivo:Shield_Nightmare_Potion.png|link=]] |
| | | align="center" | '''Nightmare Shield Elixir''' |
| | | align="center" | [[Nightmare_Mark|Nightmare Mark]] <br> [[Nightmare Merchant|Nightmare Merchant]] |
| | | align="center" | 33000 dollar <br>30000 dollar |
| |- | | |- |
| | | align="center" colspan="4"| Beber um gole desta deliciosa poção vai aumentar sua defesa em 40% por 1 horas e 0 minutos. <br> Utilizado somente dentro do Nightmare World. Recarga: 2 minutos e 0 segundos. |
| |- | | |- |
| | align="center" | [[Arquivo:655-ShinyDelphox.png|Shiny Delphox|link=]] '''Shiny Delphox''' | | | align="center" | [[Arquivo:Big_Shield_Nightmare_Potion.gif|link=]] |
| | align="center" | '''3000 Pontos''' | | | align="center" | '''Big Nightmare Shield Elixir''' |
| | align="center" | '''[[Arquivo:Comvip.png|link=]]''' | | | align="center" | [[Nightmare_Mark|Nightmare Mark]] <br> [[Nightmare Merchant|Nightmare Merchant]] |
| | | align="center" | 82000 dollar <br>75000 dollar |
| |- | | |- |
| | | align="center" colspan="4"| Beber um gole desta deliciosa poção vai aumentar sua defesa em 40% por 3 horas e 0 minutos. <br> Recarga: 2 minutos e 0 segundos. |
| |- | | |- |
| | align="center" | [[Arquivo:738-ShinyVikavolt.png|Shiny Vikavolt|link=]] '''Shiny Vikavolt''' | | | align="center" | [[Arquivo:Small_Nightmare_Potion.gif|link=]] |
| | align="center" | '''3000 Pontos''' | | | align="center" | '''Small Nightmare Potion''' |
| | align="center" | '''[[Arquivo:Comvip.png|link=]]''' | | | align="center" | [[Nightmare_Mark|Nightmare Mark]] <br> [[Nightmare Merchant|Nightmare Merchant]] |
| | | align="center" | 530 dollar <br>480 dollar |
| |- | | |- |
| | | align="center" colspan="4"| Recupera 5.000 pontos de vida do seu pokémon por segundo. <br> A duração máxima é de 8 segundos. Utilizado somente dentro do Nightmare World. |
| |- | | |- |
| | align="center" | [[Arquivo:879-ShinyCopperajah.png|Shiny Copperajah|link=]] '''Shiny Copperajah''' | | | align="center" | [[Arquivo:Medium-Nightmare-Potion2.gif|link=]] |
| | align="center" | '''3000 Pontos''' | | | align="center" | '''Medium Nightmare Potion''' |
| | align="center" | '''[[Arquivo:Comvip.png|link=]]''' | | | align="center" | [[Nightmare_Mark|Nightmare Mark]] <br> [[Nightmare Merchant|Nightmare Merchant]] |
| | | align="center" | 610 dollar <br>550 dollar |
| |- | | |- |
| | | align="center" colspan="4"| Recupera 6.500 pontos de vida do seu pokémon por segundo. <br> A duração máxima é de 8 segundos. Utilizado somente dentro do Nightmare World (Necessário Nightmare Level 25). |
| |- | | |- |
| | align="center" | [[Arquivo:815-ShinyCinderace.png|Shiny Cinderace|link=]] '''Shiny Cinderace''' | | | align="center" | [[Arquivo:Ultimate_Nightmare_Potion.gif|link=]] |
| | align="center" | '''3000 Pontos''' | | | align="center" | '''Ultimate Nightmare Potion''' |
| | align="center" | '''[[Arquivo:Comvip.png|link=]]''' | | | align="center" | [[Nightmare_Mark|Nightmare Mark]] <br> [[Nightmare Merchant|Nightmare Merchant]] |
| | | align="center" | 720 dollar <br>650 dollar |
| |- | | |- |
| |} | | | align="center" colspan="4"| Recupera 10.000 pontos de vida do seu pokémon por segundo. <br> A duração máxima é de 8 segundos. Utilizado somente dentro do Nightmare World (Necessário Nightmare Level 70). |
| </center>
| |
| | |
| == <b>1° ao 4º Andar</b>== <!--T:17--> | |
| | |
|
| |
| <b>Regras:</b><br>
| |
| | |
|
| |
| <b>1-</b> Seu objetivo é <b>derrotar todos os pokémon do local</b> e, após isso, derrotar o boss (chefe).<br>
| |
| <b>2-</b> Haverá um <b>limite de 80 poções e 12 revives</b> por tentativa.<br>
| |
| <b>3-</b> Sua premiação dependerá do andar concluído, sendo <b>40 pontos para o primeiro andar, 80 para o segundo, 120 para o terceiro e 160 para o quarto</b>.<br>
| |
| <b>4-</b> <b>Caso encontre um fragmento</b> (falaremos sobre eles depois), <b>você deverá obrigatoriamente concluir o andar</b>, ou o perderá.<br>
| |
| <b>5-</b> <b>Não é possível usar poções ou revives durante a batalha contra o boss.</b><br>
| |
| <b>6-</b> As <b>armadilhas da torre</b> (falaremos sobre elas depois) <b>causam dano em porcentagem fixa</b>, ou seja, não importa seu level ou se possui itens que aumentem a vida de seu personagem, pois a armadilha irá tratar todos os jogadores igualmente. <br>
| |
| <b>7-</b> O jogador terá <b>1h </b>para terminar estes andares;<br>
| |
| | |
|
| |
| Os andares 1 a 4 tem o mesmo mapa. A cada andar, o nível dos pokémon aumentará e, a partir do terceiro andar, existirão pokémon diferentes e mais fortes dos dois anteriores. Seu objetivo é derrotar todos os pokémon do local e, após isso, o boss (chefe) do local.
| |
| *'''obs:''' Os bosses são de elemento '''neutro''' nesses andares.<br>
| |
| ==<b>Fragmentos</b>== <!--T:23-->
| |
| Do primeiro ao quarto andar, os fragmentos se encontram escondidos nos cantos do mapa, até você achar as 4 partes de cada andar, sempre faça devagar olhando cada cantinho, alguns ficam bem escondidos, ao encontrar as 4 partes, volte ao NPC Syncamore e junte as 4 partes para formar o Tablet do andar coletado, falando o nome respectivo a cada uma delas e depois YES. Você deve entregar os fragmentos da tower em ordem. Exemplo: Para entregar os fragmentos do nível 3 você deve antes ter entregado os do nível 2.<br>
| |
| <b>1º - Blackwing Fragment - Recompensa: Blackwing Tablet, 1kk EXP, 1.000 Pontos<br>
| |
| 2º - Cyanflame Fragment - Recompensa: Cyanflame Tablet, 2kk EXP, 1.200 Pontos<br>
| |
| 3º - Whitevolt Fragment - Recompensa: Whitevolt Tablet, 3kk EXP, 1.400 Pontos<br>
| |
| 4º - Greenclaw Fragment - Recompensa: Greenclaw Tablet, 4kk EXP, 2.000 Pontos</b><br>
| |
|
| |
| Abaixo o mapa dos 4 primeiros andares, com os possíveis locais que podem aparecer fragmento:
| |
| | |
|
| |
| <center>
| |
| [[Arquivo:Mapa 1a 4.png|link=Embedded_Tower]]
| |
| </center>
| |
| | |
| Abaixo você poderá conferir os bosses dos andares, seus fragmentos e seus drops:<br>
| |
| | |
|
| |
| <center>
| |
| {| class="wikitable" width="30%"
| |
| ! width="3%" style="background-color: #483D8B" | <span style="color:white">Andar</span>
| |
| ! width="1%" style="background-color: #483D8B" | <span style="color:white">Boss</span>
| |
| ! width="1%" style="background-color: #483D8B" | <span style="color:white">Item</span>
| |
| ! width="1%" style="background-color: #483D8B" | <span style="color:white">Fragmento</span>
| |
| ! width="1%" style="background-color: #483D8B" | <span style="color:white">Tablet</span>
| |
| |- | | |- |
| | align="center" | '''1º - Shiny Salamence''' | | | align="center" | [[Arquivo:Shadow_Potion.png|link=]] |
| | align="center" | '''[[Arquivo:Shinysalamence.png|Shiny Salamence|link=]]'''
| | | align="center" | '''Shadow Potion''' |
| | align="center" | '''[[Arquivo:Blue wings.png|Blue Wings|link=]]''' | | | align="center" | [[Nightmare_Mark|Nightmare Mark]] |
| | align="center" | '''[[Arquivo:JJYlsjR.png|link=]]''' | | | align="center" | 10,000.00 |
| | align="center" | '''[[Arquivo:IVH6wXz.png|link=]]''' | |
| |- | | |- |
| | | align="center" colspan="4"| Esta poção cria fraquezas no oponente, fazendo com que ataques que ele seria imune passem a causar dano inefetivo durante 30 segundos. Tempo de recarga: 1 minutos. |
| |- | | |- |
| | align="center" | '''2º - Shiny Magmortar''' | | | align="center" | [[Arquivo:Hot_Nightmare_Potion.png|link=]] |
| | align="center" | '''[[Arquivo:Shinymagmortar.png|Shiny Magmortar|link=]]'''
| | | align="center" | '''Hot Nightmare Potion''' |
| | align="center" | '''[[Arquivo:Cyan topknot.png|link=]]''' | | | align="center" | [[Craft_Profissões_-_Professor#Rank_S|Workshop - Rank S de Professor]] |
| | align="center" | '''[[Arquivo:RJNlJDI.png|link=]]''' | | | align="center" | - |
| | align="center" | '''[[Arquivo:S67DFYX.png|link=]]''' | |
| |- | | |- |
| | | align="center" colspan="4"| Ao Utilizá-la, a velocidade de movimento do Pokémon do jogador aumentará em 60%, e sua regeneração de HP será um pouco mais rápida que as poções convencionais, porém, a HP atual do Pokémon do jogador reduzirá em 35%. |
| |- | | |- |
| | align="center" | '''3º - Shiny Electivire''' | | | align="center" | [[Arquivo:Black_Nightmare_Potion.png|link=]] |
| | align="center" | '''[[Arquivo:Shinyelectivire.png|Shiny Electivire|link=]]'''
| | | align="center" | '''Black Nightmare Potion''' |
| | align="center" | '''[[Arquivo:White volt paw.png|link=]]''' | | | align="center" | [[Craft_Profissões_-_Professor#Rank_S|Workshop - Rank S de Professor]] |
| | align="center" | '''[[Arquivo:QuhiFgP.png|link=]]''' | | | align="center" | - |
| | align="center" | '''[[Arquivo:RcoPfpy.png|link=]]''' | |
| |- | | |- |
| |-
| | | align="center" colspan="4"| Recupera 12.000 pontos de vida do seu pokémon por segundo. <br> A duração máxima é de 6 segundos. Utilizado somente dentro do Nightmare World.(Necessário Nightmare Level 50) |
| | align="center" | '''4º Shiny Scizor''' | |
| | align="center" | '''[[Arquivo:Shinyscizor.png|Shiny Scizor|link=]]'''
| |
| | align="center" | '''[[Arquivo:Green scizor claw.png|link=]]'''
| |
| | align="center" | '''[[Arquivo:W05BAp2.png|link=]]'''
| |
| | align="center" | '''[[Arquivo:QEaziaz.png|link=]]'''
| |
| |- | | |- |
| |} | | |} |
| </center> | | </center> |
|
| |
| *Ao entregar todos os fragmentos, o Sycamore pedirá que você fale com o Professor Birch que fica no andar inferior da Tower.
| |
|
| |
| [[Arquivo:Andar 14.png|link=Embedded_Tower]]
| |
|
| |
|
| |
| '''[[Arquivo:Tower Points.png|29px|link=]]'''
| |
| '''[[Arquivo:Wish_Points.png|22px|link=]]'''
| |
|
| |
|
| |
| *Ao conversar com este NPC, ele lhe dará um Ancient Tablet ([[Arquivo:Item4 a 1.png|link=Embedded_Tower]]), e pedirá para conversar com o Professor Sycamore novamente e assim, irá liberar o acesso à Tower 5.
| |
|
| |
|
| |
|
| |
|
| |
|
| |
|
| |
|
| |
|
| |
|
| |
|
| |
|
| |
|
| |
|
| |
|
| |
|
| |
|
| |
|
| |
|
| |
| [[Arquivo:Rayquaza.png|link=]]
| |
|
| |
| == '''Informações Gerais''' ==
| |
|
| |
| '''Nome:''' Rayquaza<br />
| |
| '''Level:''' 600<br />
| |
| '''Elemento:''' Dragon & Flying<br />
| |
| '''Habilidades:''' Fly.<br />
| |
| '''Boost:''' (0)<br />
| |
| '''Materia:''' Wingeon<br />
| |
|
| |
| == '''Evoluções''' ==
| |
|
| |
| '''Rayquaza''' precisa de Level 600.
| |
|
| |
| == '''Descrição:''' ==
| |
| Um Pokémon que voa sem parar na camada de ozônio. Diz-se que ele desceria ao chão se Kyogre e Groudon lutassem..
| |
|
| |
| == '''Movimentos''' ==
| |
|
| |
| {| border="0" style="border-collapse:collapse"
| |
| |- align="center" style="background-color: #E6E6FA;"
| |
| ! rowspan="2" | M1
| |
| | width="10px" |
| |
| | align="left" | Twister (35s)
| |
| | width="50px" rowspan="2" |
| |
| | rowspan="2" align="right" | [[Arquivo:AOE.png|AOE]] [[Arquivo:Damage.png|Damage]]
| |
| | rowspan="2" | [[Arquivo:Dragon.png|Dragon|link=Wingeon]]
| |
| |- align="center" style="background-color: #E6E6FA;"
| |
| | width="10px" |
| |
| | align="left" | Level 604
| |
|
| |
| |- align="center"
| |
| ! rowspan="2" | M2
| |
| | width="10px" |
| |
| | align="left" | Dragon Claw (15s)
| |
| | width="50px" rowspan="2" |
| |
| | rowspan="2" align="right" | [[Arquivo:Target.png|Target]] [[Arquivo:Damage.png|Damage]]
| |
| | rowspan="2" | [[Arquivo:Dragon.png|Dragon|link=Wingeon]]
| |
| |- align="center"
| |
| | width="10px" |
| |
| | align="left" | Level 600
| |
|
| |
| |- align="center" style="background-color: #E6E6FA;"
| |
| ! rowspan="2" | M3
| |
| | width="10px" |
| |
| | align="left" | Crunch (10s)
| |
| | width="50px" rowspan="2" |
| |
| | rowspan="2" align="right" | [[Arquivo:Target.png|Target]] [[Arquivo:Damage.png|Damage]]
| |
| | rowspan="2" | [[Arquivo:Dark1.png|Dark|link=Malefic]]
| |
| |- align="center" style="background-color: #E6E6FA;"
| |
| | width="10px" |
| |
| | align="left" | Level 600
| |
|
| |
| |- align="center"
| |
| ! rowspan="2" | M4
| |
| | width="10px" |
| |
| | align="left" | Extreme Speed (25s)
| |
| | width="50px" rowspan="2" |
| |
| | rowspan="2" align="right" | [[Arquivo:Target.png|Target]] [[Arquivo:Damage.png|Damage]] [[Arquivo:Buff.png|Buff]]
| |
| | rowspan="2" | [[Arquivo:Normal1.png|Normal|link=Gardestrike]]
| |
| |- align="center"
| |
| | width="10px" |
| |
| | align="left" | Level 600
| |
|
| |
| |- align="center" style="background-color: #E6E6FA;"
| |
| ! rowspan="2" | M5
| |
| | width="10px" |
| |
| | align="left" | Hyper Voice (40s)
| |
| | width="50px" rowspan="2" |
| |
| | rowspan="2" align="right" | [[Arquivo:AOE.png|AOE]] [[Arquivo:Damage.png|Damage]] [[Arquivo:Paralyze.png|Paralyze]]
| |
| | rowspan="2" | [[Arquivo:Fairy.png|Fairy|link=Psycraft]]
| |
| |- align="center" style="background-color: #E6E6FA;"
| |
| | width="10px" |
| |
| | align="left" | Level 600
| |
|
| |
| |- align="center"
| |
| ! rowspan="2" | M6
| |
| | width="10px" |
| |
| | align="left" | Ancient Power (30s)
| |
| | width="50px" rowspan="2" |
| |
| | rowspan="2" align="right" | [[Arquivo:AOE.png|AOE]] [[Arquivo:Damage.png|Damage]] [[Arquivo:Slow.png|Slow]]
| |
| | rowspan="2" | [[Arquivo:Rock.png|Rock|link=Orebound]]
| |
| |- align="center"
| |
| | width="10px" |
| |
| | align="left" | Level 600
| |
|
| |
| |- align="center" style="background-color: #E6E6FA;"
| |
| ! rowspan="2" | M7
| |
| | width="10px" |
| |
| | align="left" | Air Slash (28s)
| |
| | width="50px" rowspan="2" |
| |
| | rowspan="2" align="right" | [[Arquivo:AOE.png|AOE]] [[Arquivo:Damage.png|Damage]]
| |
| | rowspan="2" | [[Arquivo:Flying.png|Flying|link=Wingeon]]
| |
| |- align="center" style="background-color: #E6E6FA;"
| |
| | width="10px" |
| |
| | align="left" | Level 603
| |
|
| |
| |- align="center"
| |
| ! rowspan="2" | M8
| |
| | width="10px" |
| |
| | align="left" | Dragon Ascent (40s)
| |
| | width="50px" rowspan="2" |
| |
| | rowspan="2" align="right" | [[Arquivo:AOE.png|AOE]] [[Arquivo:Damage.png|Damage]] [[Arquivo:Buff.png|Buff]] [[Arquivo:Debuff.png|Debuff]] [[Arquivo:Slow.png|Slow]]
| |
| | rowspan="2" | [[Arquivo:Flying.png|Flying|link=Wingeon]]
| |
| |- align="center"
| |
| | width="10px" |
| |
| | align="left" | Level 602
| |
|
| |
| |- align="center" style="background-color: #E6E6FA;"
| |
| ! rowspan="2" | M9
| |
| | width="10px" |
| |
| | align="left" | Dragon Pulse (35s)
| |
| | width="50px" rowspan="2" |
| |
| | rowspan="2" align="right" | [[Arquivo:AOE.png|AOE]] [[Arquivo:Damage.png|Damage]]
| |
| | rowspan="2" | [[Arquivo:Dragon.png|Dragon|link=Wingeon]]
| |
| |- align="center" style="background-color: #E6E6FA;"
| |
| | width="10px" |
| |
| | align="left" | Level 605
| |
|
| |
| |- align="center"
| |
| ! rowspan="2" | M10
| |
| | width="10px" |
| |
| | align="left" | Hyper Beam (45s)
| |
| | width="50px" rowspan="2" |
| |
| | rowspan="2" align="right" | [[Arquivo:AOE.png|AOE]] [[Arquivo:Damage.png|Damage]]
| |
| | rowspan="2" | [[Arquivo:Normal1.png|Normal|link=Gardestrike]]
| |
| |- align="center"
| |
| | width="10px" |
| |
| | align="left" | Level 608
| |
|
| |
| |- align="center" style="background-color: #E6E6FA;"
| |
| ! rowspan="2" | M11
| |
| | width="10px" |
| |
| | align="left" | Outrage (60s)
| |
| | width="50px" rowspan="2" |
| |
| | rowspan="2" align="right" | [[Arquivo:AOE.png|AOE]] [[Arquivo:Damage.png|Damage]] [[Arquivo:Buff.png|Buff]] [[Arquivo:Nevermiss.png|Nevermiss]] [[Arquivo:Debuff.png|Debuff]]
| |
| | rowspan="2" | [[Arquivo:Dragon.png|Dragon|link=Wingeon]]
| |
| |- align="center" style="background-color: #E6E6FA;"
| |
| | width="10px" |
| |
| | align="left" | Level 615
| |
|
| |
| |- align="center"
| |
| ! rowspan="2" | M12
| |
| | width="10px" |
| |
| | align="left" | Solar Beam (50s)
| |
| | width="50px" rowspan="2" |
| |
| | rowspan="2" align="right" | [[Arquivo:AOE.png|AOE]] [[Arquivo:Damage.png|Damage]]
| |
| | rowspan="2" | [[Arquivo:Grass.png|Grass|link=Naturia]]
| |
| |- align="center"
| |
| | width="10px" |
| |
| | align="left" | Level 600
| |
|
| |
| |}
| |
| == '''Efetividades''' ==
| |
|
| |
| '''Muito Efetivo:''' Ice.<br />
| |
| '''Efetivo:''' Rock, Dragon and Fairy.<br />
| |
| '''Normal:''' Normal, Electric, Poison, Fly, Psychic, Ghost, Steel, Dark and Crystal.<br />
| |
| '''Inefetivo:''' Fire, Water, Fight and Bug.<br />
| |
| '''Muito Inefetivo:''' Grass.<br />
| |
| '''Nulo:''' Ground.<br />
| |