Duelist Brotherhood: mudanças entre as edições
Sem resumo de edição |
|||
| (38 revisões intermediárias por 12 usuários não estão sendo mostradas) | |||
| Linha 1: | Linha 1: | ||
<languages /> | |||
<translate> | |||
<span style="color:red">'''Nível necessário:</span> 100 | |||
<!--T:2--> | |||
<span style="color:red">'''Recompensa:</span> 15 Boost Stones, 30.75KK de EXP, 2 Helds Tier 7 e Legendary Outfit. | |||
<b>Caso encontre algum erro ou queira acrescentar alguma informação,</b> <span style="color:red">'''entre em contato com um dos membros da wiki.</span> | |||
==Introdução== <!--T:1--> | |||
<center>[[Arquivo:Duelist_Brotherhood_Quest.png|link=NPC_Brotherhood]]<br></center> | <center>[[Arquivo:Duelist_Brotherhood_Quest.png|link=NPC_Brotherhood]]<br></center> | ||
<!--T:2--> | |||
Duelist Brotherhood é um famoso clube de duelistas localizado ao noroeste do centro Pokémon de Shamouti. | Duelist Brotherhood é um famoso clube de duelistas localizado ao noroeste do centro Pokémon de Shamouti. | ||
<!--T:3--> | |||
Somente os melhores e mais corajosos treinadores Pokémon entram nesse clube, pois sabem o quão perigosos são os desafios que encontrarão. O primeiro NPC a ser avistado nesse clube é o Yellow Parachute, que desde logo fará questão de avisar que o clube não é um local para novatos. | Somente os melhores e mais corajosos treinadores Pokémon entram nesse clube, pois sabem o quão perigosos são os desafios que encontrarão. O primeiro NPC a ser avistado nesse clube é o Yellow Parachute, que desde logo fará questão de avisar que o clube não é um local para novatos. | ||
<!--T:4--> | |||
O jogador que ingressar na Duelist Brotherhood receberá uma roupa e estará apto para iniciar os desafios, que consistem em pegar contratos e derrotar os alvos estabelecidos. | O jogador que ingressar na Duelist Brotherhood receberá uma roupa e estará apto para iniciar os desafios, que consistem em pegar contratos e derrotar os alvos estabelecidos. | ||
<!--T:5--> | |||
<center>[[Arquivo:Brotherhood.png|link=NPC_Brotherhood]]</center> | <center>[[Arquivo:Brotherhood.png|link=NPC_Brotherhood]]</center> | ||
==Contratos== | ==Contratos== <!--T:6--> | ||
<!--T:7--> | |||
Os contratos são divididos em quatro dificuldades, sendo elas: '''Easy''', '''Medium''', '''Hard''' e '''Expert'''. | Os contratos são divididos em quatro dificuldades, sendo elas: '''Easy''', '''Medium''', '''Hard''' e '''Expert'''. | ||
<!--T:8--> | |||
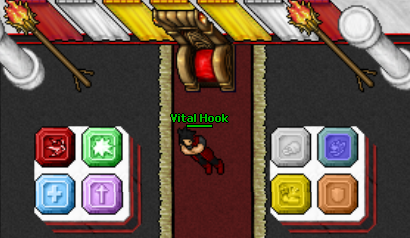
Todo membro novo receberá contratos de dificuldade "Easy" e para aumentar a dificuldade é necessário concluir a quantidade pré estabelecida pelo NPC Vital Hook. Além disso, é com ele que o jogador poderá alterar a dificuldade dos contratos que está concluindo. Esse procedimento se repetirá para atingir as outras dificuldades, mas com alteração da quantidade de contratos, é claro. | Todo membro novo receberá contratos de dificuldade "Easy" e para aumentar a dificuldade é necessário concluir a quantidade pré estabelecida pelo NPC Vital Hook. Além disso, é com ele que o jogador poderá alterar a dificuldade dos contratos que está concluindo. Esse procedimento se repetirá para atingir as outras dificuldades, mas com alteração da quantidade de contratos, é claro. | ||
Obs: O jogador que concluir | Obs: O jogador que concluir a quest, automaticamente será transferido para a dificuldade "Expert". | ||
<center> | |||
'''Easy:''' 12 NPC's | '''Medium:''' 36 NPC's | '''Hard:''' 1.000 NPC'S | |||
</center> | |||
<center> | <center> | ||
''' | '''250K EXP''' total | '''500K EXP''' total | '''15KK EXP''' total | ||
''' | |||
</center> | </center> | ||
O contrato consiste na missão de encontrar e derrotar um NPC pelo mapa, de modo que o jogador receberá uma única dica sobre a sua localização, que na maioria das vezes indica os arredores de onde o NPC está, mas não sua localização exata. | O contrato consiste na missão de encontrar e derrotar um NPC pelo mapa, de modo que o jogador receberá uma única dica sobre a sua localização, que na maioria das vezes indica os arredores de onde o NPC está, mas não sua localização exata. | ||
<!--T:9--> | |||
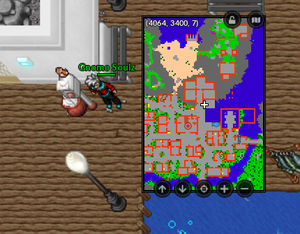
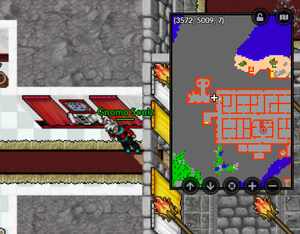
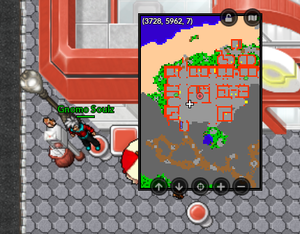
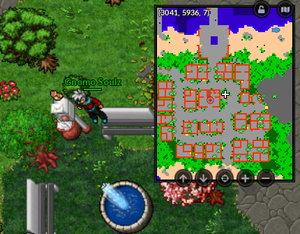
* Ao iniciar a Quest, você receberá um PokePhone para poder visualizar o contrato de cada cidade na interface. | * Ao iniciar a Quest, você receberá um PokePhone para poder visualizar o contrato de cada cidade na interface. | ||
<center>[[Arquivo:PokePhone.png|link=Duelist_Brotherhood]]</center> | <center>[[Arquivo:PokePhone.png|link=Duelist_Brotherhood]]</center> | ||
==Como pegar um Contrato?== | ==Como pegar um Contrato?== <!--T:10--> | ||
Cada cidade principal do jogo possui um correio em que o jogador poderá pegar um contrato, abaixo você pode verificar a localização de cada correio que é onde você pega os contratos para prosseguir na Quest, para pegar o contrato basta dar '''use''' no correio. | Cada cidade principal do jogo possui um correio em que o jogador poderá pegar um contrato, abaixo você pode verificar a localização de cada correio que é onde você pega os contratos para prosseguir na Quest, para pegar o contrato basta dar '''use''' no correio. | ||
<center> | <center> | ||
</center> | </center> | ||
<!--T:11--> | |||
<center> | <center> | ||
{| width="60%" | |||
! align="center" | [[Arquivo:BHCerulean.png|300px|link=]]<br />'''Cerulean''' | |||
| align="center" | [[Arquivo:BHSaffron.png|300px|link=]]<br />'''Saffron''' | |||
! align="center" | [[Arquivo:BHCeladon.png|300px|link=]]<br />'''Celadon''' | |||
| align="center" | [[Arquivo:BHVermilion.png|300px|link=]]<br />'''Vermilion''' | |||
|- | |||
! align="center" | [[Arquivo:BHFuchsia.png|300px|link=]]<br />'''Fuchsia''' | |||
| align="center" | [[Arquivo:BHPewter.png|300px|link=]]<br />'''Pewter''' | |||
! align="center" | [[Arquivo:BHViridian.png|300px|link=]]<br />'''Viridian''' | |||
| align="center" | [[Arquivo:BHCinnabar.png|300px|link=]]<br />'''Cinnabar''' | |||
|- | |||
! align="center" | [[Arquivo:BHHamlin.png|300px|link=]]<br />'''Hamlin''' | |||
| align="center" | [[Arquivo:BHAscorbia.png|300px|link=]]<br />'''Ascorbia''' | |||
! align="center" | [[Arquivo:BHShamouti.png|300px|link=]]<br />'''Shamouti''' | |||
| align="center" | [[Arquivo:BHMandarin.png|300px|link=]]<br />'''Mandarin''' | |||
|- | |||
! align="center" | [[Arquivo:BHTangelo.png|300px|link=]]<br />'''Tangelo''' | |||
|- | |||
|} | |||
</center> | </center> | ||
'''Observação:''' O tempo de espera de novos contratos da Brotherhood são de 30 segundos. | |||
---- | ---- | ||
Tais contratos são únicos e aleatórios no sentido de que todos os NPC's serão diferentes, terão uma outfit nova e Pokémon aleatórios. Sempre que você pegar um novo contrato, você receberá uma dica que dirá em qual região o NPC está, nunca será a localização exata do NPC, se caso você perder a informação do seu contrato, sempre será possível vê-la novamente no '''PokePhone''', como mostrado abaixo e se porventura o seu contrato for cancelado, você poderá voltar na cidade e pegá-lo novamente quantas vezes precisar. <br> | Tais contratos são únicos e aleatórios no sentido de que todos os NPC's serão diferentes, terão uma outfit nova e Pokémon aleatórios. Sempre que você pegar um novo contrato, você receberá uma dica que dirá em qual região o NPC está, nunca será a localização exata do NPC, se caso você perder a informação do seu contrato, sempre será possível vê-la novamente no '''PokePhone''', como mostrado abaixo e se porventura o seu contrato for cancelado, você poderá voltar na cidade e pegá-lo novamente quantas vezes precisar. <br> | ||
| Linha 72: | Linha 80: | ||
• As recompensas dos contratos variam de acordo com a dificuldade em que você está, mas todo NPC dará Mighty Tokens e experiência.<br><center> | • As recompensas dos contratos variam de acordo com a dificuldade em que você está, mas todo NPC dará Mighty Tokens e experiência.<br><center> | ||
<!--T:12--> | |||
{| class="wikitable" | {| class="wikitable" | ||
! scope="col" width="10%" colspan="0" align="center" style="background-color: #9d1a64" | <span style="color: white">'''Dificuldade'''</span> | ! scope="col" width="10%" colspan="0" align="center" style="background-color: #9d1a64" | <span style="color: white">'''Dificuldade'''</span> | ||
| Linha 82: | Linha 91: | ||
| align="center" | [[Arquivo:Mighttoken.png|link=Duelist_Brotherhood]] '''3''' Might Token e '''20.000''' EXP. | | align="center" | [[Arquivo:Mighttoken.png|link=Duelist_Brotherhood]] '''3''' Might Token e '''20.000''' EXP. | ||
|- | |- | ||
! align="center" | Hard | ! align="center" | Hard e Expert | ||
| align="center" | [[Arquivo:Mighttoken.png|link=Duelist_Brotherhood]] '''5''' Might Token e '''75.000''' EXP. | | align="center" | [[Arquivo:Mighttoken.png|link=Duelist_Brotherhood]] '''5''' Might Token e '''75.000''' EXP. | ||
|- | |- | ||
! align="center" | Lendário | ! align="center" | Hard (Lendário) | ||
| align="center" | [[Arquivo:Mighttoken.png|link=Duelist_Brotherhood]] ''' | | align="center" | [[Arquivo:Mighttoken.png|link=Duelist_Brotherhood]] '''20''' Might Token e '''300.000''' EXP. | ||
|- | |||
! align="center" | Expert (Lendário) | |||
| align="center" | [[Arquivo:Mighttoken.png|link=Duelist_Brotherhood]] '''60''' Might Token e '''900.000''' EXP. | |||
|} | |} | ||
</center> | </center> | ||
; Causas que podem lhe fazer perder o contrato: | ; Causas que podem lhe fazer perder o contrato: | ||
<!--T:13--> | |||
# Se após ter iniciado a batalha com o NPC e derrotado 4 Pokémon dele o jogador se distanciar muito, o contrato é cancelado. Isso foi feito para evitar que jogadores deixassem o NPC com 1 ou 2 Pokémon e fossem embora, fazendo outros perderem tempo e adquirindo certa vantagem. | # Se após ter iniciado a batalha com o NPC e derrotado 4 Pokémon dele o jogador se distanciar muito, o contrato é cancelado. Isso foi feito para evitar que jogadores deixassem o NPC com 1 ou 2 Pokémon e fossem embora, fazendo outros perderem tempo e adquirindo certa vantagem. | ||
# Outro jogador derrotar o NPC antes. | # Outro jogador derrotar o NPC antes. | ||
# Em disputa de KS, o outro jogador mais dano no total. | # Em disputa de KS, o outro jogador der mais dano no total. | ||
==Observações== | *'''Observação:''' Se o jogador morrer para o Npc, todo Pokémon que o jogador derrotou antes da morte passará a contar como inexistente, mesmo que o jogador pegue o contrato novamente. | ||
* O jogador | |||
==Observações== <!--T:14--> | |||
* O jogador poderá pegar até 13 contratos por dia, porém só poderá concluir 12 contratos. | |||
* No nível Hard existe uma possibilidade muito pequena de pegar um contrato de NPC Legendary, que nada mais é do que um personagem do desenho. Esses NPC's são extremamente fortes, portanto tome muito cuidado. | * No nível Hard existe uma possibilidade muito pequena de pegar um contrato de NPC Legendary, que nada mais é do que um personagem do desenho. Esses NPC's são extremamente fortes, portanto tome muito cuidado. | ||
* Quem não tem contrato poderá encontrar tais NPC's pelo mapa, mas não será atacado por eles e nem poderá atacá-los. | * Quem não tem contrato poderá encontrar tais NPC's pelo mapa, mas não será atacado por eles e nem poderá atacá-los. | ||
| Linha 104: | Linha 117: | ||
<!--T:15--> | |||
<center> | <center> | ||
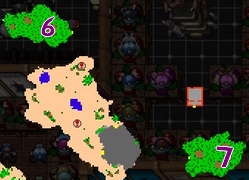
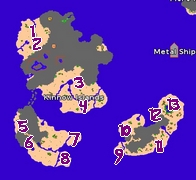
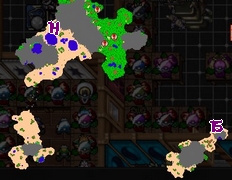
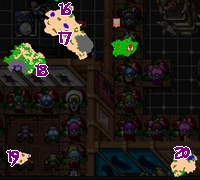
==Localização dos NPC== | ==Localização dos NPC== <!--T:16--> | ||
< | |||
{| class="wikitable sortable" | {| class="wikitable sortable" | ||
! scope="col" width="10%" align="center" style="background-color: #9d1a64" | <span style="color: white">'''Dica da Localização'''</span> | ! scope="col" width="10%" align="center" style="background-color: #9d1a64" | <span style="color: white">'''Dica da Localização'''</span> | ||
| Linha 194: | Linha 208: | ||
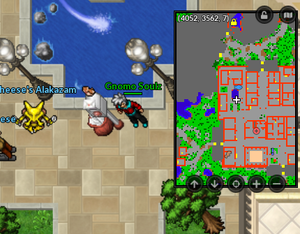
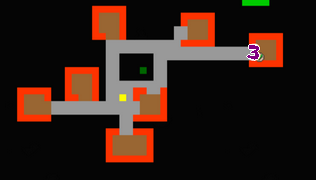
'''EN''' Wandering between Cerulean and Saffron cities | '''EN''' Wandering between Cerulean and Saffron cities | ||
</div> | </div> | ||
| align="center" | [[Arquivo: | | align="center" | [[Arquivo:Saffron_x_cerulean.jpg|link=Duelist_Brotherhood]] | ||
|- | |- | ||
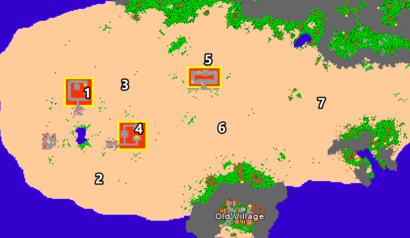
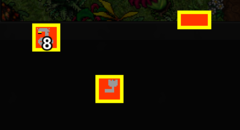
| align="center" | <div align="left"> | | align="center" | <div align="left"> | ||
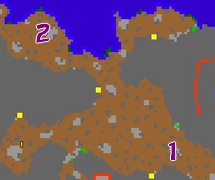
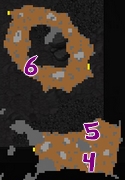
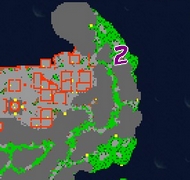
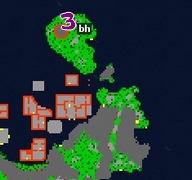
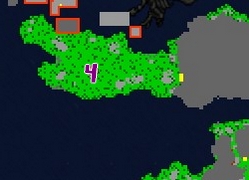
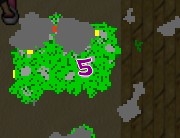
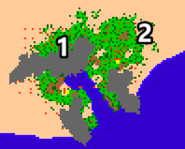
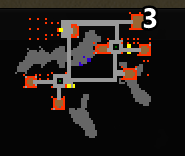
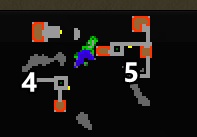
'''PT''' Explorando uma misteriosa ilha com pirâmides em algum | '''PT''' Explorando uma misteriosa ilha com pirâmides em algum lugar ao nordeste | ||
'''EN''' Exploring a | '''EN''' Exploring a mysterious island with pyramids, somewhere in the north-east | ||
</div> | </div> | ||
| align="center" | [[Arquivo:DesertIsland.png|link=Duelist_Brotherhood]] [[Arquivo:DesertIsland2.png|link=Duelist_Brotherhood]] [[Arquivo:DesertIsland3.png|link=Duelist_Brotherhood]] [[Arquivo:DesertIsland4.png|link=Duelist_Brotherhood]] | | align="center" | [[Arquivo:DesertIsland.png|link=Duelist_Brotherhood]] [[Arquivo:DesertIsland2.png|link=Duelist_Brotherhood]] [[Arquivo:DesertIsland3.png|link=Duelist_Brotherhood]] [[Arquivo:DesertIsland4.png|link=Duelist_Brotherhood]] | ||
| Linha 209: | Linha 223: | ||
|- | |- | ||
| align="center" | <div align="left"> | | align="center" | <div align="left"> | ||
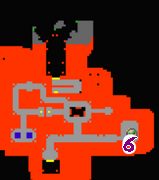
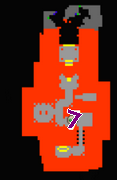
'''PT''' Tentando capturar um | '''PT''' Tentando capturar um Pokémon parecido com um macaco próximo à cidade de Viridian | ||
'''EN''' Trying to catch a monkey kind pokemon near Viridian city | '''EN''' Trying to catch a monkey kind pokemon near Viridian city | ||
</div> | </div> | ||
| Linha 227: | Linha 241: | ||
|- | |- | ||
| align="center" | <div align="left"> | | align="center" | <div align="left"> | ||
'''PT''' Investigando um navio quebrado ao leste da cidade de | '''PT''' Investigando um navio quebrado ao leste da cidade de Fuchsia | ||
'''EN''' Investigating a crashed ship, east of Fuchsia city | '''EN''' Investigating a crashed ship, east of Fuchsia city | ||
</div> | </div> | ||
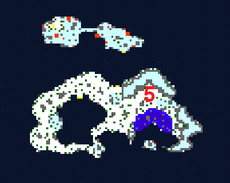
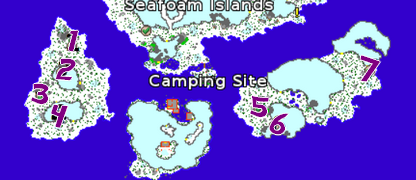
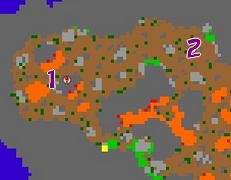
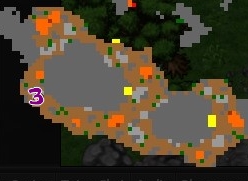
| Linha 254: | Linha 268: | ||
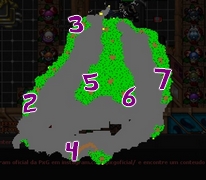
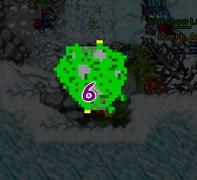
'''EN''' Exploring the greatest of Seafoam islands | '''EN''' Exploring the greatest of Seafoam islands | ||
</div> | </div> | ||
| align="center" | [[Arquivo: | | align="center" | [[Arquivo:seaf1.png|230px|link=Duelist_Brotherhood]] [[Arquivo:seaf2.png|230px|link=Duelist_Brotherhood]] [[Arquivo:seaf3.png|230px|link=Duelist_Brotherhood]] | ||
|- | |- | ||
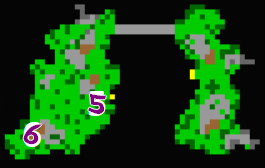
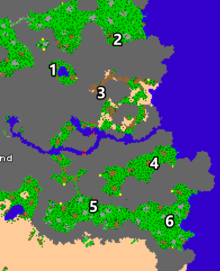
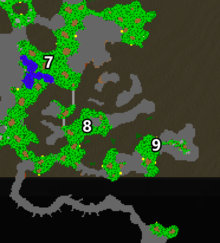
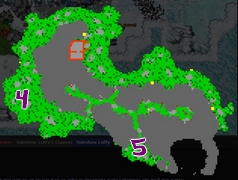
| align="center" | <div align="left"> | | align="center" | <div align="left"> | ||
| Linha 261: | Linha 275: | ||
</div> | </div> | ||
| align="center" | [[Arquivo:SeaPequena.png|link=Duelist_Brotherhood]] | | align="center" | [[Arquivo:SeaPequena.png|link=Duelist_Brotherhood]] | ||
|- | |||
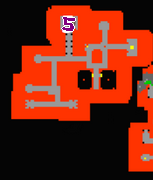
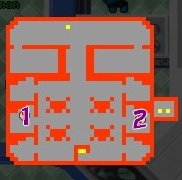
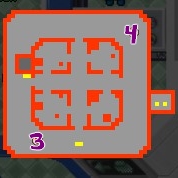
| align="center" | <div align="left"> | |||
'''PT''' Procurando por um raro pokémon do tipo elétrico na Power Plant | |||
'''EN''' Searching for a rare electric type pokemon at Power Plant | |||
</div> | |||
| align="center" | [[Arquivo:PowerP.jpg|link=Duelist_Brotherhood]] [[Arquivo:PowerP1.jpg|link=Duelist_Brotherhood]] [[Arquivo:PowerP2.jpg|link=Duelist_Brotherhood]] | |||
|- | |||
| align="center" | <div align="left"> | |||
'''PT''' Vagando na área dos Rocket na ilha de Ascorbia | |||
'''EN''' Wandering in the rocket area at Ascorbia island | |||
</div> | |||
| align="center" | [[Arquivo:RocketAscorbia.jpg|link=Duelist_Brotherhood]] [[Arquivo:RocketAscorbia2.jpg|link=Duelist_Brotherhood]] | |||
|- | |||
| align="center" | <div align="left"> | |||
'''PT''' Visto pela última vez: Explorando a ilha Butwal | |||
'''EN''' Last seen: Exploring the Butwal island | |||
</div> | |||
| align="center" | [[Arquivo:Butwal_bh.png|link=Duelist_Brotherhood]] | |||
|- | |||
| align="center" | <div align="left"> | |||
'''PT''' Caçando pokémon elétrico na ilha de Hamlin | |||
'''EN''' Hunting electric type pokémon at Hamlin island | |||
</div> | |||
| align="center" | [[Arquivo:EletricoHamlin.jpg|link=Duelist_Brotherhood]] | |||
|- | |||
| align="center" | <div align="left"> | |||
'''PT''' Procurando por uma pequena e misteriosa ilha cheia de Butterfree | |||
'''EN''' Searching for a small and mysterious island full of Butterfree | |||
</div> | |||
| align="center" | [[Arquivo:ButterIsland.png|link=Duelist_Brotherhood]] | |||
|- | |||
| align="center" | <div align="left"> | |||
'''PT''' Procurando por sobreviventes nas cidades abandonadas da ilha de Hamlin | |||
'''EN''' Looking for survivors at abandoned cities at Hamlin island | |||
</div> | |||
| align="center" | [[Arquivo:HamlinAban.jpg|link=Duelist_Brotherhood]] [[Arquivo:HamlinAban1.jpg|link=Duelist_Brotherhood]] [[Arquivo:HamlinAban2.jpg|link=Duelist_Brotherhood]] | |||
|- | |||
| align="center" | <div align="left"> | |||
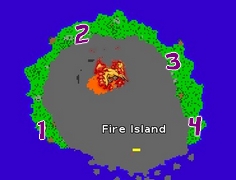
'''PT''' Caçando pokémon de terra na ilha Magma | |||
'''EN''' Hunting ground type pokémon at Magma island | |||
</div> | |||
| align="center" | [[Arquivo:TerraMagma.jpg|link=Duelist_Brotherhood]] [[Arquivo:TerraMagma1.jpg|link=Duelist_Brotherhood]] [[Arquivo:TerraMagma2.jpg|link=Duelist_Brotherhood]] | |||
|- | |||
| align="center" | <div align="left"> | |||
'''PT''' Caçando pokémon de fogo na ilha Magma | |||
'''EN''' Hunting fire type pokémon at Magma island | |||
</div> | |||
| align="center" | [[Arquivo:FogoMagma.jpg|link=Duelist_Brotherhood]] [[Arquivo:FogoMagma1.jpg|link=Duelist_Brotherhood]] [[Arquivo:FogoMagma2.jpg|link=Duelist_Brotherhood]] [[Arquivo:FogoMagma3.jpg|link=Duelist_Brotherhood]] | |||
|- | |||
| align="center" | <div align="left"> | |||
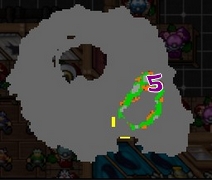
'''PT''' Explorando cavernas na ilha Magma | |||
'''EN''' Exploring caves at Magma island | |||
</div> | |||
| align="center" | [[Arquivo:CaveMagma.jpg|link=Duelist_Brotherhood]] | |||
|- | |||
| align="center" | <div align="left"> | |||
'''PT''' Vagando na ilha Tarroco | |||
'''EN''' Wandering at Tarroco island | |||
</div> | |||
| align="center" | [[Arquivo:Tarroco.jpg|link=Duelist_Brotherhood]] [[Arquivo:Tarroco1.jpg|link=Duelist_Brotherhood]] | |||
|- | |||
| align="center" | <div align="left"> | |||
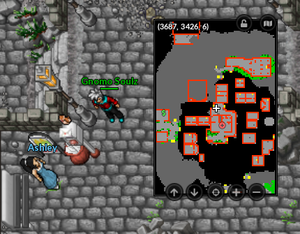
'''PT''' Treinando pokémon no Clube de Luta na ilha de Shamouti | |||
'''EN''' Training pokemon at the Fight Club at Shamouti island | |||
</div> | |||
| align="center" | [[Arquivo:FightClub.jpg|link=Duelist_Brotherhood]] [[Arquivo:FightClub1.jpg|link=Duelist_Brotherhood]] [[Arquivo:FightClub2.jpg|link=Duelist_Brotherhood]] [[Arquivo:Shamouti.bh.PNG|link=Duelist_Brotherhood]] | |||
|- | |||
| align="center" | <div align="left"> | |||
'''PT''' Explorando a ilha Pinkan | |||
'''EN''' Exploring the Pinkan island | |||
</div> | |||
| align="center" | [[Arquivo:Pinkan.jpg|link=Duelist_Brotherhood]] [[Arquivo:Pinkan1.jpg|link=Duelist_Brotherhood]] | |||
|- | |||
| align="center" | <div align="left"> | |||
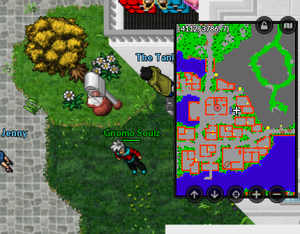
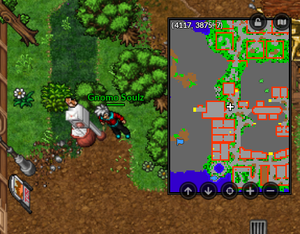
'''PT''' Vagando pelas florestas da ilha de Shamouti | |||
'''EN''' Wandering at Shamouti island forests | |||
</div> | |||
| align="center" | [[Arquivo:ExpShamouti.jpg|link=Duelist_Brotherhood]] [[Arquivo:ExpShamouti1.jpg|link=Duelist_Brotherhood]] [[Arquivo:ExpShamouti2.jpeg|link=Duelist_Brotherhood]] [[Arquivo:ExpShamouti3.jpg|link=Duelist_Brotherhood]] [[Arquivo:ExpShamouti4.jpg|link=Duelist_Brotherhood]] | |||
|- | |||
| align="center" | <div align="left"> | |||
'''PT''' Caçando perto dos Tauros na ilha de Shamouti. | |||
'''EN''' Hunting near Tauros at Shamouti island | |||
</div> | |||
| align="center" | [[Arquivo:TaurosShamouti.jpg|link=Duelist_Brotherhood]] [[Arquivo:TaurosShamouti1.jpg|link=Duelist_Brotherhood]] [[Arquivo:TaurosShamouti2.jpg|link=Duelist_Brotherhood]] | |||
|- | |||
| align="center" | <div align="left"> | |||
'''PT''' Procurando por pokémon raros na ilha Cleopatra | |||
'''EN''' Searching for rare pokémon at Cleopatra island | |||
</div> | |||
| align="center" | [[Arquivo:Cleopatra.jpg|link=Duelist_Brotherhood]] [[Arquivo:Cleopatra1.jpg|link=Duelist_Brotherhood]] [[Arquivo:Cleopatra2.jpg|link=Duelist_Brotherhood]] | |||
|- | |||
| align="center" | <div align="left"> | |||
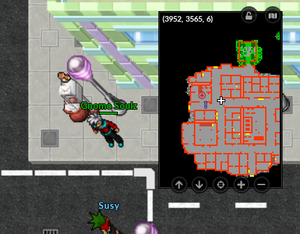
'''PT''' Tentando parar o Big Snorlax nas ilhas Grapefruit | |||
'''EN''' Trying to stop the big Snorlax at grapefruits islands | |||
</div> | |||
| align="center" | [[Arquivo:BigLax.jpg|link=Duelist_Brotherhood]] | |||
|- | |||
| align="center" | <div align="left"> | |||
'''PT''' Procurando pelo Lendário pokémon Articuno | |||
'''EN''' Searching for the Legendary pokemon Articuno | |||
</div> | |||
| align="center" | [[Arquivo:Art.jpg|link=Duelist_Brotherhood]] [[Arquivo:Art1.jpg|link=Duelist_Brotherhood]] [[Arquivo:Art2.jpg|link=Duelist_Brotherhood]] | |||
|- | |||
| align="center" | <div align="left"> | |||
'''PT''' Procurando pelo Lendário pokémon Zapdos | |||
'''EN''' Searching for the Legendary pokemon Zapdos | |||
</div> | |||
| align="center" | [[Arquivo:Zapd.jpg|link=Duelist_Brotherhood]] [[Arquivo:Zapd1.jpg|link=Duelist_Brotherhood]] | |||
|- | |||
| align="center" | <div align="left"> | |||
'''PT''' Procurando pelo Lendário pokémon Moltres | |||
'''EN''' Searching for the Legendary pokemon Moltres | |||
</div> | |||
| align="center" | [[Arquivo:Molt.jpg|link=Duelist_Brotherhood]] [[Arquivo:Molt1.jpg|link=Duelist_Brotherhood]] | |||
|- | |||
| align="center" | <div align="left"> | |||
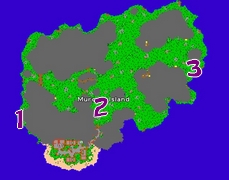
'''PT''' Treinando contra pokémon inseto na ilha Murcott | |||
'''EN''' Training against bug type pokémon at Murcott island | |||
</div> | |||
| align="center" | [[Arquivo:Murcott.jpg|link=Duelist_Brotherhood]] [[Arquivo:Murcott1.jpg|link=Duelist_Brotherhood]] | |||
|- | |||
| align="center" | <div align="left"> | |||
'''PT''' Procurando por Meowth na ilha Golden | |||
'''EN''' Searching for Meowths at Golden island | |||
</div> | |||
| align="center" | [[Arquivo:Golden1.jpg|link=Duelist_Brotherhood]] [[Arquivo:Golden2.jpg|link=Duelist_Brotherhood]] | |||
|- | |||
| align="center" | <div align="left"> | |||
'''PT''' Tentando capturar algum pokémon de planta na ilha Kinnow | |||
'''EN''' Trying to catch some grass type pokémon at Kinnow islands | |||
</div> | |||
| align="center" | [[Arquivo:GramaKinnow.jpg|link=Duelist_Brotherhood]] [[Arquivo:GramaKinnow1.jpg|link=Duelist_Brotherhood]] | |||
|- | |||
| align="center" | <div align="left"> | |||
'''PT''' Tentando capturar algum pokémon de água na ilha Kinnow | |||
'''EN''' Trying to catch some water type pokémon at Kinnow islands | |||
</div> | |||
| align="center" | [[Arquivo:AguaKinnow.jpg|link=Duelist_Brotherhood]] [[Arquivo:AguaKinnow1.jpg|link=Duelist_Brotherhood]] [[Arquivo:AguaKinnow2.jpg|link=Duelist_Brotherhood]] | |||
|- | |||
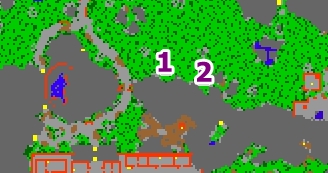
| align="center" | <div align="left"> | |||
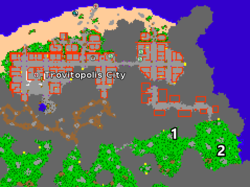
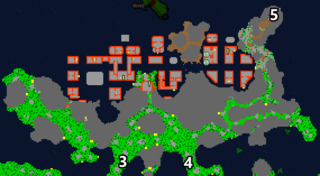
'''PT''' Ajudando novos treinadores pokémon nos arredores da cidade de Trovitopolis | |||
'''EN''' Helping new pokemon trainers at Trovitopolis city outskirts | |||
</div> | |||
| align="center" | [[Arquivo:Arredores_de_trovitopolis.png|250px|link=Duelist_Brotherhood]] [[Arquivo:Arredores_trovitopolis_2.png|320px|link=Duelist_Brotherhood]] | |||
|- | |||
| align="center" | <div align="left"> | |||
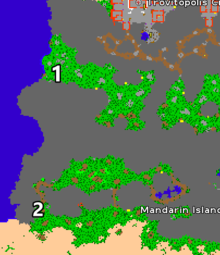
'''PT''' Caçando no lado oeste da floresta de Mandarin | |||
'''EN''' Hunting at the west side of Mandarin island forest | |||
</div> | |||
| align="center" | [[Arquivo:Oeste_1.png|220px|link=Duelist_Brotherhood]] [[Arquivo:Oeste_2.png|210px|link=Duelist_Brotherhood]] | |||
|- | |||
| align="center" | <div align="left"> | |||
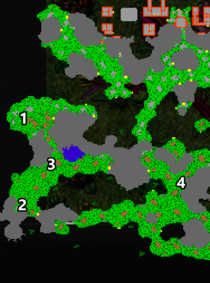
'''PT''' Caçando no lado leste da floresta de Mandarin | |||
'''EN''' Hunting at the east side of Mandarin island forest | |||
</div> | |||
| align="center" | [[Arquivo:Leste_de_mandarin_ok.png|220px|link=Duelist_Brotherhood]] [[Arquivo:Leste_de_mandarin_2_ok.png|220px|link=Duelist_Brotherhood]] | |||
|- | |||
| align="center" | <div align="left"> | |||
'''PT''' Explorando o deserto misterioso na ilha de Mandarin | |||
'''EN''' Exploring the mysterious desert of Mandarin island | |||
</div> | |||
| align="center" | [[Arquivo:Deserto_de_mandarin_1.png|410px|link=Duelist_Brotherhood]] [[Arquivo:Deserto_de_mandarin_2.png|240px|link=Duelist_Brotherhood]] | |||
|- | |||
| align="center" | <div align="left"> | |||
'''PT''' Indo capturar Aipom na ilha de Mandarin | |||
'''EN''' Going to catch an Aipom at Mandarin Island | |||
</div> | |||
| align="center" | [[Arquivo:Aipom_de_mandarin_1.png|185px|link=Duelist_Brotherhood]] [[Arquivo:Aipom_de_mandarin_2.png|185px|link=Duelist_Brotherhood]] [[Arquivo:Aipom_de_mandarin_3.png|210px|link=Duelist_Brotherhood]] | |||
|- | |||
| align="center" | <div align="left"> | |||
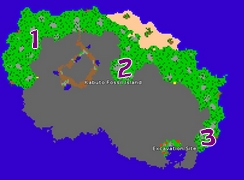
'''PT''' Vagando na Kabuto Fossil Island | |||
'''EN''' Wandering at the Kabuto Fossil island | |||
</div> | |||
| align="center" | [[Arquivo:Kbut.jpg|link=Duelist_Brotherhood]] [[Arquivo:Kbut1.jpg|link=Duelist_Brotherhood]] [[Arquivo:Kbut2.jpg|link=Duelist_Brotherhood]] | |||
|} | |} | ||
==NPCs Lendários== | ==NPCs Lendários== <!--T:17--> | ||
{| class="wikitable" | {| class="wikitable" | ||
! '''Blaine''' | ! '''Blaine''' | ||
| Linha 280: | Linha 467: | ||
[[Arquivo:038-Sh_Ninetales.png|link=Shiny Ninetales]] [[Arquivo:126-Sh_Magmar.png|link=Shiny Magmar]] [[Arquivo:006-shCharizard.png|link=Shiny Charizard]] <br /> [[Arquivo:Shinyfla.png|link=Shiny Flareon]] [[Arquivo:059-Sh_Arcanine.png|link=Shiny Arcanine]] [[Arquivo:157-Typhlosion.png|link=Typhlosion]] | [[Arquivo:038-Sh_Ninetales.png|link=Shiny Ninetales]] [[Arquivo:126-Sh_Magmar.png|link=Shiny Magmar]] [[Arquivo:006-shCharizard.png|link=Shiny Charizard]] <br /> [[Arquivo:Shinyfla.png|link=Shiny Flareon]] [[Arquivo:059-Sh_Arcanine.png|link=Shiny Arcanine]] [[Arquivo:157-Typhlosion.png|link=Typhlosion]] | ||
<!--T:18--> | |||
| [[Arquivo:Erika.png|link=Duelist_Brotherhood]]<br /> | | [[Arquivo:Erika.png|link=Duelist_Brotherhood]]<br /> | ||
[[Arquivo:114-Sh_Tangela.png|link=Shiny Tangela]] [[Arquivo:Shinyven.png|link=Shiny Venusaur]] [[Arquivo:Tang.png|link=Tangrowth]] <br/> [[Arquivo:154-Sh_Meganium.png|link=Shiny Meganium]] [[Arquivo:Shinyvil.png|link=Shiny Vileplume]] [[Arquivo:103-Exeggutor.png|link=Exeggutor]] | [[Arquivo:114-Sh_Tangela.png|link=Shiny Tangela]] [[Arquivo:Shinyven.png|link=Shiny Venusaur]] [[Arquivo:Tang.png|link=Tangrowth]] <br/> [[Arquivo:154-Sh_Meganium.png|link=Shiny Meganium]] [[Arquivo:Shinyvil.png|link=Shiny Vileplume]] [[Arquivo:103-Exeggutor.png|link=Exeggutor]] | ||
<!--T:19--> | |||
| [[Arquivo:Misty.png|link=Duelist_Brotherhood]]<br /> | | [[Arquivo:Misty.png|link=Duelist_Brotherhood]]<br /> | ||
[[Arquivo:SshBlastoise.png|link=Shiny Blastoise]] [[Arquivo:073-Sh_Tentacruel.png|link=Shiny Tentacruel]] [[Arquivo: | [[Arquivo:SshBlastoise.png|link=Shiny Blastoise]] [[Arquivo:073-Sh_Tentacruel.png|link=Shiny Tentacruel]] [[Arquivo:Shinyvap.png|link=Shiny Shiny Vaporeon]] <br /> [[Arquivo:186-shPolitoed.png|link=Shiny Politoed]] [[Arquivo:226-Mantine.png|link=Mantine]] [[Arquivo:160-Feraligatr.png|link=Feraligatr]] | ||
<!--T:20--> | |||
| [[Arquivo:Brock.png|link=Duelist_Brotherhood]]<br /> | | [[Arquivo:Brock.png|link=Duelist_Brotherhood]]<br /> | ||
[[Arquivo:105-Sh_Marowak.png|link=Shiny Marowak]] [[Arquivo:142-Aerodactyl.png|link=Aerodactyl]] [[Arquivo:Shinyrh.png|link=Shiny Rhydon]] <br/> [[Arquivo:095-CrystalOnix.png|link=Crystal Onix]] [[Arquivo:Shinygol.png|link=Shiny Golem]] [[Arquivo:208-Steelix.png|link=Steelix]] | [[Arquivo:105-Sh_Marowak.png|link=Shiny Marowak]] [[Arquivo:142-Aerodactyl.png|link=Aerodactyl]] [[Arquivo:Shinyrh.png|link=Shiny Rhydon]] <br/> [[Arquivo:095-CrystalOnix.png|link=Crystal Onix]] [[Arquivo:Shinygol.png|link=Shiny Golem]] [[Arquivo:208-Steelix.png|link=Steelix]] | ||
<!--T:21--> | |||
| [[Arquivo:BrunoOutfit.png|link=Duelist_Brotherhood]]<br /> | | [[Arquivo:BrunoOutfit.png|link=Duelist_Brotherhood]]<br /> | ||
[[Arquivo:068-Sh_Machamp.png|link=Shiny Machamp]] [[Arquivo:095-CrystalOnix.png|link=Crystal Onix]] [[Arquivo:208-Steelix.png|link=Steelix]] <br/> [[Arquivo:107-Hitmonchan.png|link=Elite Hitmonchan]] [[Arquivo:106-HitmonleeNormal.png|link=Elite Hitmonlee]] [[Arquivo:E.hitmontop.png|link=Elite Hitmontop]] | [[Arquivo:068-Sh_Machamp.png|link=Shiny Machamp]] [[Arquivo:095-CrystalOnix.png|link=Crystal Onix]] [[Arquivo:208-Steelix.png|link=Steelix]] <br/> [[Arquivo:107-Hitmonchan.png|link=Elite Hitmonchan]] [[Arquivo:106-HitmonleeNormal.png|link=Elite Hitmonlee]] [[Arquivo:E.hitmontop.png|link=Elite Hitmontop]] | ||
<!--T:22--> | |||
| [[Arquivo:Agatha.png|link=Duelist_Brotherhood]]<br /> | | [[Arquivo:Agatha.png|link=Duelist_Brotherhood]]<br /> | ||
[[Arquivo:Sgengar.png|link=Shiny Gengar]] [[Arquivo:477-Dusknoir.png|link=Dusknoir]] [[Arquivo:197-Sh_Umbreon.png|link=Shiny Umbreon]] <br/> [[Arquivo:063-DarkAbra.png|link=Dark Abra]] [[Arquivo:200-Misdreavus.png|link=Misdreavus]] [[Arquivo:354-Banette.png|link=Banette]] | [[Arquivo:Sgengar.png|link=Shiny Gengar]] [[Arquivo:477-Dusknoir.png|link=Dusknoir]] [[Arquivo:197-Sh_Umbreon.png|link=Shiny Umbreon]] <br/> [[Arquivo:063-DarkAbra.png|link=Dark Abra]] [[Arquivo:200-Misdreavus.png|link=Misdreavus]] [[Arquivo:354-Banette.png|link=Banette]] | ||
<!--T:23--> | |||
| [[Arquivo:Sabrina.png|link=Duelist_Brotherhood]]<br /> | | [[Arquivo:Sabrina.png|link=Duelist_Brotherhood]]<br /> | ||
[[Arquivo:065-shAlakazam.png|link=Shiny Alakazam]] [[Arquivo:122-Sh_Mr.png|link=Shiny Mr.Mime]] [[Arquivo:196-shEspeon.png|link=Shiny Espeon]] <br/> [[Arquivo:Shinyhyp.png|link=Shiny Hypno]] [[Arquivo:063-DarkAbra.png|link=Dark Abra]] [[Arquivo:202-Wobbuffet.png|link=Wobbuffet]] | [[Arquivo:065-shAlakazam.png|link=Shiny Alakazam]] [[Arquivo:122-Sh_Mr.png|link=Shiny Mr.Mime]] [[Arquivo:196-shEspeon.png|link=Shiny Espeon]] <br/> [[Arquivo:Shinyhyp.png|link=Shiny Hypno]] [[Arquivo:063-DarkAbra.png|link=Dark Abra]] [[Arquivo:202-Wobbuffet.png|link=Wobbuffet]] | ||
<!--T:24--> | |||
| [[Arquivo:Koga.png|link=Duelist_Brotherhood]]<br /> | | [[Arquivo:Koga.png|link=Duelist_Brotherhood]]<br /> | ||
[[Arquivo:073-Sh_Tentacruel.png|link=Shiny Tentacruel]] [[Arquivo:049-Sh_Venomoth.png|link=Shiny Venomoth]] [[Arquivo:089-Sh_Muk.png|link=Shiny Muk]] <br/> [[Arquivo:169-Sh_Crobat.png|link=Shiny Crobat]] [[Arquivo:Shinynid.png|link=Shiny Nidoking]] [[Arquivo:454-Toxicroak.png|link=Toxicroak]] | [[Arquivo:073-Sh_Tentacruel.png|link=Shiny Tentacruel]] [[Arquivo:049-Sh_Venomoth.png|link=Shiny Venomoth]] [[Arquivo:089-Sh_Muk.png|link=Shiny Muk]] <br/> [[Arquivo:169-Sh_Crobat.png|link=Shiny Crobat]] [[Arquivo:Shinynid.png|link=Shiny Nidoking]] [[Arquivo:454-Toxicroak.png|link=Toxicroak]] | ||
<!--T:25--> | |||
| [[Arquivo:Kyra.png|link=Duelist_Brotherhood]]<br /> | | [[Arquivo:Kyra.png|link=Duelist_Brotherhood]]<br /> | ||
[[Arquivo:234-shStantler.png|link=Shiny Stantler]] [[Arquivo:143-Snorlax.png|link=Snorlax]] [[Arquivo:217-Ursaring.png|link=Ursaring]] <br/> [[Arquivo:242-Blissey.png|link=Blissey]] [[Arquivo:210-Granbull.png|link=Granbull]] [[Arquivo:241-Miltank.png|link=Miltank]] | [[Arquivo:234-shStantler.png|link=Shiny Stantler]] [[Arquivo:143-Snorlax.png|link=Snorlax]] [[Arquivo:217-Ursaring.png|link=Ursaring]] <br/> [[Arquivo:242-Blissey.png|link=Blissey]] [[Arquivo:210-Granbull.png|link=Granbull]] [[Arquivo:241-Miltank.png|link=Miltank]] | ||
<!--T:26--> | |||
| [[Arquivo:Lance.png|link=Duelist_Brotherhood]]<br /> | | [[Arquivo:Lance.png|link=Duelist_Brotherhood]]<br /> | ||
[[Arquivo:006-shCharizard.png|link=Shiny Charizard]] [[Arquivo:148-Sh_Dragonair.png|link=Shiny Dragonair]] [[Arquivo:142-Aerodactyl.png|link=Aerodactyl]] <br/> [[Arquivo:149-Dragonite.png|link=Dragonite]] [[Arquivo:130-Gyarados.png|link=Gyarados]] [[Arquivo:230-Kingdra.png|link=Kingdra]] | [[Arquivo:006-shCharizard.png|link=Shiny Charizard]] [[Arquivo:148-Sh_Dragonair.png|link=Shiny Dragonair]] [[Arquivo:142-Aerodactyl.png|link=Aerodactyl]] <br/> [[Arquivo:149-Dragonite.png|link=Dragonite]] [[Arquivo:130-Gyarados.png|link=Gyarados]] [[Arquivo:230-Kingdra.png|link=Kingdra]] | ||
|} | |} | ||
<!--T:27--> | |||
{| class="wikitable" | {| class="wikitable" | ||
! '''Lorelei''' | ! '''Lorelei''' | ||
! '''Ash Ketchum''' | ! '''Ash Ketchum''' | ||
! '''Gary Oak''' | ! '''Gary Oak''' | ||
! '''Looker''' | ! '''Looker *''' | ||
! '''Chun Li''' | ! '''Chun Li''' | ||
! '''Lt. Surge''' | ! '''Lt. Surge''' | ||
| Linha 321: | Linha 518: | ||
[[Arquivo:124-shJynx.png|link=Shiny Jynx]] [[Arquivo:199-Slowking.png|link=Slowking]] [[Arquivo:131-Lapras.png|link=Lapras]] <br/> [[Arquivo:091-Cloyster.png|link=Cloyster]] [[Arquivo:087-Dewgong.png|link=Dewgong]] [[Arquivo:221-Piloswine.png|link=Piloswine]] | [[Arquivo:124-shJynx.png|link=Shiny Jynx]] [[Arquivo:199-Slowking.png|link=Slowking]] [[Arquivo:131-Lapras.png|link=Lapras]] <br/> [[Arquivo:091-Cloyster.png|link=Cloyster]] [[Arquivo:087-Dewgong.png|link=Dewgong]] [[Arquivo:221-Piloswine.png|link=Piloswine]] | ||
<!--T:28--> | |||
| [[Arquivo:Ash.png|link=Duelist_Brotherhood]]<br /> | | [[Arquivo:Ash.png|link=Duelist_Brotherhood]]<br /> | ||
[[Arquivo:143-Snorlax.png|link=Snorlax]] [[Arquivo:018-Pidgeot.png|link=Pidgeot]] [[Arquivo:0009-Blastoise.png|link=Blastoise]] <br/> [[Arquivo:003-Venusaur.png|link=Venusaur]] [[Arquivo:006-Charizard.png|link=Charizard]] [[Arquivo:025-Pikachu.png|link=Pikachu]] | [[Arquivo:143-Snorlax.png|link=Snorlax]] [[Arquivo:018-Pidgeot.png|link=Pidgeot]] [[Arquivo:0009-Blastoise.png|link=Blastoise]] <br/> [[Arquivo:003-Venusaur.png|link=Venusaur]] [[Arquivo:006-Charizard.png|link=Charizard]] [[Arquivo:025-Pikachu.png|link=Pikachu]] | ||
<!--T:29--> | |||
| [[Arquivo:GaryOak.png|link=Duelist_Brotherhood]]<br /> | | [[Arquivo:GaryOak.png|link=Duelist_Brotherhood]]<br /> | ||
[[Arquivo:065-shAlakazam.png|link=Shiny Alakazam]] [[Arquivo:059-Sh_Arcanine.png|link=Shiny Arcanine]] [[Arquivo:SshBlastoise.png|link=Shiny Blastoise]] <br/> [[Arquivo:196-shEspeon.png|link=Shiny Espeon]] [[Arquivo:197-Sh_Umbreon.png|link=Shiny Umbreon]] [[Arquivo:Shinynid.png|link=Shiny Nidoking]] | [[Arquivo:065-shAlakazam.png|link=Shiny Alakazam]] [[Arquivo:059-Sh_Arcanine.png|link=Shiny Arcanine]] [[Arquivo:SshBlastoise.png|link=Shiny Blastoise]] <br/> [[Arquivo:196-shEspeon.png|link=Shiny Espeon]] [[Arquivo:197-Sh_Umbreon.png|link=Shiny Umbreon]] [[Arquivo:Shinynid.png|link=Shiny Nidoking]] | ||
<!--T:30--> | |||
| [[Arquivo:Looker.png|link=Duelist_Brotherhood]]<br /> | | [[Arquivo:Looker.png|link=Duelist_Brotherhood]]<br /> | ||
[[Arquivo:133- | [[Arquivo:133-Sh_Eevee.png|link=Shiny Eevee]] [[Arquivo:Shinyfla.png|link=Shiny Flareon]] [[Arquivo:Shinyjoe.png|link=Shiny Jolteon]] <br/> [[Arquivo:Shinyvap.png|link=Shiny Vaporeon]] [[Arquivo:197-Sh_Umbreon.png|link=Shiny Umbreon]] [[Arquivo:196-shEspeon.png|link=Shiny Espeon]] <br/> | ||
[[Arquivo:470-Sh_Leafeon.png|link=Shiny Leafeon]] [[Arquivo:471-Sh_Glaceon.png|link=Shiny Glaceon]] [[Arquivo:700-Sh_Sylveon.png|link=Shiny Sylveon]] | |||
<!--T:31--> | |||
| [[Arquivo:ChunLi.png|link=Duelist_Brotherhood]]<br /> | | [[Arquivo:ChunLi.png|link=Duelist_Brotherhood]]<br /> | ||
[[Arquivo:107-Hitmonchan.png|link=Elite Hitmonchan]] [[Arquivo:106-HitmonleeNormal.png|link=Elite Hitmonlee]] [[Arquivo:E.hitmontop.png|link=Elite Hitmontop]] <br/> [[Arquivo:068-Machamp.png|link=Machamp]] [[Arquivo:062-Poliwrath.png|link=Poliwrath]] [[Arquivo:057-Primeape.png|link=Primeape]] | [[Arquivo:107-Hitmonchan.png|link=Elite Hitmonchan]] [[Arquivo:106-HitmonleeNormal.png|link=Elite Hitmonlee]] [[Arquivo:E.hitmontop.png|link=Elite Hitmontop]] <br/> [[Arquivo:068-Machamp.png|link=Machamp]] [[Arquivo:062-Poliwrath.png|link=Poliwrath]] [[Arquivo:057-Primeape.png|link=Primeape]] | ||
<!--T:32--> | |||
| [[Arquivo:LtSurge.png|link=Duelist_Brotherhood]]<br /> | | [[Arquivo:LtSurge.png|link=Duelist_Brotherhood]]<br /> | ||
[[Arquivo:125-Sh_Electabuzz.png|link=Shiny Electabuzz]] [[Arquivo:026-Sh_Raichu.png|link=Shiny Raichu]] [[Arquivo:171-shLanturn.png|link=Shiny Lanturn]] <br/> [[Arquivo:181-Sh_Ampharos.png|link=Shiny Ampharos]] [[Arquivo:082-Sh_Magneton.png|link=Shiny Magneton]] [[Arquivo:Shinyjoe.png|link=Shiny Jolteon]] | [[Arquivo:125-Sh_Electabuzz.png|link=Shiny Electabuzz]] [[Arquivo:026-Sh_Raichu.png|link=Shiny Raichu]] [[Arquivo:171-shLanturn.png|link=Shiny Lanturn]] <br/> [[Arquivo:181-Sh_Ampharos.png|link=Shiny Ampharos]] [[Arquivo:082-Sh_Magneton.png|link=Shiny Magneton]] [[Arquivo:Shinyjoe.png|link=Shiny Jolteon]] | ||
<!--T:33--> | |||
| [[Arquivo:Deadpool.png|link=Duelist_Brotherhood]]<br /> | | [[Arquivo:Deadpool.png|link=Duelist_Brotherhood]]<br /> | ||
[[Arquivo:130-RedGyarados.png|link=Red Gyarados]] [[Arquivo:123-Sh_Scyther.png|link=Shiny Scyther]] [[Arquivo:126-Sh_Magmar.png|link=Shiny Magmar]] <br/> [[Arquivo:065-shAlakazam.png|link=Shiny Alakazam]] [[Arquivo:125-Sh_Electabuzz.png|link=Shiny Electabuzz]] [[Arquivo:Sgengar.png|link=Shiny Gengar]] | [[Arquivo:130-RedGyarados.png|link=Red Gyarados]] [[Arquivo:123-Sh_Scyther.png|link=Shiny Scyther]] [[Arquivo:126-Sh_Magmar.png|link=Shiny Magmar]] <br/> [[Arquivo:065-shAlakazam.png|link=Shiny Alakazam]] [[Arquivo:125-Sh_Electabuzz.png|link=Shiny Electabuzz]] [[Arquivo:Sgengar.png|link=Shiny Gengar]] | ||
<!--T:34--> | |||
| [[Arquivo:Telecoteco.png|link=Duelist_Brotherhood]]<br /> | | [[Arquivo:Telecoteco.png|link=Duelist_Brotherhood]]<br /> | ||
[[Arquivo:212-MegaScizor.png|link=Mega Scizor]] [[Arquivo:059-Sh_Arcanine.png|link=Shiny Arcanine]] [[Arquivo:310-Sh_Manectric.png|link=Shiny Manectric]] <br/> [[Arquivo:171-shLanturn.png|link=Shiny Lanturn]] [[Arquivo:073-Sh_Tentacruel.png|link=Shiny Tentacruel]] [[Arquivo:014-Kakuna_shiny.png|link=Kakuna]] | [[Arquivo:212-MegaScizor.png|link=Mega Scizor]] [[Arquivo:059-Sh_Arcanine.png|link=Shiny Arcanine]] [[Arquivo:310-Sh_Manectric.png|link=Shiny Manectric]] <br/> [[Arquivo:171-shLanturn.png|link=Shiny Lanturn]] [[Arquivo:073-Sh_Tentacruel.png|link=Shiny Tentacruel]] [[Arquivo:014-Kakuna_shiny.png|link=Kakuna]] | ||
|} | |} | ||
==Premiação== | '''* Obs.:''' O '''NPC Looker''' fica alternando entre os 9 Pokémon, usando 6 dentre eles. | ||
==Premiação== <!--T:35--> | |||
</center> | </center> | ||
Após concluir todos os NPCs (Easy, Medium, e Hard), terá recebido 15.75kk de EXP no total. No entanto, a premiação principal da Duelist Brotherhood Quest ocorre após finalizar os 1.000 NPC's e 5 lendários na dificuldade Hard, você deverá falar com o NPC Vital Hook, você receberá como recompensa:<br> | |||
* [[Arquivo:BoostStone.png|link=Duelist_Brotherhood]] 15 Boost Stones.<br> | * [[Arquivo:BoostStone.png|link=Duelist_Brotherhood]] 15 Boost Stones.<br> | ||
* 15KK de EXP.<br> | * 15KK de EXP.<br> | ||
* 2 Helds Tier 7.<br> | * 2 Helds Tier 7, sendo um de cada tabela.<br> | ||
* [[Legendary Outfit]] | * [[Legendary Outfit]] | ||
<!--T:36--> | |||
Segue abaixo a tabela dos possíveis Helds Tier 7 que você poderá receber como recompensa. | Segue abaixo a tabela dos possíveis Helds Tier 7 que você poderá receber como recompensa. | ||
{| class="wikitable" width="30%" style="float:left" | {| class="wikitable" width="30%" style="float:left" | ||
|- style="width:50px; text-align:center;" | |||
|'''Tabela 1''' | |||
|- style="width:50px; text-align:center;"| | |||
! width="10%"|'''Held''' | ! width="10%"|'''Held''' | ||
! width="20%"|'''Nome''' | ! width="20%"|'''Nome''' | ||
|- style="width:50px; text-align:center;" | |- style="width:50px; text-align:center;" | ||
| [[Arquivo: | | [[Arquivo:attack2.png|link=Held Itens]] || '''X-Attack''' | ||
|- style="width:50px; text-align:center;" | |- style="width:50px; text-align:center;" | ||
| [[Arquivo: | | [[Arquivo:critical2.png|link=Held Itens]] || '''X-Critical''' | ||
|- style="width:50px; text-align:center;" | |- style="width:50px; text-align:center;" | ||
| [[Arquivo: | | [[Arquivo:defense2.png|link=Held Itens]] || '''X-Defense''' | ||
|- style="width:50px; text-align:center;" | |- style="width:50px; text-align:center;" | ||
| [[Arquivo: | | [[Arquivo:lucky2.png|link=Held Itens]] || '''X-Lucky''' | ||
|- style="width:50px; text-align:center;" | |- style="width:50px; text-align:center;" | ||
| [[Arquivo: | | [[Arquivo:teleport2.png|link=Held Itens]] || '''Y-Teleport''' | ||
|} | |} | ||
<!--T:37--> | |||
{| class="wikitable" width="30%" style="float:right" | {| class="wikitable" width="30%" style="float:right" | ||
|- style="width:50px; text-align:center;" | |||
|'''Tabela 2''' | |||
|- style="width:50px; text-align:center;"| | |||
!width="10%"|'''Held''' | !width="10%"|'''Held''' | ||
!width="20%"|'''Nome''' | !width="20%"|'''Nome''' | ||
|- style="width:50px; text-align:center;" | |- style="width:50px; text-align:center;" | ||
| [[Arquivo: | | [[Arquivo:poison2.png|link=Held Itens]] || '''X-Poison''' | ||
|- style="width:50px; text-align:center;" | |||
| [[Arquivo:rage2.png|link=Held Itens]] || '''X-Rage''' | |||
|- style="width:50px; text-align:center;" | |- style="width:50px; text-align:center;" | ||
| [[Arquivo: | | [[Arquivo:return2.png|link=Held Itens]] || '''X-Return''' | ||
|- style="width:50px; text-align:center;" | |- style="width:50px; text-align:center;" | ||
| [[Arquivo: | | [[Arquivo:strafe2.png|link=Held Itens]] || '''X-Strafe''' | ||
|- style="width:50px; text-align:center;" | |- style="width:50px; text-align:center;" | ||
| [[Arquivo: | | [[Arquivo:vitality2.png|link=Held Itens]] || '''X-Vitality''' | ||
|- style="width:50px; text-align:center;" | |- style="width:50px; text-align:center;" | ||
| [[Arquivo: | | [[Arquivo:cure2.png|link=Held Itens]] || '''Y-Cure''' | ||
|- style="width:50px; text-align:center;" | |- style="width:50px; text-align:center;" | ||
| [[Arquivo: | | [[Arquivo:control2.png|link=Held Itens]] || '''Y-Control''' | ||
|- style="width:50px; text-align:center;" | |||
| [[Arquivo:regeneration2.png|link=Held Itens]] || '''Y-Regeneration''' | |||
|- style="width:50px; text-align:center;" | |- style="width:50px; text-align:center;" | ||
| [[Arquivo:YWing2.png|link=Held Itens]] || '''Y-Wing''' | | [[Arquivo:YWing2.png|link=Held Itens]] || '''Y-Wing''' | ||
|} | |} | ||
<!--T:38--> | |||
{| class="wikitable" width="30%" style="margin-left: auto; margin-right: auto; border: none" | {| class="wikitable" width="30%" style="margin-left: auto; margin-right: auto; border: none" | ||
|- style="width:50px; text-align:center;" | |||
|'''Tabela 2''' | |||
|- style="width:50px; text-align:center;"| | |||
!width="10%"|'''Held''' | !width="10%"|'''Held''' | ||
!width="20%"|'''Nome''' | !width="20%"|'''Nome''' | ||
|- style="width:50px; text-align:center;" | |||
| [[Arquivo:Accuracy2.png|link=Held Itens]] || '''X-Accuracy''' | |||
|- style="width:50px; text-align:center;" | |||
| [[Arquivo:agility2.png|link=Held Itens]] || '''X-Agility''' | |||
|- style="width:50px; text-align:center;" | |- style="width:50px; text-align:center;" | ||
| [[Arquivo:BoosT.png|link=Held Itens]] || '''X-Boost''' | | [[Arquivo:BoosT.png|link=Held Itens]] || '''X-Boost''' | ||
|- style="width:50px; text-align:center;" | |- style="width:50px; text-align:center;" | ||
| [[Arquivo: | | [[Arquivo:X-coldown2.png|link=Held Itens]] || '''X-Cooldown''' | ||
|- style="width:50px; text-align:center;" | |- style="width:50px; text-align:center;" | ||
| [[Arquivo: | | [[Arquivo:elemental2.png|link=Held Itens]] || '''X-Elemental''' | ||
|- style="width:50px; text-align:center;" | |- style="width:50px; text-align:center;" | ||
| [[Arquivo: | | [[Arquivo:experience2.png|link=Held Itens]] || '''X-Experience''' | ||
|- style="width:50px; text-align:center;" | |- style="width:50px; text-align:center;" | ||
| [[Arquivo: | | [[Arquivo:haste2.png|link=Held Itens]] || '''X-Haste''' | ||
|- style="width:50px; text-align:center;" | |- style="width:50px; text-align:center;" | ||
| [[Arquivo: | | [[Arquivo:harden2.png|link=Held Itens]] || '''X-Harden''' | ||
|- style="width:50px; text-align:center;" | |- style="width:50px; text-align:center;" | ||
| [[Arquivo: | | [[Arquivo:hellfire2.png|link=Held Itens]] || '''X-Hellfire''' | ||
|} | |} | ||
</translate> | |||
Edição das 15h08min de 31 de maio de 2021
Nível necessário: 100
Recompensa: 15 Boost Stones, 30.75KK de EXP, 2 Helds Tier 7 e Legendary Outfit.
Caso encontre algum erro ou queira acrescentar alguma informação, entre em contato com um dos membros da wiki.
Introdução
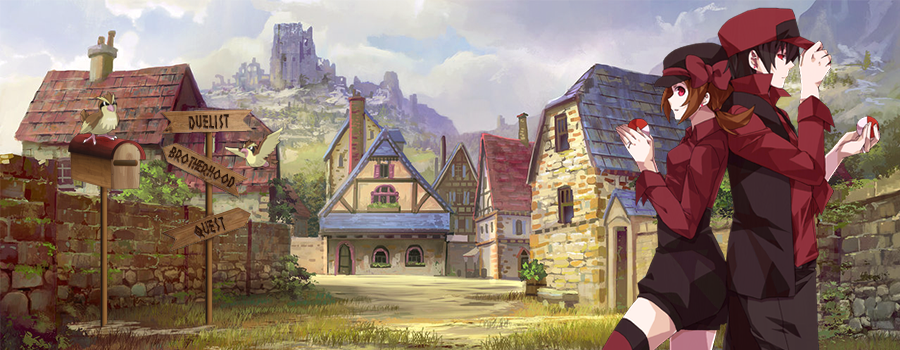
Duelist Brotherhood é um famoso clube de duelistas localizado ao noroeste do centro Pokémon de Shamouti.
Somente os melhores e mais corajosos treinadores Pokémon entram nesse clube, pois sabem o quão perigosos são os desafios que encontrarão. O primeiro NPC a ser avistado nesse clube é o Yellow Parachute, que desde logo fará questão de avisar que o clube não é um local para novatos.
O jogador que ingressar na Duelist Brotherhood receberá uma roupa e estará apto para iniciar os desafios, que consistem em pegar contratos e derrotar os alvos estabelecidos.
Contratos
Os contratos são divididos em quatro dificuldades, sendo elas: Easy, Medium, Hard e Expert.
Todo membro novo receberá contratos de dificuldade "Easy" e para aumentar a dificuldade é necessário concluir a quantidade pré estabelecida pelo NPC Vital Hook. Além disso, é com ele que o jogador poderá alterar a dificuldade dos contratos que está concluindo. Esse procedimento se repetirá para atingir as outras dificuldades, mas com alteração da quantidade de contratos, é claro. Obs: O jogador que concluir a quest, automaticamente será transferido para a dificuldade "Expert".
Easy: 12 NPC's | Medium: 36 NPC's | Hard: 1.000 NPC'S
250K EXP total | 500K EXP total | 15KK EXP total
O contrato consiste na missão de encontrar e derrotar um NPC pelo mapa, de modo que o jogador receberá uma única dica sobre a sua localização, que na maioria das vezes indica os arredores de onde o NPC está, mas não sua localização exata.
- Ao iniciar a Quest, você receberá um PokePhone para poder visualizar o contrato de cada cidade na interface.
Como pegar um Contrato?
Cada cidade principal do jogo possui um correio em que o jogador poderá pegar um contrato, abaixo você pode verificar a localização de cada correio que é onde você pega os contratos para prosseguir na Quest, para pegar o contrato basta dar use no correio.
 Cerulean |
 Saffron |
 Celadon |
 Vermilion |
|---|---|---|---|
 Fuchsia |
 Pewter |
 Viridian |
 Cinnabar |
 Hamlin |
 Ascorbia |
 Shamouti |
 Mandarin |
 Tangelo |
Observação: O tempo de espera de novos contratos da Brotherhood são de 30 segundos.
Tais contratos são únicos e aleatórios no sentido de que todos os NPC's serão diferentes, terão uma outfit nova e Pokémon aleatórios. Sempre que você pegar um novo contrato, você receberá uma dica que dirá em qual região o NPC está, nunca será a localização exata do NPC, se caso você perder a informação do seu contrato, sempre será possível vê-la novamente no PokePhone, como mostrado abaixo e se porventura o seu contrato for cancelado, você poderá voltar na cidade e pegá-lo novamente quantas vezes precisar.
Interface do PokePhone
• As recompensas dos contratos variam de acordo com a dificuldade em que você está, mas todo NPC dará Mighty Tokens e experiência.
| Dificuldade | Recompensa |
|---|---|
| Easy | |
| Medium | |
| Hard e Expert | |
| Hard (Lendário) | |
| Expert (Lendário) | |
- Causas que podem lhe fazer perder o contrato
- Se após ter iniciado a batalha com o NPC e derrotado 4 Pokémon dele o jogador se distanciar muito, o contrato é cancelado. Isso foi feito para evitar que jogadores deixassem o NPC com 1 ou 2 Pokémon e fossem embora, fazendo outros perderem tempo e adquirindo certa vantagem.
- Outro jogador derrotar o NPC antes.
- Em disputa de KS, o outro jogador der mais dano no total.
- Observação: Se o jogador morrer para o Npc, todo Pokémon que o jogador derrotou antes da morte passará a contar como inexistente, mesmo que o jogador pegue o contrato novamente.
Observações
- O jogador poderá pegar até 13 contratos por dia, porém só poderá concluir 12 contratos.
- No nível Hard existe uma possibilidade muito pequena de pegar um contrato de NPC Legendary, que nada mais é do que um personagem do desenho. Esses NPC's são extremamente fortes, portanto tome muito cuidado.
- Quem não tem contrato poderá encontrar tais NPC's pelo mapa, mas não será atacado por eles e nem poderá atacá-los.
- Os contratos Hard e Expert têm o mesmo nível de dificuldade. A diferença entre eles é que o nível expert foi criado para que não haja conflito entre quem está fazendo a quest e quem já terminou.
Localização dos NPC
| Dica da Localização | Imagem do Mapa |
|---|---|
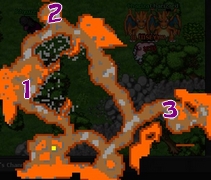
PT Explorando a ilha de Charizard Valley EN Exploring the island of the Charizard Valley |
|
PT Procurando por tesouros escondidos no cemitério próximo à cidade de Pewter EN Searching for hidden treasures at a cemetery near Pewter city |
|
PT Procurando por pedras da lua dentro do Mt. Moon EN Searching for moon stones inside the MT.MOON |
|
PT Tentando capturar pokémon do tipo pedra no Mt. Moon EN Trying to capture rock type pokemon at MT.MOON |
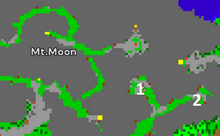 
|
PT Caçando pokémon do elemento voador perto da cidade de Pewter EN Hunting flying type pokemon near Pewter city |

|
PT Explorando uma ilha distante no nordeste, cheia de pokémon elétrico EN Exploring an island full of electric type pokémon far north-east |
|
PT Explorando o pântano perto da Cidade de Cerulean EN Exploring the swamp near Cerulean city |
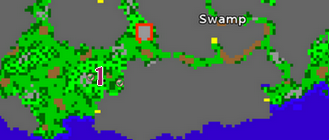 
|
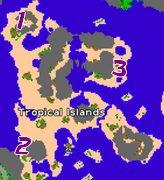
PT Explorando uma ilha tropical distante no norte, cheia de pokémon água EN Exploring a tropical island full of water type pokémon far to the north |
|
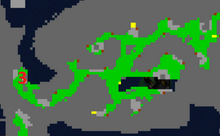
PT Indo para a cidade de Lavender pelo Rock Tunnel EN Going to Lavender town through the Rock Tunnel |
|
PT Explorando o cemitério da cidade de Lavender EN Exploring the Lavender town cemetery |
|
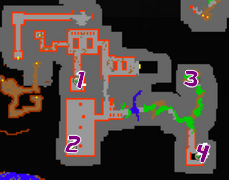
PT Tentando capturar alguns pokémon de fogo na ilha de Cinnabar EN Trying to catch some fire pokémon at Cinnabar island |
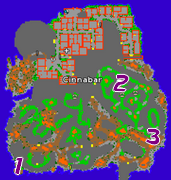 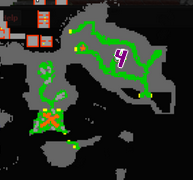 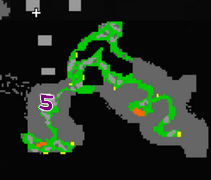 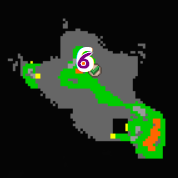
|
PT Estudando caveiras de Cubone perto da cidade de Cerulean EN Studying Cubone skulls near Cerulean city |
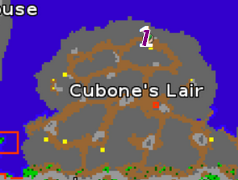 
|
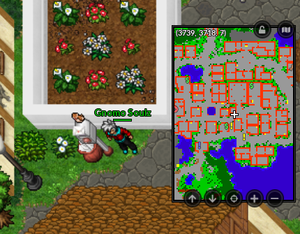
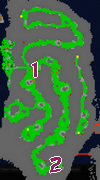
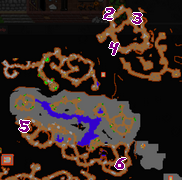
PT Explorando uma ilha ao norte da cidade de Cerulean EN Exploring an island, north of Cerulean city |
|
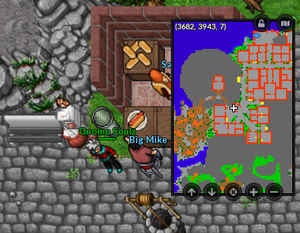
PT Vagando entre as cidades de Cerulean e Saffron EN Wandering between Cerulean and Saffron cities |
|
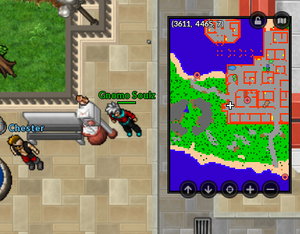
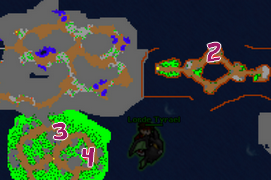
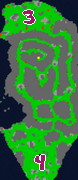
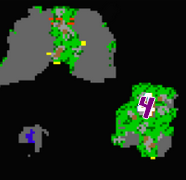
PT Explorando uma misteriosa ilha com pirâmides em algum lugar ao nordeste EN Exploring a mysterious island with pyramids, somewhere in the north-east |
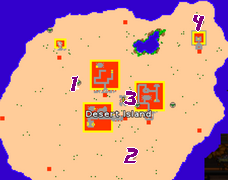   
|
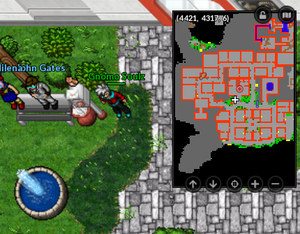
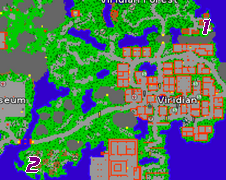
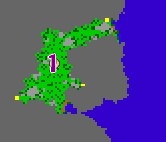
PT Explorando uma densa floresta perto da cidade de Viridian EN Exploring a dense forest near Viridian city |
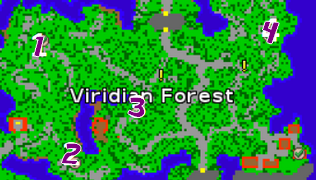
|
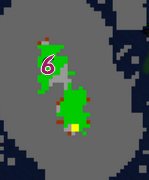
PT Tentando capturar um Pokémon parecido com um macaco próximo à cidade de Viridian EN Trying to catch a monkey kind pokemon near Viridian city |
|
PT Pescando em uma ponte gigante EN Fishing in a giant bridge |
|
PT Cortando árvores perto da cidade de Fuchsia EN Cutting trees near Fuchsia city |
|
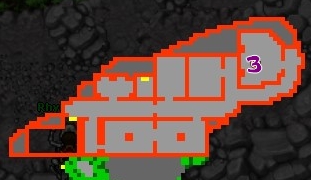
PT Investigando um navio quebrado ao leste da cidade de Fuchsia EN Investigating a crashed ship, east of Fuchsia city |
|
PT Explorando uma floresta tropical perto da cidade de Vermilion EN Exploring a tropical forest near Vermilion city |
|
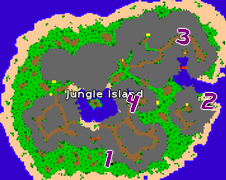
PT Caçando no Safari EN Hunting at Saffari Zone |
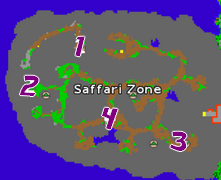 
|
PT Explorando algumas ilhas cheias de Pokémon de água ao oeste da cidade de Celadon EN Exploring some islands full of water type pokémon, west of Celadon city |
|
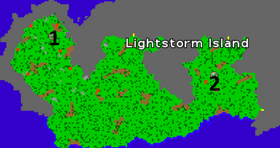
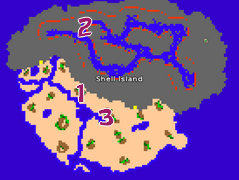
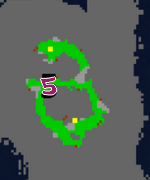
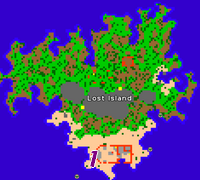
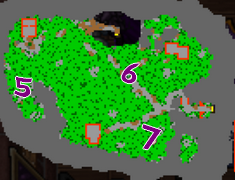
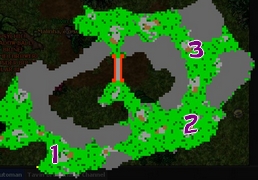
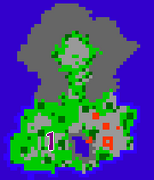
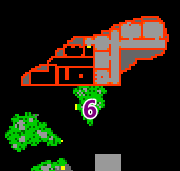
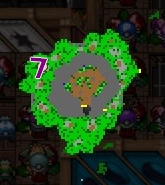
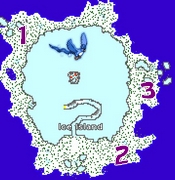
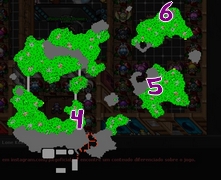
PT Explorando a maior ilha de Seafoam EN Exploring the greatest of Seafoam islands |
|
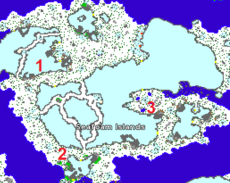
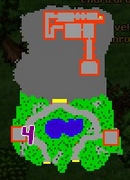
PT Explorando pequenas ilhas em Seafoam EN Exploring small islands of the Seafoam islands |
|
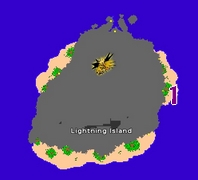
PT Procurando por um raro pokémon do tipo elétrico na Power Plant EN Searching for a rare electric type pokemon at Power Plant |
|
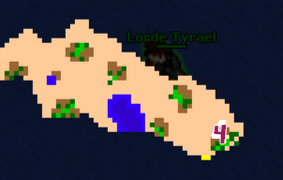
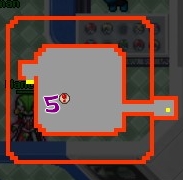
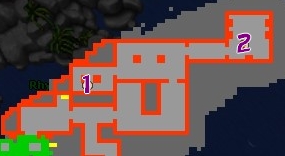
PT Vagando na área dos Rocket na ilha de Ascorbia EN Wandering in the rocket area at Ascorbia island |
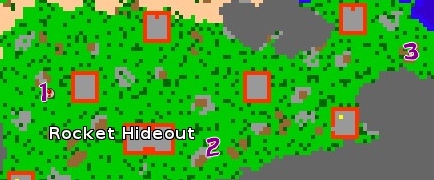 
|
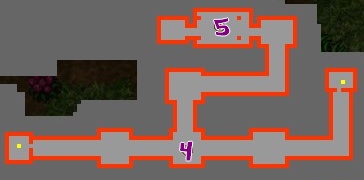
PT Visto pela última vez: Explorando a ilha Butwal EN Last seen: Exploring the Butwal island |
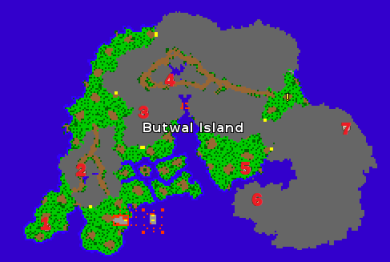
|
PT Caçando pokémon elétrico na ilha de Hamlin EN Hunting electric type pokémon at Hamlin island |
|
PT Procurando por uma pequena e misteriosa ilha cheia de Butterfree EN Searching for a small and mysterious island full of Butterfree |
|
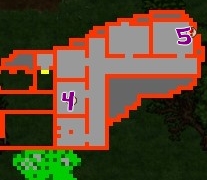
PT Procurando por sobreviventes nas cidades abandonadas da ilha de Hamlin EN Looking for survivors at abandoned cities at Hamlin island |
 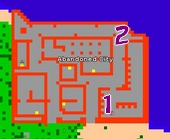 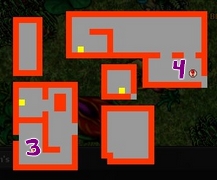
|
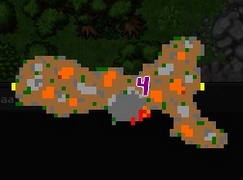
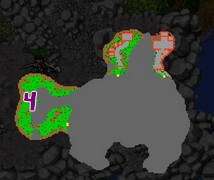
PT Caçando pokémon de terra na ilha Magma EN Hunting ground type pokémon at Magma island |
|
PT Caçando pokémon de fogo na ilha Magma EN Hunting fire type pokémon at Magma island |
   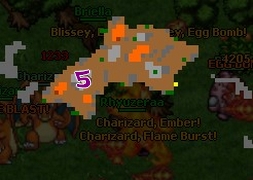
|
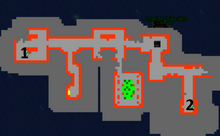
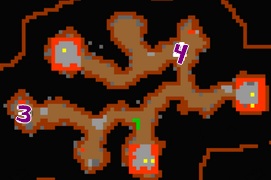
PT Explorando cavernas na ilha Magma EN Exploring caves at Magma island |
|
PT Vagando na ilha Tarroco EN Wandering at Tarroco island |
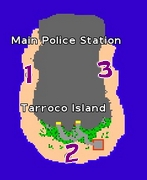 
|
PT Treinando pokémon no Clube de Luta na ilha de Shamouti EN Training pokemon at the Fight Club at Shamouti island |
|
PT Explorando a ilha Pinkan EN Exploring the Pinkan island |
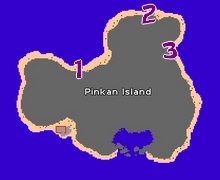 
|
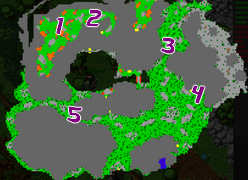
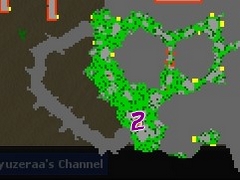
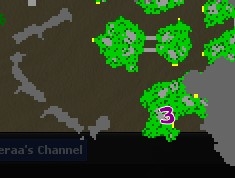
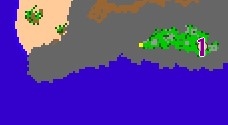
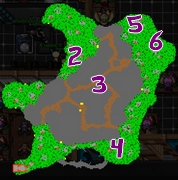
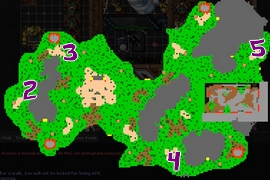
PT Vagando pelas florestas da ilha de Shamouti EN Wandering at Shamouti island forests |
|
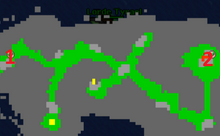
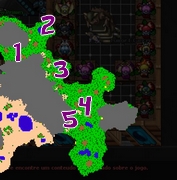
PT Caçando perto dos Tauros na ilha de Shamouti. EN Hunting near Tauros at Shamouti island |
|
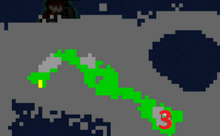
PT Procurando por pokémon raros na ilha Cleopatra EN Searching for rare pokémon at Cleopatra island |
|
PT Tentando parar o Big Snorlax nas ilhas Grapefruit EN Trying to stop the big Snorlax at grapefruits islands |
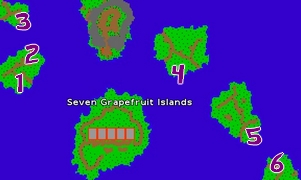
|
PT Procurando pelo Lendário pokémon Articuno EN Searching for the Legendary pokemon Articuno |
|
PT Procurando pelo Lendário pokémon Zapdos EN Searching for the Legendary pokemon Zapdos |
|
PT Procurando pelo Lendário pokémon Moltres EN Searching for the Legendary pokemon Moltres |
|
PT Treinando contra pokémon inseto na ilha Murcott EN Training against bug type pokémon at Murcott island |
|
PT Procurando por Meowth na ilha Golden EN Searching for Meowths at Golden island |
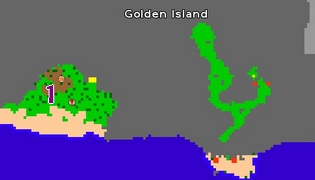 
|
PT Tentando capturar algum pokémon de planta na ilha Kinnow EN Trying to catch some grass type pokémon at Kinnow islands |
|
PT Tentando capturar algum pokémon de água na ilha Kinnow EN Trying to catch some water type pokémon at Kinnow islands |
|
PT Ajudando novos treinadores pokémon nos arredores da cidade de Trovitopolis EN Helping new pokemon trainers at Trovitopolis city outskirts |
|
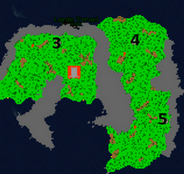
PT Caçando no lado oeste da floresta de Mandarin EN Hunting at the west side of Mandarin island forest |
|
PT Caçando no lado leste da floresta de Mandarin EN Hunting at the east side of Mandarin island forest |
|
PT Explorando o deserto misterioso na ilha de Mandarin EN Exploring the mysterious desert of Mandarin island |
|
PT Indo capturar Aipom na ilha de Mandarin EN Going to catch an Aipom at Mandarin Island |
|
PT Vagando na Kabuto Fossil Island EN Wandering at the Kabuto Fossil island |
|
NPCs Lendários
| Blaine | Erika | Misty | Brock | Bruno | Agatha | Sabrina | Koga | Kyra | Lance |
|---|---|---|---|---|---|---|---|---|---|

|

|

|

|

|

|

|

|

|

|
| Lorelei | Ash Ketchum | Gary Oak | Looker * | Chun Li | Lt. Surge | Deadpool | Telecoteco |
|---|---|---|---|---|---|---|---|

|

|

|

|

|

|

|

|
* Obs.: O NPC Looker fica alternando entre os 9 Pokémon, usando 6 dentre eles.
Premiação
Após concluir todos os NPCs (Easy, Medium, e Hard), terá recebido 15.75kk de EXP no total. No entanto, a premiação principal da Duelist Brotherhood Quest ocorre após finalizar os 1.000 NPC's e 5 lendários na dificuldade Hard, você deverá falar com o NPC Vital Hook, você receberá como recompensa:
 15 Boost Stones.
- 15KK de EXP.
- 2 Helds Tier 7, sendo um de cada tabela.
- Legendary Outfit
Segue abaixo a tabela dos possíveis Helds Tier 7 que você poderá receber como recompensa.
| Tabela 1 | |
| Held | Nome |
|---|---|
| X-Attack | |
| X-Critical | |
| X-Defense | |
| X-Lucky | |
| Y-Teleport |
| Tabela 2 | |
| Held | Nome |
|---|---|
| X-Poison | |
| X-Rage | |
| X-Return | |
| X-Strafe | |
| X-Vitality | |
| Y-Cure | |
| Y-Control | |
| Y-Regeneration | |
| Y-Wing |
| Tabela 2 | |
| Held | Nome |
|---|---|
| X-Accuracy | |
| X-Agility | |
| X-Boost | |
| X-Cooldown | |
| X-Elemental | |
| X-Experience | |
| X-Haste | |
| X-Harden | |
| X-Hellfire |