How Embedded Tower works: mudanças entre as edições
| Linha 113: | Linha 113: | ||
! width="7%" style="background-color: #4682B4" | Points | ! width="7%" style="background-color: #4682B4" | Points | ||
|- | |- | ||
| align="center" | '''[[Embedded_Tower_- | | align="center" | '''[[Embedded_Tower_-_First_to_Fourth_Floor|1st Floor]]''' | ||
| align="center" | ''' 150 to 424 '''<br> ''' 425 to 449'''<br> ''' 450 to 600 ''' | | align="center" | ''' 150 to 424 '''<br> ''' 425 to 449'''<br> ''' 450 to 600 ''' | ||
| align="center" | ''' 150,000 XP '''<br> '''37,500 XP '''<br> ''' 18,750 XP ''' | | align="center" | ''' 150,000 XP '''<br> '''37,500 XP '''<br> ''' 18,750 XP ''' | ||
| align="center" | '''[[Arquivo:Tower Points.png|29px|link=]]'''<br> '''40 Tower Points ''' | | align="center" | '''[[Arquivo:Tower Points.png|29px|link=]]'''<br> '''40 Tower Points ''' | ||
|- | |- | ||
| align="center" | '''[[ | | align="center" | '''[[Embedded_Tower_-_First_to_Fourth_Floor|2nd Floor]]''' | ||
| align="center" | '''150 to 424'''<br> '''425 to 449 '''<br> '''450 to 600''' | | align="center" | '''150 to 424'''<br> '''425 to 449 '''<br> '''450 to 600''' | ||
| align="center" | '''200,000 XP '''<br> '''50,000 XP '''<br> '''25,000 XP ''' | | align="center" | '''200,000 XP '''<br> '''50,000 XP '''<br> '''25,000 XP ''' | ||
| align="center" | '''[[Arquivo:Tower Points.png|29px|link=]]'''<br> '''80 Tower Points ''' | | align="center" | '''[[Arquivo:Tower Points.png|29px|link=]]'''<br> '''80 Tower Points ''' | ||
|- | |- | ||
| align="center" | '''[[ | | align="center" | '''[[Embedded_Tower_-_First_to_Fourth_Floor|3rd Floor]]''' | ||
| align="center" | '''150 to 424'''<br> '''425 to 449'''<br> '''450 to 600''' | | align="center" | '''150 to 424'''<br> '''425 to 449'''<br> '''450 to 600''' | ||
| align="center" | '''250,000 XP '''<br> '''62,500 XP '''<br> '''31,250 XP ''' | | align="center" | '''250,000 XP '''<br> '''62,500 XP '''<br> '''31,250 XP ''' | ||
| Linha 129: | Linha 129: | ||
|- | |- | ||
|- | |- | ||
| align="center" | '''[[ | | align="center" | '''[[Embedded_Tower_-_First_to_Fourth_Floor|4th Floor]]''' | ||
| align="center" | '''150 to 424'''<br> '''425 to 449'''<br> '''450 to 600''' | | align="center" | '''150 to 424'''<br> '''425 to 449'''<br> '''450 to 600''' | ||
| align="center" | '''300,000 XP '''<br> '''75,000 XP '''<br> '''37,500 XP ''' | | align="center" | '''300,000 XP '''<br> '''75,000 XP '''<br> '''37,500 XP ''' | ||
| Linha 135: | Linha 135: | ||
|- | |- | ||
|- | |- | ||
| align="center" | '''[[ | | align="center" | '''[[Embedded_Tower_-_Fifth_Floor|5th Floor]]''' | ||
| align="center" | '''150 to 424'''<br> '''425 to 449 '''<br> '''450 to 600''' | | align="center" | '''150 to 424'''<br> '''425 to 449 '''<br> '''450 to 600''' | ||
| align="center" | '''600,000 XP '''<br> '''150,000 XP '''<br> '''75,000 XP ''' | | align="center" | '''600,000 XP '''<br> '''150,000 XP '''<br> '''75,000 XP ''' | ||
| Linha 141: | Linha 141: | ||
|- | |- | ||
|- | |- | ||
| align="center" | '''[[ | | align="center" | '''[[Embedded_Tower_-_Sexto_Andar|6th Floor]]''' | ||
| align="center" | '''450 to 600 ''' | | align="center" | '''450 to 600 ''' | ||
| align="center" | '''1,000,000 XP ''' | | align="center" | '''1,000,000 XP ''' | ||
| Linha 147: | Linha 147: | ||
|- | |- | ||
|- | |- | ||
| align="center" | '''[[ | | align="center" | '''[[Embedded_Tower_-_Seventh_Floor|7th Floor]]''' | ||
| align="center" | '''525 to 600''' | | align="center" | '''525 to 600''' | ||
| align="center" | '''6,000,000 XP ''' | | align="center" | '''6,000,000 XP ''' | ||
| Linha 166: | Linha 166: | ||
|- | |- | ||
|- | |- | ||
| align="center" | '''[[ | | align="center" | '''[[Embedded_Tower_-_First_to_Fourth_Floor|1st Floor]]''' | ||
| align="center" | '''80''' | | align="center" | '''80''' | ||
| align="center" | '''12''' | | align="center" | '''12''' | ||
| Linha 174: | Linha 174: | ||
|- | |- | ||
|- | |- | ||
| align="center" | '''[[ | | align="center" | '''[[Embedded_Tower_-_First_to_Fourth_Floor|2nd Floor]]''' | ||
| align="center" | '''80''' | | align="center" | '''80''' | ||
| align="center" | '''12''' | | align="center" | '''12''' | ||
| Linha 182: | Linha 182: | ||
|- | |- | ||
|- | |- | ||
| align="center" | '''[[ | | align="center" | '''[[Embedded_Tower_-_First_to_Fourth_Floor|3rd Floor]]''' | ||
| align="center" | '''80''' | | align="center" | '''80''' | ||
| align="center" | '''12''' | | align="center" | '''12''' | ||
| Linha 190: | Linha 190: | ||
|- | |- | ||
|- | |- | ||
| align="center" | '''[[ | | align="center" | '''[[Embedded_Tower_-_First_to_Fourth_Floor|4th Floor]]''' | ||
| align="center" | '''80''' | | align="center" | '''80''' | ||
| align="center" | '''12''' | | align="center" | '''12''' | ||
| Linha 198: | Linha 198: | ||
|- | |- | ||
|- | |- | ||
| align="center" | '''[[ | | align="center" | '''[[Embedded_Tower_-_Fifth_Floor|5th Floor]]''' | ||
| align="center" | '''100''' | | align="center" | '''100''' | ||
| align="center" | '''25''' | | align="center" | '''25''' | ||
| Linha 206: | Linha 206: | ||
|- | |- | ||
|- | |- | ||
| align="center" | '''[[ | | align="center" | '''[[Embedded_Tower_-_Sexto_Andar|6th Floor]]''' | ||
| align="center" | '''175''' | | align="center" | '''175''' | ||
| align="center" | '''20''' | | align="center" | '''20''' | ||
| Linha 214: | Linha 214: | ||
|- | |- | ||
|- | |- | ||
| align="center" | '''[[ | | align="center" | '''[[Embedded_Tower_-_Seventh_Floor|7th Floor]]''' | ||
| align="center" | '''[[Arquivo:Semvip.png|link=]]''' | | align="center" | '''[[Arquivo:Semvip.png|link=]]''' | ||
| align="center" | '''[[Arquivo:Semvip.png|link=]]''' | | align="center" | '''[[Arquivo:Semvip.png|link=]]''' | ||
Edição atual tal como às 18h50min de 3 de junho de 2026
![]()
![]()
| Shortcuts | ||||
|---|---|---|---|---|
| First to Fourth Floor | Fifth Floor | Sixth Floor | Jirachi's Chamber | Seventh Floor |
Level required: 150
Suggested level: 150+
Reward: Embedded Tower Rewards
If you find any errors or want to add any information, please contact one of the wiki members.
How to get access to the Embedded Tower
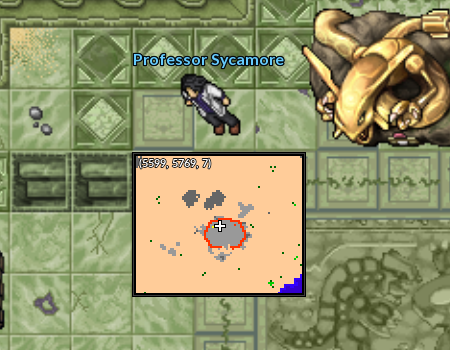
First of all, the player must go to Phenac and talk to Professor Sycamore. He'll tell you that he's doing research in the tower and hasn't been able to make any progress because there are Pokémon with greater strength than normal. He then tells that the last researcher to enter the tower was injured on the way out and that there was no one left to send. He will propose a deal offering a reward if the player manages to help him.
|
Coordinates: 5599, 5769, 7
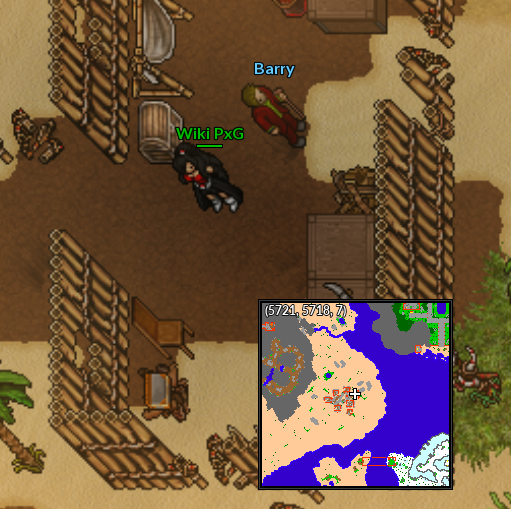
After that, the Professor will ask you to talk to one of his researchers who is in the desert east of Phenac, doing research. His name is Barry and he will help you enter the tower.
|
Coordinates: 5722, 5717, 7
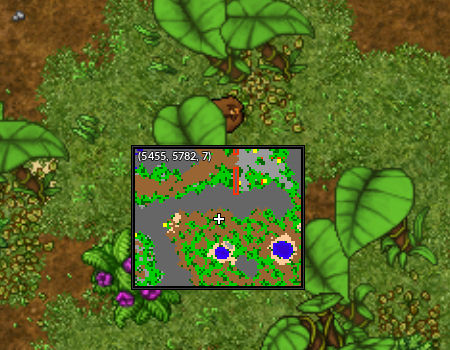
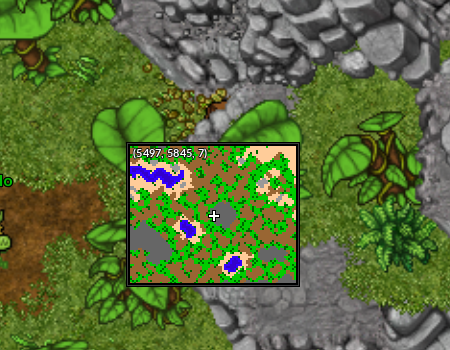
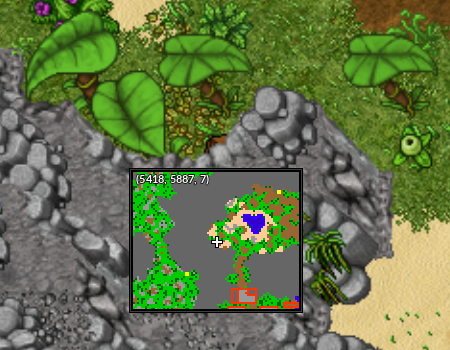
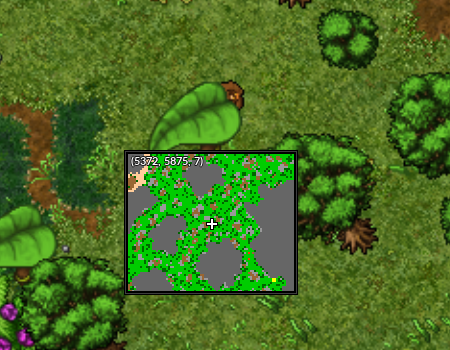
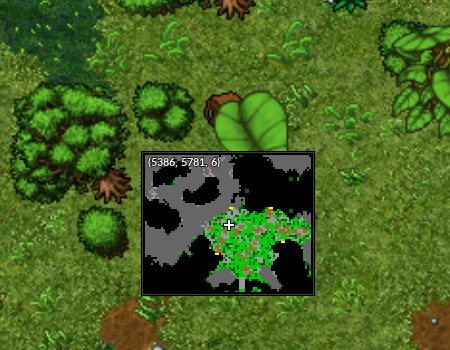
Barry will say that he has lost his backpack and will ask you to look for it in one of these places:
| Location 1 | Location 2 |
|---|---|
 |
|
| Coordinates: 5455, 5782, 7 | Coordinates: 5497, 5845, 7 |
| Location 3 | Location 4 |
 |
|
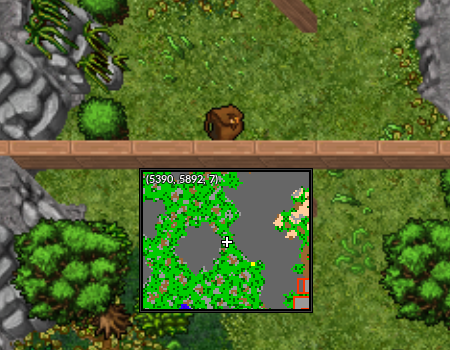
| Coordinates: 5418, 5887, 7 | Coordinates: 5372, 5875, 7 |
| Location 5 | Location 6 |
 |
|
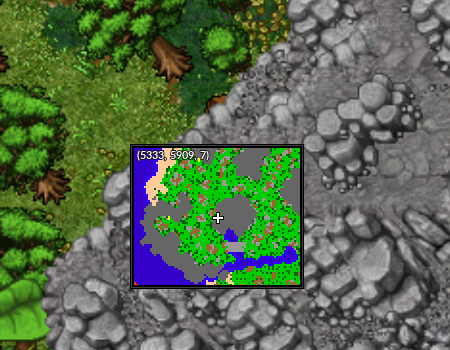
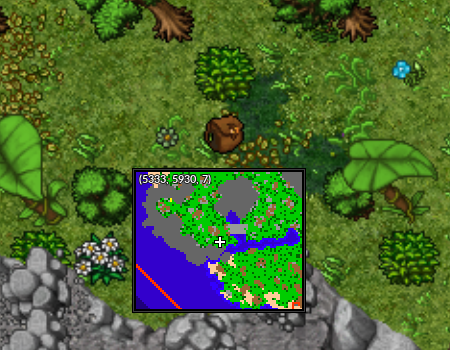
| Coordinates: 5386, 5781, 6 | Coordinates: 5333, 5909, 7 |
| Location 7 | Location 8 |
 |
|
| Coordinates: 5386, 5781, 6 | Coordinates: 5333, 5909, 7 |
Note: You will only need to click on the backpack.
After that, return to Barry to hand over your backpack, and he will give you the ![]() Sky Pillar Emblem, an item that must be in your backpack to enter the Embedded Tower.
Sky Pillar Emblem, an item that must be in your backpack to enter the Embedded Tower.
General Operation of Embedded Tower
The Embbeded Tower is a weekly content and can be done at any time during the week, always resetting every Monday at 07:40 in the morning. The system has 15 Tower Attempts each week, and you can buy 15 Tower Attempts in the diamond store through the ![]() Tower Attempts item, which costs 15 Diamonds (
Tower Attempts item, which costs 15 Diamonds (![]() ).
).
The weekly Tower Attempts are consumed upon entering the floor, but the number of Tower Attempts consumed by the tower varies according to the floors, and in case of failure during the attempt, the system returns some Tower Attempts varying according to the table below:
| Floor | Tower Attempts required | Tower Attempts returned |
|---|---|---|
| 1st to 5th Floor | 2 Tower Attempts | 1 Tower Attempts |
| 6th Floor | 6 Tower Attempts | 4 Tower Attempts |
| 7th Floor | 8 Tower Attempts | 6 Tower Attempts |
The floors have a varied experience and a fixed score, with Tower Points (![]() ) on the 1st to 5th floors and Wish Points (
) on the 1st to 5th floors and Wish Points (![]() ) on the 6th and 7th floors.
) on the 6th and 7th floors.
| Floor | Level required | Experience gained | Points |
|---|---|---|---|
| 1st Floor | 150 to 424 425 to 449 450 to 600 |
150,000 XP 37,500 XP 18,750 XP |
40 Tower Points |
| 2nd Floor | 150 to 424 425 to 449 450 to 600 |
200,000 XP 50,000 XP 25,000 XP |
80 Tower Points |
| 3rd Floor | 150 to 424 425 to 449 450 to 600 |
250,000 XP 62,500 XP 31,250 XP |
120 Tower Points |
| 4th Floor | 150 to 424 425 to 449 450 to 600 |
300,000 XP 75,000 XP 37,500 XP |
160 Tower Points |
| 5th Floor | 150 to 424 425 to 449 450 to 600 |
600,000 XP 150,000 XP 75,000 XP |
500 Tower Points 300 Tower Points |
| 6th Floor | 450 to 600 | 1,000,000 XP | 50 Wish Points |
| 7th Floor | 525 to 600 | 6,000,000 XP | 150 Wish Points |
There is a resource limit within the floors.
| Floor | Potions and Elixirs | Revive | Medicine | Death penalties | Berries |
|---|---|---|---|---|---|
| 1st Floor | 80 | 12 | |||
| 2nd Floor | 80 | 12 | |||
| 3rd Floor | 80 | 12 | |||
| 4th Floor | 80 | 12 | |||
| 5th Floor | 100 | 25 | |||
| 6th Floor | 175 | 20 | |||
| 7th Floor |
How to unlock the floors
Tower Points (![]() ) are used to redeem part of the available rewards, but their main use is for unlocking floors.
) are used to redeem part of the available rewards, but their main use is for unlocking floors.
| Item | Points needed |
|---|---|
1st Floor |
Unlocked |
2nd Floor |
50 Tower Points |
3rd Floor |
75 Tower Points |
4th Floor |
150 Tower Points |
5th Floor |
300 Tower Points |
6th Floor |
600 Tower Points |
7th Floor |
1200 Tower Points |
- To unlock the 5th Floor, in addition to the points you need to complete the Tablets from the 1st Floor to the 4th Floor.
- To unlock the 6th Floor, in addition to the points you need to possess the 3 spheres from the 5th Floor and defeat Regigigas to obtain the Tectonics Plates
 .
. - To unlock the 7th Floor, in addition to the points, you need to complete the entire 6th Floor at least once and win the battle against Jirachi.