|
|
| (5 revisões intermediárias por 4 usuários não estão sendo mostradas) |
| Linha 1: |
Linha 1: |
| <center>[[Arquivo:Sea.png|link=Seavell Tasks]]</center> | | <center> [[file:Banner_Clã_Seavell.png|link=]] </center> |
|
| |
|
| ==Introdução==
| | =Introdução= |
|
| |
|
| Em cada Clã existe 5 Rankings. Quando o jogador entra para um Clã, o mesmo se torna membro do Rank 1, sendo necessário concluir as 4 Tasks do Clã para alcançar o Rank 5. Cada task constitui em 4 partes, sendo elas:
| | Para escolher seu clã, o jogador deve ir até os portais na área norte do Trade Center. Pode acessar dessa forma, ou subindo as escadas após a seção de profissões. O portal para os domínios do clã '''Seavell''' é representado por um Gyarados. |
|
| |
|
| *Coletar e entregar itens.
| | <center> |
| **'''Observação:''' Os itens podem ser comprados de outros jogadores.
| | <br> |
| *Capturar um Pokémon.
| | [[Arquivo:Porta Clãs.gif|link=]] |
| *Derrotar duas listas de diferentes Pokémon.
| | </center> |
| *Entregar o Pokémon capturado e concluir duas Danger Room.
| | |
| | <br> |
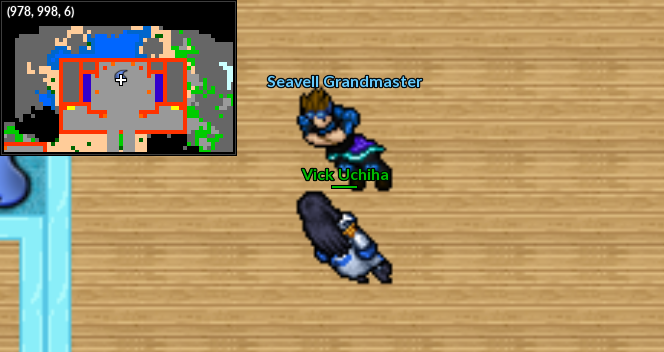
| | Ao atravessar o portal, o jogador deve encontrar o NPC '''Seavell Grandmaster''', responsável pelo recrutamento de novos membros. Ao ingressar no clã, o jogador receberá o título de '''Seavell Drop''', o primeiro dos cinco rankings disponíveis. |
| | |
| | <center> |
| | <br> |
| | [[Arquivo:NPC Seavell Grandmaster.png|link=]]<br> |
| | '''Coordenadas:''' 979, 995, 6 |
| | </center> |
| | |
| | =Tasks= |
| | |
| | Para progredir no clã escolhido, o jogador deve concluir uma série de tarefas divididas em etapas. Essas etapas consistem em coletar itens, capturar Pokémon, derrotar Pokémon selvagens com o Pokémon capturado e, por fim, enfrentar as Danger Rooms. O jogador deve conversar com os treinadores de cada ranking para receber suas missões. Não é possível pular etapas, a progressão segue a ordem: '''Drop''', '''Icelake''', '''Waterfall''', '''Frost''' e, por fim, o ranking máximo, '''Queen/King''' (dependendo do gênero do personagem). |
| | |
| | <center> |
| | <br> |
| | {| class="wikitable" style="width: 30%; text-align: center" |
| | |- |
| | ! colspan="2" | Requisitos |
| | |- |
| | ! style="width: 50%" | Task |
| | ! style="width: 50%" | Nível |
| | |- |
| | | Rank 1 ao 2 || 90 |
| | |- |
| | | Rank 2 ao 3 || 100 |
| | |- |
| | | Rank 3 ao 4 || 110 |
| | |- |
| | | Rank 4 ao 5 || 120 |
| | |} |
|
| |
|
| <table class="seeMore">
| | </center> |
| <tr>
| | |
| <td class="seeMore__image">[[Arquivo:Telekinetic-compass.gif|link=]]</td>
| | == Rank 1 ao 2 == |
| <td> '''Veja Também:''' [[Danger Room]] • [[Clan Tasks]]. </td>
| | |
| </tr>
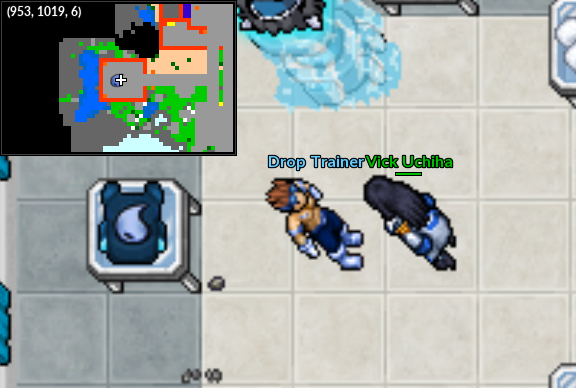
| | Para iniciar a primeira tarefa, o jogador deve conversar com o NPC '''Drop Trainer''', localizado a oeste da área do clã Seavell. Lembrando que para esse rank, é necessário o jogador ser level 90 ou superior. |
| </table>
| | |
| | <center> <br> |
| | [[Arquivo:NPC Seavell Drop Trainer.png|link=]]<br> |
| | '''Coordenadas:''' 952, 1019, 6 |
| | </center> |
|
| |
|
| ==Rank 1 ao 2 (Nível 90)==
| |
| <tabber> | | <tabber> |
| |-|Coletar= | | |
| | |-|1º Etapa= |
| | |
| | <br> |
| <center> | | <center> |
| {|class="wikitable" width="40%" align="center" text-align="center"
| | <br> |
| ! colspan="2" style="background-color: #007FFF" | <span style="color: white">'''Coletar'''</span>
| | {|class="wikitable" width="20%" align="center" text-align="center" |
| |-style="width:50px; text-align:center;"
| | ! colspan="2" style="background-color: #E84B16" | Etapa 1 - Entregar item |
| ! | Quantidade
| | |-style="width:40px; text-align:center;" |
| ! | Item
| | ! width="40%" | Quantidade |
| |-style="width:50px; text-align:center;"
| | ! width="40%" | Item |
| | '''1.500'''
| | |-style="width:40px; text-align:center;" |
| | [[Arquivo:Watergem.png|link=Drop de Itens]] Water Gem
| | | '''20''' |
| |-style="width:50px; text-align:center;"
| | | [[Arquivo:SolidWaterGem.png|link=]] [[Solid Water Gem]] |
| | '''1.500'''
| | |-style="width:40px; text-align:center;" |
| | [[Arquivo:Snowball.png|link=Drop de Itens]] Snowball
| | | '''20''' |
| |-style="width:50px; text-align:center;"
| | | [[Arquivo:SolidIce.png|link=]] [[Solid Ice Cube]] |
| | '''5'''
| | |} |
| | [[Arquivo: Crab Claw.png|link= Drop de Itens]] Crab Claw
| |
| |}
| |
| </center> | | </center> |
| |-|Capturar= | | <br> |
| | |
| | '''Observações:''' |
| | * Os itens podem ser comprados de outros jogadores. <br> |
| | * É possível converter 100 [[Water Gem]] em 1 [[Solid Water Gem]] |
| | * É possível converter 100 [[Snowball]] em 1 [[Solid Ice Cube]] |
| | |
| | Após obter todos os itens solicitados, retorne ao NPC e entregue-os para concluir a etapa atual e avançar para a próxima fase da missão. |
| | |
| | |-|2º Etapa= |
| | |
| <center> | | <center> |
| {|class="wikitable" width="40%" align="center" text-align="center"
| | {|class="wikitable" width="20%" align="center" text-align="center" |
| ! colspan="2" style="background-color: #007FFF" | <span style="color: white">'''Capturar'''</span>
| | ! colspan="2" style="background-color: #E84B16" | Etapa 2 - Capturar |
| |-style="width:50px; text-align:center;"
| | |-style="width:40px; text-align:center;" |
| ! width="20%" |
| | |
| ! | Pokémon
| | | width="33%" | [[Arquivo:134-Vaporeon.png|link=Vaporeon]] <br> Vaporeon |
| |-style="width:50px; text-align:center;"
| | |} |
| | [[Arquivo:087-Dewgong.png|link=Dewgong]]
| |
| | Dewgong
| |
| |}
| |
| </center> | | </center> |
| |-|Derrotar= | | |
| | O jogador poderá escolher onde deseja realizar a captura do Pokémon: dentro ou fora da Dungeon. Cada opção possui características próprias, conforme descrito abaixo. |
| | |
| | Para acessar a Dungeon, basta conversar com o NPC responsável pela missão e confirmar a entrada. |
| | |
| | '''Dentro da Dungeon:''' <br> |
| | * Utiliza um sistema de captura especial, com chances de captura facilitadas. |
| | * Os Pokémon não concedem experiência ao serem derrotados. |
| | * Os Pokémon não fornecem loot. |
| | * Não é possível encontrar versões Shiny. |
| | * Não há perda de Experiência ou Bless em caso de morte. |
| | * As Poké Balls não são consumidas durante as tentativas de captura. |
| | * Todas as Poké Balls possuem a mesma chance de captura. |
| | * As seguintes Poké Balls são bloqueadas: Master Ball, Beast Ball, Premier Ball e Repeat Ball. |
| | |
| | '''Fora da Dungeon:'''<br> |
| | * A captura segue o sistema tradicional do jogo. |
| | * Não há mais o bônus de captura facilitada concedido pela Task de Clã. |
| | |
| | Ao capturar o Pokémon solicitado, ele será entregue como um item único na mochila. Em seguida, retorne ao NPC para prosseguir para a próxima etapa da missão. |
| | |
| | |-|3º Etapa= |
| | |
| | Na 3ª etapa, o NPC solicitará que o jogador derrote uma quantidade específica de Pokémon de determinados elementos. Apenas Pokémon de nível 50 ou superior serão contabilizados para o progresso. |
| | |
| <center> | | <center> |
| {|class="wikitable" width="40%" align="center" text-align="center"
| | <br> |
| ! colspan="3" style="background-color: #007FFF" | <span style="color: white">'''Derrotar (1ª Lista)'''</span>
| | {|class="wikitable" width="35%" align="center" text-align="center" |
| |-style="width:50px; text-align:center;"
| | ! colspan="3" style="background-color: #E84B16" | Etapa 3 - Derrotar Pokémon |
| | [[Arquivo:022-Fearow.png|link=Fearow]]<br />'''50''' Fearow
| | |-style="text-align:center;" |
| | [[Arquivo:083-Farfetch-D.png|link=Farfetch-D]]<br />'''50''' Farfetch'd
| | | width="33%" | [[Arquivo:Fire.png|link=]]<br> 100 Pokémon do elemento Fogo<br> Level 50 ou superior |
| | [[Arquivo:105-Marowak.png|link=Marowak]]<br />'''50''' Marowak
| | | width="33%" | [[Arquivo:Ground.png|link=]]<br> 100 Pokémon do elemento Terra<br> Level 50 ou superior |
| |}
| | |
| <br />
| | |} |
| {|class="wikitable" width="40%" align="center" text-align="center"
| |
| ! colspan="3" style="background-color: #007FFF" | <span style="color: white">'''Derrotar (2ª Lista)'''</span>
| |
| |-style="width:50px; text-align:center;"
| |
| | [[Arquivo:232-Donphan.png|link=Donphan]]<br />'''45''' Donphan
| |
| | [[Arquivo:028-Sandslash.png|link=Sandslash]]<br />'''45''' Sandslash
| |
| | [[Arquivo:148-Dragonair.png|link=Dragonair]]<br />'''20''' Dragonair
| |
| |}
| |
| </center> | | </center> |
| |-|Danger Room= | | |
| | '''Observações:'''<br> |
| | * Caso o jogador possua outro Pokémon da mesma espécie com '''Boost''', '''Held Itens''' ou outras melhorias, ele poderá utilizá-lo normalmente para concluir os objetivos da missão. |
| | * Para que o progresso seja contabilizado, é necessário apenas que o Pokémon solicitado seja o responsável por finalizar os Pokémon. Não é obrigatório utilizar a versão recebida como item único durante a missão. |
| | |
| | Após terminar de derrotar a lista solicitada do NPC, retorne a ele, devolva o Pokémon com o status de item único e vá para a próxima etapa, da Danger Room. |
| | |
| | |-|4º Etapa= |
| | |
| | <center> |
| | [[Arquivo:DR Clã Seavell.png|link=]]<br> |
| | '''Coordenadas:''' 974, 998, 5 |
| | </center> |
| | |
| | Ao entrar no saguão da Danger Room, o jogador poderá escolher de qual Clã deseja realizar essa etapa da missão. Para concluir essa fase, será necessário completar a Danger Room de dois '''Clãs diferentes'''. |
| | |
| | Ao entrar na Danger Room, o jogador receberá automaticamente 6 Pokémon temporários, definidos de acordo com o seu rank atual. |
| | |
| | '''Observações:'''<br> |
| | * Dentro da Danger Room, o jogador poderá utilizar revives ilimitados. |
| | * O jogador terá 20 minutos para concluir a Danger Room ao entrar nela. |
| | |
| <center> | | <center> |
| {|class="wikitable" width="40%" align="center" text-align="center"
| | {|class="wikitable" width="45%" align="center" text-align="center" |
| ! colspan="3" style="background-color: #007FFF" | <span style="color: white">'''Danger Room Team'''</span>
| | ! colspan="3" style="background-color: #E84B16" | Danger Room Team |
| |-style="width:50px; text-align:center;"
| | |-style="text-align:center;" |
| | [[Arquivo:087-Dewgong.png|link=Dewgong]]<br />Dewgong
| | | width="33%" | [[Arquivo:080 - Shiny Slowbro.png|link=Shiny Slowbro]] <br> Shiny Slowbro |
| | [[Arquivo:184-Azumarill.png|link=Azumarill]]<br />Azumarill
| | | width="33%" | [[Arquivo:121-Starmie.png|link=Starmie]] <br> Starmie |
| | [[Arquivo:186-Politoed.png|link=Politoed]]<br />Politoed
| | | width="33%" | [[Arquivo:134-Vaporeon.png|link=Vaporeon]] <br> Vaporeon |
| |-style="width:50px; text-align:center;"
| | |-style="text-align:center;" |
| | [[Arquivo:271-Lombre.png|link=Lombre]]<br />Lombre
| | | width="33%" | [[Arquivo:139-Omastar.png|link=Omastar]] <br> Omastar |
| | [[Arquivo:195-Quagsire.png|link=Quagsire]]<br />Quagsire
| | | width="33%" | [[Arquivo:342-Crawdaunt.png|link=Crawdaunt]] <br> Crawdaunt |
| | [[Arquivo:091-Cloyster.png|link=Cloyster]]<br />Cloyster
| | | width="33%" | [[Arquivo:362-Glalie.png|link=Glalie]] <br> Glalie |
| |}
| | |} |
| </center> | | </center> |
| | |
| | <br>Após concluir a Danger Room de dois Clãs diferentes, converse com o NPC Drop Trainer, o jogador receberá [[Arquivo:Exp_icon.png|link=]] 210.000 de experiência e uma [[Arquivo:Ice_Stone.gif|link=]] Ice Stone. |
| </tabber> | | </tabber> |
| '''Recompensa:''' 100.000 de [[Arquivo:Exp_icon.png|24px|link=]] Experiência e 1 [[Arquivo:Ice-stone.gif|link=Pedras de Evolução]] Ice Stone.
| |
|
| |
|
| ==Rank 2 ao 3 (Level 100)== | | == Rank 2 ao 3 == |
| | |
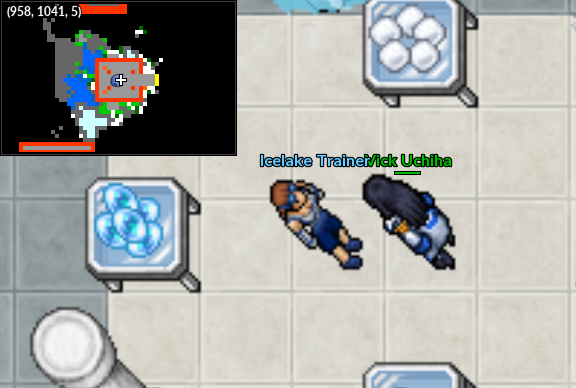
| | Para iniciar a primeira tarefa, o jogador deve conversar com a '''NPC Icelake Trainer''', é necessário ser level 100 ou superior. |
| | |
| | <center> <br> |
| | [[Arquivo:NPC Seavell Icelake Trainer.png|link=]]<br> |
| | '''Coordenadas:''' 957, 1041, 5 |
| | </center> |
| | |
| <tabber> | | <tabber> |
| |-|Coletar=
| | |-|1º Etapa= |
| | |
| | <br> |
| <center> | | <center> |
| {|class="wikitable" width="40%" align="center" text-align="center"
| | <br> |
| ! colspan="2" style="background-color: #007FFF" | <span style="color: white">'''Coletar'''</span>
| | {|class="wikitable" width="20%" align="center" text-align="center" |
| |-style="width:50px; text-align:center;"
| | ! colspan="2" style="background-color: #E84B16" | Etapa 1 - Entregar item |
| ! | Quantidade
| | |-style="width:40px; text-align:center;" |
| ! | Item
| | ! width="40%" | Quantidade |
| |-style="width:50px; text-align:center;"
| | ! width="40%" | Item |
| | '''2.000'''
| | |-style="width:40px; text-align:center;" |
| | [[Arquivo:Watergem.png|link=Drop de Itens]] Water Gem
| | | '''30''' |
| |-style="width:50px; text-align:center;"
| | | [[Arquivo:SolidWaterGem.png|link=]] [[Solid Water Gem]] |
| | '''2.000'''
| | |-style="width:40px; text-align:center;" |
| | [[Arquivo:Snowball.png|link=Drop de Itens]] Snowball
| | | '''30''' |
| |-style="width:50px; text-align:center;"
| | | [[Arquivo:SolidIce.png|link=]] [[Solid Ice Cube]] |
| | '''10'''
| | |} |
| | [[Arquivo:Fish Fin.png|link= Drop de Itens]] Fish Fin
| |
| |}
| |
| </center> | | </center> |
| |-|Capturar=
| | <br> |
| | |
| | '''Observações:''' |
| | * Os itens podem ser comprados de outros jogadores. <br> |
| | * É possível converter 100 [[Water Gem]] em 1 [[Solid Water Gem]] |
| | * É possível converter 100 [[Snowball]] em 1 [[Solid Ice Cube]] |
| | |
| | Após obter todos os itens solicitados, retorne ao NPC e entregue-os para concluir a etapa atual e avançar para a próxima fase da missão. |
| | |
| | |-|2º Etapa= |
| | |
| <center> | | <center> |
| {|class="wikitable" width="40%" align="center" text-align="center"
| | {|class="wikitable" width="20%" align="center" text-align="center" |
| ! colspan="2" style="background-color: #007FFF" | <span style="color: white">'''Capturar'''</span>
| | ! colspan="2" style="background-color: #E84B16" | Etapa 2 - Capturar |
| |-style="width:50px; text-align:center;"
| | |-style="width:40px; text-align:center;" |
| ! width="20%" |
| | |
| ! | Pokémon
| | | width="33%" | [[Arquivo:362-Glalie.png|link=Glalie]] <br> Glalie |
| |-style="width:50px; text-align:center;"
| | |} |
| | [[Arquivo:224-Octillery.png|link=Octillery]]
| |
| | Octillery
| |
| |}
| |
| Pokémon que era solicitado ao jogador antes da atualização: '''Jynx''' ([[Arquivo:124-Jynx.png|link=Jynx]]).
| |
| </center> | | </center> |
| |-|Derrotar=
| | |
| | O jogador poderá escolher onde deseja realizar a captura do Pokémon: dentro ou fora da Dungeon. Cada opção possui características próprias, conforme descrito abaixo. |
| | |
| | Para acessar a Dungeon, basta conversar com o NPC responsável pela missão e confirmar a entrada. |
| | |
| | '''Dentro da Dungeon:''' <br> |
| | * Utiliza um sistema de captura especial, com chances de captura facilitadas. |
| | * Os Pokémon não concedem experiência ao serem derrotados. |
| | * Os Pokémon não fornecem loot. |
| | * Não é possível encontrar versões Shiny. |
| | * Não há perda de Experiência ou Bless em caso de morte. |
| | * As Poké Balls não são consumidas durante as tentativas de captura. |
| | * Todas as Poké Balls possuem a mesma chance de captura. |
| | * As seguintes Poké Balls são bloqueadas: Master Ball, Beast Ball, Premier Ball e Repeat Ball. |
| | |
| | '''Fora da Dungeon:'''<br> |
| | * A captura segue o sistema tradicional do jogo. |
| | * Não há mais o bônus de captura facilitada concedido pela Task de Clã. |
| | |
| | Ao capturar o Pokémon solicitado, ele será entregue como um item único na mochila. Em seguida, retorne ao NPC para prosseguir para a próxima etapa da missão. |
| | |
| | |-|3º Etapa= |
| | |
| | Na 3ª etapa, o NPC solicitará que o jogador derrote uma quantidade específica de Pokémon de determinados elementos. Apenas Pokémon de nível 60 ou superior serão contabilizados para o progresso. |
| | |
| | <center> |
| | <br> |
| | {|class="wikitable" width="35%" align="center" text-align="center" |
| | ! colspan="3" style="background-color: #E84B16" | Etapa 3 - Derrotar Pokémon |
| | |-style="text-align:center;" |
| | | width="33%" | [[Arquivo:Flying.png|link=]]<br> 110 Pokémon do elemento Voador<br>Level 60 ou superior |
| | | width="33%" | [[Arquivo:Electric.png|link=]]<br> 110 Pokémon do elemento Elétrico<br>Level 60 ou superior |
| | |} |
| | </center> |
| | |
| | '''Observações:'''<br> |
| | * Caso o jogador possua outro Pokémon da mesma espécie com '''Boost''', '''Held Itens''' ou outras melhorias, ele poderá utilizá-lo normalmente para concluir os objetivos da missão. |
| | * Para que o progresso seja contabilizado, é necessário apenas que o Pokémon solicitado seja o responsável por finalizar os Pokémon. Não é obrigatório utilizar a versão recebida como item único durante a missão. |
| | |
| | Após terminar de derrotar a lista solicitada do NPC, retorne a ele, devolva o Pokémon com o status de item único e vá para a próxima etapa, da Danger Room. |
| | |
| | |-|4º Etapa= |
| | |
| <center> | | <center> |
| {|class="wikitable" width="40%" align="center" text-align="center"
| | [[Arquivo:DR Clã Seavell.png|link=]]<br> |
| ! colspan="3" style="background-color: #007FFF" | <span style="color: white">'''Derrotar (1ª Lista)'''</span>
| | '''Coordenadas:''' 974, 998, 5 |
| |-style="width:50px; text-align:center;"
| |
| | [[Arquivo:038-Ninetales.png|link=Ninetales]]<br />'''50''' Ninetales
| |
| | [[Arquivo:157-Typhlosion.png|link=Typhlosion]]<br />'''50''' Typhlosion
| |
| | [[Arquivo:219-Magcargo.png|link=Magcargo]]<br />'''50''' Magcargo
| |
| |}
| |
| <br />
| |
| {|class="wikitable" width="40%" align="center" text-align="center"
| |
| ! colspan="2" style="background-color: #007FFF" | <span style="color: white">'''Derrotar (2ª Lista)'''</span>
| |
| |-style="width:50px; text-align:center;"
| |
| | [[Arquivo:107-HitmonchanNormal.png|link=Hitmonchan]]<br />'''45''' Hitmonchan
| |
| | [[Arquivo:106-HitmonleeNormal.png|link=Hitmonlee]]<br />'''45''' Hitmonlee
| |
| |-style="width:50px; text-align:center;"
| |
| | [[Arquivo:237-HitmontopNormal.png|link=Hitmontop]]<br />'''45''' Hitmontop
| |
| | [[Arquivo:108-Lickitung.png|link=Lickitung]]<br />'''15''' Lickitung
| |
| |}
| |
| </center> | | </center> |
| |-|Danger Room=
| | |
| | Ao entrar no saguão da Danger Room, o jogador poderá escolher de qual Clã deseja realizar essa etapa da missão. Para concluir essa fase, será necessário completar a Danger Room de dois '''Clãs diferentes'''. |
| | |
| | Ao entrar na Danger Room, o jogador receberá automaticamente 6 Pokémon temporários, definidos de acordo com o seu rank atual. |
| | |
| | '''Observações:'''<br> |
| | * Dentro da Danger Room, o jogador poderá utilizar revives ilimitados. |
| | * O jogador terá 20 minutos para concluir a Danger Room ao entrar nela. |
| | |
| <center> | | <center> |
| {|class="wikitable" width="40%" align="center" text-align="center" | | {|class="wikitable" width="45%" align="center" text-align="center" |
| ! colspan="3" style="background-color: #007FFF" | <span style="color: white">'''Danger Room Team'''</span> | | ! colspan="3" style="background-color: #E84B16" | Danger Room Team |
| |-style="width:50px; text-align:center;" | | |-style="text-align:center;" |
| | [[Arquivo:160-Feraligatr.png|link=Feraligatr]]<br />Feraligatr | | | width="33%" | [[Arquivo:199-Slowking.png|link=Slowking]] <br> Slowking |
| | [[Arquivo:0009-Blastoise.png|link=Blastoise]]<br />Blastoise | | | width="33%" | [[Arquivo:226-Mantine.png|link=Mantine]] <br> Mantine |
| | [[Arquivo:260-Swampert.png|link=Swampert]]<br />Swampert | | | width="33%" | [[Arquivo:260-Swampert.png|link=Swampert]] <br> Swampert |
| |-style="width:50px; text-align:center;" | | |-style="text-align:center;" |
| | [[Arquivo:342-Crawdaunt.png|link=Crawdaunt]]<br />Crawdaunt | | | width="33%" | [[Arquivo:461-Weavile.png|link=Weavile]] <br> Weavile |
| | [[Arquivo:121-Starmie.png|link=Starmie]]<br />Starmie | | | width="33%" | [[Arquivo:689-Barbaracle.png|link=Barbaracle]] <br> Barbaracle |
| | [[Arquivo:221-Piloswine.png|link=Piloswine]]<br />Piloswine | | | width="33%" | [[Arquivo:873_-_Frosmoth.png|link=Frosmoth]] <br> Frosmoth |
| |} | | |} |
| </center> | | </center> |
| | |
| | <br>Após concluir a Danger Room de dois Clãs diferentes, converse com a NPC Icelake Trainer, o jogador receberá [[Arquivo:Exp_icon.png|link=]] 420.000 de experiência, uma [[Arquivo:Water_Stone.gif|link=]] Water Stone e uma [[Arquivo:Ice_Stone.gif|link=]] Ice Stone. |
| </tabber> | | </tabber> |
| '''Recompensa:''' 200.000 de [[Arquivo:Exp_icon.png|24px|link=]] Experiência, 1 [[Arquivo:Ice-stone.gif|link=Pedras de Evolução]] Ice Stone e 1 [[Arquivo:Water-stone.gif|link=Pedras de Evolução]] Water Stone.
| |
|
| |
|
| ==Rank 3 ao 4 (Level 110)== | | ==Rank 3 ao 4== |
| | |
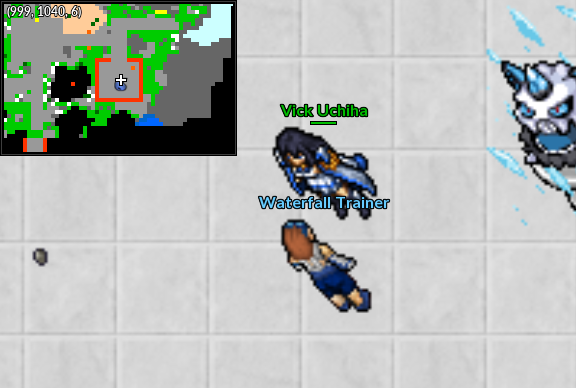
| | Para iniciar a primeira tarefa, o jogador deve conversar com a '''Waterfall Trainer''', é necessário ser level 110 ou superior. |
| | |
| | <center> <br> |
| | [[Arquivo:NPC Seavell Waterfall Trainer.png|link=]]<br> |
| | '''Coordenadas:''' 999, 1041, 6 |
| | </center> |
| | |
| <tabber> | | <tabber> |
| |-|Coletar=
| | |-|1º Etapa= |
| | |
| | <br> |
| <center> | | <center> |
| {|class="wikitable" width="40%" align="center" text-align="center"
| | <br> |
| ! colspan="2" style="background-color: #007FFF" | <span style="color: white">'''Coletar'''</span>
| | {|class="wikitable" width="20%" align="center" text-align="center" |
| |-style="width:50px; text-align:center;"
| | ! colspan="2" style="background-color: #E84B16" | Etapa 1 - Entregar item |
| ! | Quantidade
| | |-style="width:40px; text-align:center;" |
| ! | Item
| | ! width="40%" | Quantidade |
| |-style="width:50px; text-align:center;"
| | ! width="40%" | Item |
| | '''2.500'''
| | |-style="width:40px; text-align:center;" |
| | [[Arquivo:Watergem.png|link=Drop de Itens]] Water Gem
| | | '''40''' |
| |-style="width:50px; text-align:center;"
| | | [[Arquivo:SolidWaterGem.png|link=]] [[Solid Water Gem]] |
| | '''2.500'''
| | |-style="width:40px; text-align:center;" |
| | [[Arquivo:Snowball.png|link=Drop de Itens]] Snowball
| | | '''40''' |
| |-style="width:50px; text-align:center;"
| | | [[Arquivo:SolidIce.png|link=]] [[Solid Ice Cube]] |
| | '''15'''
| | |} |
| | [[Arquivo: Seal Tail.png |link= Drop de Itens]] Seal Tail
| |
| |}
| |
| </center> | | </center> |
| |-|Capturar=
| | <br> |
| | |
| | '''Observações:''' |
| | * Os itens podem ser comprados de outros jogadores. <br> |
| | * É possível converter 100 [[Water Gem]] em 1 [[Solid Water Gem]] |
| | * É possível converter 100 [[Snowball]] em 1 [[Solid Ice Cube]] |
| | |
| | Após obter todos os itens solicitados, retorne ao NPC e entregue-os para concluir a etapa atual e avançar para a próxima fase da missão. |
| | |
| | |-|2º Etapa= |
| | |
| <center> | | <center> |
| {|class="wikitable" width="40%" align="center" text-align="center"
| | {|class="wikitable" width="20%" align="center" text-align="center" |
| ! colspan="2" style="background-color: #007FFF" | <span style="color: white">'''Capturar'''</span>
| | ! colspan="2" style="background-color: #E84B16" | Etapa 2 - Capturar |
| |-style="width:50px; text-align:center;"
| | |-style="width:40px; text-align:center;" |
| ! width="20%" |
| |
| ! | Pokémon
| |
| |-style="width:50px; text-align:center;"
| |
| | [[Arquivo:0009-Blastoise.png|link=Blastoise]]
| |
| | Blastoise
| |
| |}
| |
|
| |
|
| Pokémon que era solicitado ao jogador antes da atualização: '''Lapras''' ([[Arquivo:131-Lapras.png|link=Lapras]]).
| | | width="33%" | [[Arquivo:130-Gyarados.png|link=Gyarados]] <br> Gyarados |
| | |} |
| </center> | | </center> |
| |-|Derrotar=
| | |
| | O jogador poderá escolher onde deseja realizar a captura do Pokémon: dentro ou fora da Dungeon. Cada opção possui características próprias, conforme descrito abaixo. |
| | |
| | Para acessar a Dungeon, basta conversar com o NPC responsável pela missão e confirmar a entrada. |
| | |
| | '''Dentro da Dungeon:''' <br> |
| | * Utiliza um sistema de captura especial, com chances de captura facilitadas. |
| | * Os Pokémon não concedem experiência ao serem derrotados. |
| | * Os Pokémon não fornecem loot. |
| | * Não é possível encontrar versões Shiny. |
| | * Não há perda de Experiência ou Bless em caso de morte. |
| | * As Poké Balls não são consumidas durante as tentativas de captura. |
| | * Todas as Poké Balls possuem a mesma chance de captura. |
| | * As seguintes Poké Balls são bloqueadas: Master Ball, Beast Ball, Premier Ball e Repeat Ball. |
| | |
| | '''Fora da Dungeon:'''<br> |
| | * A captura segue o sistema tradicional do jogo. |
| | * Não há mais o bônus de captura facilitada concedido pela Task de Clã. |
| | |
| | Ao capturar o Pokémon solicitado, ele será entregue como um item único na mochila. Em seguida, retorne ao NPC para prosseguir para a próxima etapa da missão. |
| | |
| | |-|3º Etapa= |
| | |
| | Na 3ª etapa, o NPC solicitará que o jogador derrote uma quantidade específica de Pokémon de determinados elementos. Apenas Pokémon de nível 80 ou superior serão contabilizados para o progresso. |
| | |
| <center> | | <center> |
| {|class="wikitable" width="40%" align="center" text-align="center"
| | <br> |
| ! colspan="3" style="background-color: #007FFF" | <span style="color: white">'''Derrotar (1ª Lista)'''</span>
| | {|class="wikitable" width="35%" align="center" text-align="center" |
| |-style="width:50px; text-align:center;"
| | ! colspan="3" style="background-color: #E84B16" | Etapa 3 - Derrotar Pokémon |
| | [[Arquivo:068-Machamp.png|link=Machamp]]<br />'''50''' Machamp
| | |-style="text-align:center;" |
| | [[Arquivo:203-Girafarig.png|link=Girafarig]]<br />'''50''' Girafarig
| | | width="33%" | [[Arquivo:Rock.png|link=]]<br> 200 Pokémon do elemento Pedra<br> Level 80 ou superior |
| |-style="width:50px; text-align:center;"
| | | width="33%" | [[Arquivo:Ghost1.png|link=]]<br> 40 Pokémon do elemento Fantasma<br> Level 80 ou superior |
| | [[Arquivo:006-Charizard.png|link=Charizard]]<br />'''50''' Charizard
| |
| | [[Arquivo:232-Donphan.png|link=Donphan]]<br />'''50''' Donphan
| |
| |}
| |
| {|class="wikitable" width="40%" align="center" text-align="center"
| |
| ! colspan="2" style="background-color: #007FFF" | <span style="color: white">'''Derrotar (2ª Lista)'''</span>
| |
| |-style="width:50px; text-align:center;"
| |
| | [[Arquivo:036-Clefable.png|link=Clefable]]<br />'''50''' Clefable | |
| | [[Arquivo:178-Xatu.png|link=Xatu]]<br />'''50''' Xatu
| |
| |-style="width:50px; text-align:center;"
| |
| | [[Arquivo:169-Crobat.png|link=Crobat]]<br />'''50''' Crobat
| |
| | [[Arquivo:089-Muk.png|link=Muk]]<br />'''50''' Muk
| |
| |} | | |} |
| <br />
| |
| </center> | | </center> |
| |-|Danger Room=
| | |
| | '''Observações:'''<br> |
| | * Caso o jogador possua outro Pokémon da mesma espécie com '''Boost''', '''Held Itens''' ou outras melhorias, ele poderá utilizá-lo normalmente para concluir os objetivos da missão. |
| | * Para que o progresso seja contabilizado, é necessário apenas que o Pokémon solicitado seja o responsável por finalizar os Pokémon. Não é obrigatório utilizar a versão recebida como item único durante a missão. |
| | |
| | Após terminar de derrotar a lista solicitada do NPC, retorne a ele, devolva o Pokémon com o status de item único e vá para a próxima etapa, da Danger Room. |
| | |
| | |-|4º Etapa= |
| | |
| <center> | | <center> |
| {|class="wikitable" width="40%" align="center" text-align="center" | | [[Arquivo:DR Clã Seavell.png|link=]]<br> |
| ! colspan="3" style="background-color: #007FFF" | <span style="color: white">'''Danger Room Team'''</span> | | '''Coordenadas:''' 974, 998, 5 |
| |-style="width:50px; text-align:center;" | | </center> |
| | [[Arquivo:230-Kingdra.png|link=Kingdra]]<br />Kingdra | | |
| | [[Arquivo:130-Gyarados.png|link=Gyarados]]<br />Gyarados | | Ao entrar no saguão da Danger Room, o jogador poderá escolher de qual Clã deseja realizar essa etapa da missão. Para concluir essa fase, será necessário completar a Danger Room de dois '''Clãs diferentes'''. |
| | [[Arquivo:365-Walrein.png|link=Walrein]]<br />Walrein | | |
| |-style="width:50px; text-align:center;" | | Ao entrar na Danger Room, o jogador receberá automaticamente 6 Pokémon temporários, definidos de acordo com o seu rank atual. |
| | [[Arquivo:131-Lapras.png|link=Lapras]]<br />Lapras | | |
| | [[Arquivo:272-Ludicolo.png|link=Ludicolo]]<br />Ludicolo | | '''Observações:'''<br> |
| | [[Arquivo:226-Mantine.png|link=Mantine]]<br />Mantine | | * Dentro da Danger Room, o jogador poderá utilizar revives ilimitados. |
| | * O jogador terá 20 minutos para concluir a Danger Room ao entrar nela. |
| | |
| | <center> |
| | {|class="wikitable" width="45%" align="center" text-align="center" |
| | ! colspan="3" style="background-color: #E84B16" | Danger Room Team |
| | |-style="text-align:center;" |
| | | width="33%" | [[Arquivo:121_-_Mega_Starmie.png|link=Mega Starmie]] <br> Mega Starmie |
| | | width="33%" | [[Arquivo:131-Lapras.png|link=Lapras]] <br> Lapras |
| | | width="33%" | [[Arquivo:Shinyvap.png|link=Shiny Vaporeon]] <br> Shiny Vaporeon |
| | |-style="text-align:center;" |
| | | width="33%" | [[Arquivo:160_-_Mega_Feraligatr.png|link=Mega Feraligatr]] <br> Mega Feraligatr |
| | | width="33%" | [[Arquivo:419-Floatzel.png|link=Floatzel]] <br> Floatzel |
| | | width="33%" | [[Arquivo:419-Shiny Floatzel.png|link=Shiny Floatzel]] <br> Shiny Floatzel |
| |} | | |} |
| </center> | | </center> |
| | |
| | <br>Após concluir a Danger Room de dois Clãs diferentes, converse com a NPC Waterfall Trainer, o jogador receberá [[Arquivo:Exp_icon.png|link=]] 630.000 de experiência, uma [[Arquivo:Water_Stone.gif|link=]] Water Stone e duas [[Arquivo:Ice_Stone.gif|link=]] Ice Stone. |
| </tabber> | | </tabber> |
|
| |
|
| ==Rank 4 ao 5 (Level 120)== | | ==Rank 4 ao 5== |
| | |
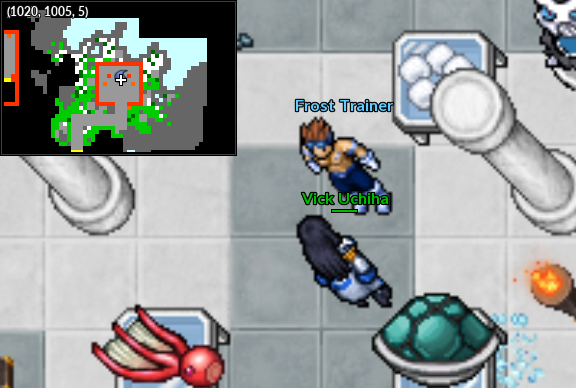
| | Para iniciar a primeira tarefa, o jogador deve conversar com o '''NPC Frost Trainer''', é necessário ser level 120 ou superior. |
| | |
| | <center> <br> |
| | [[Arquivo:NPC Seavell Frost Trainer.png|link=]]<br> |
| | '''Coordenadas:''' 1020, 1004, 5 |
| | </center> |
| | |
| <tabber> | | <tabber> |
| |-|Coletar=
| | |-|1º Etapa= |
| | |
| | <br> |
| <center> | | <center> |
| {|class="wikitable" width="40%" align="center" text-align="center"
| | <br> |
| ! colspan="2" style="background-color: #007FFF" | <span style="color: white">'''Coletar'''</span>
| | {|class="wikitable" width="20%" align="center" text-align="center" |
| |-style="width:50px; text-align:center;"
| | ! colspan="2" style="background-color: #E84B16" | Etapa 1 - Entregar item |
| ! | Quantidade
| | |-style="width:40px; text-align:center;" |
| ! | Item
| | ! width="40%" | Quantidade |
| |-style="width:50px; text-align:center;"
| | ! width="40%" | Item |
| | '''3.000'''
| | |-style="width:40px; text-align:center;" |
| | [[Arquivo:Watergem.png|link=Drop de Itens]] Water Gem
| | | '''50''' |
| |-style="width:50px; text-align:center;"
| | | [[Arquivo:SolidWaterGem.png|link=]] [[Solid Water Gem]] |
| | '''3.000'''
| | |-style="width:40px; text-align:center;" |
| | [[Arquivo:Snowball.png|link=Drop de Itens]] Snowball
| | | '''50''' |
| |-style="width:50px; text-align:center;"
| | | [[Arquivo:SolidIce.png|link=]] [[Solid Ice Cube]] |
| | '''20'''
| | |} |
| | [[Arquivo: Squirtle Hull.png|link= Drop de Itens]] Squirtle Hull
| |
| |}
| |
| </center> | | </center> |
| |-|Capturar=
| | <br> |
| | |
| | '''Observações:''' |
| | * Os itens podem ser comprados de outros jogadores. <br> |
| | * É possível converter 100 [[Water Gem]] em 1 [[Solid Water Gem]] |
| | * É possível converter 100 [[Snowball]] em 1 [[Solid Ice Cube]] |
| | |
| | Após obter todos os itens solicitados, retorne ao NPC e entregue-os para concluir a etapa atual e avançar para a próxima fase da missão. |
| | |
| | |-|2º Etapa= |
| | |
| <center> | | <center> |
| {|class="wikitable" width="40%" align="center" text-align="center"
| | {|class="wikitable" width="20%" align="center" text-align="center" |
| ! colspan="2" style="background-color: #007FFF" | <span style="color: white">'''Capturar'''</span>
| | ! colspan="2" style="background-color: #E84B16" | Etapa 2 - Capturar |
| |-style="width:50px; text-align:center;"
| | |-style="width:40px; text-align:center;" |
| ! width="20%" |
| |
| ! | Pokémon
| |
| |-style="width:50px; text-align:center;"
| |
| | [[Arquivo:131-Lapras.png|link=Lapras]]
| |
| | Lapras
| |
| |}
| |
|
| |
|
| Pokémon que era solicitado ao jogador antes da atualização: '''Blastoise''' ([[arquivo:009-Blastoise.png|link=Blastoise]]).
| | | width="33%" | [[Arquivo:131-Lapras.png|link=Lapras]] <br> Lapras |
| | |} |
| </center> | | </center> |
| |-|Derrotar=
| | |
| | O jogador poderá escolher onde deseja realizar a captura do Pokémon: dentro ou fora da Dungeon. Cada opção possui características próprias, conforme descrito abaixo. |
| | |
| | Para acessar a Dungeon, basta conversar com o NPC responsável pela missão e confirmar a entrada. |
| | |
| | '''Dentro da Dungeon:''' <br> |
| | * Utiliza um sistema de captura especial, com chances de captura facilitadas. |
| | * Os Pokémon não concedem experiência ao serem derrotados. |
| | * Os Pokémon não fornecem loot. |
| | * Não é possível encontrar versões Shiny. |
| | * Não há perda de Experiência ou Bless em caso de morte. |
| | * As Poké Balls não são consumidas durante as tentativas de captura. |
| | * Todas as Poké Balls possuem a mesma chance de captura. |
| | * As seguintes Poké Balls são bloqueadas: Master Ball, Beast Ball, Premier Ball e Repeat Ball. |
| | |
| | '''Fora da Dungeon:'''<br> |
| | * A captura segue o sistema tradicional do jogo. |
| | * Não há mais o bônus de captura facilitada concedido pela Task de Clã. |
| | |
| | Ao capturar o Pokémon solicitado, ele será entregue como um item único na mochila. Em seguida, retorne ao NPC para prosseguir para a próxima etapa da missão. |
| | |
| | |-|3º Etapa= |
| | |
| | Na 3ª etapa, o NPC solicitará que o jogador derrote uma quantidade específica de Pokémon de determinados elementos. Apenas Pokémon de nível 100 ou superior serão contabilizados para o progresso. |
| | |
| <center> | | <center> |
| {|class="wikitable" width="40%" align="center" text-align="center"
| | <br> |
| ! colspan="3" style="background-color: #007FFF" | <span style="color: white">'''Derrotar (1ª Lista)'''</span>
| | {|class="wikitable" width="35%" align="center" text-align="center" |
| |-style="width:50px; text-align:center;"
| | ! colspan="3" style="background-color: #E84B16" | Etapa 3 - Derrotar Pokémon |
| | [[Arquivo:018-Pidgeot.png|link=Pidgeot]]<br />'''75''' Pidgeot
| | |-style="text-align:center;" |
| | [[Arquivo:154-Meganium.png|link=Meganium]]<br />'''75''' Meganium
| | | width="33%" | [[Arquivo:Grass.png|link=]]<br> 250 Pokémon do elemento Grama<br>Level 80 ou superior |
| |-style="width:50px; text-align:center;"
| | | width="33%" | [[Arquivo:Steel.png|link=]]<br> 40 Pokémon do elemento Metal<br>Level 80 ou superior |
| | [[Arquivo:076-Golem.png|link=Golem]]<br />'''75''' Golem
| | |} |
| | [[Arquivo:112-Rhydon.png|link=Rhydon]]<br />'''75''' Rhydon
| |
| |}
| |
| <br />
| |
| {|class="wikitable" width="40%" align="center" text-align="center"
| |
| ! colspan="3" style="background-color: #007FFF" | <span style="color: white">'''Derrotar (2ª Lista)'''</span>
| |
| |-style="width:50px; text-align:center;"
| |
| | [[Arquivo:126-Magmar.png|link=Magmar]]<br />'''50''' Magmar
| |
| | [[Arquivo:059-Arcanine.png|link=Arcanine]]<br />'''50''' Arcanine
| |
| | [[Arquivo:082-Magneton.png|link=Magneton]]<br />'''50''' Magneton
| |
| |}
| |
| </center> | | </center> |
| |-|Danger Room=
| | |
| | '''Observações:'''<br> |
| | * Caso o jogador possua outro Pokémon da mesma espécie com '''Boost''', '''Held Itens''' ou outras melhorias, ele poderá utilizá-lo normalmente para concluir os objetivos da missão. |
| | * Para que o progresso seja contabilizado, é necessário apenas que o Pokémon solicitado seja o responsável por finalizar os Pokémon. Não é obrigatório utilizar a versão recebida como item único durante a missão. |
| | |
| | Após terminar de derrotar a lista solicitada do NPC, retorne a ele, devolva o Pokémon com o status de item único e vá para a próxima etapa, da Danger Room. |
| | |
| | |-|4º Etapa= |
| | |
| <center> | | <center> |
| {|class="wikitable" width="40%" align="center" text-align="center"
| | [[Arquivo:DR Clã Seavell.png|link=]]<br> |
| ! colspan="3" style="background-color: #007FFF" | <span style="color: white">'''Danger Room Team'''</span>
| | '''Coordenadas:''' 974, 998, 5 |
| |-style="width:50px; text-align:center;"
| |
| | [[Arquivo:SshBlastoise.png|link=Shiny Blastoise]]<br />Shiny Blastoise
| |
| | [[Arquivo:073-Sh_Tentacruel.png|link=Shiny Tentacruel]]<br />Shiny Tentacruel
| |
| | [[Arquivo:124-shJynx.png|link=Shiny Jynx]]<br />Shiny Jynx
| |
| |-style="width:50px; text-align:center;"
| |
| | [[Arquivo:160-shFeraligatr.png|link=Shiny Feraligatr]]<br />Shiny Feraligatr
| |
| | [[Arquivo:130-RedGyarados.png|link=Shiny Gyarados]]<br />Shiny Gyarados
| |
| | [[Arquivo:471-Sh_Glaceon.png|link=Shiny Glaceon]]<br />Shiny Glaceon
| |
| |}
| |
| </center> | | </center> |
| | |
| | Ao entrar no saguão da Danger Room, o jogador poderá escolher de qual Clã deseja realizar essa etapa da missão. Para concluir essa fase, será necessário completar a Danger Room de dois '''Clãs diferentes'''. |
| | |
| | Ao entrar na Danger Room, o jogador receberá automaticamente 6 Pokémon temporários, definidos de acordo com o seu rank atual. |
| | |
| | '''Observações:'''<br> |
| | * Dentro da Danger Room, o jogador poderá utilizar revives ilimitados. |
| | * O jogador terá 20 minutos para concluir a Danger Room ao entrar nela. |
| | |
| | <center> |
| | {|class="wikitable" width="45%" align="center" text-align="center" |
| | ! colspan="3" style="background-color: #E84B16" | Danger Room Team |
| | |-style="text-align:center;" |
| | | width="33%" | [[Arquivo:SshBlastoise.png|link=Shiny Blastoise]] <br> Shiny Blastoise |
| | | width="33%" | [[Arquivo:130-RedGyarados.png|link=Shiny Gyarados]] <br> Shiny Gyarados |
| | | width="33%" | [[Arquivo:131 - Shiny Lapras.png|link=Shiny Lapras]] <br> Shiny Lapras |
| | |-style="text-align:center;" |
| | | width="33%" | [[Arquivo:Megaglalie.png|link=Mega Glalie]] <br> Mega Glalie |
| | | width="33%" | [[Arquivo:471-Sh Glaceon.png|link=Shiny Glaceon]] <br> Shiny Glaceon |
| | | width="33%" | [[Arquivo:478_-_Mega_Froslass.png|link=Mega Froslass]] <br> Mega Froslass |
| | |} |
| | </center> |
| | |
| | <br>Após concluir a Danger Room de dois Clãs diferentes, converse com o NPC Frost Trainer, o jogador receberá [[Arquivo:Exp_icon.png|link=]] 840.000 de experiência e três [[Arquivo:Water_Stone.gif|link=]] Water Stone e uma [[Arquivo:Ice_Stone.gif|link=]] Ice Stone. |
| </tabber> | | </tabber> |
|
| |
| '''Recompensa:''' 600.000 de [[Arquivo:Exp_icon.png|24px|link=]] Experiência, 1 [[Arquivo:Ice-stone.gif|link=Pedras de Evolução]] Ice Stone e 3 [[Arquivo:Water-stone.gif|link=Pedras de Evolução]] Water Stone.
| |