Mega Gengar: mudanças entre as edições
Ir para navegação
Ir para pesquisar
(Atualiza Tier e Função a partir do JSON revisado) |
|||
| (12 revisões intermediárias por 8 usuários não estão sendo mostradas) | |||
| Linha 5: | Linha 5: | ||
'''Nome:''' Mega Gengar<br /> | '''Nome:''' Mega Gengar<br /> | ||
'''Level:''' 100<br /> | '''Level:''' 100<br /> | ||
'''Tier: ''' T1C <br /> | |||
'''Função: ''' Disrupter PvP <br /> | |||
'''Elemento:''' Ghost / Poison<br /> | '''Elemento:''' Ghost / Poison<br /> | ||
'''Mega Stone:''' Gengarite<br /> | '''Habilidade:''' none<br /> | ||
'''Mega Stone:''' Gengarite<br><br> | |||
<b>Este Pokémon é EXCLUSIVO do clã Malefic em batalhas PvP</b>. | |||
== '''Evoluções''' == | == '''Evoluções''' == | ||
| Linha 23: | Linha 27: | ||
! rowspan="2" | M1 | ! rowspan="2" | M1 | ||
| width="10px" | | | width="10px" | | ||
| align="left" | | | align="left" | Dark Pulse (15s) | ||
| width="50px" rowspan="2" | | | width="50px" rowspan="2" | | ||
| rowspan="2" align="right" | [[Arquivo:Target.png|Target]] [[Arquivo:Damage.png|Damage]] | | rowspan="2" align="right" | [[Arquivo:Target.png|Target]] [[Arquivo:Damage.png|Damage]] | ||
| Linha 29: | Linha 33: | ||
|- align="center" style="background-color: #E6E6FA;" | |- align="center" style="background-color: #E6E6FA;" | ||
| width="10px" | | | width="10px" | | ||
| align="left" | Level | | align="left" | Level 100 | ||
|- align="center" | |- align="center" | ||
! rowspan="2" | M2 | ! rowspan="2" | M2 | ||
| width="10px" | | | width="10px" | | ||
| align="left" | Shadow | | align="left" | Shadow Ball (10s) | ||
| width="50px" rowspan="2" | | | width="50px" rowspan="2" | | ||
| rowspan="2" align="right" | [[Arquivo:Target.png|Target]] [[Arquivo:Damage.png|Damage]] | | rowspan="2" align="right" | [[Arquivo:Target.png|Target]] [[Arquivo:Damage.png|Damage]] | ||
| Linha 40: | Linha 44: | ||
|- align="center" | |- align="center" | ||
| width="10px" | | | width="10px" | | ||
| align="left" | Level | | align="left" | Level 100 | ||
|- align="center" style="background-color: #E6E6FA;" | |- align="center" style="background-color: #E6E6FA;" | ||
| Linha 58: | Linha 62: | ||
| align="left" | Scary Face (40s) | | align="left" | Scary Face (40s) | ||
| width="50px" rowspan="2" | | | width="50px" rowspan="2" | | ||
| rowspan="2" align="right" | [[Arquivo:AOE.png|AOE]] [[Arquivo:Paralyze.png|Paralyze]] | | rowspan="2" align="right" | [[Arquivo:AOE.png|AOE]] [[Arquivo:Focus Blocked.png|Focus Blocked]] [[Arquivo:Paralyze.png|Paralyze]] | ||
| rowspan="2" | [[Arquivo:Normal1.png|Normal|link=Gardestrike]] | | rowspan="2" | [[Arquivo:Normal1.png|Normal|link=Gardestrike]] | ||
|- align="center" | |- align="center" | ||
| width="10px" | | | width="10px" | | ||
| align="left" | Level | | align="left" | Level 100 | ||
|- align="center" style="background-color: #E6E6FA;" | |- align="center" style="background-color: #E6E6FA;" | ||
! rowspan="2" | M5 | ! rowspan="2" | M5 | ||
| width="10px" | | | width="10px" | | ||
| align="left" | Shadow Storm ( | | align="left" | Shadow Storm (60s) | ||
| width="50px" rowspan="2" | | | width="50px" rowspan="2" | | ||
| rowspan="2" align="right" | [[Arquivo:AOE.png|AOE]] [[Arquivo:Damage.png|Damage]] | | rowspan="2" align="right" | [[Arquivo:AOE.png|AOE]] [[Arquivo:Damage.png|Damage]] | ||
| Linha 73: | Linha 77: | ||
|- align="center" style="background-color: #E6E6FA;" | |- align="center" style="background-color: #E6E6FA;" | ||
| width="10px" | | | width="10px" | | ||
| align="left" | Level | | align="left" | Level 100 | ||
|- align="center" | |- align="center" | ||
! rowspan="2" | M6 | ! rowspan="2" | M6 | ||
| width="10px" | | | width="10px" | | ||
| align="left" | Hex ( | | align="left" | Hex (35s) | ||
| width="50px" rowspan="2" | | | width="50px" rowspan="2" | | ||
| rowspan="2" align="right" | [[Arquivo:AOE.png|AOE]] [[Arquivo:Buff.png|Buff]] [[Arquivo:Damage.png|Damage]] [[Arquivo:Nevermiss.png|Nevermiss]] | | rowspan="2" align="right" | [[Arquivo:AOE.png|AOE]] [[Arquivo:Buff.png|Buff]] [[Arquivo:Damage.png|Damage]] [[Arquivo:Nevermiss.png|Nevermiss]] | ||
| Linha 84: | Linha 88: | ||
|- align="center" | |- align="center" | ||
| width="10px" | | | width="10px" | | ||
| align="left" | Level | | align="left" | Level 100 | ||
|- align="center" style="background-color: #E6E6FA;" | |- align="center" style="background-color: #E6E6FA;" | ||
! rowspan="2" | M7 | ! rowspan="2" | M7 | ||
| width="10px" | | | width="10px" | | ||
| align="left" | Nightmare ( | | align="left" | Nightmare (30s) | ||
| width="50px" rowspan="2" | | | width="50px" rowspan="2" | | ||
| rowspan="2" align="right" | [[Arquivo:Target.png|Target]] [[Arquivo:Damage.png|Damage]] | | rowspan="2" align="right" | [[Arquivo:Target.png|Target]] [[Arquivo:Damage.png|Damage]] | ||
| Linha 100: | Linha 104: | ||
! rowspan="2" | M8 | ! rowspan="2" | M8 | ||
| width="10px" | | | width="10px" | | ||
| align="left" | Hypnosis ( | | align="left" | Hypnosis (60s) | ||
| width="50px" rowspan="2" | | | width="50px" rowspan="2" | | ||
| rowspan="2" align="right" | [[Arquivo:Target.png|Target]] [[Arquivo:Stun.png|Stun]] | | rowspan="2" align="right" | [[Arquivo:Target.png|Target]] [[Arquivo:Focus Blocked.png|Focus Blocked]] [[Arquivo:Stun.png|Stun]] | ||
| rowspan="2" | [[Arquivo:Psychic.png|Psychic|link=Psycraft]] | | rowspan="2" | [[Arquivo:Psychic.png|Psychic|link=Psycraft]] | ||
|- align="center" | |- align="center" | ||
| Linha 113: | Linha 117: | ||
| align="left" | Shadow Tag (50s) | | align="left" | Shadow Tag (50s) | ||
| width="50px" rowspan="2" | | | width="50px" rowspan="2" | | ||
| rowspan="2" align="right" | [[Arquivo:AOE.png|AOE]] [[Arquivo:Damage.png|Damage]] [[Arquivo:Buff.png|Buff]] [[Arquivo:Nevermiss.png|Nevermiss]] | | rowspan="2" align="right" | [[Arquivo:AOE.png|AOE]] [[Arquivo:Focus Blocked.png|Focus Blocked]] [[Arquivo:Damage.png|Damage]] [[Arquivo:Buff.png|Buff]] [[Arquivo:Nevermiss.png|Nevermiss]] | ||
| rowspan="2" | [[Arquivo:Ghost1.png|Ghost|link=Malefic]] | | rowspan="2" | [[Arquivo:Ghost1.png|Ghost|link=Malefic]] | ||
|- align="center" style="background-color: #E6E6FA;" | |- align="center" style="background-color: #E6E6FA;" | ||
| Linha 126: | Linha 130: | ||
! rowspan="2" | M1 | ! rowspan="2" | M1 | ||
| width="10px" | | | width="10px" | | ||
| align="left" | | | align="left" | Dark Pulse (15s) | ||
| width="50px" rowspan="2" | | | width="50px" rowspan="2" | | ||
| rowspan="2" align="right" | [[Arquivo:Target.png|Target]] [[Arquivo:Damage.png|Damage]] | | rowspan="2" align="right" | [[Arquivo:Target.png|Target]] [[Arquivo:Damage.png|Damage]] | ||
| Linha 132: | Linha 136: | ||
|- align="center" style="background-color: #E6E6FA;" | |- align="center" style="background-color: #E6E6FA;" | ||
| width="10px" | | | width="10px" | | ||
| align="left" | Level | | align="left" | Level 100 | ||
|- align="center" | |- align="center" | ||
! rowspan="2" | M2 | ! rowspan="2" | M2 | ||
| width="10px" | | | width="10px" | | ||
| align="left" | Shadow | | align="left" | Shadow Ball (10s) | ||
| width="50px" rowspan="2" | | | width="50px" rowspan="2" | | ||
| rowspan="2" align="right" | [[Arquivo:Target.png|Target]] [[Arquivo:Damage.png|Damage]] | | rowspan="2" align="right" | [[Arquivo:Target.png|Target]] [[Arquivo:Damage.png|Damage]] | ||
| Linha 143: | Linha 147: | ||
|- align="center" | |- align="center" | ||
| width="10px" | | | width="10px" | | ||
| align="left" | Level | | align="left" | Level 100 | ||
|- align="center" style="background-color: #E6E6FA;" | |- align="center" style="background-color: #E6E6FA;" | ||
| Linha 161: | Linha 165: | ||
| align="left" | Scary Face (40s) | | align="left" | Scary Face (40s) | ||
| width="50px" rowspan="2" | | | width="50px" rowspan="2" | | ||
| rowspan="2" align="right" | [[Arquivo:AOE.png|AOE]] [[Arquivo:Paralyze.png|Paralyze]] | | rowspan="2" align="right" | [[Arquivo:AOE.png|AOE]] [[Arquivo:Focus Blocked.png|Focus Blocked]] [[Arquivo:Paralyze.png|Paralyze]] | ||
| rowspan="2" | [[Arquivo:Normal1.png|Normal|link=Gardestrike]] | | rowspan="2" | [[Arquivo:Normal1.png|Normal|link=Gardestrike]] | ||
|- align="center" | |- align="center" | ||
| width="10px" | | | width="10px" | | ||
| align="left" | Level | | align="left" | Level 100 | ||
|- align="center" style="background-color: #E6E6FA;" | |- align="center" style="background-color: #E6E6FA;" | ||
| Linha 176: | Linha 180: | ||
|- align="center" style="background-color: #E6E6FA;" | |- align="center" style="background-color: #E6E6FA;" | ||
| width="10px" | | | width="10px" | | ||
| align="left" | Level | | align="left" | Level 100 | ||
|- align="center" | |- align="center" | ||
! rowspan="2" | M6 | ! rowspan="2" | M6 | ||
| width="10px" | | | width="10px" | | ||
| align="left" | Hex ( | | align="left" | Hex (35s) | ||
| width="50px" rowspan="2" | | | width="50px" rowspan="2" | | ||
| rowspan="2" align="right" | [[Arquivo:AOE.png|AOE]] [[Arquivo:Buff.png|Buff]] [[Arquivo:Damage.png|Damage]] [[Arquivo:Nevermiss.png|Nevermiss]] | | rowspan="2" align="right" | [[Arquivo:AOE.png|AOE]] [[Arquivo:Buff.png|Buff]] [[Arquivo:Damage.png|Damage]] [[Arquivo:Nevermiss.png|Nevermiss]] | ||
| Linha 187: | Linha 191: | ||
|- align="center" | |- align="center" | ||
| width="10px" | | | width="10px" | | ||
| align="left" | Level | | align="left" | Level 100 | ||
|- align="center" style="background-color: #E6E6FA;" | |- align="center" style="background-color: #E6E6FA;" | ||
! rowspan="2" | M7 | ! rowspan="2" | M7 | ||
| width="10px" | | | width="10px" | | ||
| align="left" | | | align="left" | Nightmare (30s) | ||
| width="50px" rowspan="2" | | | width="50px" rowspan="2" | | ||
| rowspan="2" align="right" | [[Arquivo:Target.png|Target]] [[Arquivo:Damage.png|Damage]] | | rowspan="2" align="right" | [[Arquivo:Target.png|Target]] [[Arquivo:Damage.png|Damage]] | ||
| Linha 205: | Linha 209: | ||
| align="left" | '''Hypnosis (40s)''' | | align="left" | '''Hypnosis (40s)''' | ||
| width="50px" rowspan="2" | | | width="50px" rowspan="2" | | ||
| rowspan="2" align="right" | [[Arquivo:Target.png|Target]] [[Arquivo:Stun.png|Stun]] | | rowspan="2" align="right" | [[Arquivo:Target.png|Target]] [[Arquivo:Focus Blocked.png|Focus Blocked]] [[Arquivo:Stun.png|Stun]] | ||
| rowspan="2" | [[Arquivo:Psychic.png|Psychic|link=Psycraft]] | | rowspan="2" | [[Arquivo:Psychic.png|Psychic|link=Psycraft]] | ||
|- align="center" | |- align="center" | ||
| Linha 214: | Linha 218: | ||
! rowspan="2" | M9 | ! rowspan="2" | M9 | ||
| width="10px" | | | width="10px" | | ||
| align="left" | | | align="left" | Shadow Tag (50s) | ||
| width="50px" rowspan="2" | | | width="50px" rowspan="2" | | ||
| rowspan="2" align="right" | [[Arquivo:AOE.png|AOE]] [[Arquivo:Damage.png|Damage]] [[Arquivo:Buff.png|Buff]] [[Arquivo:Nevermiss.png|Nevermiss]] | | rowspan="2" align="right" | [[Arquivo:AOE.png|AOE]] [[Arquivo:Focus Blocked.png|Focus Blocked]] [[Arquivo:Damage.png|Damage]] [[Arquivo:Buff.png|Buff]] [[Arquivo:Nevermiss.png|Nevermiss]] | ||
| rowspan="2" | [[Arquivo:Ghost1.png|Ghost|link=Malefic]] | | rowspan="2" | [[Arquivo:Ghost1.png|Ghost|link=Malefic]] | ||
|- align="center" style="background-color: #E6E6FA;" | |- align="center" style="background-color: #E6E6FA;" | ||
Edição atual tal como às 23h35min de 3 de outubro de 2026
Informações Gerais
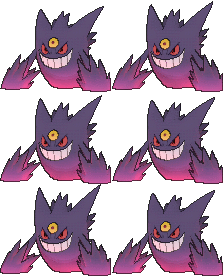
Nome: Mega Gengar
Level: 100
Tier: T1C
Função: Disrupter PvP
Elemento: Ghost / Poison
Habilidade: none
Mega Stone: Gengarite
Este Pokémon é EXCLUSIVO do clã Malefic em batalhas PvP.
Evoluções
Gengar precisa de Level 100.
Mega Gengar precisa de Level 100.
Descrição:
No meio da noite, sua sombra projetada por uma luz da rua pode subitamente ultrapassá-lo. Na verdade, é um Gengar passando por você, fingindo ser sua sombra.
Movimentos
Moveset PVP
| M1 | Dark Pulse (15s) |  
|

| ||
|---|---|---|---|---|---|
| Level 100 | |||||
| M2 | Shadow Ball (10s) |
|

| ||
| Level 100 | |||||
| M3 | Night Shade (25s) |  
|
| ||
| Level 100 | |||||
| M4 | Scary Face (40s) |  
|

| ||
| Level 100 | |||||
| M5 | Shadow Storm (60s) |
|
| ||
| Level 100 | |||||
| M6 | Hex (35s) |  
|
| ||
| Level 100 | |||||
| M7 | Nightmare (30s) |
|
| ||
| Level 100 | |||||
| M8 | Hypnosis (60s) | 
|

| ||
| Level 100 | |||||
| M9 | Shadow Tag (50s) |
|
| ||
| Level 100 |
Moveset PVE
| M1 | Dark Pulse (15s) |
|
| ||
|---|---|---|---|---|---|
| Level 100 | |||||
| M2 | Shadow Ball (10s) |
|
| ||
| Level 100 | |||||
| M3 | Night Shade (25s) |
|
| ||
| Level 100 | |||||
| M4 | Scary Face (40s) |
|
| ||
| Level 100 | |||||
| M5 | Shadow Storm (50s) |
|
| ||
| Level 100 | |||||
| M6 | Hex (35s) |
|
| ||
| Level 100 | |||||
| M7 | Nightmare (30s) |
|
| ||
| Level 100 | |||||
| M8 | Hypnosis (40s) |
|
| ||
| Level 100 | |||||
| M9 | Shadow Tag (50s) |
|
| ||
| Level 100 |
Efetividades
Efetivo: Ground, Psychic, Ghost and Dark.
Normal: Fire, Water, Electric, Ice, Flying, Rock, Dragon, Steel and Crystal.
Inefetivo: Grass and Fairy.
Muito Inefetivo: Poison and Bug.
Nulo: Normal and Fighting.
Outras Versões

|
Gengar |

|
Shiny Gengar |