Shamouti Island Quest: mudanças entre as edições
Sem resumo de edição |
Sem resumo de edição |
||
| (Uma revisão intermediária por um outro usuário não está sendo mostrada) | |||
| Linha 1: | Linha 1: | ||
<center> [[Arquivo:Banner | <center> [[Arquivo:Banner Shamouti Island Quest.png|link=]] </center> | ||
<!--T:1--> | <!--T:1--> | ||
| Linha 21: | Linha 21: | ||
<center> | <center> | ||
{| class="wikitable" width="5%" | {| class="wikitable" width="5%" | ||
! width="5%" style="background-color: #9d1a64" | | ! width="5%" style="background-color: #9d1a64" | | ||
| width="3%" style="border-top-style: hidden; border-width: 1px; border-bottom-style: hidden; border-width: 1px" | | | width="3%" style="border-top-style: hidden; border-width: 1px; border-bottom-style: hidden; border-width: 1px" | | ||
! width="5%" style="background-color: #9d1a64" | | ! width="5%" style="background-color: #9d1a64" | | ||
|- align="center" | |- align="center" | ||
| [[Arquivo:Mapa SQ 1,5.png|350px|link=]] | | [[Arquivo:Mapa SQ 1,5.png|350px|link=]] | ||
| Linha 29: | Linha 29: | ||
| [[Arquivo:Print SQ 1.png|350px|link=]] | | [[Arquivo:Print SQ 1.png|350px|link=]] | ||
|- | |- | ||
! width="5%" style="background-color: #9d1a64" | | ! width="5%" style="background-color: #9d1a64" | | ||
| width="3%" style="border-top-style: hidden; border-width: 1px; border-bottom-style: hidden; border-width: 1px" | | | width="3%" style="border-top-style: hidden; border-width: 1px; border-bottom-style: hidden; border-width: 1px" | | ||
! width="5%" style="background-color: #9d1a64" | | ! width="5%" style="background-color: #9d1a64" | | ||
|- align="center" | |- align="center" | ||
| [[Arquivo:Mapa SQ 2.png|350px|link=]] | | [[Arquivo:Mapa SQ 2.png|350px|link=]] | ||
| Linha 42: | Linha 42: | ||
<center> | <center> | ||
{| class="wikitable" width="70%" background-color:#9d1a64"; | {| class="wikitable" width="70%" background-color:#9d1a64"; | ||
! align="center" style="background-color: #9d1a64"| | ! align="center" style="background-color: #9d1a64"|Venusaur | ||
! align="center" style="background-color: #9d1a64"| | ! align="center" style="background-color: #9d1a64"|Rattata | ||
! align="center" style="background-color: #9d1a64"| | ! align="center" style="background-color: #9d1a64"|Ekans | ||
! align="center" style="background-color: #9d1a64"| | ! align="center" style="background-color: #9d1a64"|Arbok | ||
! align="center" style="background-color: #9d1a64"| | ! align="center" style="background-color: #9d1a64"|Zubat | ||
! align="center" style="background-color: #9d1a64"| | ! align="center" style="background-color: #9d1a64"|Golbat | ||
! align="center" style="background-color: #9d1a64"| | ! align="center" style="background-color: #9d1a64"|Venomoth | ||
! align="center" style="background-color: #9d1a64"| | ! align="center" style="background-color: #9d1a64"|Grimer | ||
! align="center" style="background-color: #9d1a64"| | ! align="center" style="background-color: #9d1a64"|Muk | ||
! align="center" style="background-color: #9d1a64"| | ! align="center" style="background-color: #9d1a64"|Spinarak | ||
! align="center" style="background-color: #9d1a64"| | ! align="center" style="background-color: #9d1a64"|Crobat | ||
|- align="center" | |- align="center" | ||
|[[Arquivo:003-Venusaur.png|link=Venusaur]] | |[[Arquivo:003-Venusaur.png|link=Venusaur]] | ||
| Linha 71: | Linha 71: | ||
<center> | <center> | ||
{| class="wikitable" width="5%" | {| class="wikitable" width="5%" | ||
! width="5%" style="background-color: #9d1a64" | | ! width="5%" style="background-color: #9d1a64" | | ||
| width="3%" style="border-top-style: hidden; border-width: 1px; border-bottom-style: hidden; border-width: 1px" | | | width="3%" style="border-top-style: hidden; border-width: 1px; border-bottom-style: hidden; border-width: 1px" | | ||
! width="5%" style="background-color: #9d1a64" | | ! width="5%" style="background-color: #9d1a64" | | ||
|- align="center" | |- align="center" | ||
| [[Arquivo:Mapa SQ 3.png|350px|link=]] | | [[Arquivo:Mapa SQ 3.png|350px|link=]] | ||
| Linha 79: | Linha 79: | ||
| [[Arquivo:Print SQ 3.png|350px|link=]] | | [[Arquivo:Print SQ 3.png|350px|link=]] | ||
|- | |- | ||
! width="5%" style="background-color: #9d1a64" | | ! width="5%" style="background-color: #9d1a64" | | ||
| width="3%" style="border-top-style: hidden; border-width: 1px; border-bottom-style: hidden; border-width: 1px" | | | width="3%" style="border-top-style: hidden; border-width: 1px; border-bottom-style: hidden; border-width: 1px" | | ||
! width="5%" style="background-color: #9d1a64" | | ! width="5%" style="background-color: #9d1a64" | | ||
|- align="center" | |- align="center" | ||
| [[Arquivo:Mapa SQ 4.png|350px|link=]] | | [[Arquivo:Mapa SQ 4.png|350px|link=]] | ||
| Linha 92: | Linha 92: | ||
<center> | <center> | ||
{| class="wikitable" width="5%" | {| class="wikitable" width="5%" | ||
! width="5%" style="background-color: #9d1a64" | | ! width="5%" style="background-color: #9d1a64" | | ||
| width="3%" style="border-top-style: hidden; border-width: 1px; border-bottom-style: hidden; border-width: 1px" | | | width="3%" style="border-top-style: hidden; border-width: 1px; border-bottom-style: hidden; border-width: 1px" | | ||
! width="5%" style="background-color: #9d1a64" | | ! width="5%" style="background-color: #9d1a64" | | ||
|- align="center" | |- align="center" | ||
| [[Arquivo:Mapa SQ 5.png|350px|link=]] | | [[Arquivo:Mapa SQ 5.png|350px|link=]] | ||
| Linha 100: | Linha 100: | ||
| [[Arquivo:Print SQ 5.png|350px|link=]] | | [[Arquivo:Print SQ 5.png|350px|link=]] | ||
|- | |- | ||
! width="5%" style="background-color: #9d1a64" | | ! width="5%" style="background-color: #9d1a64" | | ||
| width="3%" style="border-top-style: hidden; border-width: 1px; border-bottom-style: hidden; border-width: 1px" | | | width="3%" style="border-top-style: hidden; border-width: 1px; border-bottom-style: hidden; border-width: 1px" | | ||
! width="5%" style="background-color: #9d1a64" | | ! width="5%" style="background-color: #9d1a64" | | ||
|- align="center" | |- align="center" | ||
| [[Arquivo:Mapa SQ 6.png|350px|link=]] | | [[Arquivo:Mapa SQ 6.png|350px|link=]] | ||
| Linha 113: | Linha 113: | ||
<center> | <center> | ||
{| class="wikitable" width="5%" | {| class="wikitable" width="5%" | ||
! width="5%" style="background-color: #9d1a64" | | ! width="5%" style="background-color: #9d1a64" | | ||
| width="3%" style="border-top-style: hidden; border-width: 1px; border-bottom-style: hidden; border-width: 1px" | | | width="3%" style="border-top-style: hidden; border-width: 1px; border-bottom-style: hidden; border-width: 1px" | | ||
! width="5%" style="background-color: #9d1a64" | | ! width="5%" style="background-color: #9d1a64" | | ||
|- align="center" | |- align="center" | ||
| [[Arquivo:Mapa SQ 7.png|350px|link=]] | | [[Arquivo:Mapa SQ 7.png|350px|link=]] | ||
| Linha 121: | Linha 121: | ||
| [[Arquivo:Print SQ 7.png|350px|link=]] | | [[Arquivo:Print SQ 7.png|350px|link=]] | ||
|- | |- | ||
! width="5%" style="background-color: #9d1a64" | | ! width="5%" style="background-color: #9d1a64" | | ||
| width="3%" style="border-top-style: hidden; border-width: 1px; border-bottom-style: hidden; border-width: 1px" | | | width="3%" style="border-top-style: hidden; border-width: 1px; border-bottom-style: hidden; border-width: 1px" | | ||
! width="5%" style="background-color: #9d1a64" | | ! width="5%" style="background-color: #9d1a64" | | ||
|- align="center" | |- align="center" | ||
| [[Arquivo:Mapa SQ 8.png|350px|link=]] | | [[Arquivo:Mapa SQ 8.png|350px|link=]] | ||
| Linha 134: | Linha 134: | ||
<center> | <center> | ||
{| class="wikitable" width="5%" | {| class="wikitable" width="5%" | ||
! width="5%" style="background-color: #9d1a64" | | ! width="5%" style="background-color: #9d1a64" | | ||
| width="3%" style="border-top-style: hidden; border-width: 1px; border-bottom-style: hidden; border-width: 1px" | | | width="3%" style="border-top-style: hidden; border-width: 1px; border-bottom-style: hidden; border-width: 1px" | | ||
! width="5%" style="background-color: #9d1a64" | | ! width="5%" style="background-color: #9d1a64" | | ||
|- align="center" | |- align="center" | ||
| [[Arquivo:Mapa SQ 9.png|350px|link=]] | | [[Arquivo:Mapa SQ 9.png|350px|link=]] | ||
| Linha 149: | Linha 149: | ||
<center> | <center> | ||
{| class="wikitable" background-color:#9d1a64"; | {| class="wikitable" background-color:#9d1a64"; | ||
! width="10%" align="center" width="10%" style="background-color: #9d1a64"| | ! width="10%" align="center" width="10%" style="background-color: #9d1a64"|5.000 Dollars | ||
! width="10%" align="center" width="10%" style="background-color: #9d1a64"| | ! width="10%" align="center" width="10%" style="background-color: #9d1a64"|40 Revives | ||
! width="10%" align="center" width="10%" style="background-color: #9d1a64"| | ! width="10%" align="center" width="10%" style="background-color: #9d1a64"|1 Venom Stone | ||
! width="10%" align="center" width="10%" style="background-color: #9d1a64"| | ! width="10%" align="center" width="10%" style="background-color: #9d1a64"|1 Cocoon Stone | ||
|- align="center" | |- align="center" | ||
|[[Arquivo:Hundred Dollars.png|link=Drop de Itens]] | |[[Arquivo:Hundred Dollars.png|link=Drop de Itens]] | ||
Edição atual tal como às 22h25min de 7 de agosto de 2025
Nível Mínimo: 60
Habilidades Necessárias: Surf (ou Fly)
Recompensa: 5.000 dollars, 40 Revives, 1 Venom Stone e 1 Cocoon Stone
Caso encontre algum erro ou queira acrescentar alguma informação, entre em contato com um dos membros da wiki.
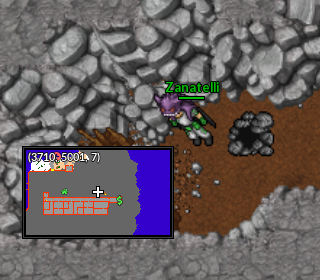
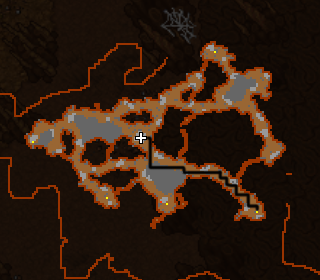
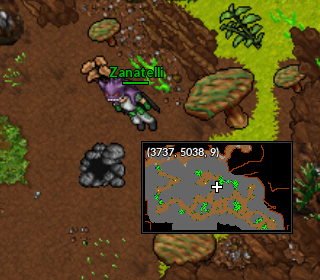
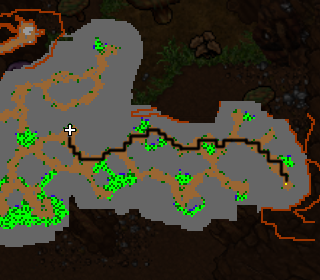
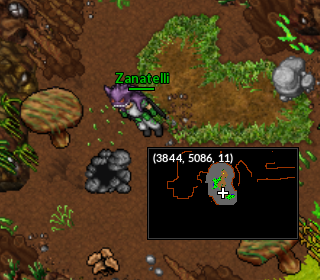
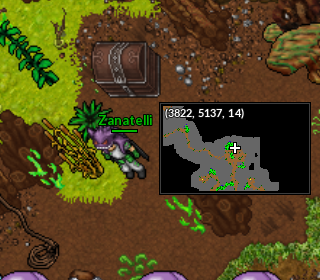
Para realizar esta missão, dirija-se até a ilha de Shamouti:
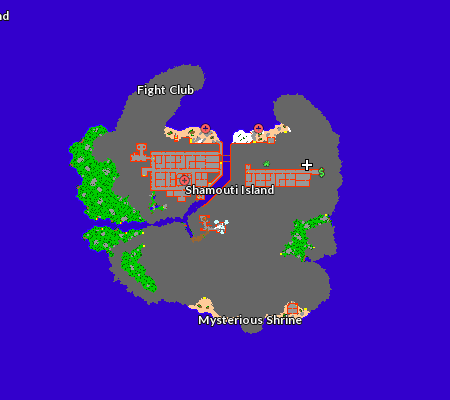
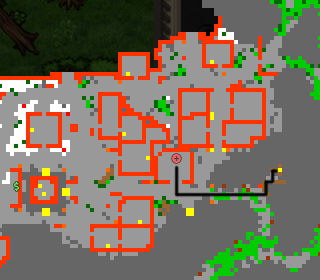
Agora, vá até a direita do menor Centro Pokémon da ilha, encontre uma passagem em um tipo de caverna e em seguida, desça a cave.
|

|
|
|
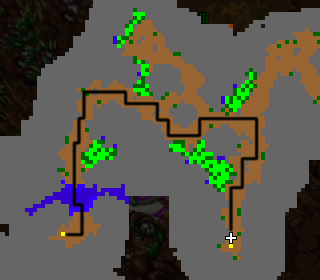
Deste caminho em diante, o jogador encontrará uma grande variedade de Pokémon pelo caminho, não necessariamente na ordem abaixo. São eles:
| Venusaur | Rattata | Ekans | Arbok | Zubat | Golbat | Venomoth | Grimer | Muk | Spinarak | Crobat |
|---|---|---|---|---|---|---|---|---|---|---|
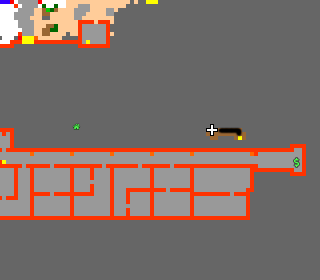
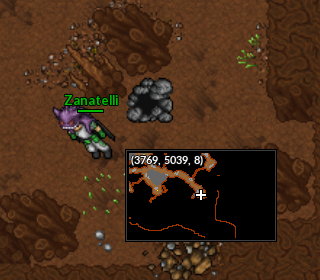
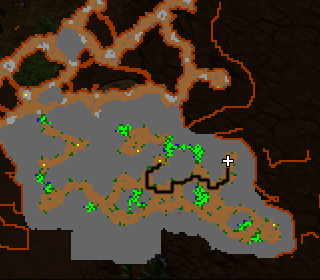
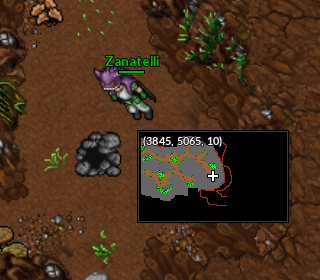
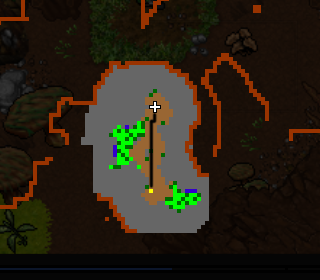
Continue seguindo em frente e descendo cada vez mais, explorando o subterrâneo de Shamouti Island enquanto busca pelo baú.
|
|
|
|
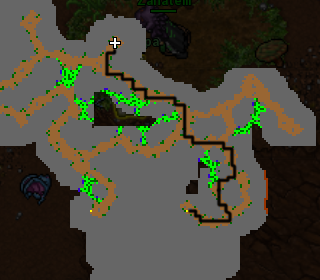
Continue avançando e derrotando os Pokémon com cuidado. Quanto mais descer, mais perigoso o caminho pode se tornar.
|
|
|
|
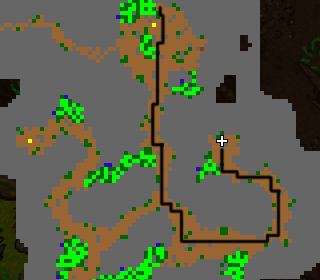
Aqui, o jogador precisará de um Pokémon com a habilidade Fly ou com a habilidade Surf. Ela será necessária para atravessar um lago no meio do trajeto.
|

|
|

|
Esta é a parte final da missão. Tenha muita cautela, pois muitos Pokémon fortes estarão juntos protegendo o baú.
|
|
Observação: Não suba a corda encontrada próxima ao baú, pois não há como descer novamente sem ter que refazer todo o caminho!
Ao encontrar e abrir o baú, o jogador receberá:
| 5.000 Dollars | 40 Revives | 1 Venom Stone | 1 Cocoon Stone |
|---|---|---|---|
O jogador será automaticamente teleportado para o centro Pokémon de sua cidade natal após receber as recompensas.