Predefinição:Teste14: mudanças entre as edições
Sem resumo de edição |
|||
| (656 revisões intermediárias por 6 usuários não estão sendo mostradas) | |||
| Linha 1: | Linha 1: | ||
= ultra lab = | |||
= | |||
<center> [[Arquivo:Banner_Ultra_Lab.png|link=]] </center> | |||
<br> | |||
<font color="red">''' Nível necessário:</font> 550+ '''<br> | |||
<font color="red>''' Requisito:</font> Ter completado a [[Sarkies Quest]]. '''<br> | |||
<b>Caso encontre algum erro ou queira acrescentar alguma informação, entre em contato com [[Nossa Equipe|um dos membros da wiki.]]</b> <br> | |||
== Acessando o Ultra Laboratory == | |||
<center> | <center> | ||
{| class="wikitable" | [[file:pc0.png|link=]] | ||
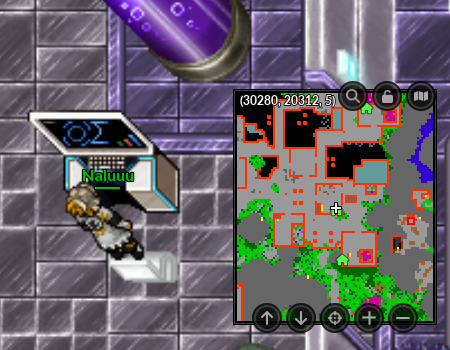
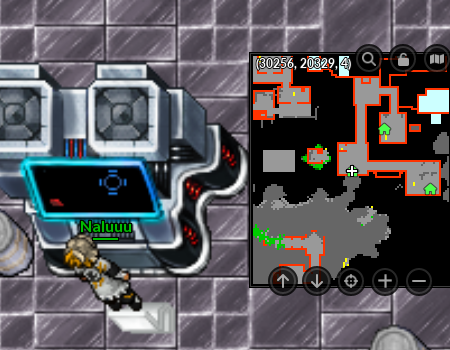
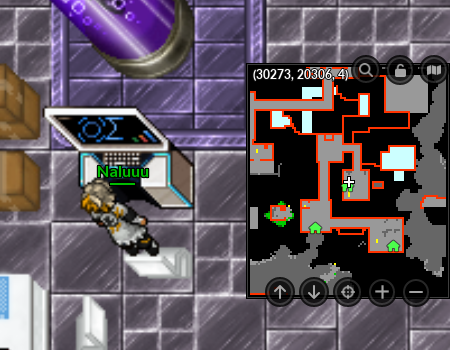
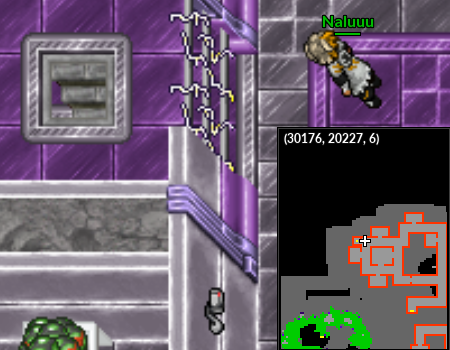
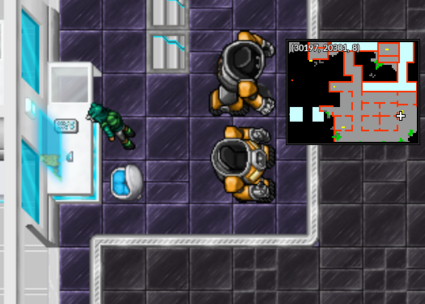
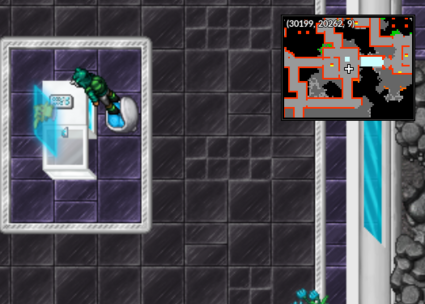
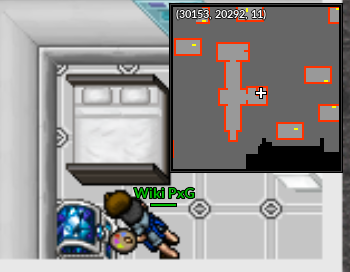
Para acessar o Ultra Lab, deve-se desativar a barreira da entrada. Para isso, o jogador deve desativar os '''7''' computadores de segurança na Fortaleza do Sarkies.</center> | |||
<center> | |||
{| class="wikitable bg-none border-0" style="text-align:center" | |||
|- | |- | ||
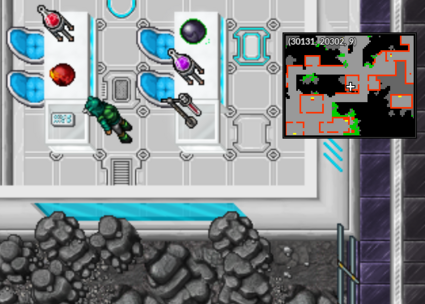
! | ! <b>1/7</b> !! <b>2/7</b> | ||
|- | |- | ||
| | | [[Arquivo:pc1.png|link=]] || [[Arquivo:pc2.png|link=]] | ||
| | |||
|- | |- | ||
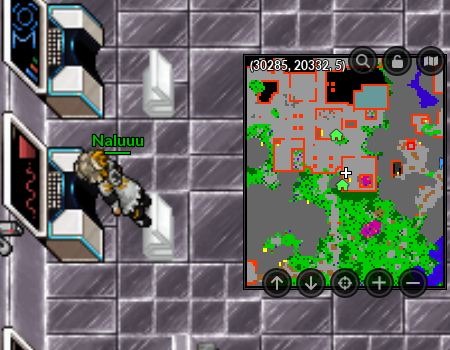
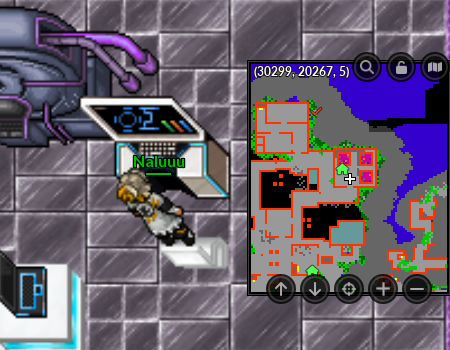
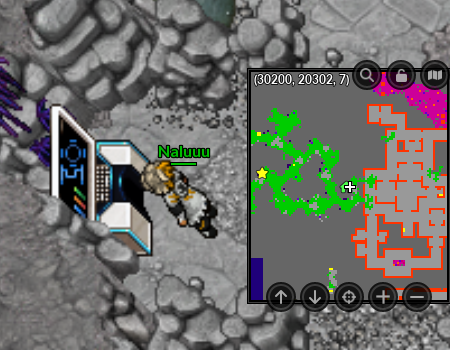
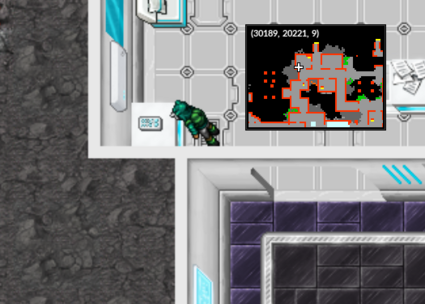
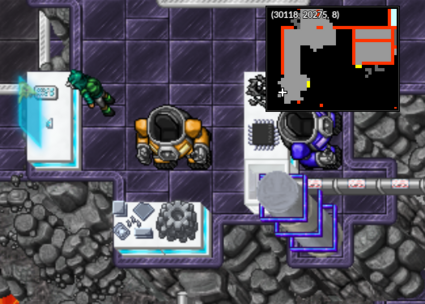
! <b>3/7</b> !! <b>4/7</b> | |||
|- | |- | ||
| | | [[Arquivo:pc3.png|link=]] || [[arquivo:pc4.png|link=]] | ||
| | |||
|- | |- | ||
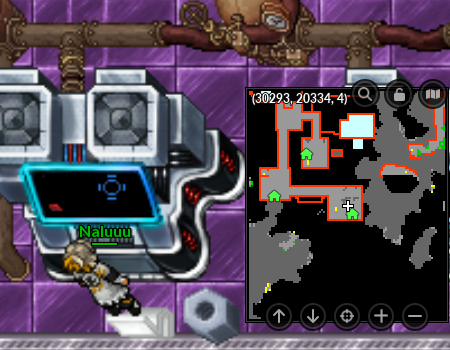
| style="text-align:center" | ! <b>5/7</b> !! <b>6/7</b> | ||
| | |- | ||
| | | [[Arquivo:pc5.png|link=]] || [[arquivo:pc6.png|link=]] | ||
= | |- | ||
{| class="wikitable bg-none border-0" style="text-align:center" | |||
! colspan="2" | 7/7 | |||
|- | |||
| colspan="2" | [[Arquivo:pc7.png|link=]] | |||
|} | |||
[[ | |||
</center> | </center> | ||
<center>Ao desativar todos os computadores acima, a barreira irá ser desativada e concederá aos jogadores acesso ao Ultra Lab.</center> | |||
<center | |||
<center> | <center> | ||
[[ | {|style="text-align:center" | ||
</center> | |- | ||
|[[Arquivo:Barreiralab.gif|link=]] | |||
|- | |||
|'''A barreira ficará desativada até o Shutdown.''' | |||
|}</center> | |||
== Acessando os Andares == | |||
Apenas os jogadores que derrotaram o Sarkies e falaram com o '''NPC Bill''' em Cerulean da Nightmare World conseguirão acessar as áreas de caça do Ultra Lab.<br> | |||
<center>[[arquivo:ultralab_billgate.png|link=]]</center> | |||
<table class="seeMore"> | |||
<tr> | |||
<td class="seeMore__image">[[Arquivo:Telekinetic-compass.gif|link=]]</td> | |||
<td> '''Veja mais: [[Sarkies_Quest|Sarkies Quest]]'''</td> | |||
< | </tr> | ||
[[ | </table> | ||
</ | |||
== Held Enhancement == | |||
Esse sistema concede bônus importantes para jogadores que estiverem utilizando determinadas categorias de Held. O sistema é baseado no Held Item X equipado no Pokémon que o jogador estiver utilizando. <br> | |||
< | |||
[[Arquivo:Pokeball.png|15px|link=]] Caso o jogador esteja utilizando Held de Tier 8, causará 40% mais dano e receberá 40% menos dano dos inimigos. | |||
<br><br> | |||
< | '''Observações:''' | ||
* Esse sistema somente é válido para o Held equipado diretamente no slot X do Pokémon escolhido para o combate, ou seja, não é aplicado para o Held equipado no slot Y ou no Device. | |||
* O bônus do sistema de Held Enhancement é cumulativo, ou seja, se um jogador estiver usando o held X-Attack ou X-Defense, terá bônus tanto do sistema quanto o do held somados. | |||
== | == Tasks == | ||
Dentro do Ultra Lab existem algumas task. <br> | |||
<center> | <center> | ||
[[ | {| class="wikitable" width="70%" style="text-align:center;" | ||
! width="12%" |Nº e NPC | |||
! width="32%" |Objetivo | |||
! width="20%" |Recompensa | |||
|- | |||
| '''1.''' NPC Sidis S-1 | |||
|<!-- Objetivo --> | |||
'''Derrotar:''' 600 Sentinelas ou Troopers<br> | |||
[[Arquivo:Advanced_Sentinel.png|link=Advanced Sentinel]] Advanced Sentinel <br> [[Arquivo:mecha trooper.png|link=Advanced Sentinel]] Mecha Trooper | |||
|<!-- Recompensas --> | |||
[[Arquivo:Exp icon.png|30px|link=]] 2.000.000 <br> | |||
[[Arquivo:Exp icon nw.png|30px|link=]] 35.000 <br> | |||
[[Arquivo:Nightmare_Token.png|link=]] 15 Nightmare Token <br> | |||
[[Arquivo:Access_Card.png|link=]] Access Card <br> | |||
|- | |||
| '''2.''' NPC Sidis S-3 | |||
|<!-- Objetivo --> | |||
'''Derrotar:''' 15 Subjects Alpha <br> | |||
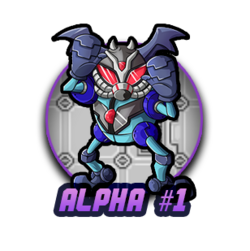
[[Arquivo:mecha_shiny_mrmime.png|link=]] '''Subject Alpha #1''' <br> [[Arquivo:mecha_elite_farfetchd.png|link=]]''' Subject Alpha #2''' <br> [[Arquivo:mecha_shiny_raichu.png|link=]] '''Subject Alpha #3''' <br> [[Arquivo:mecha_shiny_marowak.png|link=]] '''Subject Alpha #4''' | |||
|<!-- Recompensas --> | |||
[[Arquivo:Exp icon.png|30px|link=]] 715.000 <br> | |||
[[Arquivo:Exp icon nw.png|30px|link=]] 11.000 <br> | |||
[[Arquivo:Nightmare_Token.png|link=]] 12 Nightmare Token <br> | |||
|- | |||
|} | |||
</center> | </center> | ||
== Subjects Alpha == | |||
Os Subject Alpha são mini bosses que foram criados por Sarkies e estão no Ultra Lab, cada um possui sua própria mecânica, é recomendado um grupo de 3 jogadores para caçar neste local. Clique no boss desejado para entender sua mecânica. | |||
< | <center class="hover-minimize"> | ||
[[Arquivo: | [[Arquivo:Banner Bolinha Alpha -1.png|250px|link=]] | ||
[[Arquivo:Banner Bolinha Alpha -2.png|250px|link=]] | |||
<BR> | |||
[[Arquivo:Banner Bolinha Alpha -3.png|250px|link=]] | |||
[[Arquivo:Banner Bolinha Alpha -4.png|250px|link=]] | |||
</center> | </center> | ||
== Area Secreta do Ultra Lab == | |||
Dentro do Ultra Lab existe uma área secreta que da acesso a sala para criar um TM caso o jogador tenha 10 discos e a um baú para nível 600.<br> | |||
Ao todo, seis Remote Control deverão ser encontrados e clicados na seguinte sequência:<br> | |||
<center> | <center> | ||
{| class="wikitable bg-none border-0" style="text-align:center;" | |||
|- | |||
! 1º Remote Control | |||
! 2º Remote Control | |||
|- | |||
| [[Arquivo:Controle_1.png|425px|link=]] | |||
{| class="wikitable bg-none border-0 | | [[Arquivo:Controle_2.png|425px|link=]] | ||
! | |- | ||
! | ! 3º Remote Control | ||
! 4º Remote Control | |||
|- | |||
| [[Arquivo:Controle_3.png|425px|link=]] | |||
| [[Arquivo:Controle_4.png|425px|link=]] | |||
|- | |- | ||
! 5º Remote Control | |||
! 6º Remote Control | |||
|- | |- | ||
| [[Arquivo:Controle_5.png|425px|link=]] | |||
| [[Arquivo:Controle_6.png|425px|link=]] | |||
|} | |} | ||
</center> | </center> | ||
Depois de ativar a sequência dos remote controls, o jogador liberará uma passagem secreta próximo ao Controle número 3, ao qual deverá entrar. Em seguida, encontrará um caminho de lava que deverá percorrer até localizar uma nova passagem secreta.<br> | |||
<center> [[Arquivo:Entrada_TM_Room.png|450px|link=]] [[Arquivo:Lava_Caminho_TM_Room.png|450px|link=]] </center> | |||
Ao descer através da nova escada encontrada, o jogador deverá passar por um trajeto repleto de armadilhas que causarão dano ao personagem. Não há penalidade de bless ou experiência ao ser atingido pela armadilha, todavia, é recomendado que o jogador faça o trajeto com um Pokémon fora da ball, pois ao ser detectado pelas câmeras de segurança do local, retornará para a entrada secreta onde há chances de encontrar Advanced Sentinels que poderão derrotá-lo. <br> | |||
<center> [[Arquivo:Camera.png|450px|link=]] </center> | |||
Após atravessar pelas armadilhas do local, o jogador encontrará a TM's Room. Com os 10 discos em mãos, clique no console (caixa em frente ao local indicado na imagem abaixo) para criar a coleção de TM.<br> | |||
<center> [[Arquivo:TM_room.png|450px|link=]] </center> | |||
O Baú de nível 600 fica na sala que antecede a sala principal. <br> | |||
{| class="wikitable" width="90%" | |||
=== | |- | ||
! width="1%" | Número | |||
! width="25%" | Localização | |||
! width="10%" | Requisito | |||
<center> | ! width="35%" | Recompensa | ||
! width="10%" | Mapa | |||
</center> | |- | ||
| align="center" | 1 | |||
| <center>Dentro do Ultra Lab</center> | |||
| <center>'''Level:''' 600 <br> | |||
'''NW Level:''' 75</center> | |||
| <center>[[Arquivo:Access_Card.png|link=]] 3 Access Cards<br> | |||
[[Arquivo:X-upgrade-tier-7.gif|link=]] 1 X-Upgrade (Tier: 7)</center> | |||
| <center>[[Arquivo:UL_Chest.png|350px|link=]]</center> | |||
[[Arquivo: | |||
|- | |- | ||
|} | |} | ||
<table class="seeMore"> | <table class="seeMore"> | ||
<tr> | <tr> | ||
<td class="seeMore__image" | <td class="seeMore__image">[[Arquivo:Telekinetic-compass.gif|link=]]</td> | ||
<td> '''Veja Também:''' | <td> '''Veja Também:''' [[Technical Machine (TM)#Como fazer uma Coleção de TM|'''Liberando o acesso do Baú''']]. </td> | ||
</tr> | </tr> | ||
</table> | </table> | ||
== | == Advanced Ultra Lab == | ||
Dentro do Ultra Lab jogador pode obter os [[file:Access_Card.png|link=]] Access Cards que serão usados para acessar este local. Existem 10 locais espalhados por toda a Nightmare, cada um corresponde a um clã. <br> | |||
Todos os bosses possuem mecânicas exclusivas, clique sob o boss escolhido para ter acesso a mais informações. <br> | |||
=c= | |||
=pot= | |||
<!--T:1--> | |||
<center> | <center> | ||
{| class="wikitable | {| class="wikitable" width="45%" align="center" | ||
! | ! width="1%" style="background-color: #9d1a64" | Ícone | ||
! width="3%" style="background-color: #9d1a64" | Nome | |||
! width="2%" style="background-color: #9d1a64" | Onde adquirir | |||
! width="1%" style="background-color: #9d1a64" | Preço | |||
|- | |||
|+Medicine | |||
|align="center" | [[Arquivo:Medicine.png|link=]] | |||
| align="center" | '''Medicine''' | |||
| align="center" | [[NPC_Mark_(Itens)|NPC Mark]] | |||
| align="center" | 2 dollar | |||
|- | |||
| align="center" colspan="4"| Este item cura seu pokémon de todos os status negativos. | |||
|- | |||
{| class="wikitable" width="45%" align="center" | |||
! width="1%" style="background-color: #9d1a64" | Ícone | |||
! width="3%" style="background-color: #9d1a64" | Nome | |||
! width="2%" style="background-color: #9d1a64" | Onde adquirir | |||
! width="1%" style="background-color: #9d1a64" | Preço | |||
|+ Revives | |||
|- | |||
| align="center" | [[Arquivo:Revive.png|link=]] | |||
| align="center" | '''Revive''' | |||
| align="center" | [[NPC_Mark_(Itens)|NPC Mark]] | |||
| align="center" | 250 dollar | |||
|- | |||
| align="center" colspan="4"| Utilizado para reviver um pokémon derrotado. Lembrando que há um limite de level para poder usá-lo, que é até o level '''199-'''. | |||
|- | |||
| align="center" | [[Arquivo:Max_revive.png|link=]] | |||
| align="center" | '''Max Revive''' | |||
| align="center" | [[NPC_Mark_(Itens)|NPC Mark]] | |||
| align="center" | 350 dollar | |||
|- | |||
| align="center" colspan="4"| Utilizado para reviver um pokémon derrotado. Recomendado para jogadores level '''200+'''. | |||
|- | |||
| align="center" | [[Arquivo:Nightmare_Revive.png|link=]] | |||
| align="center" | '''Nightmare Revive''' | |||
| align="center" | [[Nightmare_Mark|Nightmare Mark]] <br> [[Nightmare Merchant|Nightmare Merchant]] | |||
| align="center" | 11000 dollar <br>10000 dollar | |||
|- | |- | ||
| | | align="center" colspan="4"| Utilizado para reviver um pokémon derrotado. Utilizado somente dentro do Nightmare World.<br> Tempo de Recarga: 5 minutos | ||
|- | |- | ||
| | | align="center" | [[Arquivo:Superior_Nightmare_Revive.png|link=]] | ||
| | | align="center" | '''Superior Nightmare Revive''' | ||
| | | align="center" | [[Craft_Profissões_-_Professor#Rank_S|Workshop - Rank S de Professor]] | ||
| align="center" | - | |||
|- | |- | ||
| | | align="center" colspan="4"| Utilizado para reviver um pokémon derrotado. Utilizado somente dentro do Nightmare World.<br> Tempo de Recarga: 4 minutos | ||
|- | |- | ||
|width=" | {| class="wikitable" width="45%" align="center" | ||
| | ! width="1%" style="background-color: #9d1a64" | Ícone | ||
| [[ | ! width="3%" style="background-color: #9d1a64" | Nome | ||
! width="2%" style="background-color: #9d1a64" | Onde adquirir | |||
! width="1%" style="background-color: #9d1a64" | Preço | |||
|+ Poções Normais | |||
| align="center" | [[Arquivo:Small_Poiton.png|link=]] | |||
| align="center" | '''Small Potion''' | |||
| align="center" | [[NPC_Mark_(Itens)|NPC Mark]] | |||
| align="center" | 5 dollar | |||
|- | |- | ||
| | | align="center" colspan="4"| Recupera 60 pontos de vida do seu pokémon por segundo. A duração máxima é de 10 segundos. Nível recomendado: 1. | ||
|- | |- | ||
| | | align="center" | [[Arquivo:Great_Poiton.png|link=]] | ||
| | | align="center" | '''Great Potion''' | ||
| | | align="center" | [[NPC_Mark_(Itens)|NPC Mark]] | ||
| align="center" | 10 dollar | |||
|- | |- | ||
| | | align="center" colspan="4"| Recupera 150 pontos de vida do seu pokémon por segundo. A duração máxima é de 10 segundos. Nível recomendado: 15. | ||
|- | |||
| align="center" | [[Arquivo:Ultra_potion.png|link=]] | |||
| align="center" | '''Ultra Potion''' | |||
| align="center" | [[NPC_Mark_(Itens)|NPC Mark]] | |||
{| class="wikitable | | align="center" | 22 dollar | ||
|- | |||
| align="center" colspan="4"| Recupera 400 pontos de vida do seu pokémon por segundo. A duração máxima é de 10 segundos. Nível recomendado: 40. | |||
|- | |||
| align="center" | [[Arquivo:Hyper_Poiton.png|link=]] | |||
| align="center" | '''Hyper Potion''' | |||
| align="center" | [[NPC_Mark_(Itens)|NPC Mark]] | |||
| align="center" | 55 dollar | |||
|- | |||
| align="center" colspan="4"| Recupera 1.000 pontos de vida do seu pokémon por segundo. A duração máxima é de 10 segundos. Nível recomendado: 60. | |||
|- | |||
| align="center" | [[Arquivo:Ultimate_Potion.png|link=]] | |||
| align="center" | '''Ultimate Potion''' | |||
| align="center" | [[NPC_Mark_(Itens)|NPC Mark]] | |||
| align="center" | 135 dollar | |||
|- | |||
| align="center" colspan="4"| Recupera 3.000 pontos de vida do seu pokémon por segundo. A duração máxima é de 10 segundos. Nível recomendado: 100. | |||
|- | |||
| align="center" | [[Arquivo:Restore_Potion.png|link=]] | |||
| align="center" | '''Restore Potion''' | |||
| align="center" | [[Craft Profissões|Workshop - Rank A de Professor]] | |||
| align="center" | - | |||
|- | |||
| align="center" colspan="4"| Recupera 5.000 pontos de vida do seu pokémon por segundo. A duração máxima é de 10 segundos. Nível mínimo: 200. | |||
|- | |||
{| class="wikitable" width="45%" align="center" | |||
! width="1%" style="background-color: #9d1a64" | Ícone | |||
! width="3%" style="background-color: #9d1a64" | Nome | |||
! width="2%" style="background-color: #9d1a64" | Onde adquirir | |||
! width="1%" style="background-color: #9d1a64" | Preço | |||
|+ Poções da Nightmare | |||
| align="center" | [[Arquivo:Shield_Nightmare_Potion.png|link=]] | |||
| align="center" | '''Nightmare Shield Elixir''' | |||
| align="center" | [[Nightmare_Mark|Nightmare Mark]] <br> [[Nightmare Merchant|Nightmare Merchant]] | |||
| align="center" | 33000 dollar <br>30000 dollar | |||
|- | |||
| align="center" colspan="4"| Beber um gole desta deliciosa poção vai aumentar sua defesa em 40% por 1 horas e 0 minutos. <br> Utilizado somente dentro do Nightmare World. Recarga: 2 minutos e 0 segundos. | |||
|- | |||
| align="center" | [[Arquivo:Big_Shield_Nightmare_Potion.gif|link=]] | |||
| align="center" | '''Big Nightmare Shield Elixir''' | |||
| align="center" | [[Nightmare_Mark|Nightmare Mark]] <br> [[Nightmare Merchant|Nightmare Merchant]] | |||
| align="center" | 82000 dollar <br>75000 dollar | |||
|- | |||
| align="center" colspan="4"| Beber um gole desta deliciosa poção vai aumentar sua defesa em 40% por 3 horas e 0 minutos. <br> Recarga: 2 minutos e 0 segundos. | |||
|- | |||
| align="center" | [[Arquivo:Small_Nightmare_Potion.gif|link=]] | |||
| align="center" | '''Small Nightmare Potion''' | |||
| align="center" | [[Nightmare_Mark|Nightmare Mark]] <br> [[Nightmare Merchant|Nightmare Merchant]] | |||
| align="center" | 530 dollar <br>480 dollar | |||
|- | |||
| align="center" colspan="4"| Recupera 5.000 pontos de vida do seu pokémon por segundo. <br> A duração máxima é de 8 segundos. Utilizado somente dentro do Nightmare World. | |||
|- | |||
| align="center" | [[Arquivo:Medium-Nightmare-Potion2.gif|link=]] | |||
| align="center" | '''Medium Nightmare Potion''' | |||
| align="center" | [[Nightmare_Mark|Nightmare Mark]] <br> [[Nightmare Merchant|Nightmare Merchant]] | |||
| align="center" | 610 dollar <br>550 dollar | |||
|- | |||
| align="center" colspan="4"| Recupera 6.500 pontos de vida do seu pokémon por segundo. <br> A duração máxima é de 8 segundos. Utilizado somente dentro do Nightmare World (Necessário Nightmare Level 25). | |||
|- | |||
| align="center" | [[Arquivo:Ultimate_Nightmare_Potion.gif|link=]] | |||
| align="center" | '''Ultimate Nightmare Potion''' | |||
| align="center" | [[Nightmare_Mark|Nightmare Mark]] <br> [[Nightmare Merchant|Nightmare Merchant]] | |||
| align="center" | 720 dollar <br>650 dollar | |||
|- | |- | ||
| | | align="center" colspan="4"| Recupera 10.000 pontos de vida do seu pokémon por segundo. <br> A duração máxima é de 8 segundos. Utilizado somente dentro do Nightmare World (Necessário Nightmare Level 70). | ||
|- | |- | ||
| | | align="center" | [[Arquivo:Shadow_Potion.png|link=]] | ||
| | | align="center" | '''Shadow Potion''' | ||
| | | align="center" | [[Nightmare_Mark|Nightmare Mark]] | ||
| align="center" | 10,000.00 | |||
|- | |- | ||
| | | align="center" colspan="4"| Esta poção cria fraquezas no oponente, fazendo com que ataques que ele seria imune passem a causar dano inefetivo durante 30 segundos. Tempo de recarga: 1 minutos. | ||
| | |||
|- | |- | ||
| | | align="center" | [[Arquivo:Hot_Nightmare_Potion.png|link=]] | ||
| | | align="center" | '''Hot Nightmare Potion''' | ||
| [[ | | align="center" | [[Craft_Profissões_-_Professor#Rank_S|Workshop - Rank S de Professor]] | ||
| align="center" | - | |||
|- | |- | ||
| | | align="center" colspan="4"| Ao Utilizá-la, a velocidade de movimento do Pokémon do jogador aumentará em 60%, e sua regeneração de HP será um pouco mais rápida que as poções convencionais, porém, a HP atual do Pokémon do jogador reduzirá em 35%. | ||
|- | |- | ||
| | | align="center" | [[Arquivo:Black_Nightmare_Potion.png|link=]] | ||
| align="center" | '''Black Nightmare Potion''' | |||
| align="center" | [[Craft_Profissões_-_Professor#Rank_S|Workshop - Rank S de Professor]] | |||
= | | align="center" | - | ||
|- | |- | ||
| | | align="center" colspan="4"| Recupera 12.000 pontos de vida do seu pokémon por segundo. <br> A duração máxima é de 6 segundos. Utilizado somente dentro do Nightmare World.(Necessário Nightmare Level 50) | ||
| | |||
|- | |- | ||
|} | |} | ||
</center> | </center> | ||
Edição atual tal como às 02h25min de 26 de junho de 2024
ultra lab
Nível necessário: 550+
Requisito: Ter completado a Sarkies Quest.
Caso encontre algum erro ou queira acrescentar alguma informação, entre em contato com um dos membros da wiki.
Acessando o Ultra Laboratory

| 1/7 | 2/7 |
|---|---|
 |
|
| 3/7 | 4/7 |
 |
|
| 5/7 | 6/7 |
 |
|
| 7/7 | |
|---|---|
|
|
| A barreira ficará desativada até o Shutdown. |
Acessando os Andares
Apenas os jogadores que derrotaram o Sarkies e falaram com o NPC Bill em Cerulean da Nightmare World conseguirão acessar as áreas de caça do Ultra Lab.
| Veja mais: Sarkies Quest |
Held Enhancement
Esse sistema concede bônus importantes para jogadores que estiverem utilizando determinadas categorias de Held. O sistema é baseado no Held Item X equipado no Pokémon que o jogador estiver utilizando.
![]() Caso o jogador esteja utilizando Held de Tier 8, causará 40% mais dano e receberá 40% menos dano dos inimigos.
Caso o jogador esteja utilizando Held de Tier 8, causará 40% mais dano e receberá 40% menos dano dos inimigos.
Observações:
- Esse sistema somente é válido para o Held equipado diretamente no slot X do Pokémon escolhido para o combate, ou seja, não é aplicado para o Held equipado no slot Y ou no Device.
- O bônus do sistema de Held Enhancement é cumulativo, ou seja, se um jogador estiver usando o held X-Attack ou X-Defense, terá bônus tanto do sistema quanto o do held somados.
Tasks
Dentro do Ultra Lab existem algumas task.
| Nº e NPC | Objetivo | Recompensa |
|---|---|---|
| 1. NPC Sidis S-1 |
Derrotar: 600 Sentinelas ou Troopers |
|
| 2. NPC Sidis S-3 |
Derrotar: 15 Subjects Alpha |
|


Subjects Alpha
Os Subject Alpha são mini bosses que foram criados por Sarkies e estão no Ultra Lab, cada um possui sua própria mecânica, é recomendado um grupo de 3 jogadores para caçar neste local. Clique no boss desejado para entender sua mecânica.


Area Secreta do Ultra Lab
Dentro do Ultra Lab existe uma área secreta que da acesso a sala para criar um TM caso o jogador tenha 10 discos e a um baú para nível 600.
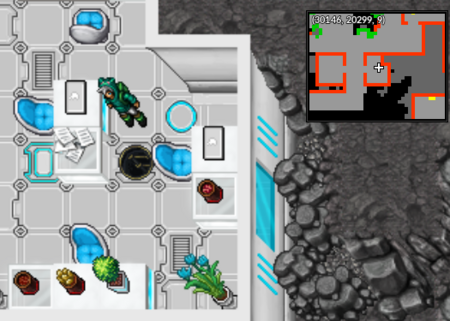
Ao todo, seis Remote Control deverão ser encontrados e clicados na seguinte sequência:
| 1º Remote Control | 2º Remote Control |
|---|---|
|
|
| 3º Remote Control | 4º Remote Control |
|
|
| 5º Remote Control | 6º Remote Control |
|

|
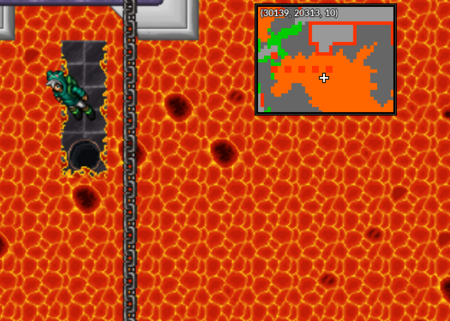
Depois de ativar a sequência dos remote controls, o jogador liberará uma passagem secreta próximo ao Controle número 3, ao qual deverá entrar. Em seguida, encontrará um caminho de lava que deverá percorrer até localizar uma nova passagem secreta.
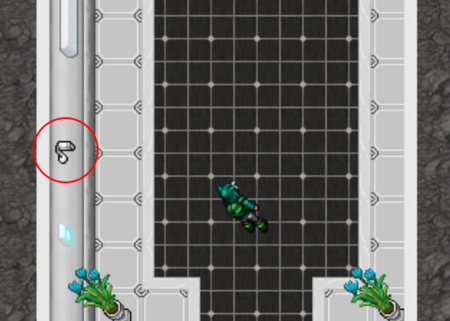
Ao descer através da nova escada encontrada, o jogador deverá passar por um trajeto repleto de armadilhas que causarão dano ao personagem. Não há penalidade de bless ou experiência ao ser atingido pela armadilha, todavia, é recomendado que o jogador faça o trajeto com um Pokémon fora da ball, pois ao ser detectado pelas câmeras de segurança do local, retornará para a entrada secreta onde há chances de encontrar Advanced Sentinels que poderão derrotá-lo.
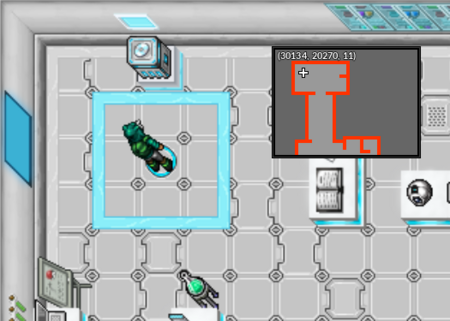
Após atravessar pelas armadilhas do local, o jogador encontrará a TM's Room. Com os 10 discos em mãos, clique no console (caixa em frente ao local indicado na imagem abaixo) para criar a coleção de TM.
O Baú de nível 600 fica na sala que antecede a sala principal.
| Número | Localização | Requisito | Recompensa | Mapa |
|---|---|---|---|---|
| 1 | NW Level: 75 |
 |
| Veja Também: Liberando o acesso do Baú. |
Advanced Ultra Lab
Dentro do Ultra Lab jogador pode obter os ![]() Access Cards que serão usados para acessar este local. Existem 10 locais espalhados por toda a Nightmare, cada um corresponde a um clã.
Access Cards que serão usados para acessar este local. Existem 10 locais espalhados por toda a Nightmare, cada um corresponde a um clã.
Todos os bosses possuem mecânicas exclusivas, clique sob o boss escolhido para ter acesso a mais informações.
c
pot
| Ícone | Nome | Onde adquirir | Preço |
|---|---|---|---|
| Medicine | NPC Mark | 2 dollar | |
| Este item cura seu pokémon de todos os status negativos. | |||
| Ícone | Nome | Onde adquirir | Preço |
|---|---|---|---|
| Revive | NPC Mark | 250 dollar | |
| Utilizado para reviver um pokémon derrotado. Lembrando que há um limite de level para poder usá-lo, que é até o level 199-. | |||
| Max Revive | NPC Mark | 350 dollar | |
| Utilizado para reviver um pokémon derrotado. Recomendado para jogadores level 200+. | |||
| Nightmare Revive | Nightmare Mark Nightmare Merchant |
11000 dollar 10000 dollar | |
| Utilizado para reviver um pokémon derrotado. Utilizado somente dentro do Nightmare World. Tempo de Recarga: 5 minutos | |||
| Superior Nightmare Revive | Workshop - Rank S de Professor | - | |
| Utilizado para reviver um pokémon derrotado. Utilizado somente dentro do Nightmare World. Tempo de Recarga: 4 minutos | |||
| Ícone | Nome | Onde adquirir | Preço |
|---|---|---|---|
| Small Potion | NPC Mark | 5 dollar | |
| Recupera 60 pontos de vida do seu pokémon por segundo. A duração máxima é de 10 segundos. Nível recomendado: 1. | |||
| Great Potion | NPC Mark | 10 dollar | |
| Recupera 150 pontos de vida do seu pokémon por segundo. A duração máxima é de 10 segundos. Nível recomendado: 15. | |||
| Ultra Potion | NPC Mark | 22 dollar | |
| Recupera 400 pontos de vida do seu pokémon por segundo. A duração máxima é de 10 segundos. Nível recomendado: 40. | |||
| Hyper Potion | NPC Mark | 55 dollar | |
| Recupera 1.000 pontos de vida do seu pokémon por segundo. A duração máxima é de 10 segundos. Nível recomendado: 60. | |||
| Ultimate Potion | NPC Mark | 135 dollar | |
| Recupera 3.000 pontos de vida do seu pokémon por segundo. A duração máxima é de 10 segundos. Nível recomendado: 100. | |||
| Restore Potion | Workshop - Rank A de Professor | - | |
| Recupera 5.000 pontos de vida do seu pokémon por segundo. A duração máxima é de 10 segundos. Nível mínimo: 200. | |||
| Ícone | Nome | Onde adquirir | Preço |
|---|---|---|---|
| Nightmare Shield Elixir | Nightmare Mark Nightmare Merchant |
33000 dollar 30000 dollar | |
| Beber um gole desta deliciosa poção vai aumentar sua defesa em 40% por 1 horas e 0 minutos. Utilizado somente dentro do Nightmare World. Recarga: 2 minutos e 0 segundos. | |||
| Big Nightmare Shield Elixir | Nightmare Mark Nightmare Merchant |
82000 dollar 75000 dollar | |
| Beber um gole desta deliciosa poção vai aumentar sua defesa em 40% por 3 horas e 0 minutos. Recarga: 2 minutos e 0 segundos. | |||
| Small Nightmare Potion | Nightmare Mark Nightmare Merchant |
530 dollar 480 dollar | |
| Recupera 5.000 pontos de vida do seu pokémon por segundo. A duração máxima é de 8 segundos. Utilizado somente dentro do Nightmare World. | |||
| Medium Nightmare Potion | Nightmare Mark Nightmare Merchant |
610 dollar 550 dollar | |
| Recupera 6.500 pontos de vida do seu pokémon por segundo. A duração máxima é de 8 segundos. Utilizado somente dentro do Nightmare World (Necessário Nightmare Level 25). | |||
| Ultimate Nightmare Potion | Nightmare Mark Nightmare Merchant |
720 dollar 650 dollar | |
| Recupera 10.000 pontos de vida do seu pokémon por segundo. A duração máxima é de 8 segundos. Utilizado somente dentro do Nightmare World (Necessário Nightmare Level 70). | |||
| Shadow Potion | Nightmare Mark | 10,000.00 | |
| Esta poção cria fraquezas no oponente, fazendo com que ataques que ele seria imune passem a causar dano inefetivo durante 30 segundos. Tempo de recarga: 1 minutos. | |||
| Hot Nightmare Potion | Workshop - Rank S de Professor | - | |
| Ao Utilizá-la, a velocidade de movimento do Pokémon do jogador aumentará em 60%, e sua regeneração de HP será um pouco mais rápida que as poções convencionais, porém, a HP atual do Pokémon do jogador reduzirá em 35%. | |||
| Black Nightmare Potion | Workshop - Rank S de Professor | - | |
| Recupera 12.000 pontos de vida do seu pokémon por segundo. A duração máxima é de 6 segundos. Utilizado somente dentro do Nightmare World.(Necessário Nightmare Level 50) | |||