|
|
| (844 revisões intermediárias por 4 usuários não estão sendo mostradas) |
| Linha 1: |
Linha 1: |
| =Minigames de Profissão= | | =À Procura de Bunnelby= |
| | <center>[[Arquivo:Banner bunnelby.jpg|link=À procura de Bunnelby]]<br></center> |
|
| |
|
| ==Coleta de recursos em Kanto, Ilhas Laranja, Orre e Outland==
| |
|
| |
|
| ===Aventureiro===
| |
| Ao encontrar um baú, seja ele de madeira, ouro ou prata, o Aventureiro precisa abri-lo com uma lockpick. Ao usar o item no baú, uma janela se abre com a fechadura dele para que o jogador acerte a posição correta, posicionando a chave com o mouse e utilizando a barra de espaço para virar. Caso a posição esteja incorreta, a chave fica vermelha e a lockpick quebra, e o jogador precisa recomeçar. Ao acertar a posição, o baú se abre e a recompensa é recebida no inventário.
| |
|
| |
|
| ==Coleta de recursos na Nightmare World== | | <span style="color:red">'''Nível necessário:</span> 100 |
|
| |
|
| ===Aventureiro=== | | <span style="color:red">'''Recompensa:</span> 1.55KK EXP |
|
| |
|
| ===Cozinheiro===
| | <b>Caso encontre algum erro ou queira acrescentar alguma informação, entre em contato com [[Nossa Equipe|um dos membros da wiki.]]</b> <br> |
|
| |
|
| ===Hacker=== | | ==1ª parte: Procurando a Yume Ball== |
| | Para iniciar a quest o jogador deve se dirigir até '''Old Village''', no sul da ilha de Mandarin, e conversar com a '''NPC Jasmine''' e o '''NPC Jason'''. |
|
| |
|
| ==Desafio: Onde está o Pokémon?==
| | <center>[[Arquivo:Localização_NPCs_Jasmine_e_Jason.png|link=]]</center> |
|
| |
|
| Durante a coleta de recurso, o jogador pode encontrar este desafio aleatório. Para compensar o tempo gasto para resolvê-lo, o jogador é recompensado com três vezes mais recursos do que receberia numa coleta comum. Este desafio aparece nas coletas de todas as profissões, nos seguintes recursos: minérios (iron ore, platinum ore e corrupted iron ore), eletronic scraps, tech data, arbustos, style e fashion points, madeira (logs), hidden relics, food bags, (adicionar nome dos outros). Caso o jogador esteja utilizando um Profession Ressource Boost o bônus de coleta também se aplica na coleta do desafio.
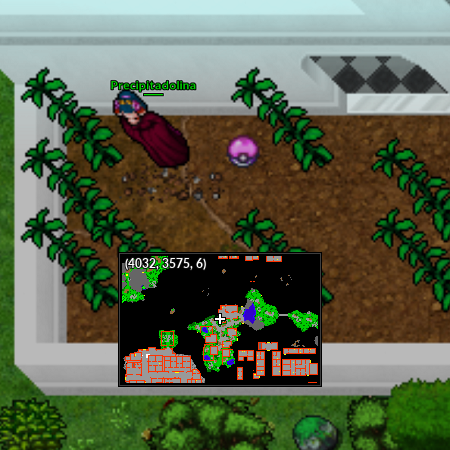
| | Jason irá explicar que sua esposa está muito brava com ele porque ele perdeu seu novo Pokémon Bunnelby, da região de Kalos, numa visita ao farol do Bill em Cerulean. Jason conta que acredita ter perdido a Yume Ball que contém o Bunnelby entre Vermilion e Cerulean, e pede para o jogador procurá-la. |
|
| |
|
| O desafio consiste em identificar qual o Pokémon escolhido e localizar a respectiva pokébola depois de ter sido embaralhada. Após o fim do embaralhamento o jogador deve clicar na pokébola correta e a coleta do recurso será iniciada. Caso o jogador clique na pokébola errada, nada acontece, e ao tentar coletar o recurso novamente, o desafio será reiniciado com novos Pokémon.
| | A Yume Ball está num jardim de uma casa ao norte de Saffron. Basta clicar nela para que ela apareça no inventário. |
|
| |
|
| <center> [[Arquivo:Minigame_Profissão.gif|link=]] </center> | | <center>[[Arquivo:Localização_Yume_Ball.png|link=]]</center> |
|
| |
|
| | Após encontrar a Yume Ball, o jogador deve retornar com ela para Jason, que o recompensará com '''100K de experiência'''. |
|
| |
|
| <!-- Tag: minigame; desafio; acertar pokémon; onde está o pokémon; profissão;-->
| | ==2ª parte: Investigando o paradeiro de Bunnelby== |
| | ===Albert=== |
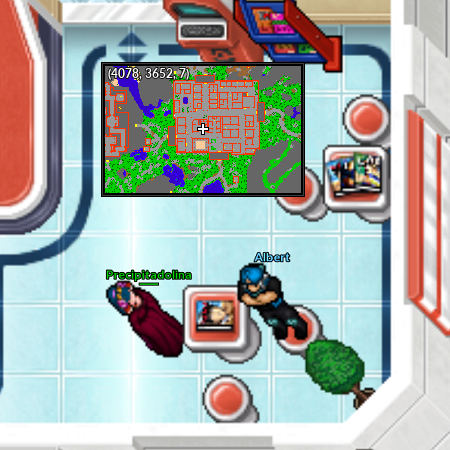
| | Quando o jogador entregar a Yume Ball para Jason, ele perceberá que está vazia. Depois disso, Jason pede para que o jogador investigue nos Centros Pokémon próximos para encontrar alguma notícia sobre o Bunnelby de Jasmine. <br> |
| | Nesse momento, o jogador deve se dirigir ao Centro Pokémon de Saffron e conversar com o '''NPC Albert'''. |
|
| |
|
| =Granbull= | | <center>[[Arquivo:Localização_NPC_Albert.png|link=]]</center> |
|
| |
|
| == '''Movimentos''' ==
| | Albert contará que viu uma treinadora dias atrás com um Bunnelby que não a obedecia, mas vai pedir ajuda para contar para onde ela foi. Albert pede que o jogador o traga os seguintes itens: |
|
| |
|
| === '''Moveset PVP''' ===
| | <center> |
|
| |
|
| | | {| class="wikitable" width="20%" |
| {| border="0" style="border-collapse:collapse" | | | align="center"| [[Arquivo:Psp.png|link=]] |
| |- align="center" style="background-color: #E6E6FA;"
| | | align="center"| '''1 PSP''' |
| ! rowspan="2" | M1
| | |- |
| | width="10px" |
| | | align="center"| [[Arquivo:Gameboycolor.png|link=]] |
| | align="left" | Tackle (15s)
| | | align="center"| '''1 Game Boy Color''' |
| | width="50px" rowspan="2" |
| |
| | rowspan="2" align="right" | [[Arquivo:Damage.png|Target]] [[Arquivo:Target.png|Damage]]
| |
| | rowspan="2" | [[Arquivo:Fairy.png|Fairy|link=Psycraft]]
| |
| |- align="center" style="background-color: #E6E6FA;"
| |
| | width="10px" |
| |
| | align="left" | Level 80
| |
| | |
| |- align="center"
| |
| ! rowspan="2" | M2
| |
| | width="10px" |
| |
| | align="left" | Dazzling Gleam (18s)
| |
| | width="50px" rowspan="2" |
| |
| | rowspan="2" align="right" | [[Arquivo:Damage.png|Damage]] [[Arquivo:Target.png|Target]]
| |
| | rowspan="2" | [[Arquivo:Fairy.png|Fairy|link=Psycraft]]
| |
| |- align="center"
| |
| | width="10px" |
| |
| | align="left" | Level 84
| |
| | |
| |- align="center" style="background-color: #E6E6FA;"
| |
| ! rowspan="2" | M3
| |
| | width="10px" |
| |
| | align="left" | Play Rough (15s)
| |
| | width="50px" rowspan="2" |
| |
| | rowspan="2" align="right" | [[Arquivo:Damage.png|Damage]] [[Arquivo:Target.png|Target]]
| |
| | rowspan="2" | [[Arquivo:Fairy.png|Fairy|link=Psycraft]]
| |
| |- align="center" style="background-color: #E6E6FA;"
| |
| | width="10px" |
| |
| | align="left" | Level 80
| |
| | |
| |- align="center"
| |
| ! rowspan="2" | M5
| |
| | width="10px" |
| |
| | align="left" | Take Down (40s)
| |
| | width="50px" rowspan="2" |
| |
| | rowspan="2" align="right" | [[Arquivo:AOE.png|AOE]] [[Arquivo:Damage.png|Damage]]
| |
| | rowspan="2" | [[Arquivo:Fairy.png|Fairy|link=Psycraft]]
| |
| |- align="center"
| |
| | width="10px" |
| |
| | align="left" | Level 80
| |
| | |
| |- align="center" style="background-color: #E6E6FA;"
| |
| ! rowspan="2" | M6
| |
| | width="10px" |
| |
| | align="left" | '''Hyper Beam (50s)'''
| |
| | width="50px" rowspan="2" |
| |
| | rowspan="2" align="right" | [[Arquivo:AOE.png|AOE]] [[Arquivo:Damage.png|Damage]]
| |
| | rowspan="2" | [[Arquivo:Fairy.png|Fairy|link=Psycraft]]
| |
| |- align="center" style="background-color: #E6E6FA;"
| |
| | width="10px" |
| |
| | align="left" | Level 85
| |
| | |
| |- align="center" | |
| ! rowspan="2" | M7
| |
| | width="10px" |
| |
| | align="left" | Heart Pound (25s)
| |
| | width="50px" rowspan="2" |
| |
| | rowspan="2" align="right" | [[Arquivo:AOE.png|AOE]] [[Arquivo:Damage.png|Damage]]
| |
| | rowspan="2" | [[Arquivo:Fairy.png|Fairy|link=Psycraft]]
| |
| |- align="center" | |
| | width="10px" |
| |
| | align="left" | Level 80
| |
| | |
| |- align="center" style="background-color: #E6E6FA;"
| |
| ! rowspan="2" | M8
| |
| | width="10px" |
| |
| | align="left" | '''Floral Storm (60s)'''
| |
| | width="50px" rowspan="2" |
| |
| | rowspan="2" align="right" | [[Arquivo:AOE.png|AOE]] [[Arquivo:Damage.png|Damage]]
| |
| | rowspan="2" | [[Arquivo:Fairy.png|Fairy|link=Psycraft]]
| |
| |- align="center" style="background-color: #E6E6FA;"
| |
| | width="10px" |
| |
| | align="left" | Level 85
| |
| | |
| |- align="center"
| |
| ! rowspan="2" | M8
| |
| | width="10px" |
| |
| | align="left" | Scary Face (40s)
| |
| | width="50px" rowspan="2" |
| |
| | rowspan="2" align="right" | [[Arquivo:AOE.png|AOE]] [[Arquivo:Paralyze.png|Paralyze]]
| |
| | rowspan="2" | [[Arquivo:Normal1.png|Normal|link=Gardestrike]]
| |
| |- align="center"
| |
| | width="10px" |
| |
| | align="left" | Level 82
| |
| | |
| |- align="center" style="background-color: #E6E6FA;" | |
| ! rowspan="2" | P
| |
| | width="10px" |
| |
| | align="left" | Pixilate
| |
| | width="50px" rowspan="2" |
| |
| | rowspan="2" align="right" | [[Arquivo:Passive.png|Passive]] [[Arquivo:Buff.png|Buff]]
| |
| | rowspan="2" | [[Arquivo:Fairy.png|Fairy|link=Psycraft]]
| |
| |- align="center" style="background-color: #E6E6FA;"
| |
| | width="10px" |
| |
| | align="left" |
| |
| | |
| |- align="center" style="background-color: #E6E6FA;" | |
| ! rowspan="2" | P
| |
| | width="10px" |
| |
| | align="left" | Quick Feet
| |
| | width="50px" rowspan="2" |
| |
| | rowspan="2" align="right" | [[Arquivo:Passive.png|Passive]] [[Arquivo:Buff.png|Buff]]
| |
| | rowspan="2" | [[Arquivo:Normal1.png|Normal|link=Gardestrike]]
| |
| |- align="center" style="background-color: #E6E6FA;" | |
| | width="10px" | | |
| | align="left" |
| |
| |}
| |
| | |
| === '''Moveset PVE''' ===
| |
| | |
| {| border="0" style="border-collapse:collapse"
| |
| |- align="center" style="background-color: #E6E6FA;"
| |
| ! rowspan="2" | M1
| |
| | width="10px" |
| |
| | align="left" | Tackle (15s)
| |
| | width="50px" rowspan="2" |
| |
| | rowspan="2" align="right" | [[Arquivo:Damage.png|Target]] [[Arquivo:Target.png|Damage]]
| |
| | rowspan="2" | [[Arquivo:Fairy.png|Fairy|link=Psycraft]]
| |
| |- align="center" style="background-color: #E6E6FA;"
| |
| | width="10px" |
| |
| | align="left" | Level 80
| |
| | |
| |- align="center"
| |
| ! rowspan="2" | M2
| |
| | width="10px" |
| |
| | align="left" | Dazzling Gleam (18s)
| |
| | width="50px" rowspan="2" |
| |
| | rowspan="2" align="right" | [[Arquivo:Damage.png|Damage]] [[Arquivo:Target.png|Target]]
| |
| | rowspan="2" | [[Arquivo:Fairy.png|Fairy|link=Psycraft]]
| |
| |- align="center"
| |
| | width="10px" |
| |
| | align="left" | Level 84
| |
| | |
| |- align="center" style="background-color: #E6E6FA;"
| |
| ! rowspan="2" | M3
| |
| | width="10px" |
| |
| | align="left" | Play Rough (15s)
| |
| | width="50px" rowspan="2" |
| |
| | rowspan="2" align="right" | [[Arquivo:Damage.png|Damage]] [[Arquivo:Target.png|Target]]
| |
| | rowspan="2" | [[Arquivo:Fairy.png|Fairy|link=Psycraft]]
| |
| |- align="center" style="background-color: #E6E6FA;"
| |
| | width="10px" |
| |
| | align="left" | Level 80
| |
| | |
| |- align="center"
| |
| ! rowspan="2" | M5
| |
| | width="10px" |
| |
| | align="left" | Take Down (40s)
| |
| | width="50px" rowspan="2" |
| |
| | rowspan="2" align="right" | [[Arquivo:AOE.png|AOE]] [[Arquivo:Damage.png|Damage]]
| |
| | rowspan="2" | [[Arquivo:Fairy.png|Fairy|link=Psycraft]]
| |
| |- align="center"
| |
| | width="10px" |
| |
| | align="left" | Level 80
| |
| | |
| |- align="center" style="background-color: #E6E6FA;"
| |
| ! rowspan="2" | M6
| |
| | width="10px" |
| |
| | align="left" | '''Hyper Beam (40s)'''
| |
| | width="50px" rowspan="2" |
| |
| | rowspan="2" align="right" | [[Arquivo:AOE.png|AOE]] [[Arquivo:Damage.png|Damage]]
| |
| | rowspan="2" | [[Arquivo:Fairy.png|Fairy|link=Psycraft]]
| |
| |- align="center" style="background-color: #E6E6FA;"
| |
| | width="10px" |
| |
| | align="left" | Level 85
| |
| | |
| |- align="center"
| |
| ! rowspan="2" | M7
| |
| | width="10px" |
| |
| | align="left" | Heart Pound (25s)
| |
| | width="50px" rowspan="2" |
| |
| | rowspan="2" align="right" | [[Arquivo:AOE.png|AOE]] [[Arquivo:Damage.png|Damage]]
| |
| | rowspan="2" | [[Arquivo:Fairy.png|Fairy|link=Psycraft]]
| |
| |- align="center"
| |
| | width="10px" |
| |
| | align="left" | Level 80
| |
| | |
| |- align="center" style="background-color: #E6E6FA;"
| |
| ! rowspan="2" | M8
| |
| | width="10px" |
| |
| | align="left" | '''Floral Storm (50s)'''
| |
| | width="50px" rowspan="2" |
| |
| | rowspan="2" align="right" | [[Arquivo:AOE.png|AOE]] [[Arquivo:Damage.png|Damage]]
| |
| | rowspan="2" | [[Arquivo:Fairy.png|Fairy|link=Psycraft]]
| |
| |- align="center" style="background-color: #E6E6FA;"
| |
| | width="10px" |
| |
| | align="left" | Level 85
| |
| | |
| |- align="center"
| |
| ! rowspan="2" | M8
| |
| | width="10px" |
| |
| | align="left" | Scary Face (40s)
| |
| | width="50px" rowspan="2" |
| |
| | rowspan="2" align="right" | [[Arquivo:AOE.png|AOE]] [[Arquivo:Paralyze.png|Paralyze]]
| |
| | rowspan="2" | [[Arquivo:Normal1.png|Normal|link=Gardestrike]]
| |
| |- align="center"
| |
| | width="10px" |
| |
| | align="left" | Level 82
| |
| | |
| |- align="center" style="background-color: #E6E6FA;"
| |
| ! rowspan="2" | P
| |
| | width="10px" |
| |
| | align="left" | Pixilate
| |
| | width="50px" rowspan="2" |
| |
| | rowspan="2" align="right" | [[Arquivo:Passive.png|Passive]] [[Arquivo:Buff.png|Buff]]
| |
| | rowspan="2" | [[Arquivo:Fairy.png|Fairy|link=Psycraft]]
| |
| |- align="center" style="background-color: #E6E6FA;"
| |
| | width="10px" |
| |
| | align="left" |
| |
| | |
| |- align="center" style="background-color: #E6E6FA;"
| |
| ! rowspan="2" | P
| |
| | width="10px" |
| |
| | align="left" | Quick Feet
| |
| | width="50px" rowspan="2" |
| |
| | rowspan="2" align="right" | [[Arquivo:Passive.png|Passive]] [[Arquivo:Buff.png|Buff]]
| |
| | rowspan="2" | [[Arquivo:Normal1.png|Normal|link=Gardestrike]]
| |
| |- align="center" style="background-color: #E6E6FA;"
| |
| | width="10px" |
| |
| | align="left" |
| |
| |} | | |} |
| | </center> |
|
| |
|
| =Shiny Granbull=
| | Ao entregá-los, o jogador receberá '''50K de experiência''', e Albert irá contar que viu a treinadora se encontrando com o '''NPC Mr. Jones'''. |
| | |
| === '''Moveset PVP''' ===
| |
| | |
| {| border="0" style="border-collapse:collapse"
| |
| |- align="center" style="background-color: #E6E6FA;"
| |
| ! rowspan="2" | M1
| |
| | width="10px" |
| |
| | align="left" | Roar (50s)
| |
| | width="50px" rowspan="2" |
| |
| | rowspan="2" align="right" | [[Arquivo:AOE.png|AOE]] [[Arquivo:Silence.png|Silence]] [[Arquivo:Debuff.png|Debuff]] [[Arquivo:NeverBoost.png|Neverboost]]
| |
| | rowspan="2" | [[Arquivo:Fairy.png|Fairy|link=Psycraft]]
| |
| |- align="center" style="background-color: #E6E6FA;"
| |
| | width="10px" |
| |
| | align="left" | Level 110
| |
| | |
| |- align="center"
| |
| ! rowspan="2" | M2
| |
| | width="10px" |
| |
| | align="left" | Crunch (15s)
| |
| | width="50px" rowspan="2" |
| |
| | rowspan="2" align="right" | [[Arquivo:Target.png|Target]] [[Arquivo:Damage.png|Damage]]
| |
| | rowspan="2" | [[Arquivo:Dark1.png|Dark|link=Malefic]]
| |
| |- align="center"
| |
| | width="10px" |
| |
| | align="left" | Level 100
| |
|
| |
|
| |- align="center" style="background-color: #E6E6FA;"
| | ===Mr. Jones=== |
| ! rowspan="2" | M3
| |
| | width="10px" |
| |
| | align="left" | Dazzling Gleam (15s)
| |
| | width="50px" rowspan="2" |
| |
| | rowspan="2" align="right" | [[Arquivo:Target.png|Target]] [[Arquivo:Damage.png|Damage]]
| |
| | rowspan="2" | [[Arquivo:Fairy.png|Fairy|link=Psycraft]]
| |
| |- align="center" style="background-color: #E6E6FA;"
| |
| | width="10px" |
| |
| | align="left" | Level 104
| |
|
| |
|
| |- align="center"
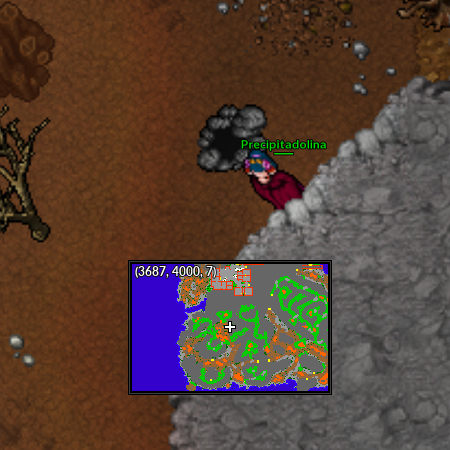
| | Mr. Jones se encontra no noderste de Pewter, na saída da cidade. |
| ! rowspan="2" | M4
| |
| | width="10px" |
| |
| | align="left" | Play Rough (12s)
| |
| | width="50px" rowspan="2" |
| |
| | rowspan="2" align="right" | [[Arquivo:Target.png|Target]] [[Arquivo:Damage.png|Damage]]
| |
| | rowspan="2" | [[Arquivo:Fairy.png|Fairy|link=Psycraft]]
| |
| |- align="center"
| |
| | width="10px" |
| |
| | align="left" | Level 100
| |
|
| |
|
| |- align="center" style="background-color: #E6E6FA;"
| | <center>[[Arquivo:Pronta_Localização_NPC_Mr._Jones.png|link]]</center> |
| ! rowspan="2" | M5
| |
| | width="10px" |
| |
| | align="left" | Super Fang (35s)
| |
| | width="50px" rowspan="2" |
| |
| | rowspan="2" align="right" | [[Arquivo:Target.png|Target]] [[Arquivo:Damage.png|Damage]]
| |
| | rowspan="2" | [[Arquivo:Fairy.png|Fairy|link=Psycraft]]
| |
| |- align="center" style="background-color: #E6E6FA;"
| |
| | width="10px" |
| |
| | align="left" | Level 100
| |
|
| |
|
| |- align="center"
| | Ele conta que viu a treinadora, e o Bunnelby dela tinha sido forçado a entrar em sua Pokébola e por isso não a obedecia. Mr. Jones pede ajuda do jogador pedindo os seguintes itens para contar para onde a treinadora foi: |
| ! rowspan="2" | M6
| |
| | width="10px" |
| |
| | align="left" | Take Down (20s)
| |
| | width="50px" rowspan="2" |
| |
| | rowspan="2" align="right" | [[Arquivo:AOE.png|AOE]] [[Arquivo:Damage.png|Damage]]
| |
| | rowspan="2" | [[Arquivo:Fairy.png|Fairy|link=Psycraft]]
| |
| |- align="center"
| |
| | width="10px" |
| |
| | align="left" | Level 100
| |
|
| |
|
| |- align="center" style="background-color: #E6E6FA;"
| | <center> |
| ! rowspan="2" | M7
| |
| | width="10px" |
| |
| | align="left" | Last Resort (25s)
| |
| | width="50px" rowspan="2" |
| |
| | rowspan="2" align="right" | [[Arquivo:AOE.png|AOE]] [[Arquivo:Damage.png|Damage]]
| |
| | rowspan="2" | [[Arquivo:Fairy.png|Fairy|link=Psycraft]]
| |
| |- align="center" style="background-color: #E6E6FA;"
| |
| | width="10px" |
| |
| | align="left" | Level 106
| |
| | |
| |- align="center"
| |
| ! rowspan="2" | M8
| |
| | width="10px" |
| |
| | align="left" | Floral Storm (60s)
| |
| | width="50px" rowspan="2" |
| |
| | rowspan="2" align="right" | [[Arquivo:AOE.png|AOE]] [[Arquivo:Damage.png|Damage]]
| |
| | rowspan="2" | [[Arquivo:Fairy.png|Fairy|link=Psycraft]]
| |
| |- align="center"
| |
| | width="10px" |
| |
| | align="left" | Level 105
| |
| | |
| |- align="center" style="background-color: #E6E6FA;"
| |
| ! rowspan="2" | P
| |
| | width="10px" |
| |
| | align="left" | Pixilate
| |
| | width="50px" rowspan="2" |
| |
| | rowspan="2" align="right" | [[Arquivo:Buff.png|Buff]] [[Arquivo:Passive.png|Passive]]
| |
| | rowspan="2" | [[Arquivo:Fairy.png|Fairy|link=Psycraft]]
| |
| |- align="center" style="background-color: #E6E6FA;"
| |
| | width="10px" |
| |
| | align="left" |
| |
| | |
| |- align="center"
| |
| ! rowspan="2" | P
| |
| | width="10px" |
| |
| | align="left" | Play Dead
| |
| | width="50px" rowspan="2" |
| |
| | rowspan="2" align="right" | [[Arquivo:Buff.png|Buff]] [[Arquivo:Passive.png|Passive]]
| |
| | rowspan="2" | [[Arquivo:Fairy.png|Fairy|link=Psycraft]]
| |
| |- align="center"
| |
| | width="10px" |
| |
| | align="left" |
| |
| | |
| |- align="center" style="background-color: #E6E6FA;"
| |
| ! rowspan="2" | P
| |
| | width="10px" |
| |
| | align="left" | Quick Feet
| |
| | width="50px" rowspan="2" |
| |
| | rowspan="2" align="right" | [[Arquivo:Buff.png|Buff]] [[Arquivo:Passive.png|Passive]]
| |
| | rowspan="2" | [[Arquivo:Normal1.png|Normal|link=Gardestrike]]
| |
| |- align="center" style="background-color: #E6E6FA;"
| |
| | width="10px" |
| |
| | align="left" |
| |
|
| |
|
| | {| class="wikitable" width="20%" |
| | | align="center"|[[Arquivo:Rock-stone.gif|link=Pedras de Evolução]] |
| | | align="center"|''' 1 Rock Stone ''' |
| | |- |
| | | align="center"|[[Arquivo: Onix Tail.png |link=]] |
| | | align="center"|'''4 Onix Tail''' |
| | |- |
| | | align="center"|[[Arquivo:Mushroom1.png|link=]] |
| | | align="center"|'''5 Mushroom''' |
| |} | | |} |
| | </center> |
|
| |
|
| === '''Moveset PVE''' ===
| | Ele agradece o jogador concedendo '''100K de experiência''' e conta que como ele não a ajudou a treinadora, chamada Cindy, ela provavelmente foi para onde mora, em Cinnabar. |
|
| |
|
| {| border="0" style="border-collapse:collapse"
| | ===Cindy=== |
| |- align="center" style="background-color: #E6E6FA;"
| |
| ! rowspan="2" | M1
| |
| | width="10px" |
| |
| | align="left" | Roar (50s)
| |
| | width="50px" rowspan="2" |
| |
| | rowspan="2" align="right" | [[Arquivo:AOE.png|AOE]] [[Arquivo:Silence.png|Silence]] [[Arquivo:Debuff.png|Debuff]] [[Arquivo:NeverBoost.png|Neverboost]]
| |
| | rowspan="2" | [[Arquivo:Fairy.png|Fairy|link=Psycraft]]
| |
| |- align="center" style="background-color: #E6E6FA;"
| |
| | width="10px" |
| |
| | align="left" | Level 110
| |
|
| |
|
| |- align="center"
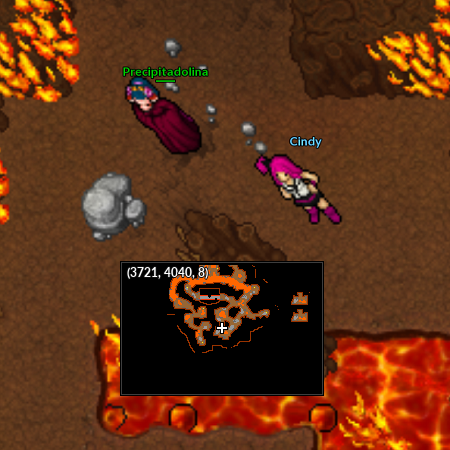
| | Para encontrá-la, o jogador deve descer neste buraco no sul de Cinnabar e em seguida seguir à direita e ao sul. |
| ! rowspan="2" | M2
| |
| | width="10px" |
| |
| | align="left" | Crunch (15s)
| |
| | width="50px" rowspan="2" |
| |
| | rowspan="2" align="right" | [[Arquivo:Target.png|Target]] [[Arquivo:Damage.png|Damage]]
| |
| | rowspan="2" | [[Arquivo:Dark1.png|Dark|link=Malefic]]
| |
| |- align="center"
| |
| | width="10px" |
| |
| | align="left" | Level 100
| |
|
| |
|
| |- align="center" style="background-color: #E6E6FA;"
| | <center>[[Arquivo:Localização_Buraco_NPC_Cindy.png|link=]]</center> |
| ! rowspan="2" | M3
| |
| | width="10px" |
| |
| | align="left" | Dazzling Gleam (15s)
| |
| | width="50px" rowspan="2" |
| |
| | rowspan="2" align="right" | [[Arquivo:Target.png|Target]] [[Arquivo:Damage.png|Damage]]
| |
| | rowspan="2" | [[Arquivo:Fairy.png|Fairy|link=Psycraft]]
| |
| |- align="center" style="background-color: #E6E6FA;"
| |
| | width="10px" |
| |
| | align="left" | Level 104
| |
|
| |
|
| |- align="center"
| | Cindy está no subsolo de Cinnabar, no respawn de Charmander e Charmeleon. |
| ! rowspan="2" | M4
| |
| | width="10px" |
| |
| | align="left" | Play Rough (12s)
| |
| | width="50px" rowspan="2" |
| |
| | rowspan="2" align="right" | [[Arquivo:Target.png|Target]] [[Arquivo:Damage.png|Damage]]
| |
| | rowspan="2" | [[Arquivo:Fairy.png|Fairy|link=Psycraft]]
| |
| |- align="center"
| |
| | width="10px" |
| |
| | align="left" | Level 100
| |
|
| |
|
| |- align="center" style="background-color: #E6E6FA;"
| | <center>[[Arquivo:Localização_NPC_Cindy.png|link=]]</center> |
| ! rowspan="2" | M5
| |
| | width="10px" |
| |
| | align="left" | Super Fang (35s)
| |
| | width="50px" rowspan="2" |
| |
| | rowspan="2" align="right" | [[Arquivo:Target.png|Target]] [[Arquivo:Damage.png|Damage]]
| |
| | rowspan="2" | [[Arquivo:Fairy.png|Fairy|link=Psycraft]]
| |
| |- align="center" style="background-color: #E6E6FA;"
| |
| | width="10px" |
| |
| | align="left" | Level 100
| |
|
| |
|
| |- align="center"
| | Ao encontrá-la, ela se recusa a devolver o Bunnelby mas aceita participar de um duelo. Se ela perder, devolverá o Pokémon. |
| ! rowspan="2" | M6
| |
| | width="10px" |
| |
| | align="left" | Take Down (20s)
| |
| | width="50px" rowspan="2" |
| |
| | rowspan="2" align="right" | [[Arquivo:AOE.png|AOE]] [[Arquivo:Damage.png|Damage]]
| |
| | rowspan="2" | [[Arquivo:Fairy.png|Fairy|link=Psycraft]]
| |
| |- align="center"
| |
| | width="10px" |
| |
| | align="left" | Level 100
| |
|
| |
|
| |- align="center" style="background-color: #E6E6FA;"
| | O jogador terá 2 minutos para derrotá-la. Cindy utilizará os seguintes Pokémon: |
| ! rowspan="2" | M7
| |
| | width="10px" |
| |
| | align="left" | Last Resort (25s)
| |
| | width="50px" rowspan="2" |
| |
| | rowspan="2" align="right" | [[Arquivo:AOE.png|AOE]] [[Arquivo:Damage.png|Damage]]
| |
| | rowspan="2" | [[Arquivo:Fairy.png|Fairy|link=Psycraft]]
| |
| |- align="center" style="background-color: #E6E6FA;"
| |
| | width="10px" |
| |
| | align="left" | Level 106
| |
| | |
| |- align="center"
| |
| ! rowspan="2" | M8
| |
| | width="10px" |
| |
| | align="left" | Floral Storm (50s)
| |
| | width="50px" rowspan="2" |
| |
| | rowspan="2" align="right" | [[Arquivo:AOE.png|AOE]] [[Arquivo:Damage.png|Damage]]
| |
| | rowspan="2" | [[Arquivo:Fairy.png|Fairy|link=Psycraft]]
| |
| |- align="center"
| |
| | width="10px" |
| |
| | align="left" | Level 105
| |
| | |
| |- align="center" style="background-color: #E6E6FA;"
| |
| ! rowspan="2" | P
| |
| | width="10px" |
| |
| | align="left" | Pixilate
| |
| | width="50px" rowspan="2" |
| |
| | rowspan="2" align="right" | [[Arquivo:Buff.png|Buff]] [[Arquivo:Passive.png|Passive]]
| |
| | rowspan="2" | [[Arquivo:Fairy.png|Fairy|link=Psycraft]]
| |
| |- align="center" style="background-color: #E6E6FA;"
| |
| | width="10px" |
| |
| | align="left" |
| |
| | |
| |- align="center"
| |
| ! rowspan="2" | P
| |
| | width="10px" |
| |
| | align="left" | Play Dead
| |
| | width="50px" rowspan="2" |
| |
| | rowspan="2" align="right" | [[Arquivo:Buff.png|Buff]] [[Arquivo:Passive.png|Passive]]
| |
| | rowspan="2" | [[Arquivo:Fairy.png|Fairy|link=Psycraft]]
| |
| |- align="center"
| |
| | width="10px" |
| |
| | align="left" |
| |
| | |
| |- align="center" style="background-color: #E6E6FA;"
| |
| ! rowspan="2" | P
| |
| | width="10px" |
| |
| | align="left" | Quick Feet
| |
| | width="50px" rowspan="2" |
| |
| | rowspan="2" align="right" | [[Arquivo:Buff.png|Buff]] [[Arquivo:Passive.png|Passive]]
| |
| | rowspan="2" | [[Arquivo:Normal1.png|Normal|link=Gardestrike]]
| |
| |- align="center" style="background-color: #E6E6FA;"
| |
| | width="10px" |
| |
| | align="left" |
| |
|
| |
|
| | <center> |
| | {| class="wikitable" width="20%" |
| | !colspan="2"|'''NPC Cindy''' |
| | |- |
| | | align="center"|[[Arquivo:659-Bunnelby.png|link=Bunnelby]] |
| | | align="center"|[[Bunnelby]] |
| | |- |
| | | align="center"|[[Arquivo:006-Charizard.png|link=Charizard]] |
| | | align="center"|[[Charizard]] |
| | |- |
| | | align="center"|[[Arquivo:286-Breloom.png|link=Breloom]] |
| | | align="center"|[[Breloom]] |
| | |- |
| | | align="center"|[[Arquivo:108-Lickitung.png|link=Lickitung]] |
| | | align="center"|[[Lickitung]] |
| | |- |
| | | align="center"|[[Arquivo:121-Starmie.png|link=Starmie]] |
| | | align="center"|[[Starmie]] |
| | |- |
| | | align="center"|[[Arquivo:281-Kirlia.png|link=Kirlia]] |
| | | align="center"|[[Kirlia]] |
| |} | | |} |
|
| |
|
| =Medicham=
| | </center> |
| {| border="0" style="border-collapse:collapse"
| |
| |- align="center" style="background-color: #E6E6FA;"
| |
| ! rowspan="2" | M1
| |
| | width="10px" |
| |
| | align="left" | Low Kick (10s)
| |
| | width="50px" rowspan="2" |
| |
| | rowspan="2" align="right" | [[Arquivo:Target.png|Target]] [[Arquivo:Damage.png|Damage]]
| |
| | rowspan="2" | [[Arquivo:Fighting.png|Fighting|link=Gardestrike]]
| |
| |- align="center" style="background-color: #E6E6FA;"
| |
| | width="10px" |
| |
| | align="left" | Level 80
| |
| | |
| |- align="center"
| |
| ! rowspan="2" | M2
| |
| | width="10px" |
| |
| | align="left" | Thunder Punch (18s)
| |
| | width="50px" rowspan="2" |
| |
| | rowspan="2" align="right" | [[Arquivo:Target.png|Target]] [[Arquivo:Damage.png|Damage]]
| |
| | rowspan="2" | [[Arquivo:Electric.png|Electric|link=Raibolt]]
| |
| |- align="center"
| |
| | width="10px" |
| |
| | align="left" | Level 80
| |
| | |
| |- align="center" style="background-color: #E6E6FA;"
| |
| ! rowspan="2" | M3
| |
| | width="10px" |
| |
| | align="left" | Zen Headbutt (45s)
| |
| | width="50px" rowspan="2" |
| |
| | rowspan="2" align="right" | [[Arquivo:Target.png|Target]] [[Arquivo:Damage.png|Damage]] [[Arquivo:Stun.png|Stun]]
| |
| | rowspan="2" | [[Arquivo:Psychic.png|Psychic|link=Psycraft]]
| |
| |- align="center" style="background-color: #E6E6FA;"
| |
| | width="10px" |
| |
| | align="left" | Level 80
| |
| | |
| |- align="center"
| |
| ! rowspan="2" | M4
| |
| | width="10px" |
| |
| | align="left" | Low Sweep (40s)
| |
| | width="50px" rowspan="2" |
| |
| | rowspan="2" align="right" | [[Arquivo:AOE.png|AOE]] [[Arquivo:Damage.png|Damage]] [[Arquivo:Stun.png|Stun]]
| |
| | rowspan="2" | [[Arquivo:Fighting.png|Fighting|link=Gardestrike]]
| |
| |- align="center"
| |
| | width="10px" |
| |
| | align="left" | Level 80
| |
| | |
| |- align="center" style="background-color: #E6E6FA;"
| |
| ! rowspan="2" | M5
| |
| | width="10px" |
| |
| | align="left" | Psychic (30s)
| |
| | width="50px" rowspan="2" |
| |
| | rowspan="2" align="right" | [[Arquivo:AOE.png|AOE]] [[Arquivo:Damage.png|Damage]]
| |
| | rowspan="2" | [[Arquivo:Psychic.png|Psychic|link=Psycraft]]
| |
| |- align="center" style="background-color: #E6E6FA;"
| |
| | width="10px" |
| |
| | align="left" | Level 80
| |
| | |
| |- align="center"
| |
| ! rowspan="2" | M6
| |
| | width="10px" |
| |
| | align="left" | High Jump Kick (50s)
| |
| | width="50px" rowspan="2" |
| |
| | rowspan="2" align="right" | [[Arquivo:AOE.png|AOE]] [[Arquivo:Damage.png|Damage]]
| |
| | rowspan="2" | [[Arquivo:Fighting.png|Fighting|link=Gardestrike]]
| |
| |- align="center"
| |
| | width="10px" |
| |
| | align="left" | Level 80
| |
|
| |
|
| |- align="center" style="background-color: #E6E6FA;"
| | ==3ª Parte: Final== |
| ! rowspan="2" | M7
| |
| | width="10px" |
| |
| | align="left" | Meditate (50s)
| |
| | width="50px" rowspan="2" |
| |
| | rowspan="2" align="right" | [[Arquivo:Self.png|Self]] [[Arquivo:Buff.png|Buff]] [[Arquivo:Debuff.png|Debuff]] [[Arquivo:Nevermiss.png|Nevermiss]]
| |
| | rowspan="2" | [[Arquivo:Psychic.png|Psychic|link=Psycraft]]
| |
| |- align="center" style="background-color: #E6E6FA;"
| |
| | width="10px" |
| |
| | align="left" | Level 90
| |
|
| |
|
| |- align="center"
| | Após derrotá-la e conseguir o Bunnelby de volta, o jogador deve encontrar Jason novamente para entregar o Pokémon, o NPC o recompensará com '''300K de experiência''' e pedirá que entregue a Yume Ball para Jasmine. |
| ! rowspan="2" | M8
| | Ao conversar com Jasmine, ela recompensará com '''500K de experiência''', e continuando a conversa, com mais '''500K de experiência'''. |
| | width="10px" |
| |
| | align="left" | Focus Energy (50s)
| |
| | width="50px" rowspan="2" |
| |
| | rowspan="2" align="right" | [[Arquivo:Self.png|Self]] [[Arquivo:Buff.png|Buff]]
| |
| | rowspan="2" | [[Arquivo:Normal1.png|Normal|link=Gardestrike]]
| |
| |- align="center"
| |
| | width="10px" |
| |
| | align="left" | Level 90
| |
|
| |
|
| |- align="center" style="background-color: #E6E6FA;"
| | =Correção Emilia Quest= |
| ! rowspan="2" | M9
| |
| | width="10px" |
| |
| | align="left" | Miracle Eye (15s)
| |
| | width="50px" rowspan="2" |
| |
| | rowspan="2" align="right" | [[Arquivo:Self.png|Self]] [[Arquivo:Buff.png|Buff]]
| |
| | rowspan="2" | [[Arquivo:Psychic.png|Psychic|link=Psycraft]]
| |
| |- align="center" style="background-color: #E6E6FA;"
| |
| | width="10px" |
| |
| | align="left" | Level 1000
| |
| | |
| |- align="center"
| |
| ! rowspan="2" | P
| |
| | width="10px" |
| |
| | align="left" | Evasion
| |
| | width="50px" rowspan="2" |
| |
| | rowspan="2" align="right" | [[Arquivo:Passive.png|Passive]] [[Arquivo:Buff.png|Buff]]
| |
| | rowspan="2" | [[Arquivo:Normal1.png|Normal|link=Gardestrike]]
| |
| |- align="center"
| |
| | width="10px" |
| |
| | align="left" |
| |
| | |
| |- align="center" style="background-color: #E6E6FA;"
| |
| ! rowspan="2" | P
| |
| | width="10px" |
| |
| | align="left" | Foresight
| |
| | width="50px" rowspan="2" |
| |
| | rowspan="2" align="right" | [[Arquivo:Passive.png|Passive]] [[Arquivo:Buff.png|Buff]]
| |
| | rowspan="2" | [[Arquivo:Fighting.png|Fighting|link=Gardestrike]]
| |
| |- align="center" style="background-color: #E6E6FA;"
| |
| | width="10px" |
| |
| | align="left" |
| |
| | |
| |}
| |