|
|
| (41 revisões intermediárias por 3 usuários não estão sendo mostradas) |
| Linha 1: |
Linha 1: |
| <center>[[Arquivo:Banner_lorelei.jpg|link=Lorelei Quest]]<br></center> | | <center> [[Arquivo:The_Lost_Clefairy_Banner.png|link=]] </center> <br> |
|
| |
|
|
| |
|
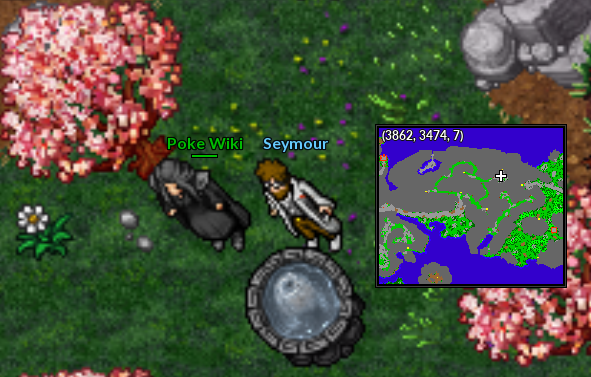
| | == Encontrando Seymour == |
|
| |
|
| <!--T:1--> | | Seymour é um pesquisador de Pokémon. Durante uma experiência de evolução da sua preferida Clefairy, ela começou a correr e se esconder. <br> |
| <span style="color:red">'''Nível necessário: 40
| |
|
| |
|
| <!--T:2-->
| |
| <span style="color:red">'''Recompensa: Star Flute.
| |
|
| |
|
| <!--T:3--> | | <center> |
| <b>Caso encontre algum erro ou queira acrescentar alguma informação,</b> <span style="color:red">'''entre em contato com um dos membros da wiki.</span>
| | [[Arquivo:Seymour_Npc.png|link=]] |
| | </center> <br /> |
|
| |
|
| | == Siga a Seymour Clefairy == |
|
| |
|
| ==<b>1ª Parte</b>== <!--T:4-->
| | Seymour pede ajuda ao jogador para segui-la.<br> |
|
| |
|
| <!--T:5--> | | <center> |
| Para começar encontre <b>Lorelei</b> em Cerulean, em cima do Gym da Misty e clique nela:
| | [[Arquivo:Seymour_Clefairy.gif|link=]] |
| | | </center> <br /> |
| <!--T:6-->
| |
| [[Arquivo:Lorelei1.png]] | |
| | |
| | |
| <!--T:7-->
| |
| Ela irá pedir para você ajudar a apagar o fogo da casa de seu amigo <b>Dom</b> que se encontra em Vermilion:
| |
| | |
| <!--T:8-->
| |
| [[Arquivo:Lorelei2.png]]
| |
| | |
| <!--T:9-->
| |
| [[Arquivo:Lorelei3.png]]
| |
| | |
| | |
| <!--T:10-->
| |
| Chegando fale com <b>Dom</b> e entre em sua casa apagar as chamas dos cômodos em um determinado tempo. <b>(Leve pokémon do tipo Water ou Flying, com bastante ataque em area, leve revives também para não ter que esperar o cooldown de seus pokémons).</b>
| |
| | |
| <!--T:11-->
| |
| [[Arquivo:Lorelei4.gif]]
| |
| | |
| | |
| <!--T:12-->
| |
| Feito isso, retorne e fale com <b>Lorelei</b> para receber sua recompensa.
| |
|
| |
|
| | Depois disso, o jogador deverá sempre segui-la e conversar com ela. Durante o caminho o jogador poderá enfrentar os seguintes Pokémon: <br> |
|
| |
|
| ==Stacy==
| |
| *'''Obs.:''' O local mostrado aqui é só um exemplo dos possíveis locais, portanto existe outras localizações.
| |
| <center> | | <center> |
| {| class="wikitable sortable" width="50%" | | {| class="wikitable" width="15%" |
| ! width="1%" style="background-color: #7F0000" | <span style="color:white">Nº</span> | | ! width="50%" style="background-color: #9d1a64" | Pokémon |
| ! width="10%" style="background-color: #7F0000" | <span style="color:white">Imagem</span>
| |
| ! width="20%" style="background-color: #7F0000" | <span style="color:white">Nome</span>
| |
| ! width="30%" style="background-color: #7F0000" | <span style="color:white">Localização do mapa</span>
| |
| ! width="1%" style="background-color: #7F0000" | <span style="color:white">Mapa</span>
| |
| |- | | |- |
| ! align="center" | <font size='5'>'''1'''</font>
| | | width="5%" align="center" | [[Arquivo:074-Geodude.png|link=Geodude]] Geodude |
| | align="center" | [[Arquivo:Algae.png|link=]]
| |
| | align="center" | '''Algae'''
| |
| | align="center" | Kinnow Island
| |
| | align="center" | [[Arquivo:Algae_mapa.jpg|link=]]
| |
| |- | | |- |
| ! align="center" | <font size='5'>'''2'''</font>
| | | width="5%" align="center" | [[Arquivo:075-Graveler.png|link=Graveler]] Graveler |
| | align="center" | [[Arquivo:Beach_Umbrella_1.png|link=]]
| |
| | align="center" | '''Beach Umbrella'''
| |
| | align="center" | Hamlin
| |
| | align="center" | [[Arquivo:Beach_umbrella_1_mapa.jpg|link=]]
| |
| |- | | |- |
| ! align="center" | <font size='5'>'''3'''</font>
| | | width="5%" align="center" | [[Arquivo:076-Golem.png|link=Golem]] Golem |
| | align="center" | [[Arquivo:Beach_Umbrella_2.png|link=]]
| |
| | align="center" | '''Beach Umbrella'''
| |
| | align="center" | Hamlin
| |
| | align="center" | [[Arquivo:Beach_umbrella_2_mapa.jpg|link=]]
| |
| |- | | |- |
| ! align="center" | <font size='5'>'''4'''</font>
| | | width="5%" align="center" | [[Arquivo:035-Clefairy.png|link=Clefairy]] Clefairy |
| | align="center" | [[Arquivo:Beach_Umbrella_3.png|link=]]
| |
| | align="center" | '''Beach Umbrella'''
| |
| | align="center" | Hamlin
| |
| | align="center" | [[Arquivo:Beach_umbrella_3_mapa.jpg|link=]]
| |
| |- | | |- |
| ! align="center" | <font size='5'>'''5'''</font>
| | | width="5%" align="center" | [[Arquivo:036-Clefable.png|link=Clefable]] Clefable |
| | align="center" | [[Arquivo:Blastoise_Hull.png|link=]]
| |
| | align="center" | '''Blastoise Hull'''
| |
| | align="center" | Diving Spot
| |
| | align="center" | [[Arquivo:Blastoise_hull_mapa.jpg|link=]]
| |
| |- | | |- |
| ! align="center" | <font size='5'>'''6'''</font>
| | | width="5%" align="center" | [[Arquivo:039-Jigglypuff.png|link=Jigglypuff]] Jigglypuff |
| | align="center" | [[Arquivo:Broken_Anchor.png|link=]]
| |
| | align="center" | '''Broken Anchor'''
| |
| | align="center" | Lost Island
| |
| | align="center" | [[Arquivo:Broken_anchor_mapa.jpg|link=]]
| |
| |- | | |- |
| ! align="center" | <font size='5'>'''7'''</font>
| | | width="5%" align="center" | [[Arquivo:041-Zubat.png|link=Zubat]] Zubat |
| | align="center" | [[Arquivo:Coconut_palm.png|link=]]
| |
| | align="center" | '''Coconut Palm'''
| |
| | align="center" | Leek Island
| |
| | align="center" | [[Arquivo:Coconut_palm_mapa.jpg|link=]]
| |
| |- | | |- |
| ! align="center" | <font size='5'>'''8'''</font>
| | | width="5%" align="center" | [[Arquivo:042-Golbat.png|link=Golbat]] Golbat |
| | align="center" | [[Arquivo:Coral.png|link=]]
| | |} |
| | align="center" | '''Coral''' | | |
| | align="center" | Kinnow Island
| | </center> <br> |
| | align="center" | [[Arquivo:Coral_mapa.jpg|link=]]
| | |
| | '''Observação:''' É importante que o jogador se certifique de que não há outros Pokémon por ali, pois será necessário derrotá-los. |
| | |
| | == A evolução surpreendente == |
| | |
| | Quem diria que a Clefairy só queria mostrar sua evolução para Clefable pela Moon Stone?<br> |
| | Vá até Seymour, conte o que você viu e receba a sua recompensa!<br> |
| | |
| | <center> [[Arquivo:Clefairy_evoluindo.gif|link=]]</center> |
| | |
| | <center> |
| | |
| | <center> |
| | {| class="wikitable" width="15%" |
| | ! width="50%" | Recompensa |
| |- | | |- |
| ! align="center" | <font size='5'>'''9'''</font>
| | | width="5%" align="center" | [[Arquivo:Exp_icon.png|30px|link=]]30.000 de experiência |
| | align="center" | [[Arquivo:Coral_reef_1.png|link=]]
| |
| | align="center" | '''Coral Reef'''
| |
| | align="center" | Kinnow Island
| |
| | align="center" | [[Arquivo:Coral_reef_1_mapa.jpg|link=]]
| |
| |- | | |- |
| ! align="center" | <font size='5'>'''10'''</font>
| | | width="5%" align="center" | [[Arquivo:Heart-stone.gif|link=]] 1 Heart Stone |
| | align="center" | [[Arquivo:Coral_reef_2.png|link=]]
| | |} |
| | align="center" | '''Coral Reef'''
| |
| | align="center" | Kinnow Island
| |
| | align="center" | [[Arquivo:Coral_reef_2_mapa.jpg|link=]]
| |
| |-
| |
| ! align="center" | <font size='5'>'''11'''</font>
| |
| | align="center" | [[Arquivo:Coral_reef_3.png|link=]]
| |
| | align="center" | '''Coral Reef'''
| |
| | align="center" | Kinnow Island
| |
| | align="center" | [[Arquivo:Coral_reef_3_mapa.jpg|link=]]
| |
| |-
| |
| ! align="center" | <font size='5'>'''12'''</font>
| |
| | align="center" | [[Arquivo:Coral_reef_4.png|link=]]
| |
| | align="center" | '''Coral Reef'''
| |
| | align="center" | Kinnow Island
| |
| | align="center" | [[Arquivo:Coral_reef_4_mapa.jpg|link=]]
| |
| |-
| |
| ! align="center" | <font size='5'>'''13'''</font>
| |
| | align="center" | [[Arquivo:Coral_reef_5.png|link=]]
| |
| | align="center" | '''Coral Reef'''
| |
| | align="center" | Kinnow Island
| |
| | align="center" | [[Arquivo:Coral_reef_5_mapa.jpg|link=]]
| |
| |-
| |
| ! align="center" | <font size='5'>'''14'''</font>
| |
| | align="center" | [[Arquivo:Coral_reef_6.png|link=]]
| |
| | align="center" | '''Coral Reef'''
| |
| | align="center" | Kinnow Island
| |
| | align="center" | [[Arquivo:Coral_reef_6_mapa.jpg|link=]]
| |
| |-
| |
| ! align="center" | <font size='5'>'''15'''</font>
| |
| | align="center" | [[Arquivo:Damaged_Mast_1.png|link=]]
| |
| | align="center" | '''Damaged Mast'''
| |
| | align="center" | Diving Spot
| |
| | align="center" | [[Arquivo:Damaged_mast_1_mapa.jpg|link=]]
| |
| |-
| |
| ! align="center" | <font size='5'>'''16'''</font>
| |
| | align="center" | [[Arquivo:Damaged_Mast_2.png|link=]]
| |
| | align="center" | '''Damaged Mast'''
| |
| | align="center" | Diving Spot
| |
| | align="center" | [[Arquivo:Damaged_mast_2_mapa.jpg|link=]]
| |
| |-
| |
| ! align="center" | <font size='5'>'''17'''</font>
| |
| | align="center" | [[Arquivo:Damaged_Mast_3.png|link=]]
| |
| | align="center" | '''Damaged Mast'''
| |
| | align="center" | Diving Spot
| |
| | align="center" | [[Arquivo:Damaged_mast_3_mapa.jpg|link=]]
| |
| |-
| |
| ! align="center" | <font size='5'>'''18'''</font>
| |
| | align="center" | [[Arquivo:Damaged_Mast_4.png|link=]]
| |
| | align="center" | '''Damaged Mast'''
| |
| | align="center" | Diving Spot
| |
| | align="center" | [[Arquivo:Damaged_mast_4_mapa.jpg|link=]] | |
| |-
| |
| ! align="center" | <font size='5'>'''19'''</font>
| |
| | align="center" | [[Arquivo:Damaged_Mast_5.png|link=]]
| |
| | align="center" | '''Damaged Mast'''
| |
| | align="center" | Respawn Subaquatico, próximo a Viridian e Celadon
| |
| | align="center" | [[Arquivo:Damaged_mast_5_mapa.jpg|link=]]
| |
| |-
| |
| ! align="center" | <font size='5'>'''20'''</font>
| |
| | align="center" | [[Arquivo:Damaged_Mast_6.png|link=]]
| |
| | align="center" | '''Damaged Mast'''
| |
| | align="center" | Respawn Subaquatico, próximo a Viridian e Celadon
| |
| | align="center" | [[Arquivo:Damaged_mast_6_mapa.jpg|link=]]
| |
| |-
| |
| ! align="center" | <font size='5'>'''21'''</font>
| |
| | align="center" | [[Arquivo:Firefly-pronto.gif|link=]]
| |
| | align="center" | '''Firefly'''
| |
| | align="center" | Diving Spot
| |
| | align="center" | [[Arquivo:Firefly_mapa.jpg|link=]]
| |
| |-
| |
| ! align="center" | <font size='5'>'''22'''</font>
| |
| | align="center" | [[Arquivo:Kelp.png|link=]]
| |
| | align="center" | '''Kelp'''
| |
| | align="center" | Kinnow Island
| |
| | align="center" | [[Arquivo:Kelp_mapa.jpg|link=]]
| |
| |-
| |
| ! align="center" | <font size='5'>'''23'''</font>
| |
| | align="center" | [[Arquivo:Open oyster.png|link=]]
| |
| | align="center" | '''Open Oyster'''
| |
| | align="center" | Kinnow Island
| |
| | align="center" | [[Arquivo:Open oyster mapa.jpg|link=]]
| |
| |-
| |
| ! align="center" | <font size='5'>'''24'''</font>
| |
| | align="center" | [[Arquivo:Palm_Tree.png|link=]]
| |
| | align="center" | '''Palm Tree'''
| |
| | align="center" | Leek Island
| |
| | align="center" | [[Arquivo:Palm_tree_mapa.jpg|link=]]
| |
| |-
| |
| ! align="center" | <font size='5'>'''25'''</font>
| |
| | align="center" | [[Arquivo:Shell_1.png|link=]]
| |
| | align="center" | '''Shells'''
| |
| | align="center" | Leek Island
| |
| | align="center" | [[Arquivo:Shells_1_mapa.jpg|link=]]
| |
| |-
| |
| ! align="center" | <font size='5'>'''26'''</font>
| |
| | align="center" | [[Arquivo:Shell_2.png|link=]]
| |
| | align="center" | '''Shells'''
| |
| | align="center" | Leek Island
| |
| | align="center" | [[Arquivo:Shells_2_mapa.jpg|link=]]
| |
| |-
| |
| ! align="center" | <font size='5'>'''27'''</font>
| |
| | align="center" | [[Arquivo:Shell_3.png|link=]]
| |
| | align="center" | '''Shells'''
| |
| | align="center" | Leek Island
| |
| | align="center" | [[Arquivo:Shells_3_mapa.jpg|link=]]
| |
| |-
| |
| ! align="center" | <font size='5'>'''28'''</font>
| |
| | align="center" | [[Arquivo:Shell_4.png|link=]]
| |
| | align="center" | '''Shells'''
| |
| | align="center" | Leek Island
| |
| | align="center" | [[Arquivo:Shells_4_mapa.jpg|link=]]
| |
| |-
| |
| ! align="center" | <font size='5'>'''29'''</font>
| |
| | align="center" | [[Arquivo:Starfish.png|link=]]
| |
| | align="center" | '''Starfish'''
| |
| | align="center" | Leek Island
| |
| | align="center" | [[Arquivo:Starfish_mapa.jpg|link=]]
| |
| |-
| |
| ! align="center" | <font size='5'>'''30'''</font>
| |
| | align="center" | [[Arquivo:Steering_wheel.png|link=]]
| |
| | align="center" | '''Steering Wheel'''
| |
| | align="center" | Lost Island
| |
| | align="center" | [[Arquivo:Steering_wheel_mapa.jpg|link=]]
| |
| |-
| |
| ! align="center" | <font size='5'>'''31'''</font>
| |
| | align="center" | [[Arquivo:Underwater_volcano.png|link=]]
| |
| | align="center" | '''Underwater Volcano'''
| |
| | align="center" | Kinnow Island
| |
| | align="center" | [[Arquivo:Underwater_volcano_mapa.jpg|link=]]
| |
| |} | |
| | |
|
| |
|
| </center> | | </center> |