|
|
Linha 1: |
Linha 1: |
| <center>[[Arquivo:Beds_OutDate.png|link=]]</center>
| |
| == Simple Bed ==
| |
| A Simple Bed, em conjunto ao "sistema de camas", permite que os treinadores possam simular uma noite de sono.
| |
|
| |
| Os jogadores poderão adquirir uma cama base e, então, montá-la com um conjunto temático (Toolkit) que escolher. Cada conjunto fornecerá um bônus diferente ao ser utilizado.
| |
|
| |
| <center> | | <center> |
| {| class="wikitable bg-none border-0" width="20%" style="text-align:center;" | | {| class="wikitable" width=50%;" |
| ! width="20%"| Cama Base (sem toolkit)
| | |- |
| | ! colspan="2" scope="col" style="text-align:center" | Informações Importantes |
| |- | | |- |
| | [[Arquivo:Simple Bed Vertical.png]] | | | style="text-align:center" width=20% | '''Grupo''' |
| |}
| | | width=70% | 3 Jogadores. </center> |
| </center>
| |
| | |
| == Bonus ==
| |
| | |
| <center>
| |
| {| class="wikitable bg-none border-0" width="80%" style="text-align:center;"
| |
| ! width="8%" | Toolkit
| |
| ! width="40%"| Descrição
| |
| ! width="20%"| Cama Montada
| |
| ! width="12%" | Tempo de Bonus
| |
| |- | | |- |
| | width="1%"| [[Arquivo:Bulbasaur Toolkit.png|link=]]<br> Bulbasaur Toolkit | | | style="text-align:center" width=10% | '''Experiência recompensada:''' |
| | A cama temática do Bulbasaur fará com que o jogador receba um '''bônus de 8% de chance de captura'''. | | | width=70% | 150k (Beginner), 190k (Talented), 250k (Intermediate), 300k (Advanced) e 350k (Expert). |
| | [[Arquivo:Bulbasaur Bed.png|link=]] | |
| | 2 horas | |
| |- | | |- |
| | width="1%"| [[Arquivo:Charmander Toolkit.png|link=]]<br> Charmander Toolkit | | | style="text-align:center" width=20% | '''Revives:''' |
| | A cama temática do Charmander fará com que o jogador receba um '''bônus de 12% de experiência'''. | | | width=70% |É possível utilizar até 5 Revives. |
| | | |
| [[Arquivo:Charmander Bed2.png|link=]]
| |
| | 2 horas | |
| |- | | |- |
| | width="1%"| [[Arquivo:Squirtle Toolkit.png|link=]]<br> Squirtle Toolkit | | | style="text-align:center" width=20% | '''Tempo limite:''' |
| | A cama temática do Squirtle fará com que o jogador receba um '''bônus de 8% de sorte ao sacar itens'''. | | | width=70% | 1 hora. |
| | | | |}</center> |
| [[Arquivo:Squirtle Bed.png|link=]]
| |
| | 2 horas | |
| |} | |
| </center>
| |
| | |
| Todos os bônus são acumulativos, podendo ser usados juntamente com elixirs, totems, Bônus do calendário e afins.
| |
| </center> | |
| | |
| A cama tem 10 cargas de uso, ao utilizar pela décima vez, será necessário renovar o Toolkit
| |
| | |
| '''Nota:''' Caso a cama seja desmontada com um [[Arquivo:Package Kit2.png|link=]] Package Kit, o Toolkit será removido da cama, e ao montar ela voltará a ser a cama base (Simple Bed).
| |
| | |
| == Usando a Simple Bed ==
| |
| | |
| Após utilizar a cama, ela ficará desarrumada por '''8 horas'''. Após o periódo de 8 horas, é possível que outro jogador utilize a cama, porém tempo para o mesmo jogador utilizar a cama novamente é de '''20 horas'''.
| |
| | |
| 10:37 Restam 3 usos antes que sua cama precise de conserto.
| |
| | |
| Agora as camas têm reset individual no Server Save diário.
| |
|
| |
|
| | == Inimigos== |
| | '''Quantidade''':59. |
| <center> | | <center> |
| {| class="wikitable bg-none border-0" width="40%" style="text-align:center;" | | {|class="wikitable" width="50%" style= "text-align:center" |
| ! width="40%"| Camas Desarrumadas
| |
| |-
| |
| | [[Arquivo:Used Charmander Bed.png|link=]][[Arquivo:Used Bulbasaur Bed.png|link=]][[Arquivo:Used Squirtle Bed.png|link=]]
| |
| |}
| |
| </center>
| |
| | |
| <table class="seeMore">
| |
| <tr>
| |
| <td class="seeMore__image">[[Arquivo:Telekinetic-compass.gif|link=]]</td>
| |
| <td> '''Veja mais: [[Craft Profissões - Estilista]]'''</td>
| |
| </tr>
| |
| </table>
| |
| | |
| <!--cama; simple bed-->
| |
|
| |
|
| =Acampamento Crystal Lake=
| |
| =='''Informações Básicas'''==
| |
|
| |
| *'''Modalidade:''' Solo <br />
| |
| *'''Nivel necessário:''' 80 (Fácil), 200 (Normal) e 350 (Difícil). <br />
| |
| *'''Elemento:''' [[Arquivo:NeutralICON.png|Neutro|20px|link=Clãs]] Neutro
| |
| *'''Tempo limite:''' 5 minutos. <br />
| |
| *'''PokéView: [[Arquivo:semvip.png|link=]] ''' <br>
| |
| *'''Quantidade de Inimigos: 1.'''
| |
| <center>
| |
| {| class="wikitable" width="55%"
| |
| |+ align="center" | Limitações e Bloqueios
| |
| |- | | |- |
| ! width="1%" style="background-color: #4682B4" | Poções | | ! colspan="2" width="20%" | Pokémon |
| ! width="1%" style="background-color: #4682B4" | Elixir
| | ! Elemento |
| ! width="1%" style="background-color: #4682B4" | Penalidade por morte | |
| ! width="1%" style="background-color: #4682B4" | Revive
| |
| ! width="1%" style="background-color: #4682B4" | Medicine
| |
| ! width="1%" style="background-color: #4682B4" | Berries
| |
| |- | | |- |
| | align="center" | [[Arquivo:comvip.png|link=]] | | |style="border-right-style: hidden;" | [[Arquivo:192-Sunflora.png|link=Sunflora]] || [[Sunflora]] |
| | align="center" | [[Arquivo:semvip.png|link=]]
| | | [[Arquivo:grass.png|link=Pedras de Evolução]] '''Grass''' |
| | align="center" | [[Arquivo:semvip.png|link=]] | | |
| | align="center" | Ilimitado
| |
| | align="center" | [[Arquivo:semvip.png|link=]]
| |
| | align="center" | [[Arquivo:semvip.png|link=]]
| |
| |- | | |- |
| |} | | |style="border-right-style: hidden;" | [[Arquivo:315-Roselia.png|link=Roselia]] || [[Roselia]] |
| </center>
| | | [[Arquivo:grass.png|link=Pedras de Evolução]] '''Grass''' [[Arquivo:poison1.png|link=Pedras de Evolução]] '''Poison''' |
|
| |
|
| == Localização ==
| |
|
| |
| Essa dungeon fica localizada próxima ao Pântano de Cerulean (Cerulean Swamp). <br>
| |
|
| |
| <center>
| |
| {| border="1" style="text-align: center; border-collapse: collapse"
| |
| | width="100%" | [[Arquivo:Loc Acampamento Crystal Lake.png|link=]]
| |
| |- | | |- |
| |} | | |style="border-right-style: hidden;" | [[Arquivo:043-Sh Oddish.png|link=Shiny Oddish]] || [[Shiny Oddish]] |
| </center>
| | | [[Arquivo:grass.png|link=Pedras de Evolução]] '''Grass''' [[Arquivo:poison1.png|link=Pedras de Evolução]] '''Poison''' |
|
| |
|
| == Funcionamento==
| |
|
| |
| O Jogador devera derrotar o boss '''Jason Voorhees'''. <br>
| |
|
| |
| Além do tradicional ataque básico, o Boss conta com 2 tipos de habilidades que atingirão diretamente na vida do jogador, tendo ou não um Pokémon em batalha. Ambas as habilidades podem ser evitadas se o jogador desviar no tempo correto.
| |
|
| |
| <center>
| |
| {| border="1" style="text-align: center; border-collapse: collapse"
| |
| |+ align="center" | '''Habilidade 1:''' Arremesso de faca.
| |
| |+ align="center" | Jason Voorhees arremessará uma faca contra jogador causando dano à distância.
| |
| |+ align="center" | '''Nota:''' É possível desviar dessa habilidade.
| |
| | width="100%" | [[Arquivo:Jason Habilidade 1.gif|link=]]
| |
| |}
| |
| <br>
| |
| {| border="1" style="text-align: center; border-collapse: collapse"
| |
| |+ align="center" | '''Habilidade 2:''' Ataque Frontal.
| |
| |+ align="center" | Jason Voorhees fará um ataque frontal que ao acertar tanto o Pokémon quanto o personagem, o jogador terá sua vida diretamente atingida.
| |
| |+ align="center" | '''Nota:''' É possível desviar dessa habilidade.
| |
| | width="100%" | [[Arquivo:Jason Habilidade 2.gif|link=]]
| |
| |- | | |- |
| |} | | |style="border-right-style: hidden;" | [[Arquivo:Sh tangela.png|link=Shiny Tangela]] || [[Shiny Tangela]] |
| </center>
| | | [[Arquivo:grass.png|link=Pedras de Evolução]] '''Grass''' |
|
| |
|
| == Boss ==
| |
|
| |
| Ao entrar na dungeon, o Boss '''Jason Voorhees''' estará no local indicado.
| |
| <center>
| |
| {| border="1" style="text-align: center; border-collapse: collapse"
| |
| | width="100%" | [[Arquivo:Boss map Acampamento Crystal Lake.png|link=]]
| |
| |- | | |- |
| |} | | |style="border-right-style: hidden;" | [[Arquivo:Sh meganium.png|link=Shiny Meganium]] || [[Shiny Meganium]] |
| </center>
| | | [[Arquivo:grass.png|link=Pedras de Evolução]] '''Grass''' |
|
| |
|
| ==Recompensas==
| |
| <center class="center-tab"><tabber>
| |
| |-|Fácil=
| |
| <center>
| |
| {| class="wikitable" width="25%"
| |
| |-
| |
| ! colspan="2" | Item
| |
| ! Raridade
| |
| |-
| |
| | align="center" | [[Arquivo:Halloween Token 2020.png|link=]]
| |
| |align="left" style="border-left-style: hidden; | 20 Halloween Token
| |
| | align="center" |Comum
| |
| |-
| |
| | align="center" | [[Arquivo:Halloween dimensional key.png|link=]]
| |
| |align="left" style="border-left-style: hidden; | Halloween Dimensional Key
| |
| | align="center" |Comum
| |
| |-
| |
| | align="center" |
| |
| |align="left" style="border-left-style: hidden; | Bloody Machete
| |
| |align="center" | Épico
| |
| |-
| |
| | align="center" |
| |
| |align="left" style="border-left-style: hidden; | Jason Voorhees Hangable Mask
| |
| |align="center" | Épico
| |
| |-
| |
| | align="center" |
| |
| |align="left" style="border-left-style: hidden; | Huntress Hangable Mask
| |
| |align="center" | Épico
| |
| |-
| |
| | align="center" |
| |
| |align="left" style="border-left-style: hidden; | Pig Hangable Mask
| |
| |align="center" | Épico
| |
| |-
| |
| | align="center" |
| |
| |align="left" style="border-left-style: hidden; | Onryo Hangable Mask
| |
| |align="center" | Épico
| |
| |-
| |
| | align="center" |
| |
| |align="left" style="border-left-style: hidden; | Billy Hangable Mask
| |
| |align="center" | Épico
| |
| |-
| |
| | align="center" | [[Arquivo:Shiny-gengar-locker.png|70px|link=]]
| |
| |align="left" style="border-left-style: hidden; | Shiny Gengar Locker
| |
| |align="center" | Lendário
| |
| |-
| |
| ! colspan="3" | [[Arquivo:Exp_icon.png|30px|link=]] Experiência: 100.000
| |
| |}
| |
| </center>
| |
| |-|Normal=
| |
| <center>
| |
| {| class="wikitable" width="25%"
| |
| |-
| |
| ! colspan="2" | Item
| |
| ! Raridade
| |
| |-
| |
| | align="center" | [[Arquivo:Halloween Token 2020.png|link=]]
| |
| |align="left" style="border-left-style: hidden; | 30 Halloween Token
| |
| | align="center" |Comum
| |
| |-
| |
| | align="center" | [[Arquivo:Halloween dimensional key.png|link=]]
| |
| |align="left" style="border-left-style: hidden; | Halloween Dimensional Key
| |
| | align="center" |Comum
| |
| |-
| |
| | align="center" |
| |
| |align="left" style="border-left-style: hidden; | Bloody Machete
| |
| |align="center" | Épico
| |
| |-
| |
| | align="center" |
| |
| |align="left" style="border-left-style: hidden; | Jason Voorhees Hangable Mask
| |
| |align="center" | Épico
| |
| |-
| |
| | align="center" |
| |
| |align="left" style="border-left-style: hidden; | Huntress Hangable Mask
| |
| |align="center" | Épico
| |
| |-
| |
| | align="center" |
| |
| |align="left" style="border-left-style: hidden; | Pig Hangable Mask
| |
| |align="center" | Épico
| |
| |-
| |
| | align="center" |
| |
| |align="left" style="border-left-style: hidden; | Onryo Hangable Mask
| |
| |align="center" | Épico
| |
| |-
| |
| | align="center" |
| |
| |align="left" style="border-left-style: hidden; | Billy Hangable Mask
| |
| |align="center" | Épico
| |
| |-
| |
| | align="center" | [[Arquivo:Shiny-gengar-locker.png|70px|link=]]
| |
| |align="left" style="border-left-style: hidden; | Shiny Gengar Locker
| |
| |align="center" | Lendário
| |
| |-
| |
| ! colspan="3" | [[Arquivo:Exp_icon.png|30px|link=]] Experiência: 150.000
| |
| |}
| |
| </center>
| |
| |-|Dificil=
| |
| <center>
| |
| {| class="wikitable" width="25%"
| |
| |-
| |
| ! colspan="2" | Item
| |
| ! Raridade
| |
| |-
| |
| | align="center" | [[Arquivo:Halloween Token 2020.png|link=]]
| |
| |align="left" style="border-left-style: hidden; | 40 Halloween Token
| |
| | align="center" |Comum
| |
| |-
| |
| | align="center" | [[Arquivo:Halloween dimensional key.png|link=]]
| |
| |align="left" style="border-left-style: hidden; | Halloween Dimensional Key
| |
| | align="center" |Comum
| |
| |-
| |
| | align="center" |
| |
| |align="left" style="border-left-style: hidden; | Bloody Machete
| |
| |align="center" | Épico
| |
| |-
| |
| | align="center" |
| |
| |align="left" style="border-left-style: hidden; | Jason Voorhees Hangable Mask
| |
| |align="center" | Épico
| |
| |-
| |
| | align="center" |
| |
| |align="left" style="border-left-style: hidden; | Huntress Hangable Mask
| |
| |align="center" | Épico
| |
| |-
| |
| | align="center" |
| |
| |align="left" style="border-left-style: hidden; | Pig Hangable Mask
| |
| |align="center" | Épico
| |
| |-
| |
| | align="center" |
| |
| |align="left" style="border-left-style: hidden; | Onryo Hangable Mask
| |
| |align="center" | Épico
| |
| |-
| |
| | align="center" |
| |
| |align="left" style="border-left-style: hidden; | Billy Hangable Mask
| |
| |align="center" | Épico
| |
| |-
| |
| | align="center" | [[Arquivo:Shiny-gengar-locker.png|70px|link=]]
| |
| |align="left" style="border-left-style: hidden; | Shiny Gengar Locker
| |
| |align="center" | Lendário
| |
| |- | | |- |
| ! colspan="3" | [[Arquivo:Exp_icon.png|30px|link=]] Experiência: 100.000
| | |style="border-right-style: hidden;" | [[Arquivo:Shinyvil.png|link=Shiny Vileplume]] || [[Shiny Vileplume]] |
| |} | | | [[Arquivo:grass.png|link=Pedras de Evolução]] '''Grass''' |
| </tabber>
| |
| </center>
| |
|
| |
|
| =Cemitério Assombrado de Pewter=
| |
| =='''Informações Básicas'''==
| |
|
| |
| *'''Modalidade:''' Solo <br />
| |
| *'''Nivel necessário:''' 80 (Fácil), 200 (Normal) e 350 (Difícil). <br />
| |
| *'''Elemento:''' [[Arquivo:NeutralICON.png|Neutro|20px|link=Clãs]] Neutro
| |
| *'''Tempo limite:''' 30 minutos. <br />
| |
| *'''PokéView: [[Arquivo:semvip.png|link=]] ''' <br>
| |
| *'''Quantidade de Inimigos:''' 29.
| |
| <center>
| |
| {| class="wikitable" width="55%"
| |
| |+ align="center" | Limitações e Bloqueios
| |
| |- | | |- |
| ! width="1%" style="background-color: #4682B4" | Poções
| | |style="border-right-style: hidden;" | [[Arquivo:192-Sunflora.png|link=Sunflora]] || [[Sunflora]] |
| ! width="1%" style="background-color: #4682B4" | Elixir
| | | [[Arquivo:grass.png|link=Pedras de Evolução]] '''Grass''' |
| ! width="1%" style="background-color: #4682B4" | Penalidade por morte
| | '' |
| ! width="1%" style="background-color: #4682B4" | Revive
| |
| ! width="1%" style="background-color: #4682B4" | Medicine
| |
| ! width="1%" style="background-color: #4682B4" | Berries
| |
| |- | | |- |
| | align="center" | [[Arquivo:comvip.png|link=]]
| |
| | align="center" | [[Arquivo:semvip.png|link=]]
| |
| | align="center" | [[Arquivo:semvip.png|link=]]
| |
| | align="center" | 9 Revives
| |
| | align="center" | [[Arquivo:comvip.png|link=]]
| |
| | align="center" | [[Arquivo:semvip.png|link=]]
| |
| |-
| |
| |}
| |
| </center>
| |
|
| |
|
| == Localização ==
| |
|
| |
|
| Essa dungeon fica localizada próximo ao Cemetério de Pewter <br>
| |
|
| |
|
| <center>
| | |} |
| {| border="1" style="text-align: center; border-collapse: collapse"
| |
| | width="100%" | [[Arquivo:Loc Cemiterio Assombrado Pewter.png|link=]]
| |
| |-
| |
| |} | |
| </center> | | </center> |
| | | == Possíveis Catchs == |
| == Funcionamento== | |
| | |
| O Jogador devera derrotar todos os Pokémon e o Boss Final que é um '''Dusknoir'''. <br>
| |
|
| |
| Em seu primeiro andar é necessário derrotar 8 Pokémon e descer para o andar inferior.
| |
|
| |
| <center> | | <center> |
| {| border="1" style="text-align: center; border-collapse: collapse" | | {|class="wikitable" width="50%" style= "text-align:center" |
| |+ align="center" | Entrada para o andar inferior
| |
| | width="100%" | [[Arquivo:Descer Cemiterio Assombrado Pewter.png|link=]]
| |
| |-
| |
| |}
| |
| </center>
| |
|
| |
| == Boss ==
| |
|
| |
| O Boss '''Dusknoir''' se encontra no final do 2 andar, no local marcado.
| |
|
| |
|
| '''Nota:''' O Boss conta como um dos 29 Pokémon da Dungeon, não sendo necessário derrotar todos os Pokémon antes de enfrentar o Boss.
| |
| <center>
| |
| {| border="1" style="text-align: center; border-collapse: collapse"
| |
| | width="100%" | [[Arquivo:Boss map Cemiterio Assombrado Pewter.png|link=]]
| |
| |- | | |- |
| |}
| | ! colspan="2" width="20%" | Pokémon |
| </center>
| | ! Pokébolas Indicadas |
| ==Recompensas==
| |
| <center class="center-tab"><tabber>
| |
| |-|Fácil=
| |
| <center>
| |
| {| class="wikitable" width="25%"
| |
| |- | | |- |
| ! colspan="2" | Item
| | |style="border-right-style: hidden;" | [[Arquivo:043-Sh Oddish.png|link=Shiny Oddish]] || [[Shiny Oddish]] |
| ! Raridade
| | | [[Arquivo:Ultra-ball(1).png|link=Pokébolas]] [[Arquivo:Janguru-ball.png|link=Pokébolas]] [[Arquivo:Premier-ball(1).png|link=Pokébolas]] |
| |- | | |- |
| | align="center" | [[Arquivo:Halloween Token 2020.png|link=]] | | |style="border-right-style: hidden;" | [[Arquivo:046-Sh Paras.png|link=Shiny Paras]] || [[Shiny Paras]] |
| |align="left" style="border-left-style: hidden; | 20 Halloween Token | | | [[Arquivo:Ultra-ball(1).png|link=Pokébolas]] [[Arquivo:Janguru-ball.png|link=Pokébolas]] [[Arquivo:Premier-ball(1).png|link=Pokébolas]] |
| | align="center" |Comum
| |
| |- | | |- |
| | align="center" | [[Arquivo:Halloween dimensional key.png|link=]] | | |style="border-right-style: hidden;" | [[Arquivo:315-Roselia.png|link=Roselia]] || [[Roselia]] |
| |align="left" style="border-left-style: hidden; | Halloween Dimensional Key | | | [[Arquivo:Ultra-ball(1).png|link=Pokébolas]] [[Arquivo:Janguru-ball.png|link=Pokébolas]] [[Arquivo:Premier-ball(1).png|link=Pokébolas]] |
| | align="center" |Comum
| |
| |- | | |- |
| | align="center" |
| |
| |align="left" style="border-left-style: hidden; | Shiny Gengar Emote Toy
| |
| |align="center" | Épico
| |
| |-
| |
| | align="center" |
| |
| |align="left" style="border-left-style: hidden; | Misdreavus Emote Toy
| |
| |align="center" | Épico
| |
| |-
| |
| | align="center" |
| |
| |align="left" style="border-left-style: hidden; | Gengar Emote Toy
| |
| |align="center" | Épico
| |
| |-
| |
| | align="center" |
| |
| |align="left" style="border-left-style: hidden; | Sableye Emote Toy
| |
| |align="center" | Épico
| |
| |-
| |
| | align="center" | [[Arquivo:gengar-locker.png|70px|link=]]
| |
| |align="left" style="border-left-style: hidden; | Gengar Locker
| |
| |align="center" | Épico
| |
| |-
| |
| | align="center" | [[Arquivo:Shiny-gengar-locker.png|70px|link=]]
| |
| |align="left" style="border-left-style: hidden; | Shiny Gengar Locker
| |
| |align="center" | Lendário
| |
| |-
| |
| ! colspan="3" | [[Arquivo:Exp_icon.png|30px|link=]] Experiência: 100.000
| |
| |}
| |
| </center>
| |
| |-|Normal=
| |
| <center>
| |
| {| class="wikitable" width="25%"
| |
| |-
| |
| ! colspan="2" | Item
| |
| ! Raridade
| |
| |-
| |
| | align="center" | [[Arquivo:Halloween Token 2020.png|link=]]
| |
| |align="left" style="border-left-style: hidden; | 30 Halloween Token
| |
| | align="center" |Comum
| |
| |-
| |
| | align="center" | [[Arquivo:Halloween dimensional key.png|link=]]
| |
| |align="left" style="border-left-style: hidden; | Halloween Dimensional Key
| |
| | align="center" |Comum
| |
| |-
| |
| | align="center" |
| |
| |align="left" style="border-left-style: hidden; | Shiny Gengar Emote Toy
| |
| |align="center" | Épico
| |
| |-
| |
| | align="center" |
| |
| |align="left" style="border-left-style: hidden; | Misdreavus Emote Toy
| |
| |align="center" | Épico
| |
| |-
| |
| | align="center" |
| |
| |align="left" style="border-left-style: hidden; | Gengar Emote Toy
| |
| |align="center" | Épico
| |
| |-
| |
| | align="center" |
| |
| |align="left" style="border-left-style: hidden; | Sableye Emote Toy
| |
| |align="center" | Épico
| |
| |-
| |
| | align="center" | [[Arquivo:gengar-locker.png|70px|link=]]
| |
| |align="left" style="border-left-style: hidden; | Gengar Locker
| |
| |align="center" | Épico
| |
| |-
| |
| | align="center" | [[Arquivo:Shiny-gengar-locker.png|70px|link=]]
| |
| |align="left" style="border-left-style: hidden; | Shiny Gengar Locker
| |
| |align="center" | Lendário
| |
| |-
| |
| ! colspan="3" | [[Arquivo:Exp_icon.png|30px|link=]] Experiência: 150.000
| |
| |}
| |
| </center>
| |
| |-|Dificil=
| |
| <center>
| |
| {| class="wikitable" width="25%"
| |
| |-
| |
| ! colspan="2" | Item
| |
| ! Raridade
| |
| |-
| |
| | align="center" | [[Arquivo:Halloween Token 2020.png|link=]]
| |
| |align="left" style="border-left-style: hidden; | 40 Halloween Token
| |
| | align="center" |Comum
| |
| |-
| |
| | align="center" | [[Arquivo:Halloween dimensional key.png|link=]]
| |
| |align="left" style="border-left-style: hidden; | Halloween Dimensional Key
| |
| | align="center" |Comum
| |
| |-
| |
| | align="center" |
| |
| |align="left" style="border-left-style: hidden; | Shiny Gengar Emote Toy
| |
| |align="center" | Épico
| |
| |-
| |
| | align="center" |
| |
| |align="left" style="border-left-style: hidden; | Misdreavus Emote Toy
| |
| |align="center" | Épico
| |
| |-
| |
| | align="center" |
| |
| |align="left" style="border-left-style: hidden; | Gengar Emote Toy
| |
| |align="center" | Épico
| |
| |-
| |
| | align="center" |
| |
| |align="left" style="border-left-style: hidden; | Sableye Emote Toy
| |
| |align="center" | Épico
| |
| |-
| |
| | align="center" | [[Arquivo:gengar-locker.png|70px|link=]]
| |
| |align="left" style="border-left-style: hidden; | Gengar Locker
| |
| |align="center" | Épico
| |
| |-
| |
| | align="center" | [[Arquivo:Shiny-gengar-locker.png|70px|link=]]
| |
| |align="left" style="border-left-style: hidden; | Shiny Gengar Locker
| |
| |align="center" | Lendário
| |
| |-
| |
| ! colspan="3" | [[Arquivo:Exp_icon.png|30px|link=]] Experiência: 100.000
| |
| |}
| |
| </tabber>
| |
| </center> | | </center> |
| | |} |
| | == Mapa == |
| | |
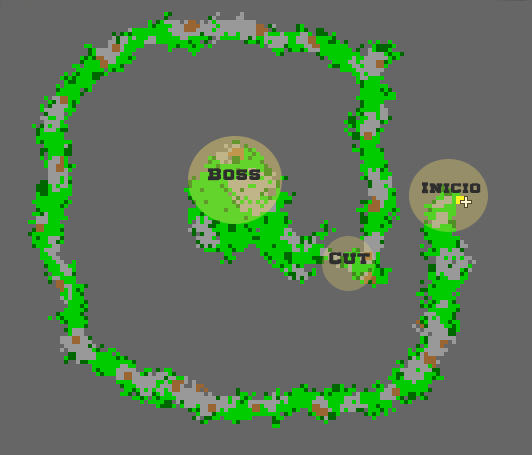
| | <center><br />[[Arquivo:Mapa test ya.png|link=DZ Giant Sunflora]]</center> |
| | É muito importante levar um Pokémon que tenha '''CUT''' para cortar a bush caso contrário não será possível prosseguir a Dungeon. |