Forest Quest (EN): mudanças entre as edições
(Criou página com 'link=Forest Quest link=Forest Quest (EN)<br><br> <!--T:1--> <span style="color:red">'''Minimum Level:</span> 170 <!--T:2--> <span sty...') |
Sem resumo de edição |
||
| Linha 1: | Linha 1: | ||
[[Arquivo:PT-BR.png|link=Forest Quest]] | [[Arquivo:PT-BR.png|link=Forest Quest]] | ||
< | <center>[[Arquivo:Banner Forest Quest.webp|link=]]</center> | ||
'''Minimum Level:''' 170. | |||
'''Rewards:''' 1,776,000 EXP, 5 Healing Elixirs, 5 Fortune Elixirs, 5 Knowledge Elixirs, 10 Bounty Elixirs, 20 Running Elixirs, 10 Attack Elixirs, 10 Defense Elixirs, 2 Boost Stones and Replica of an Ancient Jewel. | |||
If you find an error or want to add any information, contact [[Nossa Equipe|one of the wiki members.]] | |||
==Proving Your Worth== | |||
To start the quest, go to NPC Symon, located on one of the mountains in Zangoose's respawn. | |||
''' | <center> [[Arquivo:Loc NPC_Symon.png|link=]]<br> | ||
'''Coordinates:''' {{Copiar|5409, 5703, 6}}</center> | |||
He will tell you that it is dangerous to be among the Zangoose because they are at war with the Seviper and that he is there researching more about these Pokémon. Symon says he wants to tell you a secret, but first he needs to know if you're ready and asks you to defeat 250 Zangoose. | |||
'''Note:''' Remember to collect the loot from the requested Pokémon, as it will be used during the quest. | |||
|- align="center" | <center> | ||
{| class="wikitable" width="40%" | |||
|- align="center" | |||
!align="center" width="1%" colspan="9" style="background-color: #4682B4" | Mission | |||
|- align="center" | |||
| Defeat 250 [[Arquivo:335-Zangoose.png|link=Zangoose]] Zangoose | |||
|} | |||
</center> | |||
Upon defeating 250 Zangoose, Symon will grant you 513,000 [[Arquivo:Exp_icon.png|link=]] experience points and ask for another favor. This time, he wants you to defeat 250 Seviper and says he will explain everything afterward. | |||
<center> | |||
{| class="wikitable" width="40%" | |||
|- align="center" | |||
!align="center" width="1%" colspan="9" style="background-color: #4682B4" | Mission | |||
|- align="center" | |||
| Defeat 250 [[Arquivo:336-Seviper.png|link=Seviper]] Seviper | |||
|} | |||
</center> | </center> | ||
Upon defeating 250 | Upon defeating 250 Seviper, Symon will grant you another 513,000 [[Arquivo:Exp_icon.png|link=]] experience points and says that now he will reveal the secret. He tells you that there are rumors about a lost treasure in this region, which is why the Zangoose and Seviper are battling each other. Symon claims to have asked the villagers east of there but couldn't obtain any further information. Now, he wants your help finding the treasure. | ||
==The Hidden Treasure== | |||
After promising to help Symon find the treasure, it's time to seek information from the villagers mentioned earlier. Find NPC Carter in the village located south of Phenac and try to get more information from him. | |||
| | <center> [[Arquivo:Loc NPC_Carter.png|link=]]<br> | ||
'''Coordinates:''' {{Copiar|5489, 5761, 7}}</center> | |||
Carter asks you not to bother him, as he doesn't want to be tricked by another stranger. Someone else had promised to help him but never returned. He explains that it was a man wearing a strange uniform who stopped him and asked about a location. The man was carrying a strange stone in his hands and had promised to help Carter in exchange for his assistance, but he never received the help he was expecting. | |||
To reveal the location where this man went, Carter will ask you for a favor as well: deliver 100 Tribe Marks and 100 Poisonous Tails. | |||
<center> | |||
{| class="wikitable" width="40%" | |||
|- align="center" | |||
!align="center" width="1%" colspan="9" style="background-color: #4682B4" | Mission | |||
|- align="center" | |||
| Deliver 100 [[Arquivo: Tribe Mark.png|link=]] [[Tribe Mark]] and 100 [[Arquivo: Poisonous Tail.png|link=]] [[Poisonous Tail]] | |||
|} | |||
</center> | </center> | ||
After delivering the requested items, Carter says that the mysterious man showed him a picture and mentioned that the location he was looking for was to the south. However, he didn't specify exactly where it was, and Carter believes the man probably went there. | |||
=== | ==Looking for the Mysterious Man== | ||
Based on the information Carter gave you, head south to look for the mysterious man. Enter Mightyena's respawn, located underground between Shiftry's and Manectric's respawns. | |||
<center> [[Arquivo:Loc Cave_Mightyena.png|link=]]<br> | |||
'''Coordinates:''' {{Copiar|5432, 6008, 7}}</center> | |||
'''Note:''' Bring a Pokémon with Fly or Surf to access Mightyena's respawn. | |||
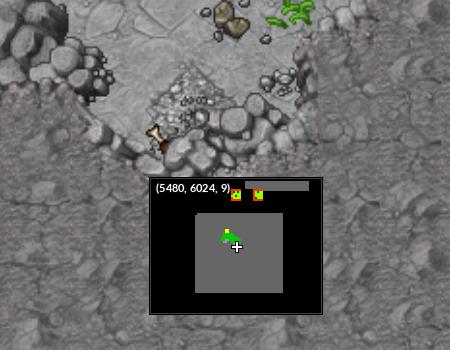
Once inside the respawn, go down one floor, where you will find an Absol. | |||
<center> | |||
{| class="Sortable" | |||
|- align="center" | |||
| [[Arquivo:Loc Cave_Passo_1.png|link=]] | |||
| [[Arquivo:Loc Cave_Passo_2.png|link=]] | |||
|- align="center" | |||
| '''Coordinates:''' {{Copiar|5475, 6015, 8}} | |||
| '''Coordinates:''' {{Copiar|5480, 6024, 9}} | |||
|} | |||
</center> | </center> | ||
Upon entering the secret passage, you will discover that the mysterious man is a member of Team Rocket. When you talk to him, the Rocket Member will ask how you found him and confess to stealing the treasure, stating that he has no intention of returning it. He will then challenge you to a battle. | |||
<center> [[Arquivo:NPC_Rocket_Member. | <center> [[Arquivo:Loc NPC_Rocket_Member.png|link=]]<br> | ||
'''Coordinates:''' {{Copiar|5484, 6039, 10}}</center> | |||
The Rocket Member NPC will use the following Pokémon: | The Rocket Member NPC will use the following Pokémon: | ||
<center> | <center> | ||
{| class="wikitable" width=" | {| class="wikitable" width="40%" style="text-align:center;" | ||
! | ! Name | ||
! Type | |||
! Effective Against | |||
|- | |||
| [[Arquivo:306-Aggron.png|link=Aggron]]<br>Aggron | |||
| [[Arquivo:Steel.png|link=]] [[Arquivo:Rock.png|link=]] | |||
| | | [[Arquivo:Ground.png|link=]] [[Arquivo:Fighting.png|link=]] [[Arquivo:Water.png|link=]] | ||
|[[Arquivo: | |- | ||
| [[Arquivo:295-Exploud.png|link=Exploud]]<br>Exploud | |||
|[[Arquivo: | | [[Arquivo:Normal1.png|link=]] | ||
|[[Arquivo: | | [[Arquivo:Fighting.png|link=]] | ||
|[[Arquivo: | |- | ||
|[[Arquivo: | | [[Arquivo:260-Swampert.png|link=Swampert]]<br>Swampert | ||
| [[Arquivo:Water.png|link=]] [[Arquivo:Ground.png|link=]] | |||
| [[Arquivo:Grass.png|link=]] | |||
|- | |||
| [[Arquivo:324-Torkoal.png|link=Torkoal]]<br>Torkoal | |||
| [[Arquivo:Fire.png|link=]] | |||
| [[Arquivo:Water.png|link=]] [[Arquivo:Ground.png|link=]] [[Arquivo:Rock.png|link=]] | |||
|- | |||
| [[Arquivo:336-Seviper.png|link=Seviper]]<br>Seviper | |||
| [[Arquivo:Poison1.png|link=]] | |||
| [[Arquivo:Ground.png|link=]] [[Arquivo:Psychic.png|link=]] | |||
|- | |||
| [[Arquivo:297-Hariyama.png|link=Hariyama]]<br>Hariyama | |||
| [[Arquivo:Fighting.png|link=]] | |||
| [[Arquivo:Flying.png|link=]] [[Arquivo:Psychic.png|link=]] [[Arquivo:Fairy.png|link=]] | |||
|} | |} | ||
</center> | </center> | ||
'''Note:''' You will have 3 minutes to win this battle. You will not lose experience or Bless if you are defeated. | |||
After winning, he will complain that the treasure was almost his and that he regrets losing the battle | After winning, he will complain that the treasure was almost his and that he regrets losing the battle. He will then hand over the treasure. Now, return to NPC Symon and deliver the jewel. He will say that he intends to study it, and you will receive a reward of 250,000 [[Arquivo:Exp_icon.png|link=]] experience points. | ||
== | ==The Lying Explorer== | ||
After giving the | After giving the jewel to Symon, return to the villagers to tell them what happened. Find Ruphert, who will ask you for help. | ||
<center> [[Arquivo:NPC_Ruphert. | <center> [[Arquivo:Loc NPC_Ruphert.png|link=]] <br> | ||
'''Coordinates:''' {{Copiar|5473, 5745, 6}}</center> | |||
Ruphert | Ruphert explains that Pokémon attacked his village and that there is a jewel hidden in the forest that keeps them calm. He believes the reason for their anger may be that the jewel was stolen. He claims that the explorer lied when he said the Pokémon were fighting over the jewel, as it has always protected them. He asks for your help in recovering it. Return to Symon and confront him. | ||
Upon finding Symon, he will reveal that his true intentions have been discovered, but | Upon finding Symon, he will reveal that his true intentions have been discovered, but it is too late. He refuses to return the jewel unless you take it by force. Battle him to recover the treasure. | ||
The NPC | The Symon NPC will use the following Pokémon: | ||
<center> | <center> | ||
{| class="wikitable" width=" | {| class="wikitable" width="40%" style="text-align:center;" | ||
! | ! Name | ||
! Type | |||
! Effective Against | |||
|- | |||
| [[Arquivo:330-Flygon.png|link=Flygon]]<br>Flygon | |||
| [[Arquivo:Ground.png|link=]] [[Arquivo:Dragon.png|link=]] | |||
|- | | [[Arquivo:Ice.png|link=]] [[Arquivo:Dragon.png|link=]] [[Arquivo:Fairy.png|link=]] | ||
|[[Arquivo: | |- | ||
|[[Arquivo: | | [[Arquivo:260-shMegaSwampert.png|link=Mega Swampert]]<br>Mega Swampert | ||
| [[Arquivo:Water.png|link=]] [[Arquivo:Ground.png|link=]] | |||
|[[Arquivo: | | [[Arquivo:Grass.png|link=]] | ||
|[[Arquivo: | |- | ||
|[[Arquivo: | | [[Arquivo:359-Absol.png|link=Absol]]<br>Absol | ||
| [[Arquivo:Dark1.png|link=]] | |||
| [[Arquivo:Fighting.png|link=]] [[Arquivo:Bug.png|link=]] [[Arquivo:Fairy.png|link=]] | |||
|- | |||
| [[Arquivo:454-Toxicroak.png|link=Toxicroak]]<br>Toxicroak | |||
| [[Arquivo:Poison1.png|link=]] [[Arquivo:Fighting.png|link=]] | |||
| [[Arquivo:Ground.png|link=]] [[Arquivo:Flying.png|link=]] | |||
|- | |||
| [[Arquivo:448-Lucario.png|link=Lucario]]<br>Lucario | |||
| [[Arquivo:Fighting.png|link=]] [[Arquivo:Steel.png|link=]] | |||
| [[Arquivo:Fire.png|link=]] [[Arquivo:Ground.png|link=]] [[Arquivo:Fighting.png|link=]] | |||
|- | |||
| [[Arquivo:332.Cacturne.png|link=Cacturne]]<br>Cacturne | |||
| [[Arquivo:Grass.png|link=]] [[Arquivo:Dark1.png|link=]] | |||
| [[Arquivo:Fire.png|link=]] [[Arquivo:Ice.png|link=]] [[Arquivo:Fighting.png|link=]] [[Arquivo:Bug.png|link=]] [[Arquivo:Fairy.png|link=]] | |||
|} | |} | ||
</center> | </center> | ||
'''Note:''' You will have 3 minutes to win this battle. You will not lose experience or Bless if you are defeated. | |||
Right after defeating Symon, he will regret having his plans ruined and hand over the jewel. Return to NPC Ruphert to tell him about your progress. | |||
==Restoring Peace== | |||
' | Ruphert is very happy that you managed to recover the treasure and asks you to return it to its rightful place so that peace can reign in the forest once again. To do this, go to Zangoose's respawn and access the cave where you must return the jewel. | ||
<center> [[Arquivo:Loc Caminho_para_a_Caverna_do_Tesouro.png|link=]]<br> | |||
'''Coordinates:''' {{Copiar|5417, 5747, 7}}</center> | |||
'''Note:''' Bring a Pokémon with Surf to access the treasure location. | |||
Once inside the cave, head to the right until you find a large chest. You must place the jewel inside it. | |||
< | <center> [[Arquivo:Loc Devolvendo_a_Joia.png|link=]]<br> | ||
'''Coordinates:''' {{Copiar|5430, 5744, 8}}</center> | |||
<center> ''Right-click the jewel and then left-click the chest. An exclamation mark will appear on the screen once the action is confirmed.'' </center> | |||
After returning the jewel to its rightful place, go back to Ruphert. He will thank you and say that the village is indebted to you for your great work. As a token of his gratitude, he will give you the following rewards: | |||
<center> | <center> | ||
{| class="wikitable" width=" | {| class="wikitable" width="60%" | ||
! | ! 500K XP | ||
! | ! 5 Healing Elixirs | ||
! | ! 5 Fortune Elixirs | ||
! | ! 5 Knowledge Elixirs | ||
! | ! 10 Bounty Elixirs | ||
|- align="center" | |||
! | |[[Arquivo:Exp_icon.png|link=]] | ||
! | |[[Arquivo:Healing.png|link=]] | ||
! | |[[Arquivo:Fortune.png|link=]] | ||
! | |[[Arquivo:Knowledge.png|link=]] | ||
|[[Arquivo:Bounty.png|link=]] | |||
|- | |||
! 20 Running Elixirs | |||
! 10 Attack Elixirs | |||
! 10 Defense Elixirs | |||
! 2 Boost Stones | |||
! Replica of an Ancient Jewel | |||
|- align="center" | |- align="center" | ||
|[[Arquivo:Running.png|link=]] | |||
|[[Arquivo:Attackelixir.png|link=]] | |||
|[[Arquivo:Defensee.png|link=]] | |||
|[[Arquivo:Boost1.png|link=]] | |||
|[[Arquivo:Replica_of_Ancient_Jewel.png|link=]] | |||
|[[Arquivo:Running.png|link= | |} | ||
|[[Arquivo:Attackelixir.png|link= | </center> | ||
|[[Arquivo:Defensee.png|link= | |||
|[[Arquivo:Boost1.png|link= | |||
|[[Arquivo:Replica_of_Ancient_Jewel.png| link=]] | |||
|} </center | |||


Edição atual tal como às 18h57min de 11 de novembro de 2026


Minimum Level: 170.
Rewards: 1,776,000 EXP, 5 Healing Elixirs, 5 Fortune Elixirs, 5 Knowledge Elixirs, 10 Bounty Elixirs, 20 Running Elixirs, 10 Attack Elixirs, 10 Defense Elixirs, 2 Boost Stones and Replica of an Ancient Jewel.
If you find an error or want to add any information, contact one of the wiki members.
Proving Your Worth
To start the quest, go to NPC Symon, located on one of the mountains in Zangoose's respawn.
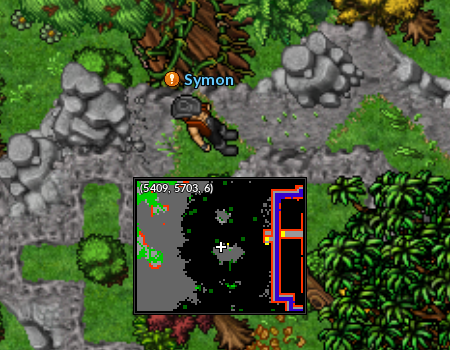
Coordinates:
He will tell you that it is dangerous to be among the Zangoose because they are at war with the Seviper and that he is there researching more about these Pokémon. Symon says he wants to tell you a secret, but first he needs to know if you're ready and asks you to defeat 250 Zangoose.
Note: Remember to collect the loot from the requested Pokémon, as it will be used during the quest.
| Mission | ||||||||
|---|---|---|---|---|---|---|---|---|
Defeat 250  Zangoose | ||||||||
Upon defeating 250 Zangoose, Symon will grant you 513,000  experience points and ask for another favor. This time, he wants you to defeat 250 Seviper and says he will explain everything afterward.
| Mission | ||||||||
|---|---|---|---|---|---|---|---|---|
Defeat 250  Seviper | ||||||||
Upon defeating 250 Seviper, Symon will grant you another 513,000 experience points and says that now he will reveal the secret. He tells you that there are rumors about a lost treasure in this region, which is why the Zangoose and Seviper are battling each other. Symon claims to have asked the villagers east of there but couldn't obtain any further information. Now, he wants your help finding the treasure.
The Hidden Treasure
After promising to help Symon find the treasure, it's time to seek information from the villagers mentioned earlier. Find NPC Carter in the village located south of Phenac and try to get more information from him.
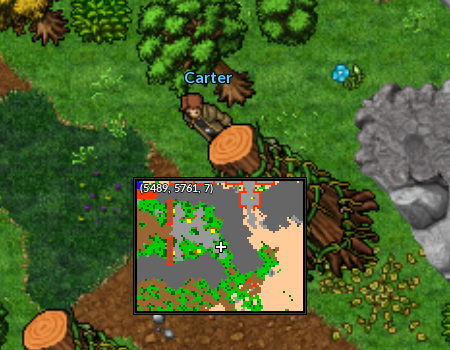
Coordinates:
Carter asks you not to bother him, as he doesn't want to be tricked by another stranger. Someone else had promised to help him but never returned. He explains that it was a man wearing a strange uniform who stopped him and asked about a location. The man was carrying a strange stone in his hands and had promised to help Carter in exchange for his assistance, but he never received the help he was expecting.
To reveal the location where this man went, Carter will ask you for a favor as well: deliver 100 Tribe Marks and 100 Poisonous Tails.
| Mission | ||||||||
|---|---|---|---|---|---|---|---|---|
Deliver 100  Tribe Mark and 100  Poisonous Tail | ||||||||
After delivering the requested items, Carter says that the mysterious man showed him a picture and mentioned that the location he was looking for was to the south. However, he didn't specify exactly where it was, and Carter believes the man probably went there.
Looking for the Mysterious Man
Based on the information Carter gave you, head south to look for the mysterious man. Enter Mightyena's respawn, located underground between Shiftry's and Manectric's respawns.
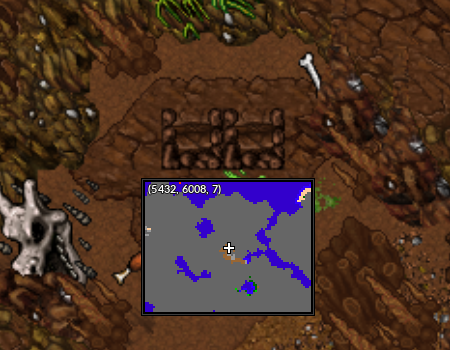
Coordinates:
Note: Bring a Pokémon with Fly or Surf to access Mightyena's respawn.
Once inside the respawn, go down one floor, where you will find an Absol.
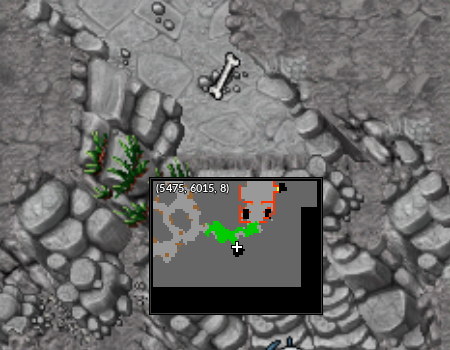
|
|
| Coordinates: | Coordinates: |
Upon entering the secret passage, you will discover that the mysterious man is a member of Team Rocket. When you talk to him, the Rocket Member will ask how you found him and confess to stealing the treasure, stating that he has no intention of returning it. He will then challenge you to a battle.
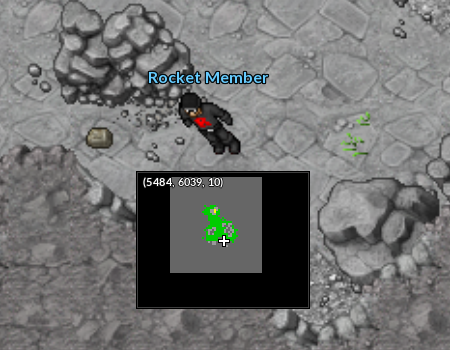
Coordinates:
The Rocket Member NPC will use the following Pokémon:
| Name | Type | Effective Against |
|---|---|---|
 Aggron |
 
|
  
|
 Exploud |

|
|
 Swampert |
|

|
 Torkoal |

|
|
Seviper |

|

|
 Hariyama |
|
 
|
Note: You will have 3 minutes to win this battle. You will not lose experience or Bless if you are defeated.
After winning, he will complain that the treasure was almost his and that he regrets losing the battle. He will then hand over the treasure. Now, return to NPC Symon and deliver the jewel. He will say that he intends to study it, and you will receive a reward of 250,000 experience points.
The Lying Explorer
After giving the jewel to Symon, return to the villagers to tell them what happened. Find Ruphert, who will ask you for help.
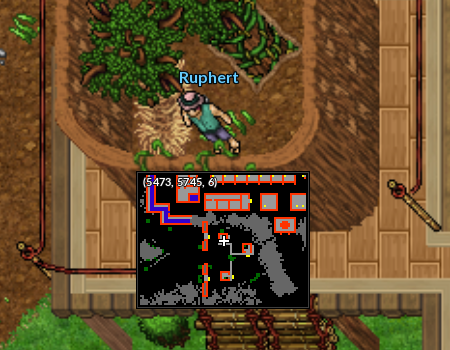
Coordinates:
Ruphert explains that Pokémon attacked his village and that there is a jewel hidden in the forest that keeps them calm. He believes the reason for their anger may be that the jewel was stolen. He claims that the explorer lied when he said the Pokémon were fighting over the jewel, as it has always protected them. He asks for your help in recovering it. Return to Symon and confront him.
Upon finding Symon, he will reveal that his true intentions have been discovered, but it is too late. He refuses to return the jewel unless you take it by force. Battle him to recover the treasure.
The Symon NPC will use the following Pokémon:
| Name | Type | Effective Against |
|---|---|---|
 Flygon |

|

|
 Mega Swampert |
|
|
 Absol |

|

|
 Toxicroak |
|
|
 Lucario |
|
|
 Cacturne |
|
|
Note: You will have 3 minutes to win this battle. You will not lose experience or Bless if you are defeated.
Right after defeating Symon, he will regret having his plans ruined and hand over the jewel. Return to NPC Ruphert to tell him about your progress.
Restoring Peace
Ruphert is very happy that you managed to recover the treasure and asks you to return it to its rightful place so that peace can reign in the forest once again. To do this, go to Zangoose's respawn and access the cave where you must return the jewel.
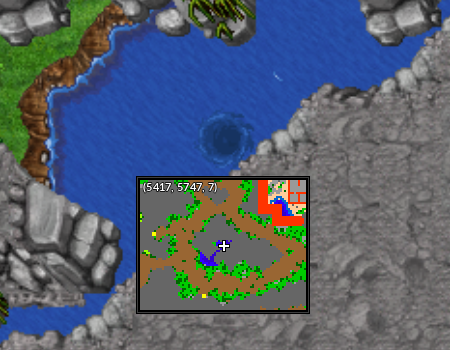
Coordinates:
Note: Bring a Pokémon with Surf to access the treasure location.
Once inside the cave, head to the right until you find a large chest. You must place the jewel inside it.
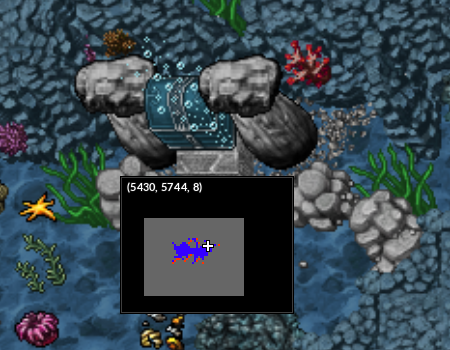
Coordinates:
After returning the jewel to its rightful place, go back to Ruphert. He will thank you and say that the village is indebted to you for your great work. As a token of his gratitude, he will give you the following rewards:
| 500K XP | 5 Healing Elixirs | 5 Fortune Elixirs | 5 Knowledge Elixirs | 10 Bounty Elixirs |
|---|---|---|---|---|
|
|

|

|

|

|
| 20 Running Elixirs | 10 Attack Elixirs | 10 Defense Elixirs | 2 Boost Stones | Replica of an Ancient Jewel |

|

|

|

|

|