Cofagrigus: mudanças entre as edições
Ir para navegação
Ir para pesquisar
(Atualiza Tier e Função a partir do JSON revisado) |
|||
| (8 revisões intermediárias por 5 usuários não estão sendo mostradas) | |||
| Linha 5: | Linha 5: | ||
'''Nome:''' Cofagrigus<br /> | '''Nome:''' Cofagrigus<br /> | ||
'''Level:''' 100<br /> | '''Level:''' 100<br /> | ||
'''Tier: ''' T2 <br /> | |||
'''Função: ''' Offensive Tank PvE <br /> | |||
'''Elemento:''' Ghost<br /> | '''Elemento:''' Ghost<br /> | ||
'''Habilidades:''' Headbutt.<br /> | '''Habilidades:''' Headbutt.<br /> | ||
| Linha 32: | Linha 34: | ||
|- align="center" style="background-color: #E6E6FA;" | |- align="center" style="background-color: #E6E6FA;" | ||
| width="10px" | | | width="10px" | | ||
| align="left" | Level | | align="left" | Level 100 | ||
|- align="center" | |- align="center" | ||
| Linha 59: | Linha 61: | ||
! rowspan="2" | M4 | ! rowspan="2" | M4 | ||
| width="10px" | | | width="10px" | | ||
| align="left" | Will O | | align="left" | Will-O-Wisp (40s) | ||
| width="50px" rowspan="2" | | | width="50px" rowspan="2" | | ||
| rowspan="2" align="right" | [[Arquivo:Target.png|Target]] [[Arquivo:Damage.png|Damage]] [[arquivo:Burn.png|Burn]] [[Arquivo:Debuff.png|Debuff]] [[arquivo:NeverBoost.png|NeverBoost]] | | rowspan="2" align="right" | [[Arquivo:Target.png|Target]] [[Arquivo:Damage.png|Damage]] [[arquivo:Burn.png|Burn]] [[Arquivo:Debuff.png|Debuff]] [[arquivo:NeverBoost.png|NeverBoost]] | ||
| Linha 65: | Linha 67: | ||
|- align="center" | |- align="center" | ||
| width="10px" | | | width="10px" | | ||
| align="left" | Level | | align="left" | Level 100 | ||
|- align="center" style="background-color: #E6E6FA;" | |- align="center" style="background-color: #E6E6FA;" | ||
| Linha 87: | Linha 89: | ||
|- align="center" | |- align="center" | ||
| width="10px" | | | width="10px" | | ||
| align="left" | Level | | align="left" | Level 100 | ||
|- align="center" style="background-color: #E6E6FA;" | |- align="center" style="background-color: #E6E6FA;" | ||
| Linha 98: | Linha 100: | ||
|- align="center" style="background-color: #E6E6FA;" | |- align="center" style="background-color: #E6E6FA;" | ||
| width="10px" | | | width="10px" | | ||
| align="left" | Level | | align="left" | Level 100 | ||
|- align="center" | |- align="center" | ||
| Linha 105: | Linha 107: | ||
| align="left" | Nasty Plot (50s) | | align="left" | Nasty Plot (50s) | ||
| width="50px" rowspan="2" | | | width="50px" rowspan="2" | | ||
| rowspan="2" align="right" | [[Arquivo:AOE.png|AOE]] [[Arquivo:Damage.png|Damage]] [[Arquivo:Buff.png|Buff]] | | rowspan="2" align="right" | [[Arquivo:AOE.png|AOE]] [[Arquivo:Focus Blocked.png|Focus Blocked]] [[Arquivo:Damage.png|Damage]] [[Arquivo:Buff.png|Buff]] | ||
| rowspan="2" | [[Arquivo:Dark1.png|Dark|link=Malefic]] | | rowspan="2" | [[Arquivo:Dark1.png|Dark|link=Malefic]] | ||
|- align="center" | |- align="center" | ||
| width="10px" | | | width="10px" | | ||
| align="left" | Level | | align="left" | Level 100 | ||
|- align="center" style="background-color: #E6E6FA;" | |- align="center" style="background-color: #E6E6FA;" | ||
| Linha 116: | Linha 118: | ||
| align="left" | Confide (60s) | | align="left" | Confide (60s) | ||
| width="50px" rowspan="2" | | | width="50px" rowspan="2" | | ||
| rowspan="2" align="right" | [[Arquivo:Self.png|Self]] [[Arquivo:Buff.png|Buff]] | | rowspan="2" align="right" | [[Arquivo:Self.png|Self]] [[Arquivo:Focus Blocked.png|Focus Blocked]] [[Arquivo:Buff.png|Buff]] [[Arquivo:Nevermiss.png|Nevermiss]] | ||
| rowspan="2" | [[Arquivo:Normal1.png|Normal|link=Gardestrike]] | | rowspan="2" | [[Arquivo:Normal1.png|Normal|link=Gardestrike]] | ||
|- align="center" style="background-color: #E6E6FA;" | |- align="center" style="background-color: #E6E6FA;" | ||
| width="10px" | | | width="10px" | | ||
| align="left" | Level | | align="left" | Level 100 | ||
|- align="center" | |- align="center" | ||
! rowspan="2" | M10 | ! rowspan="2" | M10 | ||
| width="10px" | | | width="10px" | | ||
| align="left" | Dark Accurate | | align="left" | Dark Accurate | ||
| width="50px" rowspan="2" | | | width="50px" rowspan="2" | | ||
| rowspan="2" align="right" | [[Arquivo:Self.png|Self]] [[Arquivo:Buff.png|Buff]] | | rowspan="2" align="right" | [[Arquivo:Self.png|Self]] [[Arquivo:Focus Blocked.png|Focus Blocked]] [[Arquivo:Buff.png|Buff]] | ||
| rowspan="2" | [[Arquivo:Ghost1.png|Ghost|link=Malefic]] | | rowspan="2" | [[Arquivo:Ghost1.png|Ghost|link=Malefic]] | ||
|- align="center" | |- align="center" | ||
| width="10px" | | | width="10px" | | ||
| align="left" | | | align="left" | '''(Usado apenas por Pokémon selvagem)''' | ||
|- align="center" style="background-color: #E6E6FA;" | |- align="center" style="background-color: #E6E6FA;" | ||
| Linha 158: | Linha 160: | ||
|- align="center" style="background-color: #E6E6FA;" | |- align="center" style="background-color: #E6E6FA;" | ||
| width="10px" | | | width="10px" | | ||
| align="left" | Level | | align="left" | Level 100 | ||
|- align="center" | |- align="center" | ||
| Linha 185: | Linha 187: | ||
! rowspan="2" | M4 | ! rowspan="2" | M4 | ||
| width="10px" | | | width="10px" | | ||
| align="left" | Will O | | align="left" | Will-O-Wisp (40s) | ||
| width="50px" rowspan="2" | | | width="50px" rowspan="2" | | ||
| rowspan="2" align="right" | [[Arquivo:Target.png|Target]] [[Arquivo:Damage.png|Damage]] [[arquivo:Burn.png|Burn]] [[Arquivo:Debuff.png|Debuff]] [[arquivo:NeverBoost.png|NeverBoost]] | | rowspan="2" align="right" | [[Arquivo:Target.png|Target]] [[Arquivo:Damage.png|Damage]] [[arquivo:Burn.png|Burn]] [[Arquivo:Debuff.png|Debuff]] [[arquivo:NeverBoost.png|NeverBoost]] | ||
| Linha 191: | Linha 193: | ||
|- align="center" | |- align="center" | ||
| width="10px" | | | width="10px" | | ||
| align="left" | Level | | align="left" | Level 100 | ||
|- align="center" style="background-color: #E6E6FA;" | |- align="center" style="background-color: #E6E6FA;" | ||
! rowspan="2" | M5 | ! rowspan="2" | M5 | ||
| width="10px" | | | width="10px" | | ||
| align="left" | | | align="left" | Spectral Grap (50s) | ||
| width="50px" rowspan="2" | | | width="50px" rowspan="2" | | ||
| rowspan="2" align="right" | [[Arquivo:AOE.png|AOE]] [[Arquivo:Damage.png|Damage]] | | rowspan="2" align="right" | [[Arquivo:AOE.png|AOE]] [[Arquivo:Damage.png|Damage]] | ||
| Linha 213: | Linha 215: | ||
|- align="center" | |- align="center" | ||
| width="10px" | | | width="10px" | | ||
| align="left" | Level | | align="left" | Level 100 | ||
|- align="center" style="background-color: #E6E6FA;" | |- align="center" style="background-color: #E6E6FA;" | ||
| Linha 224: | Linha 226: | ||
|- align="center" style="background-color: #E6E6FA;" | |- align="center" style="background-color: #E6E6FA;" | ||
| width="10px" | | | width="10px" | | ||
| align="left" | Level | | align="left" | Level 100 | ||
|- align="center" | |- align="center" | ||
| Linha 231: | Linha 233: | ||
| align="left" | <b>Nasty Plot (40s)</b> | | align="left" | <b>Nasty Plot (40s)</b> | ||
| width="50px" rowspan="2" | | | width="50px" rowspan="2" | | ||
| rowspan="2" align="right" | [[Arquivo:AOE.png|AOE]] [[Arquivo:Damage.png|Damage]] [[Arquivo:Buff.png|Buff]] | | rowspan="2" align="right" | [[Arquivo:AOE.png|AOE]] [[Arquivo:Damage.png|Damage]] [[Arquivo:Buff.png|Buff]] [[Arquivo:Nevermiss.png|Nevermiss]] | ||
| rowspan="2" | [[Arquivo:Dark1.png|Dark|link=Malefic]] | | rowspan="2" | [[Arquivo:Dark1.png|Dark|link=Malefic]] | ||
|- align="center" | |- align="center" | ||
| width="10px" | | | width="10px" | | ||
| align="left" | Level | | align="left" | Level 100 | ||
|- align="center" style="background-color: #E6E6FA;" | |- align="center" style="background-color: #E6E6FA;" | ||
| Linha 246: | Linha 248: | ||
|- align="center" style="background-color: #E6E6FA;" | |- align="center" style="background-color: #E6E6FA;" | ||
| width="10px" | | | width="10px" | | ||
| align="left" | Level | | align="left" | Level 100 | ||
|- align="center" | |- align="center" | ||
! rowspan="2" | M10 | ! rowspan="2" | M10 | ||
| width="10px" | | | width="10px" | | ||
| align="left" | Dark Accurate | | align="left" | Dark Accurate | ||
| width="50px" rowspan="2" | | | width="50px" rowspan="2" | | ||
| rowspan="2" align="right" | [[Arquivo:Self.png|Self]] [[Arquivo:Buff.png|Buff]] | | rowspan="2" align="right" | [[Arquivo:Self.png|Self]] [[Arquivo:Focus Blocked.png|Focus Blocked]] [[Arquivo:Buff.png|Buff]] | ||
| rowspan="2" | [[Arquivo:Ghost1.png|Ghost|link=Malefic]] | | rowspan="2" | [[Arquivo:Ghost1.png|Ghost|link=Malefic]] | ||
|- align="center" | |- align="center" | ||
| width="10px" | | | width="10px" | | ||
| align="left" | | | align="left" | '''(Usado apenas por Pokémon selvagem)''' | ||
|- align="center" style="background-color: #E6E6FA;" | |- align="center" style="background-color: #E6E6FA;" | ||
Edição atual tal como às 23h59min de 3 de outubro de 2026
Informações Gerais
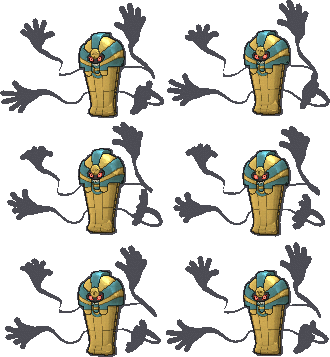
Nome: Cofagrigus
Level: 100
Tier: T2
Função: Offensive Tank PvE
Elemento: Ghost
Habilidades: Headbutt.
Boost: Darkness Stone (2)
Materia: Malefic Superior
Evoluções
Yamask precisa de Level 50.
Cofagrigus precisa de Level 100.
Descrição:
Dizem que eles engolem quem se aproxima demais e os transformam em múmias. Eles gostam de comer pepitas de ouro.
Movimentos
Movimentos PvP
| M1 | Curse (50s) |    
|

| ||
|---|---|---|---|---|---|
| Level 100 | |||||
| M2 | Shadow Ball (10s) | 
|
| ||
| Level 100 | |||||
| M3 | Dark Pulse (15s) |
|

| ||
| Level 100 | |||||
| M4 | Will-O-Wisp (40s) |  
|

| ||
| Level 100 | |||||
| M5 | Spectral Grap (50s) |
|
| ||
| Level 100 | |||||
| M6 | Shadow Storm (70s) |
|
| ||
| Level 100 | |||||
| M7 | Trick Room (60s) | 
|

| ||
| Level 100 | |||||
| M8 | Nasty Plot (50s) |  
|
| ||
| Level 100 | |||||
| M9 | Confide (60s) | 
|

| ||
| Level 100 | |||||
| M10 | Dark Accurate |
|
| ||
| (Usado apenas por Pokémon selvagem) | |||||
| P | Mummy | 
|
| ||
| Level 100 |
Movimentos PvE
| M1 | Curse (40s) |
|
| ||
|---|---|---|---|---|---|
| Level 100 | |||||
| M2 | Shadow Ball (10s) |
|
| ||
| Level 100 | |||||
| M3 | Dark Pulse (15s) |
|
| ||
| Level 100 | |||||
| M4 | Will-O-Wisp (40s) |
|
| ||
| Level 100 | |||||
| M5 | Spectral Grap (50s) |
|
| ||
| Level 100 | |||||
| M6 | Shadow Storm (50s) |
|
| ||
| Level 100 | |||||
| M7 | Trick Room (40s) |
|
| ||
| Level 100 | |||||
| M8 | Nasty Plot (40s) |
|
| ||
| Level 100 | |||||
| M9 | Confide (40s) |
|
| ||
| Level 100 | |||||
| M10 | Dark Accurate |
|
| ||
| (Usado apenas por Pokémon selvagem) | |||||
| P | Mummy |
|
| ||
| Level 100 |
Efetividades
Muito Efetivo: Ghost and Dark.
Normal: Fire, Water, Grass, Electric, Ice, Ground, Flying, Psychic, Rock, Dragon, Steel, Crystal and Fairy.
Muito Inefetivo: Poison and Bug.
Nulo: Normal and Fighting.