|
|
| (113 revisões intermediárias por 3 usuários não estão sendo mostradas) |
| Linha 1: |
Linha 1: |
| ==natal== | | <center> [[Arquivo:The_Lost_Clefairy_Banner.png|link=]] </center> <br> |
|
| |
|
| <p align="center"><font size="4">'''Bem-vindo(a) à wiki de PokeXGames!'''</font><br>
| |
| O melhor e mais completo conteúdo oficial sobre o jogo.</p>
| |
|
| |
|
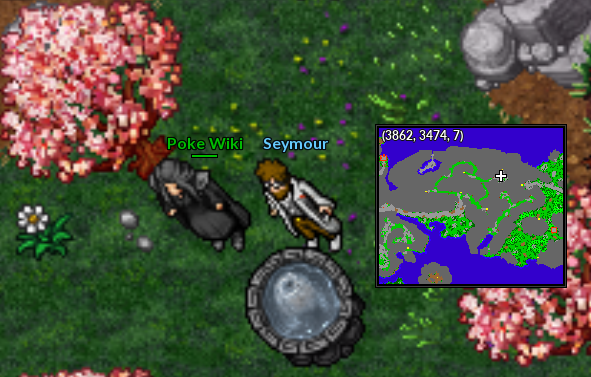
| | == Encontrando Seymour == |
|
| |
|
| <center>[[Arquivo:Banner-natal-2021-1.png|link=Página_principal|1000px]]</center>
| | Seymour é um pesquisador de Pokémon. Durante uma experiência de evolução da sua preferida Clefairy, ela começou a correr e se esconder. <br> |
|
| |
|
|
| |
|
| <!-- Mais acessados --> | | <center> |
| <div style="box-shadow: 0 0 .3em #999; border-radius: .2em; margin: 1em 0 2em 0; padding: 1px;">
| | [[Arquivo:Seymour_Npc.png|link=]] |
| <div style="background: #184e2b; border-radius: .2em; color: #ffffff; padding: .4em .8em .5em;">
| | </center> <br /> |
| <span style="opacity: .82;">[[Arquivo:MB.png|20px|link=]]</span> '''Mais acessados'''
| |
| </div>
| |
|
| |
|
| <div style="padding: 1em; display: flex; flex-wrap: wrap; justify-content: center;>
| | == Siga a Seymour Clefairy == |
| <div style="min-width: 300px;">
| |
| <!-- <div style="background: #184e2b; border-radius: .2em; color: #ffffff; padding: .4em .8em .5em;"></div>
| |
| <div style="padding: 1em;"> -->
| |
| <center> [[Arquivo:Banner-tutorial-início-do-jogo.jpg|link=Early_Game_Quest]] </center>
| |
| </div>
| |
| </div>
| |
| <hr>
| |
|
| |
|
| | Seymour pede ajuda ao jogador para segui-la.<br> |
|
| |
|
| <!-- Mais acessados -->
| |
| <div style="box-shadow: 0 0 .3em #999; border-radius: .2em; margin: 1em 0 2em 0; padding: 1px;">
| |
| <div style="background: #ce0000; border-radius: .2em; color: #000000; padding: .4em .8em .5em;"><span style="opacity: .82;">[[Arquivo:MB.png|20px]]</span> '''Mais acessados'''</div>
| |
| <div style="padding: 1em;">
| |
| <table style="text-align:center;font-weight:bold; font-size: 90%;width:100%;">
| |
| <tr>
| |
| <td style="width:20%; padding:0 1em">[[Arquivo:Quests2natal.png|link=Quests|180px]]</td>
| |
| <td style="width:20%; padding:0 1em">[[Arquivo:Tasks2natal.png|link=Tasks|160px]]</td>
| |
| </tr>
| |
| <tr>
| |
| <td style="width:20%; padding:0 1em">[[Arquivo:Pokenatal.png|link=Pokémon|260px]]</td>
| |
| <td style="width:20%; padding:0 1em">[[Arquivo:Beneficiosnatal.png|link=Benefícios VIP|300px]]</td>
| |
| </tr>
| |
| <tr>
| |
| <td style="width:20%">[[Arquivo:Profissoes2natal2.png|link=Profissões|280px]]</td>
| |
| <td style="width:20%">[[Arquivo:Outfitnatal.png|link=Outfits|230px]]</td>
| |
| </tr>
| |
| <tr>
| |
| <td style="width:20%">[[Arquivo:Clãsnatal.png|link=Clãs|150px]]</td>
| |
| <td style="width:20%">[[Arquivo:Tutoriaisnatal.png|link=Tutoriais|270px]]</td>
| |
| </tr>
| |
| <tr>
| |
| <td style="width:20%">[[Arquivo:Dz2natal2.png|link=Dimensional Zone|350px]]</td>
| |
| <td style="width:20%">[[Arquivo:Heldnatal.png|link=Held Itens|300px]]</td>
| |
| </tr>
| |
| <tr>
| |
| <td style="width:20%">[[Arquivo:Boostnatal.png|link=Tabela de Boost|250px]]</td>
| |
| <td style="width:20%">[[Arquivo:Torneionatal.png|link=Torneios Semanais|250px]]</td>
| |
| </tr>
| |
|
| |
| </table>
| |
| </div></div>
| |
|
| |
| <div style="box-shadow: 0 0 .3em #999; border-radius: .2em; margin: 1em 0 2em 0; padding: 1px;">
| |
| <div style="background: #ce0000; border-radius: .2em; color: #000000; padding: .4em .8em .5em;"><span style="opacity: .82;">[[Arquivo:MB.png|20px]]</span> '''Links oficiais'''</div>
| |
| <div style="padding: 1em;">
| |
| <center> | | <center> |
| <table style="text-align:center; width:520px; height:120px">
| | [[Arquivo:Seymour_Clefairy.gif|link=]] |
| <tr style="text-align:center">
| | </center> <br /> |
| <td style="text-align:center">
| |
| <slideshow sequence="forward" transition="fade" captionalign="center" position="center" refresh="6000">
| |
| <div>[[Arquivo:Facebook banner off.png|link=https://www.facebook.com/pokexgames]]</div>
| |
| <div>[[Arquivo:Sitepxg.png|link=https://www.pokexgames.com]]</div>
| |
| <div>[[Arquivo:Instagram banner off.png|link=https://www.instagram.com/pxgoficial]]</div>
| |
| <div>[[Arquivo:Pxgplayers banner off.png|link=https://www.facebook.com/groups/308983082923248/]]</div>
| |
| <div>[[Arquivo:Forum banner off.png|link=https://forum.pokexgames.com]]</div>
| |
| <div>[[Arquivo:Discord banner off.png|link=https://www.discord.gg/3Hxs4XT]]</div>
| |
| <div>[[Arquivo:CanalWIKIBanner.png|link=https://www.youtube.com/channel/UC2d6GMBTfF2xD4Yr4Wj_7Vg]]</div>
| |
| </slideshow>
| |
| </td>
| |
| </tr>
| |
| </table></center>
| |
| </div> | |
|
| |
|
| | Depois disso, o jogador deverá sempre segui-la e conversar com ela. Durante o caminho o jogador poderá enfrentar os seguintes Pokémon: <br> |
|
| |
|
|
| |
| ==Stacy==
| |
| *'''Obs.:''' O local mostrado aqui é só um exemplo dos possíveis locais, portanto existe outras localizações.
| |
| <center> | | <center> |
| {| class="wikitable sortable" width="50%" | | {| class="wikitable" width="15%" |
| ! width="1%" style="background-color: #7F0000" | <span style="color:white">Nº</span> | | ! width="50%" style="background-color: #9d1a64" | Pokémon |
| ! width="10%" style="background-color: #7F0000" | <span style="color:white">Imagem</span>
| |
| ! width="20%" style="background-color: #7F0000" | <span style="color:white">Nome</span>
| |
| ! width="30%" style="background-color: #7F0000" | <span style="color:white">Localização do mapa</span>
| |
| ! width="1%" style="background-color: #7F0000" | <span style="color:white">Mapa</span>
| |
| |- | | |- |
| ! align="center" | <font size='5'>'''1'''</font>
| | | width="5%" align="center" | [[Arquivo:074-Geodude.png|link=Geodude]] Geodude |
| | align="center" | [[Arquivo:Algae.png|link=]]
| |
| | align="center" | '''Algae'''
| |
| | align="center" | Kinnow Island
| |
| | align="center" | [[Arquivo:Algae_mapa.jpg|link=]]
| |
| |- | | |- |
| ! align="center" | <font size='5'>'''2'''</font>
| | | width="5%" align="center" | [[Arquivo:075-Graveler.png|link=Graveler]] Graveler |
| | align="center" | [[Arquivo:Beach_Umbrella_1.png|link=]]
| |
| | align="center" | '''Beach Umbrella'''
| |
| | align="center" | Hamlin
| |
| | align="center" | [[Arquivo:Beach_umbrella_1_mapa.jpg|link=]]
| |
| |- | | |- |
| ! align="center" | <font size='5'>'''3'''</font>
| | | width="5%" align="center" | [[Arquivo:076-Golem.png|link=Golem]] Golem |
| | align="center" | [[Arquivo:Beach_Umbrella_2.png|link=]]
| |
| | align="center" | '''Beach Umbrella'''
| |
| | align="center" | Hamlin
| |
| | align="center" | [[Arquivo:Beach_umbrella_2_mapa.jpg|link=]]
| |
| |- | | |- |
| ! align="center" | <font size='5'>'''4'''</font>
| | | width="5%" align="center" | [[Arquivo:035-Clefairy.png|link=Clefairy]] Clefairy |
| | align="center" | [[Arquivo:Beach_Umbrella_3.png|link=]]
| |
| | align="center" | '''Beach Umbrella'''
| |
| | align="center" | Hamlin
| |
| | align="center" | [[Arquivo:Beach_umbrella_3_mapa.jpg|link=]]
| |
| |- | | |- |
| ! align="center" | <font size='5'>'''5'''</font>
| | | width="5%" align="center" | [[Arquivo:036-Clefable.png|link=Clefable]] Clefable |
| | align="center" | [[Arquivo:Blastoise_Hull.png|link=]]
| |
| | align="center" | '''Blastoise Hull'''
| |
| | align="center" | Diving Spot
| |
| | align="center" | [[Arquivo:Blastoise_hull_mapa.jpg|link=]]
| |
| |- | | |- |
| ! align="center" | <font size='5'>'''6'''</font>
| | | width="5%" align="center" | [[Arquivo:039-Jigglypuff.png|link=Jigglypuff]] Jigglypuff |
| | align="center" | [[Arquivo:Broken_Anchor.png|link=]]
| |
| | align="center" | '''Broken Anchor'''
| |
| | align="center" | Lost Island
| |
| | align="center" | [[Arquivo:Broken_anchor_mapa.jpg|link=]]
| |
| |- | | |- |
| ! align="center" | <font size='5'>'''7'''</font>
| | | width="5%" align="center" | [[Arquivo:041-Zubat.png|link=Zubat]] Zubat |
| | align="center" | [[Arquivo:Coconut_palm.png|link=]]
| |
| | align="center" | '''Coconut Palm'''
| |
| | align="center" | Leek Island
| |
| | align="center" | [[Arquivo:Coconut_palm_mapa.jpg|link=]]
| |
| |- | | |- |
| ! align="center" | <font size='5'>'''8'''</font>
| | | width="5%" align="center" | [[Arquivo:042-Golbat.png|link=Golbat]] Golbat |
| | align="center" | [[Arquivo:Coral.png|link=]]
| | |} |
| | align="center" | '''Coral''' | | |
| | align="center" | Kinnow Island
| | </center> <br> |
| | align="center" | [[Arquivo:Coral_mapa.jpg|link=]]
| | |
| |-
| | '''Observação:''' É importante que o jogador se certifique de que não há outros Pokémon por ali, pois será necessário derrotá-los. |
| ! align="center" | <font size='5'>'''9'''</font>
| | |
| | align="center" | [[Arquivo:Coral_reef_1.png|link=]]
| | == A evolução surpreendente == |
| | align="center" | '''Coral Reef'''
| | |
| | align="center" | Kinnow Island
| | Quem diria que a Clefairy só queria mostrar sua evolução para Clefable pela Moon Stone?<br> |
| | align="center" | [[Arquivo:Coral_reef_1_mapa.jpg|link=]]
| | Vá até Seymour, conte o que você viu e receba a sua recompensa!<br> |
| |-
| | |
| ! align="center" | <font size='5'>'''10'''</font>
| | <center> [[Arquivo:Clefairy_evoluindo.gif|link=]]</center> |
| | align="center" | [[Arquivo:Coral_reef_2.png|link=]]
| | |
| | align="center" | '''Coral Reef'''
| | <center> |
| | align="center" | Kinnow Island
| | |
| | align="center" | [[Arquivo:Coral_reef_2_mapa.jpg|link=]]
| | <center> |
| |-
| | {| class="wikitable" width="15%" |
| ! align="center" | <font size='5'>'''11'''</font>
| | ! width="50%" | Recompensa |
| | align="center" | [[Arquivo:Coral_reef_3.png|link=]]
| |
| | align="center" | '''Coral Reef'''
| |
| | align="center" | Kinnow Island
| |
| | align="center" | [[Arquivo:Coral_reef_3_mapa.jpg|link=]]
| |
| |-
| |
| ! align="center" | <font size='5'>'''12'''</font> | |
| | align="center" | [[Arquivo:Coral_reef_4.png|link=]]
| |
| | align="center" | '''Coral Reef'''
| |
| | align="center" | Kinnow Island
| |
| | align="center" | [[Arquivo:Coral_reef_4_mapa.jpg|link=]]
| |
| |-
| |
| ! align="center" | <font size='5'>'''13'''</font>
| |
| | align="center" | [[Arquivo:Coral_reef_5.png|link=]]
| |
| | align="center" | '''Coral Reef'''
| |
| | align="center" | Kinnow Island
| |
| | align="center" | [[Arquivo:Coral_reef_5_mapa.jpg|link=]]
| |
| |-
| |
| ! align="center" | <font size='5'>'''14'''</font>
| |
| | align="center" | [[Arquivo:Coral_reef_6.png|link=]] | |
| | align="center" | '''Coral Reef'''
| |
| | align="center" | Kinnow Island
| |
| | align="center" | [[Arquivo:Coral_reef_6_mapa.jpg|link=]]
| |
| |- | | |- |
| ! align="center" | <font size='5'>'''15'''</font>
| | | width="5%" align="center" | [[Arquivo:Exp_icon.png|30px|link=]]30.000 de experiência |
| | align="center" | [[Arquivo:Damaged_Mast_1.png|link=]]
| |
| | align="center" | '''Damaged Mast'''
| |
| | align="center" | Diving Spot
| |
| | align="center" | [[Arquivo:Damaged_mast_1_mapa.jpg|link=]]
| |
| |- | | |- |
| ! align="center" | <font size='5'>'''16'''</font>
| | | width="5%" align="center" | [[Arquivo:Heart-stone.gif|link=]] 1 Heart Stone |
| | align="center" | [[Arquivo:Damaged_Mast_2.png|link=]]
| | |} |
| | align="center" | '''Damaged Mast'''
| |
| | align="center" | Diving Spot
| |
| | align="center" | [[Arquivo:Damaged_mast_2_mapa.jpg|link=]]
| |
| |-
| |
| ! align="center" | <font size='5'>'''17'''</font>
| |
| | align="center" | [[Arquivo:Damaged_Mast_3.png|link=]]
| |
| | align="center" | '''Damaged Mast'''
| |
| | align="center" | Diving Spot
| |
| | align="center" | [[Arquivo:Damaged_mast_3_mapa.jpg|link=]]
| |
| |-
| |
| ! align="center" | <font size='5'>'''18'''</font>
| |
| | align="center" | [[Arquivo:Damaged_Mast_4.png|link=]]
| |
| | align="center" | '''Damaged Mast'''
| |
| | align="center" | Diving Spot
| |
| | align="center" | [[Arquivo:Damaged_mast_4_mapa.jpg|link=]]
| |
| |-
| |
| ! align="center" | <font size='5'>'''19'''</font>
| |
| | align="center" | [[Arquivo:Damaged_Mast_5.png|link=]]
| |
| | align="center" | '''Damaged Mast'''
| |
| | align="center" | Respawn Subaquatico, próximo a Viridian e Celadon
| |
| | align="center" | [[Arquivo:Damaged_mast_5_mapa.jpg|link=]]
| |
| |- | |
| ! align="center" | <font size='5'>'''20'''</font>
| |
| | align="center" | [[Arquivo:Damaged_Mast_6.png|link=]]
| |
| | align="center" | '''Damaged Mast'''
| |
| | align="center" | Respawn Subaquatico, próximo a Viridian e Celadon
| |
| | align="center" | [[Arquivo:Damaged_mast_6_mapa.jpg|link=]]
| |
| |-
| |
| ! align="center" | <font size='5'>'''21'''</font>
| |
| | align="center" | [[Arquivo:Firefly-pronto.gif|link=]]
| |
| | align="center" | '''Firefly'''
| |
| | align="center" | Diving Spot
| |
| | align="center" | [[Arquivo:Firefly_mapa.jpg|link=]]
| |
| |-
| |
| ! align="center" | <font size='5'>'''22'''</font>
| |
| | align="center" | [[Arquivo:Kelp.png|link=]]
| |
| | align="center" | '''Kelp'''
| |
| | align="center" | Kinnow Island
| |
| | align="center" | [[Arquivo:Kelp_mapa.jpg|link=]]
| |
| |-
| |
| ! align="center" | <font size='5'>'''23'''</font>
| |
| | align="center" | [[Arquivo:Open oyster.png|link=]]
| |
| | align="center" | '''Open Oyster'''
| |
| | align="center" | Kinnow Island
| |
| | align="center" | [[Arquivo:Open oyster mapa.jpg|link=]]
| |
| |-
| |
| ! align="center" | <font size='5'>'''24'''</font>
| |
| | align="center" | [[Arquivo:Palm_Tree.png|link=]]
| |
| | align="center" | '''Palm Tree'''
| |
| | align="center" | Leek Island
| |
| | align="center" | [[Arquivo:Palm_tree_mapa.jpg|link=]]
| |
| |-
| |
| ! align="center" | <font size='5'>'''25'''</font>
| |
| | align="center" | [[Arquivo:Shell_1.png|link=]]
| |
| | align="center" | '''Shells'''
| |
| | align="center" | Leek Island
| |
| | align="center" | [[Arquivo:Shells_1_mapa.jpg|link=]]
| |
| |-
| |
| ! align="center" | <font size='5'>'''26'''</font>
| |
| | align="center" | [[Arquivo:Shell_2.png|link=]]
| |
| | align="center" | '''Shells'''
| |
| | align="center" | Leek Island
| |
| | align="center" | [[Arquivo:Shells_2_mapa.jpg|link=]]
| |
| |-
| |
| ! align="center" | <font size='5'>'''27'''</font>
| |
| | align="center" | [[Arquivo:Shell_3.png|link=]]
| |
| | align="center" | '''Shells'''
| |
| | align="center" | Leek Island
| |
| | align="center" | [[Arquivo:Shells_3_mapa.jpg|link=]]
| |
| |-
| |
| ! align="center" | <font size='5'>'''28'''</font>
| |
| | align="center" | [[Arquivo:Shell_4.png|link=]]
| |
| | align="center" | '''Shells'''
| |
| | align="center" | Leek Island
| |
| | align="center" | [[Arquivo:Shells_4_mapa.jpg|link=]]
| |
| |-
| |
| ! align="center" | <font size='5'>'''29'''</font>
| |
| | align="center" | [[Arquivo:Starfish.png|link=]]
| |
| | align="center" | '''Starfish'''
| |
| | align="center" | Leek Island
| |
| | align="center" | [[Arquivo:Starfish_mapa.jpg|link=]]
| |
| |-
| |
| ! align="center" | <font size='5'>'''30'''</font>
| |
| | align="center" | [[Arquivo:Steering_wheel.png|link=]]
| |
| | align="center" | '''Steering Wheel'''
| |
| | align="center" | Lost Island
| |
| | align="center" | [[Arquivo:Steering_wheel_mapa.jpg|link=]]
| |
| |-
| |
| ! align="center" | <font size='5'>'''31'''</font>
| |
| | align="center" | [[Arquivo:Underwater_volcano.png|link=]]
| |
| | align="center" | '''Underwater Volcano'''
| |
| | align="center" | Kinnow Island
| |
| | align="center" | [[Arquivo:Underwater_volcano_mapa.jpg|link=]]
| |
| |} | |
| | |
|
| |
|
| </center> | | </center> |